Overmax Home Aspiri Robo User manual


Introduction
Dear customer!
Thank you for placing trust in us and choosing Overmax Home.
We provide you with a product perfect for everyday use thanks to the use of high-
quality materials and modern solutions.
We are convinced that they product will satisfy your requirements as it has been
designed with utmost care.
Before the rst use, please read this manual carefully.
Should you have any remarks or questions concerning the product, please do not
Please read this manual before you start using the device to see all its functions
and use them in accordance with intended use.
A failure to follow the safety instructions or use at variance with the manual may lead
to electric shock, re or serious injuries.
IMPORTANT!
IMPORTANT! KEEP THIS MANUAL FOR FUTURE REFERENCE!
1. Do not repair or modify the device. Only an authorized service technician is allowed to perform
these operations.
2. Do not switch the device on if you have noticed any damage. This applies to charging unit
and feeder cable too.
3. Do not use the device when it acts up, has been dropped or wetted, overheats extensively, is
discolored or deformed, emits abnormal sounds, odors and when other atypical circumstances
occur. This being the case, contact the manufacturer’s authorized service center.
4. If the charging unit is not used for a long time, unplug it.
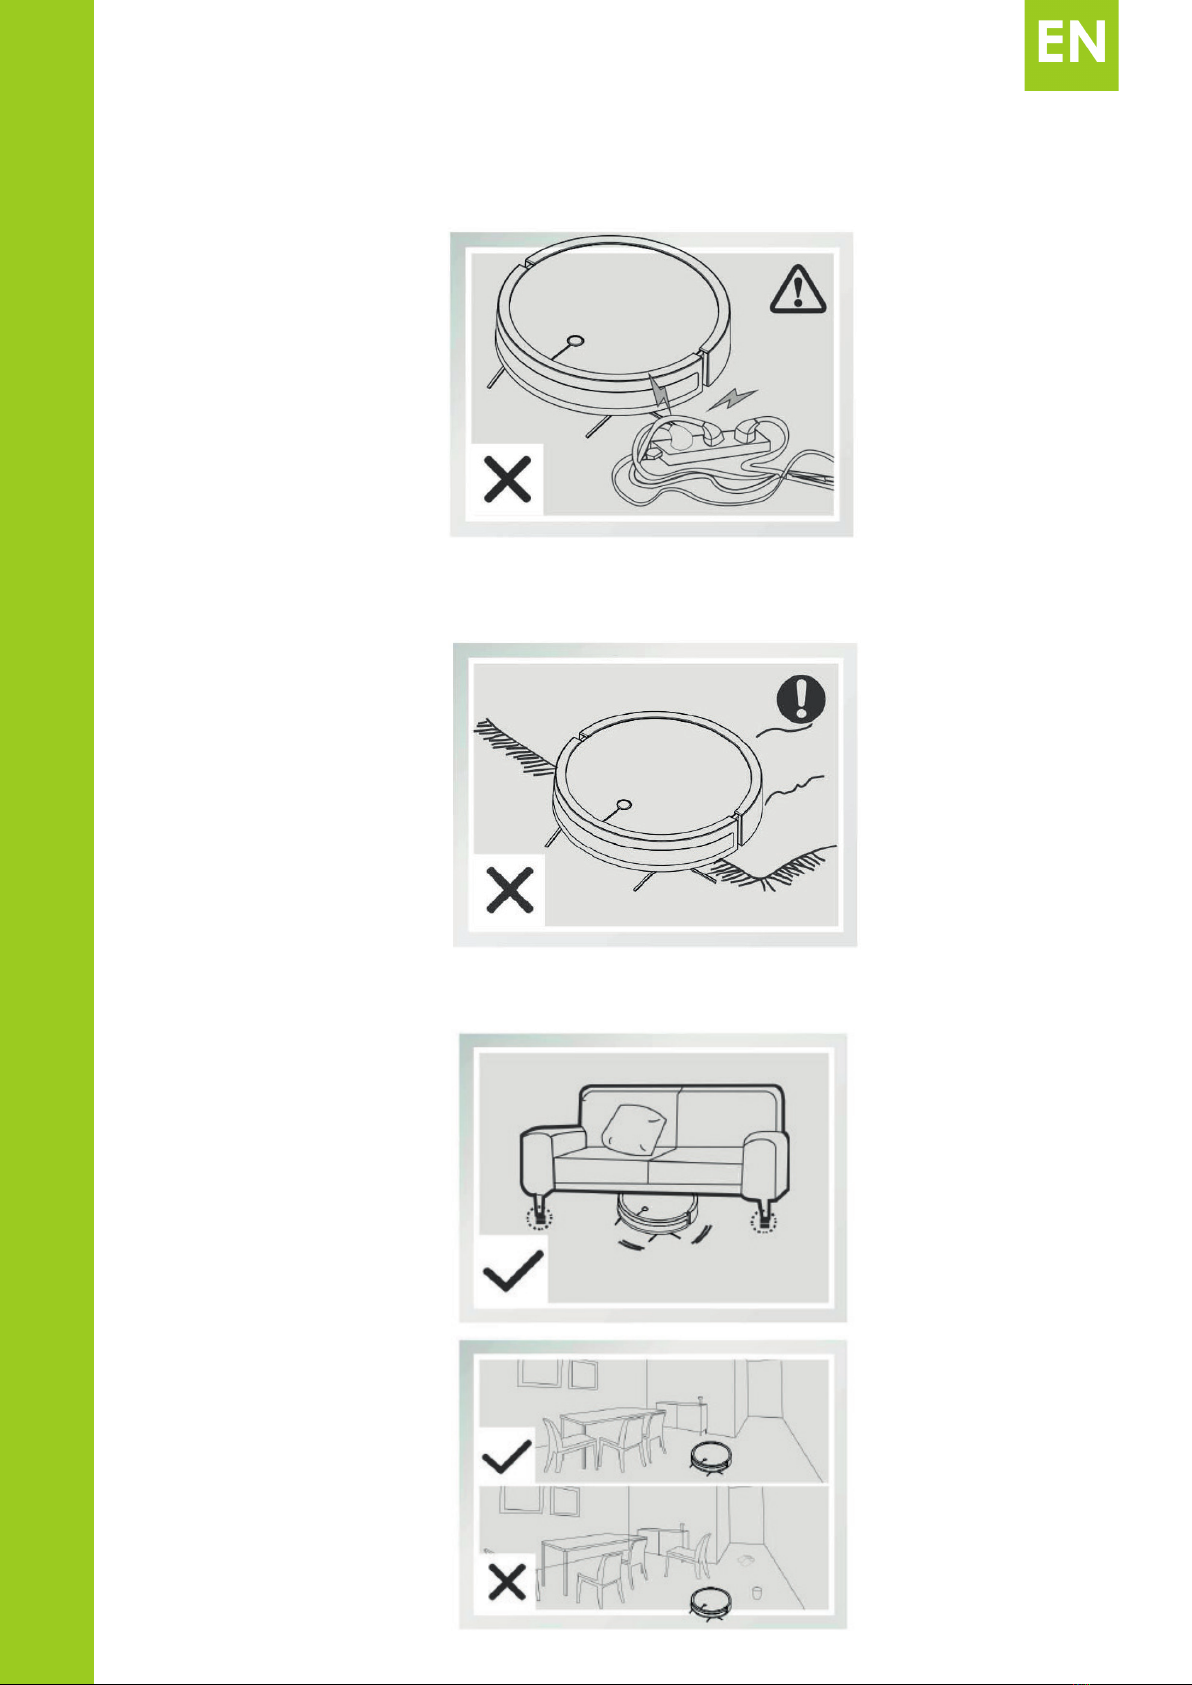
5. The device is intended for vacuuming at home only. Do not use it outdoors. The cleaner is not
adapted to vacuuming industrial surfaces.
6. The device is not adapted to vacuuming wet surfaces. It may lead to damage to the device.
7. The device must not be used by persons with physical or mental disability.
8. This device is not a toy. Do not let children play with it.
9. The device must operate at a room temperature. Do not switch the device on at low
temperatures. Before you switch the device on, leave it at a room temperature for at least 30
minutes.
10. The device is not waterproof, do not immerse it in water and do not keep in humid place.
11. Position the device on a at and horizontal surface and avoid slopes. Do not position it on very
soft surfaces.
12. Use the device away from sources of heat, high temperatures, hot surfaces, direct sunlight,
sources of ignition, naked ame, oils and sharp edges.
13. Do not use the device in the inammable, explosive or toxic atmosphere.
14. Do not use chemicals to clean the device.
15. Before you start cleaning, switch the device off and unplug.
16. Do not use the device for other purposes than designed.
17. Do not suck mud, paste-like items, ash, plaster and sharp items. It may lead to damage
to the dust tank, lter and motor.

18. Do not suck hair, large paper items, plastic bags which may clog the suction passage. Remove
them from the oor before you start vacuuming.
19. Do not block the air outlet located at the back of the vacuum cleaner. It may lead to
overheating and damage.
20. Do not place any items on the vacuum cleaner.
21. Do not use the device if your hands are wet.
22. To charge the device, use only the charging base and feeder cable (attached).
23. Do not use the device without lters and dust tank.
24. Do not use the device in the place with fragile items (e.g. vases).
25. Do not use the device in rooms where a child sleeps.
26. The vacuum cleaner is intended to clean oors and carpets with short bristle. Do not use it
if the carpet has long bristle.
27. Do not pull the feeder cable through sharp edges of walls and furniture, do not trap it with
doors and do not wrap too tight.
28. The manufacturer shall not be held responsible for any damage arising from wrong use
and non-compliance with the manual.
DEVICE OUTLINE
Vacuum cleaner
1. On/o switch/AUTO mode
2. Anti-collision sensors
3. Wheels
4. Anti-fall sensor
5. Battery
6. Front wheel
7. Dust and water tank
8. Side brushes
9. Battery charging contacts
Charging unit
1. Feeder cable
2. Charging port
3. Battery charging contacts

6. Front wheel
7. Dust and water tank
8. Side brushes
9. Battery charging contacts
Remote control
1. AUTO mode
2. Screen
3. Vacuum time setting key
4. Time setting
5. Control keys
6. Stop key
7. Return to docking station
8. Local vacuum mode
9. Scheduled vacuum mode
10. Intensive vacuum mode
11. Silent mode
12. Edge vacuum mode
Dust tank
1. Dust and water tank
2. Filter
3. Gasket
4. HEPA filter
5. Rear cover of the tank
6. Tank cover

PREPARING ROOMS FOR VACUUMING
1. Remove cables and other items which may get entangled in the vacuum cleaner from the floor.
2. The vacuum cleaner is intended to clean floors and carpets with short bristle. Do not use
the device if the carpet has long bristle.
3. Position furniture elements in a way that the vacuum cleaner cannot get stuck anywhere.

4. Remove any obstacles in narrow rooms.
CHARGING UNIT
1. Place the charging unit by the wall. Make sure the space around the unit is free
from items and bouncing surfaces. The minimum distance is 0,5 meters on both
sides and 1,5m before the unit, recommended distance is 1 m on both sides
and 2 m before the unit.
2. Plug the feeder cable in the charging unit and supply power.
HOW TO CHARGE
1. Place the vacuum cleaner on the
docking station. Make sure the battery
charging contacts on the station and
cleaner have a contact.
2. When charging, AUTO key on the
cleaner ashes in violet/purple.
3. When the battery is full, AUTO key on the
vacuum cleaner glows in blue.
4. Before the rst use, it is recommended to
charge the battery for 12 hours.

START AND END OF VACUUMING
1. Press AUTO key on the vacuum cleaner or remote control to start vacuuming in AUTO mode
(default mode).
2. Before you start, make sure AUTO key flashes in blue, which means that the cleaner is active.
If it does not glow, hold AUTO key on the cleaner to switch it on.
3. The vacuum cleaner sometimes stops to analyze the surrounding. The stop time varies
and depends on the area being vacuumed.
4. To stop vacuuming, press AUTO key on the vacuum cleaner or stop key on the remote.
5. To switch the vacuum cleaner o, hold AUTO key on the device.
DESCRIPTION OF VACUUMING MODES AND FUNCTIONS
1. AUTO mode
Automatic mode is a default vacuuming mode. The vacuum cleaner will move around the room
automatically.

2. Local vacuum mode
In this mode the vacuum cleaner will make spiral moves around the start area (at first from
the inside, then outside). After the cleaning has been completed, the vacuum cleaner will stop.
3. Edge vacuum mode
In this mode the vacuum cleaner will move along the edge (e.g. wall) and return to the charging unit
after cleaning has finished.
4. Intensive/silent vacuum mode
In intensive mode, the vacuum cleaner has increased capacity. In silent mode, the device operates
in the battery-saving mode.
5. Return to docking station
When the battery is low, the vacuum cleaner will return to charging unit automatically to charge
the battery. Press the return key on the remote control to force it to return to the unit too.

6. Time setting.
• Press the vacuum time setting key to set the hour at which the device starts vacuuming.
• Use arrows to change time
• Press time setting key again to remember the settings.
7. Scheduled vacuum mode.
• Press the vacuum time setting key to set the hour at which the device starts vacuuming.
Use arrows to change time.

• Press the vacuum time setting key again to remember settings.
• Every day the vacuum cleaner will start vacuuming at the set hour.
• To deactivate the mode, hold the scheduled vacuum mode key or vacuum time setting key.
• To activate this mode again, press the scheduled vacuum mode key or set the start date again.
CLEANING ELEMENTS
1. Water tank and microfiber mop.
• To pour water into the tank, take it out of the vacuum cleaner, open the flap and pour water into
the tank slowly.
• Attach the microfiber mop to the bottom of the tank.
• After cleaning, wash the mop with running water with the use of soft detergent, and dry it.
• If you wish to keep on cleaning, refill the water tank. Do not leave the filled water tank when
charging or when the vacuum cleaner is on standby.

2. Dust tank and filters
• To clean the dust tank and filters, take the tank out of the cleaner.
• Open the tank and throw the content out into the bin. Next you can clean the interior with
a wet cloth.
• Remove the sponge filter and HEPA filter and shake them out of dust.
• You can wash the sponge filter with running water. Do not wash HEPA filter with water!
• Dry filters and tank before another use.

3. Brushes
• To remove the main brush, take the cover and brush out.
• To fix the main brush, insert it into the vacuum cleaner. Make sure the holes on both sides
match, and then apply the cover.
4. Side brushes
• Side brushes must be attached from the bottom of the cleaner to dedicated spots.
• To clean side brushes, take them out and wipe with a dry cloth.
CLEANING AND MAINTENANCE
Before you clean the vacuum cleaner and its elements, switch it o.
1. Clean the vacuum cleaner with a dry cloth.
2. Remember to wipe any sensors and battery charging contacts with a cloth after every use
(it applies to elements in the cleaner and docking station).
3. Accessories and filters cleaning has been described in previous chapter.
4. When you do not use the vacuum cleaner for a long time, remove the battery.
LED
The vacuum cleaner is equipped with a signaling LED which indicates the mode of the device:
1. Charging – purple light pulsates.
2. End of charging – blue light glows.
3. Standby – blue light flashes.
4. Cleaning mode – blue light glows.
5. WIFI selection mode – blue light flashes fast.
6. Error – red light flashes.
7. Low battery – red light glows.

WARNING SIGNALS
When the vacuum cleaner detects an error, the red light flashes and sound is emitted
1. One signal – vacuum cleaner got stuck: change its position.
2. Two signals – dust tank error: take the dust tank out and insert again.
3. Three signals – wheels and side brushes error: restart the device.
4. Four signals – altitude sensors error: remove dust from sensors.
TROUBLESHOOTING
PROBLEM LIKELY CAUSE SOLUTION
The vacuum cleaner does not
charge.
No connection with docking
station.
Make sure the contacts of the
vacuum cleaner and docking
station have a proper connection.
Try to clean the contacts and
position the vacuum cleaner on
the docking station manually.
The battery does not charge Make sure the docking station
has been supplied with power.
If the vacuum cleaner has not
been used for a long time and the
battery does not charge, position
the cleaner on the docking station
and charge for 3 minutes, next
stop charging. Repeat 3 times
and connect the vacuum cleaner
to charging unit normally.
The vacuum cleaner has
diculty with cleaning.
The vacuum cleaner wraps with
room items (cables, drapes, etc.)
The vacuum cleaner does its
best to avoid obstacles. If it
fails to do so, remove obstacles
before another vacuuming.
The vacuum cleaner returns to
charging unit automatically
Low battery. It is normal.
End of working time. It is normal.
The vacuum cleaner does not
activate during scheduled
vacuuming.
Cleaner is inactive. Switch the vacuum cleaner on.
Low battery. Charge the battery.
Dust tank is clogged or other
elements are blocked.
Switch the vacuum cleaner o and
clean the dust tank and filters.
Remote control does not work Flat batteries in the remote
control.
Replace batteries in the remote
control.
The vacuum cleaner is inactive
or low battery.
Switch the vacuum cleaner on
and/or charge the battery.
Infrared signal is not received by
the vacuum cleaner
Clean the infrared sensor on the
vacuum cleaner and remote.
Check for any obstacles which
bock the signal between the
remote and cleaner. Check for
any other items which emit
infrared signal (e.g. TV remote).

APPLICATION
Download „Aspiri” application into your mobile device from Google Play store (for devices with Android)
and App Store (for iOS).
1. Registering and logging in
• When you run the application for the first time, please register.
• Enter your phone number or e-mail address.
• A verification code will be send either to your phone or mailbox. Enter the code and give
password to your account.
• If you already have your account, log in by entering your account data.
• If you have registered with the phone number, you can also log in by entering the code sent
by SMS.
• if you have forgotten your password, press „forgot password”. Enter your phone number
or e-mail address. You will receive a message with a verification code. Enter it to set a new
password.

Vacuum cleaner key
• Confirm in the application that the vacuum cleaner operates in WIFI mode
(LED flashes fast in blue)
2. Adding a device:
• After you have logged in, press „+” in the top right corner.
• There are two connection modes – normal mode via WIFI (default) and AP mode. To select AP
mode, select it in the top right corner of the application.
Normal mode
• Make sure the LED on the vacuum cleaner flashes fast in blue. If it does not flash, press
hidden WIFI key at the bottom of the cleaner

• Select WIFI network which the device with application is connected to and enter the router
password.
• The application will connect the vacuum cleaner with WIFI. The device will be present in
the list of application.
• Ifthereisaddingerror,checktheconnectionandmakesureyouhaveenteredthecorrectpassword.
AP mode
• Make sure the LED on the vacuum cleaner flashes slowly in blue. If it does not, press WIFI key
(the LED will start flashing fast) and press it again.
• Connect the device with the application to WIFI point generated by the vacuum cleaner.
• Connect to the vacuum cleaner in the application.

3. How to use application
Basic functions of the application:
• My places
Main place of managing devices and their locations.
• Scenarios
It allows setting vacuum cleaner operation scenarios, depending on conditions added
(e.g. temperature, hour, etc.)
• Profile
It allows setting your first name, avatar, adding family member (who can also control
the device), setting the number of rooms in which the cleaner may operate, etc.
• Device control
It allows controlling the vacuum cleaner. All functions correspond to functions of the remote
(vacuuming modes, control, etc.),
• Sharing device
Enter e-mail address or phone number of the account you wish to share your device with.
AMAZON ALEXA CONTROL
1. Download Aspiri app and register.
2. Download Amazon Alexa app and register or log in.
3. If you have Amazon Echo device, connect it with Alexa app.
4. Enter Skills menu, find „Aspiri” and enter „Enable”.

5. You will be redirected to log-in window. Log in the account from Aspiri application.
6. After you have connected Aspiri and Alexa accounts, return to Aspiri application and add
the device in accordance with instructions.
7. After adding the device, it will be connected with Alexa app too.
8. From now on you can switch the vacuum cleaner on or o via Alexa application and via Echo
device. The following commands are available:
• „Alexa, turn on Aspiri” – vacuum cleaner starts working.
• „Alexa, turn o Aspiri” – vacuum cleaner returns to charging unit.
The pictures and graphics are for reference only. The real design of the products may dier
from the pictures and graphics presented.

Table of contents
Languages:
Other Overmax Home Vacuum Cleaner manuals
Popular Vacuum Cleaner manuals by other brands

Shark
Shark UV210CN owner's manual

Bissell
Bissell SMARTCLEAN 1605 SERIES user guide

Clarke
Clarke SUMMIT 3 Operator's manual

Scheppach
Scheppach HA 1800 Translation from the original instruction manual

Thomas
Thomas SYNTHO Aquafilter Instructions for use

Taurus
Taurus Ideal Lithium Cross ID All-Over Use and care