OXYLANE ONmove 200 GPS User manual

1
EN
TABLE OF CONTENTS
1 SETTINGS..............................................................................................................3
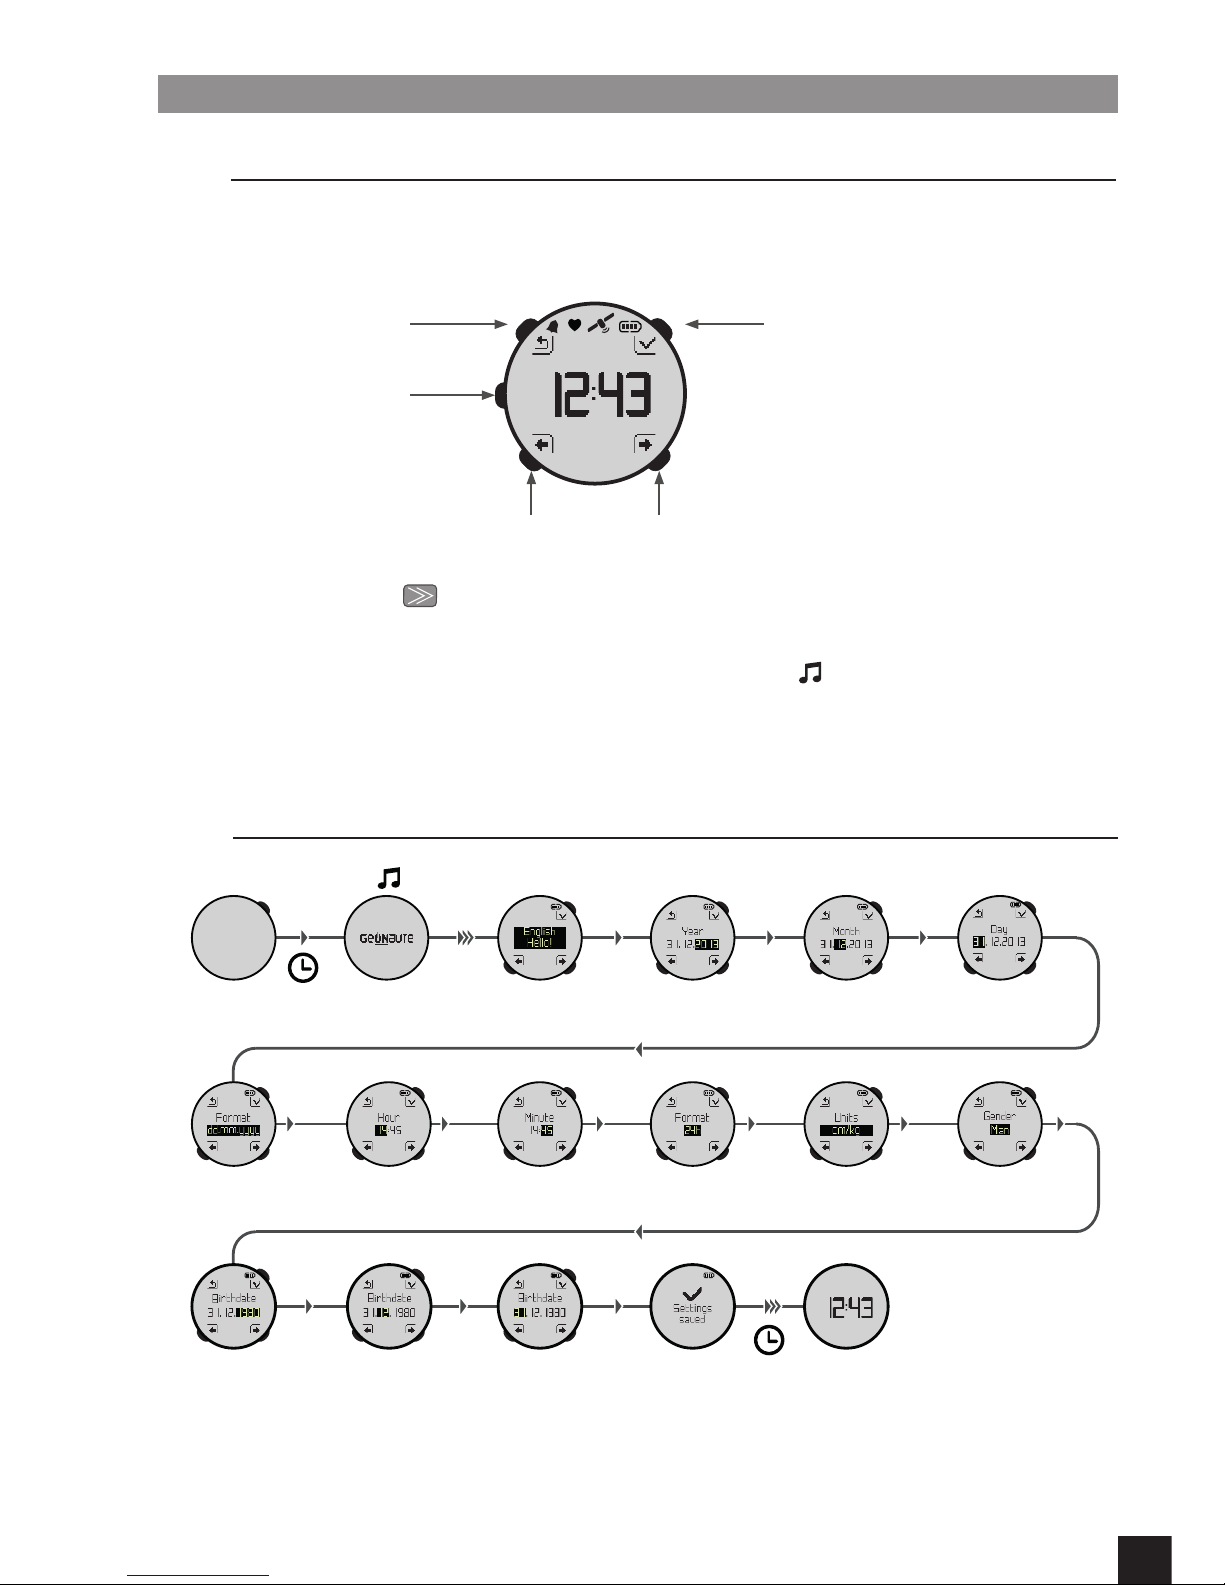
1.1 Intuitive guide............................................................................................................................................................3
6HWWLQJWKHGHYLFHIRUWKH¿UVWWLPH.........................................................................................................................3
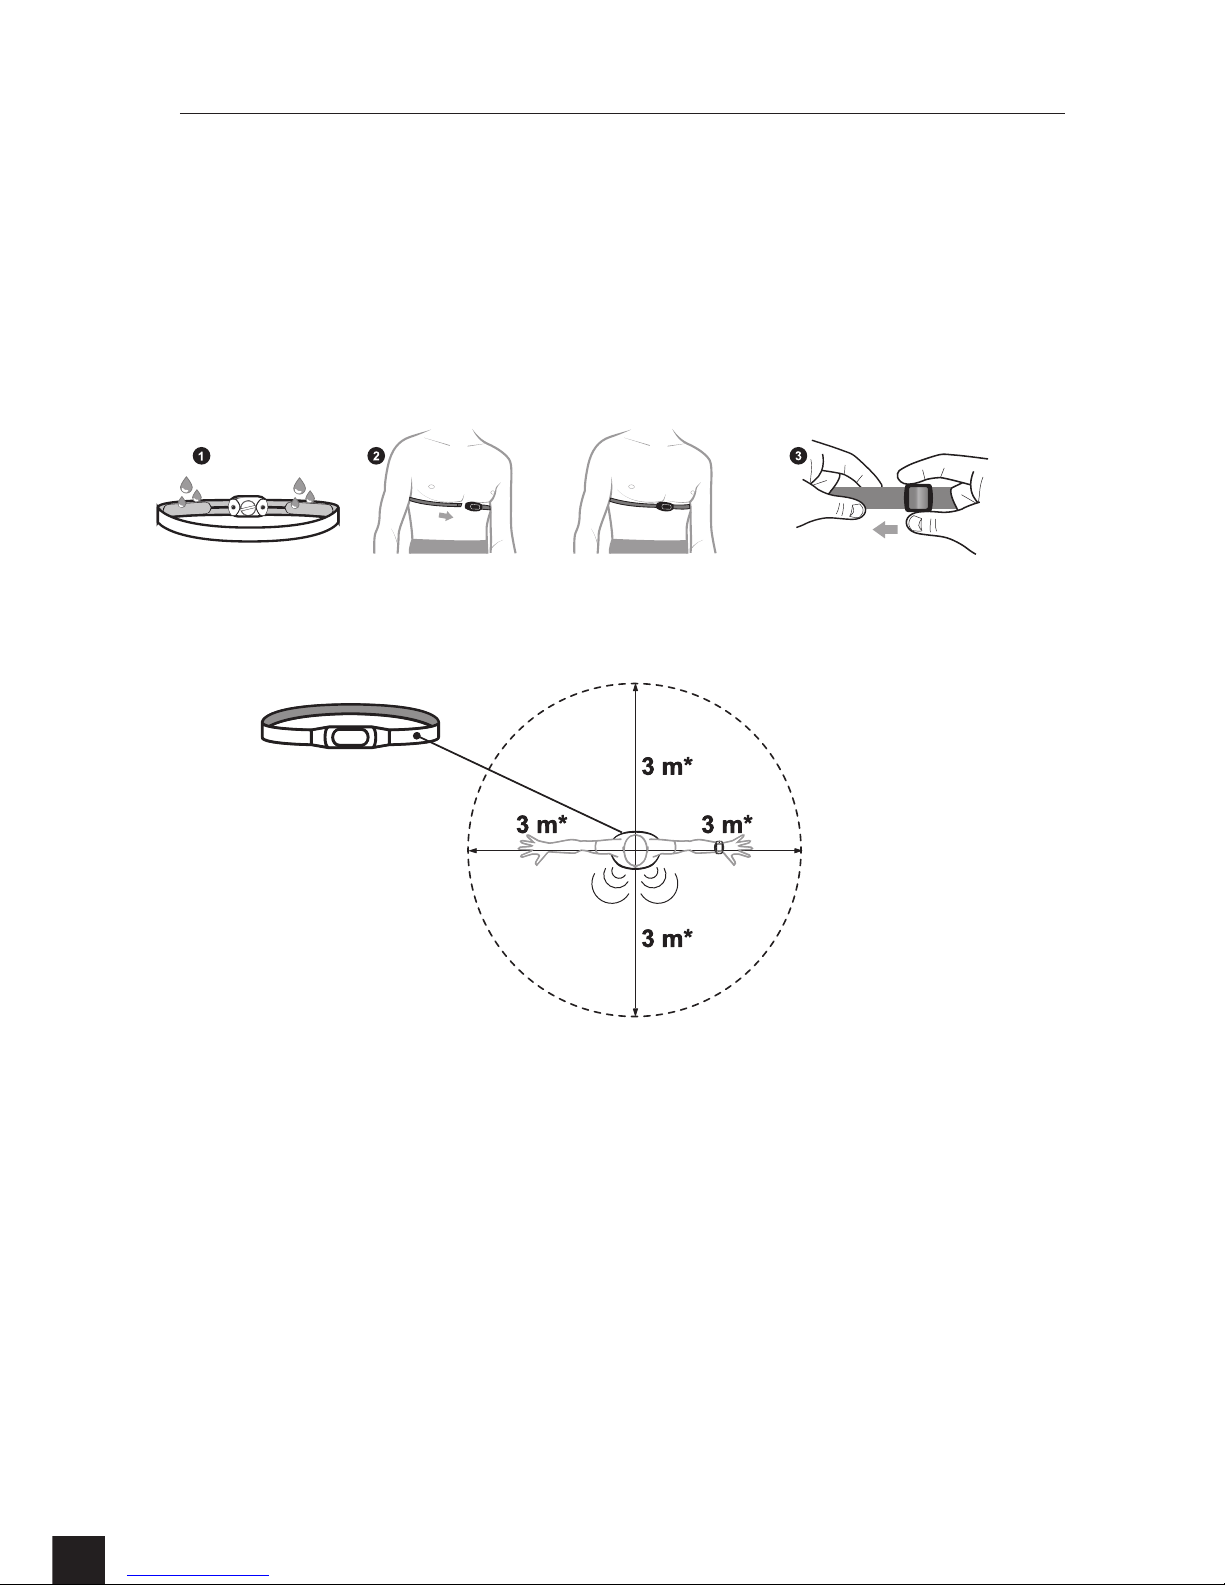
1.3 Heart rate belt............................................................................................................................................................4
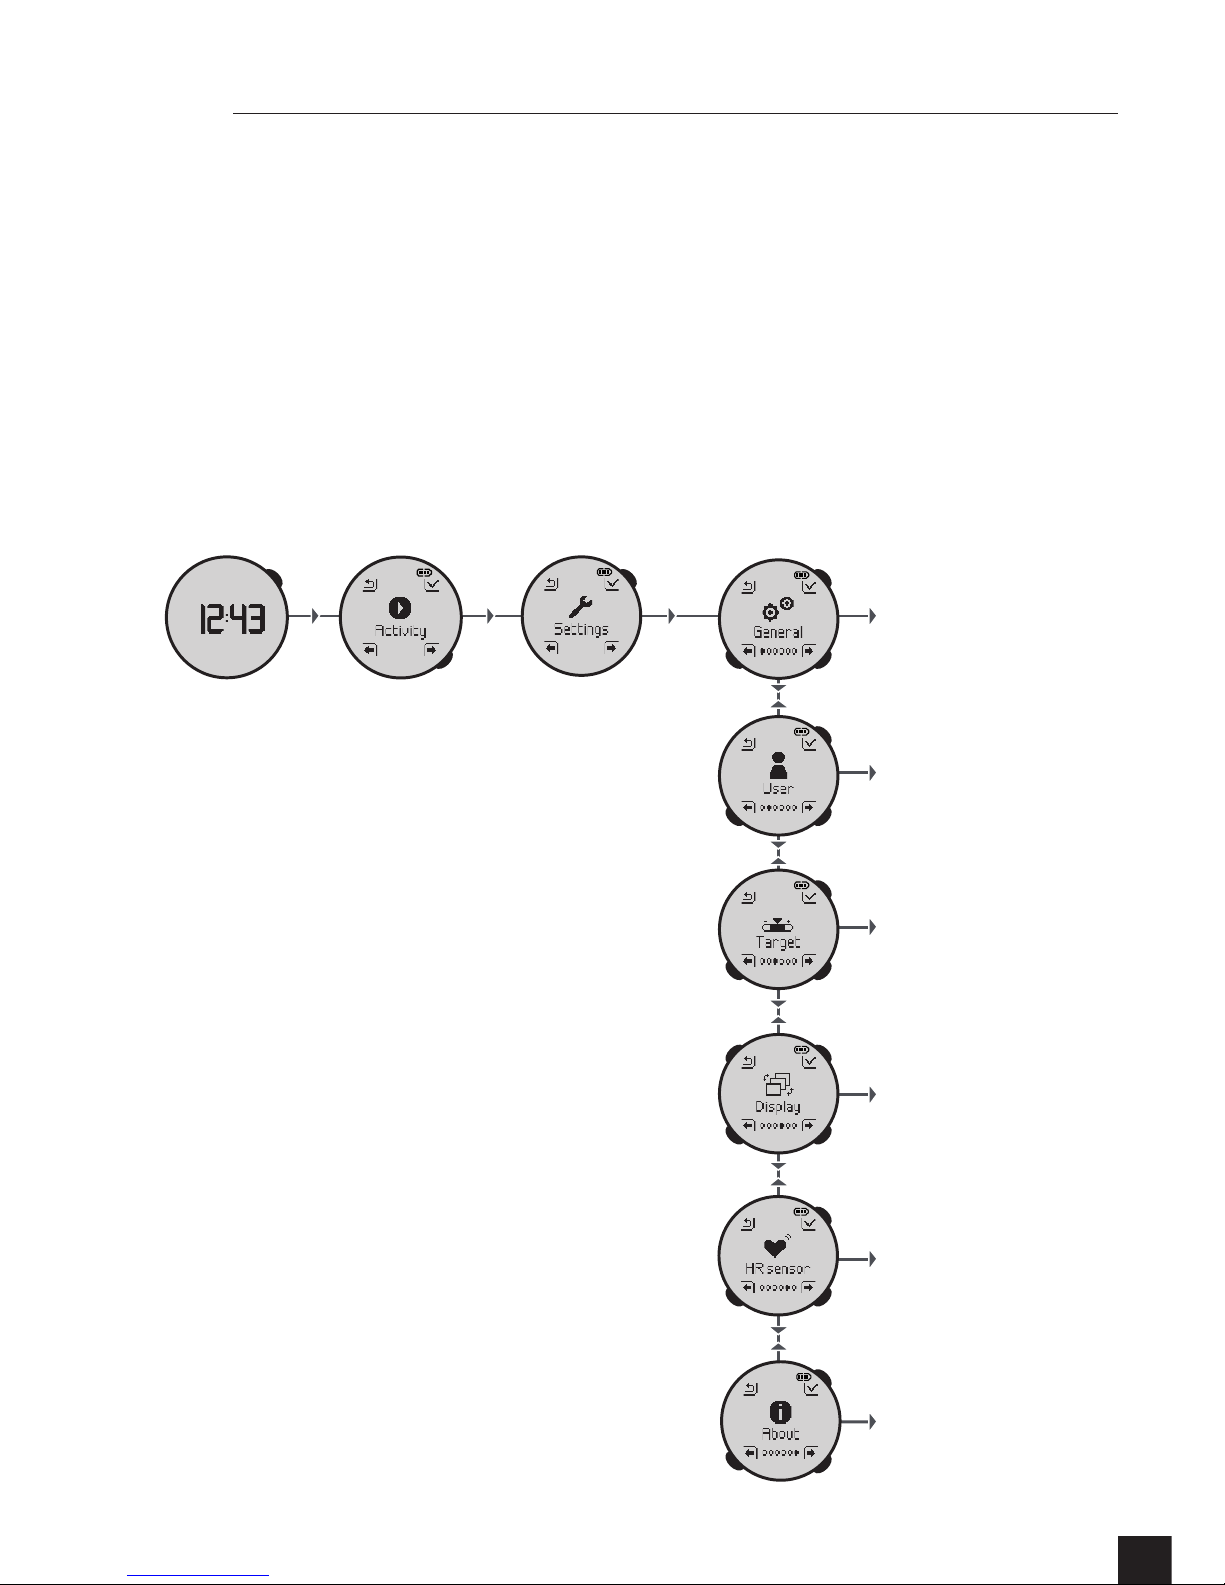
$FFHVVWR6HWWLQJVPRGH .........................................................................................................................................5
*HQHUDOVHWWLQJV........................................................................................................................................................6
8VHUSDUDPHWHUV........................................................................................................................................................8
7DUJHW]RQHSDUDPHWHUV............................................................................................................................................9
'LVSOD\SDUDPHWHUV.................................................................................................................................................10
6HWWLQJWKHKHDUWUDWHPRQLWRU................................................................................................................................11
1.10 About 12
2 USE 13
2.1 Charging ..................................................................................................................................................................13
:DWFKPRGH.............................................................................................................................................................13
$FWLYLW\PRGH ..........................................................................................................................................................13
6ZLWFKLQJRIIWKH21PRYH ..............................................................................................................................16
3 LOGBOOK ............................................................................................................17
6HVVLRQORJERRN .....................................................................................................................................................17
'HOHWLQJDVHVVLRQ ..................................................................................................................................................17
'HOHWLQJWKHPHPRU\ ..............................................................................................................................................18
0HPRU\VWDWXV.........................................................................................................................................................18
4 MESSAGES ..........................................................................................................18
*36DQGRUKHDUWUDWHPRQLWRUVLJQDOORVW............................................................................................................18
%DWWHU\OHYHO.............................................................................................................................................................19
0HPRU\IXOO..............................................................................................................................................................20
5 CHARGING THE BATTERY ..................................................................................21
6 TRANSFERRING AND VIEWING YOUR DATA ON MYGEONAUTE .......................21
7UDQVIHUIURPDFRPSXWHU ......................................................................................................................................21
7UDQVIHUIURPDVPDUWSKRQHRUWDEOHW ..................................................................................................................22
7 TECHNICAL CHARACTERISTICS ........................................................................22
8 CONTACT US .......................................................................................................22
9 PRECAUTIONS FOR USE AND WARRANTY ........................................................23
ONmove 200 GPS

2
*36VLJQDO
)ODVKLQJ VHDUFKLQJ
)L[HG VLJQDOGHWHFWHG
%DWWHU\OHYHO
7LPH
7RSRU
6WDUW3DXVH
Validation / Switch on /
Switch off
+HDUWUDWHPRQLWRU
)ODVKLQJ VHDUFKLQJ
)L[HG VLJQDOGHWHFWHG
$ODUPRQ
5HWXUQ6WRS
%DFNOLJKWLQJ
%RWWRPRU
USB cable to:
- Recharge the battery,
- Transfer your activities to myGeonaute,

EE
C D
E
C D
E
C DC D
- + - + - + - +
- +- +- +- +
- +- +- +
- + - +
EE
C D
E
C D
E
C DC D
E
C D
E
C D
E
C D
E
C D
E
C D
E
Language Year Month Day
Time Minute 12/24 time format Unit Type
Year of birth Month of birth Day of birth Recorded
parameters
Date format
3
1 SETTINGS
V
$XWRV
§¨
A
B
C
E
D
1.2 6HWWLQJWKHGHYLFHIRUWKHÀUVWWLPH
$GMXVWPHQWPHWKRGIRUHDFKVHWWLQJ
For every setting, use the Cand Dbuttons to adjust the values
The settings marked allow fast scrolling through the values when pressing and holding
the Ebutton
Certain settings or displays cause a beep represented by the icon.
5HWXUQWRSUHYLRXV
VFUHHQ
%DFNOLJKWLQJ
*RWRWKHQH[WVWHSWR
FRQ¿UP\RXUFKRLFH
1.1 Intuitive guide

4
1.3 Heart rate belt
Your ONmove 200 is compatible with the heart rate belts using the Bluetooth®Smart protocol.
Installing the belt:
1. Moisten the electrodes on the belt to optimise the heart rate signal reception
2. Place the belt onto your torso
&DUHIXOO\WLJKWHQWKHEHOWPDNLQJVXUHWKHHOHFWURGHVDUHSUHVVHG¿UPO\DJDLQVW\RXUWRUVR
Signal detection: When your ONmove 200 is searching for the heart rate signal, make sure
your ONmove 200 is within the transmission range of your belt:
*118.08 inches

C
§
E
D
¨
EE
D(x3)
C
E
D
C
E
D
A
C
E
D
C
E
D
C
E
D
§ ¨
§ ¨
§ ¨
§ ¨
§ ¨
5
*HQHUDOVHWWLQJV
8VHUVHWWLQJV
Target zone
VHWWLQJV
6FUHHQVHWWLQJV
+HDUWUDWHPRQLWRU
VHWWLQJV
About
This menu gives you access to the different settings of your ONmove 200:
- General settings.
- User settings.
- Target zones.
- Screen customisation.
- Activation of the heart rate monitor.
In watch mode, press Eto access the main menu.
Browse the menus using the C(§) and D(¨) keys until you reach the "Settings" mode.
Press Eonce again to enter the "Settings" menu.
Press Ato return to the previous menu.
1.4 $FFHVVWR6HWWLQJVPRGH

E
DC
E
D
E
DCDC
EE
(§) (¨) (¨)
(§) (¨) (§) (¨)
E
DC
E
DC
EE
(§) (¨)(§) (¨)
E
Dx1
DC
EE
DC
E
DC
E
DC
E
(§) (¨) (§) (¨) (§) (¨) (§) (¨)
E
Dx2
6
1.5 *HQHUDOVHWWLQJV
Note7KHGHIDXOWYDOXHVRIWKHGLIIHUHQWPHQXVDUHWKRVHGH¿QHGZKHQVHWWLQJWKHGHYLFHIRU
WKH¿UVWWLPH
1.5.1 6HWWLQJWKHDODUP
1.5.2 6HWWLQJWKHWLPH
1.5.3 Setting the date

DC
EE
Dx4
E
(§) (¨)
DC
EE
Dx5
(§) (¨)
E
DC
E
E
(§) (¨)
E
Dx3
7
1.5.5 6HWWLQJWKHXQLWV
1.5.6 Setting the language
1.5.4 6HWWLQJWKHVRXQG
Note: This setting does not concern the alarm sound. If it is set to "OFF", the alarm sound will
remain active.

EEE
D
(+)
CC
(-)
EE
D
(+)
C
(-)
DC
DC
D
EE
EE
EE EE
EE
D
(+)
C
(-)
D
(+)
C
(-)
DC
D
CD
(+)
C
(-)
D
(+)
C
(-)
D
D
(+)
C
(-)
D
(+)
C
(-)
8
1.6 8VHUSDUDPHWHUV
The user's personal parameters are also synchronised automatically when you log on to your
myGeonaute account (see § 6).
Weight: min : 20kg/44lb
max : 220 kg/485 lb
Default value: 70 kg/154 lb
Height:
min : 100cm/39inch
max : 220cm/86inch
Default value: 175 cm/69 inch
Resting heart rate*: min : 30
max : 200
Default value: 65
Maximum heart
rate**:
31-220
Default value: 220 - age
* Note: This value represents your resting heart rate. It helps calculate your calories burned
more accurately. To determine this value, stay lying down after waking up and measure
your heart rate. You can also measure it at any time by lying down quietly for 5 minutes.
** Note:This value represents the highest heart rate you can reach during exercise.
By default it is calculated in accordance with the following formula: 220 - age = max bpm

E E E
D
(+)
C
(-)
E
D
(+)
C
(-)
E
D
(+)
C
(-)
E
D
(+)
C
(-)
E
D
(+)
C
(-)
E
D
(+)
C
(-)
E
D
(+)
C
(-)
E
D
(+)
C
(-)
9
1.7 7DUJHW]RQHSDUDPHWHUV
Setting a target zone helps you manage your effort by helping you stay within a determined
effort zone.
There is a beep every time you exit a zone.
3 types of target zone are available: speed, pace and heart rate monitor
Note: The "Heart rate target" setting is only available if the heart rate monitor is activated
(see § 1.8).
When a target zone is activated, a 4th screen showing a graphic indication of your target zone
is available during the activity.
Settings values of the different target zones.
3DFHWDUJHW]RQH
Min pace : 2’ 00"" to 60’ 00", (default value: 10’ 0")
Max pace : 1’ 00"" to 59’ 00", (default value: 8’ 0")
+HDUWUDWHWDUJHW]RQH
Min heart rate : 30 to 200 bpm
Max heart rate : 40 to 220 bpm
6SHHGWDUJHW]RQH
Min speed : 1 to 98km/hr, (default value: 9 km/hr)
Max speed : 2 to 99 km/hr, (default value: 12 km/hr)
6SHHGGHIDXOW
Pace
Heart rate
7DUJHW]RQH
Pace Target Heart rate Target 6SHHG7DUJHW

EE
DC
E
DC
E
DC
E
DC
E
DC
E
DC
E
DC
E
DC
E
DC
(§) (¨) (§) (¨) (§) (¨)
(§) (¨) (§) (¨) (§) (¨)
(§) (¨) (§) (¨) (§) (¨)
10
7KLVFRQ¿JXUDWLRQKHOSVVHOHFWWKHLQIRUPDWLRQVKRZQGXULQJDQDFWLYLW\
(YHU\VFUHHQGLVSOD\VRQHRUWZRLQGLFDWLRQVGH¿QHGE\WKHXVHU
Note: At least one value must be selected on the 3 screens.
The size of the message adapts to the number of values selected. The display is therefore
larger when a single value is selected per screen.
Example:
Screen 1: Stopwatch + Distance,
Screen 2: Speed + Pace,
Screen 3: Calories.
/LVWRIDYDLODEOHYDOXHV
Stopwatch
Instantaneous speed
Average speed
Instantaneous pace
Average pace
Calories
Heart rate Note: the heart rate monitor must be activated before selecting the heart rate
value. (see § 1.8)
Note: This screen is only
available if a target area has
EHHQFRQ¿JXUHG
and activated. (see § 1.6)
1.8 'LVSOD\SDUDPHWHUV

EEE
D
(+)
C
(-)
E
D
(+)
C
(-)
15 s.
15 s.
3 s.
E
DC
E
DC
11
1.9 Setting the heart rate monitor
1.9.1 $FWLYDWLQJWKHKHDUWUDWHPRQLWRU
OFF: (default value), the sensor will not be searched for when an activity starts.
ON: the sensor will be automatically searched for when an activity start.
:KHQDFWLYDWLQJWKHKHDUWUDWHPRQLWRUIRUWKH¿UVWWLPHWKHVHDUFKIRU\RXUEHOWLVODXQFKHG
automatically. This search makes it possible to associate your belt with your ONmove 200;
this action is referred to as "Pairing".
Once the pairing has been completed, your belt is stored in the memory.
3DLULQJPXVWEHSHUIRUPHGZKHQ¿UVWXVLQJ\RXUEHOWZKHQ\RXFKDQJH\RXUEHOWRUDIWHU
resetting your ONmove 200.
1.9.2 Pairing a belt

E
E
D
(+)
C
(-)
D
(+)
C
(-)
D
(+)
C
(-)
D
(+)
C
(-)
12
1.10 About
)LUPZDUH
YHUVLRQ
)DVW)L[ Microcontroller
VHULDOQR
1.10.1 )DVW)L[
<RXU21PRYHQHHGVWRGHWHFWDWOHDVWVDWHOOLWHVLJQDOVWRGH¿QH\RXUSRVLWLRQ
The FastFix system enables your ONmove 200 to predict the trajectory of the satellites for 7
days.
Therefore your ONmove 200 knows the exact location of these satellites even before the
search is launched.
You can detect a signal within 30 seconds even if the signal is weak or if the area is partially
covered.
You can see whether or not your FastFix is up to date at any time in the "About" menu.
To update your FastFix, simply synchronise your product with the ONconnect software.
1.10.2 )LUPZDUH
Firmware is the internal software of your watch. It can be updated to provide your watch with
patches or new functionalities.
You are informed of the new updates when you synchronise your product with the ONconnect
software.
0DNHVXUH\RXKDYHWKHODWHVWXSGDWHWREHQH¿WIURPWKHODWHVWSDWFKHV
1.10.3 MCU Serial
Our customer service department may ask you for this number if there is a problem with your
product.
1.10.4 5HVHW
This function is to reset your watch. Warning: all your sessions, settings and personal
parameters will be deleted.

EE
C
13
To access the activity mode, press E from the watch mode.
Note: When the memory of your ONmove 200 is full, a beep can be heard and the screen dis
plays "Memory full". You are then invited to:
- free up memory space by deleting sessions.
- or automatically overwrite the oldest training session.
Select the Activity mode by pressing the E. button. The search for the GPS and/or heart rate
monitor signal will launch automatically.
During this search, the and LFRQVDUHÀDVKLQJ7KHVHDUFKIRUWKH*36VLJQDOFDQ
take 15 seconds to 1 minute depending on the reception conditions.
When the GPS signal has been found, there is a beep.
Note7KHTXDOLW\RIWKHVDWHOOLWHVLJQDOUHFHSWLRQLVVLJQL¿FDQWO\DIIHFWHGE\WKHHQYLURQPHQW
and movements. To facilitate reception, we recommend whenever possible that you:
Position yourself in an open space, away from surrounding buildings and not under a tree.
Do not move while the signal is being detected.
To optimise the reception of the satellite signal, do not forget to update the FastFix by
synchronising your product with the ONconnect software. (See§ 1.9.1)
:HUHFRPPHQGWKDW\RXIXOO\FKDUJHWKH21PRYHEHIRUHXVLQJLWIRUWKH¿UVWWLPH)XOO
charging time is approximately 1 1/2 hours. A full charge will give you a 7 hour life span in GPS
mode and 10 days in clock mode. The ONmove 200 can be charged simply by connecting it to
a USB port on your computer or a 5 V-1A. USB adapter.
2 USE
2.1 Charging
2.2 Watch mode
The watch mode is permanently accessible when the watch is on.
To switch on the watch, press the E button for 1 second.
1 s.
Auto return
3 s.
2.3 $FWLYLW\PRGH

E
DC
EE
DC
DC
DC
DC
E
DC
E
DC
E
DC
14
2.3.1 *36RU+HDUWUDWHPRQLWRUQRWGHWHFWHG
&DVH: GPS signal not found.
You can start the activity without a GPS.
The "Speed", "Pace", "Distance" values
and the icon will no longer be
displayed.
&DVH: heart rate monitor not found.
You can start the activity without a heart rate
monitor. The "BPM" and "Calories" values
will no longer be displayed. The search for
your heart rate monitor's signal will continue
for 15 minutes and the LFRQZLOOÀDVK
If, after 15 minutes, no signal is detected,
the search will stop automatically and the
icon will no longer be displayed.
E
DC
Press Eto start the activity; a beep can be heard.
During the activity, press Cor DWRPRGLI\WKHVFUHHQGLVSOD\VGH¿QHGLQWKHGLVSOD\
parameters (see § 1.7).
5HDG\ $FWLYLW\VWDUWHG
Once the GPS signal has been
detected, your ONmove 200
automatically switches to "Activity"
mode.
Note: This screen is only available
LIDWDUJHW]RQHKDVEHHQFRQ¿JXUHG
and activated. (see § 1.6)
Flashing while activity
has not started
50 s.

E
DC
E E E
E
E
DC
E E E
D
x2
DC
E
DC
E
DC
E
DC
E
DC
(+)(-)
15
2.3.2 6WRSSLQJRUSDXVLQJWKHDFWLYLW\
This action allows the user to:
Save the activity
Quit the activity
Access the product settings
see § 1.7
3 s.
Resuming the activity

E
E E E
D
(+)
C
(-)
D
(+)
C
(-)
D
(+)
C
(-)
D
(+)
C
(-)
D
(+)
C
(-)
16
7RVDYHEDWWHU\DQGZLWKWKHH[FHSWLRQRIVSHFL¿FFDVHVVHH$FWLYLW\0RGH\RXFDQVZLWFK
off your ONmove 200 at any time.
Press E(1 second)
1 s.
(1 s.)
2.3.3 YLHZLQJWKHDFWLYLW\DIWHUVDYLQJ
2.4 Switching off the ONmove 200

E
E E
E
D
DC
E
E
E A
E E E
DC DC DC DC
17
After deleting a session, the display will return to the last session saved.
Press Ato return to the logbook menu.
Auto 3 s.
3 LOGBOOK
3.1 6HVVLRQORJERRN
Activity time
and distance
Average speed
and average
pace
Calories burned and
average heart rate
If no session has been saved
% of time spent within the
target zone
LIGH¿QHGLQWKHXVHU
settings)
3.2 'HOHWLQJDVHVVLRQ

E EE
D DC
(§) (¨)
A
E E
Dx2
18
When the GPS or heart rate monitor connection is lost, a 30-second search starts
automatically.
In the meantime, the values displayed are blocked and the and LQGLFDWRUVDUHÀDVKLQJ
If, after 30 seconds, the connection is not restored, the screen displays < - - - > instead of
the "Speed" and "Pace" values, the "Distance" display remains blocked and a beep can be
heard.
The search will continue automatically and the and LQGLFDWRUVZLOONHHSÀDVKLQJXQWLO
the connection is restored.
Connection restored
Connection not restored
,QGLFDWRUVÀDVKLQJ
30 s.
Auto 3 s.
Recording time still
available
(hours and minutes)
3.3 'HOHWLQJWKHPHPRU\
3.4 0HPRU\VWDWXV
4 MESSAGES
4.1 *36DQGRUKHDUWUDWHPRQLWRUVLJQDOORVW

x2 x3
19
There are 3 alert levels:
:KHQWKHEDWWHU\LVDWEHHSVFDQEHKHDUGDQGWKHLQGLFDWRUÀDVKHV
When the battery is at 10%, 2 beeps can be heard.
When the battery is at 5%, 3 beeps can be heard.
the product switches off when the battery is completely discharged.
If an activity is underway, it is automatically saved in the logbook before the ONmove 200
switches off
Recharge the battery (see § 5)
Flashing
1VW alert
Battery = 15%
2nd alert
Battery = 5%
5 s.
3 s. Auto
4.2 %DWWHU\OHYHO
4.2.1 21PRYHEDWWHU\
4.2.2 +HDUWUDWHEHOWEDWWHU\
An indication appears when the battery of your heart rate belt is low.
Don't forget to change the battery of your heart rate belt (refer to the user manual of your
heart rate belt)

E
D
(+)
C
(-)
3 s.
5 s.
X 3
3 s.
20
4.3 0HPRU\IXOO
4.3.1 0HPRU\IXOOEHIRUHWKHDFWLYLW\
4.3.2 0HPRU\IXOOGXULQJWKHDFWLYLW\
Table of contents