Oypla 3045 User manual

Electric Golf Trolley
User Manual
USER MANUAL Model No: 3045

Safety Instructions
Notice: Ensure you read and fully understand instructions before use
While every attempt is made to ensure the highest degree of protection in all equipment, we cannot
guarantee freedom from injury. The user assumes all risk of injury due to use. All merchandise is sold on
this condition, which no representative of the company can waive or change.
•This product contains small parts that could be a choking hazard if swallowed.
Keep these items away from children.
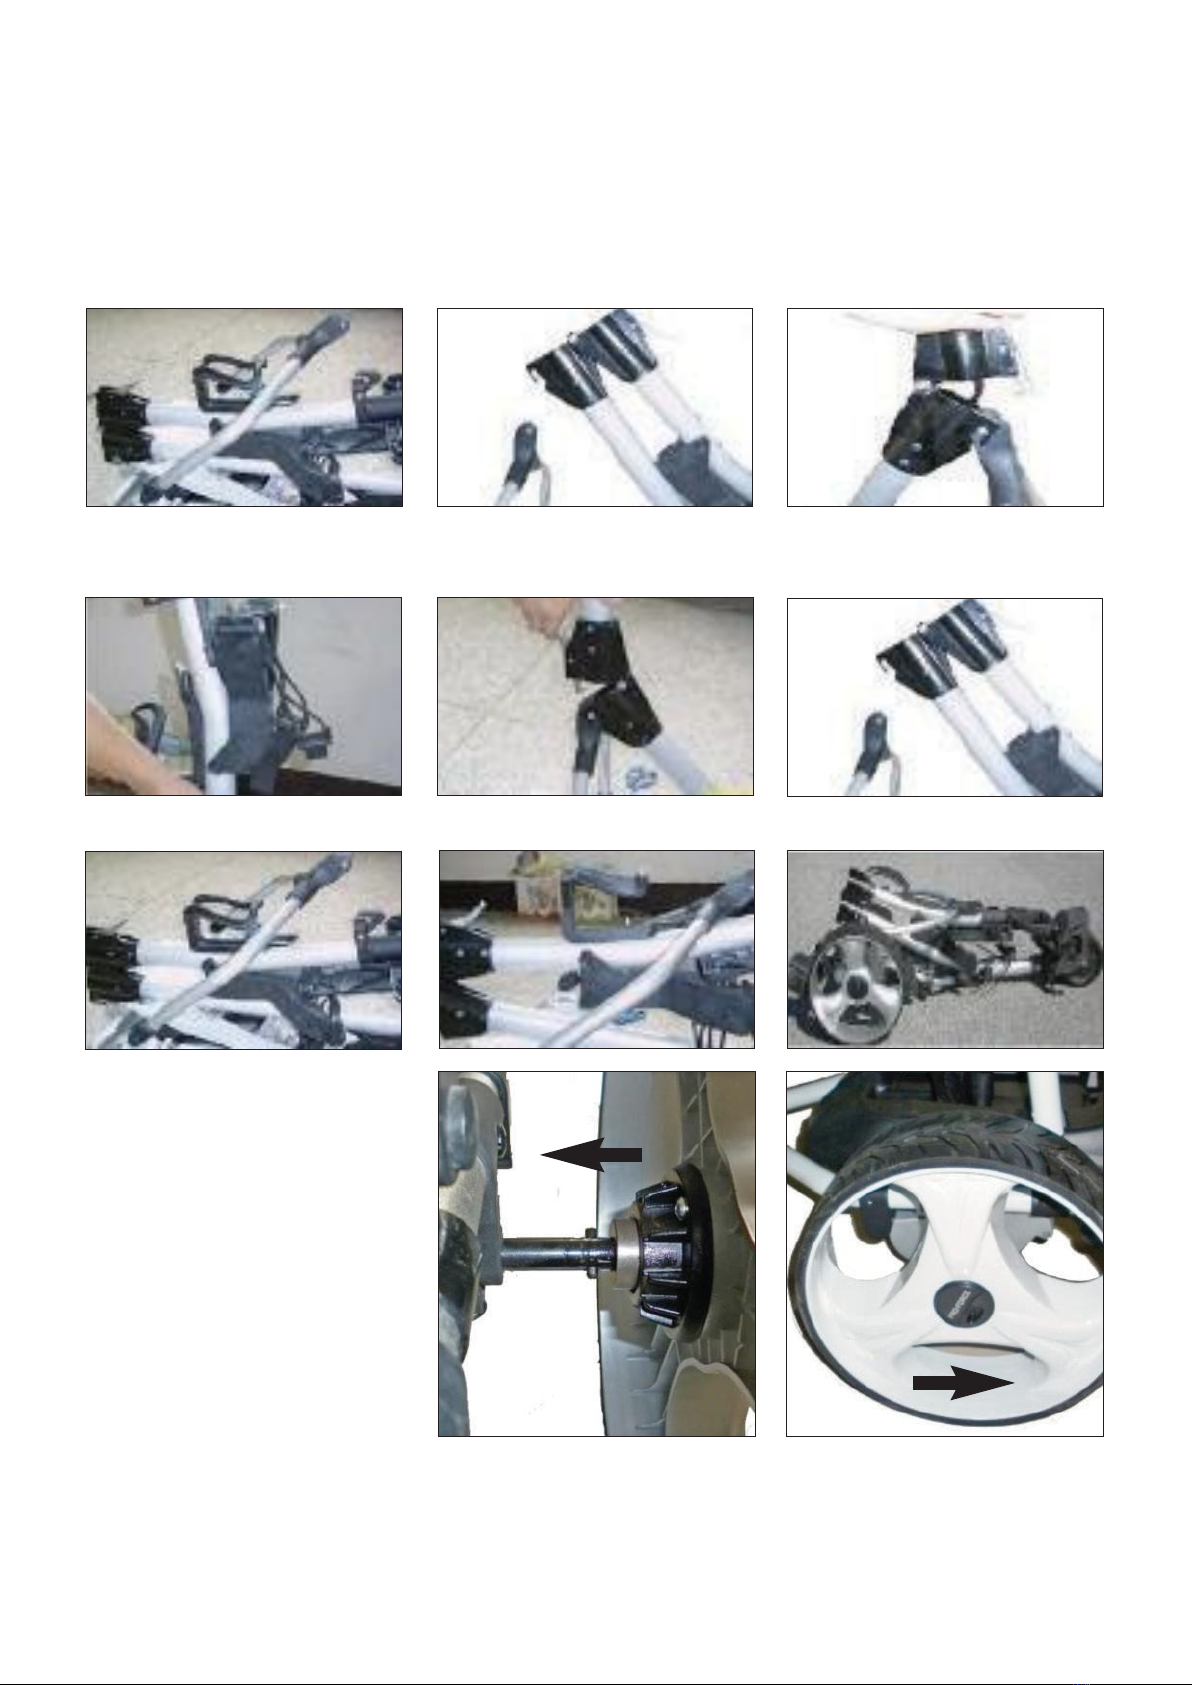
•Make sure all fastenings are tightly in place and that everything is in order before
using the product. This should be checked periodically by an adult.
•This product is intended for outdoor use only.
•This product is not a toy, and is only to be used for its designated purpose.
•Do not carry out alterations or modifications to this product.
•Clean only with a damp cloth. Do not use strong industrial cleaning substances.
•Leaving the product outside exposed to weather, especially direct sun and rain,
will speed the weathering process. This can be slowed by removing the product
from these conditions.
•To protect against electrical shock, do not immerse cord, plug or any part of this
appliance in water or any other liquid.
•Never operate electrical appliance in immediate vicinity of water sources.
•Do not discard any of the packaging until you have checked that you have all of
the parts and fittings required.
•Use the correct fixings as indicated. Do not tighten any of the nuts until the unit is
completely assembled, then finish by tightening all nuts. All nuts must be
tightened before use.
•Never allow children to operate, play with, the electric golf trolley.
•If the product is damaged or has any defects, please contact cs[email protected]
USER MANUAL Model No: 3045

Operating Instructions
Parts List:
Please be aware that you will be referring to this parts list throughout the assembly process.
1. Wheel Rubber
2. Battery Tray
3. Lower holder
4. Front Wheel
5. Fold part
6. Charger
7. Handle
8. Upper holder
9. Upper holder belt
10. Battery
11. Rear Wheel
12. Wheel Cap
USER MANUAL Model No: 3045
General Maintenance
1) The trolley has been designed so that the user can concentrate on playing golf, while the
trolley does the work of carrying your bag. In order to keep your trolley looking at its best,
we advise that you wipe any mud or grass from the frame, wheels and chassis after every
round with a damp cloth or paper towel.
2) Do NOT use any high-pressure jet washers to prevent moisture entering the electronic
systems, motors or gear boxes of the caddy.
3) Remove the rear wheels every few weeks and remove any debris that might cause the
wheels to drag. You might also apply some lubricant, such as WD-40 to keep moving
parts smooth.
4) A four - five-hour round of golf played once a week for 12 months is equivalent tofour years
use of a lawnmower, so please inspect your cart at least once a year thoroughly.
5) Always disconnect the battery when you store the trolley, and always put your trolley
together before re-connecting the battery. If you are not planning to play for at least a
month, store the battery in a warm and dry place (not on concrete floor).
All of these recommendations will help keep your
trolley in top condition and ensure that it remains
your reliable partner, both on and off the links.

Assembly Instructions
Unfold Step
Fold Step
Attach wheels to axles by pushing
wheel locking button on the
outside of the wheel and inserting
the axle extension into the wheel.
Make sure to keep the locking
button on the outside of the
wheel pushed in during the
process, in order to enable the
axle extensions, including the two
pins, to be inserted all the way
into the wheel. If not locked in,
the wheel will not be connected
to the clutch and will not be
propelled! Test the lock by trying
to pull the wheel out. To
disassemble the wheels, proceed
in reverse order.
Place battery pack onto battery try with the connector facing the left
side of the trolley. Fasten velcro strap around battery tightly. Insert
battery plug into caddy outlet.
USER MANUAL Model No: 3045

Speed Controller
Scrolling of the speed button lets you choose your preferred speed to suit your space perfectly, and
the display will show the preferred speed.
The speed level is from 1 to 5 (1 to 7 on some models).
How to charge the Battery
Charge the battery by plugging the charger into the battery and then plug the charger into the main electricity
supply. Charge the battery after each round of golf. Charging is complete when charger light (see type of
charger) changes colour. Battery charging takes anywhere between 5-12 hours.
Once the battery is charged there is no need to leave it plugged into the charger. These are two types of battery
chargers. The chargers in LED in colours for these different chargers are as follows:
1) The LED turns green when connecting the battery and changed to red once connected to an outlet
indicating that the battery is being charged. The LED will revert to green once the battery is fully
charged.
2) The LED light starts as steady green. If the battery requires charge and while charging the LEDs will
revert to flashing green. When the battery is fully charged, the LED will stop flashing and revert to
steady green.
Power Vol.
H (High Power): Green Colour
M (Mid Power): Yellow Colour
L (Low Power): Red Colour
New Timer Function (Distance Function)
When you press 10m, the trolley will run 10m and stop by itself.
When you press 20m, the trolley will run 20m and stop by itself.
When you press 30m, the trolley will run 30m and stop by itself.
New Cruise and Brake Function
Easy scrolling action lets you choose your preferred speeds to suit your pace
perfectly; the one press stop/start (power brake) function means your cart will
always proceed at the speed you’ve selected.
Select the speed to match your pace. The cart will remember its last setting when you
stop, and travel at that speed automatically when you start again, except when you
change the speed knob position.
ON/OFF button controls the caddy’s power supply. Press for 2-5 seconds in order to
switch the caddy ON or OFF (similar to a mobile phone operation). After you have
connected your battery, you need to press ON, and the battery LED will illuminate.
Now your caddy I ready for operation.
USER MANUAL Model No: 3045

Operating your trolley
•In order to turn the trolley on push the On/Off switch to On. The battery charge LED
should light up.
•While holding on to the handle start dialing the speed control with your index finger
slowly forward or clockwise. The trolley will start moving forward. Adjust the speed
seamlessly to the desired pace.
•To stop or slow the trolley down either dial the speed control knob backwards or use the
cruise control or On/Off buttons as described previously.
Battery Use and Care
PLEASE OBEY THESE PRECAUTIONS FOR BATTERY USE & CHARGING
a) Please do not charge the battery in a sealed container or in an upside down position. It
is recommended to charge the battery in a well ventilated area.
b) Please do not charge the battery near a heater, or where heat accumulation may occur,
or in direct sunshine.
c) In order to prolong the service life of the battery, please avoid complete discharge and
charge the battery after every use. When the trolley is not in use for an extended
period of time, it is recommended to charge the battery once a month.
d) The battery’s poles red colour stands for positive, and the black for negative. In case of
battery replacement please reconnect the poles of the battery correctly. Otherwise
your caddy could suffer severe damage.
e) Please do not disassemble the battery or throw it into a fire. EXPLOSION!
f) NEVER TOUCH THE ELECTRIC POLES OF THE BATTERY! SAFETY HAZARD!
Troubleshooting
USER MANUAL Model No: 3045

USER MANUAL Model No: 3045
Imported into the EU by Oypla.com LLP, Uxbridge, UB8 2FX
Environmental Protection
Products bearing the symbol shown above means that used electrical and electronic equipment (WEEE) should not be mixed with general
household waste. For proper treatment, recovery and recycling, please take this product(s) to designated collection points where it will be
accepted free of charge. Disposing of this product correctly will help save valuable resources and prevent any potential negative effects on
human health and the environment, which could otherwise arise from inappropriate waste handling. Please contact your local authority for
further details of your nearest designated collection point. Penalties may be applicable for incorrect disposal of this waste, in accordance with
your national legislation.
Please retain a copy of all instructions for future
consultation.
Table of contents