Oz Audio ME OZ 180CS User manual


Congratulations!! You have just invested in the world’s greatest component
system-period. When properly installed and tuned, your Oz Audio Matrix com-
ponents will transform your car audio system into a concert experience. You
will be pleased to know that the engineers at Oz Audio are committed to provid-
ing you the highest level of performance and quality in the industry. Oz Audio
speaker systems are the product of countless hours of research, development,
and engineering. These efforts are necessary to continue our development of
new technologies and materials that make it possible for Oz audio to maintain
its reputation as the best sounding speakers on the planet.
The audio system you have invested in today is a testament to our “No Com-
promise” approach to the pursuit of the most accurate and natural sounding
musical reproduction possible. We began with the development of a mid-bass
driver capable of delivering tight accurate bass down to 36 Hz (easy for us, hard
for them), transition swiftly enough to provide faultless midrange, and do it all
without an enclosure. We accomplished this through the use of our flat progres-
sive-roll spider, computer optimized suspension compliance, oversized voice
coil, and a proprietary 3-layer cone. This honeycomb matrix of woven glass
fiber and Nomex has proven itself the perfect medium to accomplish these
amazing feats. All of these technologies are fastened to our proprietary cast
aluminum basket. For the treble range we commissioned our newly developed
silk soft dome tweeter. This tweeter exemplifies the next step in the evolution
of our original silk soft dome tweeter which set industry standard 15 years ago.
This breakthrough in engineering uses a new silk cotton blend to distribute
crisp clear high’s that exceed the limits of human hearing and the performance
of metal dome tweeters. When the capabilities of these two independents are
coupled through our audiophile crossovers, the results must to be heard to be
believed.
Through years of Research & Development and competition we have unlocked
a combination of speakers and electronics that have set a new industry stan-
dard for excellence. This became evident when our original design of compo-
nents set the first and only perfect score ever recorded in sound quality history.
We have succeeded where others have failed; our systems provide endless
hours of musical enjoyment with the lowest amounts of distortion or ear fatigue
at any and all volume levels. Through our use of innovative materials and
technology, coupled with the strictest quality and performance standards in the
industry, you have bought front row center tickets for every CD you own. Every
time this system played it will be remembered as an experience.
Congratulations, you are taking the firsts steps on your newest journey through
sound.
Features:
Mid-bass:
• 3-layer glass fiber and Nomex cone woven in a honeycomb matrix
• High quality Butyl Rubber surround
• Flat progressive roll spider
• Thermoset Four layer copper voice coil
• Aluminum voice coil former for improved heat dissipation
• Custom embossed, protective magnet boot
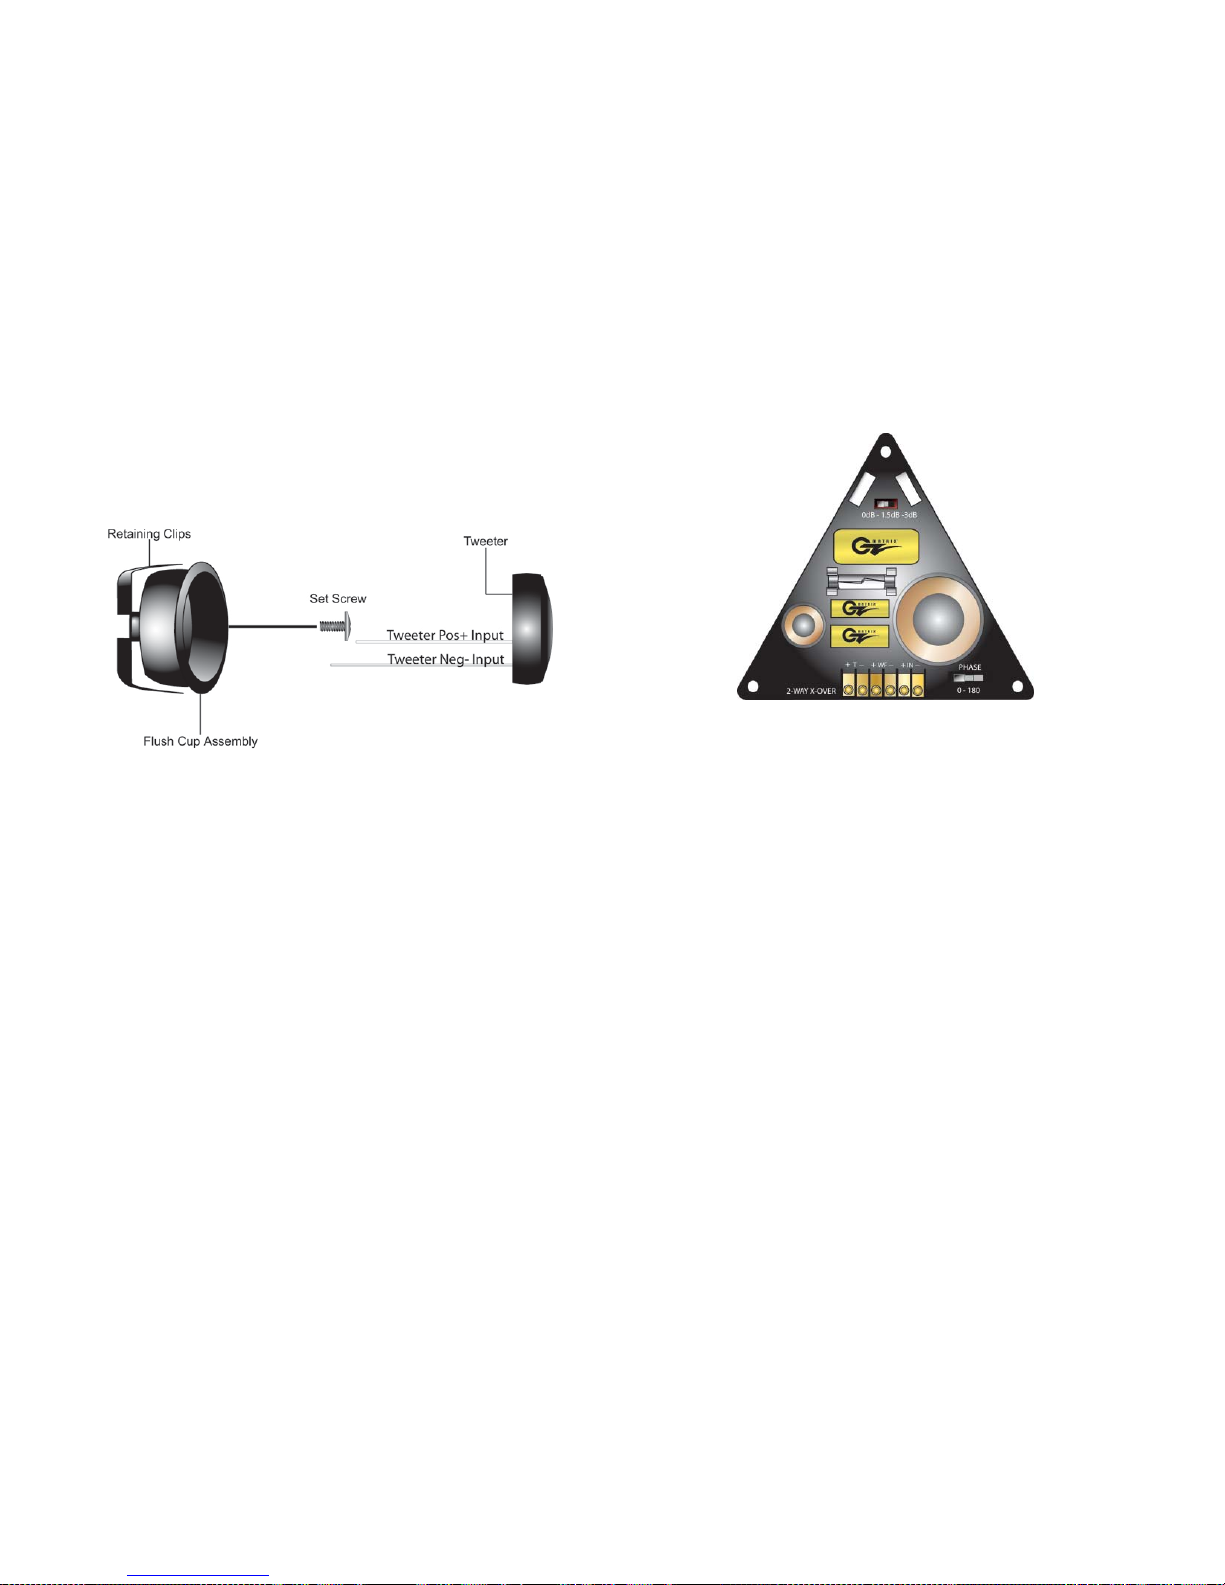
Tweeter:
• 1” silk soft dome tweeter
• Neodymium iron-boron motor structure
• Ferrofluid cooled motor for advanced heat dissipation
Crossover:
• New proprietary design and cosmetics
• 12 dB per octave, 2-way crossover
• Three position tweeter attenuation switch 0, -1.5 dB, -3 dB
• Tweeter polarity switch 0/-180
• Heavy duty gold plated terminals

Matrix Component Specifications:
Model ME OZ 180CS ME OZ 130CS ME OZ 100CS
Freq. Response: 36 Hz – 40 KHz 55 Hz – 40 KHz 65 Hz – 40 KHz
RMS PWR: 150 - 225 watts 130 - 200 watts 100 – 150 watts
Peak PWR: 300 - 450 watts 280 - 400 watts 220 – 330 watts
SPL @ 1w/1m 91 dB 92 dB 92 dB
Nominal Impedance: 4 Ω 4 Ω 4 Ω
Crossover point: 1800 Hz 1800 Hz 1800 Hz
Matrix Mid-bass Dimensions:
Model ME OZ 180CS ME OZ 130CS ME OZ 100CS
A 6.50” 5.25” 4”
B 5.625” 4.875” 3.625”
C 3.0” 2.625” 2.125”
D 3.25” 2.875” 2.25
E 3.75” 3.75” 2.875”
Matrix Tweeter Dimentions:
Tweeter
A 2.3125”
B 2.0”
C.75”
D 1.25”.
Mid bass Installation:
Determine the mounting location. Factory speaker locations are recommended
for ease of installation. When installing in the factory speaker locations, make
sure that there is enough depth to accommodate the replacement speaker.
If an alternate location is used, measurements should be carefully taken before
any cutting is done to insure that there is enough depth and to make sure that
the speaker will not interfere with any moving parts in the vehicle (i.e. window
gears/braces, hood/trunk cables, etc.). Once the mounting location is decided
upon, the grill-mounting ring can be used as a template to mark the hole and
screw locations. If the panel that the speaker is to be mounted to can be re-
moved, then it is recommended that the panel be removed before cutting the
speaker hole. Once the hole is cut to fit the speaker, replace the panel. If there
is any metal obstructing the installation of the speaker, with top panel in place,
mark the metal that needs to be removed and then remove it with tin snips or
saw.
If new wiring is necessary, make sure to route the wires under factory moldings
to make the installation as clean as possible. The minimum gauge recommend-
ed is 16 gauge to avoid signal loss. In addition, make sure that the new wiring
is clear of any screw or clip holes so that it will not be pinched or shorted after
the factory panels and mounting screws are replaced.
Once the speaker opening is cut and the wires are run, the wires can be con-
nected to the speaker and the speaker can be mounted. The speed clips and
screws that come with the packaging can be used to mount the speaker. If
mounting the speaker in a factory location, then the factory screws should be
utilized.
TWEETER INSTALLATION 180CS/130CS/100CS
When using the flush mounting system it is important that you install the tweeter
assembly in the proper location for optimum results. Be sure to verify that there
is enough room for the tweeter housing and wiring behind your chosen location.
If the tweeter assembly is being mounted in the door be certain that the area is
clear of obstructions when the door is closed. It’s also recommended that you
verify that the wires can be safely run from the tweeter location to the crossover.
Once these few precautions have been taken, you are ready to proceed.
You will need to make a 2” diameter hole (outside measurement.) A 2” hole saw
makes for an easy clean precise fit. Mark your location for the tweeter

should be connected to the tweeter. Make sure that the polarities on all three
connections are correct.
After all connections have been made, tweeter attenuation can be adjusted
through the switch mounted on the crossover. The level of tweeter attenua-
tion can be adjusted from -3dB to a reference level of 0dB. These adjustments
should be tested with reference listening material to insure the correct level has
been selected. If you find that your installation is producing a “confused” center,
double check that the polarities of all the connections are correct. If the prob-
lem persists it may be necessary to reverse the polarity (phase) of one channel
in the component system (left or right) through the phase switch located on the
crossovers. Again test the system with reference listening material to verify the
phase selection.
Once these steps have been taken the tuning and installation of your new Oz
audio system is completed.
If you have any difficulties or questions please contact your local authorized
dealer or call Oz Audio Technical Support Line at 561-998-0211.
assembly and proceed to cut the opening. Once this step is completed you
can place the tweeter assembly into place. Place the retaining clips through
the slotted openings located inside of the housing adjacent to the brass insert.
When aligned correctly the two clips should leave an opening for the supplied
set screw.
At this point in the installation you can thread the supplied set screw into the
brass insert and continue to tighten the fastener completely. It is highly recom-
mended that you tighten this screw by hand and not with a power drill to prevent
potentially damaging the retaining clips or the flush cup assembly. Feel free to
insert the tweeter into the flush mount assembly taking care to run both wires
through one of the remaining openings along the inside edge of the flush cup
assembly and aim accordingly.
Crossover Installation:
The crossovers should be mounted in a dry, moisture free location. Never install
the crossover in the door where it can be damaged by water and moisture.
There are three sets of connections on the crossover. The input terminals
should be connected to the source of the signal (radio or amplifier). The woofer
terminals should be connected to the mid-bass driver. The tweeter terminals
Other Oz Audio Stereo System manuals