manuals.online logo
Brands
  1. Home
  2. •
  3. Brands
  4. •
  5. Ozark Trail
  6. •
  7. Camping Equipment
  8. •
  9. Ozark Trail W930 User manual

Ozark Trail W930 User manual

AA
W930 - Multipurpose Tarp Shelter
A
B
DESCRIPTION PART NO.
QTY
REQ
KEY
NO.
Upright Pole
Complete Frame
Guy Rope
Plastic Stake
W930U
W930ST
W930PF
A1001
7.25 STAKE
2
2
1
6
6
Pole Foot
ASSEMBLY INSTRUCTIONS
DO NOT LEAVE YOUR SHADE CANOPY SET UP IN DIRECT SUNLIGHT LONGER THAN NECESSARY. THE SUN’S
ULTRAVIOLET (UV) LIGHT DEGRADES ALMOST EVERY FABRIC AND MATERIAL. IF LEFT IN SUNLIGHT FOR
PROLONGED PERIODS OF TIME, FABRIC WILL FADE AND WEAKEN. DO NOT STORE SHADE CANOPY ON
CONCRETE FLOOR. DO NOT SPRAY THE SHADE CANOPY WITH INSECTICIDE.
EXERCISE CARE WHEN USING ELECTRIC DEVICES IN AND NEAR SHADE CANOPY.
Although our tents and canopies are constructed to rigid specifications, periods of wind or rain soaking the
ground may loosen the stakes and cause the uprights to sink into the ground. This will weaken the rigidity of the
overall structure. Water pockets may also form in the roof if the unit is not assembled taut, possibly causing
broken frames and torn fabric.
If you have questions or need to order a part, call 1-800-325-4121 or send an email to contactus@wenzelco.com. Have your model
number or part number ready when you call.
DO NOT ORDER BY REFERENCE KEY NUMBER.
CARE
REPLACEMENT PARTS
Send your request for parts to:
Exxel Outdoors, LLC.
6235 Lookout Road
Boulder, CO 80301
SAFETY WARNING -
DOs AND DO NOTs
EVERYONE WHO USES THIS SHADE CANOPY SHOULD READ THIS MANUAL AND BECOME FAMILIAR
WITH ALL SAFETY WARNINGS AND PRECAUTIONS FOR SAFE USE, ASSEMBLY, CARE,
MAINTENANCE, AND STORAGE. KEEP THIS MANUAL SO YOU CAN REFER TO IT LATER.
WARNING
FLAMMABILITY WARNING KEEP ALL FLAME AND HEAT SOURCES AWAY FROM THIS SHADE CANOPY FABRIC
This shade canopy is made with flame resistant fabric which meets CPAI-84 specification. IT IS NOT FIREPROOF. The fabric will burn if left in continuous
contact with any flame source. The application of any foreign substance to the shade canopy fabric may render the flame-resistant properties ineffective.
For these reasons:
• DO NOT use matches, lighters, stoves, heaters, grills, lanterns, candles, cooking equipment, or other fuel-burning devices inside or
near a shade canopy.
• DO NOT build fires inside or near a shade canopy.
• DO NOT leave campfires unattended.
Your failure to follow this warning will cause death, serious injury, or permanent disability to you or others.
PROTECT YOUR CHILDREN
Children will not understand and appreciate safety warnings, and will not know how to avoid or respond to these hazards if no adults are present.
For these reasons:
• DO NOT leave children unattended inside a shade canopy or in camp.
• DO NOT allow children to assemble a shade canopy.
• DO NOT allow children to enter or exit a shade canopy except through the door.
Your failure to follow this warning will cause death, serious injury, or permanent disability to your children.
MODEL W930 - Multipurpose Tarp Shelter
STEP 1: Spread the tarp out flat with
the logo facing upward.
IMPORTANT: WE ADVISE YOU TO ASSEMBLE THE TENT ONCE BEFORE
GOING CAMPING TO BECOME FAMILIAR WITH THE ASSEMBLY OF THE TENT.
NOTE: PLEASE LOOK AT THE REPLACEMENT PARTS DIAGRAM TO SEE HOW
YOUR FRAME IS ASSEMBLED.
TO PROLONG THE LIFE OF THE TENT FLOOR, SELECT A LEVEL, CLEAN AREA FOR
THE CAMPSITE. TO PREVENT DAMAGE TO THE ZIPPER, UNZIP THE DOORS TO
ALLOW AIR TO ENTER THE TENT.
TO IMPROVE THE WEATHER RESISTANCE OF YOUR TENT, IT IS ADVISABLE
TO USE SEAM SEALER TO COAT ALL EXPOSED SEAMS. YOU SHOULD APPLY
ONLY TO THE INSIDE SEAMS OF THE TENT AND UNDERSIDE OF THE TENT
FLY. IF APPLIED TO THE OUTSIDE OF SEAMS, DISCOLORATION OF YOUR
TENT MAY OCCUR. SEAM SEALER IS AVAILABLE IN THE CAMPING SECTION
OF ANY LOCAL SPORTING GOODS STORE.
ASSEMBLY INSTRUCTIONS
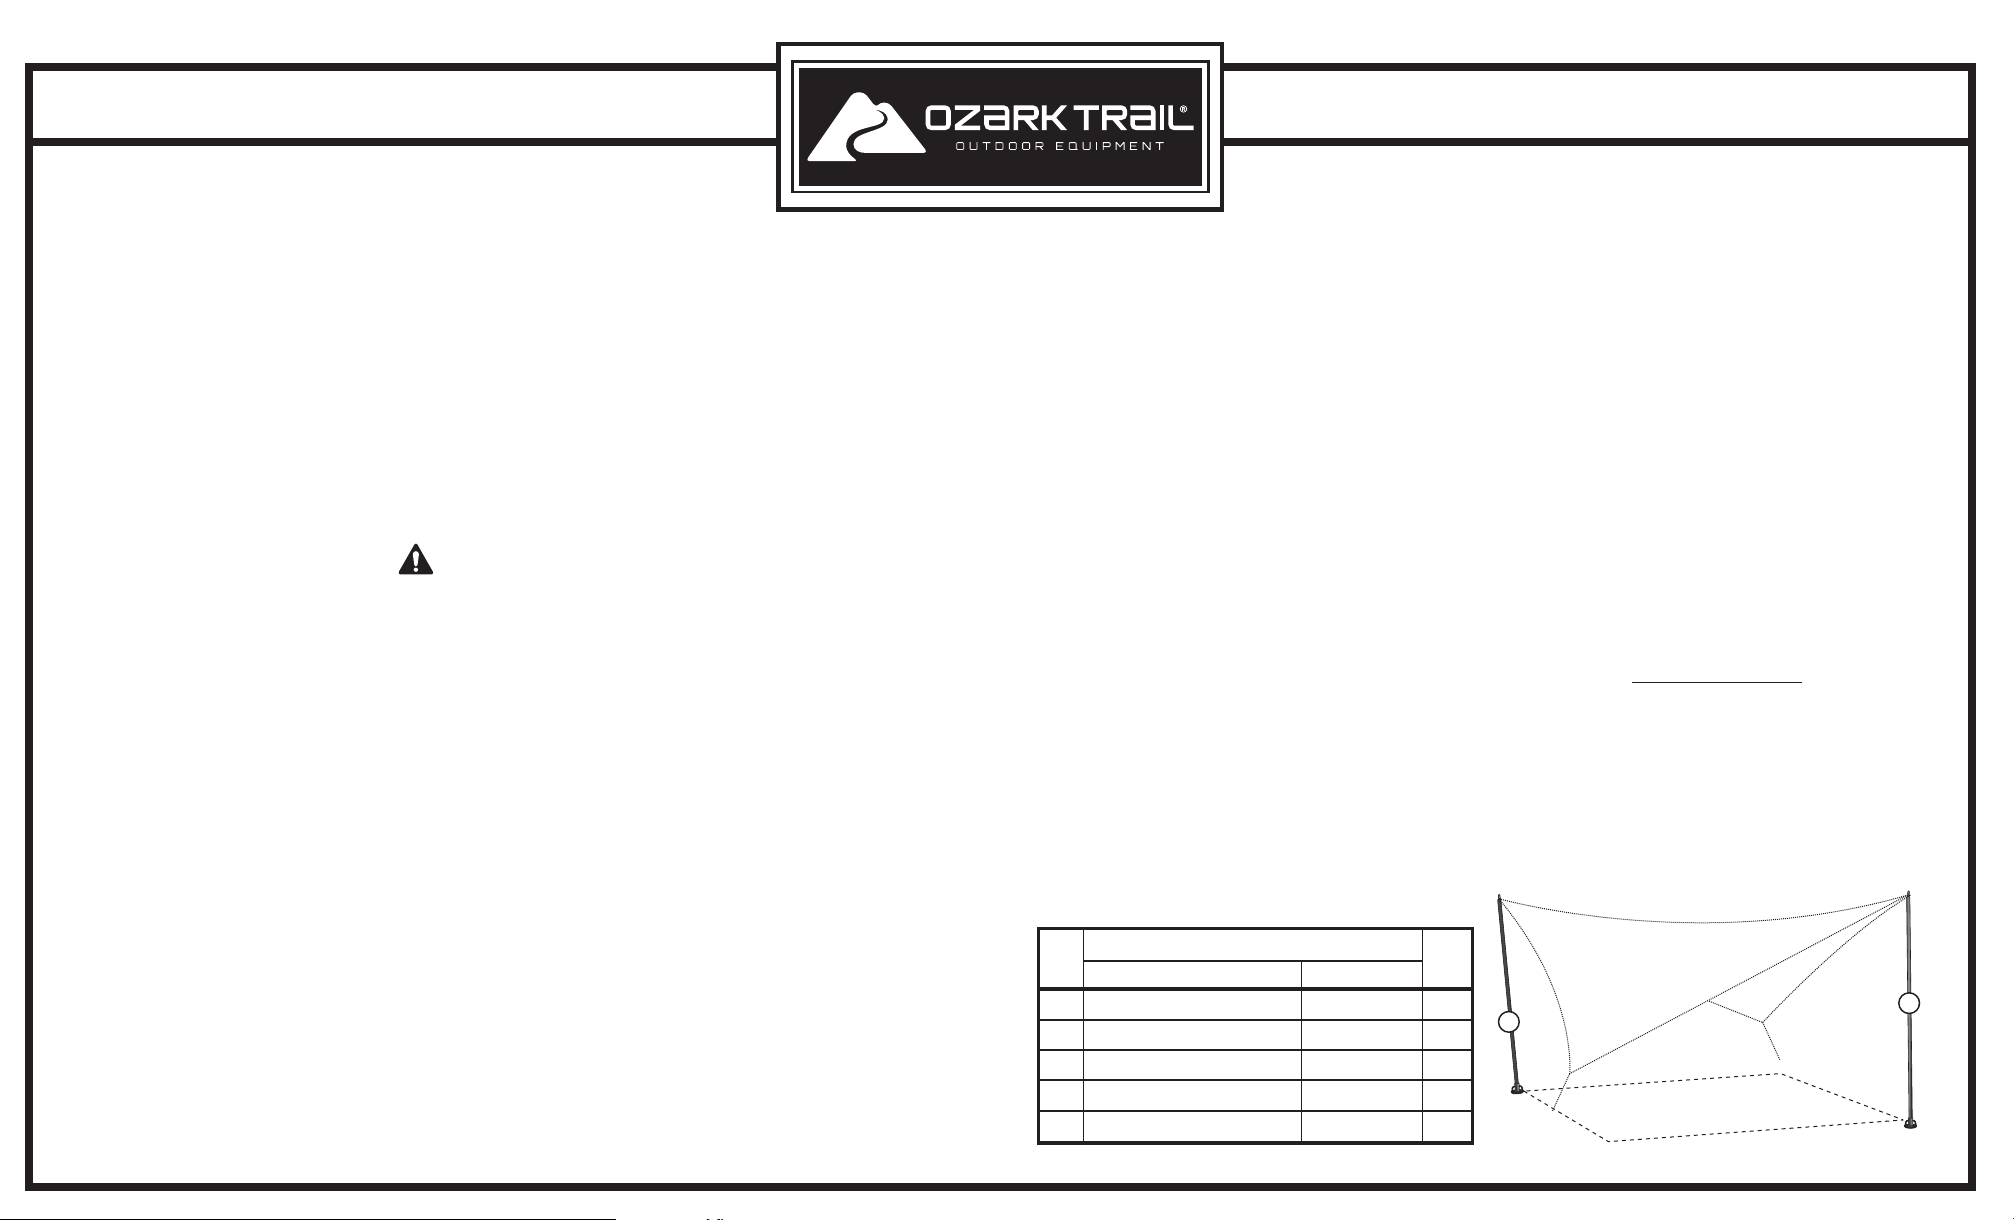
STEP 7: The guy ropes on the 2 corners of the tarp without the upright poles
should now be extended and staked to the ground at a 45° angle.
MODEL W930 - Multipurpose Tarp Shelter
STEP 2: Locate and extend the two
steel upright poles by pulling out each
wire-corded section and placing the
jointed ends into the connected pole
sections.
STEP 3: Insert the tip of the pole into the grommet at the corner of the
tarp that has 2 guy ropes connected. Lift up on the steel pole and raise
one side of the tarp. Place the foot on the bottom of the pole on the ground.
STEP 4: With one person holding the pole in an upright position a
second person needs to extend the two guy ropes at the corner of
the tarp. Make a loops at the opposite ends of the guy ropes, by using
slider as shown and place loop over a tent stake. Adjust slider to make
the guy ropes tight and stake to the ground at a 45° angle.
STEP 5: While the first person continues to hold the first pole in place
the second person should go to the opposite corner of the tarp and
Insert the tip of the pole into the grommet Lift up on the steel pole and
raise the second side of the tarp. Place the foot on the bottom of the
pole on the ground and tension the tarp between the two poles.
Continue to hold the pole under tension through Step 6.
STEP 6: The person holding the first pole should now be able to
let go. They should extend the two guy ropes at the corner of the
tarp. Make a loops at the opposite ends of the guy ropes, by using
slider as shown and place loop over a tent stake. Adjust slider to
make the guy ropes tight and stake to the ground at a 45° angle.
STEP 8: Check and adjust tension of all guy ropes to make sure the tarp is held
securely in place
Configuration 1
Configuration 2
STEP 1: Spread the tarp out flat
with the logo facing upward.
STEP 2:
Remove one guy rope from each of the corners with 2 guy ropes connected. Tie the guy
ropes to the webbing loops located at the grommets at the midway point of the two tarp sides.
STEP 3: Locate and extend the two steel upright poles by pulling out each wire-corded
section and placing the jointed ends into the connected pole sections.
STEP 4: Insert the tip of the pole into the grommet at midpoint on one
side of the tarp Lift up on the steel pole and raise one side of the tarp.
Place the foot on the bottom of the pole on the ground.
STEP 5: With one person holding the pole in an upright position a second person
needs to extend the guy rope from the webbing at the tip of the pole.
Make a loop at the opposite end of the guy rope, by using slider as
shown and place loop over a tent stake. Adjust slider to make the guy
rope tight and stake to the ground at a 45° angle.
STEP 7: With one person continuing to hold the upright pole extend the guy ropes
at the corners of the tarp. Make a loop at the opposite end of the guy rope, by
using slider and place loop over a tent stake. Adjust slider to make the guy rope
tight and stake to the ground at a 45° angle.
STEP 6: While the first person continues to hold the first pole in place
the second person should go to the opposite side of the tarp and Insert
the tip of the pole into the grommet. Lift up on the steel pole and raise the
second side of the tarp. Place the foot on the bottom of the pole on the
ground and tension the tarp between the two poles. Continue to hold the
pole under tension through Step 7.
STEP 10: Check and adjust the tension of all guy ropes to make sure the tarp is
held securely in place
NOTE : To take down tarp, follow steps above in the reverse order. Place stakes
into stake bag and pole into the pole bag, which are provided. Make sure tarp
is clean and dry before storing. The tarp should be folded into equal parts
toward the center to distribute the bulk. Start a small tight roll, the width of the carry
bag, with the pole bag placed at the end of the tarp. Roll tarp to allow air to escape.
Once rolled, tie a string or rope around tarp to hold into place. Place tarp, frame
and stakes into carry bag.
A
A
AA
Tent should appear
as shown.
Tent should appear
as shown.
NOTE: Sandbags are provided for use at the beach. Fill the bags with sand and
attach to the end of the guy ropes. Bury the bags in the sand to hold the tarp in place.

Other Ozark Trail Camping Equipment manuals

Ozark Trail WMT-8859 User manual

Ozark Trail

Ozark Trail WMT-8859 User manual

Ozark Trail WMT-530NQ User manual

Ozark Trail

Ozark Trail WMT-530NQ User manual

Ozark Trail 842-A100-W User manual

Ozark Trail

Ozark Trail 842-A100-W User manual

Ozark Trail WT191412AF User manual

Ozark Trail

Ozark Trail WT191412AF User manual

Ozark Trail WMT-530NQ User manual

Ozark Trail

Ozark Trail WMT-530NQ User manual

Popular Camping Equipment manuals by other brands

Skandika HAFSLO 5 manual

Skandika

Skandika HAFSLO 5 manual

Wagan 2296 user manual

Wagan

Wagan 2296 user manual

ActiveProducts CampKitchen 76-2642-0 manual

ActiveProducts

ActiveProducts CampKitchen 76-2642-0 manual

Cascade DC-BK- quick start guide

Cascade

Cascade DC-BK- quick start guide

Sourse WIDESLIDE Care and use instructions

Sourse

Sourse WIDESLIDE Care and use instructions

Leckey Firefly Playpak quick start guide

Leckey

Leckey Firefly Playpak quick start guide

Oypla leisure 4811 user manual

Oypla

Oypla leisure 4811 user manual

Coachmen RV Viking 17FQ 2019 manual

Coachmen RV

Coachmen RV Viking 17FQ 2019 manual

Kampa Rally Pro Series Instructions & care manual

Kampa

Kampa Rally Pro Series Instructions & care manual

SeasonsComfort Wrapping Supplies Storage Duffel instructions

SeasonsComfort

SeasonsComfort Wrapping Supplies Storage Duffel instructions

Osprey TALON Series owner's manual

Osprey

Osprey TALON Series owner's manual

Yukatana YukaCook 900 instructions

Yukatana

Yukatana YukaCook 900 instructions

Kogan orbis ORBAGCRGRYA user guide

Kogan

Kogan orbis ORBAGCRGRYA user guide

Quest Leisure Products Childrens Tiger 5203 instructions

Quest Leisure Products

Quest Leisure Products Childrens Tiger 5203 instructions

Clam Corp Thermal X 8280 product manual

Clam Corp

Clam Corp Thermal X 8280 product manual

Outsunny B2-0006 manual

Outsunny

Outsunny B2-0006 manual

Coleman 9392-162 instructions

Coleman

Coleman 9392-162 instructions

Quick Pitch RTT Mini Max Operating and maintenance instructions

Quick Pitch

Quick Pitch RTT Mini Max Operating and maintenance instructions

manuals.online logo
manuals.online logoBrands
  • About & Mission
  • Contact us
  • Privacy Policy
  • Terms and Conditions

Copyright 2025 Manuals.Online. All Rights Reserved.