OzCharge OC-RM750 User manual

OWNER’S MANUAL
Model: OC1206U / OC1212U
AUSTRALIAN & NEW ZEALAND STANDARD AS/NZS 60335.2.29 APPROVED
Charging Full /
Ready
RUN
RESCUE MATE
12 Volt 750 Amp Max.
Super Safe Jump Starter
Model: OC-RM750 Model: OC-RM750
RED BLACK
CONNECTION IN VEHICLE
(NEGATIVELY EARTHED)
Model: OC-RM750
RED
BLACK
CONNECTION IN VEHICLE
(POSITIVELY EARTHED)
Model: OC-RM750
OWNER’S MANUAL
Models: OC-RM750
** PATENT - AUS2016102104 **
USA PATENT PENDING

1 • Oz Charge manual www.ozcharge.com.au
Congratulations on purchasing the Oz Charge Rescue Mate Super Safe Jump Starter. Please take the
time to carefully read and understand this manual before using this product.
This Oz Charge Rescue Mate Super Safe Capacitor Jump Starter is microprocessor controlled and
contains NO BATTERIES which means it’s extremely safe to store and transport.
IMPORTANT SAFETY ADVICE AND WARNINGS:
• This device is suitable for 12V applications only.
• Always refer to your vehicles manufacturers manual and safety advice with regards to jump starting
vehicles. Some new vehicles may display warning lights when a battery goes at and these warning lights
may have to be cleared from your dealership using a scan tool.
• Always check your vehicle is in Neutral or Park before attempting to jump start.
• This device should never be exposed to water, rain, snow, liquids etc.
• Double check all connections are correct before turning on the device.
• Never Short Circuit or connect the input / output leads Reverse Polarity during RUN Mode as all safety
features are disabled.
• Never short circuit the output leads / crocodile clamps and press the RUN button.
• Do not attempt to use the device if it has been dropped or damaged.
• Do not attempt to use the device if the cables or plugs are damaged.
• If battery acid contacts your skin or clothing, wash immediately with soap and water. If acid enters your
eye, immediately ush the eye with running cold water for at least 10 minutes and seek medical attention.
Someone should always be within range of your voice.
• Never attempt to use this device on a damaged battery, frozen battery or non rechargeable battery.
• Never place the device on the battery or near any moving parts.
• When working with lead-acid batteries, remove personal metal items such as rings, bracelets, necklaces,
watches and make sure you don’t short circuit the battery terminals with any type of metal tool or piece of
jewellery as this will cause an explosion. You can wrap your spanner with insulation tape to minimise the
risk of a short circuit.
• NEVER smoke, use an open ame or create sparks near a battery or this device during operation as this
may cause an explosion and explosive gases.
• Do not disassemble the device. Take it to a qualied and authorised person for repair.
• The device must not be used or played with by inrm persons or children. Also keep it away from any
pets.
ENGINE TYPES & CAPACITY:
The OC-RM750 has been designed for use in automotive and marine applications with petrol/gas-
oline engines up to 8.0 litres. This should be used as a general guide only as all vehicles are dierent
and require dierent amounts of starting current to start. Note: This device may not work on Diesel
vehicles due to longer cranking times required to start Diesel engines and the amount of power
required to heat up the glow plugs on older vehicles.
WHAT’S INCLUDED:
Main unit
Micro USB charge cable
Cigarette lighter plug charge cable
Carry / storage bag
Operating instructions

2 • Oz Charge manual www.ozcharge.com.au
TECHNICAL SPECIFICATIONS:
Model Number OC-RM750
Output 12V DC / 750A Max.
Input Voltage 3V - 15.5V
USB Input 5V / 2A Max.
DC Input 12V / 10A Max.
Charge Time - 12V Battery 90 Seconds *
Charge Time - DC Input 180 Seconds *
Charge Time - USB Input 25 Minutes *
Output Leads Length 300 mm / 11.8 in - 6AWG
Operating Temperature -40 to 65 C° / -40 to 149 F°
Operating Humidity 90% RH Max.
IP Rating IP52
Size (L*W*H) 318 x 104 x 55 mm / 12.52 x 4.1 x 2.17 in
Weight 1.5 kg / 3.3 lbs
Approvals CE, FCC, EMC / EN55032 EN55024 / AS/NZS CISPR 22
* Charge times can vary depending on the devices current charge status and the condition
of the battery or power source being used to charge the device.
INPUTS / OUTPUTS:
1) DC Input - Charge from a DC Power Source/12V outlet (Cigarette lighter socket)
2) USB Input - Charge from a USB power source. Portable power bank or USB wall socket
3) Battery Input / Output - Connect the crocodile clips to vehicles 12V Battery to charge
and/or jump start.
4) Buzzer - Sounds when outputting. 1 2
3
4

3 • Oz Charge manual www.ozcharge.com.au
HOW IT WORKS?
This device must be charged before each use and in most cases can be charged up from your
vehicles existing at battery as it contains a built in converter circuit which allows the device to be
charged up from a at battery providing it’s at least 3 Volts. If your vehicles at battery is below 3V
then you’ll need to use another vehicles battery / power source or use the USB input to charge up
the device.
STEP 1 - CHARGING THE DEVICE
12 Volt Battery in a vehicle - Connect the Red clamp to the Positive (+) battery terminal and the
Black Negative (-) clamp to the vehicles chassis if it’s a negatively earthed vehicle.
Refer to diagrams below. Note: If the battery is not located under the bonnet, connect the device
to the vehicles Positive (+) and Negative (-) jump starter connection points. Refer to vehicles hand-
book for connection details.
DC Input / Cigarette lighter charge lead - Connect the supplied cigarette lighter charge lead to
the devices DC input then connect the cigarette lighter plug to a 12V outlet.
USB - Connect the supplied Micro USB cable to the USB input on the device, then connect it to a
USB power source.
The device will automatically start charging as soon as an input is connected, the units LCD will illu-
minate and it will display the device voltage and the charging blue LED will be on. Once the device
is fully charged, the LCD will display Ready to Use and the Green Full / Ready LED will ash.
STEP 2 - STARTING YOUR VEHICLE
a) Connect the Red Clamp to the Positive (+) battery terminal and the Black Negative (-) clamp to
the vehicles chassis if it’s a negatively earthed vehicle. (If you’ve charged this device o your vehi-
cles at battery, leave the Clamps connected)
b) Now press the RUN button. A timer will count down from 10, 9 ... ... 4, 3, 2, 1, RUN. During this
countdown you should position yourself so that you are accessible to the vehicle’s ignition. Once
the countdown concludes and“RUN”is displayed on-screen the buzzer will sound. Once hearing
the buzzer you should crank the vehicle immediately. WARNING: Only press the RUN button once
both clamps are connected to your battery. (Please ensure your radio, heater, air conditioner, head-
lights are switched o before starting). Once the vehicle has started the device will automatically
disable RUN mode and start recharging the device. NEVER DISCONNECT THE DEVICE WHILE IN RUN
MODE AS ALL SAFETY PROTECTION IS DISABLED.
When safe to do so, (Blue Charging LED Flashing or Green Ready to Use LED ashing) disconnect
the Black then Red Clamps from your battery.
If your vehicle fails to start, please disconnect the device, wait 5 minutes and repeat Steps 1 and 2.
Charging Full /
Ready
RUN
RESCUE MATE
12 Volt 750 Amp Max.
Super Safe Jump Starter
Model: OC-RM750 Model: OC-RM750
RED BLACK
CONNECTION IN VEHICLE
(NEGATIVELY EARTHED)
Model:OC-RM750 RED
BLACK
CONNECTION IN VEHICLE
(POSITIVELY EARTHED)
Model:OC-RM750

4 • Oz Charge manual www.ozcharge.com.au
LED / LCD STATUS INDICATOR TABLE:
RUN Button:
The RUN button can be pressed once to activate RUN
mode once the device is fully charged and Ready To Use.
If RUN mode is activated, you can press the RUN button
again to stop RUN mode.
Pressing and holding the RUN button when the device is
Ready To Use will extend the start delay time up to 120
Seconds. The default start delay is 10 seconds.
If the device is not connected to any battery or input, press
and hold the RUN button for 1 second to turn the LCD on.
Note: The LCD will only turn on and display the devices
voltage if the voltage is over 10 Volts.
Battery Bypass Mode: If the battery has been removed/
bypassed or the battery voltage is below 1V, you’ll need
to press and hold the RUN button for 3 seconds. All Safety
protection is disabled so please ensure you have made the
right connections.
LED Status Description
Charging LED
Blue ON The Charging LED will illuminate blue while the device is being charged
Full / Ready LED
Green Flash The Full/Ready LED will ash green to indicates the device is charged and ready
to use. READY TO USE will also be scrolling across the LCD.
Green ON Indicates the unit is in RUN mode (outputting power). During RUN mode all
safety protection is DISABLED. Do not short circuit or make a reverse polarity
connection while in RUN mode. RUN mode will time out after 30 seconds or you
can press the RUN button to stop RUN mode.
Note: If both the Charging and Full/Ready LED are OFF, this indicates no charge input has been detected.
LCD Status Description
LCD ERR If the LCD displays ERR, this means the leads were connected reverse polarity.
LCD ERR ERR NO BATT. PRESS RUN TO BYPASS. This means no battery has been
detected, the output leads or battery is shorted, or the battery voltage is below
1V. If you wish to proceed, you need to press and hold the RUN button for 3
seconds until the countdown timer starts. All Safety protection is disabled.
LCD RUN If the LCD displays RUN and the devices voltage, the device is outputting power
LCD CAR If the LCD displays CAR then a voltage, this is the voltage of the vehicles battery
LCD USB If the LCD displays USB then a voltage, this is the voltage of the USB input source.
LCD DC I If the LCD displays DC I then a voltage, this is the voltage of the DC input source
LCD READY
TO USE
If the LCD displays READY TO USE, the device is charged and ready to go.
Note: If the devices voltage is under 10V, the unit / LCD will not turn on until you charge the device.
Charging Full /
Ready
RUN
RESCUE MATE
12 Volt 750 Amp Max.
Super Safe Jump Starter
Model: OC-RM750
Model: OC-RM750
RED BLACK
CONNECTION IN VEHICLE
(NEGATIVELY EARTHED)
Model: OC-RM750 RED
BLACK
CONNECTION IN VEHICLE
(POSITIVELY EARTHED)
Model: OC-RM750

5 • Oz Charge manual www.ozcharge.com.au
TROUBLE SHOOTING:
Problem Indication Possible Causes Suggested Solution
Device will not turn ON The LED’s and LCD
is OFF.
- The Capacitor Voltage is
below 10V
- No input has been
detected.
- Connect a power source to one of the 3
inputs to start charging the device.
- Check all input connections and make
sure it’s not connected Reverse Polarity.
An Error is displayed on
the LCD
ERR is displayed on
the LCD
- The crocodile clip
output leads are
connected reverse
polarity.
- No Battery Detected,
battery voltage below 1V,
battery or output leads
short circuit.
- Check the connections of the crocodile
clip output leads and connect them to the
correct polarity.
- Check the device is connected to the
battery correctly. If the battery has been
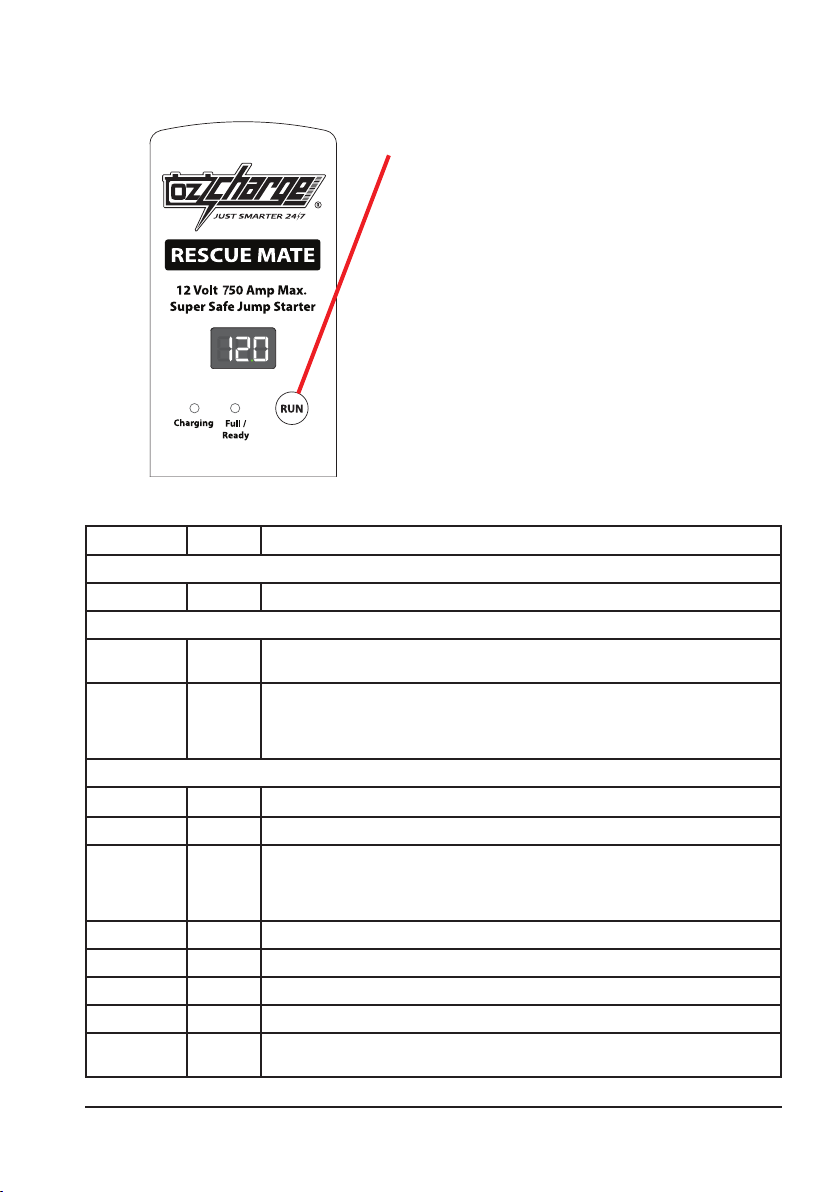
bypassed, you’ll need to Press and hold
the RUN button for 3 seconds until the
countdown timer appears.
The device will not start
my vehicle?
RUN mode times
out.
- Accessories such as a
heater, air conditioner or
headlights are draining
all the power from the
device before you have
a chance to start the
vehicle.
- The vehicle requires
more power to start than
the device can supply.
- Try charging the device again, ensure all
accessories such as heater, air conditioner,
radio, headlights are turned o. Press the
RUN button and try and start your vehicle
again.
- Ensure the clamps have a solid
connection and try starting the vehicle
again.
The device will not charge
of my vehicles at battery?
Charging light is
ON then turns o
while charging.
- Vehicle battery has
no capacity and has
dropped below 3V while
charging the device.
- Charge the device from another vehicles
battery or use the USB input or DC input
and charge the device from another
power source.
F.A.Q.:
How long will the device hold charge for?
As the device doesn’t contain any batteries and uses Super Capacitors to hold charge, the
capacitors will slowly discharge over time. Once fully charged, the device can hold charge up to a
few days before it requires charging. For best performance, please ensure the unit is fully charged
to 13.8V before using.
How many times can a fully charged unit start my vehicle?
This device is designed for a single start only. To start a vehicle, it will drain nearly all power stored
in the device so it will need to be recharged before attempting to start another vehicle.
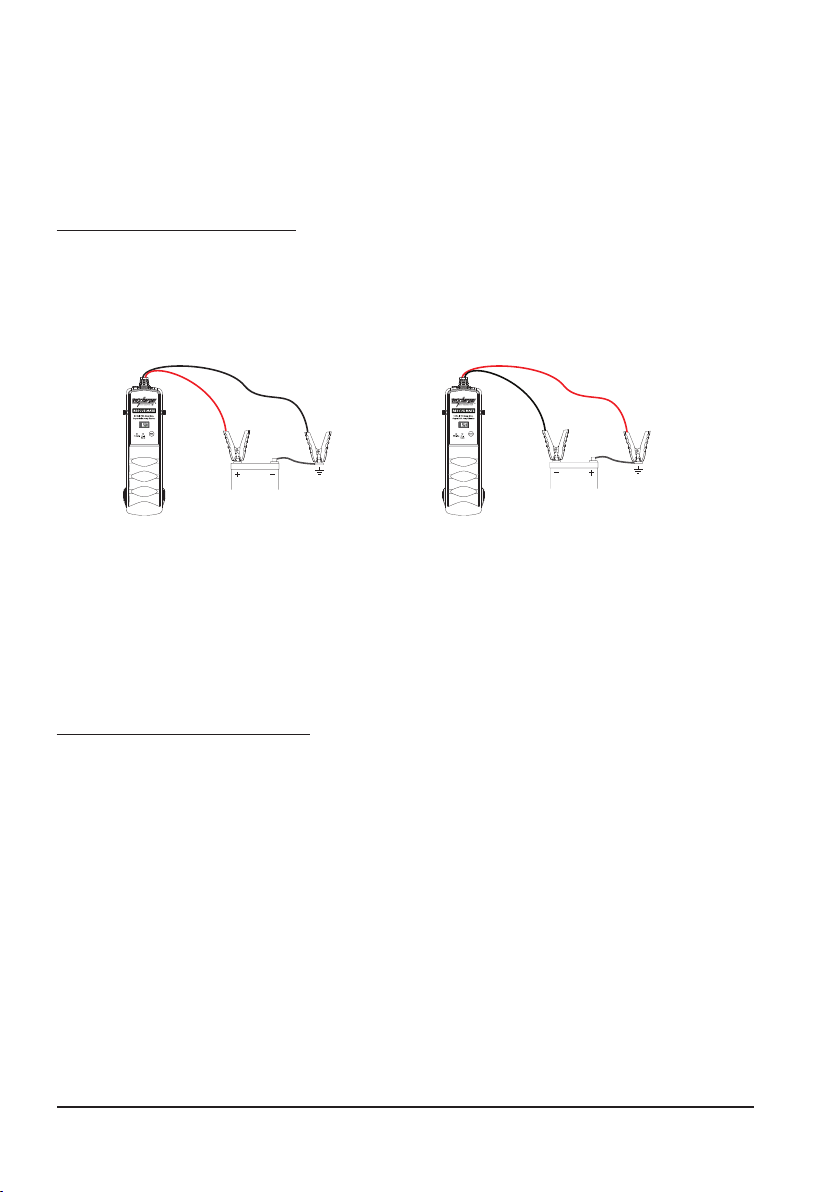
What if my vehicle doesn’t start after several attempts?
In some cases your vehicles battery might be too damaged to jump start (internal short
or severely sulphated). In this case you may bypass the vehicles battery if safe to do so by
disconnecting the vehicles negative battery terminal lead and then connect the device if Ready
To Use by connecting the Red Positive (+) Clamp rst directly to the Positive battery post/
terminal and then the Black Negative (-) Clamp directly to the Negative wire/terminal which was
disconnected from the battery. IMPORTANT NOTE: When bypassing the battery, there will
be no Short Circuit Protection. You’ll also need to press and Hold the RUN button for 3
seconds to enter bypass mode.
Note: Please consult your vehicles handbook before disconnecting the battery.

6 • Oz Charge manual www.ozcharge.com.au
3 YEAR PRODUCT WARRANTY:
Zylux Distribution Pty. Ltd. (ABN 66 101 378 009) of 166 Christmas Street, Faireld, Victoria,
3078, Australia warrants to the Customer that this product is substantially free from defects
in materials and workmanship under normal use for a period of Three (3) Years from the Date
of Purchase. Please ensure you keep a copy of your purchase receipt on le as this will be
required to validate your warranty.
Obtaining Warranty Service:
Within the warranty period, the Customer must contact the authorised supplier / retailer
where the product was purchased or alternatively you can contact the Oz Charge service
centre through one of the following methods:
Service help phone: Within Australia (03) 9482 2203
Outside of Australia: +61 3 9482 2203
Website: www.ozcharge.com.au / www.ozcharge.co.nz / www.ozcharge.com
If the Authorised Supplier and / or Oz Charge service centre concludes that while under
normal use, a product failure or malfunction occurred during the warranty period and was
caused by a defect in material or workmanship (see Exclusions), the Customer will be asked
to ship to the nearest service point for repair or replacement, at our discretion. The prod-
uct must be packaged appropriately for safe shipment. To prove that the product is under
warranty, the customer should enclose a copy of their receipt for proof of purchase. It is
recommended that returned products be sent by registered mail as Zylux Distribution Pty.
Ltd. (Oz Charge) accepts no responsibility / liability for goods lost or damaged in transit.
Exclusions:
If upon receiving a product for repair and if testing and examining the product has disclosed
that the alleged defect or malfunction in the product does not exist or was caused by the
Customer or any third persons misuse, neglect, physical abuse, water damage, unauthorised
attempts to open, exposure to extremely high temperatures, tampered with or repaired
by an unauthorised persons, this will not be covered under this warranty. Also charges may
apply to any product returned which has no fault found or if the warranty has expired or
been void.
This Warranty is also void if:
1. The warranty seal is broken or altered.
2. The warranty period has expired.
3. The product has been tampered with or repaired by an unauthorised person.
4. If the product has been dropped or damaged due to impact.
Our goods come with guarantees that cannot be excluded under the Australian Consumer
Law. You are entitled to a replacement or refund for a major failure and compensation for
any other reasonably foreseeable loss or damage. You are also entitled to have the goods
repaired or replaced if the goods fail to be of acceptable quality and the failure does not
amount to a major failure. For New Zealand customers, this warranty is in addition to statu-
tory rights observed under New Zealand legislation.
For all other countries, please visit www.ozcharge.com for details regarding obtaining war-
ranty service.

OC-RM750 Owner’s Manual: Rev 1.0 - 08/18 - Specications subject to change without notice.
PATENT - AUS2016102104 / USA PATENT PENDING
Charging Full /
Ready
RUN
RESCUE MATE
12 Volt 500 Amp Max.
Super Safe Jump Starter
Model: OC-KANGA 12-500
RED BLACK
CONNECTION IN VEHICLE
(NEGATIVELY EARTHED)
RED
BLACK
CONNECTION IN VEHICLE
(POSITIVELY EARTHED)
Table of contents
Other OzCharge Remote Starter manuals