P Tec Pilatus User manual

P TEC
PILATUS
User Manual
Thank you very much for buying the Pilatus. In order to let you freely
operate the product and fully enjoy the overbalancing happiness it
brings you, we have introduced each function of the player in detail in
this user manual. Please carefully read this user manual before use and
keep for future reference.

Table of Contents
1. Network Requirement
2. Safety Precaution
3. Appearance and Key Description
4. Getting Started
5. Pilatus Functions
5.1 Main Menu
5.2 System Settings
5.3 Internet Radio
5.4 Spotify Connect
5.5 Music Player
5.6 DMR (DLNA streaming)
5.7 DAB
5.8 FM
5.9 Bluetooth
5.10 CD
5.11 AUX IN
5.12 Sleep
5.13 Alarm
5.14 Extra Features
6. Troubleshooting
7. Specifications

1. Network Requirement
•A broadband connection in combination with a wired/wireless access point,
router or similar network device.
•The network device needs to support Ethernet (LAN) wired connection or WiFi
(802.11 b/g/n) wireless connection.
•PC, tablet or smartphone with network connected. This network has to be the
same one as the Pilatus equipped with.
2. Safety Precaution
General
•Do not drop the Pilatus and do not expose it to liquid, moisture or humidity.
These might lead to damage to the device.
•If the Pilatus is moved from a cold environment into a warmer one, do let it
adapt to the new temperature before operate the device. Otherwise, it might
lead to condensation and cause malfunctions in the device.
•Do not use the Pilatus in the dust environment as dust can damage the interior
electronic components and lead to malfunctions in the device.
•Protect the Pilatus from strong vibrations and place it on stable surfaces.
•Do not attempt to disassembly the Pilatus.
•If the Pilatus is not using for a long period of time, disconnect it from the power
supply by unplugging the power plug. This is to avoid the risk of fire.
Power adapter
•Only use the power adaptor delivered with the Pilatus.
•The socket outlet should be installed near the Pilatus
and should be easily accessible.

•Never touch the power plug with wet hands and never pull on the power cable
when pulling the plug out of the power socket.
•Make sure the electrical voltage specified on the Pilatus
and its power plug is corresponding to the voltage of the
power socket. Incorrect voltage will destroy the device.
Compact discs
•Use only Digital Audio CDs which have the symbol.
•DO NOT USE THESE TYPES OF DISC:
-Mini (8cm) CDs. Use only full-size 12cm discs. Mini CDs will jam the feed
mechanism.
-Discs which do not have a complete metallic reflection layer. Discs with a
large transparent section will not be detected and may fail to play or eject.
-Disc which are extra thin or flexible. Such discs may fail to feed in or out
correctly and may jam the CD mechanism.
•Never write on a CD or attach any sticker to the CD. Always hold the CD at the
edge and store it in its box after use with the label facing up.
•To remove dust and dirt, breathe on the CD and wipe it with a soft, lint free
cloth in a straight line from the centre towards the edge.
•Cleaning agents may damage the CD.
•Do not expose the CD to rain, moisture, sand or to excessive heat.
(e.g. from heating equipment or in motor cars parked in the sun).
Risks associated with high volumes

•While listening the Pilatus with headphones, always
reduce the volume before put on the headphones. After
the headphones are positioned properly, increase the
volume to the desired level.
Maintenance / cleaning
•Always power off the Pilatus when cleaning it.
•Never use any harsh or strong solvents to clean the Pilatus since these may
damage the surface of the device. Dry, soft cloth is appropriate, however, if the
Pilatus is extremely dirty, it may be wiped off with a slightly moist cloth. Make
sure the device is dried off after cleaning.
•When you are necessary to ship the Pilatus, store it in its original package. Save
the package for this purpose.
Disposal
•If have to dispose the device in the future, note that it should not
be disposed with household waste. Bring it to a reception point for
the recycling of electrical devices. Consult your local authority or
retailer for recycling advice.
3. Appearance and Key Descriptions
2
4
5
1
3
6

7
8
9
10
11
No.
Description
Functions
1
CD
Play CD
2
IR receiver
Receive infrared signal from remote
3
2.8”TFT Screen
Display
4
AUX
3.5mm jack for AUX IN
5
Earphone jack
3.5mm jack for headphone or earphone
6
Buttons and Reel
Basic control of operation
7
DAB/FM antenna
Strengthen the DAB/FM receiver
8
Power switch
Power on/off the internet radio
9
DC IN
Power supply
10
USB port
Plug the USB drive or MP3 player for music playback
11
“Software update
only” port
Update the software

Remote Controller
Open the battery compartment. Install the two
batteries AAA into the battery compartment,
taking care to insert it with the positive (+) on the
right place.
Risk of explosion if battery is
replaced by an incorrect type.
Dispose of used batteries according to the
instructions.
Warning
Do not ingest the battery, Chemical Burn Hazard
(The remote control supplied with) This product contains a battery. If the battery is
swallowed, it can cause severe internal burns in just 2 hours and can lead to death.
Keep new and used batteries away from children.
If the battery compartment does not close securely, stop using the product and keep
it away from children.
If you think batteries might have been swallowed or placed inside any part of the
body, seek immediate medical attention.
4. Getting Started
The items enclosed in the packaging box are as follows:
•Pilatus unit
•Power adaptor
•Audio cable with 3.5mm jack at both ends
•User manual

Connect the power adaptor to the back of Pilatus and plug it into power socket.
Get the network environment ready
•For wireless WiFi
Make sure you have setup the wireless network and you have the WEP, WPA or
WPA2 security password to activate the connection.
You may also use the WPS (WiFi Protected Setup) function for easy pairing
between the network device and Pilatus. Check if the light indicators on the
network device are in appropriate status.
Switch it on from Pilatus.
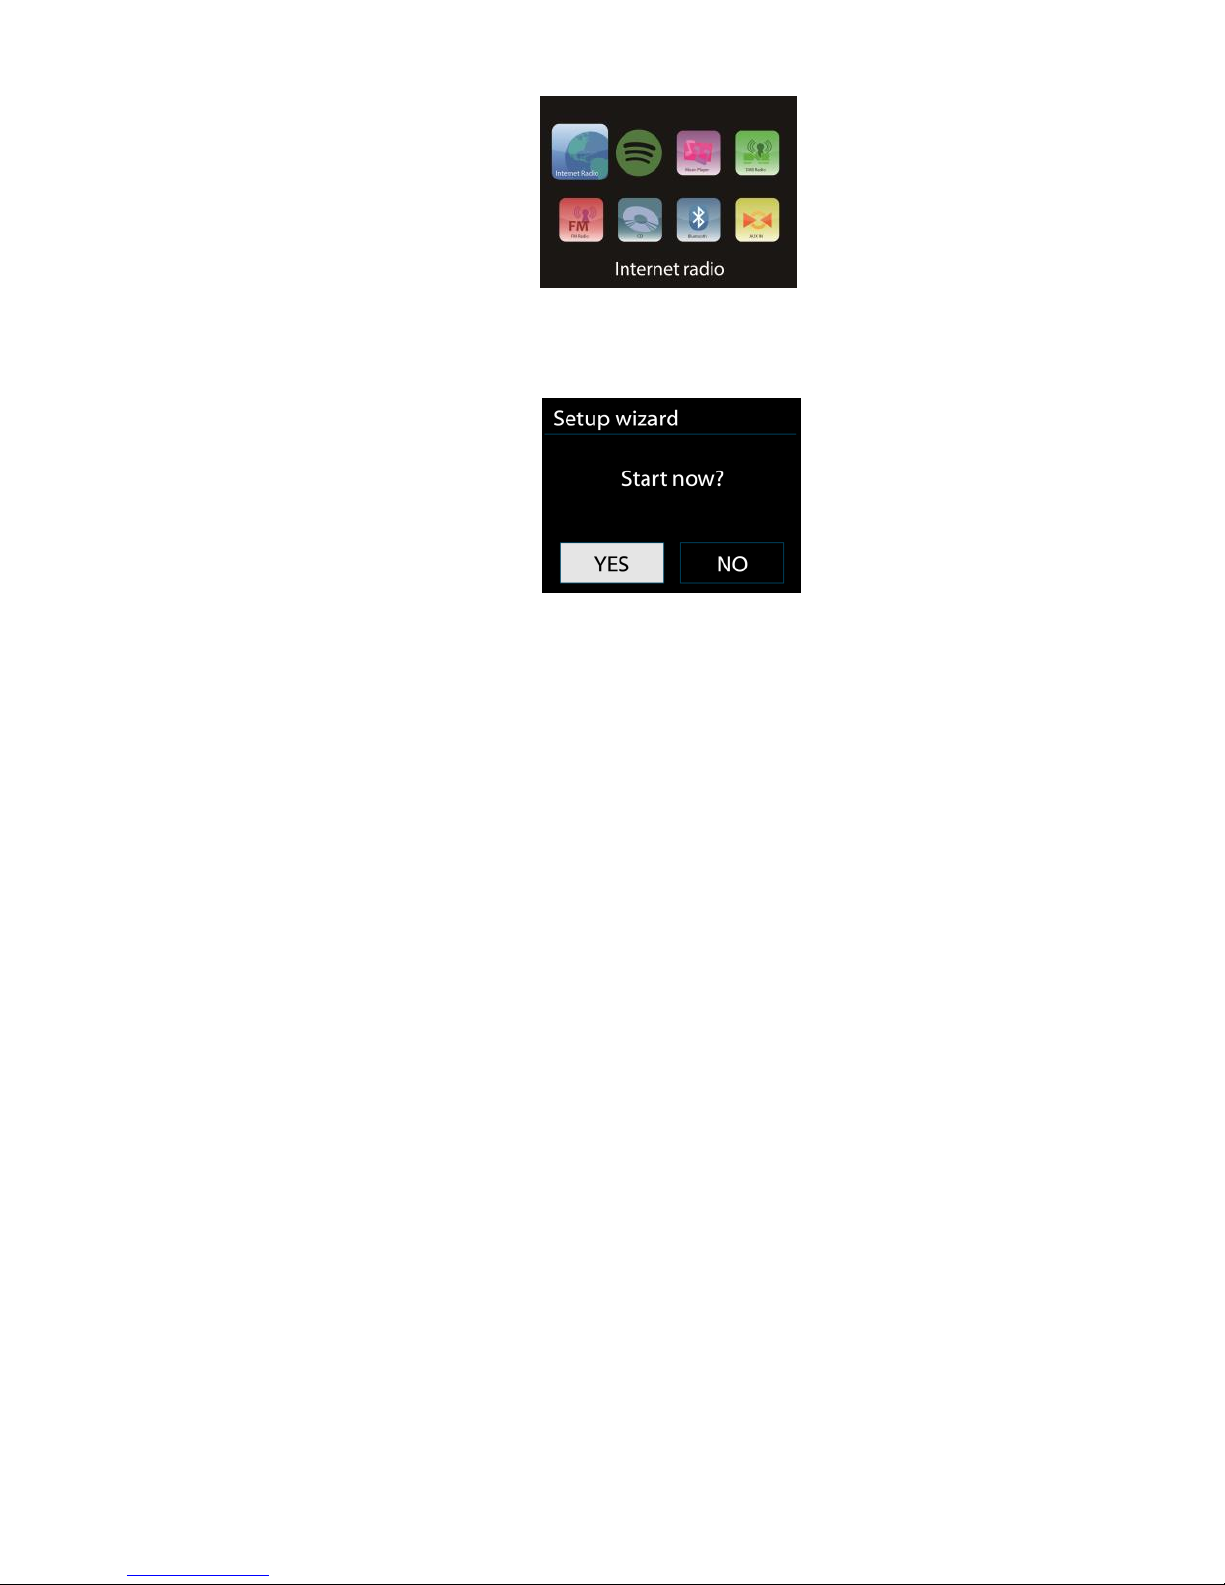
At the first time operation, system asks if you want to start the Setup Wizard. Select
YES to continue the setup. Details of the Setup Wizard can be referred to Section
5.2.1 below. After choosing NO, the next screen asks if you would like to run the
wizard next time Pilatus is started.
Pilatus will automatically connect to the network that was set before when power on
to Internet Radio again. In case you desire to change the network, enter System
Setting to configure the corresponding connection. Refer to Section 5.2.1 and 5.2.3.
Press and hold or press on the remote control to enter standby mode.
The time, date and any active alarm times display on the screen.
Rotate the reel or Press VOL+ / VOL- on the remote control to adjust the volume.
Rotate the volume reel or press VOL- until volume level becomes 0, or direct press
MUTE to mute the sound.
Music Sharing from PC
•To share the music files from PC, the following steps are done on the PC:
- Connect the PC to the network.
- Ensure Pilatus is powered on and connected to the same network.

- Open the UPnP platform Windows Media Player (11 or later).
Alternatively, other platforms or server such as Windows Media
Connection may be used.
- Allow to share your media to Pilatus XXXXXXXXXXXX, which is the device
name for music streaming.
- Add the audio files and folders you want to share with Pilatus to the
media library.
5. Pilatus Functions
5.1 Main Menu
Under the main menu, you can select the following modes: Internet Radio, Spotify
Connect, Media Player, DAB, FM, CD, Bluetooth, AUX IN, Sleep and Alarm.
Alternatively, press to enter main page, move to the mode by rotating the
reel or press or on the remote control.

5.2 System Settings
5.2.1 Setup Wizard
•Time/date
Display format
Select 12 or 24 as the time format.
Auto-update
The time and date can be updated manually or automatically from
DAB, FM or network.
Auto-update works with data sent over DAB, FM or the Internet. The
clock is only updated when in a corresponding mode, so it is best to select
a mode you use regularly.
DAB and FM use time signals broadcast with radio transmissions.
Network uses a time signal sent from the Internet radio portal when in any
network-connected mode.
Time zone, daylight
Set your time zone. If you country uses daylight saving and it is in
effect, turn on the Daylight savings option.
Manual update
If you set No update, the wizard prompts you to set the time and
date manually. The date and time are displayed as dd-mm-yyyy and
hh:mm.

The active value appears as flashing. Adjust each value with the
navigate reel or / on the remote control. Once the value is set, press
the reel or ENTER (SCAN) on the remote control to continue setting with
next value.
•Network
Wlan region
Select the Wlan region to obtain the optimal Wlan connectivity:
Europe, Canada, Spain, France, Japan, Singapore, Australia, and Republic of
Korea.
Scanning for the network
Pilatus is compatible with all common network protocols and
encryption methods. It searches for the available networks and list them
out for you choose.
There will be hints for the type of network –if your network device
supports WPS function, it will be [WPS] before the SSID (the name of
network device). Select the one you want to connect.
For the wireless connection, you will be asked for input encryption in
the next step.
Standard encrypted network
To enter the network’s key, use the navigate reel or direction keys on
the remote control to move the cursor through the characters and press
the reel or ENTER (SCAN) on the remote control to confirm. As each
character is selected, the key is built up near the top of the display.
There are three options accessible by tuning the navigate reel back
before the first characters –Backspace, OK and Cancel.

WPS encrypted network
WPS encrypted networks are identified by WPS at the start of the
network name when the Pilatus searches the available AP. Use one of the
following methods of connection:
oPush button
Pilatus prompts you to press the connect button on the router. It
then scans for a ready Push Button Connect network and connects.
oPin
Pilatus generates an 8-digit code number which you enter into the
wireless router, access point, or an external registrar.
oSkip WPS
Enter key as for a standard encrypted network.
For more information on setting up a WPS encrypted network, see
your WPS router’s instructions.
•Completion
Pilatus attempts to connect to the selected network.
It will show connected if the setup is successful. If connecting fails, Pilatus
returns to a previous screen to try again.

Press the reel or ENTER (SCAN) on the remote control to quit the setup
wizard.
5.2.2 Equaliser
Several preset EQ modes are available: Normal, Flat, Jazz, Rock, Movie,
Classic, Pop and News.
Also a user-defined setting is available; create your own EQ with custom bass,
treble settings.
5.2.3 Network
•Network wizard
Enter to search AP SSID, then input the WEP / WPA key or
choose Push Button/Pin/Skip WPS to connect to the wireless
network.
•PBC Wlan setup
Push Button Configuration, it is to connect the AP that
supports WPS (Wi-Fi Protected Setup).
•View settings
View the information of current connected network: Active
connection, MAC address, Wlan region, DHCP, SSID, IP address,
Subnet mask, Gateway address, Primary DNS and Secondary DNS.
•Wlan region
Select the Wlan region to obtain the optimal Wlan
connectivity: Europe, Canada, Spain, France, Japan, Singapore,

Australia, and Republic of Korea.
•Manual settings
Choose wired or wireless network connection and enable or
disable DHCP (Dynamic Host Configuration Protocol).
•Network profile
Pilatus remembers the last four wireless networks it has
connected to, and automatically tries to connect to whichever one
of them it can find.
From here you can see the list of registered networks. You can
delete unwanted networks by turning and pressing the reel or
on the remote control then choosing YES to confirm
delete.
•Keep network connected
If you choose to keep network connected, the WiFi will not disconnect even
you are in standby mode. Otherwise, the connection will only available. This
option allows Pilatus to be ready for DLNA streaming in any operating modes.
Details for DLNA streaming, refer to Section 5.6.
5.2.4 Time/Date
Set the time manually or auto update, time format, time zone and daylight.
5.2.5 Language
The default language is English. Change it as your preference.
5.2.6 Factory reset
A factory reset resets all user settings to default values, so that time and
date, network configuration and presets are lost. However, the Pilatus’s
current software version is maintained, as is registration with the Internet
radio portal. Internet radio favourites therefore remain unless you re-register
your Pilatus with another account on the portal website.
5.2.7 Software update
From time to time, software upgrades may be created with bug fixes and/or

additional features. You can either check manually or set Pilatus to check
periodically automatically (this is the default). If newer available software is
detected, you will be asked if you want to go ahead with an update. If you
agree, the new software is then downloaded and installed. After a software
upgrade, all user settings are maintained.
NOTE: Before starting a software upgrade, ensure that Pilatus is plugged into
a stable main power connection. Disconnecting power during an upgrade
may permanently damage the unit.
5.2.8 Info
View the firmware version and the radio ID.
5.2.9 Backlight
You may change the backlight of each environment (power on or standby) to
High, Medium or Low. And adjust the timeout duration which the radio turns
to standby backlight level when it has not been controlled.
5.3 Internet Radio
Pilatus can play thousands of radio stations and podcasts from around the world
though a broadband Internet connection.
When you select Internet radio, Pilatus directly contacts the Frontier Silicon Internet
radio portal (which is supported by v-tuner) to get a list of stations.
The portal also enables multiple lists of favourite stations that you can personalize.
If you are already listening to an Internet radio station, you can press or
on the remote control to quickly return to the last visited branch of the menu
tree, rather than press and hold to go to the first menu of Internet radio
mode.
Press to pause playing. Press again to play the station.

5.3.1 Last listened
When Internet radio mode restarts, the last-listened station is selected. To
select another recently used station, enter here to select the listed station.
Most recent stations appear at the top of the list.
5.3.2 Station list
Browse Internet broadcasts that organized into different categories, Location,
Genre, Popular and New. You can also find the station with Search by
keyword.
5.3.3 Favourites
Favourites are stored with the Internet radio portal, and are available
through all Internet radios registered on the same account. Before favourites
can be used, the radio has to be registered with the Internet radio portal.
To register your Pilatus, choose Station list > Help > Get access code to get
your radio’s unique portal access code first. (Do not confuse the portal
access code with the Radio ID from System settings.
Visit the portal website at www.wifiradio-frontier.com
If this is your first visit to the portal, register for a new account, entering the
following information:
oaccess code,
oyour e-mail address,

opassword,
oradio model.
o
If you already have an account and wish to add an additional radio, log in to
your account and select My preferences > Add another Wi-Fi radio.
Once your radio is registered with the portal, you can immediately use the
Internet radio favourites and added stations features.
To store a playing station as a favourite, press and hold the reel or
on the remote control until the display shows ‘Favourite added’. The
station appears in the default favourites list Stations.
5.3.4 My added stations
Even though the Internet radio portal contains thousands of stations, you
may want to listen to stations not listed. You can add your own via the
portal.
5.3.5 Presets
Presets are stored in the radio and cannot be accessed from other radios.
To store an Internet radio preset, press and hold until the display shows
the Save preset screen. Select one of the 10 presets to save the currently
playing station.
To select a preset, press , then select one of the listed preset stations.
When a preset station is playing, it shows n( 1, 2 etc) at the bottom
of the screen.
to on the remote control are for the use of preset station 1-10.
5.3.6 Now playing information
While the stream is playing, the screen shows its name and description. To
view further information, press .
Each time you press , another set of information is displayed,
cycle through name/description, genre/location, reliability, codec/sampling
rate, playback buffer and today’s date.
5.4 Spotify Connect

Using This Device With Spotify Connect
A better way to listen at home
Spotify Connect lets you play Spotify through your home speakers or TV, using
the Spotify app as remote.
You’ll need Spotify Premium to use Connect – see details overleaf.
Step 1. Add your device to your wifi network (see product user instructions for
details).
Step 2. Fire up the Spotify app on your phone, tablet or PC using the same wifi
network as above.
Step 3. Play a song on Spotify and hit ‘DEVICES AVAILABLE’.
Step 4. Choose your device and your music will start playing out loud.
For more information on how to set up and use Spotify Connect please visit
www.spotify.com/connect
Licenses
The Spotify Software is subject to third party licenses found here:
http://www.spotify.com/connect/third-party-licenses
5.5 Media Player
Music player mode plays audio files in MP3, WMA, WAV, AAC or FLAC format from a
computer on the local network.
If you are already playing a music file, you can press or on the remote
control rather than press and hold to quickly return to the last visited
branch of the menu tree.
You can use or to play the previous or next track, press and hold to

rewind or fast forward. Press to play or pause. Press to stop playback and
return to the song list.
5.5.1 Shared media
It you have set up shared media, you should see an entry consisting of
<computer name>: <Shared media name>. If you have more than one
computer sharing media, the alternatives are listed. Select the shared media
you want to play.
From this point on, the menus are generated from the shared media server.
The first menu shows a list of media types, for example Music, Video,
Pictures and Playlists. Pilatus can only play music and playlists.
There is also a search function which finds tracks in a similar way to Internet
radio search.
From Music, there are numerous ways of selecting tracks including Genre,
Artist, Album, Composer and Rating.
Once you have found a track you want to play, press the reel or on
the remote control. A short press plays the track immediately.
5.5.2 USB playback
From this point on, menus are generated from the folders on the USB device.
Browse folders with the navigate reel and button, or direction keys
on the remote control. The display shows folder and file names (not
necessarily track names).
Once you have found a track you want to play, press the reel or ENTER (SCAN)
on the remote control. A short press plays the track immediately.

5.5.3 Repeat/shuffle
You can set to repeat tracks or play them in random order. Press
REPEAT/RANDOM on the remote control to turn on/off the repeat
function.
Press and hold REPEAT/RANDOM to turn on/off the random function.
5.5.4 Now playing information
While a track is playing, the screen shows its track and artist. There is also a
progress bar with figures for elapsed and total track time. At the bottom of
the screen, an icon indicates UPnP or USB depending on the source. To view
further information, press .
Each time you press , another set of information is displayed,
cycling through the information:
track/artist/progress bar/track times, album, codec/sampling rate,
playback buffer and today’s date.
Album cover of the track from music server is supported, while album cover
from USB is unsupported.
5.6 DMR (DLNA Streaming)
Shared music in Section 5.5.1 is a way of music streaming which you look for the
music list and control playback from Pilatus. This topic will introduce another way to
do the music streaming which is not necessary to control playback on Pilatus.
You can share the music files from PC, Android mobile or tablet, and directly use your
PC, Android mobile, tablet or iPhone / iPad to control music playback on the Pilatus.
It is simple called DLNA streaming.
5.6.1 Control on PC
The PC system requirements for DLNA are Windows 7 and Windows Media
Player 12. Setup as below:
Table of contents