Pana-Pacific TRP Radio TR0004 User manual

Brought to market by Pana-Pacific, Inc.
TR0004
CD-RECEIVER
INSTRUCTION MANUAL
AUTORADIO CD
MODE D’EMPLOI
RECEPTOR CD
MANUAL DE INSTRUCCIONES
TRP RADIO - TR0004

2ENGLISH
Contents
Before Use................................................................................................. 3
Basics ......................................................................................................... 4
Getting Started ........................................................................................ 5
1 Set the clock and date
2 Set the other optional settings
Radio .......................................................................................................... 7
CD/USB/iPod ............................................................................................ 8
AUX........................................................................................................... 11
Audio Settings ........................................................................................ 11
Display Settings ..................................................................................... 13
Installation/Connection ....................................................................... 14
References .............................................................................................. 16
More information
Change the display information
Troubleshooting.................................................................................... 17
Specifications ......................................................................................... 19
How to read this manual
• The displays and faceplates shown in this manual are examples used to
provide clear explanations of the operations. For this reason, they may
be different from the actual displays or faceplates.
• Operations are explained mainly using buttons on the faceplate.
• English indications are used for the purpose of explanation. You can
select the display language from the
[FUNCTION]
menu. (Page6)
•
[XX]
indicates the selected items.
• (PageXX) indicates references are available on the stated page.
This symbol on the product means there are important
operating and maintenance instructions in this manual.
Be sure to carefully read instructions in this manual.

ENGLISH 3
Before Use
IMPORTANT
• To ensure proper use, please read through this manual before using this
product. It is especially important that you read and observe Warnings and
Cautions in this manual.
WARNING
•Do not operate any function that takes your attention away from safe
driving.
• Do not ingest the battery, Chemical Burn Hazard
The remote control supplied with this product contains a coin/button cell
battery.
If the coin/button cell battery is swallowed, it can cause severe internal
burns in just 2 hours and can lead to death.
Keep new and used batteries away from children.
If the battery compartment does not close securely, stop using the
product and keep it away from children.
If you think batteries might have been swallowed or placed inside any part
of the body, seek immediate medical attention.
CAUTION
Volume setting:
• Adjust the volume so that you can hear sounds outside the vehicle to
prevent accidents.
• Lower the volume before playing digital sources to avoid damaging the
speakers by the sudden increase of the output level.
General:
• Avoid using the external device if it might hinder safe driving.
• Make sure all important data has been backed up. We shall bear no
responsibility for any loss of recorded data.
• Never put or leave any metallic objects (such as coins or metal tools) inside
the unit to prevent a short circuit.
Remote control (RC-406):
• Do not leave the remote control in hot places such as on the dashboard.
• Risk of fire or explosion if the battery is replaced by an incorrect type.
Ensure to replace only with the same type.
• Risk of fire, explosion or the leakage of flammable liquid or gas if the
battery is left in an extremely high temperature surrounding environment
and/or subjected extremely low air pressure. The battery pack or batteries
shall not be exposed to excessive heat such as sunshine, fire or the like.
• Risk of fire, explosion or the leakage of flammable liquid or gas if the
battery is disposed into fire or a hot oven, recharged, shorted, mechanically
crushed or cut of the battery.
• If spilled fluid comes in contact with your eyes or on clothing, immediately
rinse with water and consult a physician.

4ENGLISH
To On the faceplate
Turn on the power Press BSRC.
• Press and hold to turn off the power.
Adjust the volume Turn the volume knob.
Select a source Press BSRC repeatedly.
Change the display information Press DISP repeatedly. (Page17)
Faceplate
Basics
* Only for illustration purpose.
Display window*
Volume knob Loading slot

ENGLISH 5
Remote control (RC-406)
Remote sensor (Do not expose to bright
sunlight.)
Pull out the insulation sheet
when using for the first time.
* Not used.
Basics Getting Started
1 Set the clock and date
1 Press the volume knob to enter
[FUNCTION]
.
2 Turn the volume knob to select
[CLOCK]
, then press the knob.
To adjust the clock
3 Turn the volume knob to select
[CLOCKADJUST]
, then press the knob.
4 Turn the volume knob to make the settings, then press the knob.
Set the time in the order of “Hour” “Minute”.
5 Turn the volume knob to select
[CLOCK FORMAT]
, then press the knob.
6 Turn the volume knob to select
[12H]
or
[24H]
, then press the knob.
To set the date
7 Turn the volume knob to select
[DATEFORMAT]
, then press the knob.
8 Turn the volume knob to select
[DD/MM/YY]
or
[MM/DD/YY]
, then press
the knob.
9 Turn the volume knob to select
[DATESET]
, then press the knob.
10 Turn the volume knob to make the settings, then press the knob.
Set the date in the order of “Day” “Month” “Year” or “Month” “Day”
“Year”.
11 Press and hold to exit.
To return to the previous setting item, press .
How to replace the battery
To On the remote control
Adjust the volume Press VOL or VOL .
• Press and hold VOL to continuously increase
the volume to 15.
Press ATT during playback to attenuate the sound.
• Press again to cancel.
Select a source Press SRC repeatedly.
Turn off the power Press and hold SRC to turn off the power.
( Pressing SRC does not turn on the power. )

6ENGLISH
Getting Started
[SOURCE SELECT]
[BUILT-IN AUX] [ON]: Enables AUX in source selection. ; [OFF]: Disables. (Page 11)
[CD READ] [1]: Automatically distinguishes between audio file disc and music CD. ;
[2]: Forces to play as a music CD. No sound can be heard if an audio file
disc is played.
[F/W UPDATE]
[UPDATE SYSTEM]
[F/W UP xxxx] (This feature is not available for this model.)
[YES]: Starts upgrading the firmware. ; [NO]: Cancels (upgrading is not
activated).
•
Once you have upgraded the firmware, you are unable to downgrade the
firmware.
[ENGLISH] Select the display language for [FUNCTION] menu and music information
if applicable.
By default, [ENGLISH] is selected.
[ESPANOL]
2 Set the other optional settings
You can only set the following items while the unit is in STANDBY source.
1 Press BSRC repeatedly to enter STANDBY.
2 Press the volume knob to enter
[FUNCTION]
.
3 Turn the volume knob to select an item (see the following table), then
press the knob.
4 Repeat step 3 until the desired item is selected or activated.
5 Press and hold to exit.
To return to the previous setting item, press .
Default: [XX]
[AUDIO CONTROL]
[SWITCH PREOUT] [REAR]/[SUB-W]: Selects whether rear speakers or a subwoofer are
connected to the line out terminals on the rear (through an external
amplifier). (Page 1
5
)
[SP SELECT] [OFF]/[5/4]/[6*9/6]/[OEM]: Selects according to the speaker size
(5 inches or 4 inches, 6×9 inches or 6 inches) or OEM speakers for optimum
performance.
[TUNER SETTING]
[PRESET TYPE] [NORMAL]: Memorizes one station for each preset button in each band
(FM1/FM2/FM3/AM). ; [MIX]: Memorizes one station for each preset
button, regardless of the selected band.
[SYSTEM]
[KEY BEEP] [ON]: Activates the keypress tone. ; [OFF]: Deactivates.

ENGLISH 7
Radio
“ST” indicator lights up when receiving an FM stereo broadcast with
sufficient signal strength.
Search for a station
1 Press BSRC repeatedly to select TUNER.
2 Press JBAND repeatedly (or press #FM+/*AM– on the remote
control) to select the band FM1/FM2/FM3/AM.
3 Press S/ T(or press S/ T(+) on the remote control) to
search for a station.
You can change the searching method for S/ Tbuttons when pressed.
Press KSEEK repeatedly to change the searching method.
• AUTO1 : Automatically search for a station.
• AUTO2 : Search for a preset station.
• MANUAL : Manually search for a station.
You can store up to 18 stations for FM and 6 stations for AM.
• To store a station: Press and hold one of the number buttons (1 to 6).
• To select a stored station: Press one of the number buttons (1 to 6) (or
press one of the number buttons (1 to 6) on the remote control).
Direct Access Tuning
(using the remote control)
1 Press DIRECT to enter Direct Access Tuning.
2 Press the number buttons to enter a station frequency.
3 Press ENT IW to search for a station.
• To cancel, press or DIRECT.
• If no operation is done for 10 seconds after step 2, Direct Access Tuning is
automatically canceled.
Other settings
1 Press the volume knob to enter
[FUNCTION]
.
2 Turn the volume knob to select an item (see the following table), then
press the knob.
3 Repeat step 2 until the desired item is selected/activated.
4 Press and hold to exit.
To return to the previous setting item, press .
Default: [XX]
[TUNER SETTING]
[AUTO MEMORY] [YES]: Automatically starts memorizing 6 stations with good reception. ;
[NO]: Cancels.
• Selectable only if [NORMAL] is selected for [PRESET TYPE]. (Page 6)
[MONO SET] [ON]: Improves the FM reception, but the stereo effect will be lost. ;
[OFF]: Cancels.

8ENGLISH
Basic operation
• For playable audio file, see “Playable files” on page 16.
• To directly select USB/iPod source, press iPod USB.
CD/USB/iPod
Insert a disc
Eject disc Label side
The source changes to CD automatically and playback starts.
Connect a USB device
USB device
USB input terminal USB cable*
(commercially available)
The source changes to USB automatically and playback starts.
*Do not leave the cable inside the
vehicle
when not in use.
Connect an iPod/iPhone
iPod/iPhone
USB input terminal
Accessory of the iPod/iPhone*
The source changes to iPod automatically and playback starts.
*Do not leave the cable inside the
vehicle
when not in use.
To On the faceplate On the remote control
Play back/pause Press 6 IW. Press ENT IW.
Reverse/
Fast-forward
Press and hold S/
T.
Press and hold S/
T(+).
Select a track/file Press S/ T. Press S/ T(+).
Select a folder*1Press J/ K.Press #FM+/ AM–.
Repeat play*2Press 4 repeatedly.
[TRACK REPEAT]
/
[ALL REPEAT]
: Audio CD
[FILE REPEAT]
/
[FOLDER REPEAT]
/
[ALL REPEAT]
: MP3/
WMA/WAV/FLAC file
[FILE REPEAT]
/
[FOLDER REPEAT]
/
[REPEAT OFF]
: iPod
Random play*2Press 3 repeatedly.
[DISC RANDOM]/[RANDOM OFF]
: Audio CD
[FOLDER RANDOM]
/
[RANDOM OFF]
: MP3/WMA/WAV/
FLAC file, iPod
Press and hold 3 to select
[ALL RANDOM]
.*1
*1
For CD: Only for MP3/WMA files. This does not work for iPod.
*
2
For iPod: Applicable only when [MODE OFF] is selected. (Page
9
)

ENGLISH 9
Select music drive
While in USB source, press iPod USB repeatedly.
Stored songs in the following drive will be played back.
• Selected internal or external memory of a smartphone (Mass Storage
Class).
• Selected drive of a multiple drive device. (This unit can support multiple
drive device of up to 4 drives. However, this unit may take some time to
read if three or more cards are connected.)
You can also select the music drive from the
[FUNCTION]
menu.
1 Press the volume knob to enter
[FUNCTION]
.
2 Turn the volume knob to select
[USB]
, then press the knob.
3 Turn the volume knob to select
[MUSIC DRIVE]
, then press the knob.
4 Turn the volume knob to select
[DRIVE CHANGE]
, then press the knob.
The next drive (
[DRIVE 1]
to
[DRIVE 5]
) is selected automatically and
playback starts.
5 Repeat step 1 to step 4 to select the following drives.
6 Press and hold to exit.
To return to the previous setting item, press .
Direct Music Search
(using the remote control)
1 Press DIRECT.
2 Press the number buttons to enter a track/file number.
3 Press ENT IW to search for music.
• To cancel, press or DIRECT.
• Not available if Random Play is selected.
• Not applicable for iPod source.
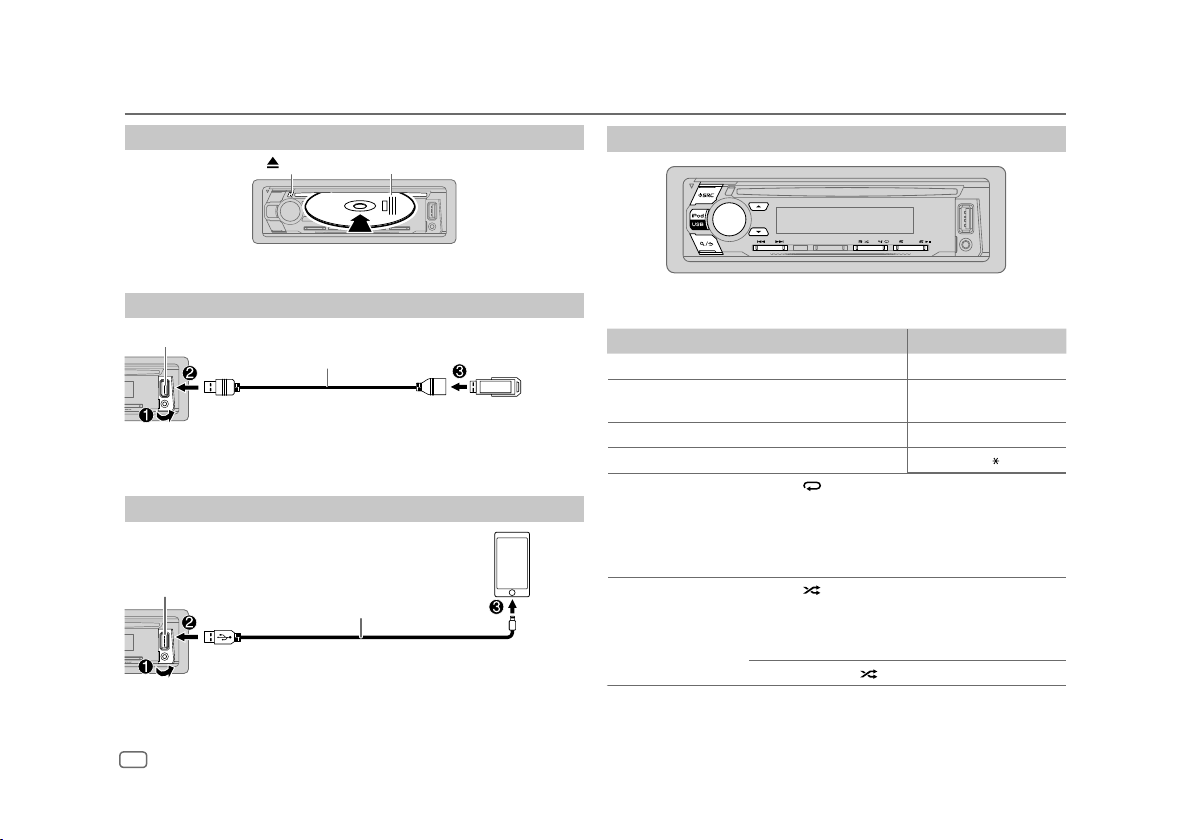
CD/USB/iPod
Select control mode
While in iPod source, press iPod USB repeatedly.
[MODE ON]
:Control iPod/iPhone using the iPod/iPhone itself. However, you
can still perform play/pause, file skip, fast-forward or fast-reverse
from this unit.
[MODE OFF]
:Control iPod/iPhone from this unit.
Select a file to play
From a folder or list
• For iPod, applicable only when
[MODE OFF]
/
[BROWSE MODE]
is selected.
1 Press .
2 Turn the volume knob to select a folder/list, then press the knob.
3 Turn the volume knob to select a file, then press the knob.
Selected file starts playing.
Quick search
(applicable only for CD source and USB source)
If you have many files, you can search through them quickly.
1 Press .
2 Turn the volume knob to select a folder/list, then press the knob.
3 Turn the volume knob quickly to browse through the list quickly.
4 Turn the volume knob to select a file, then press the knob.
Selected file starts playing.

10 ENGLISH
CD/USB/iPod
Skip search
(applicable only for iPod source)
If you have many files in the selected list, you can perform the following to
search for a file by skipping through the list at a rate selected in
[SKIP SEARCH]
.
• For iPod, applicable only when
[MODE OFF]
/
[BROWSE MODE]
is selected.
1 Press .
2 Turn the volume knob to select a list, then press the knob.
3 Press S/ Tto search at a preset skip search ratio.
• Pressing and holding S/ Tsearches at a 10% ratio irregardless of
the
[SKIP SEARCH]
settings. (See the following.)
4 Turn the volume knob to select a file, then press the knob.
Selected file starts playing.
[SKIP SEARCH] setting
1 Press the volume knob to enter
[FUNCTION]
.
2 Turn the volume knob to select
[USB]
, then press the knob.
3 Turn the volume knob to select
[SKIP SEARCH]
, then press the knob.
4 Turn the volume knob to select the skip search ratio, then press the
knob.
[0.5%]
(default)/
[1%]
/
[5%]
/
[10%]
The skip search ratio is shown as a percentage of the total files.
5 Press and hold to exit.
Alphabet search
(applicable only for iPod source)
You can search
for a file according to the first character.
• For iPod, applicable only when
[MODE OFF]
/
[BROWSE MODE]
is selected.
For iPod source
1 Press .
2 Turn the volume knob to select a list, then press the knob.
3 Turn the volume knob quickly to enter character search.
4Turn the volume knob to select the character.
• Select
S
“
*
T
” to search for a character other than A to Z, 0 to 9.
5Press / to move to the entry position.
• You can enter up to 3 characters.
6Press the volume knob to start searching.
7 Turn the volume knob to select a file, then press the knob.
Selected file starts playing.

ENGLISH 11
AUX
You can listen to music from a portable audio player via the auxiliary input
jack.
Preparation:
Select
[ON]
for
[BUILT-IN AUX]
in
[SOURCESELECT]
. (Page6)
Start listening
1 Connect a portable audio player (commercially available).
Portable audio player
3.5 mm (1/8”) stereo mini plug with “L” shaped
connector (commercially available)
Auxiliary input jack
2 Press BSRC repeatedly to select AUX.
3 Turn on the portable audio player and start playback.
Set the name of the external device
While listening to a portable audio player connected to the unit...
1 Press the volume knob to enter
[FUNCTION]
.
2 Turn the volume knob to select
[SYSTEM]
, then press the knob.
3 Turn the volume knob to select
[AUX NAME SET]
, then press the knob.
4 Turn the volume knob to select an item, then press the knob.
[AUX]
(default)/
[DVD]
/
[PORTABLE]
/
[GAME]
/
[VIDEO]
/
[TV]
5 Press and hold to exit.
To return to the previous setting item, press .
1 Press the volume knob to enter
[FUNCTION]
.
2 Turn the volume knob to select an item (see the following table), then
press the knob.
3 Repeat step 2 until the desired item is selected or activated.
4 Press and hold to exit.
(or using the remote control)
1 Press AUD to enter
[AUDIO CONTROL]
.
2 Press J/ Kto select an item, then press ENT IW.
To return to the previous setting item, press .
Default: [XX]
[AUDIO CONTROL]
[SUB-W LEVEL] [–15] to [+15] ([0]) Adjusts the subwoofer output level.
[BASS LEVEL] [–8] to [+8] ([+2])Adjusts the level to memorize for each source.
(Before making an adjustment, select the source
you want to adjust.)
[MID LEVEL] [–8] to [+8] ([+1])
[TRE LEVEL] [–8] to [+8] ([+1])
Audio Settings

12 ENGLISH
Audio Settings
[EQ PRO] Adjusts your own sound settings for each source.
• The settings are stored to [USER] in [PRESET EQ].
[BASS ADJUST] [BASS CTR FRQ] [60]/[80]/[100]/[200]: Selects the center
frequency.
[BASS LEVEL] [–8] to [+8] ([+2]): Adjusts the level.
[BASS Q FACTOR] [1.00]/[1.25]/[1.50]/[2.00]: Adjusts the quality
factor.
[BASS EXTEND] [ON]: Turns on the extended bass. ; [OFF]: Cancels.
[MID ADJUST] [MID CTR FRQ] [0.5KHZ]/[1.0KHZ]/[1.5KHZ]/[2.5KHZ]: Selects
the center frequency.
[MID LEVEL] [–8] to [+8] ([+1]): Adjusts the level.
[MID Q FACTOR] [0.75]/[1.00]/[1.25]: Adjusts the quality factor.
[TRE ADJUST] [TRE CTR FRQ] [10.0KHZ]/[12.5KHZ]/[15.0KHZ]/[17.5KHZ]:
Selects the center frequency.
[TRE LEVEL] [–8] to [+8] ([+1]): Adjusts the level.
[PRESET EQ] [DRIVE EQ]/[TOP40]/[POWERFUL]/[ROCK]/[POPS]/[EASY]/[JAZZ]/
[NATURAL]/[USER]: Selects a preset equalizer suitable to the music
genre.
• Select [USER] to use the settings made in [EQ PRO].
• [DRIVE EQ] is a preset equalizer that reduces noise outside the car or
running noise of the tyres.
[BASS BOOST] [LV1]/[LV2]/[LV3]: Selects your preferred bass boost level. ;
[OFF]: Cancels.
[LOUDNESS] [LV1]/[LV2]: Selects your preferred low or high frequencies boost to
produce a well-balanced sound at low volume. ; [OFF]: Cancels.
[SUBWOOFER SET] [ON]: Turns on the subwoofer output. ; [OFF]: Cancels.
[LPF SUBWOOFER] [THROUGH]: All signals are sent to the subwoofer. ; [85HZ]/[120HZ]/
[160HZ]: Audio signals with frequencies lower than 85 Hz/120 Hz/
160 Hz are sent to the subwoofer.
[SUB-W PHASE] [REVERSE] (180°)/[NORMAL] (0°): Selects the phase of the subwoofer
output to be in line with the speaker output for optimum performance.
• Selectable only if a setting other than [THROUGH] is selected for
[LPFSUBWOOFER].
[FADER] [R15] to [F15] ([0]): Adjusts the front and rear speaker output balance.
[BALANCE] [L15] to [R15] ([0]): Adjusts the left and right speaker output balance.
[VOLUME OFFSET] For AUX: [–8] to [+8] ([0]) ; For other sources: [–8] to [0]: Presets the
initial volume level of each source by comparing to the FM volume level.
(Before adjustment, select the source you want to adjust.)
[SOUND RECNSTR]
(Sound
reconstruction)
[ON]: Creates realistic sound by compensating the high-frequency
components and restoring the rise-time of the waveform that are lost in
audio data compression. ; [OFF]: Cancels.
•
[SUB-W LEVEL]
/
[SUBWOOFER SET]
/
[LPF SUBWOOFER]
/
[SUB-W PHASE]
is selectable
only if
[SWITCH PREOUT]
is set to
[SUB-W]
. (Page 6)
•
[SUB-W LEVEL]
/
[LPF SUBWOOFER]
/
[SUB-W PHASE]
is selectable only if
[SUBWOOFER
SET]
is set to
[ON].

ENGLISH 13
Display Settings
Zone identification for brightness settings
Set the dimmer
Press and hold DISP (DIMMER) to turn on or off the dimmer.
• Once you press and hold this button,
[DIMMER]
setting will be overwritten.
Change the display settings
1 Press the volume knob to enter
[FUNCTION]
.
2 Turn the volume knob to select an item (page 14), then press the
knob.
3 Repeat step 2 until the desired item is selected/activated or follow the
instructions stated on the selected item.
4 Press and hold to exit.
To return to the previous setting item, press .
Default: [XX]
[DISPLAY]
[DIMMER] Dims the illumination.
[ON]: Dimmer is turned on.
[OFF]: Dimmer is turned off.
[DIMMER TIME]: Set the time to turn on dimmer and to turn off dimmer.
1
Turn the volume knob to adjust the [ON] time, then press the knob.
2
Turn the volume knob to adjust the [OFF] time, then press the knob.
Default: [ON]: [6:00PM] ; [OFF]: [6:00AM]
[BRIGHTNESS]
1
Select a zone. (See the illustration on the left column.)
2
[LVL00] to [LVL31]: Select your preferred brightness level for the selected
zone.
[TEXT SCROLL] [ONCE]: Scrolls the display information once. ; [AUTO]: Repeats scrolling at
5-second intervals. ; [OFF]: Cancels.
[CLOCK]
[CLOCK DISPLAY] [ON]: The clock time is shown on the display even when the unit is turned
off. ; [OFF]: Cancels.

14 ENGLISH
Installation/Connection
Installing / Removing the unit
Insert the extraction keys deeply into the slots on each side,
then follow the arrows as shown on the illustration.

ENGLISH 15
REMOTE CONT
STEERING WHEEL
REMOTE INPUT
P. CONT
ANT CONT
MUTE
Installation/Connection
Pin Color and function (for ISO connectors)
A4 Red : Ignition (ACC)
A5 Blue/White*1 : Power control
A7 Yellow : Battery
A8 Black : Earth (ground) connection
B1 Purple
]
: Rear speaker (right)
B2 Purple/black
[
B3 Gray
]
: Front speaker (right)
B4 Gray/black
[
B5 White
]
: Front speaker (left)
B6 White/black
[
B7 Green
]
: Rear speaker (left)
B8 Green/black
[
Wiring connection
Fuse (10 A)
Antenna terminal
Blue/White*2
(Power control wire/
Antenna control wire)
Light blue/yellow
(Steering remote control
wire)
To the power control terminal when using the
optional power amplifier or to the antenna
control terminal in the vehicle
Brown
(Mute control wire)
To the terminal that is grounded when the
telephone rings or during conversation
If no connections are made, do not let the wire come out from the tab.
To the steering wheel remote control adapter
ISO connectors
NOTE: Total output for Blue/White wire (*1) + (*2) is 12 V 350 mA
Rear/subwoofer output
Yellow (A7)
Red (Ignition wire)
Red (A4)
Yellow (Battery wire)

16ENGLISH
References
More information
General
• This unit can only play the following CDs:
Playable files
• Playable audio file:
For disc: MP3 (.mp3), WMA (.wma)
For USB mass storage class device:
MP3 (.mp3), WMA (.wma), WAV (.wav), FLAC (.flac)
• Playable disc media: CD-R/CD-RW/CD-ROM
• Playable disc file format: ISO 9660 Level 1/2, Joliet, Long file name
• Playable USB device file system: FAT12, FAT16, FAT32
Even when audio files comply with the standards listed above, playback may be impossible
depending on the types or conditions of media or devices.
Unplayable discs
• Discs that are not round.
• Discs with coloring on the recording surface or discs that are dirty.
• Recordable/ReWritable discs that have not been finalized.
• 8 cm CD. Attempting to insert using an adapter may cause malfunction.
About USB devices
• You cannot connect a USB device via a USB hub.
• Connecting a cable whose total length is longer than 5 m may result in abnormal playback.
• This unit cannot recognize a USB device whose rating is other than 5 V and exceeds 1.0 A.
About iPod/iPhone
• Made for
– iPod touch (2nd, 3rd, 4th, 5th, and 6th generation)
– iPod classic
– iPod nano (3rd, 4th, 5th, 6th, and 7th generation)
– iPhone 3G, 3GS, 4, 4S, 5, 5S, 5C, 6, 6 Plus, 6S, 6S Plus, SE
• It is not possible to browse video files on the “Videos” menu in [MODE OFF].
• The song order displayed on the selection menu of this unit may differ from that of the iPod/
iPhone.
• You cannot operate iPod if or “ ” is displayed on iPod.
• Depending on the version of the operating system of the iPod/iPhone, some functions may not
operate on this unit.

ENGLISH 17
Symptom Remedy
General
Sound cannot be heard. • Adjust the volume to the optimum level.
• Check the cords and connections.
“MISWIRING CHECK WIRING
THEN PWR ON” appears.
Turn the power off, then check to be sure the terminals of
the speaker wires are insulated properly. Turn the power
on again.
“PROTECTING SEND SERVICE”
appears.
Send the unit to the nearest service center.
Source cannot be selected. Check the [SOURCESELECT] setting. (Page 6)
• Sound cannot be heard.
• The unit does not turn on.
• Information shown on the
display is incorrect.
Clean the connectors.
The unit does not work at all. Reset the unit. (Page 4)
Correct characters are not
displayed.
• This unit can only display uppercase letters, numbers,
and a limited number of symbols.
• Depending on the display language you have selected
(page 6), some characters may not be displayed
correctly.
Radio
• Radio reception is poor.
• Static noise while listening
to the radio.
Connect the antenna firmly.
CD/USB/iPod
Disc cannot be ejected. Press and hold to forcibly eject the disc. Be careful not
to drop the disc when it is ejected. If this does not solve
the problem, reset the unit (page 4).
Noise is generated. Skip to another track or change the disc.
“PLEASE EJECT” appears. Reset the unit (page 4). If this does not solve the
problem, consult your nearest service center.
Troubleshooting References
Change the display information
Each time you press DISP, the display information changes.
• If the information is unavailable or not recorded, “NO TEXT”, “NO INFO”, or other information
(eg. station name) appears or display will be blank.
Main display
Source name Display information: Main display
STANDBY Source name Clock back to the beginning
TUNER Frequency Clock back to the beginning
CD or USB For CD-DA:
Disc title/Artist Track title/Artist Playing time Clock back to the
beginning
For MP3/WMA/WAV/FLAC files:
Song title/Artist Album title/Artist Folder name File name Playing
time Clock back to the beginning
iPod When [MODE OFF]/[BROWSE MODE] is selected. (Page
9
)
Song title/Artist Album title/Artist Playing time Clock back to the
beginning
AUX Source name Clock back to the beginning

18 ENGLISH
Troubleshooting
Symptom Remedy
CD/USB/iPod
Playback order is not as
intended.
The playback order is determined by the order in which
files were recorded (disc) or the file name (USB).
Elapsed playing time is not
correct.
This depends on the recording process earlier (disc/USB).
“READING” keeps flashing. • Do not use too many hierarchical levels and folders.
• Reload the disc or reattach the device (USB).
“NO DISC” Insert a playable disc into the loading slot.
“TOC ERROR” Make sure the disc is clean and inserted properly.
“NA FILE”
Make sure the media (disc/USB) contain supported
audio files. (Page 1
6
)
“COPY PRO” A copy-protected file is played.
“NO DEVICE” Connect a device (USB), and change the source to USB
again.
“NO MUSIC” Connect a device (USB) that contains playable audio files.
“READ ERROR” Copy the files and folders onto the USB device again. If
this does not solve the problem, reset the USB device or
use another USB device.
“NA DEVICE” Connect a supported USB device, and check the
connections.
“iPod ERROR” • Reconnect the iPod.
• Reset the iPod.
Muting upon the reception of a phone call
Connect the MUTE wire to your telephone using a commercial
telephone accessory. (Page 15)
• When a call comes in, “CALL” appears. (The audio system pauses.)
– To continue listening to the audio system during a call, press BSRC.
“CALL” disappears and the audio system resumes.
• When the call ends, “CALL” disappears. (The audio system resumes.)

ENGLISH 19
Tuner
FM Frequency Range 87.9 MHz — 107.9 MHz (200 kHz space)
Usable Sensitivity
(S/N = 26 dB)
8.2 dBf
(0.71 μV/75 Ω)
Quieting Sensitivity
(DIN S/N = 46 dB)
17.2 dBf
(2.0 μV/75 Ω)
Frequency Response (±3 dB) 30 Hz — 15 kHz
Signal-to-Noise Ratio (MONO) 64 dB
Stereo Separation (1 kHz) 40 dB
AM Frequency Range 530 kHz — 1 700 kHz (10 kHz space)
Usable Sensitivity
(S/N = 20 dB)
29 dBμ
(28.2 μV)
CD player
Laser Diode GaAIAs
Digital Filter (D/A) 8 times over sampling
Spindle Speed 500 rpm — 200 rpm (CLV)
Wow & Flutter Below measurable limit
Frequency Response (±1 dB) 20 Hz — 20 kHz
Total Harmonic Distortion (1 kHz) 0.01 %
Signal-to-Noise Ratio (1 kHz) 105 dB
Dynamic Range 90 dB
Channel Separation 85 dB
MP3 Decode Compliant with MPEG-1/2 Audio Layer-3
WMA Decode Compliant with Windows Media Audio
Auxiliary
Frequency Response (±3 dB) 20 Hz — 20 kHz
Input Maximum Voltage 1 000 mV
Input Impedance 30 kΩ
Specifications
USB
USB Standard USB 1.1, USB 2.0 (Full speed)
File System FAT12/16/32
Maximum Supply Current DC 5 V 1.0 A
MP3 Decode Compliant with MPEG-1/2 Audio Layer-3
WMA Decode Compliant with Windows Media Audio
WAV Decode Linear-PCM
FLAC Decode FLAC file (Up to 48 kHz/16 bit)
Audio
Maximum Output Power 50 W × 4
Full Bandwidth Power 22 W × 4 (at less than 1 % THD)
Speaker Impedance 4 Ω — 8 Ω
Tone Action Bass 100 Hz ±8 dB
Middle 1.0 kHz ±8 dB
Treble 12.5 kHz ±8 dB
Preout Level/Load 2 500 mV/10 kΩ
Preout Impedance ≤ 600 Ω
General
Operating Voltage
12 V DC battery
Installation Size (W × H × D) 182 mm × 53 mm × 158 mm
(7-3/16” × 2-1/16” × 6-1/4”)
Net Weight (includes Trimplate,
Mounting Sleeve)
1.3 kg (2.9 lbs)
Subject to change without notice.

i
FCC CAUTION
Changes or modifications not expressly approved by the party responsible for compliance could void the
user’s authority to operate the equipment.
NOTE: This equipment has been tested and found to comply with the limits for a Class B digital device,
pursuant to part 15 of the FCC Rules. These limits are designed to provide reasonable protection against
harmful interference in a residential installation. This equipment generates, uses and can radiate radio
frequency energy and, if not installed and used in accordance with the instructions, may cause harmful
interference to radio communications. However, there is no guarantee that interference will not occur
in a particular installation. If this equipment does cause harmful interference to radio or television
reception, which can be determined by turning the equipment off and on, the user is encouraged to try
to correct the interference by one or more of the following measures:
– Reorient or relocate the receiving antenna.
– Increase the separation between the equipment and receiver.
– Connect the equipment into an outlet on a circuit different from that to which the receiver is
connected.
– Consult the dealer or an experienced radio/TV technician for help.
CALIFORNIA, USA ONLY
This product contains a CR Coin Cell Lithium Battery which contains Perchlorate Material—special
handling may apply. See www.dtsc.ca.gov/hazardouswaste/perchlorate
Información acerca de la eliminación de equipos eléctricos y electrónicos al final de la vida
útil (aplicable a los países que hayan adoptado sistemas independientes de recogida de
residuos)
Los productos con el símbolo de un contenedor con ruedas tachado no podrán ser
desechados como residuos domésticos. Los equipos eléctricos y electrónicos al final
de la vida útil, deberán ser reciclados en instalaciones que puedan dar el tratamiento
adecuado a estos productos y a sus subproductos residuales correspondientes.
Póngase en contacto con su administración local para obtener información sobre el
punto de recogida más cercano. Un tratamiento correcto del reciclaje y la eliminación
de residuos ayuda a conservar los recursos y evita al mismo tiempo efectos
perjudiciales en la salud y el medio ambiente.
Informação sobre a eliminação de pilhas
Este produto não deve ser eliminado como lixo doméstico geral. Devolva a pilha usada ao revendedor ou
entidade autorizada para que a mesma seja devolvida ao fabricante ou importador.
A reciclagem e a eliminação de lixo de maneira apropriada ajudarão a conservar os recursos naturais ao
mesmo tempo que prevenirão os efeitos prejudicais à nossa saúde e ao meio ambiente.
Declaration of Conformity
Pana-Pacific, Inc.
838 N. Laverne Avenue
Fresno, CA 93727
Phone: (800) 726-2636
THIS DEVICE COMPLIES WITH PART 15 OF THE FCC RULES. OPERATION IS SUBJECT TO THE FOLLOWING
TWO CONDITIONS:
(1) THIS DEVICE MAY NOT CAUSE HARMFUL INTERFERENCE, AND
(2) THIS DEVICE MUST ACCEPT ANY INTERFERENCE RECEIVED, INCLUDING INTERFERENCE THAT MAY
CAUSE UNDESIRED OPERATION.
Table of contents
Other Pana-Pacific Car Receiver manuals