Panasonic DMR-BWT800 User manual

VQT3C14
Operating Instructions
Dear customer
Thank you for purchasing this product. For optimum performance and safety, please read these instructions carefully.
Before connecting, operating or adjusting this product, please read the instructions completely.
Please keep this manual for future reference.
≥This Blu-ray Disc Recorder is for viewing and recording free to view channels only. It does not receive pay TV or
encrypted channels.
≥DVB and the DVB logos are trademarks of the DVB Project.
Blu-ray Disc™ Recorder
Model No. DMR-BWT800
DMR-BWT700
∫Region management information
BD-Video: This unit plays BD-Video marked with labels
containing the region code “B”.
DVD-Video: This unit plays DVD-Video marked with labels
containing the region number “4” or “ALL”.
Example: Example:
4
ALL
3
4
2
until
2011/03/21
GL
DMRBWT800&700GL_eng.book 1 ページ 2011年2月14日 月曜日 午後3時50分

VQT3C14
2
∫Unit
≥To reduce the risk of fire, electric shock or product
damage,
– Do not expose this unit to rain, moisture, dripping or
splashing.
– Do not place objects filled with liquids, such as vases, on
this unit.
– Use only the recommended accessories.
– Do not remove covers.
– Do not repair this unit by yourself. Refer servicing to
qualified service personnel.
– Do not let metal objects fall inside this unit.
– Do not place heavy items on this unit.
∫AC mains lead
≥To reduce the risk of fire, electric shock or product
damage,
– Ensure that the power supply voltage corresponds to the
voltage printed on this unit.
– Insert the mains plug fully into the socket outlet.
– Do not pull, bend, or place heavy items on the lead.
– Do not handle the plug with wet hands.
– Hold onto the mains plug body when disconnecting the
plug.
– Do not use a damaged mains plug or socket outlet.
≥Install this unit so that the AC mains lead can be
unplugged from the socket outlet immediately if any
problem occurs.
∫SD card
≥Keep the Memory Card out of reach of children to prevent
swallowing.
∫Unit
≥This unit utilizes a laser. Use of controls or adjustments or
performance of procedures other than those specified
herein may result in hazardous radiation exposure.
≥Do not place sources of naked flames, such as lighted
candles, on this unit.
≥This unit may receive radio interference caused by mobile
telephones during use. If such interference occurs, please
increase separation between this unit and the mobile
telephone.
≥This unit is intended for use in moderate climates.
∫Placement
≥Place this unit on an even surface.
≥To reduce the risk of fire, electric shock or product
damage,
– Do not install or place this unit in a bookcase, built-in
cabinet or in another confined space. Ensure this unit is
well ventilated.
– Do not obstruct this unit’s ventilation openings with
newspapers, tablecloths, curtains, and similar items.
– Do not expose this unit to direct sunlight, high
temperatures, high humidity, and excessive vibration.
∫Batteries
≥Danger of explosion if battery is incorrectly replaced.
Replace only with the type recommended by the
manufacturer.
≥Mishandling of batteries can cause electrolyte leakage and
may cause a fire.
– Do not mix old and new batteries or different types at the
same time.
– Do not heat or expose to flame.
– Do not leave the battery(ies) in a car exposed to direct
sunlight for a long period of time with doors and windows
closed.
– Do not take apart or short circuit.
– Do not recharge alkaline or manganese batteries.
– Do not use batteries if the covering has been peeled off.
– Remove batteries if you do not intend to use the remote
control for a long period of time. Store in a cool, dark
place.
≥When disposing the batteries, please contact your local
authorities or dealer and ask for the correct method of
disposal.
Safety precautions
WARNING CAUTION
DMRBWT800&700GL_eng.book 2 ページ 2011年2月14日 月曜日 午後3時50分

Getting started
VQT3C14
3
Getting started
∫3D video and 3D photo playback (>43,
56)
3D videos and 3D photos can be played back when this
unit is connected to a 3D compatible TV using a High
Speed HDMI Cable and 2D video can be enjoyed as 3D
virtually.
∫Wireless connection (>14, 21)
This unit supports Wi-Fi technology and it is possible to
make a wireless connection by using a built-in Wireless
LAN Adaptor.
∫DLNA (>74, 75)
You can enjoy the video and photos saved on the HDD of
this unit on DLNA (Client) compatible equipment
connected via a network. Additionally, You can enjoy
viewing video, photos and music saved on a DLNA
Certified media server and Panasonic DLNA compatible
recorders.
∫VIERA CAST (>71)
Internet services (such as YouTube, Picasa Web Albums,
video communication, etc.) can be accessed easily by
using the VIERA CAST button.
∫EPG (>26, 31)
Timer recording is made easier because the TV Guide
allows you to see programme information.
Please check and identify the supplied accessories.
(Product numbers correct as of February 2011. These may
be subject to change.)
1 Remote control
(N2QAYB000610)
2 Batteries for remote control
1 AC mains lead
≥Do not use AC mains lead with other equipment.
1 RF coaxial cable
1 Audio/Video cable
Insert so the poles (iand j) match those in the remote
control.
≥Use alkaline or manganese batteries.
Point it at remote control signal sensor on this unit.
(>11)
Features
The recording and playback of content on this or any
other device may require permission from the owner of
the copyright or other such rights in that content.
Panasonic has no authority to and does not grant you
that permission and explicitly disclaims any right, ability or
intention to obtain such permission on your behalf. It is
your responsibility to ensure that your use of this or any
other device complies with applicable copyright legislation
in your country. Please refer to that legislation for more
information on the relevant laws and regulations involved
or contact the owner of the rights in the content you wish
to record or playback.
Supplied accessories
Using the remote control
R6/LR6, AA
DMRBWT800&700GL_eng.book 3 ページ 2011年2月14日 月曜日 午後3時50分

VQT3C14
4
Table of contents
Safety precautions . . . . . . . . . . . . . . . . . . . . . . . . . . . 2
∫Getting started
Features . . . . . . . . . . . . . . . . . . . . . . . . . . . . . . . . . . . . 3
Supplied accessories . . . . . . . . . . . . . . . . . . . . . . . . . 3
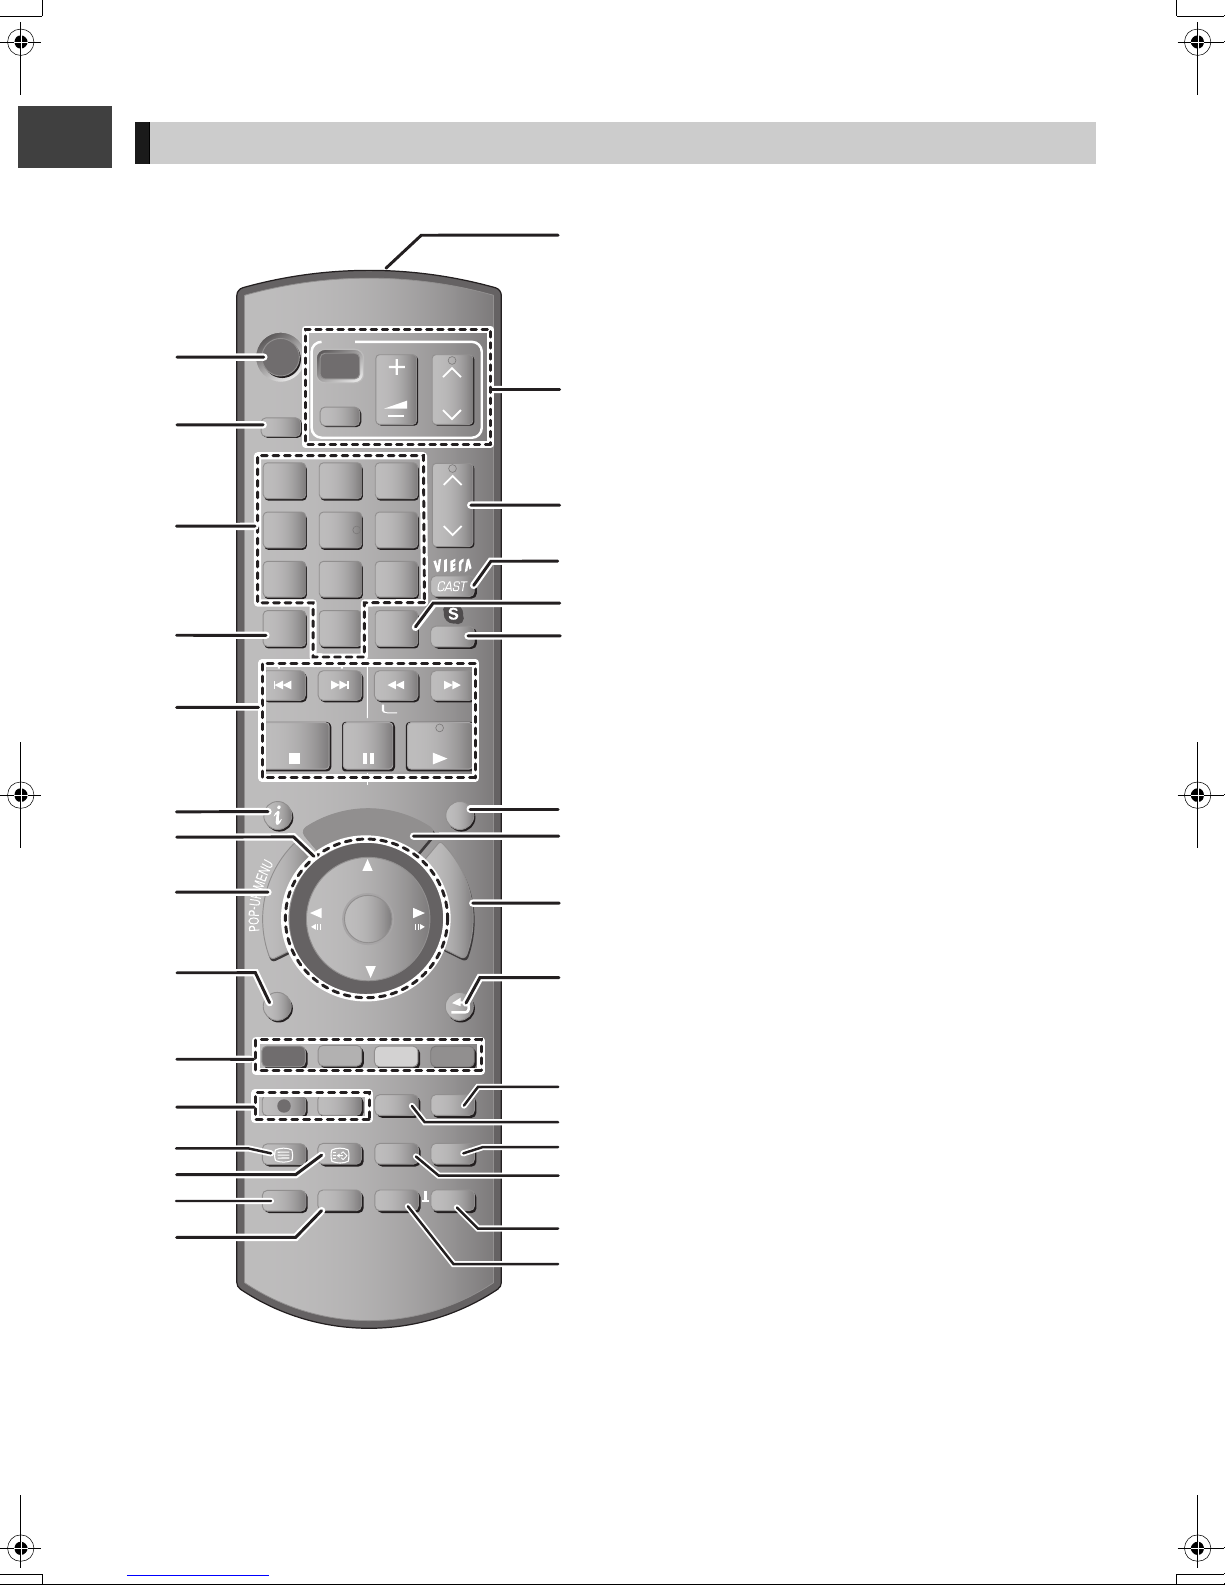
Using the remote control . . . . . . . . . . . . . . . . . . . . . . 3
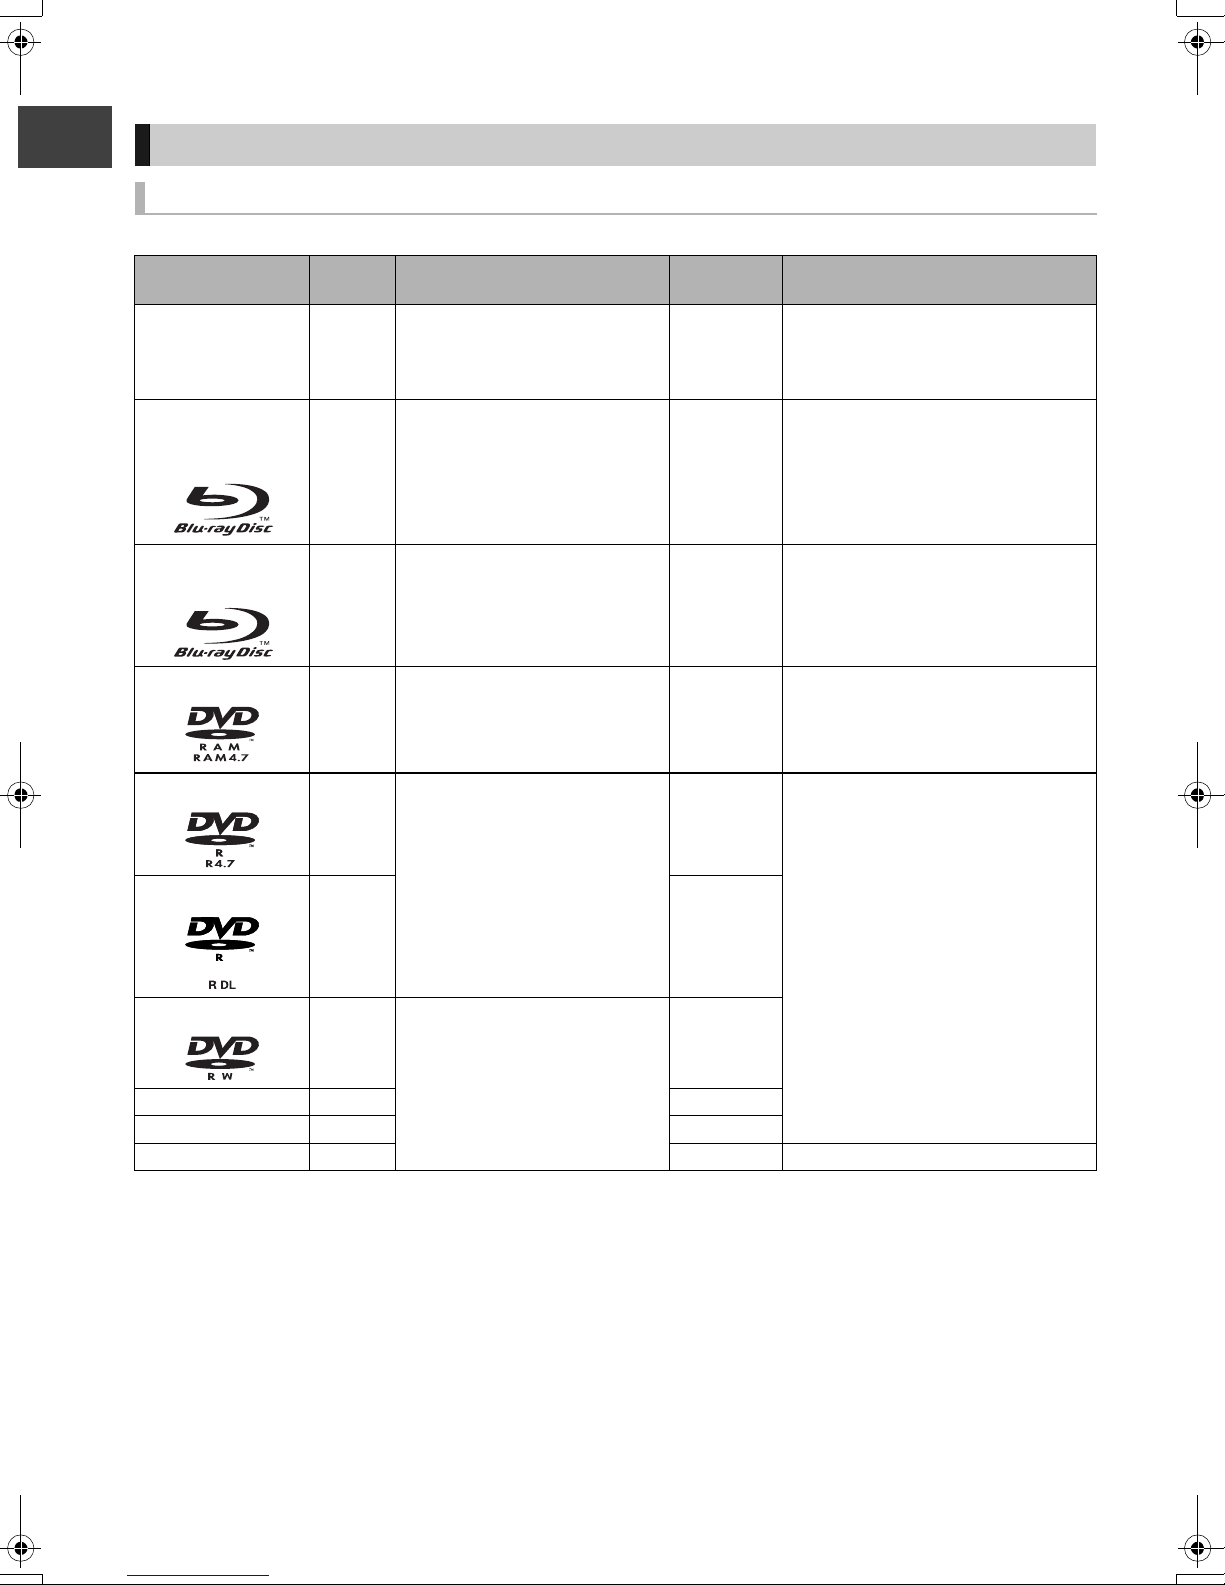
HDD and media information. . . . . . . . . . . . . . . . . . . . 6
Discs. . . . . . . . . . . . . . . . . . . . . . . . . . . . . . . . . . . . . . . . . . . 6
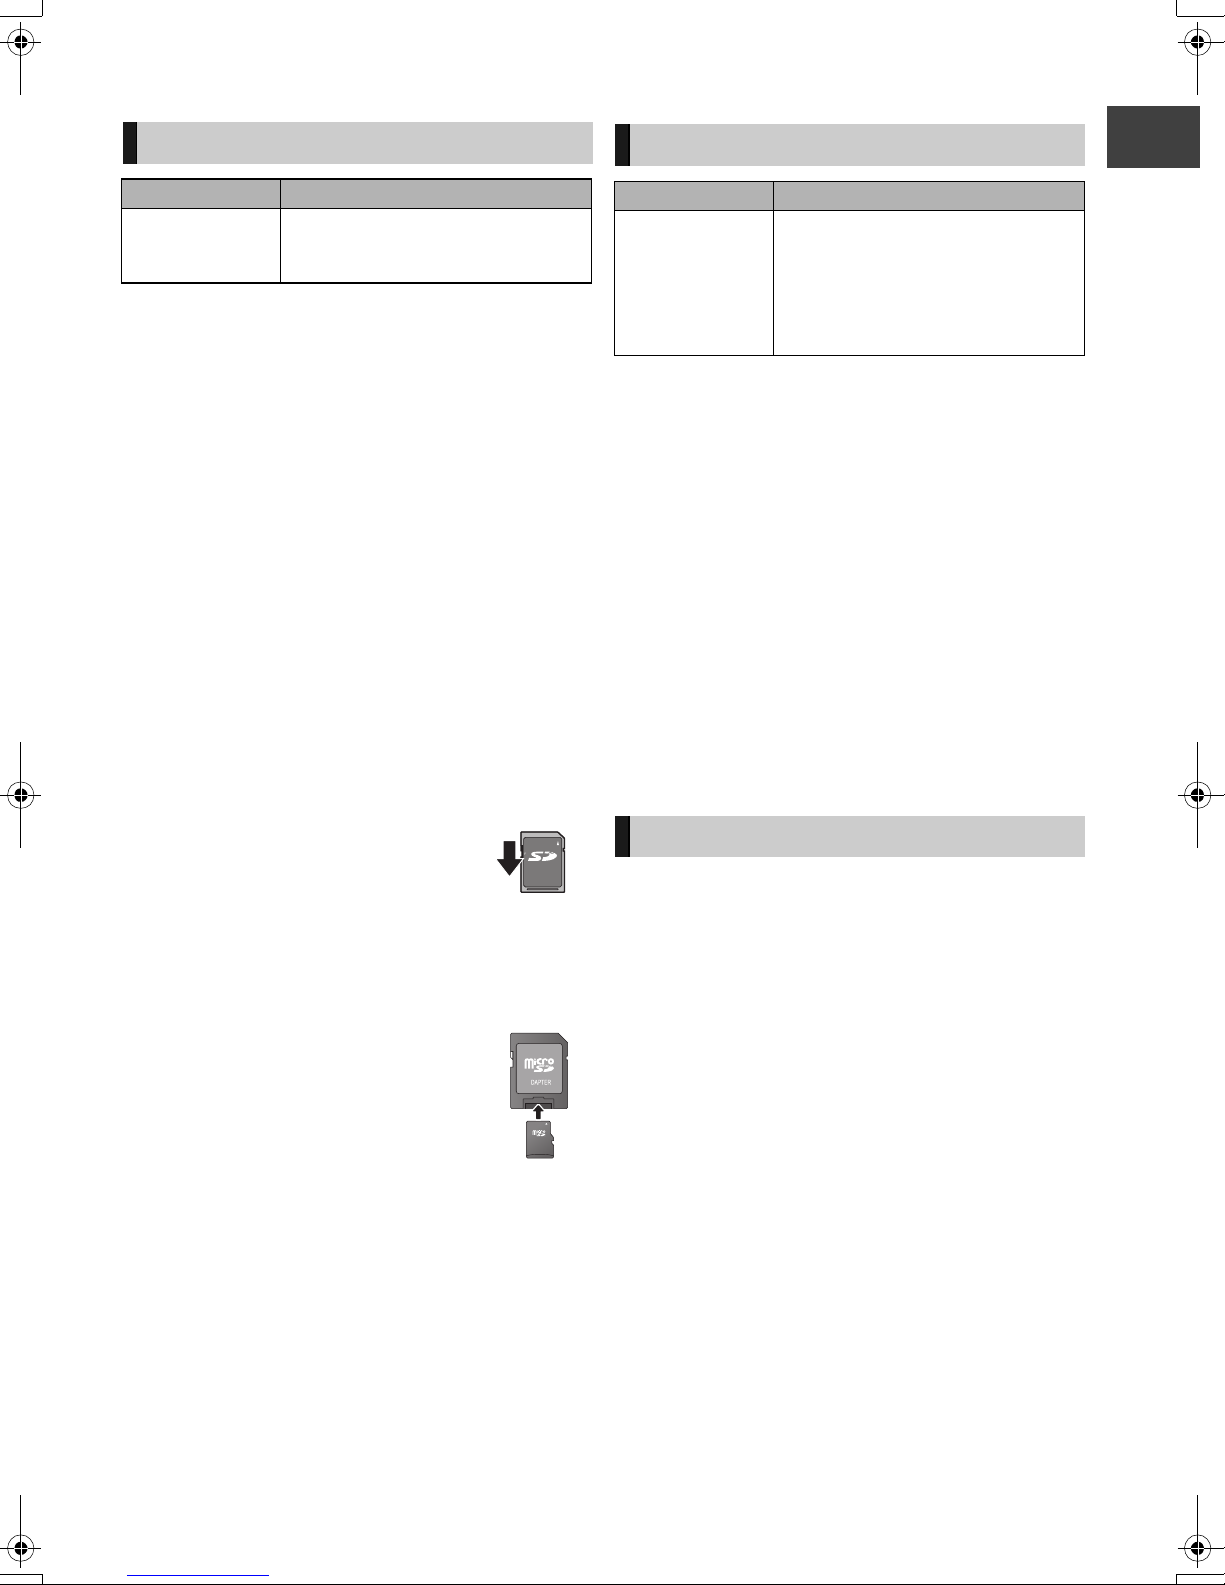
SD cards. . . . . . . . . . . . . . . . . . . . . . . . . . . . . . . . . . . . . . . . 9
USB memories . . . . . . . . . . . . . . . . . . . . . . . . . . . . . . . . . . . 9
Notes . . . . . . . . . . . . . . . . . . . . . . . . . . . . . . . . . . . . . . . . . . 9
Control reference guide . . . . . . . . . . . . . . . . . . . . . . 10
Remote control . . . . . . . . . . . . . . . . . . . . . . . . . . . . . . . . . . 10
Main unit. . . . . . . . . . . . . . . . . . . . . . . . . . . . . . . . . . . . . . . 11
Connection . . . . . . . . . . . . . . . . . . . . . . . . . . . . . . . . 12
Basic connections . . . . . . . . . . . . . . . . . . . . . . . . . . . . . . .12
Network connection . . . . . . . . . . . . . . . . . . . . . . . . . . . . . . 14
Other TV connections. . . . . . . . . . . . . . . . . . . . . . . . . . . . . 15
Amplifier connections . . . . . . . . . . . . . . . . . . . . . . . . . . . . . 16
Common Operations. . . . . . . . . . . . . . . . . . . . . . . . . 18
Preparations . . . . . . . . . . . . . . . . . . . . . . . . . . . . . . . . . . . . 18
HOLD function . . . . . . . . . . . . . . . . . . . . . . . . . . . . . . . . . . 18
Basic operation. . . . . . . . . . . . . . . . . . . . . . . . . . . . . . . . . . 19
Menu screen. . . . . . . . . . . . . . . . . . . . . . . . . . . . . . . . . . . . 19
FUNCTION MENU screen . . . . . . . . . . . . . . . . . . . . . . . . . 19
Settings . . . . . . . . . . . . . . . . . . . . . . . . . . . . . . . . . . . 20
Easy Setting . . . . . . . . . . . . . . . . . . . . . . . . . . . . . . . . . . . . 20
Network Easy Setting . . . . . . . . . . . . . . . . . . . . . . . . . . . . . 21
∫Watching broadcasts
Watching broadcasts . . . . . . . . . . . . . . . . . . . . . . . . 24
Using Channel List . . . . . . . . . . . . . . . . . . . . . . . . . . . . . . .24
Channel information . . . . . . . . . . . . . . . . . . . . . . . . . . . . . . 25
Operations while watching broadcast. . . . . . . . . . . . . . . . . 25
Using TV Guide system . . . . . . . . . . . . . . . . . . . . . . . . . . . 26
REWIND LIVE TV/PAUSE LIVE TV. . . . . . . . . . . . . . . . . . 27
∫Recording
Recording TV programmes . . . . . . . . . . . . . . . . . . . 28
Operation during Recording . . . . . . . . . . . . . . . . . . . . . . . . 29
Timer recording. . . . . . . . . . . . . . . . . . . . . . . . . . . . . 31
Manually programming timer recording . . . . . . . . . . . . . . .32
Timer recording options . . . . . . . . . . . . . . . . . . . . . . . . . . . 33
Timer recording from channel information . . . . . . . . . . . . . 33
To cancel recording when timer recording has
already begun. . . . . . . . . . . . . . . . . . . . . . . . . . . . . . . . . . . 34
Notes on timer recording . . . . . . . . . . . . . . . . . . . . . . . . . . 34
To confirm and edit a timer programme . . . . . . . . . . . . . . . 35
∫Playing back video
Playing BD-Video or DVD-Video . . . . . . . . . . . . . . . 36
Enjoying BD-Live or picture-in-picture in
BD-Video . . . . . . . . . . . . . . . . . . . . . . . . . . . . . . . . . . . . . . 36
Playing recorded video contents. . . . . . . . . . . . . . . 37
Using the DIRECT NAVIGATOR (VIDEO) . . . . . . . . . . . . . 38
Playback from Chapter View . . . . . . . . . . . . . . . . . . . . . . . 40
Operation during play. . . . . . . . . . . . . . . . . . . . . . . . 41
Enjoying 3D video . . . . . . . . . . . . . . . . . . . . . . . . . . . 43
∫Editing video
Deleting recorded titles . . . . . . . . . . . . . . . . . . . . . . 44
Editing recorded titles . . . . . . . . . . . . . . . . . . . . . . . 45
∫Copying video
Copying titles . . . . . . . . . . . . . . . . . . . . . . . . . . . . . . 49
Copying to HDD with DIRECT NAVIGATOR . . . . . . . . . . 50
Copying titles with copying list . . . . . . . . . . . . . . . . . . . . . 51
Notes for copying . . . . . . . . . . . . . . . . . . . . . . . . . . . . . . . 53
Copying Title Playing . . . . . . . . . . . . . . . . . . . . . . . . . . . . 54
Copying HD Video (AVCHD format) from HDD . . . . . . . . 55
Copying a finalised disc . . . . . . . . . . . . . . . . . . . . . . . . . . 55
∫Photo
Playing photos . . . . . . . . . . . . . . . . . . . . . . . . . . . . . 56
Photo play option . . . . . . . . . . . . . . . . . . . . . . . . . . . . . . . 57
Slideshow Settings . . . . . . . . . . . . . . . . . . . . . . . . . . . . . . 57
Editing photos . . . . . . . . . . . . . . . . . . . . . . . . . . . . . 58
Copying photos . . . . . . . . . . . . . . . . . . . . . . . . . . . . 60
Selecting and copying the photos . . . . . . . . . . . . . . . . . . . 60
Copying automatically . . . . . . . . . . . . . . . . . . . . . . . . . . . . 61
∫Music
Playing music/Copying music to HDD . . . . . . . . . . 62
Playing music recorded on HDD . . . . . . . . . . . . . . . . . . . . 63
Operations during music play . . . . . . . . . . . . . . . . . . . . . . 64
Useful functions during music play . . . . . . . . . . . . . . . . . . 64
Editing music/playlist . . . . . . . . . . . . . . . . . . . . . . . 65
∫With Other Equipment
Recording from external equipment. . . . . . . . . . . . 66
Copying the HD Video or the SD Video . . . . . . . . . 67
Copying HD Video (AVCHD format) . . . . . . . . . . . . . . . . . 67
Copying SD Video (MPEG2 format) . . . . . . . . . . . . . . . . . 67
∫Convenient functions
Media management . . . . . . . . . . . . . . . . . . . . . . . . . 68
Entering text . . . . . . . . . . . . . . . . . . . . . . . . . . . . . . . 70
Enjoying VIERA CAST . . . . . . . . . . . . . . . . . . . . . . . 71
To enjoy video communication (ex. SkypeTM) . . . . . . . . . . 71
VIERA Link functions. . . . . . . . . . . . . . . . . . . . . . . . 72
Playing contents from other equipment
(Server) . . . . . . . . . . . . . . . . . . . . . . . . . . . . . . . . . . . 74
Playing contents on other equipment
(Client) . . . . . . . . . . . . . . . . . . . . . . . . . . . . . . . . . . . . 75
Playback menu . . . . . . . . . . . . . . . . . . . . . . . . . . . . . 76
Changing the unit’s settings . . . . . . . . . . . . . . . . . . 78
Common procedures . . . . . . . . . . . . . . . . . . . . . . . . . . . . 78
Digital TV Tuning . . . . . . . . . . . . . . . . . . . . . . . . . . . . . . . 79
HDD / Disc . . . . . . . . . . . . . . . . . . . . . . . . . . . . . . . . . . . . 81
Picture. . . . . . . . . . . . . . . . . . . . . . . . . . . . . . . . . . . . . . . . 83
Sound . . . . . . . . . . . . . . . . . . . . . . . . . . . . . . . . . . . . . . . . 83
Display . . . . . . . . . . . . . . . . . . . . . . . . . . . . . . . . . . . . . . . 85
Connection . . . . . . . . . . . . . . . . . . . . . . . . . . . . . . . . . . . . 85
Network . . . . . . . . . . . . . . . . . . . . . . . . . . . . . . . . . . . . . . . 87
Others . . . . . . . . . . . . . . . . . . . . . . . . . . . . . . . . . . . . . . . . 89
Software (Firmware) Update . . . . . . . . . . . . . . . . . . 92
Other Settings. . . . . . . . . . . . . . . . . . . . . . . . . . . . . . 93
Switching the aspect ratio of the screen . . . . . . . . . . . . . . 93
TV operation . . . . . . . . . . . . . . . . . . . . . . . . . . . . . . . . . . . 93
DMRBWT800&700GL_eng.book 4 ページ 2011年2月14日 月曜日 午後3時50分

Watching broadcasts
Recording
Playing back video
Editing video
Copying video
Photo
With Other Equipment
Music
Convenient functions
Troubleshooting
Reference
Getting started
VQT3C14
5
∫Troubleshooting
Messages on the unit’s display . . . . . . . . . . . . . . . .94
Troubleshooting guide . . . . . . . . . . . . . . . . . . . . . . .96
Power . . . . . . . . . . . . . . . . . . . . . . . . . . . . . . . . . . . . . . . . 96
Displays. . . . . . . . . . . . . . . . . . . . . . . . . . . . . . . . . . . . . . . 96
TV screen and video . . . . . . . . . . . . . . . . . . . . . . . . . . . . . 96
Sound . . . . . . . . . . . . . . . . . . . . . . . . . . . . . . . . . . . . . . . . 97
Operation . . . . . . . . . . . . . . . . . . . . . . . . . . . . . . . . . . . . . 97
Recording, timer recording and copying . . . . . . . . . . . . . . 98
Play . . . . . . . . . . . . . . . . . . . . . . . . . . . . . . . . . . . . . . . . . . 98
Edit . . . . . . . . . . . . . . . . . . . . . . . . . . . . . . . . . . . . . . . . . . 99
Photo . . . . . . . . . . . . . . . . . . . . . . . . . . . . . . . . . . . . . . . . . 99
Music. . . . . . . . . . . . . . . . . . . . . . . . . . . . . . . . . . . . . . . . . 99
USB. . . . . . . . . . . . . . . . . . . . . . . . . . . . . . . . . . . . . . . . . . 99
TV Guide . . . . . . . . . . . . . . . . . . . . . . . . . . . . . . . . . . . . . 100
Broadcast . . . . . . . . . . . . . . . . . . . . . . . . . . . . . . . . . . . . 100
VIERA Link . . . . . . . . . . . . . . . . . . . . . . . . . . . . . . . . . . . 100
Network . . . . . . . . . . . . . . . . . . . . . . . . . . . . . . . . . . . . . . 100
To reset this unit . . . . . . . . . . . . . . . . . . . . . . . . . . . . . . . 100
∫Reference
Regarding DivX . . . . . . . . . . . . . . . . . . . . . . . . . . . .101
Unit care . . . . . . . . . . . . . . . . . . . . . . . . . . . . . . . . . .102
Operations that can be performed
simultaneously . . . . . . . . . . . . . . . . . . . . . . . . . . . .104
Operations that can be performed while recording or
copying a title . . . . . . . . . . . . . . . . . . . . . . . . . . . . . . . . . 104
Starting the timer recording while executing other
operation . . . . . . . . . . . . . . . . . . . . . . . . . . . . . . . . . . . . . 105
Specifications . . . . . . . . . . . . . . . . . . . . . . . . . . . . .106
Audio information . . . . . . . . . . . . . . . . . . . . . . . . . . . . . . 108
About JPEG/MPO/MP3/DivX/
MKV/MPEG2/AVCHD files . . . . . . . . . . . . . . . . . . . . . . . 108
Recording modes and approximate recording
times . . . . . . . . . . . . . . . . . . . . . . . . . . . . . . . . . . . . . . . . 110
Maximum number of titles that can be recorded . . . . . . . 111
Licenses . . . . . . . . . . . . . . . . . . . . . . . . . . . . . . . . . .112
Limited Warranty . . . . . . . . . . . . . . . . . . . . . . . . . . .114
Glossary . . . . . . . . . . . . . . . . . . . . . . . . . . . . . . . . . .115
Index . . . . . . . . . . . . . . . . . . . . . . . . . . . . . . . . . . . . .117
About descriptions in these operating instructions
≥These operating instructions are applicable to models DMR-
BWT800 and DMR-BWT700. The illustrations in these Operating
Instructions show images of DMR-BWT800 unless otherwise
indicated.
[BWT800] :indicates features applicable to DMR-BWT800 only.
[BWT700] :indicates features applicable to DMR-BWT700 only.
≥Pages to be referred to are indicated as “>±±”.
DMRBWT800&700GL_eng.book 5 ページ 2011年2月14日 月曜日 午後3時50分

Getting started
VQT3C14
6
HDD and media information
(≤: Possible, –: Impossible)
≥The DVD-R, DVD-R DL, DVD-RW, +R, and +R DL after the finalisation are referred to as “[DVD-V]” in these operating instructions.
Discs
HDD and discs you can use for recording and play
Disc type Standard
symbol Data that can be recorded Rewritable Note
Hard disk drive
(HDD) [HDD]
Video (Including AVCHD)
Photo (JPEG/MPO)
Music (Copied from music
CD/MP3)
≤
BD-RE DL/
BD-RE
(50 GB/25 GB) [BD-RE] Video (Including AVCHD)
Photo (JPEG/MPO) ≤
BD-R DL/BD-R
(50 GB/25 GB)
[BD-R] Video (Including AVCHD) – ≥LTH type is also supported.
DVD-RAM
[RAM] Video (Not including AVCHD)
Photo (JPEG/MPO) ≤
≥Take the disc out from the cartridge to
use the DVD-RAM with a cartridge.
(TYPE1 cannot be used)
DVD-R
[-R]
Video (Including AVCHD)
–
DVD-R DL
[-R]DL] –
DVD-RW
[-RW‹V›]
Video (Not including AVCHD)
≤
+R [+R] –
+R DL [+R]DL] –
+RW [+RW] ≤≥8X Speed +RW disc is not supported.
DMRBWT800&700GL_eng.book 6 ページ 2011年2月14日 月曜日 午後3時50分

Getting started
VQT3C14
7
≥It may be necessary to finalize the disc or close the session on the equipment used for recording to play on this unit.
≥The producer of the disc can control how discs are played. So you may not always be able to control play as described in these operating instructions.
Read the disc’s instructions carefully.
≥With certain recording states and folder structures, the play order may differ or playback may not be possible.
≥Operation and sound quality of CDs that do not conform to CD-DA specifications (copy control CDs, etc.) cannot be guaranteed.
Play-only discs
Disc type Standard
symbol Playable contents
BD-Video
[BD-V]
High Definition (HD) movie and music discs
≥Information for High Bit Rate Audio (>108)
≥3D videos can be played back when this unit is connected
to a 3D compatible TV using an HDMI cable.
BD-R DL/BD-R
(50 GB/25 GB)
[BD-R]
Video (DivX®and MKV)
DVD-Video
[DVD-V]
Movie and music
DVD-RW
(DVD Video Recording format)
[-RW‹VR›]
DVD-RW video recorded on another DVD recorder
≥By formatting (>68) the disc, you can record onto it in
DVD-Video format.
DVD-R
DVD-R DL
[-R]
[-R]DL]
Video (DivX®and MKV)
Photo (JPEG/MPO)
Music (MP3)
BD-RE, BD-R, DVD-RAM, DVD-R,
DVD-R DL, DVD-RW,
+R, +R DL, +RW
[BD-R] [BD-RE]
[RAM]
[-R] [-R]DL]
[-RW‹V›] [+R]
[+R]DL] [+RW]
High Definition video recorded by Panasonic video camera,
etc.
CD
(including CD-R/RW)
[CD]
Music (CD-DA)
CD
(including CD-R/RW) [CD]
Video (DivX®and MKV)
Photo (JPEG/MPO)
Music (MP3)
DMRBWT800&700GL_eng.book 7 ページ 2011年2月14日 月曜日 午後3時50分

Getting started
VQT3C14
8
HDD and media information
§1The SD quality programme can not be converted to HD quality.
§2You cannot select during play whether it appears or disappears.
¾Recording modes and approximate recording times (>110)
∫FR (Flexible Recording Mode)
The unit automatically selects a recording rate between XP and EP (8 hours) that will enable the recordings to fit in the
remaining disc space with the best possible recording quality.
∫Play on other players
[BD-RE] [BD-R]
It can be played on the players compatible with BD-RE (Ver. 2.1) and BD-R.
≥When BD-RE and BD-R cannot be played back on other Blu-ray Disc players, etc. (e.g., title recorded with HE-AAC audio
format), convert the recording mode to play them back. (>47, File Conversion)
[-R] [-R]DL] [-RW‹V›] [+R] [+R]DL] [+RW]
Finalisation is needed. (>69)
[+RW]
If the disc failed to play on other equipment, we recommend you create a Top Menu (>69).
∫Regarding 8 cm Disc
This unit cannot record or edit the 8 cm disc. Only playback or copy to the HDD is possible.
∫Discs that cannot be played
≥Discs recorded on equipment other than this unit may not be used for recording on this unit.
Recording mode
Recording Mode DR HG/HX/HE/HL/HM XP/SP/LP/EP,
FR (>below)
Feature
(Quality)
Programmes can be recorded
in a nearly perfect broadcasted
state.
Recording can be done with
reduced recording volume in
HD quality.§1
Quality will be in SD quality
even if a programme in HD
quality is recorded
Supporting copies of various
types of media.
Recordable media
[HDD] [BD-R] [BD-RE]
[HDD] [BD-R] [BD-RE]
[RAM] [-R] [-R]DL] [-RW‹V›]
[+R] [+R]DL] [+RW]
Multiple audio
(audio language)
Record all multiple audio Record only one audio
Subtitles Can be recorded Can be recorded§2
Surround audio Surround audio as the
broadcast
Depends on the settings (>84,
Audio Type for Digital
Broadcast, Audio for HG / HX /
HE / HL / HM Recording)
Stereo audio
Notes for the disc
≥DVD-RAM that cannot be removed from their cartridges
≥2.6 and 5.2 GB DVD-RAM, 12 cm
≥DVD-Audio
≥HD DVD
≥WMA discs, DivX Plus HD discs
≥Super Video CD, Super Audio CD, Video CD
≥+R (8 cm), CD-ROM, Photo CD, PD, etc.
DMRBWT800&700GL_eng.book 8 ページ 2011年2月14日 月曜日 午後3時50分

Getting started
VQT3C14
9
Compatible SD card
– SD Memory Card (from 8 MB to 2 GB)
– SDHC Memory Card (from 4 GB to 32 GB)
– SDXC Memory Card (48 GB, 64 GB)
This unit is compatible with SD Memory Cards that meet
SD Card Specifications FAT12 and FAT16 formats, as well
as SDHC Memory Cards in FAT32 format and SDXC
Memory Cards in exFAT format.
≥Useable memory is slightly less than the card capacity.
≥If the SD card is formatted on other equipment, the time necessary for
recording may be longer. Also, if the SD card is formatted on a PC, you
may not be able to use it on this unit. In these cases, format the card on
this unit (>68).
≥SDHC Memory Cards and SDXC Memory Cards can be used in
equipment that is compatible with the appropriate cards. (SDHC Memory
Cards can also be used in equipment compatible with SDXC Memory
Cards)
Using either of these cards in a non-compatible PC or non-
compatible equipment may result in formatting etc. and the loss of
recorded content.
∫Setting the protection
∫Using miniSD card or microSD card
§Video images of the copyright-protected DivX contents
stored on USB device can be output only through the
HDMI output terminal.
Compatible USB memories
≥USB memories that support USB 1.0/1.1 and USB 2.0 Full
Speed/High Speed.
≥FAT16 and FAT32 file systems are supported.
≥This unit’s USB port does not support bus-powered USB device.
≥Despite meeting the conditions mentioned above, there may be USB
memories that cannot be used for this unit.
≥This unit supports connecting a USB memory, digital camera and video
camera produced by Panasonic, etc. It is not warranted that all USB
devices will meet this unit.
≥USB memories support DivX and MKV files less than 4 GB.
≥USB port at the rear of this unit is dedicated for optional Communication
Camera (TY-CC10W or compatible equipment).
The manufacturer accepts no responsibility and offers
no compensation for loss of recorded or edited material
due to a problem with the unit or recordable media, and
accepts no responsibility and offers no compensation
for any subsequent damage caused by such loss.
Examples of causes of such losses are
≥A disc recorded and edited with this unit is played in a Blu-
ray Disc Recorder or computer disc drive manufactured by
another company.
≥A disc used as described above and then played again in
this unit.
≥A disc recorded and edited with a Blu-ray Disc Recorder or
computer disc drive manufactured by another company is
played in this unit.
SD cards
Standard symbol Contents
[SD]
Photo (JPEG/MPO)
AVCHD
MPEG2 (Copy only)
Switch the write-protect switch to the
“LOCK” position.
Mini-type and micro-type cards can
also be used, but must be used with
adaptor cards. These are usually
supplied with such cards, or otherwise
customer provided.
e.g.,
LOCK
USB memories
Standard symbol Contents
[USB]
DivX (Play only)§
MKV (Play only)
Photo (JPEG/MPO)
MP3
AVCHD (Copy only)
MPEG2 (Copy only)
Notes
DMRBWT800&700GL_eng.book 9 ページ 2011年2月14日 月曜日 午後3時50分

Getting started
VQT3C14
10
Control reference guide
Instructions for operations are generally described using the remote control.
Remote control
1Turn the unit on or off (>18, 20)
2Select drive (HDD, BD, SD or USB) (>18)
3Select channels and title numbers, etc./Enter numbers
or characters (The character buttons may be used when
operating VIERA CAST contents.)
4To delete unwanted recorded titles, timer programmes,
Photos or music (>44)
5Basic operations for recording and play
6Programme information within TV Guide screen (>26)/
Show channel information (>25)/
Show Information (>39)/
Show status messages (>41)
7Selection/OK (>19), Frame-by-frame (>42)
8Show DIRECT NAVIGATOR, Top Menu, Pop-up Menu
(>36, 38)
9Show OPTION menu (>45, 58, 65)
:Colour buttons
Use in accordance with instruction on the screen.
;Recording functions (>28)
<Show Teletext (>25)
=Show subtitles (>25)
>Create chapter (>40)
?Skip the specified time (>42)
@Transmit the remote control signal
ATV operation area (>93)
BChannel select (>24)/
Change pages in the DIRECT NAVIGATOR screen etc.
(>38)
CShow VIERA CAST (>71)
DInput select (>24, 28, 66)
EStart up a video communication (>71)
FExit the menu screen
GShow the TV Guide screen (>26)
HShow FUNCTION MENU screen (>19)
IReturn to previous screen
JShow Setup menu (>78)
KShow Timer Recording screen (>32)
LShow Playback menu (>76)
MSelect audio (>25, 42)
NSkip approx. 1 minute forward (>41)
OSkip approx. 10 seconds backward (>41)
STATUS
F
U
N
C
T
I
O
N
M
E
N
U
D
I
R
E
C
T
N
A
V
I
G
A
T
O
R
G
U
I
D
E
RETURN
PLAY/x1.3
PAUSE
PAUSE LIVE TV
STOP
SLOW/SEARCH
SKIP
CH
PAGE
SELECT
INPUT
CH
AV
INPUT
TV
DRIVE
SELECT
DEL
BYGR
EXIT
OK
OPTION
VOL
0
2
abc
5
jkl
8
tuv
1
4
ghi
7
qrs
p
3
def
6
mno
9
xyz
w
TIME SLIP
DISPLAY
SETUP
AUDIO
-10s +60s
REC MODE
PROG/CHECK
REC
TEXT STTL
CHAPTER
MANUAL SKIP
REWIND LIVE TV
DMRBWT800&700GL_eng.book 10 ページ 2011年2月14日 月曜日 午後3時50分

Getting started
VQT3C14
11
1Standby/on switch (Í/I) (>18, 20)
Press to switch the unit from on to standby mode or vice
versa. In standby mode, the unit is still consuming a
small amount of power.
2Disc tray (>18)
3Blue LED
≥It is possible to set the LED to turn on/off. (>85)
4Recording indicator
≥The indicater will light up while recording.
≥The indicator will blink while recording is paused.
5CALL LED
≥The LED will light up when this unit receives incoming
call etc. of the video communication. (>71)
6Remote control signal sensor
– Angle: Approx. 20° up and down, 30° left and right
– Distance: Within approx. 7 m in front of the unit
7Open/close disc tray (>18)
8USB port (>18)
9SD card slot (>18)
:[BWT800] HDMI (SUB) V.OFF LED (Video off LED)
≥It is possible to set the LED to turn on/off. (>85)
;Channel select (>24)
<Start recording (>28)
=Stop
>Start play
?Display
1 SD card slot indicator
2 Copying indicator (>47)
3Discindicator
4 Drive (HDD, BD or SD) indicator
5 Remote control signal indicator
6 Main display section indicator
Current time/playback counter, various messages
7 Playback indicator
8 USB port indicator
9 Timer recording indicator
This indicator lights up when the timer recording
standby is activated.
¾Rear panel terminals (>12–17)
Main unit
Pull to flip down the
front panel.
PLAY
COPY
SD USB
HDDSD
BD
123
45 6789
DMRBWT800&700GL_eng.book 11 ページ 2011年2月14日 月曜日 午後3時50分

Getting started
VQT3C14
12
Connection
When connected to an HDMI compatible unit, you can enjoy high quality, digital video and audio.
3D programmes can be played back when this unit is connected to a 3D compatible TV using an HDMI cable.
≥Before connection, turn off all equipment and read the appropriate operating instructions.
≥Other TV connections (>15)
Basic connections
10BASE-T/
100BASE-TX
AC IN
AV OU TAV IN
R-AUDIO-L
VIDEO S VIDEO
COAXIAL
OPTICAL
DIGITAL AUDIO OUT
(PCM/BITSTREAM)
COMMUNICATION
CAMERA
RF INRF IN
RF OUTRF OUT
MAINMAIN SUBSUB
HDMI IN
VHF/UHF
RF IN
10BASE-T/
100BASE-TX
COMMUNI
C
CAMERA
RF OUT
RF OUT
To the aerial
TV
Aerial cable
This unit’s rear panel
To household mains socket
(AC 220 to 240 V, 50 Hz)
Cooling fan
AC mains lead
(supplied)
≥Connect only after all other
connections are complete.
RF coaxial cable
(supplied)
HDMI cable
When using Communication Camera (>71)
[BWT700]
DMRBWT800&700GL_eng.book 12 ページ 2011年2月14日 月曜日 午後3時50分

Getting started
VQT3C14
13
Required setting:
Set “HDMI Audio Output” to “On” (>86).
(The default setting is “On”.)
≥The HDMI connection supports VIERA Link “HDAVI Control” (>72).
[BWT800] (VIERA Link “HDAVI Control” can only be used on the
connection from the HDMI (MAIN) terminal.)
About HDMI cable
≥Please use High Speed HDMI Cables that have the HDMI
logo (as shown on the cover).
≥When outputting 1080p signal, please use HDMI Cables
5.0 meters or less.
≥Recommended Panasonic HDMI cable part number:
RP-CDHS15 (1.5 m), RP-CDHS30 (3.0 m), RP-CDHS50
(5.0 m), etc.
≥You cannot connect this unit to DVI devices that are incompatible with
HDCP.
Depending on the device, images may not display properly or at all when
connecting with a DVI/HDMI switching cable. (Audio cannot be output.)
≥If you are connecting to a TV that is only compatible with 2 channel
audio output, audio with 3 channels or more will be down mixed (>115)
and output as 2 channels, even if connecting with an HDMI cable.
(Some discs cannot be down mixed.)
≥Connect to terminals of the same colour.
§If the unit is connected to the TV with the supplied
Audio/Video cable (>15), the optional one is required.
When the unit is not to be used for a long time
To save power, unplug it from the household mains socket.
This unit consumes a small amount of power, even when it
is turned off
[approx. 0.2 W (“Power Save in Standby” is activated
and “RF OUT ( Aerial Signal )” is set to “Off”)]
Connect the Set Top Box or video
equipment
∫Connecting with
AUDIO/VIDEO terminals
∫Connecting with AUDIO
and S VIDEO terminals
AV OU TAV IN
R-AUDIO-L
VIDEO S VIDEO
SUB
AV OU TAV IN
R-AUDIO-L
VIDEO S VIDEO
AUDIO OUT VIDEO OUT
RL
AUDIO OUT S VIDEO OUT
RL
This unit’s rear panel
Set Top Box, etc.
S Video cable
Audio/Video cable
(supplied)§
This unit’s rear panel
DMRBWT800&700GL_eng.book 13 ページ 2011年2月14日 月曜日 午後3時50分

Getting started
VQT3C14
14
Connection
Following functions will be available when this unit is
connected to the network.
≥DLNA functions (>74, 75)
≥Network Service functions (>71)
≥BD-Live functions with Internet (>36)
≥Automatically acquiring the title of the CD (>62)
≥Updating the software (firmware) of this unit from Internet
(>92)
For details about connection method, refer to the
instructions supplied with the connected equipment.
≥Use category 5 or above straight LAN cables (STP) when connecting to
peripheral devices.
≥Inserting any cable other than a LAN cable in the LAN terminal can
damage the unit.
≥For up to date compatibility information on your Wireless router refer to
http://panasonic.jp/support/global/cs/
(This site is in English only.)
≥The unit is not compatible with public wireless LAN services provided in
airports, stations, cafes etc.
∫Precautions of Wireless LAN connection
The following limits are in place regarding the usage of this
unit. You must be aware of these limits before using this unit.
Panasonic will in no way be responsible for any incidental
damage which may arise due to a failure to obey these
limits, or to any condition of use or disuse of this unit.
≥Data transmitted and received over radio waves may
be intercepted and monitored.
≥This unit contains delicate electronic components.
Please use this unit in the manner in which it was intended
and follow the following points:
– Do not expose this unit to high temperatures or direct
sunlight.
– Do not bend, or subject this unit to strong impacts.
– Keep this unit away from moisture.
– Do not disassemble or alter this unit in any way.
Network connection
Using LAN (ethernet) cable
10BASE-T/
100BASE-TX
COAXIAL
OPTICAL
DIGITAL AUDIO OUT
(PCM/BITSTREAM)
COMMUNICATION
CAMERA
RF IN
RF IN
RF OUT
RF OUT
MAIN
MAIN
SUB
SUB
Broadband router, etc.
Internet
LAN cable
This unit’s rear panel
Using built-in Wireless LAN Adaptor
Internet
Broadband router, etc.
This unit
DMRBWT800&700GL_eng.book 14 ページ 2011年2月14日 月曜日 午後3時50分

Getting started
VQT3C14
15
≥Connect to terminals of the same colour.
Other TV connections
AUDIO/VIDEO terminals
AUDIO/VIDEO and S VIDEO
terminals
AV OU TAV IN
R-AUDIO-L
VIDEO S VIDEO
COAXIAL
AUDIO OUT
TSTREAM)
AUDIO IN VIDEO IN
LR
Audio/Video cable
(supplied)
TV
This unit’s rear panel
AV OU TAV IN
R-AUDIO-L
VIDEO S VIDEO
COAXIAL
OPTICAL
DIGITAL AUDIO OUT
(PCM/BITSTREAM)
COMMUNICATION
CAMERA
AUDIO IN
R L
S VIDEO
IN
Audio/Video cable
(supplied)
TV
This unit’s rear panel
S Video
cable
Connect the unit directly to the TV
If you connect the unit through an AV
selector or VCR to the TV, video signal
will be affected by copy protection
systems and the picture may not be
shown correctly.
≥When connecting to a TV with a
built-in VCR
Connect to the input terminals on the
TV side if there are both TV and VCR
input terminals.
TV
VCR
This unit
DO NOT
DMRBWT800&700GL_eng.book 15 ページ 2011年2月14日 月曜日 午後3時50分

Getting started
VQT3C14
16
Connection
≥Linked operation is possible by connecting to a TV or amplifier
compatible with VIERA Link.
≥When using a TV or an amplifier that does not display “ARC compatible”
on the HDMI terminal (not compatible with ARC), it is necessary to
connect the TV and the amplifier with a digital audio cable to enjoy the
TV audio on the amplifier.
Amplifier connections
10BASE-T/
100BASE-TX
COAXIAL
OPTICAL
DIGITAL AUDIO OUT
(PCM/BITSTREAM)
COMMUNICATION
CAMERA
RF INRF IN
RF OUTRF OUT
MAINMAIN SUBSUB
HDMI IN
HDMI INHDMI OUT
This unit’s rear panel
HDMI cable
Amplifier
TV
HDMI cable
(ARC compatible)
(ARC compatible)
3D programmes can be played back when this unit
is connected to a 3D compatible amplifier and a 3D
compatible TV using an HDMI cable.
≥You will not be able to view 3D programmes with this
connection if your amplifier is not 3D compatible.
When connecting an amplifier not
compatible with 3D
10BASE-T/
100BASE-TX
COAXIA
OPTICAL
DIGITAL AUDIO OUT
(PCM/BITSTREAM)
COMMUNICATION
CAMERA
RF INRF IN
RF OUTRF OUT
MAINMAIN SUBSUB
HDMI IN
HDMI IN
HDMI OUT
This unit’s rear panel
HDMI cable
Amplifier
TV
HDMI cable
(ARC compatible)
(ARC compatible)
3D programmes can be played back when this unit
is connected to a 3D compatible TV using an HDMI
cable.
≥The audio can only be up to 5.1ch.
DMRBWT800&700GL_eng.book 16 ページ 2011年2月14日 月曜日 午後3時50分

Getting started
VQT3C14
17
[BWT800]
You can enjoy richer sound by using the HDMI AV OUT
(SUB) terminal.
≥The VIERA Link function does not work with equipment connected to the
HDMI (SUB) terminal.
≥Set the “HDMI (SUB) Output Mode” to “V. OFF ( Video Off )“.
If it is set to “Normal” when the amplifier not compatible with 3D is
connected to the HDMI (SUB) terminal, playback of 3D video is not
possible with the power of the amplifier set to “ON”. (>86, HDMI (SUB)
Output Mode)
∫Using Optical digital audio cable
∫Using Coaxial cable
≥When connecting a TV with an HDMI OUT terminal, set “HDMI Audio
Output” to “Off” (>86).
≥When you use the optical digital audio cable, insert the tip correctly into
the terminal.
Via an HDMI AV OUT (MAIN) and
HDMI AV OUT (SUB) terminal
10BASE-T/
100BASE-TX
COAXIAL
OPTICAL
DIGITAL AUDIO OUT
(PCM/BITSTREAM)
COMMUNICATION
CAMERA
RF IN
RF IN
RF OUT
RF OUT
MAIN
MAIN
SUB
SUB
HDMI IN
HDMI IN
This unit’s rear panel
HDMI cable
Amplifier
TV
HDMI cable
3D programmes can be played back when this unit
is connected to a 3D compatible TV using an HDMI
cable.
≥Connect the TV and the amplifier with the following
cables to enjoy the audio from the TV with the
amplifier.
– ARC compatible: HDMI cable
– ARC not compatible: HDMI cable and optical digital
cable
When using DIGITAL AUDIO OUT
terminal
AV OU TAV IN
R-AUDIO-L
VIDEO S VIDEO
COAXIAL
OPTICAL
DIGITAL AUDIO OUT
(PCM/BITSTREAM)
COMMUNICATION
CAMERA
MAINMAIN SUBSUB
OPTICAL IN
This unit’s rear panel
Amplifier
Optical digital
audio cable
AV OU TAV IN
R-AUDIO-L
VIDEO S VIDEO
COAXIAL
OPTICAL
DIGITAL AUDIO OUT
(PCM/BITSTREAM)
COMMUNICATION
CAMERA
MAINMAIN SUBSUB
COAXIAL IN
Amplifier
Coaxial cable
This unit’s rear panel
DMRBWT800&700GL_eng.book 17 ページ 2011年2月14日 月曜日 午後3時50分

Getting started
VQT3C14
18
Common Operations
1Turn on the TV, then select the appropriate
AV input to suit the connections to this
unit.
2Press [Í] on the remote control or [Í/I]
on this unit.
The Easy Setting will start at the initial power on after
purchasing this unit. (>20)
≥When the indicator on this unit's display blinks, do not
turn off the unit or remove the media. Such action may
result in loss of the media contents.
≥When inserting the media, ensure that it is facing the right
way up.
≥Wipe off the dust or fingerprints from the discs before use.
(>103)
≥Return discs to their cases or cartridges after use; this
helps to protect the discs against scratches and dust.
≥When removing the SD card, press on the centre of the
card and pull it straight out.
≥If you connect a Panasonic product with a USB connection
cable, setup screen may be displayed on the connected
equipment. For details, refer to the instructions for the
connected equipment.
∫To select a drive
Press [DRIVE SELECT] to select the media drive that you
operate.
∫Release disc protection
[BD-RE] [BD-R] [RAM]
If the disc is protected when writing to the disc, release the
protection (>68, Setting the protection).
The HOLD function deactivates all buttons on the unit and
remote control.
To cancel the HOLD function
Press and hold [OK] and [RETURN ] simultaneously until
“X HOLD” disappears.
Preparations
Turning on this unit
TIME SLIP
DISPLAY
STATUS
SETUP
AUDIO
-10s +60s
REC MODE
PROG/CHECK
REC
TEXT STTL
CHAPTER
F
U
N
C
T
I
O
N
M
E
N
U
D
I
R
E
C
T
N
A
V
I
G
A
T
O
R
G
U
I
D
E
RETURN
PLAY/x1.3
PAUSE
PAUSE LIVE TV
STOP
SLOW/SEARCH
SKIP
CH
PAGE
SELECT
INPUT
CH
AV
TV
DRIVE
SELECT
DEL
BYGR
EXIT
OK
OPTION
MANUAL SKIP
VOL
0
2
abc
5
jkl
8
tuv
1
4
ghi
7
qrs
p
3
def
6
mno
9
xyz
w
INPUT
REWIND LIVE TV
TV operation
area (>93)
Inserting or removing a media
HOLD function
Press and hold [OK] and
[RETURN ]
simultaneously until
“X HOLD” appears on
the unit’s display.
Press [<OPEN/CLOSE] on
the main unit to open the tray
and insert a disc.
SD card
USB memory
Unit’s display
DMRBWT800&700GL_eng.book 18 ページ 2011年2月14日 月曜日 午後3時50分

Getting started
VQT3C14
19
This unit is basically operated via the following method by
using the remote control.
To select and enter
Operating method can also be confirmed on the screen.
Available functions and buttons used are displayed on each
screen.
Selecting screen for each operation is displayed when the
media is inserted, and you can access the operation screen
easily.
e.g., [USB]
≥Display items differ depending on what is recorded in each
media.
If the menu screen is not displayed, display it by
performing the following operation.
1While Stopped
Press [OPTION].
2Select “Drive Select”, then press [OK].
3Select the media, then press [OK].
You can easily access the desired functions via the
FUNCTION MENU.
1Press [FUNCTION MENU].
2Select the item, then press [OK].
≥Repeat step 2 if necessary.
§This is a display for when drive select is set to
HDD.
≥Selectable items will change depending on the type and status of the
media.
Basic operation
To return to the previous screen Press
To exit the screen Press
Display navigation
Menu screen
OK OK
Select Enter
RETURN
EXIT
Page
CopySelect
OPTION
05.01
08.01
10.01
03.02
PLAY
RETURN
PHOTO / MUSIC
KD2A01.01
01.01
02.01
Delete
Page Up
Page Down
USB
OK
RETURN
USB device is inserted.
View Photos
Play Video
Play / Copy Music ( MP3 )
Copy Video ( MPEG2 )
Copy Video ( AVCHD )
Copy New Photos
FUNCTION MENU screen
Playback Contents§
Video (>37)
Photo (>56)
Music (>62)
TV Guide (>26, 31)
Timer Recording (>32)
Copy
Copy Video (>51)
Copy Video ( AVCHD ) to DVD-R (>55)
Network
Home Network (DLNA) (>75)
Internet Content (>71)
Others§
Flexible Recording via AV input (>66)
BD-Video Data Management (>69)
Setup (>78)
Drive Select§
Disc / SD Card / USB
FUNCTION MENU
Drive Select
OK
RETURN
Titles recorded to the HDD can be viewed,
edited, or deleted.
Blu-ray
Timer Recording
Copy
Others
Disc / SD Card / USB
Network
Playback Contents
TV Guide
HDD
Video
Photo
Music
DMRBWT800&700GL_eng.book 19 ページ 2011年2月14日 月曜日 午後3時50分

Getting started
VQT3C14
20
Settings
1Turn on the TV, then select the
appropriate AV input to suit the
connections to this unit.
2Press [Í] to turn the unit on. (>18)
When the Download from TV screen is displayed, the
setting information on the TV is acquired by this unit.
≥If the region selection screen appears.
Select your region, then press [OK].
≥Auto-Tuning starts.
This takes about 3 minutes.
≥The acquisition may take some time depending on
the setting information.
∫When the Download from TV screen appears
The setting information on the TV is acquired by
this unit.
After tuning has been completed, clock will be set
automatically.
If the clock setting screen appears, set the time
manually (>90, Clock).
3Set “Power Save” to “On”, “On Timer”
or “Off”, then press [OK].
≥Power consumption is lowered additionally when
“RF OUT ( Aerial Signal )” is set to “Off”. (>89)
When “Easy Setting has been completed.” appears,
Easy Setting is complete.
To stop partway
Press [RETURN ].
To restart set up
1 Press [SETUP].
2 Select “Auto Setup” in “Digital TV Tuning”, then press
[OK].
¾If the TV aspect setting screen appears (>85, TV
Aspect)
¾To confirm that channels have been tuned correctly
(>24, Using Channel List)
Easy Setting
TIME SLIP
DISPLAY
STATUS
SETUP
AUDIO
-10s +60s
REC MODE
PROG/CHECK
REC
TEXT STTL
CHAPTER
F
U
N
C
T
I
O
N
M
E
N
U
D
I
R
E
C
T
N
A
V
I
G
A
T
O
R
G
U
I
D
E
RETURN
PLAY/x1.3
PAUSE
PAUSE LIVE TV
STOP
SLOW/SEARCH
SKIP
CH
PAGE
SELECT
INPUT
CH
AV
TV
DRIVE
SELECT
DEL
BYGR
EXIT
OK
OPTION
MANUAL SKIP
VOL
0
2
abc
5
jkl
8
tuv
1
4
ghi
7
qrs
p
3
def
6
mno
9
xyz
w
INPUT
REWIND LIVE TV
Scan
Digital TV Auto Tuning
CH 6 69
RF Ch
Digital TV: 0
Searching
QualityTypeChannel Name
RETURN
This will take about 3 minutes.
On It will go into the Power Save in Standby
mode.
On Timer Set the start and stop time and then
press [OK].
≥“Power Save in Standby” is activated
when the set time comes.
Off It is possible to start quickly from the
standby mode. (Quick Start mode)
≥If you use Home Network ( DLNA )
Server function (>88), select “Off”.
This function is not available with other
settings.
Power Save in Standby
AM AM
From To
Power Save
12 6
On
DMRBWT800&700GL_eng.book 20 ページ 2011年2月14日 月曜日 午後3時50分
Other manuals for DMR-BWT800
1
This manual suits for next models
1
Table of contents
Other Panasonic Blu-ray Drive manuals