Panasonic SC-VKX95 User manual

Operating Instructions
DVD Stereo System
Model No.SC-VKX95
RQT9950-2B
GA GS
Thank you for purchasing this product.
For optimum performance and safety, please read these instructions carefully.
Please keep this manual for future reference.
Your system and the illustrations can look differently.
Region code
This system plays DVD-Video marked with labels containing the region number or “ALL”:
Region Number Example
Southeast Asia 3
235
3
The Middle East and South Africa 2
235
2
SC-VKX95GAGS_RQT9950-2B_En.indd 1SC-VKX95GAGS_RQT9950-2B_En.indd 1 9/3/2014 11:09:39 AM9/3/2014 11:09:39 AM
printing rev.2
Confidential
Until:
25 Jul 2014

2
RQT9950
System SC-VKX95
Main unit SA-VKX95
Speakers SB-VKX95
Subwoofer SB-VKW95
– If you see this symbol –
Information on Disposal in other Countries outside
the European Union
This symbol is only valid in the
European Union.
If you wish to discard this product,
please contact your local authorities or
dealer and ask for the correct method
of disposal.
Safety precautions
WARNING!
Unit
• To reduce the risk of fire, electric shock or product
damage,
− Do not expose this unit to rain, moisture, dripping or
splashing.
− Do not place objects filled with liquids, such as
vases, on this unit.
− Use only the recommended accessories.
− Do not remove covers.
− Do not repair this unit by yourself. Refer servicing to
qualified service personnel.
− Do not let metal objects fall inside this unit.
CAUTION!
Unit
• To reduce the risk of fire, electric shock or product
damage,
− Do not install or place this unit in a bookcase, built-in
cabinet or in another confined space. Ensure this unit
is well ventilated.
− Do not obstruct this unit’s ventilation openings with
newspapers, tablecloths, curtains, and similar items.
− Do not place sources of naked flames, such as
lighted candles, on this unit.
• For South Africa
This unit is intended for use in moderate climates.
For others
This unit is intended for use in tropical climates.
• This unit may receive radio interference caused by
mobile telephones during use. If such interference
occurs, please increase separation between this unit
and the mobile telephone.
• This unit utilizes a laser. Use of controls or adjustments
or performance of procedures other than those
specified herein may result in hazardous radiation
exposure.
• Set the unit up on an even surface away from direct
sunlight, high temperatures, high humidity, and
excessive vibration.
AC mains lead
• The mains plug is the disconnecting device. Install this
unit so that the mains plug can be unplugged from the
socket outlet immediately.
Battery
• Danger of explosion if battery is incorrectly replaced.
Replace only with the type recommended by the
manufacturer.
• When disposing of the batteries, please contact your
local authorities or dealer and ask for the correct
method of disposal.
• Do not heat or expose to flame.
• Do not leave the battery(ies) in a car exposed to direct
sunlight for a long period of time with doors and
windows closed.
• Do not break open or short-circuit the battery.
• Do not charge the alkaline or manganese battery.
• Do not use the battery if the cover has peeled off.
• Remove the battery if you do not use the remote
control for a long period of time. Keep in a cool, dark
area.
SC-VKX95GAGS_RQT9950-B_En.indd 2SC-VKX95GAGS_RQT9950-B_En.indd 2 14-Jul-14 9:38:43 AM14-Jul-14 9:38:43 AM
printing rev.2
Confidential
Until:
25 Jul 2014

3
RQT9950
Licenses
Manufactured under license from Dolby Laboratories.
Dolby and the double-D symbol are trademarks of
Dolby Laboratories.
For DTS patents, see http://patents.dts.com.
Manufactured under license from DTS Licensing Limited.
DTS, the Symbol, & DTS and the Symbol together are
registered trademarks, and DTS 2.0+Digital Out is a
trademark of DTS, Inc.
© DTS, Inc. All Rights Reserved.
HDMI, the HDMI Logo, and High-Definition Multimedia
Interface are trademarks or registered trademarks of
HDMI Licensing LLC in the United States and other
countries.
“DVD Logo” is a trademark of DVD Format/Logo
Licensing Corporation.
This item incorporates copy protection technology
that is protected by U.S. patents and other intellectual
property rights of Rovi Corporation. Reverse
engineering and disassembly are prohibited.
The Bluetooth®word mark and logos are registered
trademarks owned by Bluetooth SIG, Inc. and any
use of such marks by Panasonic Corporation is under
license. Other trademarks and trade names are those
of their respective owners.
Google Play and Android are trademarks of Google
Inc.
MPEG Layer-3 audio coding technology licensed from
Fraunhofer IIS and Thomson.
Table of Contents
Safety precautions........................................................... 2
Licenses .......................................................................... 3
Note on AC mains lead ................................................... 4
Maintenance.................................................................... 4
About Bluetooth®............................................................. 4
Supplied accessories ...................................................... 5
Preparing the remote control........................................... 5
Placement of speakers.................................................... 5
Making the connections.................................................. 6
Overview of controls........................................................ 8
Easy Setup .................................................................... 10
Preparing the media...................................................... 10
Media playback ............................................................. 11
Using the navigation menus.......................................... 13
Using on-screen menus ................................................ 14
Radio ............................................................................. 16
Recording...................................................................... 17
Sound and illumination effects...................................... 19
Clock and timers ........................................................... 20
Using microphones ....................................................... 21
External equipment ....................................................... 22
Others............................................................................ 22
Changing system settings............................................. 23
Playable media.............................................................. 25
Language code list........................................................ 26
Troubleshooting............................................................. 27
Specifications................................................................ 30
SC-VKX95GAGS_RQT9950-B_En.indd 3SC-VKX95GAGS_RQT9950-B_En.indd 3 14-Jul-14 9:38:43 AM14-Jul-14 9:38:43 AM
printing rev.2
Confidential
Until:
25 Jul 2014

4
RQT9950
About Bluetooth®
Panasonic bears no responsibility for data and/or
information that can possibly be compromised during
a wireless transmission.
Frequency band
• This system uses the 2.4 GHz frequency band.
Certification
• This system conforms to the frequency restrictions and
has received certification based on frequency laws.
Thus, a wireless permit is not necessary.
• The actions below are punishable by law:
− Taking apart or modifying the main unit.
− Removing specification indications.
Restrictions of use
• Wireless transmission and/or usage with all Bluetooth®
equipped devices is not guaranteed.
• All devices must conform to standards set by
Bluetooth SIG, Inc.
• Depending on the specifications and settings of a
device, it can fail to connect or some operations can
be different.
• This system supports Bluetooth®security features.
But depending on the operating environment and/or
settings, this security is possibly not sufficient.
Transmit data wirelessly to this system with caution.
• This system cannot transmit data to a Bluetooth®
device.
Range of use
• Use this device at a maximum range of 10 m.
• The range can decrease depending on the
environment, obstacles or interference.
Interference from other devices
• This system may not function properly and troubles
such as noise and sound jumps may arise due to radio
wave interference if this unit is located too close to
other Bluetooth®devices or the devices that use the
2.4 GHz band.
• This system may not function properly if radio waves
from a nearby broadcasting station, etc. is too strong.
Intended usage
• This system is for normal, general use only.
• Do not use this system near an equipment or in
an environment that is sensitive to radio frequency
interference (example: airports, hospitals, laboratories,
etc.).
For United Arab Emirates only
UAE-TRA
REGISTERED No:
ER34195/14
DEALER No:
DA0052708/10
For Oman only
OMAN-TRA
R / 2083 / 14
D090281
Note on AC mains lead
(For the AC mains plug of three pins)
Before use
Remove the connector cover.
How to replace the fuse
The location of the fuse differs according to the type of
AC mains plug (figures A and B). Confirm the AC mains
plug fitted and follow the instructions below.
Illustrations may differ from actual AC mains plug.
1. Open the fuse cover with a screwdriver.
Figure A Figure B
2. Replace the fuse and close or attach the fuse cover.
Figure A Figure B
Maintenance
To clean this system, wipe with a soft, dry cloth.
• Never use alcohol, paint thinner or benzine to clean
this system.
• Before using chemically treated cloth, read the
instructions that came with the cloth carefully.
Fuse cover
Fuse
(5 ampere)
Fuse
(5 ampere)
SC-VKX95GAGS_RQT9950-2B_En.indd 4SC-VKX95GAGS_RQT9950-2B_En.indd 4 9/3/2014 3:27:34 PM9/3/2014 3:27:34 PM
printing rev.2
Confidential
Until:
25 Jul 2014

5
RQT9950
Supplied accessories
Check and identify the supplied accessories.
For Southeast Asia
2 AC mains leads
For the Middle East and South Africa
2 AC mains leads
For Saudi Arabia
1 AM loop antenna
1 FM indoor antenna
1 Video cable
1 HDMI cable
1 Remote control
(N2QAYB000998)
1 Remote control battery
Preparing the remote control
Use alkaline or manganese battery.
Install the battery so that the poles (+ and –) align with
those in the remote control.
Placement of speakers
Front speakers
The left and right speakers are the same.
You cannot remove the net of the speakers.
Subwoofer
Put the subwoofer on the left or right side of the TV, on
the floor or a sturdy shelf to reduce vibration.
Keep the subwoofer more than 30 cm from the TV.
CAUTION!
Do not touch the subwoofer cone’s reverberating
surfaces:
• This may damage the subwoofer cone.
• The subwoofer cone may be hot.
Use only the supplied speakers.
You can cause damage to the system and decrease the
sound quality if you use other speakers.
Note:
• Keep your speakers more than 10 mm from the main unit
for ventilation.
• Put the speakers on a flat safe surface.
• These speakers do not have magnetic shielding. Do not put
them near TVs, PCs or other equipment easily influenced
by magnetism.
• When you play at high levels for a long period, it can
cause damage to the speakers and decrease the life of the
speakers.
• Decrease the volume in these conditions to prevent
damage:
− When the sound is distorted.
− When you adjust the sound quality.
Irregular colour on your TV
The setup condition of the speakers can cause
unwanted effects to the picture of the TV.
If this occurs, switch off the TV for 30 minutes.
If the demagnetising of the TV does not correct the
problem, increase the distance between the speakers
and the TV.
CAUTION!
• Use the speakers only with the recommended
system. If not, you can cause damage to the
amplifier and speakers and can cause a fire.
Consult an approved service personnel if damage
occurs or if there is a sudden apparent change in
performance.
• Do the procedures included in these instructions
when you attach the speakers.
SC-VKX95GAGS_RQT9950-B_En.indd 5SC-VKX95GAGS_RQT9950-B_En.indd 5 14-Jul-14 9:38:43 AM14-Jul-14 9:38:43 AM
printing rev.2
Confidential
Until:
25 Jul 2014

6
RQT9950
Making the connections
Connect the AC mains lead only after all the other
connections have been made.
3a
3b
5
1
2
4
1 Connect the AM loop antenna.
Stand the antenna up on its base until it clicks.
B
A
2 Connect the FM indoor antenna.
Put the antenna where reception is best.
3 Connect the speakers.
Connect the speaker cables to the terminals of the
same colour.
Adhesive tape
(not supplied)
SC-VKX95GAGS_RQT9950-1B_En.indd 6SC-VKX95GAGS_RQT9950-1B_En.indd 6 8/18/2014 5:51:56 PM8/18/2014 5:51:56 PM
printing rev.2
Confidential
Until:
25 Jul 2014

7
RQT9950
Alternative connection to a TV
To listen to the TV audio on this system, connect the
audio cable to this system.
AUX 1 terminal
5 Connect the AC mains lead.
(For the AC mains plug of three pins)
READ THE “Note on AC mains lead” BEFORE
CONNECTION.
Do not use an AC mains lead from other equipment.
Conserving power
The system consumes a small amount of power even
when it is in standby mode. Disconnect the power
supply if you do not use the system.
Some settings will be lost after you disconnect the
system. You have to set them again.
4 Connect the TV to this system.
Connect either HDMI cable or video cable to this
system.
HDMI terminal
HDMI IN
This connection provides the best picture quality.
• Set “VIDEO PRIORITY” to “ON” (Z24, “HDMI”
menu).
• Set “VIDEO FORMAT” in Menu 4 (HDMI) (Z16).
Note:
• Use the supplied HDMI cables.
• If you use an optional HDMI cable, use High Speed HDMI
Cables. Non-HDMI compliant cables cannot be utilised.
• It is recommended that you use Panasonic HDMI cable.
When outputting 1080p signal, use HDMI cables 5.0 m or
less.
• For TV with more than one HDMI terminal, refer to the TV’s
operating instructions for the connection.
VIDEO OUT terminal
Note:
Do not make the video connections through the VCR.
The video cannot show correctly because of copy-guard
protection.
TV
(not supplied)
Video cable
To household
mains socket
HDMI cable
TV
(not supplied)
TV
(not supplied)
Audio cable
(not supplied)
SC-VKX95GAGS_RQT9950-1B_En.indd 7SC-VKX95GAGS_RQT9950-1B_En.indd 7 8/25/2014 10:43:51 AM8/25/2014 10:43:51 AM
printing rev.2
Confidential
Until:
25 Jul 2014

8
RQT9950
Overview of controls
Do the procedures with the remote control. You can also use the buttons on the main unit if they are the same.
REPEAT
PLAY MODE
RETURN
USB REC
CLOCK/TIMER
SETUP
FL DISPLAY
DIMMER
INPUT
TV
P
L
A
Y
L
I
S
T
AV
CANCEL
DEL
DVD/CD
RADIO
AUX
SLOW(PAUSE)
SOUND
AUTO OFF
PLAY/REC
EDIT MODE
SLEEP
ILLUMINATION/
CONTROL
DVD
/
CD
TUNE
MODE
OPEN/CLOSE
AUX IN 2
ALBUM/
TRACK
PAIRING
PRESET EQ
M
ANUAL
EQ
LOCAL
/
USB REC
VOLU
ME
A
B
PLAY
REC / PLAY
/ USB
FL DISPLAY
DIMMER
KARAOKE
VOCAL CANCEL
ECHO
KEY-CON
D
J J
UKEBOX
D.BASS
–SUPER WOOFER
RADIO/AUX
MIC VOL 1 MIC VOL 2
MIN
MAX
MIN
MAX
MIC 1 MIC 2
A
B
C
D
6
E
8
7
9
L
M
N
P
O
Q
R
S
J
K
T
U
A
E
V
X
F
J
Y
Z
9
W
a
E
b
d
g
f
c
D
M
e
h
SC-VKX95GAGS_RQT9950-1B_En.indd 8SC-VKX95GAGS_RQT9950-1B_En.indd 8 8/18/2014 12:01:46 PM8/18/2014 12:01:46 PM
printing rev.2
Confidential
Until:
25 Jul 2014

9
RQT9950
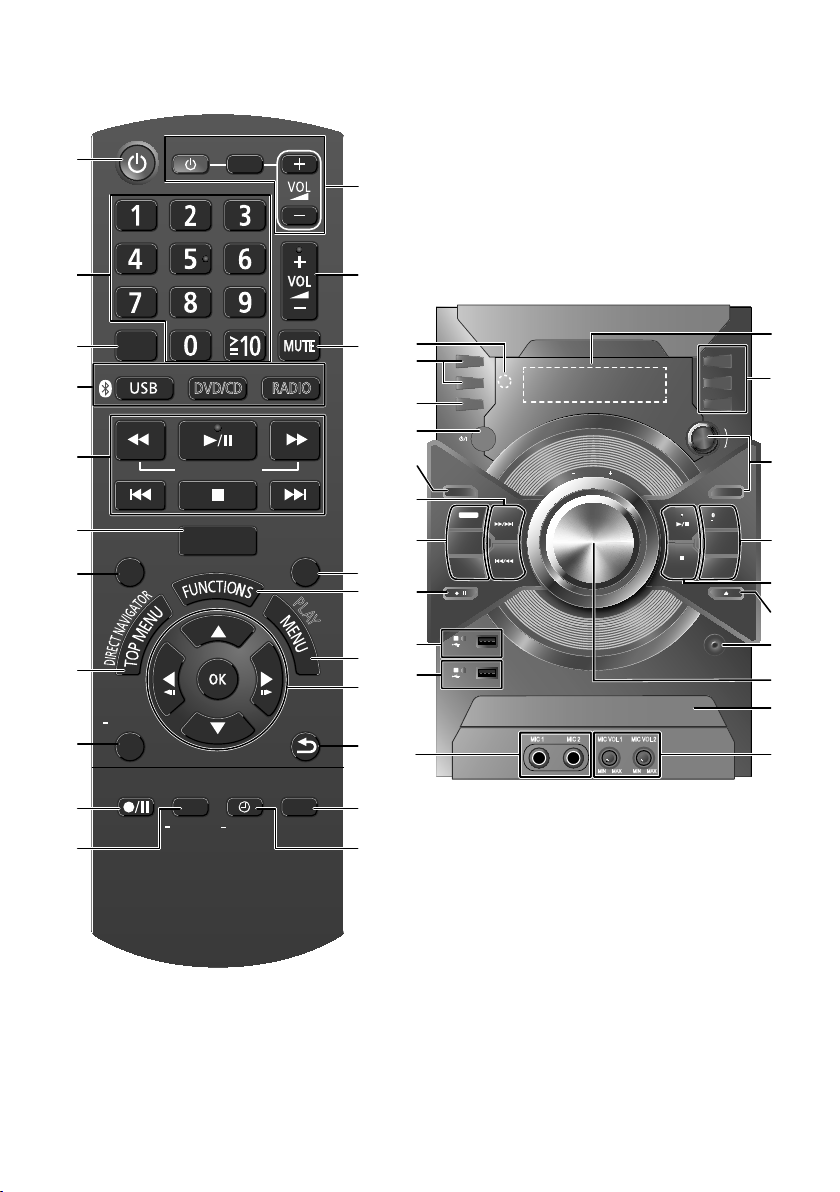
AStandby/on switch [`], [1] (Z10, 30)
Press to switch the unit from on to standby mode
or vice versa. In standby mode, the unit is still
consuming a small amount of power.
BNumeric buttons
To set a 2-digit number
Example: 16: [ 10] =[1] =[6]
CCancel an item (Z12)
Delete the programmed tracks (Z12)
DSelect the source
On the main unit:
To start Bluetooth®pairing, press and hold
[ /USB, –PAIRING] when you are in Bluetooth®
source.
EBasic playback control (Z11)
FSelect the sound effects (Z19)
Select the super woofer effect
On the main unit:
Press and hold [–SUPER WOOFER].
Press [2/3] or [5/6] to select the setting.
GRepeat playback (Z12)
HShow the disc top menu (Z13)
Show the program list (Z14)
IView the information shown on the display panel
(Z11)
Decrease the brightness of the display panel
(Z28)
Press and hold the button to use this function.
To cancel, press and hold the button again.
On the main unit:
Press [DIMMER] to use this function.
JRecord content to a USB device (Z17, 18)
KSet the sleep timer (Z20)
Automatically switch off the system
The auto off function switches off the system if you
do not use the system for approximately 20 minutes
(except when you are in radio source or when a
Bluetooth®device is connected).
Press and hold the button to use this function.
To cancel, press and hold the button again.
LOperate a Panasonic TV (compatible models only)
Point the remote control to a Panasonic TV:
[`]: Switch on or switch off the TV
[AV]: Change the video input mode of the TV
[+/ –, VOL]: Adjust the volume of the TV
MAdjust the volume level of the system
NMute the sound
To cancel, press the button again.
“MUTE” is also cancelled when you adjust the
volume or when you switch off the system.
OSet the play mode item (Z11, 12, 16, 22)
PShow the on-screen menu (Z14)
QShow the disc menu or playlist (Z14)
RSelect or confirm menu items
View frame-by-frame (Z11)
Browse albums on USB A-AUDIO and USB B-AUDIO
source
Press [R, T] to browse.
SGo back to the previous screen (Z12, 23)
TChange the system settings (Z10, 23)
Set the edit mode for USB B (Z18)
USet the clock and timer (Z20)
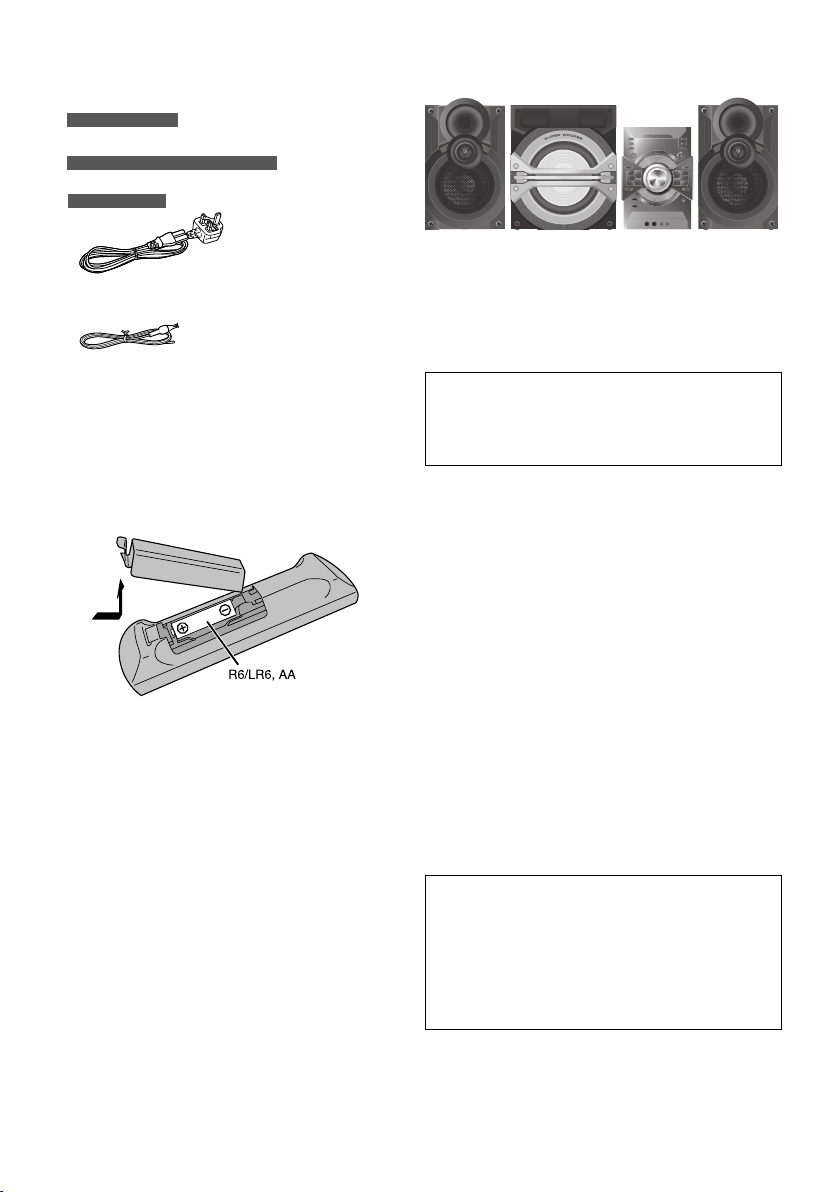
VRemote control sensor
Distance: Within approximately 7 m
Angle: Approximately 20° up and down, 30° left and
right
WSelect the Karaoke mode (Z21)
XSelect the DJ Jukebox (Z19)
YUSB A
USB port ( )
USB status indicator
Play MP3 tracks, Xvid and JPEG.
Record MP3 tracks to USB B .
ZUSB B
USB port ( )
USB status indicator
Record sound or music tracks.
Play MP3 tracks, Xvid and JPEG.
aMicrophone jacks (Z21)
bDisplay panel
cSelect the Karaoke sound effect (Z21)
dSelect MP3 album or track
Press [ALBUM/TRACK] to select album or track.
Browse tracks or albums
Turn [CONTROL] to browse.
To start playback from the selection, press [4/9].
Illumination
Turn [ILLUMINATION] to select the setting.
eOpen or close the disc tray (Z10)
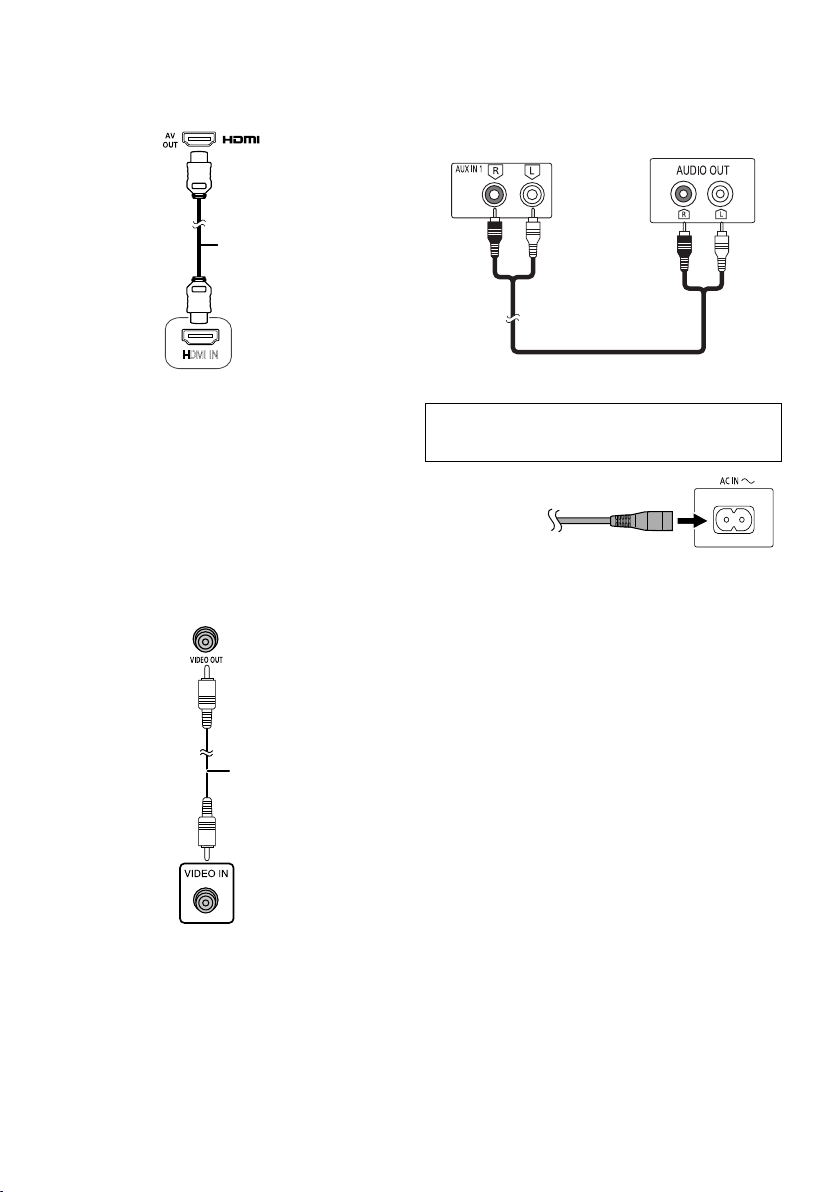
fAUX IN 2 jack (Z22)
gDisc tray
hAdjust the volume of the microphone
SC-VKX95GAGS_RQT9950-1B_En.indd 9SC-VKX95GAGS_RQT9950-1B_En.indd 9 06-Aug-14 12:52:46 PM06-Aug-14 12:52:46 PM
printing rev.2
Confidential
Until:
25 Jul 2014

10
RQT9950
Easy Setup
The EASY SETUP screen assists you in making basic
settings.
Preparation
Switch on your TV and change its video input mode
(example: HDMI, AV 1, etc.).
1 Press [`] to switch on the system.
If the EASY SETUP screen appears, skip steps 2 to
6.
2 Press [DVD/CD].
3 Press [SETUP] to show the SETUP menu.
4 Press [R, T] to select “OTHERS” and then press
[OK].
SET
MAIN
DISC
VIDEO
AUDIO
DISPLAY
HDMI
EXIT : SETUP
RETURN
OTHERS
5 Press [R, T] to select “EASY SETUP” and then
press [OK].
6 Press [OK] to select “SET”.
7 Press [R, T] to select “YES” and then press [OK].
8 Follow the messages and make the settings with
[R, T
, Y, U] and then press [OK].
Language Select the language for the
on-screen messages.
TV aspect Select the aspect ratio that suits
your TV.
9 Press [OK] to finish EASY SETUP.
Press [SETUP] to close the screen.
Note:
Settings in the EASY SETUP can also be changed in the
system settings (Z23, “Changing system settings”).
Menu
Preparing the media
Disc
1 Press [xOPEN/CLOSE] on the main unit to open
the disc tray.
Put in a disc with the label facing up.
2 Press [DVD/CD].
USB
Preparation
Before you connect a USB device to the system, make
sure you do a backup of the data.
/
USB REC
A
B
PLAY
REC / PLAY
D.BASS
–SUPER WOOFER
1 Decrease the volume and connect the USB device
to the USB port.
Hold the main unit when connecting or disconnecting
the USB device.
2 Press [USB] to select “USB A-AUDIO”, “USB
A-VIDEO”, “USB B-AUDIO” or “USB B-VIDEO”.
USB status indicator lights up in red when selected.
Note:
• Do not use a USB extension cable. The system cannot
recognise USB device connected through a cable.
• USB A-AUDIO and USB B-AUDIO source support MP3
format only.
• USB A-VIDEO and USB B-VIDEO source support JPEG
and Xvid formats only.
Bluetooth®
You can connect and play an audio device wirelessly
through Bluetooth®.
Preparation
• Switch on the Bluetooth®feature of the device and put
the device near the system.
• Read the operating instructions of the device for
details.
USB device
(not supplied)
SC-VKX95GAGS_RQT9950-B_En.indd 10SC-VKX95GAGS_RQT9950-B_En.indd 10 14-Jul-14 9:38:44 AM14-Jul-14 9:38:44 AM
printing rev.2
Confidential
Until:
25 Jul 2014

11
RQT9950
█Pairing a device
Preparation
If this system is connected to a Bluetooth®device,
disconnect it (Zbelow, “Disconnecting a device”).
1 Press [ , USB] (main unit: [ /USB, –PAIRING]) to
select “BLUETOOTH”.
If “PAIRING” is shown, continue with step 4.
2 Press [PLAY MODE] to select “PAIRING”.
Or press and hold [ /USB, –PAIRING] on the main
unit until “PAIRING” is shown. Continue with step 4.
3 Press [Y, U] to select “OK? YES” and then press
[OK].
4 Select “SC-VKX95” from the Bluetooth®menu of
the device.
If prompted for a passkey, input “0000”.
The device connects with this system automatically
after pairing is complete.
The name of the connected device is shown for a few
seconds.
Note:
You can pair up to 8 devices with this system. If a 9th device
is paired, the device that has not been used for the longest
time will be replaced.
█Connecting a device
Preparation
If this system is connected to a Bluetooth®device,
disconnect it (Zbelow, “Disconnecting a device”).
1 Press [ , USB] (main unit: [ /USB, –PAIRING]) to
select “BLUETOOTH”.
“BLUETOOTH READY” is shown.
2 Select “SC-VKX95” from the Bluetooth®menu of
the device.
The name of the connected device is shown for a few
seconds.
3 Start playback on the device.
Note:
• A device must be paired to connect.
• The system can only connect to one device at a time.
• When “BLUETOOTH” is selected as the source, this system
will automatically try to connect to the last connected
device. (“LINKING” is shown during this process.)
• Press [FL DISPLAY] repeatedly to view the name and profile
of the connected device.
█Disconnecting a device
1 Press [ , USB] (main unit: [ /USB, –PAIRING]) to
select “BLUETOOTH”.
2 Press [PLAY MODE] repeatedly to select
“DISCONNECT?”.
3 Press [Y, U] to select “OK? YES” and then press
[OK].
“BLUETOOTH READY” is shown.
To cancel, select “OK? NO”.
Using the main unit
Press and hold [ /USB, –PAIRING] until “PAIRING” is
shown.
Note:
A device is disconnected when you:
• Select a different source.
• Move the device out of the maximum range.
• Disable the Bluetooth®transmission of the device.
• Switch off the system or the device.
Media playback
(Z25, “Playable media”)
Basic playback
Preparation
To view the picture, switch on your TV and change its
video input mode (example: HDMI, AV 1, etc.).
Play Press [4/9].
Stop Press [8] during playback.
The position is memorised.
“RESUME STOP” shows on the
screen.
Press again to stop fully.
Pause Press [4/9] during playback.
Press again to continue playback.
Skip track or
content Press [2] or [6] (main unit:
[2/3] or [5/6]).
Search
(during
playback)
Slow-motion
(during pause)
Press [3] or [5].
Or
Press and hold [2/3] or
[5/6] on the main unit.
• Up to 5 speeds.
• Press [4/9] to continue normal
playback.
View
frame-by-frame
(during pause) Press [e] or [E] to go to the
previous or next frame.
Press [E] to go to the next frame.
View
information
Press [FL DISPLAY] to show
available information on the display
panel.
Note:
• For Bluetooth®, only Play, Stop, Pause, Skip and Search
can be selected.
• Depending on the type of media, some operations are
restricted.
SC-VKX95GAGS_RQT9950-1B_En.indd 11SC-VKX95GAGS_RQT9950-1B_En.indd 11 8/19/2014 5:23:34 PM8/19/2014 5:23:34 PM
printing rev.2
Confidential
Until:
25 Jul 2014

12
RQT9950
Repeat playback
This works only when the elapsed play time can be
shown. It also works with all JPEG contents.
During playback
Press [REPEAT] to select the item to play again.
Example:
TITLE CHAP.
OFF
To cancel, select “ OFF”.
Note:
Depending on the type of media and playback mode, the
display shows different items.
Link mode
(For Bluetooth®source)
You can change the link mode to suit the connection
type.
Preparation
If this system is connected to a Bluetooth®device,
disconnect it (Z11, “Disconnecting a device”).
1 Press [PLAY MODE] to select “LINK MODE”.
2 Press [Y, U] to select the setting and then press
[OK].
MODE 1 Emphasis on connectivity.
MODE 2 (default) Emphasis on sound quality.
Play mode
While stopped
Press [PLAY MODE] to select the playback mode.
(For USB A-AUDIO and USB B-AUDIO source)
1-TRACK
1-TR Play one selected track.
Press the numeric buttons to
select the track.
1-ALBUM
1-ALB Play one selected MP3 album.
Press [R, T] to select the MP3
album.
PROGRAM
PGM Play programmed tracks.
1. Press [R, T] to select the
album.
2. Press [6] and then press
the numeric buttons to select
the track.
3. Press [OK].
RANDOM
RND Play all tracks randomly.
1-ALBUM
RANDOM
1-ALB RND
Play all tracks in one selected
MP3 album randomly.
Press [R, T] to select the MP3
album.
(For DVD/CD, USB A-VIDEO and USB B-VIDEO source)
Program Random
Note:
• During random playback, you cannot skip to tracks which
have been played.
• The setting is cancelled when you open the disc tray.
• Select “DATA” in “DVD-VR/DATA”
(Z24, “OTHERS” menu) to play MP3, JPEG or Xvid
contents.
• If “PLAYBACK MENU” screen appears, refer to “Using
playback menu” (Z13).
• For a disc with MP3 and JPEG contents, select music or
picture contents.
MP3: Select “MUSIC PROGRAM” or “MUSIC RANDOM”.
JPEG: Select “PICTURE PROGRAM” or “PICTURE
RANDOM”.
• Some items cannot be played even if you have
programmed them.
█Program playback (maximum 30 items)
1 Press [R, T] to select an item and then press
[OK].
Example:
DVD-V PROGRAM
SELECT TITLE TITLE CHAPTER
TITLE 1
TITLE 2
TITLE 3
TITLE 4
TITLE 5
TITLE 6
TITLE 7
1
2
3
4
5
6
7
8
• Do this step again to program other items.
• To go back to the previous menu, press
[, RETURN].
2 Press [4/9] to start playback.
To select all the items
Press [R, T] to select “ALL” and then press [OK].
To clear the selected program
1. Press [U] and then press [R, T] to select the program.
2. Press [CANCEL DEL].
To clear the whole program
Press [U] to select “CLEAR ALL” and then press [OK].
Note:
The whole program is also cleared when you:
− Open the disc tray.
− Switch off the system.
− Select another source.
Close program and
random screens
SC-VKX95GAGS_RQT9950-B_En.indd 12SC-VKX95GAGS_RQT9950-B_En.indd 12 14-Jul-14 9:38:45 AM14-Jul-14 9:38:45 AM
printing rev.2
Confidential
Until:
25 Jul 2014

13
RQT9950
█Random playback
1 Press [R, T] to select a group or title.
2 Press [OK] to put “*” on your selection.
Example:
DVD-V RANDOM
SELECT TITLE
TITLE 1
TITLE 2
TITLE 3
TITLE 4
TITLE 5
TITLE 6
TITLE 7
To cancel a selection, press [OK] again.
3 Press [4/9] to start playback.
Using the navigation menus
Using playback menu
█Playing data discs
Select “DATA” in “DVD-VR/DATA”
(Z24, “OTHERS” menu) to play MP3, JPEG or Xvid
contents.
“PLAYBACK MENU” shows when the disc contains
video (Xvid) and other formats (MP3/JPEG).
1 Press [R, T] to select “AUDIO/PICTURE” or
“VIDEO” and then press [OK].
OK
PLAYBACK MENU
AUDIO/PICTURE
VIDEO
2 Press [4/9] to start playback.
█Playing USB
“PLAYBACK MENU” shows when you select “USB
A-VIDEO” or “USB B-VIDEO”.
1 Press [R, T] to select “PICTURE” or “VIDEO” and
then press [OK].
OK
PLAYBACK MENU
PICTURE
VIDEO
2 Press [4/9] to start playback.
MP3/JPEG
Xvid
JPEG
Xvid
Playing from the selected item
While the “DATA-DISC” screen is shown
Group/Album
(Folder)
DATA-DISC
ROOT
Perfume
Underwater
Fantasy planet
Starpersons1
Content/Track
(File)
: MP3
: JPEG
: Xvid
1 Press [R, T] to select an item.
Press [Y, U] to skip page by page.
2 Press [OK] to start playback.
Playback starts from the item you select to the last
item in the group or album.
To close the screen, press [MENU].
Selecting picture in thumbnail menu
While the display shows a picture
1 Press [TOP MENU].
2 Press [R, T
, Y, U] to select a picture and then
press [OK].
Press [6] or [2] to skip page by page.
To select a picture in other groups
1. Press [R] to select the group name.
2. Press [Y, U] to select the group and then press [OK].
Jpeg(JPEG) G 2/ 4:C 3/ 9
To close the screen, press [MENU].
Group and
content number
Group name
SC-VKX95GAGS_RQT9950-B_En.indd 13SC-VKX95GAGS_RQT9950-B_En.indd 13 14-Jul-14 9:38:45 AM14-Jul-14 9:38:45 AM
printing rev.2
Confidential
Until:
25 Jul 2014

14
RQT9950
Playing DVD-R/-RW (DVD-VR) discs
• Display shows the title only if a title is given during
recording.
• You cannot edit programs, playlists and disc titles.
█Playing the programs
While stopped
1 Press [DIRECT NAVIGATOR].
2 Press [R, T] to select the program and then press
[OK].
Press [Y, U] to skip page by page.
PG DATE LENGTH TITLE
10:16:02
10/11 LIVE CONCERT
02:15
20:38:25
12/05 AUTO ACTION
311605
04/03 CINEMA
01:30
To close the screen, press [DIRECT NAVIGATOR].
█Playing the playlist
This works only when the disc contains a playlist.
While stopped
1 Press [PLAYLIST].
2 Press [R, T] to select the playlist and then press
[OK].
Press [Y, U] to skip page by page.
PL DATE LENGTH TITLE
10:00:10
11/11 CITY PENGUIN
00:01
20:01:20
12/01 FOOTBALL
31:10:04
01/02 SPECIAL
01:20
To close the screen, press [PLAYLIST].
Using on-screen menus
1 Press [FUNCTIONS] to show the on-screen menu.
Menu 1 (Disc/Play) Menu 2 (Video)
Exit Menu 4 (HDMI)
Menu 3 (Audio)
T
1
C1 1:ENG 3/2.1ch
1 :ENG
OFF
TITLE SEARCH
2 Press [R, T
, Y, U] to select an item and then
press [OK].
Example: Menu 1 (Disc/Play)
T
1
C1 1:ENG 3/2.1ch
1 :ENG
OFF
CHAPTER SEARCH
3 Press [R, T] to make the settings and then press [OK].
To close the screen, press [ , RETURN].
The type of disc and the disc format can cause
some items tonot show or work.
█Menu 1 (Disc/Play)
TRACK SEARCH, TITLE SEARCH, CONTENT
SEARCH, CHAPTER SEARCH, PG SEARCH
(program search), PLSEARCH (playlist search)
Start playback from a specified item
This function does not work when you play a disc
with the playback control (PBC) function.
Example: : T2 C5
To select numbers for data disc
Example: 12: [ 10] =[1] =[2] =[OK]
AUDIO
(with multiple soundtrack)
Select audio soundtrack
Change the audio mode (when using Karaoke formatted
source)
Solo disc
OFF: Vocals off
ON: Vocals on
Duet disc
OFF: Vocals off
V1+V2: Vocal 1 and 2
V1: Vocal 1
V2: Vocal 2
Select “L”, “R”, “L+R” or “L R”
Item name
Current item
Current setting
SC-VKX95GAGS_RQT9950-B_En.indd 14SC-VKX95GAGS_RQT9950-B_En.indd 14 14-Jul-14 9:38:45 AM14-Jul-14 9:38:45 AM
printing rev.2
Confidential
Until:
25 Jul 2014

15
RQT9950
Signal type/data
LPCM/PPCM/GD/DTS/MP3/MPEG:
Signal type kHz (sampling frequency)/bit/ch (number of
channels)
Example: 3/2 .1ch
.1: Low frequency effect
(not shown if there is no signal)
0: No surround
1: Mono surround
2: Stereo surround (left/right)
1: Center
2: Front left + Front right
3: Front left + Front right + Center
It can be a while before playback starts if you
change the audio of a Xvid disc.
PLAY SPEED
Change play speed
– from “x0.6” to “x1.4” (in 0.1-unit step)
• Press [4/9] two times to continue normal playback.
• After you change the speed:
− Audio output will switch to 2-channel stereo.
− Sampling frequency of 96 kHz is converted to
48 kHz.
REPEAT MODE
(Z12, “Repeat playback”)
A-B Repeat: Repeat a specified section
Except (still picture part)
(SVCD only)
Press [OK] at the start and end points.
• To cancel, select “OFF”.
SUBTITLE
(with multiple subtitles) (SVCD only)
Select subtitle language
• For +R/+RW disc, a number display will replace the
subtitles that cannot be shown.
(with subtitle on or off information)
ON ↔OFF
ANGLE
(with multiple angles)
Select a video angle
DATE DISPLAY
Show the date of a picture
ON ↔OFF
ROTATION
Rotate a picture (during pause)
0 ↔90 ↔180 ↔270
█Menu
2
(Video)
PICTURE MODE
NORMAL: Normal images.
CINEMA1: Mellows images and enhances details in
dark scenes.
CINEMA2: Sharpens images and enhances details in
dark scenes.
DYNAMIC: Enhances the contrast for powerful images.
ANIMATION: Suitable for animation.
ZOOM
Select zoom sizes
NORMAL, AUTO ( ), x2,
x4
(during pause)
TRANSFER MODE
Select the method of conversion for video output
accordingly
When playing PAL discs
AUTO: Converts the film and video automatically.
VIDEO: Select when the content is distorted in the
“AUTO” mode.
FILM: Select when the edges of the film content are
jagged or rough in the “AUTO”
mode.
But, if the video content is
distorted (as illustrated on
the right), then select “AUTO”.
When playing NTSC discs
AUTO1: Converts the film and video automatically.
AUTO2: Select to automatically sense the differences in
the frame rates of the film content and converts
it accordingly.
VIDEO: Select when the video content is distorted in
the “AUTO1” or “AUTO2” mode.
SOURCE SELECT
AUTO: Converts the Xvid content
automatically.
INTERLACE: Select if the Xvid content was encoded
in interlace format.
PROGRESSIVE: Select if the Xvid content was encoded
in progressive format.
█Menu 3 (Audio)
DIALOGUE ENHANCER
Make the dialogue in films easier to hear
(Dolby Digital, DTS, 3-channel or higher, with the
dialogue recorded in the center channel)
(Dolby Digital, 3-channel or higher, with the
dialogue recorded in the center channel)
ON ↔OFF
SC-VKX95GAGS_RQT9950-B_En.indd 15SC-VKX95GAGS_RQT9950-B_En.indd 15 14-Jul-14 9:38:45 AM14-Jul-14 9:38:45 AM
printing rev.2
Confidential
Until:
25 Jul 2014

16
RQT9950
█Menu 4 (HDMI)
HDMI
HDMI STATUS
To show HDMI information
Example:
A
HDMI INFORMATION
CONNECTED STATE CONNECTED
AUDIO STREAM PCM
MAX CHANNEL 2ch
VIDEO FORMAT 720p
COLOUR SPACE YCbCr 4:4:4
A
3
5
2
4
Connection status
BShows the output signal type.
(When “OFF” is selected in “AUDIO OUT”
(Z24, “HDMI” menu), “---” will be shown.)
CShows the number of audio channels.
D(Zbelow, “VIDEO FORMAT”)
E(Zbelow, “COLOUR SPACE”)
HD ENHANCER
This works when the HDMI connection is being used
with “VIDEO PRIORITY” (Z24, “HDMI” menu) set to
“ON”.
To sharpen the “720p”, “1080i” and “1080p” picture
quality
OFF, 1 (weakest) to 3 (strongest)
VIDEO FORMAT
This works when the HDMI connection is being used
with “VIDEO PRIORITY” (Z24, “HDMI” menu) set to
“ON”.
To select suitable picture quality with your TV
(Video recordings will be converted to, and output as,
high-definition video.)
480p/576p/720p/1080p (progressive)
480i/576i/1080i(interlaced)
The numbers shown depend on the disc being
played. One of the above numbers is shown.
• If the picture is distorted, press [CANCEL DEL] until
the picture is shown correctly. (The output will return to
“480p”/“576p”.)
COLOUR SPACE
This works when the HDMI connection is being used
with “VIDEO PRIORITY” (Z24, “HDMI” menu) set to
“ON”.
To select suitable picture colour with your TV
YCbCr 4:2:2
YCbCr 4:4:4
RGB
• An “*” mark will appear if compatible with your TV.
• If the picture colour is distorted, press [CANCEL DEL]
until the picture colour is shown correctly.
Radio
Preparation
Press [RADIO/AUX] to select “FM” or “AM”.
Manual tuning
Press [3] or [5] to tune in to the station.
To tune automatically, press and hold the button until the
frequency starts changing quickly.
“ ” is shown when a stereo broadcast is being received.
Using the main unit
1 Press [TUNE MODE] to select “MANUAL”.
2 Press [2/3] or [5/6] to tune in to the
station.
Improving the sound quality
When “FM” is selected
1 Press [PLAY MODE] to select “FM MODE”.
2 Press [Y, U] to select “MONO” and then press
[OK].
To cancel, select “STEREO”.
“MONO” is also cancelled when you change the
frequency.
When “AM” is selected
1 Press [PLAY MODE] to select “B.PROOF”.
2 Press [Y, U] to select from “BP1” to “BP4” that
provides the best reception and then press [OK].
Memory presetting
You can preset up to 30 FM and 15 AM stations.
█Automatic presetting
1 Press [PLAY MODE] repeatedly to select
“A.PRESET”.
2 Press [Y, U] to select “LOWEST” or “CURRENT”.
LOWEST Tuning begins from the lowest
frequency.
CURRENT Tuning begins from the current
frequency.
3 Press [OK] to start presetting.
The tuner presets all the stations it can receive into
the channels in ascending order.
To cancel, press [8].
SC-VKX95GAGS_RQT9950-B_En.indd 16SC-VKX95GAGS_RQT9950-B_En.indd 16 14-Jul-14 9:38:46 AM14-Jul-14 9:38:46 AM
printing rev.2
Confidential
Until:
25 Jul 2014

17
RQT9950
█Manual presetting
1 Press [3] or [5] (main unit: [5/6] or
[2/3]) to tune in to the station and then press
[OK].
“
PGM
”
is shown.
2 Press the numeric buttons to select a preset
number.
The new station replaces any station that occupies
the same preset number.
Do steps 1 and 2 again to preset more stations.
█Selecting a preset station
Press the numeric buttons, [2] or [6] to select the
preset station.
Using the main unit
1 Press [TUNE MODE] to select “PRESET”.
2 Press [2/3] or [5/6] to select the preset
station.
AM allocation setting
By main unit only
This system can also receive AM broadcasts allocated in
10 kHz steps.
1 Press [RADIO/AUX] to select “FM” or “AM”.
2 Press and hold [RADIO/AUX].
After a few seconds, the display panel shows the current
minimum radio frequency. Release the button when the
minimum frequency changes.
• To go back to the initial setting, do the above steps
again.
• After you change the setting, preset frequencies are
erased.
Recording
This system can record up to the followings depending
on the available storage capacity of the USB device in
USB B and the mode selected:
• MP3 disc and CD-DA to USB B
− 255 folders or a total of 4000 tracks.
• USB A-AUDIO and others to USB B
− 800 folders (maximum 999 tracks in an album) or a
total of 8000 tracks.
To check storage space
In the stop mode (except for DVD/CD, USB A-VIDEO
and USB B-VIDEO), press [FL DISPLAY].
• “UPDATE” is shown when the system is reading the
device.
• “NODEVICE” is shown if there is no USB device
connected to USB B .
Panasonic cannot be held responsible on the action of
consumer to record copyrighted contents which can
cause copyright infringement.
Note:
• All recordings are in “.mp3” format.
• You cannot do recording when you are using random
playback mode.
• You cannot do recording when DJ jukebox is switched on.
• Repeat playback mode is off during recording.
• A new album is added each time you do a recording.
• The sequence of album may change after the recording.
• The recordings are kept in a folder named “REC_DATA” in
the USB device.
• USB status indicator blinks in red during USB recording.
Basic recording
1 Select the source you want to record.
CD-DA
Prepare the disc playback mode (Z12, “Play
mode”)
Make sure the disc is stopped.
Radio
Tune in to the radio station.
External equipment
Connect and play the equipment
(Z22, “External equipment”).
2 Press [USB REC 7/9] to start recording.
The name of the folder that keeps the recording is
shown.
Stop
recording Press [8]. “WRITING” is shown.
Pause
recording
Press [USB REC 7/9] during recording.
Press again to continue recording.
Note:
You can pause during recording from
radio, AUX 1 or AUX 2 (except in
SYNCHRO mode). A track mark is added
every time you pause (Z18, “Adding
track marks”).
Note:
• Wait for a few seconds for the system to prepare the USB
device before recording starts.
• When the next track of the CD-DA disc is being recorded, it
will be shown on the display.
SC-VKX95GAGS_RQT9950-1B_En.indd 17SC-VKX95GAGS_RQT9950-1B_En.indd 17 8/20/2014 4:45:20 PM8/20/2014 4:45:20 PM
printing rev.2
Confidential
Until:
25 Jul 2014

18
RQT9950
Recording MP3 tracks
Recording from MP3 disc
1 Put in the disc.
2 Press [R, T] to select the album and then press
[OK].
3 Press [USB REC 7/9] to start recording.
Example: Recording an album from MP3 disc.
DATA-DISC
. ./Audio/mp3
Hakkushon
LevelUp
Mata Sazae
Sazae***
Hakkushon
Recording from USB A-AUDIO
1 Prepare the source you want to record.
You can also use playmode function to record
specified files (Z12, “Play mode”).
2 Press [USB REC 7/9] to start recording.
Example: Recording an album from the USB device.
Stop
recording Press [8].
Recording stops at the last fully
recorded track in the album. For
example, if you stop recording
during the fourth track, only the first
three tracks are recorded.“NO FILE
RECORDED” is shown if no track is
recorded.
Note:
• Some tracks can use a longer time to record.
• Some tracks cannot be recorded because of the condition
of the source.
• When recording from MP3 disc, the recorded file name will
be different from the original file.
• When recording from USB A-AUDIO, the recorded file
name will be the same as the original file (maximum 32
characters).
Recording progress in percentage
of all contents in the group
Track
currently
being
recorded
█Adding track marks
When recording from radio or external equipment, you
can divide tracks using various modes.
Before recording
Press [EDIT MODE] to select the setting.
MANUAL Add a track mark manually.
Press [OK] during recording to add
a track mark.
SYNCHRO
(For AUX 1 or
AUX 2 source)
Recording starts automatically
when the other equipment starts
to play. Recording pauses when it
detects silence for 3 seconds.
TIME MARK A track is automatically divided at
5-minute intervals.
Note:
• During recording, if you press [OK] or pause recording while
using “TIME MARK” mode, the 5-minute counter is reset.
• You cannot add track marks manually in “SYNCHRO”
mode.
Deleting recorded tracks
1 Press [ , USB] (main unit: [ /USB, –PAIRING]) to
select “USB B-AUDIO”.
2 Press [R, T] to select album.
3 Press [2] or [6] to select the track.
4 Press [EDIT MODE] to select the mode.
TRK DEL Delete a single track.
ALB DEL Delete one album (maximum
999 tracks).
FORMAT Format the USB device.
5 Press [OK].
The selected item to be deleted is shown.
6 Press [OK].
“SURE? NO” is shown.
7 Press [Y, U] to select “YES” and then press [OK].
“WRITING” is shown.
To cancel, select “NO”.
Album being
recorded
Percentage of the
recording process
SC-VKX95GAGS_RQT9950-B_En.indd 18SC-VKX95GAGS_RQT9950-B_En.indd 18 14-Jul-14 9:38:46 AM14-Jul-14 9:38:46 AM
printing rev.2
Confidential
Until:
25 Jul 2014

19
RQT9950
Sound and illumination effects
Sound effects
1 Press [SOUND] to select the sound effect.
2 Press [Y, U] to select the setting and then press
[OK].
PRESET EQ Select the desired preset EQ
setting.
Using the main unit
Press [LOCAL PRESET EQ].
BASS –4 to +4
Using the main unit
1. Press [MANUAL EQ] to select
“BASS”, “MID” or “TREBLE”.
2. Press [2/3] or [5/6]
to adjust the level.
MID
TREBLE
SURROUND “ON SURROUND” or “OFF
SURROUND” (default)
INPUT LEVEL
(For AUX 2
source)
“NORMAL” (default) or “HIGH”
Note:
Select “NORMAL” if the sound is
distorted during “HIGH” input level.
SUPERWOOFER “SW1”, “SW2”, “SW3” (default)
or “OFF”
Using the main unit
1. Press and hold
[–SUPER WOOFER].
2. Press [2/3] or [5/6]
to select the setting.
D.BASS
“D.BASS ON”,
“D.BASS BEAT” (default) or
“D.BASS OFF”
Using the main unit
Press [D.BASS].
Illumination effects
By main unit only
You can change the illumination colour on this system.
Turn [ILLUMINATION].
To cancel, select “OFF”.
DJ jukebox
(For USB A-AUDIO and USB B-AUDIO source)
You can use DJ jukebox to add cross-fading effect
between songs. You can also use additional features
with the “Panasonic MAX Juke” app (Zbelow).
By main unit only
1 Press [DJ JUKEBOX] to select the setting.
OFF CROSSFADE Cancel cross-fading.
ON CROSSFADE Add cross-fading.
OFF Switch off DJ jukebox.
2 During stop mode, turn [CONTROL] to select the
repeat setting.
RANDOM REPEAT
RND Play all tracks randomly and
repeat all tracks.
ALL TITLE REPEAT Repeat all tracks.
Note:
DJ jukebox effect is cancelled when you switch off the
system or change to another source.
Using the “Panasonic MAX Juke” app
You can download and install the free Android™
app “Panasonic MAX Juke” on Google Play™ for
additional features, such as to request song playback
from multiple devices simultaneously.
SC-VKX95GAGS_RQT9950-B_En.indd 19SC-VKX95GAGS_RQT9950-B_En.indd 19 14-Jul-14 9:38:46 AM14-Jul-14 9:38:46 AM
printing rev.2
Confidential
Until:
25 Jul 2014

20
RQT9950
Clock and timers
Setting the clock
This is a 24-hour clock.
1 Press [CLOCK/TIMER] to select “CLOCK”.
2 Press [R, T] to set the time then press [OK].
To check the time
Press [CLOCK/TIMER].
Note:
Reset the clock regularly to maintain accuracy.
Sleep timer
The sleep timer switches off the system after the set
time.
Press [SLEEP] to select the setting (in minutes).
To cancel, select “OFF”.
SLEEP 30 →SLEEP 60 →SLEEP 90 →SLEEP120
OFF
To check the remaining time
Press [SLEEP].
Note:
• The play timer and sleep timer or the record timer and
sleep timer can be used together.
• The sleep timer always comes first. Be sure not to set an
overlap of timers.
Play and record timer
(Except for Bluetooth®source)
You can set the timer to come on at a certain time to:
• Wake you up (play timer).
• Record from the radio or the external equipment
(record timer).
Play timer and record timer cannot be used together.
Preparation
Set the clock.
1 Press [CLOCK/TIMER] to select “#PLAY” or
“#REC”.
2 Press [R, T] to set the start time.
3 Press [OK].
4 Do steps 2 and 3 again to set the end time.
5 Press [R, T] to select the source you want to play
or record and then press [OK].
To start the timer
1 Prepare the audio source.
Play timer Prepare the music source you
want to listen to (disc, USB, radio
or external equipment) and set
the volume.
Record timer Connect the USB device to
USB B and tune to the radio
station or select the external
equipment.
2 Press and hold [#, –PLAY/REC] and then press
the button again to select the setting.
TIMER OFF Cancel the setting.
#PLAY ON Start the play timer. “#PLAY” is
shown.
#REC ON Start the record timer. “#REC” is
shown.
The system must be switched off for the timer to
operate.
To check the settings
Press [CLOCK/TIMER] to select “#PLAY” or “#REC”.
In standby mode, press [CLOCK/TIMER] two times.
Note:
• The play timer starts at a low volume and increases
gradually to the preset level.
• The record timer starts 30 seconds before the set time with
the volume muted.
• The timer comes on at the set time every day if the timer
is on.
• If you switch off the system and switch on again while a
timer is in operation, the timer will not stop at the end time.
SC-VKX95GAGS_RQT9950-B_En.indd 20SC-VKX95GAGS_RQT9950-B_En.indd 20 14-Jul-14 9:38:46 AM14-Jul-14 9:38:46 AM
printing rev.2
Confidential
Until:
25 Jul 2014
Table of contents
Other Panasonic DVD Stereo System manuals