manuals.online logo
Brands
  1. Home
  2. •
  3. Brands
  4. •
  5. Parker
  6. •
  7. Guitar
  8. •
  9. Parker Radial NiteFly User manual

Parker Radial NiteFly User manual

Radial NiteFly Model, Hum/Hum w/ Piezo
For More Information, visit PARKERGUITARS.COM
Parker Fly Control Layout
1. Magnetic P/U Volume
2. Magnetic tone & Push/Pull for Coil Tap
3. Piezo Volume
4. Magnetic P/U Selector (bridge, bridge and neck, neck)
5. Mag/Piezo Selector (Mag only, Mag & Piezo, Piezo only)
Output
¼” Output, Mag/Piezo smart jack. Mono cable will sum both signals to mono-
stereo Y cable will split Mag/piezo signals.
9v Battery required for operation
ADJUSTING PICK-UP HEIGHT
Each pickup is secured to the body by two slotted screws.
These mounting screws are located under the E strings on the outside coils. Turn the screws
clockwise to tighten and counterclockwise to loosen. To adjust pickup height, unscrew both
pickup mounting screws. Raise or lower your pickup to the desired position with your fingers.
Re-tighten both pickup mounting screws flush with top of pickup. Do not over tighten pickup
mounting screws flush with top of pickup.
SETUP TREMOLO
CLEANING
String height measured at 12th fret: 1.5mm on treble side, 2mm on bass side.
String Height is adjusted from the back panel, via bridge adjustment posts. LEFT
turns will raise the bridge, RIGHT turns will lower the bridge. Take care to lower the
bridge evenly with the same amount of turns per side.
D’addario .009-.042 Gauge strings, .009 Tremolo Plate installed at factory.
To set the intonation (string length), loosen the screws that hold the bridge saddles using the
smaller Allen wrench supplied with the guitar.
· If a string plays sharp: Insert the same 1.5 mm Allen wrench into the back of the saddle.
Turn the screw clockwise to move the saddle back to make the string length longer.
· If a string plays flat: Turn the screw counter-clockwise to move the saddle forward to make
the string length shorter.
Once the strings are intonated re-tighten the saddle screws. Do not over-tighten the saddle-
screws. The piezo-electric elements in the bridge are delicate, so be careful.
The MaxxFly Spring Vibrato is a high quality, stable system that can be operated in three modes:
1. Balanced (Free-Floating): In this mode the bridge can bend up and down. The Stop Screw must be adjusted (lowered) so that it won't
Prevent the bridge from bending up. The HOME position of the bridge is set by adjusting the Claw Screws (balancing the tension of the coil
Springs).
2. Bend Down Only: The MaxxFly comes set up from the Parker Guitar factory in Bend Down mode. In this mode the bridge can only bend
Down and returns HOME to rest lightly against the Stop Screw. The springs must be tensioned slightly more than in the balanced mode so
That the bridge at HOME is held against the Stop Screw. Unlike the Balanced mode, you can rest your hand on the bridge without throwing
it out of tune.
3. Tremolo Restrained: This mode is similar to Bend Down mode. HOME position is also setup by contact with the Stop Screw. Additional
spring force is Applied against the stop by tightening the Claw Screws. The bridge will still bend down, but with a stiffer feel. In this mode
you can bend a String while other strings are sounded and not change their pitch. Like the Bend Down mode, resting your hand on the
bridge will not throw it out of tune. No matter which mode you prefer to use, it's quickest to tune, set intonation, and adjust the action of
your NiteFly when it's in the Fixed Mode.
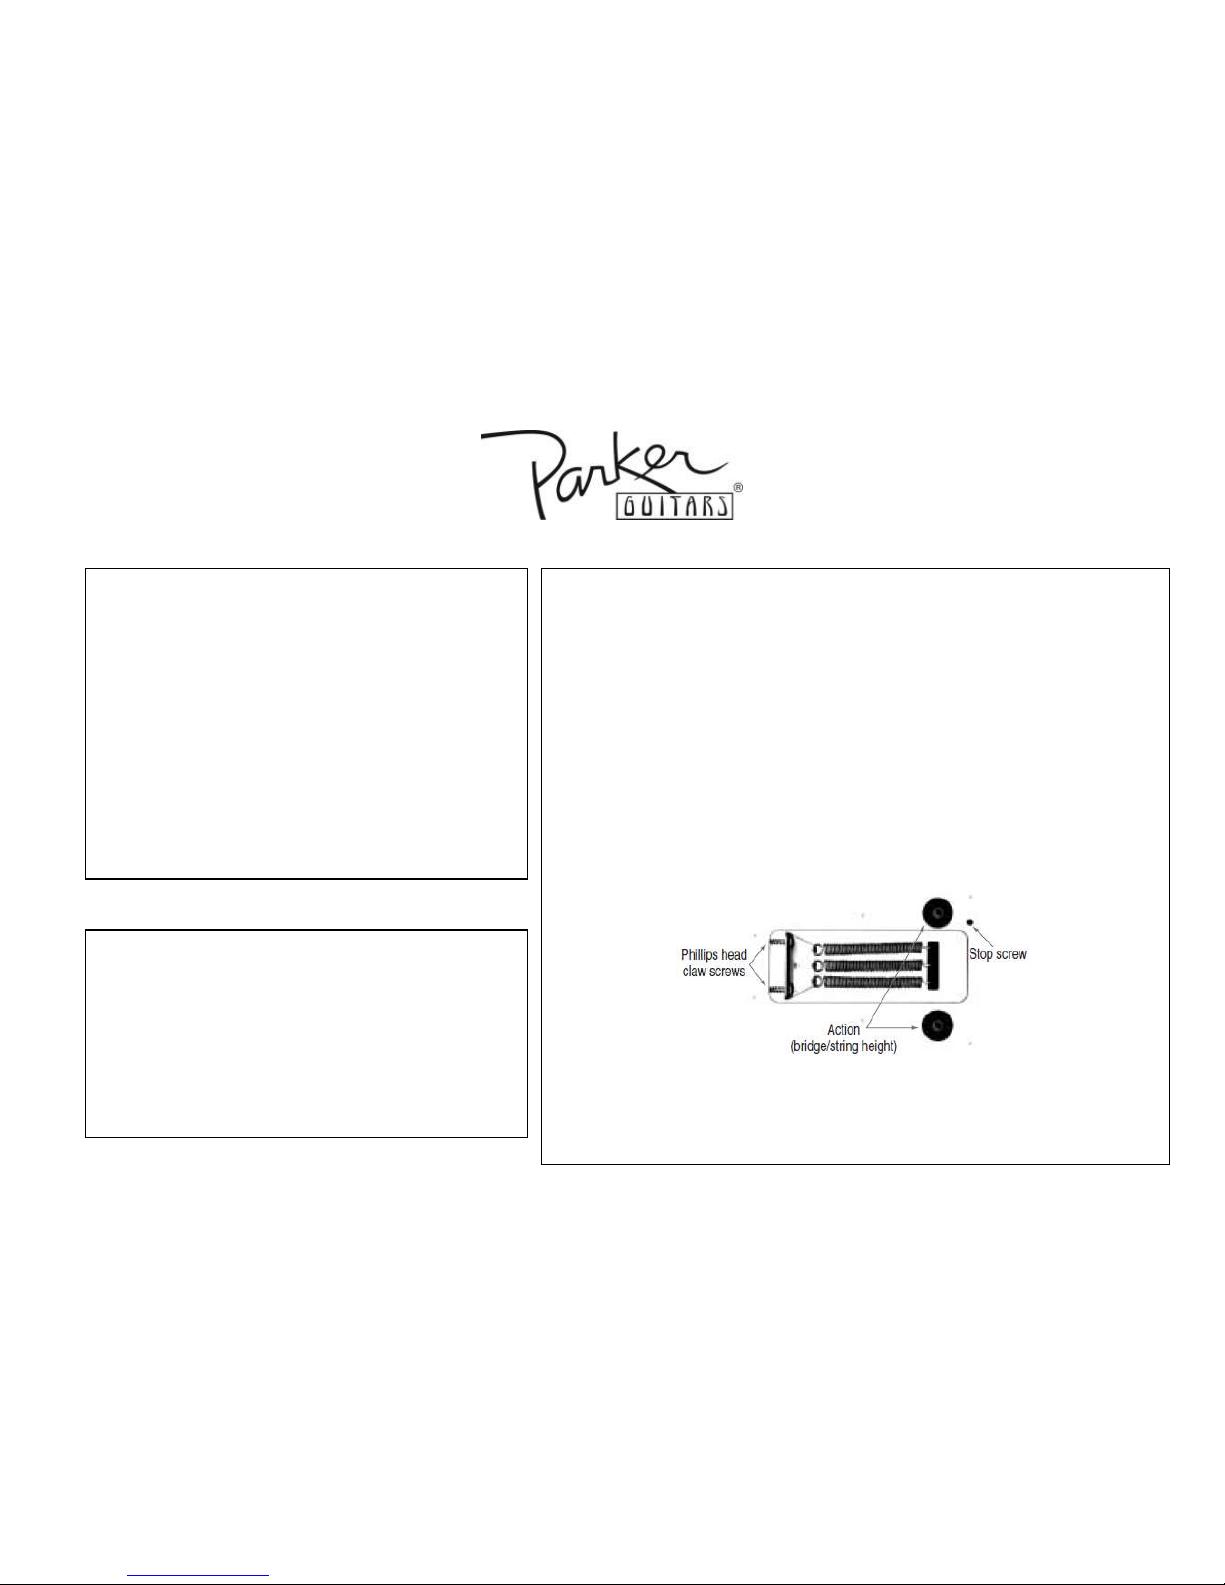
Stop Screw
Using the larger 1/8" T-handle Allen wrench supplied with your guitar, the Stop Screw can be adjusted to limit or stop the bridge from
bending up to any desired amount.
NOTE: When you raise or lower the Action you should also raise or lower the Stop Screw by the same amount (unless the Stop Screw has
already been fully lowered for the balanced mode)
Fly models and select Maxx Fly feature hardened stainless steel frets bonded to a glass and
carbon fiber fretboard. It is important to keep this fretboard clean. Not doing so can result in
corrosion and fret instability. Use warm water on a soft cloth, and make sure to remove any
dirt and sweat that may have built up around the frets. DO NOT use oils, waxes, or solvents on
this type of fretboard, as it will result in the frets coming loose.
If you’re just trying to remove fingerprints or dust from the guitar, use a soft guitar polishing
cloth. To remove fine scratches or clean away heavy dirt, use a non-abrasive guitar polish and
follow their provided instructions. Only use products designed for guitars, as other polishes
may contain abrasives that will scratch or corrode the fretboard.

This manual suits for next models

2

Other Parker Guitar manuals

Parker Fly User manual

Parker

Parker Fly User manual

Parker Nitefly Owner's manual

Parker

Parker Nitefly Owner's manual

Parker Nitefly User manual

Parker

Parker Nitefly User manual

Parker Fly User manual

Parker

Parker Fly User manual

Parker MAXXFly Bolt Hum User manual

Parker

Parker MAXXFly Bolt Hum User manual

Parker Fly User manual

Parker

Parker Fly User manual

Parker Spanish Fly User manual

Parker

Parker Spanish Fly User manual

Parker Fly Classic User manual

Parker

Parker Fly Classic User manual

Parker Fly Owner's manual

Parker

Parker Fly Owner's manual

Parker Fly Deluxe User manual

Parker

Parker Fly Deluxe User manual

Parker Fly Classic User manual

Parker

Parker Fly Classic User manual

Parker Fly User manual

Parker

Parker Fly User manual

Parker PDF Series User manual

Parker

Parker PDF Series User manual

Parker Fly User manual

Parker

Parker Fly User manual

Parker P-38 User manual

Parker

Parker P-38 User manual

Parker Fly User manual

Parker

Parker Fly User manual

Parker Adrian Belew MAXXFly Operator's manual

Parker

Parker Adrian Belew MAXXFly Operator's manual

Parker Fly Manual

Parker

Parker Fly Manual

Parker Midi Fly User manual

Parker

Parker Midi Fly User manual

Parker Fly User manual

Parker

Parker Fly User manual

Parker Fly User manual

Parker

Parker Fly User manual

Parker P-44 Operator's manual

Parker

Parker P-44 Operator's manual

Parker Fly User manual

Parker

Parker Fly User manual

Parker Fly User manual

Parker

Parker Fly User manual

Popular Guitar manuals by other brands

Oscar Schmidt OB100 brochure

Oscar Schmidt

Oscar Schmidt OB100 brochure

Guild X-175 Schematic diagram

Guild

Guild X-175 Schematic diagram

Grizzly H8070 owner's manual

Grizzly

Grizzly H8070 owner's manual

Squier Pete Wentz P Bass Specifications

Squier

Squier Pete Wentz P Bass Specifications

Squier Classic Vibe 60s J Bass Specifications

Squier

Squier Classic Vibe 60s J Bass Specifications

Fender Classic Player Baja Telecaster Wiring diagram

Fender

Fender Classic Player Baja Telecaster Wiring diagram

WowWee Paper Jamz user manual

WowWee

WowWee Paper Jamz user manual

Yamaha APX500II owner's manual

Yamaha

Yamaha APX500II owner's manual

Washburn Festival Series EA20SDL reference guide

Washburn

Washburn Festival Series EA20SDL reference guide

Epiphone Tobias guitars owner's manual

Epiphone

Epiphone Tobias guitars owner's manual

Fender Lite Ash Stratocaster Wiring diagram

Fender

Fender Lite Ash Stratocaster Wiring diagram

Yamaha 730 owner's manual

Yamaha

Yamaha 730 owner's manual

Jackson DK2L Dinky brochure

Jackson

Jackson DK2L Dinky brochure

Fender Highway One Precision Bass Diagram

Fender

Fender Highway One Precision Bass Diagram

Fender Classic Series 72 Telecaster Custom Assembly

Fender

Fender Classic Series 72 Telecaster Custom Assembly

Yamaha LLX6DN owner's manual

Yamaha

Yamaha LLX6DN owner's manual

Squier Vintage Modified P Bass Specifications

Squier

Squier Vintage Modified P Bass Specifications

Ibanez Electric Guitar instruction manual

Ibanez

Ibanez Electric Guitar instruction manual

manuals.online logo
manuals.online logoBrands
  • About & Mission
  • Contact us
  • Privacy Policy
  • Terms and Conditions

Copyright 2025 Manuals.Online. All Rights Reserved.