Parrot UNIKA User manual

Quick start guide
Guide d’utilisation rapide
Guía de instalación rápida
Bedienungsanleitung
Guida all’uso
Gebruikershandleiding
Parrot
UNIKA


www.parrot.com
Parrot UNIKA
Installation diagrams ........................
English..............................................
Français............................................
Español.............................................
Deutsch............................................
Italiano..............................................
Nederlands.......................................
Mode A ............................................
Mode B ............................................
Mode C ............................................
Mode D ............................................
General information..........................
p.04
p.07
p.09
p.11
p.13
p.15
p.17
p.21
p.22
p.23
p.24
p.25

Parrot MKi9000
UNIKA
red
yellow & red
brown/
black & green/
red
yellow & blue
Car Radio
Mute in 123
cap
black
www.parrot.com
ground
K-Bus
Can High
Can Low
V1
V2
Mute
UNIKA
yellow & red
brown/
black & green/
red
yellow & blue
www.parrot.com
ground
K-Bus
Can High
Can Low
V 1
V2
Car Radio
Mute in 123
Mute
red
black
4

Parrot MKi9100
UNIKA
red
yellow & red
brown/
black & green/
red
yellow & blue
Car Radio
Mute in 123
cap
black
www.parrot.com
ground
K-Bus
Can High
Can Low
V1
V2
Mute
UNIKA
yellow & red
brown/
black & green/
red
yellow & blue
www.parrot.com
ground
K-Bus
Can High
Can Low
V 1
V2
Car Radio
Mute in 123
Mute
red
black
5

Parrot MKi9200
UNIKA
yellow & red
yellow & blue
cap
music cable
screen
www.parrot.com
brown/
black & green/
red
ground
K-Bus
Can High
Can Low
V 1
V2
Car Radio
Mute in 123
Mute
red
black
6

UNIKA
yellow & red
yellow & blue
cap
music cable
screen
www.parrot.com
brown/
black & green/
red
ground
K-Bus
Can High
Can Low
V 1
V2
Car Radio
Mute in 123
Mute
red
black
English
The power supply for the UNIKA interface is taken from the power cable
of the Parrot MKi. It is important to follow the color code of the power
cable wires: the red wire of the kit’s cable corresponds to the permanent
12V supply; the orange wire corresponds to the ignition 12V ; the black wire
is for ground ; the yellow wire corresponds to the Parrot mute output.
Warning : Connect the ignition to the Parrot car kit if the vehicle is
based on a resistive or a K-Bus protocol. Don’t connect the ignition
if the vehicle is based on a CAN protocol.
On some vehicles, the 12V power wires may be reversed, in which case
you must reverse the red and orange wires of the hands-free kit’s power
supply. This can easily be done by reversing the two fuse holders on the
kit’s power cable.
Power supply
We recommend you to install the Parrot MKi / RKi before installing the
UNIKA. Make sure the installation is correctly performed by checking if the
«Good bye» message is displayed when you turn off the ignition.
► Refer to the documentation of your Parrot MKi for more information.
Installation
of the Parrot
MKi / RKi
Selecting the
protocol Use the DIP switches located on one side of the UNIKA to select the
protocol (resistive or CAN Bus / K-BUS) on which the vehicle is based.
►Refer to the diagrams p.19.
Warning: Make sure the UNIKA is not powered before selecting the
protocol.
UNIKA is a universal interface that allows you to control the Parrot MKi / RKi directly with the
OEM steering wheel commands. UNIKA can work with car protocols such as CAN, K-BUS
or resistive systems.
► Refer to the installation diagrams p.4 to 7. For more information, refer to the Installation
section of our website www.parrot.com.
Installation
In case of problem or if you have installed the UNIKA interface in another
car, reset the UNIKA by holding down the Reset button until the LED turns
off (if the vehicle is based on a CAN Bus / K-BUS protocol) or blinks red
(resistive protocol). You can then release the reset button.
Reset
procedure
Depending on the steering wheel control in your vehicle, the UNIKA
interface will enable you to take full advantage of the telephone and music
functions in 4 different modes: Mode A (4 buttons), Mode B (5 buttons),
Mode C (6 buttons) and Mode D (7 buttons).The selection of this mode
depends on the protocol of the vehicle.
Note : Pictograms on the buttons depend on the model of the vehicles.
UNIKA modes
7

If your vehicle is based on a CAN Bus or K-BUS protocol, the mode (A, B,
C or D) is automatically defined. The LED blinks in red and turns green
once the mode is defined.
Defining the
mode
Once your UNIKA interface has been fitted, the LED should light up green
and should turn amber while pressing a button on your steering wheel.
If the LED does not light up, check the power supply connections. If the
LED is red or blinks red, check the CAN wire connections.
Checking the
wiring
The wires corresponding to the CAN / K-BUS protocol must be connected correctly to your
car stereo’s. It is important to follow the wiring diagram for your vehicle.
► Refer to the Support section of our website http://www.parrot.com for more information.
Warning : Once the installation is complete, turn the ignition off until the UNIKA LED
switches off.
CAN / K-BUS protocol
Resistive protocol
If you do not have 7 buttons on your steering wheel, hold down the last
button for two seconds until the LED turns green.
Specific case
If your vehicle is based on a resistive protocol, you have to define the
mode manually:
1. Turn the ignition on.
> The LED blinks red once.
2. Press the buttons on the steering wheel in the following order:
s r c .
> Each time you press a button, the LED blinks in red.
Defining the
mode
The wires corresponding to the resistive protocol must be connected correctly to your car
stereo’s. It is important to follow the wiring diagram for your vehicle.
► Refer to the support section of our website http://www.parrot.com for more information.
Warning : Once the installation is complete, turn the ignition off until the UNIKA LED
switches off.
Refer to tables p.20 to 24.
Note: Pictograms on the buttons depend on the model of the vehicles.
Note : If you are using the UNIKA with a Parrot MKi9000 you can clear the memory of the
kit by repeating the following sequence five times : .
Using the commands
8

L’alimentation de l’interface UNIKA est réalisée par une dérivation de
l’alimentation du Parrot MKi. Il est important de suivre le code couleur des
tensions d’alimentation. Le fil rouge du câble du kit doit correspondre au
12V permanent, le fil orange au 12V après-contact, le fil noir à la masse et
le fil jaune à la sortie Mute Parrot.
Avertissement : Connectez l’après-contact au kit si le véhicule est
basé sur un protocole résistif ou K-Bus.
Sur certains véhicules, les tensions d’alimentation peuvent être inversées
et il est alors nécessaire d’inverser les fils rouge et orange de l’alimentation
du kit mains-libres. Cette opération s’effectue simplement en inversant les
deux portes fusibles du câble d’alimentation du kit.
Installation
du câble
d’alimentation
Nous vous recommandons d’installer le Parrot MKi / RKi avant de procéder
à l’installation de l’UNIKA. Assurez-vous également que cette installation
est correctement réalisée, en vérifiant la présence du message «Au revoir»
sur l’écran lorsque vous coupez le contact. Consultez la notice du Parrot
MKi / RKi pour plus d’informations.
Installation
du Parrot
MKi / RKi
Sélection du
protocole Utilisez les interrupteurs DIP situés sur un des côtés du boitier
UNIKA pour sélectionner le protocole sur lequel est basé le véhicule.
► Consultez les schémas p.19.
Avertissement : Assurez-vous que l’UNIKA n’est pas sous tension
avant d’effectuer ce réglage.
Français
► Consultez les schémas d’installation p.4 à 7. Pour plus d’informations, consultez la
section Installation de notre site web www.parrot.com.
L’UNIKA est une interface universelle permettant de relier les commandes aux volants de votre
véhicule au Parrot MKi / RKi. Il est compatible avec les protocoles CAN, K-BUS et résistifs.
Si vous recontrez un problème ou si vous avez réinstallé l’UNIKA dans une
autre voiture, mettez le contact puis maintenez le bouton Reset enfoncé
jusqu’à ce que la LED s’éteigne (si le véhicule est basé sur un protocole
CAN Bus ou K-BUS) ou clignote en rouge (protocole résistif) pour réinitia-
liser l’UNIKA.
Réinstallation
En fonction de la configuration du volant de votre véhicule et du nombre
de boutons disponibles, l’UNIKA peut vous permettre d’utiliser les
fonctionnalités téléphonie et musique selon 4 modes : Mode A (4 boutons),
Mode B (5 boutons), Mode C (6 boutons), Mode D (7 boutons). La sélection
du mode dépend du protocole sur lequel est basé votre véhicule.
Note : Les logos peuvent varier selon les véhicules.
Modes de
l’UNIKA
Installation
9

Si votre véhicule ne dispose pas de tous ces boutons, appuyez 2 secondes
sur le dernier bouton disponible jusqu’à ce que la LED devienne verte.
Cas
particuliers
Si votre véhicule est basé sur un protocole résistif, vous devez définir le
mode manuellement. Pour cela, une fois l’installation réalisée :
1. Mettez le contact.
> La LED de l’UNIKA clignote une fois en rouge.
2. Appuyez sur les boutons des commandes au volant de votre
véhicule dans l’ordre suivant : s r c .
> Après chaque appui, la LED de l’UNIKA clignote une fois
en rouge.
Définition du
mode
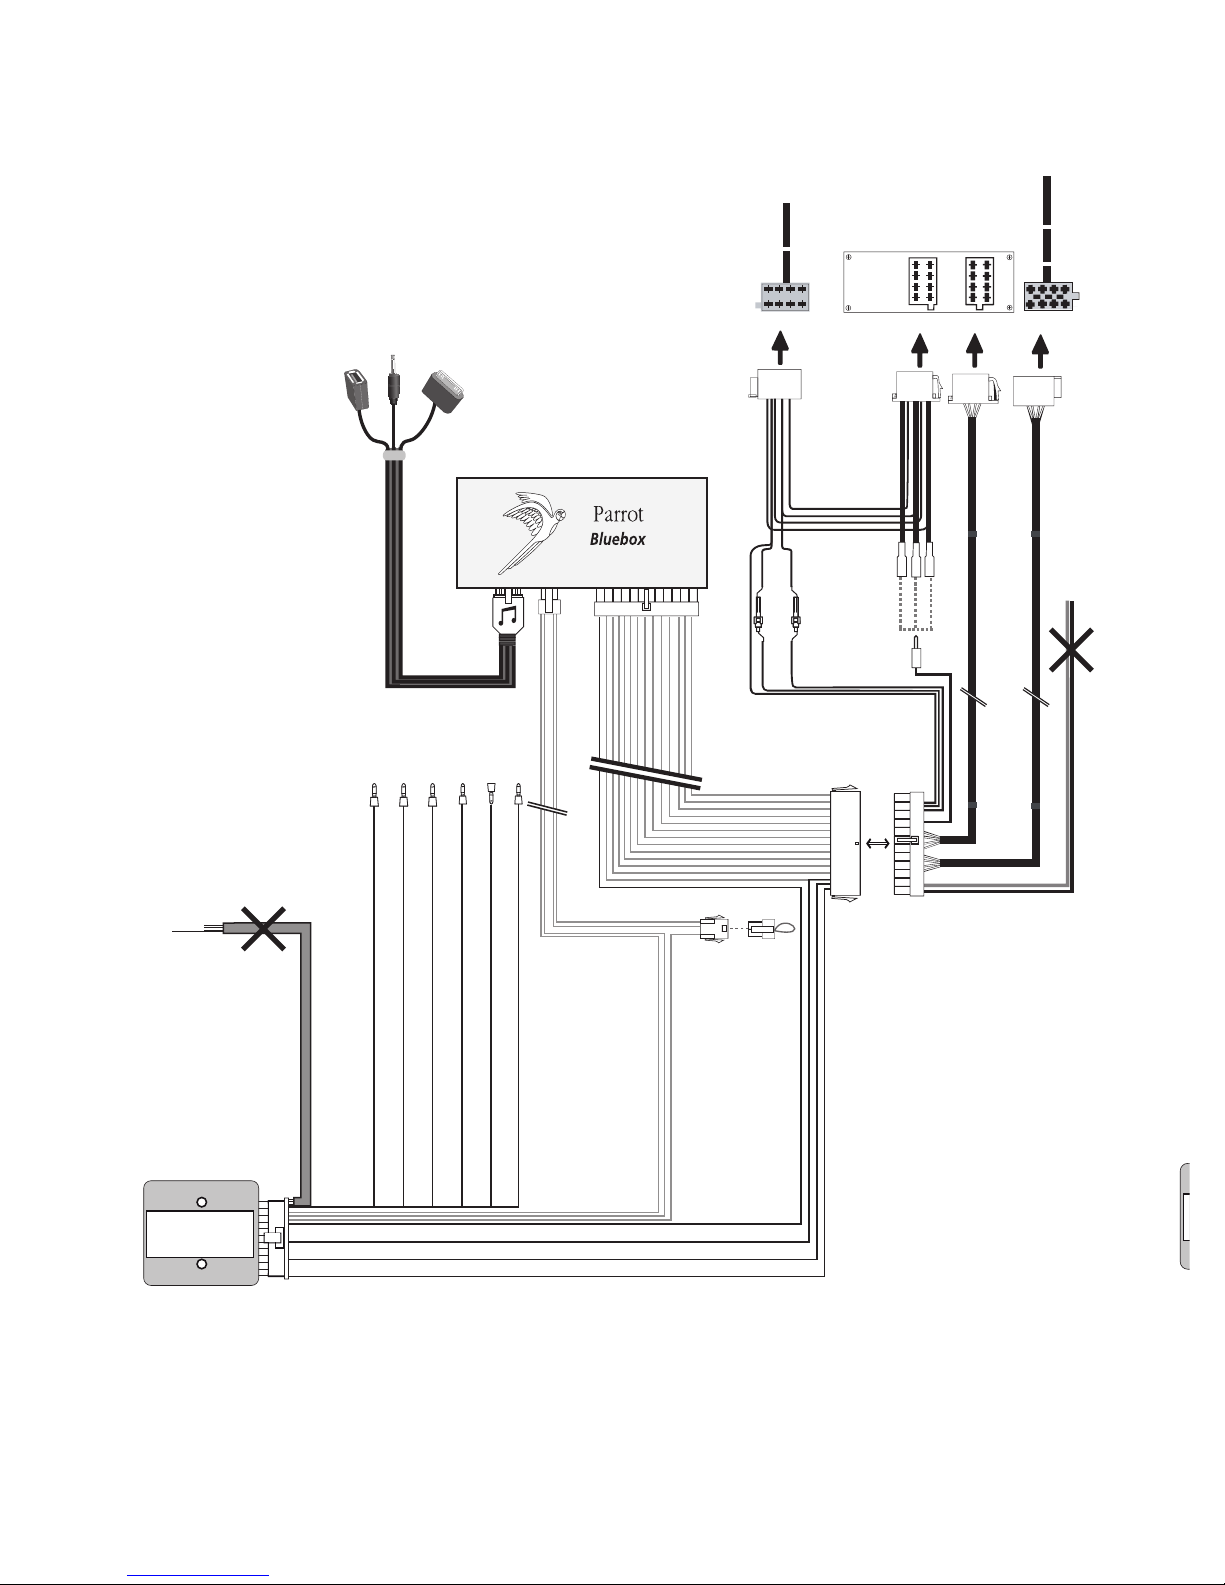
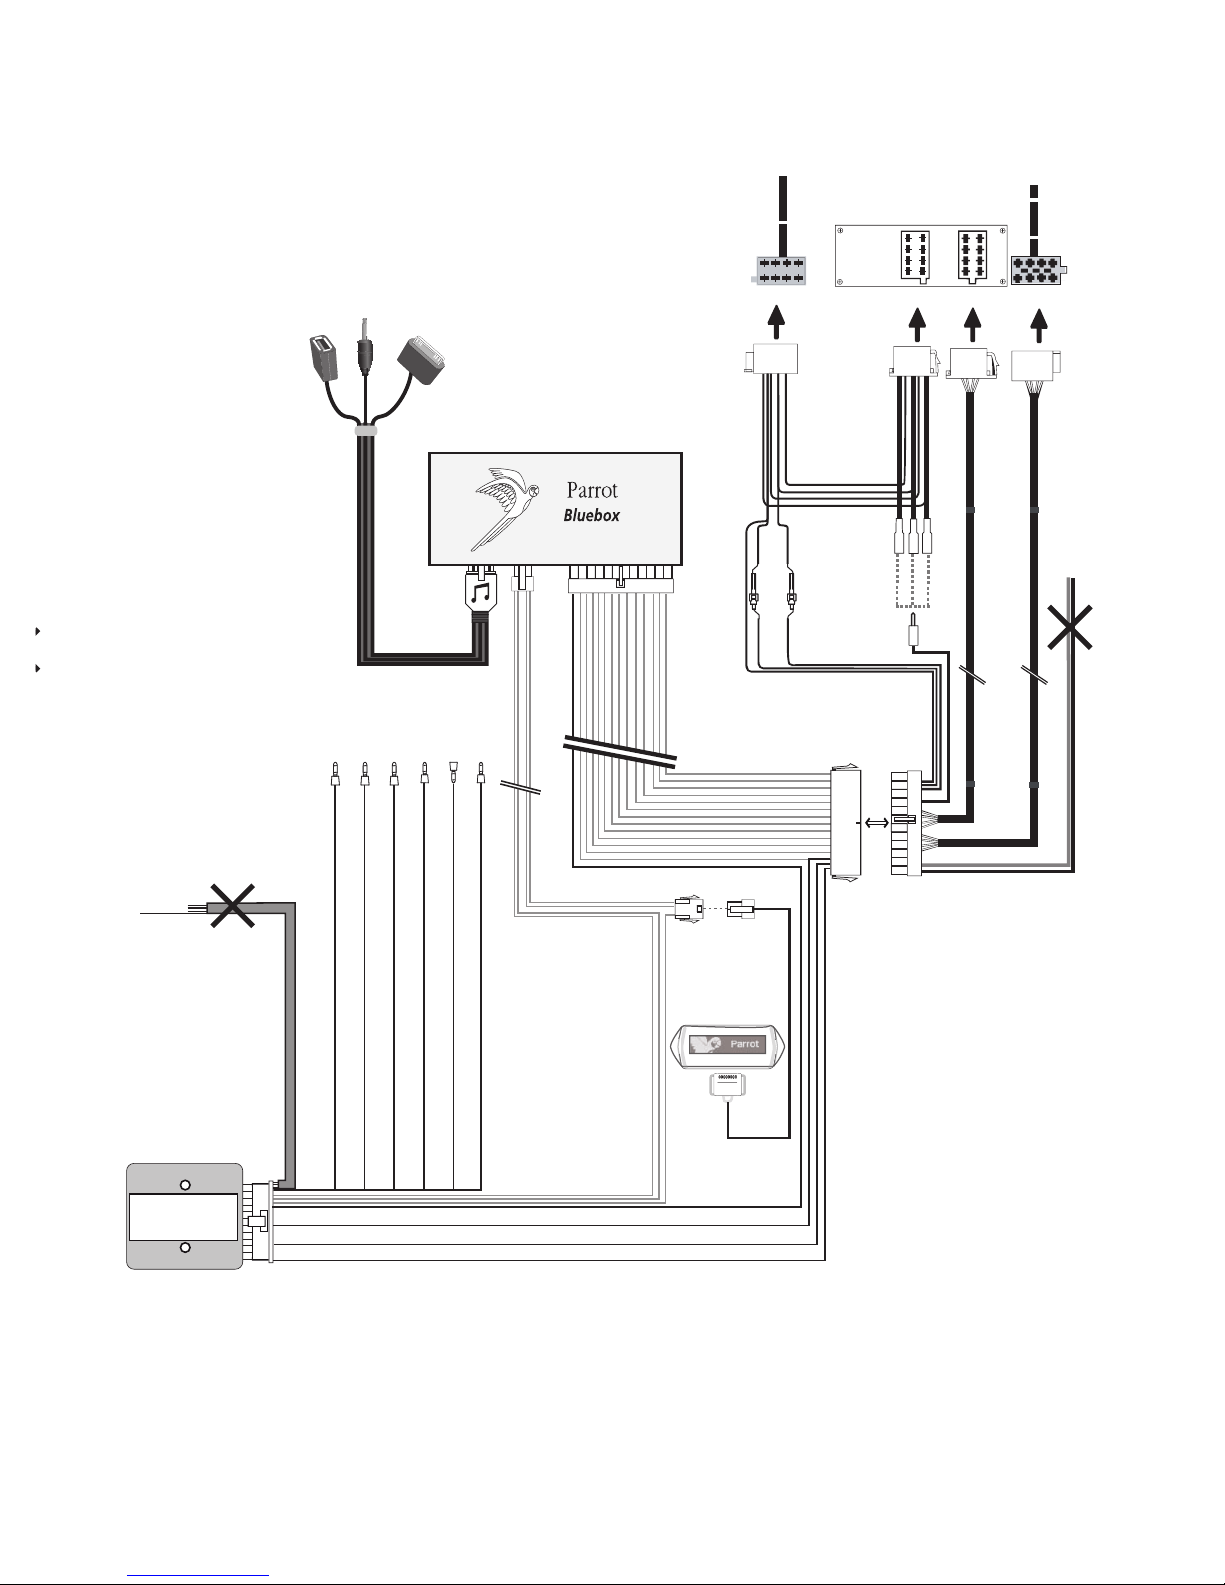
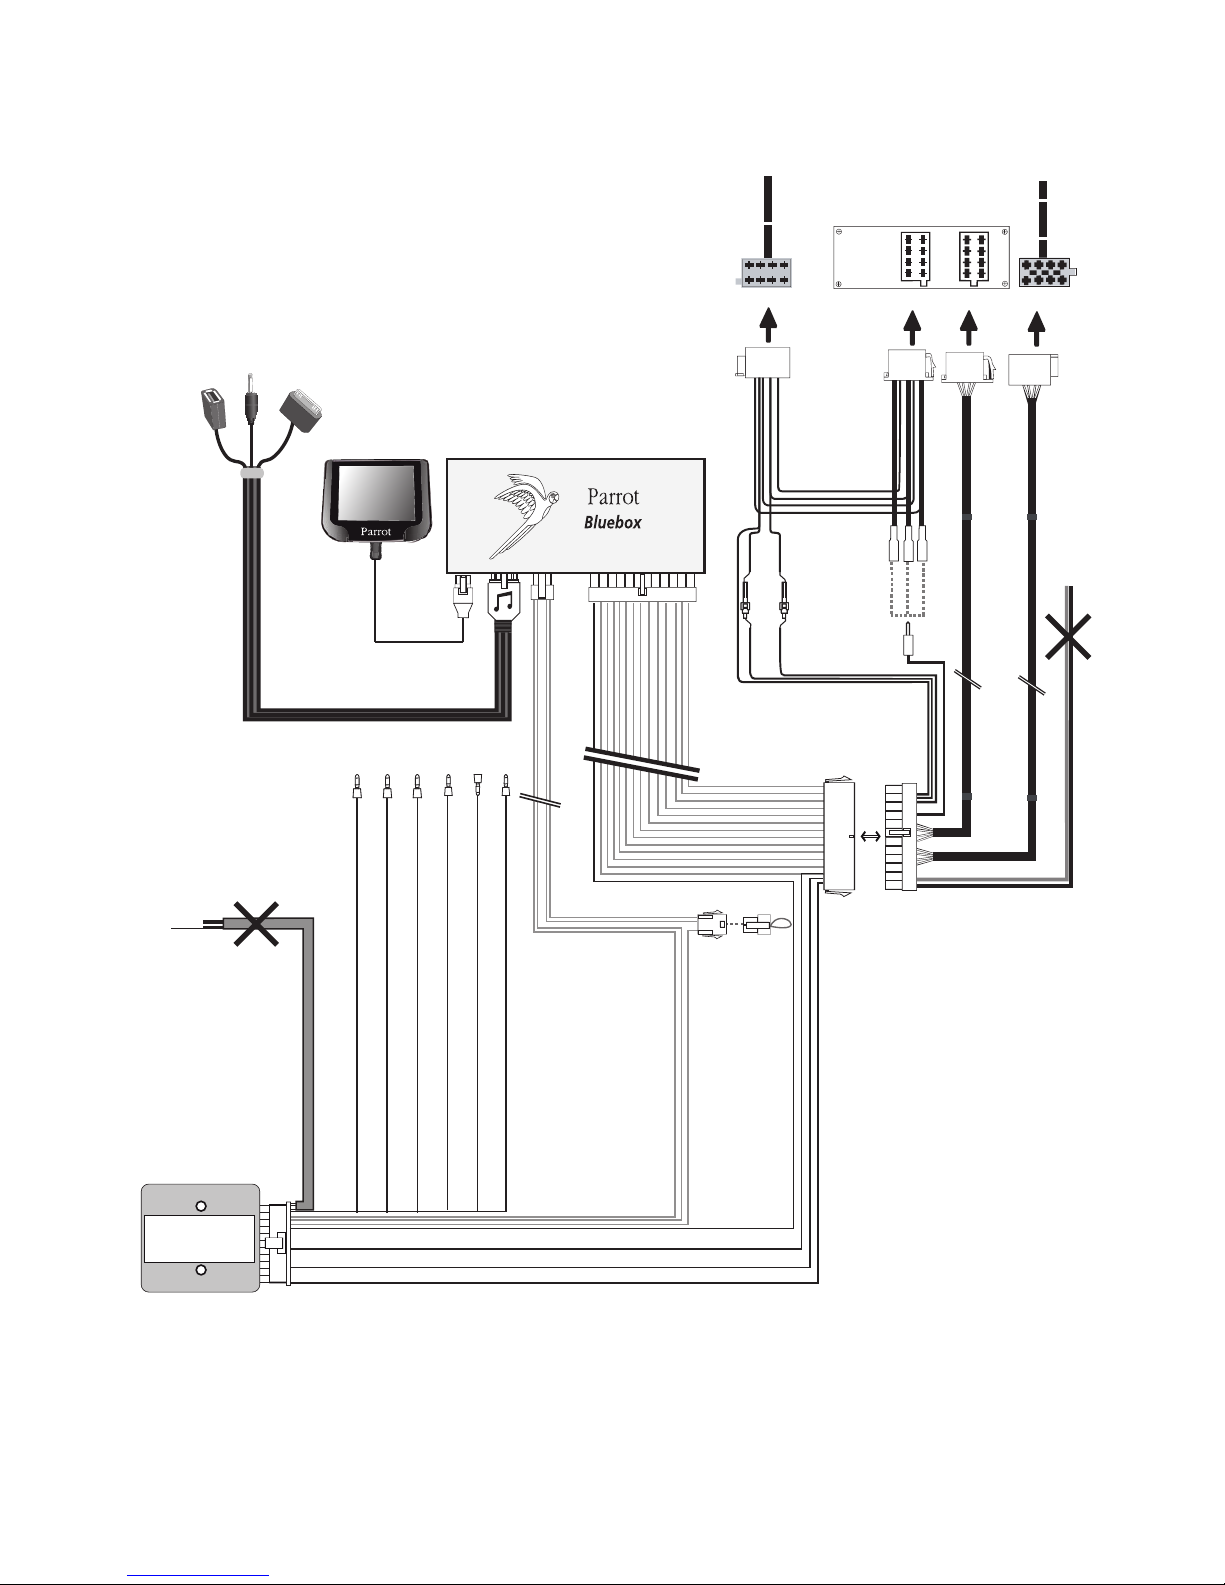
Les fils correspondant au protocole résistif doivent être correctement branchés sur votre
système radio. Il est donc important de suivre le schéma d’installation correspondant à
votre véhicule. Consultez la section support de notre site internet http://www.parrot.com
pour plus d’informations.
Note: Une fois l’installation de l’UNIKA terminée, coupez le contact jusqu’à ce que
la LED de l’UNIKA s’éteigne.
Protocole résistif
Si votre véhicule est basé sur un protocole CAN Bus ou K-BUS, la sélection
du mode (A, B, C ou D) est automatique. Un clignotement rouge de la LED
indique que le processus est en cours. La LED devient verte une fois le
mode défini.
Définition du
mode
Une fois l’UNIKA installé, la diode de l’interface doit s’allumer en vert. Lors-
que vous appuyez sur un bouton de vos commandes au volant, la couleur
de la LED doit devenir ambrée. Si c’est le cas, l’interface est prête à être
utilisée. Si cette diode ne s’allume pas, vérifier les tensions d’alimentation
de votre interface UNIKA.
Vérification de
l’installation
Les fils correspondant au protocole CAN / K-BUS doivent être correctement branchés sur
votre système radio. Il est donc important de suivre le schéma d’installation correspondant
à votre véhicule. Consultez la section support de notre site internet http://www.parrot.com
pour plus d’informations.
Protocole CAN / K-BUS
Consultez les tableaux p. 20 à 24 pour connaître les fonctions des différents boutons selon
le mode sélectionné.
Note : Les logos peuvent varier selon les véhicules.
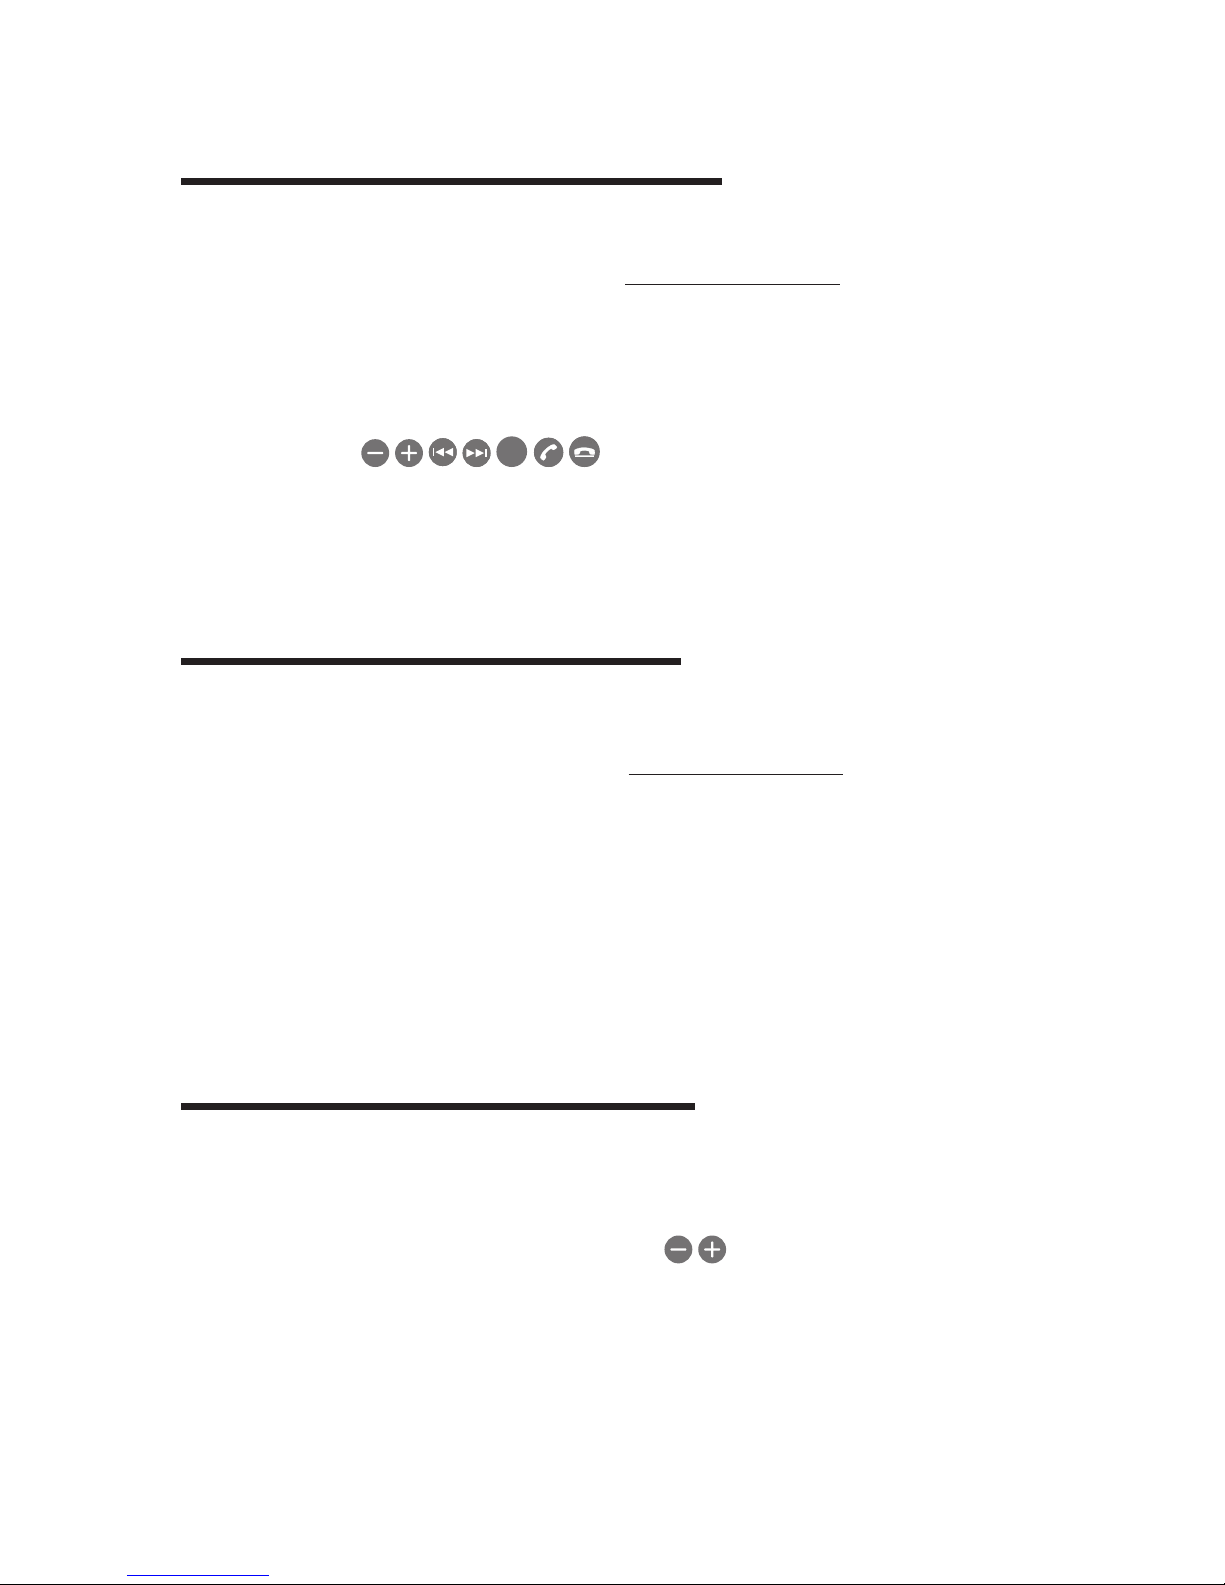
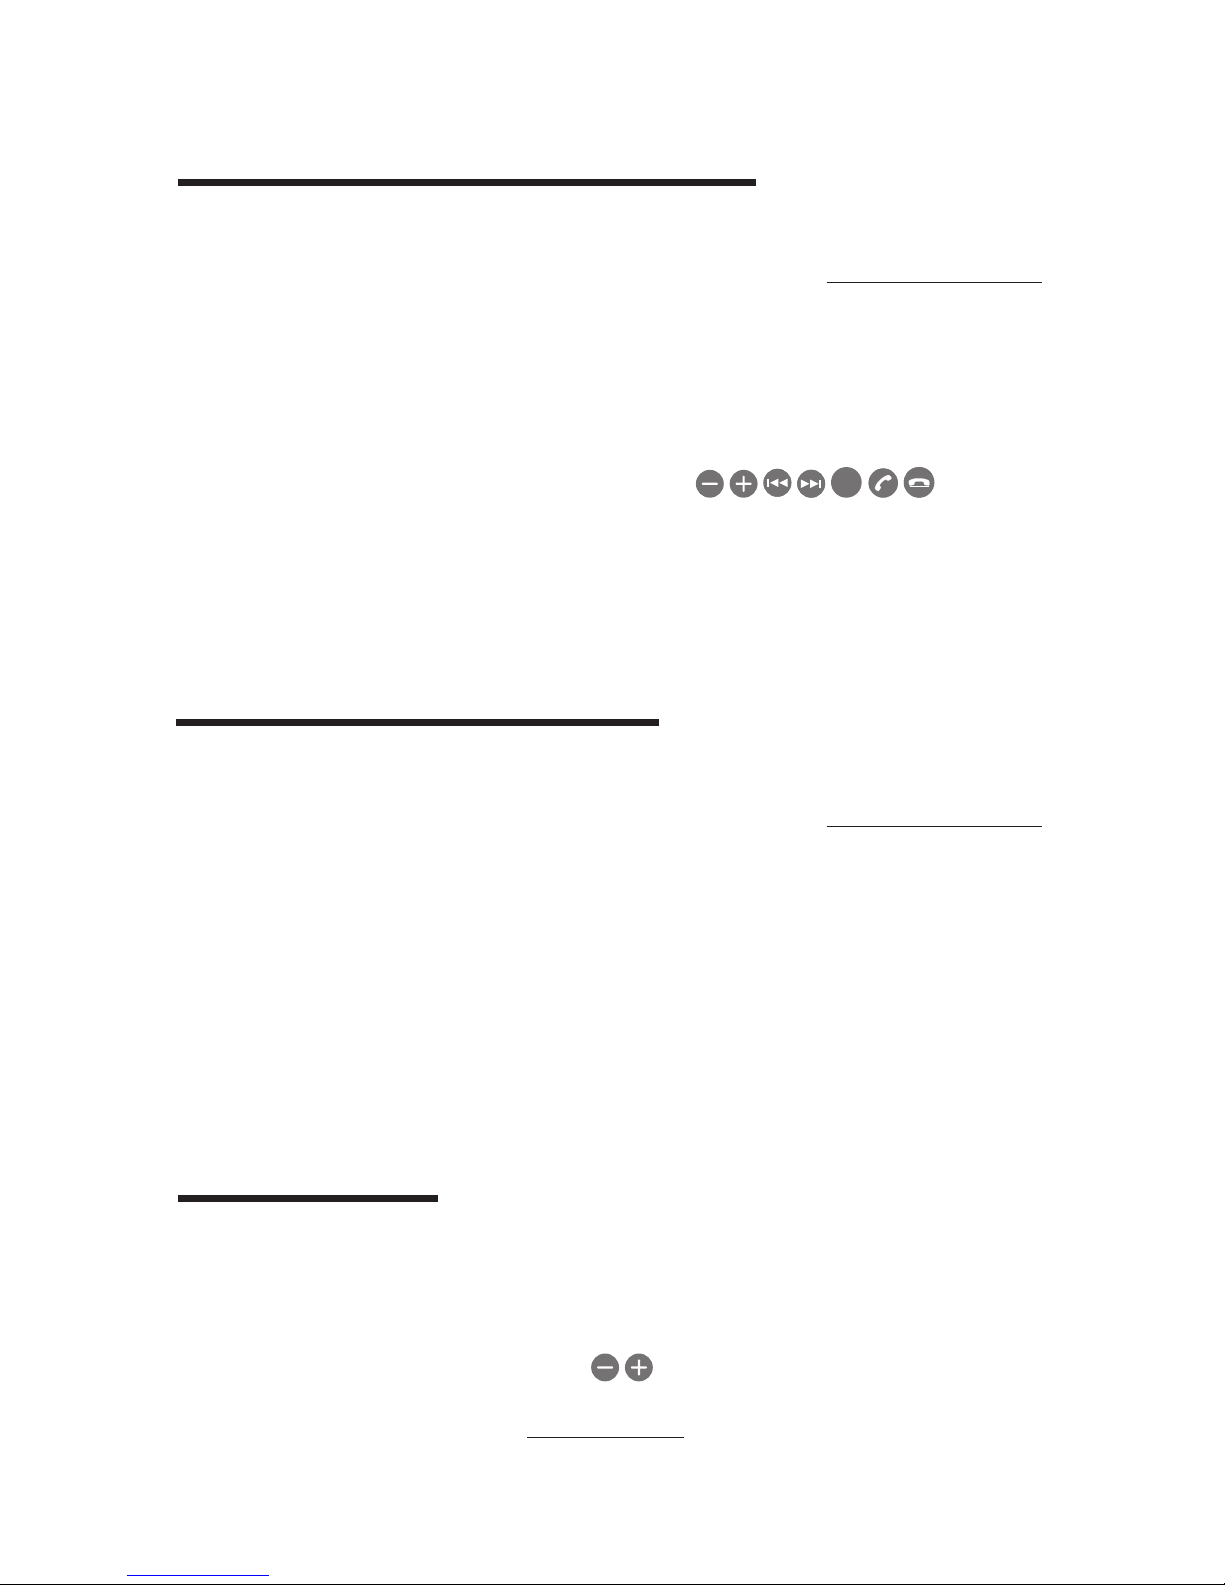
Note : Si vous utilisez l’UNIKA avec un Parrot MKi9000, vous pouvez effacer la mémoire du
kit en répétant 5 fois la séquence suivante : .
Utilisation des commandes au volant
Note: Une fois l’installation de l’UNIKA terminée, coupez le contact jusqu’à ce que la
LED de l’UNIKA s’éteigne.
► Consultez les schémas d’installation p.4 à 7. Pour plus d’informations, consultez la
section Installation de notre site web www.parrot.com.
10

La alimentación de la interfaz UNIKA se realiza con una derivación de la
alimentación del Parrot MKi. Es importante seguir el código de color de las
tensiones de alimentación. El hilo rojo del cable del kit debe corresponder a
los 12V permanentes, el hilo naranja a los 12V después del contacto, el hilo
negro a la masa y el hilo amarillo a la salida Mute Parrot.
Advertencia: Conecte el “después contacto” al kit Parrot si el vehículo
está basado en un protocolo resistivo o K-Bus.
En algunos vehículos, las tensiones de alimentación pueden estar inver-
tidas, en cuyo caso será necesario invertir el hilo rojo y el naranja de la
alimentación del kit manos-libres. Esta operación se realiza sencillamente
invirtiendo los dos portafusibles del cable de alimentación del kit.
Instalación
del cable de
alimentación
Le recomendamos que instale el Parrot MKi / RKi antes de comenzar con
la instalación del UNIKA. Asegúrese también de que la instalación esté
correctamente realizada, comprobando que al cortar el contacto aparece
el mensaje «Adiós» en la pantalla. Consulte el manual del Parrot MKi / RKi
para más información.
Instalación
del Parrot
MKi / RKi
Selección del
Protocolo
Utilice los interruptores DIP situados en una de las caras laterales de la
caja UNIKA para seleccionar el protocolo en el que se basa el vehículo.
► Consulte los esquemas p.19.
Advertencia: Asegúrese de que el Parrot UNIKA esté sin tensión antes
de realizar el ajuste.
Español
► Consulte los esquemas de instalación p.4 a 7. Para más información, consulte la
sección Instalación de nuestra página web www.parrot.com.
Si tiene algún problema o si vuelve a colocar el UNIKA en otro coche,
ponga el contacto y mantenga pulsado el botón Reset hasta que se apa-
gue el LED (si el vehículo está basado en un protocolo CAN Bus o K-BUS) o
parpadee en rojo (protocolo resistivo) para reiniciar el UNIKA.
Reinstalación
En función de la configuración del volante de su vehículo y del número de
botones disponibles, el UNIKA le puede permitir utilizar las funciones de
telefonía y música de 4 modos: Modo A (4 botones), Modo B (5 botones),
Modo C (6 botones), Modo D (7 botones). La selección del modo depende
del protocolo en el que esté basado su vehículo.
Modos de
UNIKA
UNIKA es una interfaz universal que permite utilizar los mandos del volante de su vehículo
con el Parrot MKi / RKi. Es compatible con los protocolos CAN, K-BUS y resistivos.
Instalación
11

Si su vehículo no tiene todos esos botones, pulse durante 2 s el último
botón disponible hasta que el LED pase al verde.
Casos
particulares
Si su vehículo está basado en un protocolo resistivo, deberá definir el
modo manualmente. Para ello, una vez que haya finalizado la
instalación:
Ponga el contacto.1.
> El LED del UNIKA parpadeará una vez en rojo
Pulse los botones de los mandos del volante del vehículo en el2.
siguiente orden : s r c .
> Con cada pulsación, el LED del UNIKA parpadeará una vez en rojo.
Definición del
modo
Nota: Una vez finalizada la instalación del UNIKA, dé al contacto y córtelo después.
Espere a que el LED del UNIKA se apague.
Los hilos correspondientes al protocolo resistivo deberán estar correctamente conectados
en su sistema de radio. Es importante seguir el esquema de instalación correspondiente a
su vehículo. Consulte la sección soporte de nuestra página web http://www.parrot.com para
más información.
Protocolo resistivo
Si su vehículo se basa en un protocolo CAN Bus o K-BUS, la selección del
modo (A, B, C o D) es automática. El parpadeo del LED en rojo indica que
el proceso está en curso. El LED pasará al verde cuando haya quedado
definido el modo.
Definición del
modo
Una vez que se haya instalado el UNIKA, el diodo de la interfaz se debe
encender en verde. Si pulsa algún botón de los mandos del volante, el
color del LED debe pasar a ámbar, lo que significa que la interfaz está lista
para ser utilizada. Si el LED no se enciende, compruebe la alimentación. Si
el LED está rojo o parpadea en rojo, compruebe las conexiones del CAN.
Comproba-
ción de la
instalación
Los hilos correspondientes al protocolo CAN / K-BUS deberán estar correctamente
conectados en su sistema de radio. Es importante seguir el esquema de instalación
correspondiente a su vehículo. Consulte la sección soporte de nuestra página web
http://www.parrot.com para más información.
Nota: Una vez finalizada la instalación del UNIKA, dé al contacto y córtelo después.
Espere a que el LED del UNIKA se apague.
Protocolo CAN Bus / K-BUS
Consulte los cuadros p.20 a 24 para conocer las funciones de los distintos botones según
el modo seleccionado.
Nota: Los logotipos pueden variar según los vehículos.
Nota: Si utiliza el UNIKA con un Parrot MKi9000, podrá borrar la memoria del kit repitiendo
5 veces la siguiente secuencia: .
Utilización de los mandos
12

Die UNIKA-Schnittstelle wird über einen Anschluss an der Parrot MKi
Versorgung mit Strom versorgt. Dabei muss die Farbcodierung der
Versorgungsspannungen unbedingt berücksichtigt werden. Die rote
Kabelader des Kits muss der 12V-Dauerversorgung, die orange Ader der
12 V-Versorgung über Zündung, die schwarze Ader der Masse und die
gelbe Ader dem Mute-Ausgang Parrot entsprechen.
Warnung: Bei Widerstandsprotokollen und K-Bus Protokollen muss der
Parrot-Bausatz über Kontakt angeschlossen werden, bei CAN Proto-
kollen muss UNIKA über Kontakt angeschlossen werden.
Bei manchen Fahrzeugen sind die Versorgungsspannungen umgekehrt;
in diesem Fall müssen die rote und die orange Ader der Stromversor-
gung der Freisprechanlage ebenfalls umgekehrt werden. Das macht man
einfach, indem man die beiden Sicherungshalter auf dem Versorgungska-
bel der Anlage umkehrt.
Einbau des
Stromver-
sorgungskabels
Wir empfehlen, vor UNIKA zuerst Parrot MKi / RKi zu installieren. Stellen
Sie außerdem sicher, dass die Installation einwandfrei erfolgt ist. Beim
Ausschalten muss auf dem Bildschirm die Nachricht „Auf Wiedersehen“
angezeigt werden.
Installation
des Parrot
MKi / RKi
Protokoll-
auswahl Das Fahrzeugprotokoll wird mit den DIP-Schaltern seitlich am UNIKA-
Gehäuse ausgewählt.
► Siehe hierzu die Abbildungen auf Seite 19.
Warnung: Vor den Einstellungen muss sichergestellt werden, dass
UNIKA nicht unter Spannung steht.
Deutsch
► Bitte beachten Sie die Installationspläne auf den Seiten 4 bis 7. Für weitere Informationen
konsultieren Sie den Abschnitt „Installation“ auf unserer Website www.parrot.com.
Welche Telefon- und Musikfunktionen Sie mit UNIKA bedienen können,
hängt von der Lenkradkonfiguration Ihres Fahrzeugs und von der Tas-
tenanzahl ab. Es gibt 4 Modi: Modus A (4 Tasten), Modus B (5 Tasten),
Modus C (6 Tasten), Modus D (7 Tasten). Die Modusauswahl ist vom Fa-
hrzeugprotokoll abhängig.
UNIKA-
Betriebsmodi
Bei Schwierigkeiten bzw. wenn UNIKA in ein anderes Fahrzeug eingebaut
werden soll, schalten Sie die Zündung ein und halten Sie die Reset-Taste
zur Neueinrichtung solange gedrückt, bis die LED erlischt (im Fall eines
CAN Bus oder K-BUS Protokolls), oder bis die LED rot blinkt (Widers-
tandsprotokoll).
Neueinrichtung
UNIKA ist eine universell einsetzbare Schnittstelle für die Lenkradsteuerungen Ihres Wagens
und Parrot MKi / RKi. UNIKA ist mit den Protokollen CAN und K-BUS sowie mit Widerstands-
protokollen kompatibel.
Installation
13

Anmerkung: Nach Abschluss der UNIKA-Installation muss die Zündung ein Mal aus-
und dann wieder eingeschaltet werden. Abwarten, bis die UNIKA-LED erlischt.
Wenn nicht alle Tasten in Ihrem Fahrzeug vorhanden sind, drücken Sie 2
Sekunden auf die letzte bei Ihnen verfügbare Taste, bis die LED grün wird.
Sonderfälle
Die Adern des Widerstandsprotokolls müssen korrekt an die Radioanlage angeschlos-
sen werden. Achten Sie also darauf, für den Einbau den passenden Installationsplan für
Ihr Fahrzeug zu verwenden. Konsultieren Sie die Rubrik „Support“ auf unserer Website
http://www.parrot.com für weitere Informationen.
Bei Fahrzeugen mit Widerstandsprotokoll muss der Modus händisch
ausgewählt werden. Nach der Installation:
Zündung einschalten.1.
> LED des UNIKA blinkt ein Mal rot auf.
Nun die Steuertasten am Lenkrad Ihres Fahrzeugs in folgender2.
Reihenfolge betätigen: s r c .
> Nach jedem Tastendruck blinkt die LED ein Mal rot auf.
Festlegen des
Modus
Widerstandsprotokoll
Bei Fahrzeugen mit CAN Bus bzw. K-BUS Protokoll erfolgt die Modu-
sauswahl (A, B, C oder D) automatisch. Während des Auswahlvorgangs
blinkt die LED rot, nach erfolgter Festlegung leuchtet die LED grün auf.
Festlegen des
Modus
Nach der Installation muss die Schnittstellendiode grün aufleuchten. Die
LED-Farbe muss gelblich werden, sobald man eine der Lenkradsteuerungs-
tasten betätigt. Das bedeutet, dass die Schnittstelle einsatzbereit ist. Wenn
die LED nicht aufleuchtet, muss die Stromversorgung überprüft werden.
Wenn die LED rot leuchtet oder blinkt, müssen die CAN-Anschlüsse über-
prüft werden.
Prüfung der
Anlage
Die Adern des Protokolls CAN / K-BUS müssen korrekt an die Radioanlage angeschlos-
sen werden. Achten Sie also darauf, für den Einbau den passenden Installationsplan für
Ihr Fahrzeug zu verwenden. Konsultieren Sie die Rubrik „Support“ auf unserer Website
http://www.parrot.com für weitere Informationen.
Anmerkung: Nach Abschluss der UNIKA-Installation muss die Zündung ein Mal aus-
und dann wieder eingeschaltet werden. Abwarten, bis die UNIKA-LED erlischt.
Protokoll CAN Bus / K-BUS
Die verschiedenen modusabhängigen Tastenfunktion entnehmen Sie bitte den Tabellen S.
20 bis 24.
Anmerkung: Die Symbole können je nach Fahrzeug anders aussehen.
Hinweis: Wenn Sie UNIKA mit einem Parrot Mki9000 verwenden, löscht man den Speicher
des Einbausatzes, indem man 5 Mal diese Tastenfolge wiederholt: .
Bedienung der Steuerungen
14

L’alimentazione dell’interfaccia UNIKA avviene con una derivazione dell’
alimentazione del Parrot MKi. È importante seguire il codice colore delle
tensioni di alimentazione. Il filo rosso del cavo del kit deve corrispondere al
12 V permanente, il filo arancione al 12 V sottochiave, il filo nero alla massa
ed il filo giallo all’uscita Mute Parrot.
Avvertenza: Avvertenza: Se il veicolo si basa su un protocollo resistivo o
K-Bus, collegare il positivo sottochiave al kit Parrot. Se il veicolo si basa
su un protocollo CAN, NON collegare il positivo sottochiave.
Su alcuni veicoli le tensioni di alimentazione possono essere invertite. È
allora necessario invertire i fili rosso e arancione dell’alimentazione del kit
mani libere. Questa operazione si effettua semplicemente invertendo i due
portafusibili del cavo di alimentazione del kit.
Installazione
del cavo
d’alimentazione
Vi consigliamo di installare il Parrot MKi / RKi prima di procedere all’installa-
zione dell’UNIKA. Assicurarsi anche che questa installazione venga corret-
tamente eseguita, verificando la presenza del messaggio « Arrivederci » sullo
schermo quando si spegne il motore. Consultare le istruzioni del Parrot
MKi / RKi per maggiori informazioni.
Installazione
del Parrot
MKi / RKi
Selezione del
Protocollo Utilizzare gli interruttori DIP posti su una delle facce laterali della centralina
UNIKA per selezionare il protocollo sul quale si basa il veicolo.
► Vedere gli schemi a p.19.
Avvertenza: assicurarsi che UNIKA non sia sotto tensione prima di
effettuare questa impostazione.
Italiano
►Consultare gli schemi di installazione da pag. 4 a 7. Per maggiori informazioni, consultare
la sezione Installazione del nostro sito web www.parrot.com.
In caso di problemi o se si è reinstallato l’UNIKA su un’altra autovettura,
accendere il motore poi mantenere il tasto Reset premuto fino a quando il
LED non si spegne (se il veicolo si basa su un protocollo CAN Bus o K-BUS)
o lampeggia in rosso (protocollo resistivo) per resettare l’UNIKA.
Reinstallazione
In funzione della configurazione del volante del proprio veicolo e del nu-
mero di tasti disponibili, l’UNIKA può consentire di utilizzare le funzionalità
di telefonia e musica secondo 4 modalità: Modalità A (4 tasti), Modalità B
(5 tasti), Modalità C (6 tasti), Modalità D (7 tasti). La scelta della modalità
dipende dal protocollo sul quale si basa il veicolo.
Nota: i loghi possono variare secondo i veicoli.
Modalità
dell’UNIKA
L’UNIKA è un’interfaccia universale che permette di utilizzare i comandi al volante del vostro
veicolo con il Parrot MKi / RKi. È compatibile con i protocolli CAN, K-BUS e resistivi.
Installazione
15

Consultare le tabelle da pag. 20 a 24 per conoscere le funzioni dei diversi tasti secondo la
modalità selezionata.
Nota: i loghi possono variare secondo i veicoli.
Nota: Se si utilizza l’UNIKA con un Parrot MKi9000, la memoria del kit può essere cancel-
lata ripetendo per 5 volte la seguente sequenza: .
Se il proprio veicolo si basa su un protocollo resistivo, si dovrà definire ma-
nualmente la modalità. Per fare ciò, una volta eseguita l’installazione:
Accendere il motore.1.
> Il LED dell’UNIKA lampeggia una volta in rosso.
Premere i tasti dei comandi al volante del proprio veicolo nel seguente2.
ordine s r c .
> Ogni volta che si preme, il LED dell’UNIKA lampeggia una volta in
rosso.
Definizione
della modalità
Se il proprio veicolo non dispone di tutti questi tasti, premere per 2 sec
l’ultimo tasto disponibile finché il LED non diventa verde.
Casi
particolari
I fili corrispondenti al protocollo resistivo devono essere correttamente collegati al vostro
sistema radio. È importante quindi seguire lo schema di installazione corrispondente al
vostro veicolo. Consultare la sezione supporto del nostro sito internet
http://www.parrot.com per maggiori informazioni.
Se il proprio veicolo si basa su un protocollo CAN Bus o K-BUS, la selezione
della modalità (A, B, C o D) è automatica. Un lampeggiamento rosso del
LED indica che il processo è in corso. Il LED diventa verde una volta definita
la modalità.
Definizione
della modalità
I fili corrispondenti al protocollo CAN / K-BUS devono essere correttamente colle-
gati al vostro sistema radio. È importante quindi seguire lo schema di installazione
corrispondente al vostro veicolo. Consultare la sezione supporto del nostro sito internet
http://www.parrot.com per maggiori informazioni.
Una volta installato UNIKA, il LED dell’interfaccia deve accendersi in verde.
Quando si preme un tasto dei comandi al volante, il colore del LED deve
diventare ambrato. Se ciò avviene, l’interfaccia è pronta per l’uso. Se il LED
non si accende, verificare l’alimentazione. Se il LED è rosso o lampeggia in
rosso, verificare le connessioni del CAN.
Verifica dell’
installazione
Nota: Una volta terminata l’installazione di UNIKA, togliere il positivo sottochiave.
Aspettare fino allo spegnimento del LED di UNIKA.
Nota: Una volta terminata l’installazione di UNIKA, dare e togliere il positivo
sottochiave. Aspettare fino allo spegnimento del LED di UNIKA.
Protocollo resistivo
Protocollo CAN / K-BUS
Uso dei comandi
16

De UNIKA interface wordt gevoed door een afleiding van de voeding van de
Parrot MKi. Het is belangrijk om de kleurcodes van de voedingsspanning te
volgen. De rode draad van het snoer in de set moet overeenkomen met 12V
permanent, de oranje met 12V na contact, de zwarte draad is de massa en
de gele draad komt overeen met de uitgang Mute Parrot.
Waarschuwing: sluit het na-contact aan op de Parrot kit als uw voertuig
is gebaseerd op een weerstandprotocol of K-Bus. Sluit het na-contact
aan op de UNIKA als uw voertuig is gebaseerd op een CAN protocol.
Op sommige voertuigen kan de spanning omgekeerd zijn, de rode en oranje
voedingsdraden van de hands-free set moeten dan worden omgewisseld.
Dit doet u door de twee zekeringdragers op het installatiesnoer van de set
te verwisselen.
Installatie
van het
voedingssnoer
Wij raden u aan om de Parrot MKi / RKi te installeren voordat u de UNIKA
installeert. Verzeker u er ook van dat de installatie correct is uitgevoerd,
door te controleren of het bericht ‘tot ziens’ op het scherm wordt getoond
als u het contact verbreekt.
Installatie van
de Parrot
MKi / RKi
Keuze van het
protocol
Gebruik de DIP switches die zich op één van de zijkanten van de UNIKA
kast bevinden om het protocol te kiezen waarop het voertuig is gebaseerd.
► Zie de tekeningen op p.19.
Waarschuwing: controleer dat de UNIKA niet onder stroom staat
voordat u deze instelling uitvoert.
Nederlands
► Raadpleeg de installatieschema’s op pagina 4 tot 7. Voor meer informatie kunt u het
onderdeel Installatie op onze website www.parrot.com doornemen.
Als u een probleem tegenkomt of als u de UNIKA eerst in een ander voer-
tuig heeft geïnstalleerd, schakelt u het contact in en houdt vervolgens de
knop Reset ingedrukt tot de LED uit gaat (als het voertuig is gebaseerd op
een CAN Bus of K-BUS protocol) of rood knippert (weerstandsprotocol),
om de UNIKA op nul te zetten.
Opnieuw
installeren
Afhankelijk van de configuratie van het stuur van uw voertuig en het aantal
knoppen dat beschikbaar is, kunt u met de UNIKA de functies telefoon en
muziek gebruiken op vier manieren: Modus A (4 knoppen), Modus B (5
knoppen), Modus C (6 knoppen), Modus D (7 knoppen). De selectie van
een modus hangt af van het protocol waarop uw voertuig is gebaseerd.
Modussen
van de
UNIKA
De UNIKA is een universele interface, waardoor de stuurbediening van uw voertuig kan
worden gebruikt met de Parrot MKi / RKi. Hij is compatibel met de protocollen CAN, K-BUS
en met weerstand.
Installatie
17

Raadpleeg de tabellen op p. 20 tot 24 voor de functies van de verschillende knoppen
volgens de gekozen modus.
Let op: de logo’s kunnen per voertuig verschillen.
Let op: als u de UNIKA gebruikt met een Parrot MKi9000, kunt u het geheugen van de kit
wissen door 5 maal de volgende sequentie te herhalen: .
Als uw voertuig is gebaseerd op een weerstandsprotocol, moet u de modus
handmatig bepalen. U doet dit als volgt, nadat de installatie is voltooid:
U schakelt het contact in.1.
> De UNIKA LED knippert één maal rood.
Druk op de knoppen van de stuurbediening van uw voertuig in de2.
volgende volgorde s r c .
> Elke keer als u op een knop hebt gedrukt, knippert de UNIKA LED
één maal rood.
Bepaling van
de modus
Als uw voertuig niet over al deze knoppen beschikt, drukt u twee seconden
op de laatste knop die beschikbaar is totdat de LED groen wordt.
Bijzondere
gevallen
Wanneer de UNIKA is geïnstalleerd, moet de diode van de interface groen
gaan branden. Wanneer u op een knop drukt van de stuurbediening, moet
de LED amberkleurig worden. Indien dit het geval is, is de interface klaar
voor gebruik. Als de LED niet aan gaat moet u de voeding controleren. Als
de LED rood is of rood knippert controleer dan de CAN aansluitingen.
De installatie
controleren
De draden die overeenkomen met het weerstandprotocol moeten correct worden aan-
gesloten op uw radiosysteem. Het is dus belangrijk om het installatieschema te volgen
dat overeenkomt met uw voertuig. Raadpleeg het assistentieonderdeel van onze website
http://www.parrot.com voor meer informatie.
De draden die overeenkomen met het protocol CAN/K-BUS moeten correct worden aan-
gesloten op uw radiosysteem. Het is dus belangrijk om het installatieschema te volgen
dat overeenkomt met uw voertuig. Raadpleeg het assistentieonderdeel van onze website
http://www.parrot.com voor meer informatie.
Als uw voertuig is gebaseerd op een protocol CAN Bus of K-BUS, gebeurt
de selectie van de modus (A, B, C of D) automatisch. De LED knippert rood
om aan te geven dat het proces gaande is. De LED wordt groen wanneer
de modus is bepaald.
Bepaling van
de modus
Let op: wanneer de installatie van de UNIKA is voltooid, verbreekt u het contact en
maakt vervolgens weer contact. Wacht totdat de LED van de UNIKA uit gaat.
Let op: wanneer de installatie van de UNIKA is voltooid, verbreekt u het contact en
maakt vervolgens weer contact. Wacht totdat de LED van de UNIKA uit gaat.
Weerstandsprotocol
Protocol CAN Bus / K-BUS
Gebruik van de bediening
18

ON DIP
1234
CAN Bus / K Bus protocol
Protocole CAN Bus / K-BUS
Protocolo CAN Bus / K-BUS
Protokoll CAN Bus / K-BUS
Protocollo CAN Bus / K-BUS
Protocol CAN Bus / K-BUS
ON DIP
1234
Resistive protocol with OEM radio
Protocole résistif avec radio OEM
Protocolo resistivo con radio OEM
Widerstandsprotokoll mit Radio OEM
Protocollo resistivo con radio OEM
Weerstandsprotocol met OEM radio
ON DIP
1234
Resistive protocol without OEM radio
Protocole résistif sans radio OEM
Protocolo resistivo sin radio OEM
Widerstandsprotokoll ohne Radio OEM
Protocollo resistivo senza radio OEM
Weerstandsprotocol zonder OEM radio
ON DIP
1234
CAN protocol with external IGNITION
Protocole CAN Bus avec après-contact externe
Protocolo Can con “después contacto” externo
Can Protkoll extern über Zündung
Protocollo CAN con sottochiave esterno
Can protocol met extern na-contact
19

Warning : The mode (A / B / C / D) you will use depends on the number of available but-
tons and not on the pictograms. For instance, if you have the buttons,
you will use the UNIKA in mode B : while referring to the tables p.21/24, consider the s r c
buttons is replaced by the button.
Avertissement : Le mode (A / B / C / D) que vous utiliserez dépend uniquement du nom-
bre de boutons disponibles et non des pictogrammes sur ces derniers. Ex : Si vous dis-
posez des boutons , vous utiliserez l’UNIKA en mode B. Sur les tableaux
p.21 à 24, considérez que le bouton remplace le bouton s r c .
Advertencia : El modo (A / B / C / D) que utilizará depende únicamente del número de
botones disponibles y no de los símbolos de éstos. Ej.: Si usted tiene los botones
, utilizará el UNIKA en modo B. En el cuadro p.21 a 24, considere que el botón
sustituye al botón s r c .
Warnung : Der verwendete Modus hängt ausschließlich von der Tastenanzahl ab, nicht
von den Symbolen auf den Tasten. Beispiel: Sie verfügen über die Tasten
und verwenden dementsprechend UNIKA im Modus B. In den Tabellen auf Seiten 21
bis 24 entspricht die Taste der Taste s r c .
Avvertenza: la modalità (A / B / C / D) che si utilizzerà dipende esclusivamente dal
numero dei tasti disponibili e non dai simboli posti su questi ultimi. Es.: se si dispone
dei tasti , si utilizzerà l’UNIKA in modalità B. Sulle tabelle da p. 21 a 24,
considerare che il tasto sostituisce il tasto s r c .
Waarschuwing: de modus (A / B / C / D) die u gebruikt hangt uitsluitend af van het aantal
beschikbare knoppen en niet van de pictogrammen op de knoppen. Voorbeeld: als u
beschikt over de knoppen ,gebruikt u de UNIKA in modus B. Op de
tabellen op p. 21 tot 24, kunt u ervan uitgaan dat knop de knop s r c vervangt.
2 short presses / 2 appuis courts / 2 pulsaciones corta /
2 x kurzer Druck / 2 pressioni brevi / 2 maal kort drukken
Short press / Appui court / Pulsación corta / Kurzer Druck /
Pressione breve / Kort drukken < 1s
Long press / Appui long / Pulsación larga / Langer Druck /
Pressione prolungata / Lang drukken > 2s
Volume / Volumen / Lautstärke
s r c
Seek
Source / Fuente / Quelle / Fonte
Pick up - Hang up / Décrocher - Raccrocher / Descolgar -
Colgar / Abheben - Auflegen / Rispondere - Riagganciare /
Opnemen - Ophangen
20
Other manuals for UNIKA
3
This manual suits for next models
1
Table of contents
Languages:
Other Parrot Recording Equipment manuals