Party Projector IJP557B User manual

PartyProjector
Karaoke Movie Music System
IJP557B
User’sGuide

This product utilizes a class 1 laser to read compact Discs.
This laser compact Disc Player is equipped with safety
switches to avoid exposure when the CD door is open and
the safety interlocks are defeated. invisible laser radiation is
present when the Player’s lid is open and the system’s
interlock has failed or been defeated. it is very important that
you avoid direct exposure to the laser beam at all times. Please do not attempt
to defeat or bypass the safety switches.
FCC Warnings
Warning: Changes or modifications to this unit not expressly approved by the
party responsible for compliance could void the user’s authority to operate the
equipment.
Note: This equipment has been tested and found to comply with the limits for a
class b digital device, pursuant to Part 15 of the Fcc Rules and Canada
standard. These limits are designed to provide reasonable protection against
harmful interference in a residential installation. This equipment generates,
uses, and can radiate radio frequency energy and, if not installed and used in
accordance with the instructions, may cause harmful interference to radio
communications. however, there is no guarantee that interference will not
occur in a particular installation. if this equipment does cause harmful
interference to radio or television reception, which can be determined by
turning the equipment off and on, the user is encouraged to try to correct the
interference by one or more of the following measures:
Reorient or relocate the receiving antenna.
Increase the separation between the equipment and receiver.
Connect the equipment into an outlet on a circuit different from that to
which the receiver is connected.
Consult the dealer or an experienced radio/TV technician for help.
The distance between user and products should be no less than 20cm
FCC ID: SSM3931367
SAFETY INSTRUCTIONS & WARNINGS

MAIN UNIT
LOCATION CONTROLS
1.1

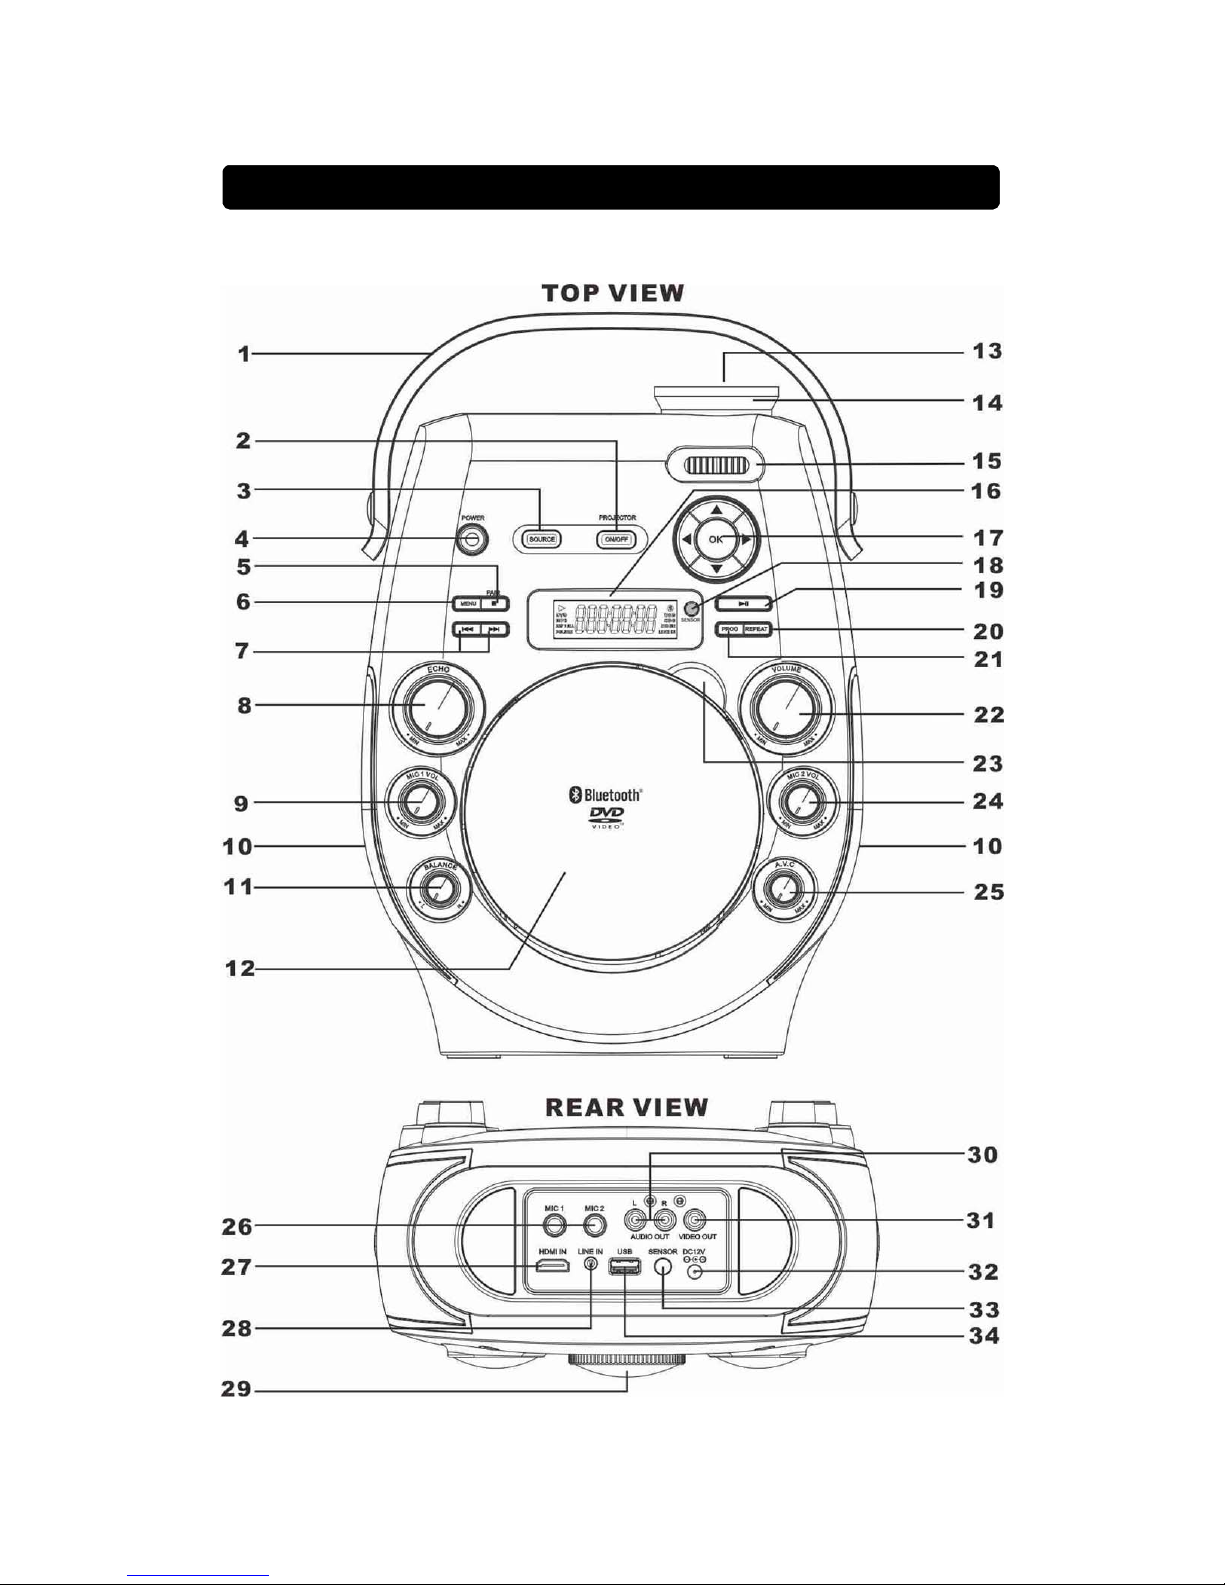
1. CARRY HANDLE: Use to remove the unit to other place.
2. PROJECTOR ON/OFF Button: Press to turn on / off projector.
3. SOURCE Button: Press to select DVD / USB / LINE IN / Bluetooth.
4. POWER Button: Press to turn on or off the unit.
5. PAIR / STOP Button: Press to stop a disc playing Hold to reconnect
Bluetooth pairing connection, when unit on Bluetooth mode.
6. MENU Button:
7. SKIP/ SEARCH Button :
8. ECHO Dial: Rotate to adjust echo sound effect.
9. MIC 1 VOL Dial: Rotate to adjust the volume from the microphone.
10. BALANCE Button:
11. SPEAKER: Built-in speaker for bigger sound output.
12. CD DOOR: Open the door to install or remove disc.
13. PROJECTOR LENS COVER: Remove the cover before use projector.
14. PROJECTOR FOCUS Adjust: Rotate to adjust focus of projector screen.
15. PROJECTOR TRAPEZOIDAL Adjust: Rotate to connect the rectangle
rescreen.
16. LCD Display: Show disc playing information
17. NETVIDATOR Buttons: Four direction select keys and OK key.
18. SENSOR Front Side: Use remote pointer to sensor to control unit.
19. PLAY / PAUSE Button: Press to play or pause a loader disc.
20. PROG Button: Press to program the loader disc to play tracks in
specified order..
21. REPEAT Button: Press repeatedly to set the current track or entire disc to
repeat playing.
22. MASTER VOLUME Dial: Rotate to adjust the main volume sound level.
23. CD Door Open Area: Use the location area to open the CD door.
24. MIC 2 VOL Dial: Rotate to adjust the volume from the microphone.
25. AVC Dial: Rotate to adjust the automatic voice control.
26. MIC 2 Inputs: Rotate to adjust the volume from the microphone.
27. HDMI Input: Connect to TV HDMI output.
28. AUX IN (LINE in / Audio in) : Connect to external device audio output.
29. PROJECTOR TILT FOOT : To adjust to correct projector screen.
30. AUDIO OUT RCA Jack: Connect to TV / ext. device audio input.
31. VIDEO OUT RCA Jack: Connect to TV video input.
32. DC INPUT Jack: Connect power adapter for AC power.
33. SENSOR Rear Side: Use remote pointer to sensor to control unit.
MAIN UNIT LOCATION CONTROLS 1.2

34. USB Input: Connect to USB device.
1. INFO :Show disc information on screen
2. TTS
3. MENU: Press to enter DVD menu
4. NETVIGATOR: Four direction select keys and OK key.
5. SETU : Press to enter DVD setup menu
6. 0-9 NUMBER: Press to DVD select number
7. STANDBY: Press to turn on or off the unit.
8. AUDIO: Press to access various function.
9. SUB: Select DVD subtitle on multi-language
10. SOURCE: Press to select DVD / USB / LINE IN / Bluetooth
11. REPEAT: Allow you to repeat a title, chapter, track or disc.
12. PROG: Press to program the loader disc to play tracks in specified order..
13. TITLE: Press to switch the disc/DVD’s subtitle language.
14. ANGLE: Press to select camera angle.
15. STOP: Press stop a disc playing.
16. SKIP/SRACH: Press to search/skip backwards or forwards.
17. PLAY/PAUSE: Press to play or pause a loader disc.
18. GOTO/- : Use to jump to other track / chapter.
19. BATTERY COMPARTMENT: Installed battery for remote power.
REMOTE LOCATION CONTROLS 1.1

Plug the included AC adapter into the standard AC power outlet to power the
unit. Connect small end to DC INPUT jack of your unit. After adapter
connection, Press POWER button ( unit or remote ) to turn on unit. slide
the SOURCE selector of your unit to DVD /USB /LINE IN / Blutooth mode.
To activate the mote control, remove the little tag sticking out of the battery
compartment by pulling on it. Once the tag is removed the remote will be ready
for use.
Replacing the Battery of remote control
Batteries shall not be exposed to excessive heat such
as sunshine, fire
Be sure that the batteries are installed polarity correctly.
Only same or equivalent type batteries as recommend
are to be used.
Do not dispose of batteries in fire, battery may explode
or leak. Do not try to recharge a battery。
SETUP POWER
Connect Power Ada
p
ter
Notes For Remote Control

Select the location with the projector placed near the floor in front of the screen.
Remove the lens cover of unit and turn on power. Make sure the projector light
on ( press the PROJECTOR ON/OFF button).This is the most common way to
position the projector for quick setup and portability.
Use below setting to correct the viewing image.
TILT FOOT
The tilt foot height can be adjusted by its turn to adjust the height of the
projected image
PROJECTOR TRAPEZOIDAL ADJUST
If the projector image is distorted, slide it to adjust projected image
PROJECTOR FOCUS ADJUST
If the projector image not cleared, rotate it to adjust projected image
PLACE PROJECTOR

1. Require an RCA video cable. Plug the included RCA audio/video cable
CONNECTING TO A TELEVISION / DVD / EXT. DEVICE
Com
p
osite Video out
p
ut

into the VIDEO OUT and a composite video input on a television.
2. Adjust the television to the correct input setting.
3. When playing a CDG / DVD discs,
4. Press the PROJECTOR ON/OFF button to turn off projector and the unit
will output written lyrics / video / image to the connected television
1. Require an RCA audio cable. Plug the included RCA audio/video cable
into the AUDIO OUT and a RCA audio input on a television or stereo
system.
2. Adjust the television or stereo system to the correct input setting.
3. When playing the disc, the unit will output audio to the connected
television or stereo system. Use the external device to control the output
sound level.
1. Require an HDMI cable. Plug the HDMI cable into the HDMI input and
connect end to a HDMI output of external device.
2. Turn on both units and set collect source
3. After connection, the external device will sound from your unit speaker and
the external device video will on show on projector.
1. To connect a MP3 Player or other Audio Device you will need a 3.5mm
Auxiliary Cable.
2. Connect a 3.5 mm Auxiliary Cable to the LINE IN jack on front of unit and
to the Audio Output or Phones on the audio device you wish to play.
3. Rotate the SOURCE selector of unit to LINE IN mode. Turn on both units.
4. After connection, the external device will sound from your unit speaker.
1. Connect power (follow SETUP POWER page) .
2. Pull the CD DOOR OPEN AREA to open the CD DOOR.
3. Place a DVD / VCD / CD’s / CDG into the CD compartment.
4. Close the CD DOOR.
5. Press the SOURCE button to DVD position. The disc playback start.
1. Connect power (follow SETUP POWER page) .
2. Pull the CD DOOR OPEN AREA to open the CD DOOR.
3. Place a DVD / VCD / CD’s / CDG into the CD compartment.
4. Close the CD DOOR.
INSTALL CD+G, CDS , VCD , DVD , USB
RCA Audio Out
p
ut
AUX IN
(
LINE In / AUDIO In
)
Loadin
g
a Disc
HDMI In
p
ut
Loadin
g
a USB Memor
y
Stick

5. Press the SOURCE button to USB position. The USB playback start.
1. Follow the instructions for Loading a Disc or Loading a USB Memory
Stick
2. After install disc or USB, the unit will be start play automatically.
3. If unit not start play, press the PLAY/ PAUSE button to begin playing
the loaded disc or USB. Rotate the MASTER VOLUME dial to select the
sound level.
4. To temporarily stop playing, press the PLAY/PAUSE button once to
pause mode. To resume play, press the PLAY /PAUSE button again.
When disc or USB playing,SKIP / SEARCH button or
NETVIGATOR buttons or GOTO button to fast skip/ search
1. Press SKIP / SEARCH buttons to skip between next or previous
tracks or chapter
2. Press NETVIGATOR buttons to search special tracks or chapter. Press the
OK of NETVIGATOR button to start play of selected tracks or chapter.
3. Press NUMBERIC buttons to key in special track or chapter number. After
selection, unit will start play of selected tracks or chapter.
4. Press GOTO button once and press NUMBERIC buttons to special track or
chapter number. After selection, unit will jump to selected tracks or chapter
to start play.
Press the REPEAT button, the indicator light on projector screen or TV screen.
1. When disc / USB playback, press the REPEAT button once to play the
current track or chapter repeatedly. REP: [REP 1] light on screen.
2. When disc / USB playback, press the REPEAT button twice to play the dir
(album) repeatedly. REP: [REP DIR] light on screen.
3. When disc / USB playback, press the REPEAT button three time to play the
entire disc repeatedly. REP: [REP ALL] light on screen.
4. To cancel the repeat function: press the REPEAT button repeatedly until
the REP “ off ” light .or press the STOP button twice to stop.
Re
p
eat Function
REPEAT AND PROGRAM OF CD+G, CDS , DVD , USB
USING PLAY/ PAUSE CD+G, CDS , DVD , USB
FAST SKIP / SEARCH TRACK OF CD+G, CDS , DVD , USB

1.
When disc / USB playing, press the PROG button and the program menu
light on projector screen or TV screen.
2. Press NETVIGATOR buttons to search special tracks and press OK button
of NETVIGATOR buttons to confirm
3. Repeat above step to more program location.
4. Press NETVIGATOR buttons to move cursor to recycle box and press OK
button of NETVIGATOR buttons to erase all program setting.
5. Press the PLAY button to start the program playing.
6. Press the STOP button twice to cancel a program.
Press MENU button to go back disc menu.
When disc title menu appears on the screen,. Press the navigator to select
different play option.
Press AUDIO button of remote to select different desired audio format if it is
available on disc you are playing.
To select the audio multi-channel ( right / left / mix or stereo / mono).
To select the audio multi-language ( English , French , Spanish ……).
To select the different audio sound effect ( 5.1 channel / 2.1 channel ).
Press the SUB button of remote repeated:
DVD special function
Main Menu on DVD Disc
AUDIO T
yp
e on DVD Disc
SUB-Subtitle on DVD Disc

To select different desired subtitle language or off ( disappear on screen) if it is
available on disc you are playing.
Press the TITLE button once when disc playing
The disc will go back the first tilt and start playing.
Press the TITLE button of remote to turn on / off function.
When TTS function turn on: Press any key, the unit will reply to you some voice
command.
Press the INFO button on the remote when disc playing:
Show the disc playback information (for example. Title or chapter number,
elapsed playing time, audio/subtitle language)’ a number of operations can be
done without interrupting disc playback.
Press the ANGLE button of remote repeated
To select different desired angle if it is available on disc you are playing.
Press the 0-9 button of remote when unit playing.
Select to special track or chapter number. After selection, unit will jump to
selected tracks or chapter to start play.
1. Press the POWER button to turn on
unit
.
2. On your smartphone / Tablet, turn on Bluetooth and enable device scanning.
3. When
xx-672 shows on the Bluetooth scan, select it to connect it to your
device.
4. When both devices are successfully connected, you are ready to play music
wirelessly from your device.
5. Press the PLAY button of
the unit e
xternal Bluetooth device to start music
playback.
6. Press the of the
unit next / previous
of external Bluetooth device to
switch between music tracks.
7. Press the /
8. Hold the BLUETOOTH button to reconnect other Bluetooth device.
TITLE on DVD Disc
TTS on DVD Disc
INFO on DVD Disc
ANGLE Function on DVD Disc
Use 0-9 of Remote
Connectin
g
Bluetooth to
y
our Smart
p
hone I Tablet
USING BLUETOOTH

The AVC (Automatic Voice Control) dial of unit adjusts the volume of the unit to
compensate for varying levels of volume from the connected microphone. Turn
the dial to adjust the degree to which the Automatic
Voice Control compensates
for
variations in volume.
Adjust the ECHO dial of unit to enhance your voice for a concert hall effect.
Requires a microphone (included) .
1. Plug the microphone (see below figure) into the MIC 1 INPUT or MIC 2
INPUT.
2. Slide the ON /OFF switch of MICROPHONE,
3. Use the
MIC VOLUME dial of unit to adjust the volume of audio sound
from the microphone.
4. Pull out the mic holder for microphone fixing on your unit (see below
figure).
5. Push in the mic holder if not use it.
INSTALL AND USING MICROPHONE
AVC
ECHO
USING AVC / ECHO / BALANCE
BALANCE

Specifications are typical, individual units might vary. They are subject to continuous
improvement without notice and without incurring any obligation.
AC Power
Adapter Connect DC Jack
Use included adapter
AC Input : 120-240V , 50 / 60 Hz ,
DC Output : 9V , 1500 mA
DC Input DC 12V , 2500 mA
USB Support 32GB USB memory stick 1.0 / 2.0 ver
CD Player
Support
CDs and CDG disc
1.75 / 3.25 inch
Bluetooth Support music share from mobile
Master Power Output 2W x 2 RMS
Loud Speakers Spec 3 Inch, 3 Watt , 8 Ohm x 2 pcs
SPECIFICATION
Table of contents