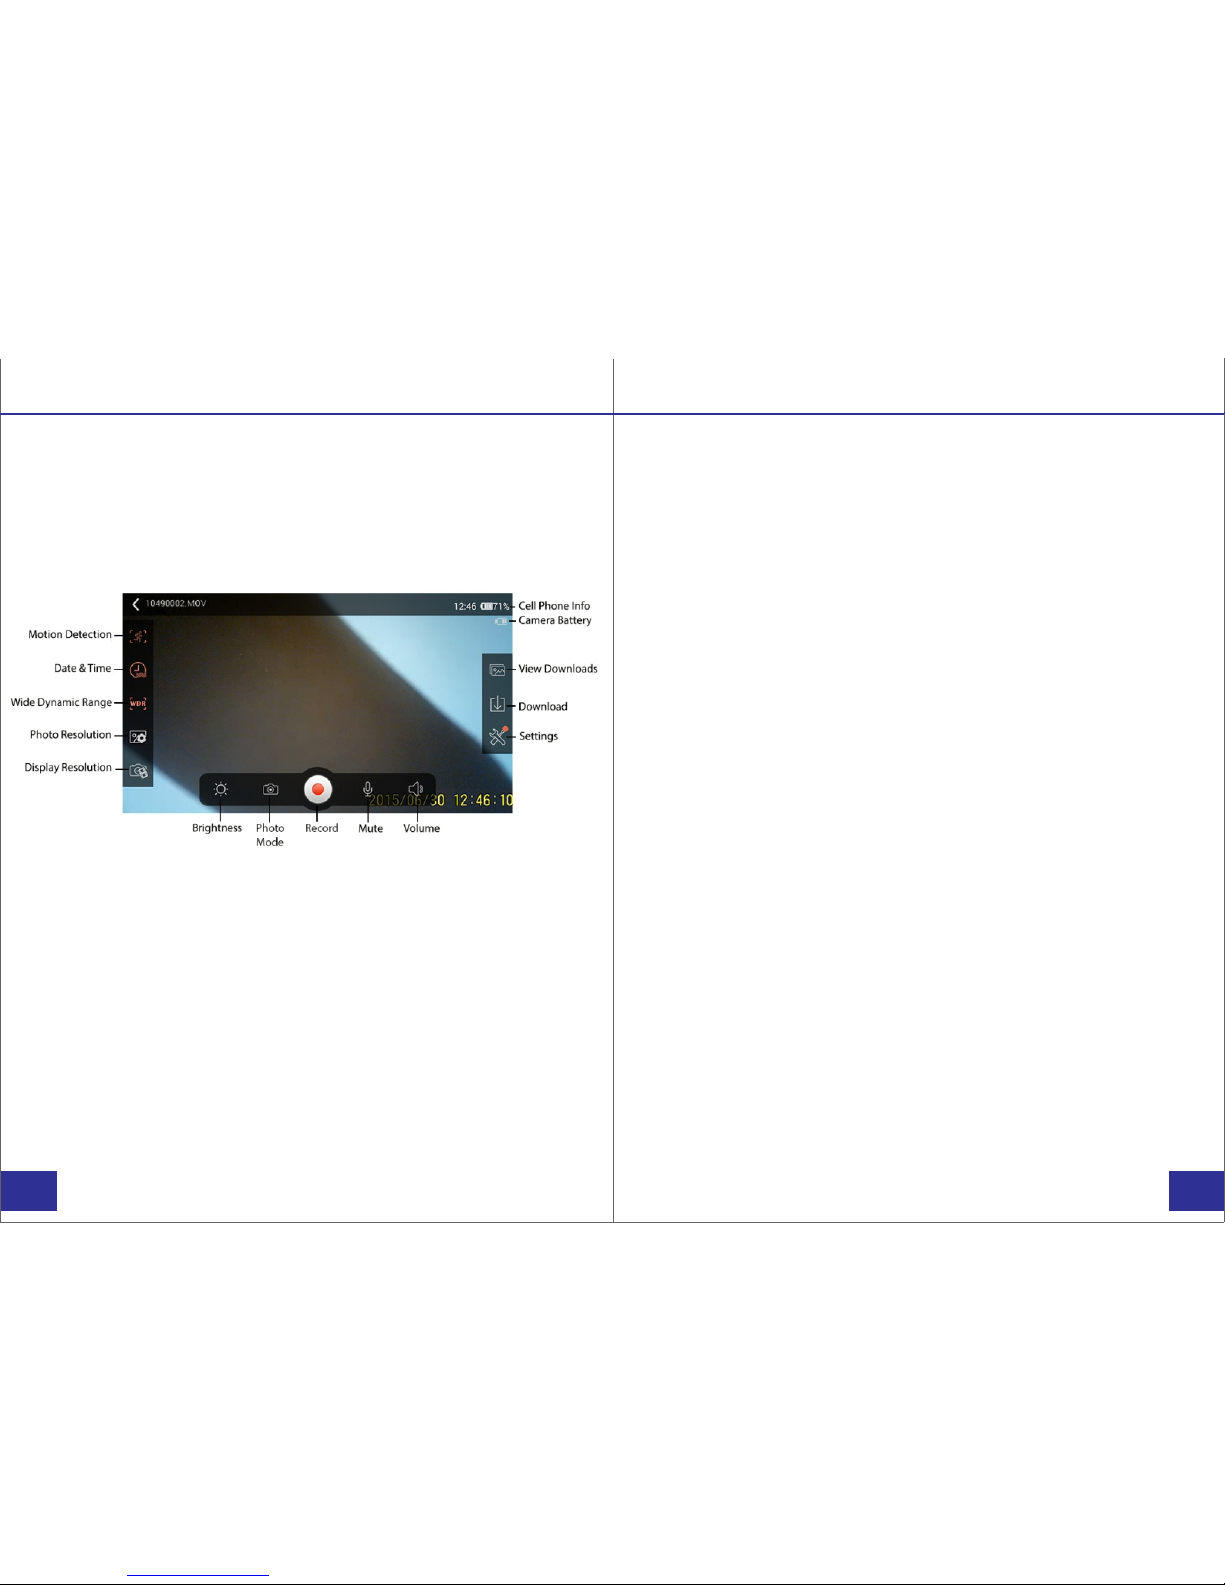
Patroleyes PHD-1080W User manual

PHD-1080W
User Manual

A. Power/confirm button
B. Mode button
C. Infrared switch
D. WIFI button
E. Microphone
F. Infrared illuminators
G. Indicator light
H. USB port
I. SD card slot
J. HDMI port
K. Camera lens
Overview
Before Use:
Fully charge the camera using the included USB cable
and charger for 3-4 hours. The blue and red indicators will
turn on when the camera is charging. When the camera is
fully charged, only the red light will turn off.
Powering on your device:
1) Press and hold the power button (located on the
right side of the device near the top) for three seconds
to start up the camera.
2) The device will enter into standby mode and
the blue indicator light will turn on. From this mode you
can record video, change to picture mode, or turn
infrared on and off.
3) To power the device back off, press and hold the
power button for three seconds.
Transfer and manage files on your computer
(Compatible with Windows XP, Vista, 7, 8, 10 & Apple)
1) Connect the camera to your computer via the USB cable.
2) Open the related Removable Disk drive (usually D: or E:
drive) in “My Computer”.
3) Double click to view the folder contents then click on
each file to view, transfer, or delete the media files.
Getting Started
PAGE PAGE
01/14

Video Recording:
1) To record video, press the power button while the
camera is in standby mode. The blue indicator light will
flash 5 times before turning off. The camera will now begin
recording video.
2) To stop recording, press the power button again. The
camera will stop recording and enter back into standby
mode.
Photo Taking:
1) While the camera is in standby mode, press the mode
switch (located on the left side of the device, near the top)
to enter photo mode. The indicator light will change to red
while in photo mode.
2) Short press the power button to take a picture. Each
time the power button is pressed the red light will flash
and the picture will be saved. (Images captured through
the smartphone app will be instantly downloaded to your
phone).
3) Press the mode button to re-enter standby mode, the
blue indicator light will turn back on.
Recording:
Audio Recording:
1) To record audio only, press the mode button twice. The
indicator light will turn green, and the camera will enter
audio mode. Short press the power button, the indicator
light will begin flashing and the camera will record audio.
(Even while voice recording is disabled in the smartphone
app settings, the camera will still record an audio file).
2) Press the power button to stop recording. The indicator
light will stop flashing and the audio file will be saved.
3) Press the mode button to re-enter standby mode, the
blue indicator light will turn back on.
Motion Detection:
1) Press the mode button three times to enter into motion
detection mode and the red and blue light will turn on.
Short press the power button, the lights will flash five times
and the camera will begin motion detection.
2) When the camera detects movement it will begin
recording video. Press the power button to stop the
recording and save the video file.
3) Press the mode button to re-enter standby mode, the
blue indicator light will turn back on.
Recording:
PAGE PAGE

Settings:
WiFi Connection:
1) Press the WiFi button to turn on the camera’s WiFi, the
blue and green indicator lights will occasionally flash. Once
the camera and smartphone app connect through WiFi, the
blue and green lights will turn solid.
2) While connected to the camera through WiFi, you can
edit settings and record video, take photos, or record audio
through your smartphone via the smartphone app.
3) To turn off WiFi, press the Wifi button. The camera will
disconnect from the app and turn off WiFi signal.
Note: The WiFi default name is “C11” and the default
password is “12345678”.
Infrared Light:
1) To turn on infrared recording, press the infrared button
(located just beneath the power button on the right side of
the device). The indicator light will flash red three times
and the camera will enter infrared mode.
2) To turn off infrared, press the infrared button again. The
indicator light will flash green three times and then enter
normal recording mode.
Note: While infrared is on, the camera will record video
and pictures in night-vision. Night-vision will give better
recording at night, but images will be in black and white.
Settings:
Video Resolution:
1) There are four options of video resolution available to
chose from. To change the resolution, first create a text
file named “moviesizeset.txt” and place it in the root
directory of the SD card.
2) Open the text file to change the resolution. Input the
following text that goes with the desired video resolution:
a) For 1080P at 30 frames per second input “0”
b) For 720P at 60fps input “1”
c) For WVGA at 60fps input “2”
d) For VGA at 60fps input “3”
3) Save the text with the desired resolution number.
Insert the SD card into the camera and power the camera
on, your desired resolution will be set.
Time and Date:
1) To update the time and date setting on the camera,
create a text file named “timeset.txt”. In the text file, input
the date and time in “YYYY.MM.DD HH:MM:SS Y” format.
2) The final “Y” in the text document is for the time and
date to be displayed as a watermark on saved files. To
not display time and date, change the “Y” to “N”.
3) Save the text document in the SD card root directory
and insert the SD card into the camera. When the camera
powers on the time and date will be updated.
PAGE PAGE

Settings: Smartphone App:
Picture Size:
1) To change the picture size, create a text file named
“photosizeset.txt”. In the text file, input the following text
that goes with the desired image size.
a) For 4032x3024 input the text “0”
b) For 2304x1536 input “1”
c) For 1920x1080 input “2”
d) For 1280x720 input “3”
2) Save the text file with the desired setting in the SD
card’s root directory. Insert the SD card into the camera
and next time you power the camera on the photo size
setting will be updated.
HDMI Connection to TV:
Connect your camera to an HD TV through the included
HDMI cable. While connected to the TV you can preview
saved files. While in preview mode, use the WiFi button to
change between files and use the power button to
play/pause the selected file. Use the mode button to stop
playing saved files, and press the mode button once more
to change back to video recording mode.
Smartphone App:
1) Download the smartphone app “finalcam” from the Apple
iTunes store or the Google Play Store. You can scan the
QR codes with your smartphone to be redirected to the
app’s page.
2) Connect to the camera through the smartphone app.
The camera’s default WiFi name is “C11” and the default
password is “12345678”.
3) While connected to the WiFi app, all the camera’s
function will be controlled through your smartphone.
PAGE PAGE

App Display: App Display:
Display Controls:
While connected to your smartphone via the WiFi app,
your phone will preview the camera’s view. Control for
settings, video and audio recording, and photo taking
through the app.
Motion detection:
Press the motion detection icon to enter motion detection
mode. The camera will enter motion detection mode and
the icon will become highlighted. Press the icon again to
exit motion detection mode, and the icon will turn grey.
Date and Time:
Press the date and time icon to turn on the date and time
watermark, the icon will become highlighted. Press the
icon again to turn off the date and time watermark, and the
icon will turn back to grey.
PAGE PAGE
Wide Dynamic Range:
Press the WDR icon to turn on Wide Dynamic Range
technology, and the icon will become highlighted. To turn
WDR back off, press the icon and it will turn back to grey.
Note: WDR technology helps to reduce over saturation of
videos for better image quality.
Photo Resolution:
Press the photo resolution icon to open the photo
resolution menu. In the menu, you can select to change the
resolution of captured photos through your phone.
Display Resolution:
Press the display resolution icon to change the size of
images transferred from the camera to your smartphone.
There are five size options to choose from:
a. 1280x720
b. 848x480
c. 640x480
d. 640x360
e. 320x240
Brightness:
Press the brightness icon to adjust the phone screen
brightness.

PAGE PAGE
App Display: App Display:
Photo Mode:
Press the photo mode icon to enter picture mode on the
camera. In camera mode, use the record button to take
pictures. To change back to video preview mode, press
the camera icon once more.
Record:
Press the record button to begin recording video, or to
take photos while in photo mode. When recording video,
press the recording button again to stop recording.
Mute:
Press the mute icon to turn off audio recording for videos
and the icon will have a slash through it. To turn on audio
recording for videos, press the icon once more and the
slash will be removed.
Volume:
Press the volume icon to adjust volume during video
playback mode.
Settings:
Press the settings icon to enter the camera settings menu.
From here you can adjust camera settings through your
smartphone. Press the settings icon once more to save
your changes and exit the settings menu.
Download:
Press the download icon to select saved videos and photos
to download to your smartphone.
View Downloads:
Press the view downloads icon to playback downloaded
videos and view saved photos through the app. The app
will display your saved files, select the file you wish to view
and the app will enter into playback mode.
Camera Battery:
The camera battery icon shows the amount of battery life
remaining on the camera.
Cell Phone Info:
While in the camera app, your cell phone information will
still be displayed at the top.

PAGE PAGE
Playback Mode: App Display:
Playback:
While connected to your smartphone via the WiFi app,
you can enter video playback mode through the app
display icons.
Current Time:
Displays the current time in the video recording.
Total Time:
Gives the overall length of the video file.
Brightness:
Press the brightness icon to adjust the smartphone’s
screenbrightness.
Skip Back:
Press the skip back icon to move to the previous video.
Skip Forward:
Press the skip forward icon to move to the next video.
Play:
Press the play button to begin or pause the current video.
Volume:
Adjust the volume of the video playback.
Delete:
Delete the current video file.
Loop:
Play the current video file on a loop. Looping means the
video file will start over from the beginning after it ends.
Tag:
You can tag video files to easily find your favorites for later
viewing.
File Name:
Displays the name of the currently selected video file.
Phone Info:
Displays the status of your smartphone.
Table of contents
Other Patroleyes Camcorder manuals