PCD Maltron RS10N1G-DK User manual

Issue: D3
Doc Ref: 00/08/KUM/SH/DK Copyright © 2013 PCD Maltron Ltd 1
PCD Maltron
Single Hand
Keyboard Range-DK
(Left & Right)
User Manual
For models
RS10N1G-DK
RS10N1B-DK
LS10N1G-DK
LS10N1B-DK

Issue: D3
Doc Ref: 00/08/KUM/SH/DK Copyright © 2013 PCD Maltron Ltd 2
PCD MALTRON SINGLE HAND RANGE USER MANUAL
Model: SINGLE LEFT & RIGHT KEYBOARD
Welcome to your new Maltron keyboard.
We hope you will find that your new keyboard quickly makes a positive improvement in your
ability to access computers and enjoy the benefits of ever-advancing computer functionality.
Please share your experience with us by letting us know your progress, and tell us of any
ideas for improving the keyboard range further.
Thank you in anticipation.
For sales & service please contact your local agent / importer, or contact:
PCD Maltron Ltd
Castlefields,
Stafford
ST16 1BU
United Kingdom
Tel: +44 (0) 845 230 3265
Fax: +44 (0) 845 230 3266
Int: +44 1785 785525
Fax: +44 845 230 3266
For more information visit:
www.maltron.com
Information in this User Manual is subject to change without notice.

Issue: D3
Doc Ref: 00/08/KUM/SH/DK Copyright © 2013 PCD Maltron Ltd 3
Table of Contents
1. Before-Use Information..................................................................................4
1.1 GUIDANCE AND WARNINGS:...................................................................4
1.2 POSTURE GUIDANCE: ..............................................................................4
1.3 KEYBOARD TRAINING AND POSITIONING:............................................5
1.4 OPERATION: ..............................................................................................6
1.5 LETTER KEYS:...........................................................................................6
1.6 LED DESCRIPTIONS:.................................................................................6
1.7 KEY FUNCTIONS: ......................................................................................7
STICKY KEYS:..................................................................................................7
DELAY:..............................................................................................................7
ONE-SHOT:.......................................................................................................7
REPEAT RATE: ................................................................................................7
1.8 FUNCTION KEYS AND THE NUMBER PAD:............................................7
1.9. SWITCHING BETWEEN LAYOUTS:.........................................................8
2. TRAINING.........................................................................................................8
3. SETTING UP THE KEYBOARD.......................................................................8
3.1 PLUGGING IN:............................................................................................8
3.2 COMMON CHECKS:...................................................................................9
3.3 REPORTING FAULTS: ...............................................................................9
4. KEYBOARD CLEANING..................................................................................9
5. STATIC AND YOUR KEYBOARD ...................................................................9
6. USING THE NUMBER PAD AS A MOUSE (IN WINDOWS) .........................11
7. COMPLIANCE................................................................................................11
Appendix A: Keyboard Layouts.......................................................................12
Single Right hand Keyboard –UK................................................................12
Single Left hand Keyboard –UK...................................................................13
Appendix B: Keyboard Specification..............................................................13

Issue: D3
Doc Ref: 00/08/KUM/SH/DK Copyright © 2013 PCD Maltron Ltd 4
1. Before-Use Information
1.1 GUIDANCE AND WARNINGS:
We are confident that you will quickly notice the benefit of using a Maltron keyboard, which is
specifically designed with ergonomic considerations to ensure ease and comfort in its
operation.
However, it is important that the keyboard is used in a suitable context, with regard to the
position and set up of the workstation and the general environment in which the keyboard will
be used. It is advised that an occupational health professional carries out a full workstation risk
assessment.
Always follow guidelines for using computer equipment from the Health & Safety
Executive http://www.hse.gov.uk/toolbox/workplace/designing.htm .
If you begin to feel any symptoms of a possible strain injury, visit your doctor as soon as
possible.
As a single hand user please be aware of increased risks of Repetitive Strain Injury (RSI) or
other related physical conditions. Although your Maltron keyboard has been ergonomically
designed to ensure maximum comfort levels it is important plenty of breaks are taken to avoid
overuse. Over the 35 years our keyboards have been in use, we have reports of users gaining
increased movement and significantly higher comfort levels while using a Maltron keyboard.
1.2 POSTURE GUIDANCE:

Issue: D3
Doc Ref: 00/08/KUM/SH/DK Copyright © 2013 PCD Maltron Ltd 5
1.3 KEYBOARD TRAINING AND POSITIONING:
The single hand keyboard has been specifically designed for users who wish to, or can
use only one hand to operate a keyboard. You will find the keyboard is easy to learn
and that it will make it possible for you to achieve a good speed with accuracy. (Speeds
of 60 wpm have been achieved).
Due to the keyboards ergonomic shape your fingers will very quickly learn to feel when
they are on the ‘home’ row that is the row on which they should rest. This row is S, (for
the thumb), A, T and H for the fingers.
The most commonly used letters are on the home row and the other letters of the
alphabet have been placed so that finger movements to and from the home row are the
easiest that could be arranged. This helps with learning where each key is located and
keying easy and fast. The online training exercises; also available with the keyboard on
the resource disc; have also been especially designed to imprint the letter positions.
It is highly recommended that the training modules are completed as this will aid
familiarisation.
As you will be using only on hand it is important to position the keyboard correctly to
avoid tiring the hand.
The keyboard has a very small downward tilt to one side. This is designed to avoid
wrist ache. Arrange the keyboard so that the corner where the thumb keys are, touches
the nearer edge of the table and the front edge of the keyboard slants at 35° upward,
away from you.
Your seating position is also very important. See the diagram above for good posture
which will ensure you achieve the right angles required to guarantee you have the right
seating position. You should have four right angles –1. At your elbow. 2. At your hip
joints. 3. At your knees. 4. At your ankles. This will mean your back, thighs and calves
will be in straight lines and your feet will be flat on the floor.
Your chair should have a supporting backrest and be height adjustable. Sit high enough
at your table to maintain the 90° right angle at your elbow. If you maintain this position
you will be able to key for long periods of time without feeling undue physical strain.
Always try and relax and ensure plenty of breaks are taken to avoid overuse. Tired
muscles take a long time to recover. Limit your typing to a couple of hour at a time.
We hope you enjoy working through the training exercises and that you will quickly
begin to enjoy the freedom that comes with easy typing.

Issue: D3
Doc Ref: 00/08/KUM/SH/DK Copyright © 2013 PCD Maltron Ltd 6
1.4 OPERATION:
The table and chair height should be low enough so that the body is positioned with
right angles at ankles, knees, back and elbow. The keyboard should be placed on the
desk or table so that the thumb group is directly in front of the operator and then turned
to give a 20 - 40 degree angle between the table edge and the front line of the
keyboard.
The thumb corner should be just above the table edge. Above all the wrist should be
straight and thumb movement between the Space and Shift keys should not require
wrist movement. Hold the palm of the hand 1-2cms above the resting pad when keying
but drop it back onto the pad to relax the hand and arm whenever you stop for 'thinking'
time. Leave the fingers lightly resting on the keys
The operating posture must be comfortable, since this indicates a position of minimum
static muscle tension and therefore longest freedom from fatigue. Be sure to relax the
hand and arm frequently. Go to the online training course at www.maltron.com for more
information on the correct use of each finger, plus training exercises. Follow the
instructions carefully to ensure that in learning the keyboard you achieve the greatest
speed and accuracy with the least amount of effort.
1.5 LETTER KEYS:
The letter allocation to the keys is based on a careful analysis of finger movement and
sequential operation to minimise the successive use of one finger. Such use slows
down keying speed, since a definite time of approximately 0.15 - 0.2 of a second is
needed for a finger nerve pathway bio-chemically to reset before the next operating
instruction from the brain can be acted upon.
Thus as far as possible the letter layout has been arranged so that frequently used
letter sequences call for the use of different fingers and the allocation also takes into
account the work load imposed on them.
1.6 LED DESCRIPTIONS:
There are 7 LED’s on the keyboard-All Green LED’s.
1. POWER –set LED on signifies there is power to the keyboard
2. SCR LOCK –set LED on to activate a toggle switch to control scrolling
3. NUM LOCK –set LED on to operate the number pad
4. FUN LOCK –set LED on to switch between two layouts
5. CAPS LOCK - set LED on for all alphabetic characters to appear in upper case
6. ALT –set LED on, will, in the same way as CTRL and SHIFT keys, change the
meaning of the key you press when it is held down at the same time
7. CTRL –set LED on, will, in the same way as ALT and SHIFT keys, change the
meaning of the key you press when it is held down at the same time.

Issue: D3
Doc Ref: 00/08/KUM/SH/DK Copyright © 2013 PCD Maltron Ltd 7
1.7 KEY FUNCTIONS:
Your keyboard has several functions built in that allow the user to change the
characteristics of how the keyboard operates.
STICKY KEYS and LATCHING:
This function allows the Shift, Ctrl or Alt keys to stay selected without the need to hold
the key down. Sticky Keys function is selected by pressing the SHIFT key TEN times.
This will activate Sticky Keys in Windows. Your keyboard also allows for key latching by
pressing the SHIFT key once and then selecting the desired key. Once this operation is
complete latching is deactivated. Repeat the process for more latching.
DELAY:
Delay can be added to each key to allow the user to only send the key they want,
where other keys may accidentally be pressed. The length of delay can be adjusted to
suit the user.
1.0 sec delay: Fun Lock, Alt + 1
1.5 sec delay: Fun Lock, Alt + 2
2.0 sec delay: Fun Lock, Alt + 3
2.5 sec delay: Fun Lock, Alt + 4
3.0 sec delay: Fun Lock, Alt + 5
Turn off delay: Fun Lock, Alt + 0 (Zero)
ONE-SHOT:
This function only allows a key to send a character once, i.e. no character repeat if a
key is held down. To turn on One-Shot press Fun Lock, Alt + O. To turn off press Fun
Lock, Alt + N.
REPEAT RATE:
This function allows you to adjust the speed at which a character repeats when you
hold down the key. To turn on Repeat Rate press Fun Lock, Alt + S (Slow), or M
(Medium) or F (Fast). To turn off press Fun Lock, Alt + N.
In this mode the Windows key is deactivated and can be reactivated by selecting Fun
Lock, Alt + N.
1.8 FUNCTION KEYS AND THE NUMBER PAD:
This model of the MALTRON Single Handed keyboard has the Function keys mounted
along the top of the keyboard where they are easily visible. They operate in exactly the

Issue: D3
Doc Ref: 00/08/KUM/SH/DK Copyright © 2013 PCD Maltron Ltd 8
same way as the usual arrangement.
The Locking Keys –CAPS LOCK, SCROLL LOCK AND NUM LOCK can be
activated by set ON which will be indicated by the LED being lit.
The special cursor keys are mounted at the top of the thumb group where they are
easily accessible. This will be useful when working with figures all the time.
1.9. SWITCHING BETWEEN LAYOUTS:
Not currently available with this product.
2. TRAINING
We strongly recommend that anyone using a Maltron keyboard for the first time
should read and follow the FREE online training module by going to www.maltron.com
and selecting the ‘TRAINING’ tab.
If you are unable to access the online training, we provide a resource disc with the
keyboard which includes the training modules.
3. SETTING UP THE KEYBOARD
3.1PLUGGING IN:
The keyboard is connected to your computer by a USB (Universal Serial Bus) cable,
supplied with your keyboard. As the cable is not connected to your keyboard please
follow A, B & C below:
a. Push the ‘plug’ end with ferrite core of the cable into your Maltron Single Hand
keyboard.
b. Push the other end of the cable ‘plug’into an available USB port socket on your
computer.
c. Position your keyboard to a comfortable position. (See 1.3 & 1.4 for
recommended positioning).
There are no drivers or any software to load onto your computer!

Issue: D3
Doc Ref: 00/08/KUM/SH/DK Copyright © 2013 PCD Maltron Ltd 9
3.2 COMMON CHECKS:
Make sure your computer is plugged into an AC electricity source.
Make sure your keyboard cable is securely fitted at both ends, and that the
‘Power On’ LED is lit. To confirm connectivity, press the ‘Num Lock’ key and
ensure the ‘Num Lock’ LED illuminates. This confirms communication between
the computer and the keyboard.
If there is a failure of any sort, disconnect any other USB devices (not your
mouse or Single Hand Keyboard) and then restart your computer.
3.3 REPORTING FAULTS:
If you are unable to resolve any faults or problems with your keyboard please contact
your IT support staff in the first instance, or call +44 (0) 845 230 3265 or Int: +44 1785
4. KEYBOARD CLEANING
PLEASE DISCONNECT THE KEYBOARD FROM MAINS POWER BEFORE CARRYING
OUT MAINTENANCE.
The outer shell and other external surfaces can be wiped clean with a soft damp cloth.
Do not use any cleaning solvents on your keyboard. A weak solution of regular washing
up liquid can be used if necessary.
You can remove the key caps to access the switch panel. This allows cleaning of the
switch panel, again with a soft damp cloth. One of the many advantages to owning a
Maltron keyboard is the keyboard can be rinsed under a warm tap to wash away liquid
stains such as tea, coffee or juices.
5.STATIC AND YOUR KEYBOARD
Static electricity in your office is very erratic and will change from day to day with the
weather, with the central heating and with ventilation. It also changes with the clothes
worn by people in the office (nylon is one of the worst) and the number and types of
VDUs you use. It often collects on objects such as curtains, light switches and VDU's -
depending on air circulation. You need to know this so that you can identify if any
factors in your office are causing a build up of static.
Static shocks are usually noticed when you hear crackling (try wiping a dusty TV or
VDU screen after it has been on for a while). However, "small" static shocks of 50 or
100volts go largely unnoticed by humans, but if this hits digital electronic equipment,
then the equipment often cannot cope and becomes unreliable.
Like any piece of electronics, the Maltron keyboard does not like being hit with static.
However unlike most other pieces of electronic equipment, it is touched every day by
people who move around picking up static charges from computer VDUs, curtains,
chairs and carpets. Even just taking off a coat with a nylon lining or getting up from a

Issue: D3
Doc Ref: 00/08/KUM/SH/DK Copyright © 2013 PCD Maltron Ltd 10
chair, can charge a person up several 1000 volts. If the charged person then touches
the keyboard immediately, its electronic brain gets a shock. To avoid this particular
problem, always touch an earthed body before the keyboard when starting work, and
do not have your hand on the keyboard when getting up from your chair.
We protect against such shocks with good screening of signal lines and using insulating
plastic. If your keyboard is working most of the time, but occasionally resets or beeps or
just goes crazy, then static is the first suspect. This is particularly true when the
keyboard's performance changes from day to day for no obvious reason.
The best way to solve the problem is at source. To do this you have to find where the
problems are coming from. For example, it could be when you operate the blinds in the
office, or rise from your chair, or walk across the carpet and sit down. Then you should
be careful not to touch the keyboard until after you have touched something that is well
earthed such as the metal case of the computer.
Another example - it could be that you have to move an office fan to point away from
your desk. In general, these options need experiment and whilst they are the cheapest,
they need more patience.
The most popular way of solving the problem is with antistatic mats which are wired to
the computer case, water pipes, or some other well grounded metal. There are mats for
the floor, or alternatively there are mats you can use on your desk under the computer
and keyboard.
Another way to solve the static problem is to use an anti-static spray. This can be
sprayed lightly over the surface and will help to carry static away from the area. One
spraying usually lasts a few weeks and is easy to apply. This can benefit in another
way in that it reduces static problems experienced with VDUs causing charged dust to
be blown into the face of the user, too little to notice, but enough to dry out skin and tire
the eyes. This is not usually a problem with flat screens.
Spraying your keyboard
We suggest an anti-static spray such as Johnson’s Sparkle or another anti-static polish.
First use a soft brush (such as a new 25mm paint brush) to loosen any dust down
between the keys and then hold the keyboard up and give it a good blow to remove any
trapped dust. This ensures that a sticky deposit does not build up between the keys
which could stop the keys working. Next, spray the keyboard all over the top surface to
dampen it slightly. Then use the brush to spread the fluid down among the keys and all
over the surface. Allow the spray to dry off completely before using the keyboard (ten
minutes or so). Keep the spray and brush together in a bag and repeat the application
every 3 or 4 weeks, or whenever a static problem occurs.
This will also help keep your keyboard clean. Anti-static wipes can be used about once
a week to rub over the front surfaces and key tops. After wiping the keyboard also wipe
the VDU and the surrounding plastic frame.

Issue: D3
Doc Ref: 00/08/KUM/SH/DK Copyright © 2013 PCD Maltron Ltd 11
6. USING THE NUMBER PAD AS A MOUSE (IN WINDOWS)
The Maltron Single hand Keyboard has specially labeled keys to enable you to make
the most use of the “Accessibility Options” found within Microsoft Windows. One of
these functions is the ability to use the number pad keys as a mouse controller; with the
number 5 being used for a click/double click function. According to your system, you
may need the Num Lock on.
To use this feature (in Windows XP and earlier versions), open the Control Panel via
the Start menu (see the image on the next page). Click on the Accessibility Options
link, and on the same named link in the resulting window, to see the Accessibility
Properties window shown below. Select the Mouse tab and tick the 'Use MouseKeys'
box and click OK.
Under Windows Vista™, the process is similar in principle. From the Control Panel
select the Ease of Access link, then under the heading Ease of Access Centre click
the link Change how your mouse works. On the resulting 'Make the mouse easier to
use' window, tick the box 'Use MouseKeys' and then Apply.
For Windows 7 & 8, please refer to MS user guide.
There are a number of other useful features to be found within the Accessibility
Options/ Ease of Access. We recommend that you explore these.
7. COMPLIANCE
EC Declaration of Conformity
In accordance with EN ISO 17050-1:2004 PCD Maltron Ltd of Castlefields, Stafford,
ST16 1BU in accordance with the following Directive(s): 2006/95/EC ‘The Low Voltage
Directive’ 2004/108/EEC ‘The Electromagnetic Compatibility Directive’ hereby declare
that: RS10N1G/B & RN10N1G/B are in conformity with the applicable requirements of
all applicable Essential Requirements of the Directives.
095
108
FCC Radio Frequency Interference Statement
This equipment has been tested and found to comply with the limits for a Class B digital
device, pursuant to Part 15 of the FCC Rules. These limits are designed to provide
reasonable protection against harmful interference when the equipment is operated in a
residential installation. This equipment generates, uses and can radiate radio frequency
energy and, if not installed and used in accordance with the instructions, may cause
harmful interference to radio communications. However, there is no guarantee that
interference will not occur in a particular installation. If this equipment does cause
harmful interference to radio or television reception, which can be determined by
Issue: D3
Doc Ref: 00/08/KUM/SH/DK Copyright © 2013 PCD Maltron Ltd 12
turning the equipment off and on, the user is encouraged to try to correct the
interference by one or more of the following measures:
1. Re-orientate or relocate the receiving antenna
2. Increase the separation between the equipment and receiver
3. Connect the equipment into an outlet on a circuit different from that to
which the receiver is connected
4. Consult the dealer or an experienced radio/TV technician for help
Warning
To assure continued FCC compliance, the user must use only shielded
interfacing cables when connecting to computer or peripheral. Also, any
unauthorized changes or modifications to this equipment may void FCC
Compliance.
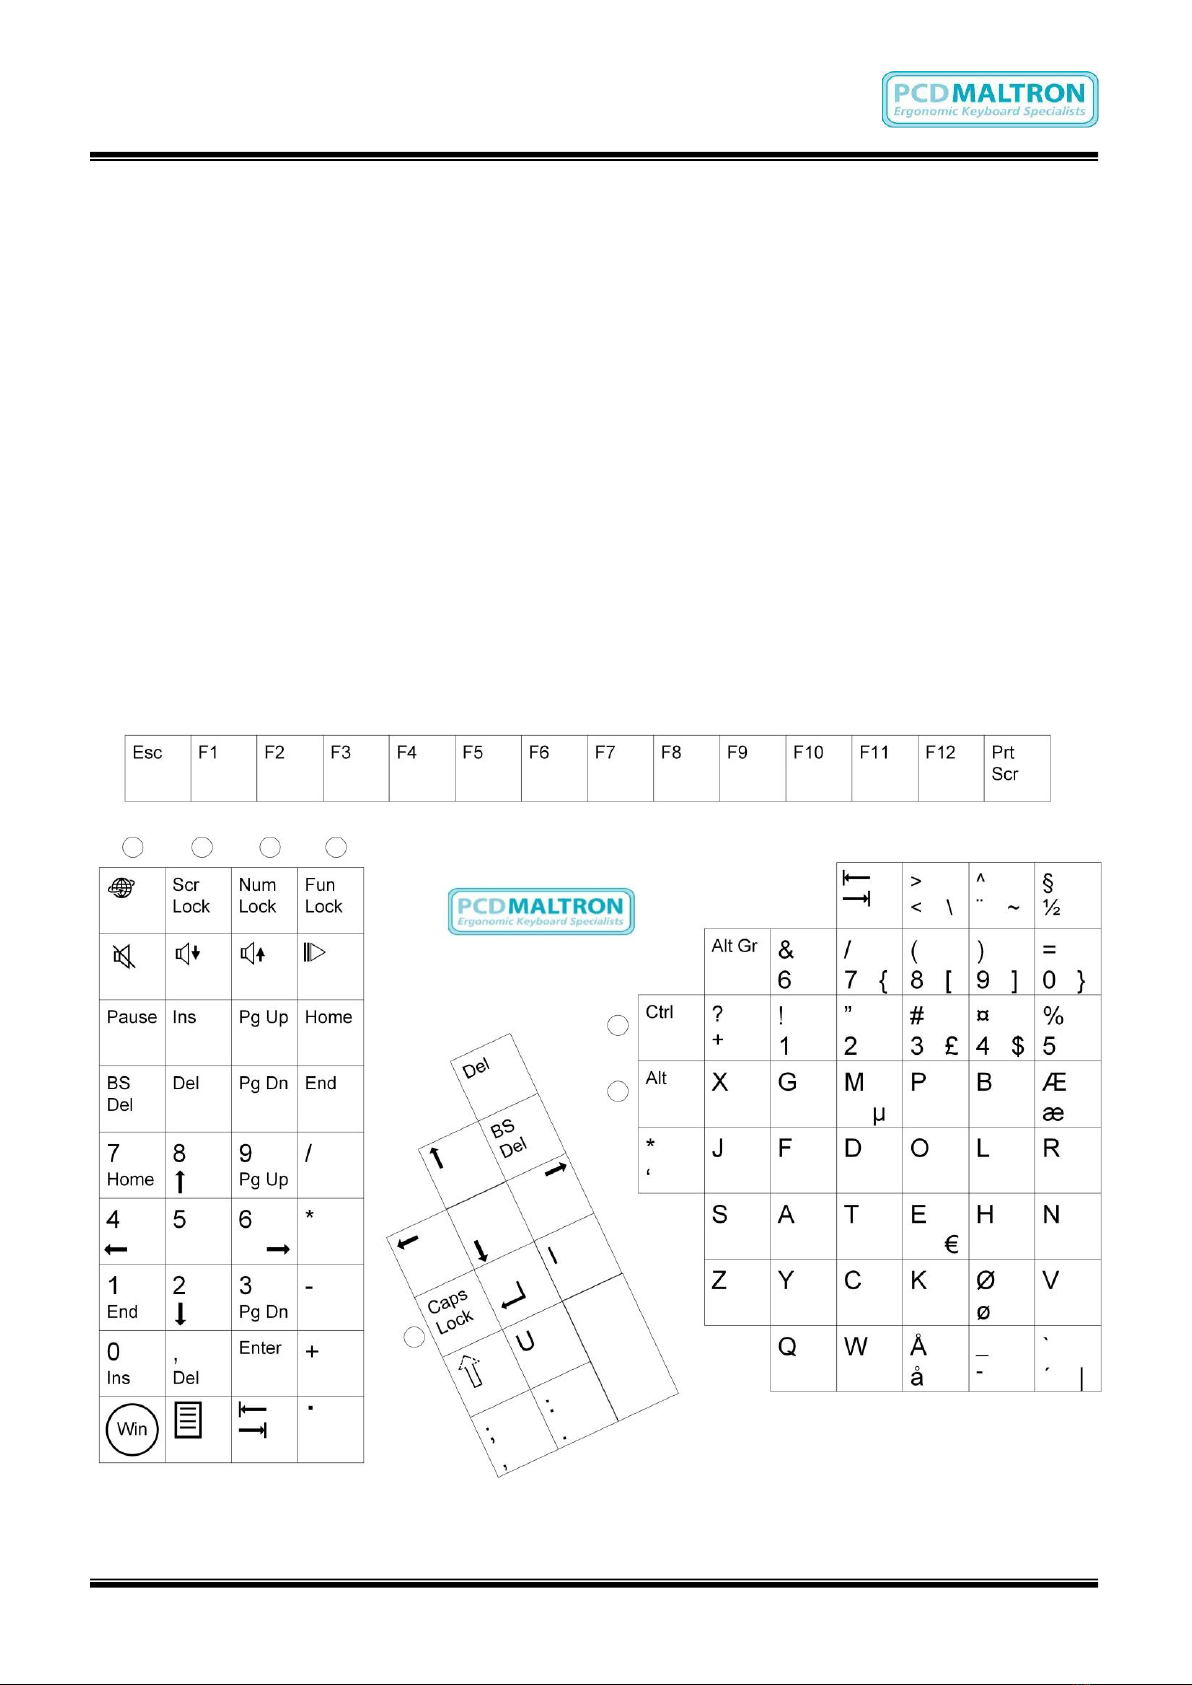
Appendix A: Keyboard Layouts
Single Right hand Keyboard –DK
Issue: D3
Doc Ref: 00/08/KUM/SH/DK Copyright © 2013 PCD Maltron Ltd 13
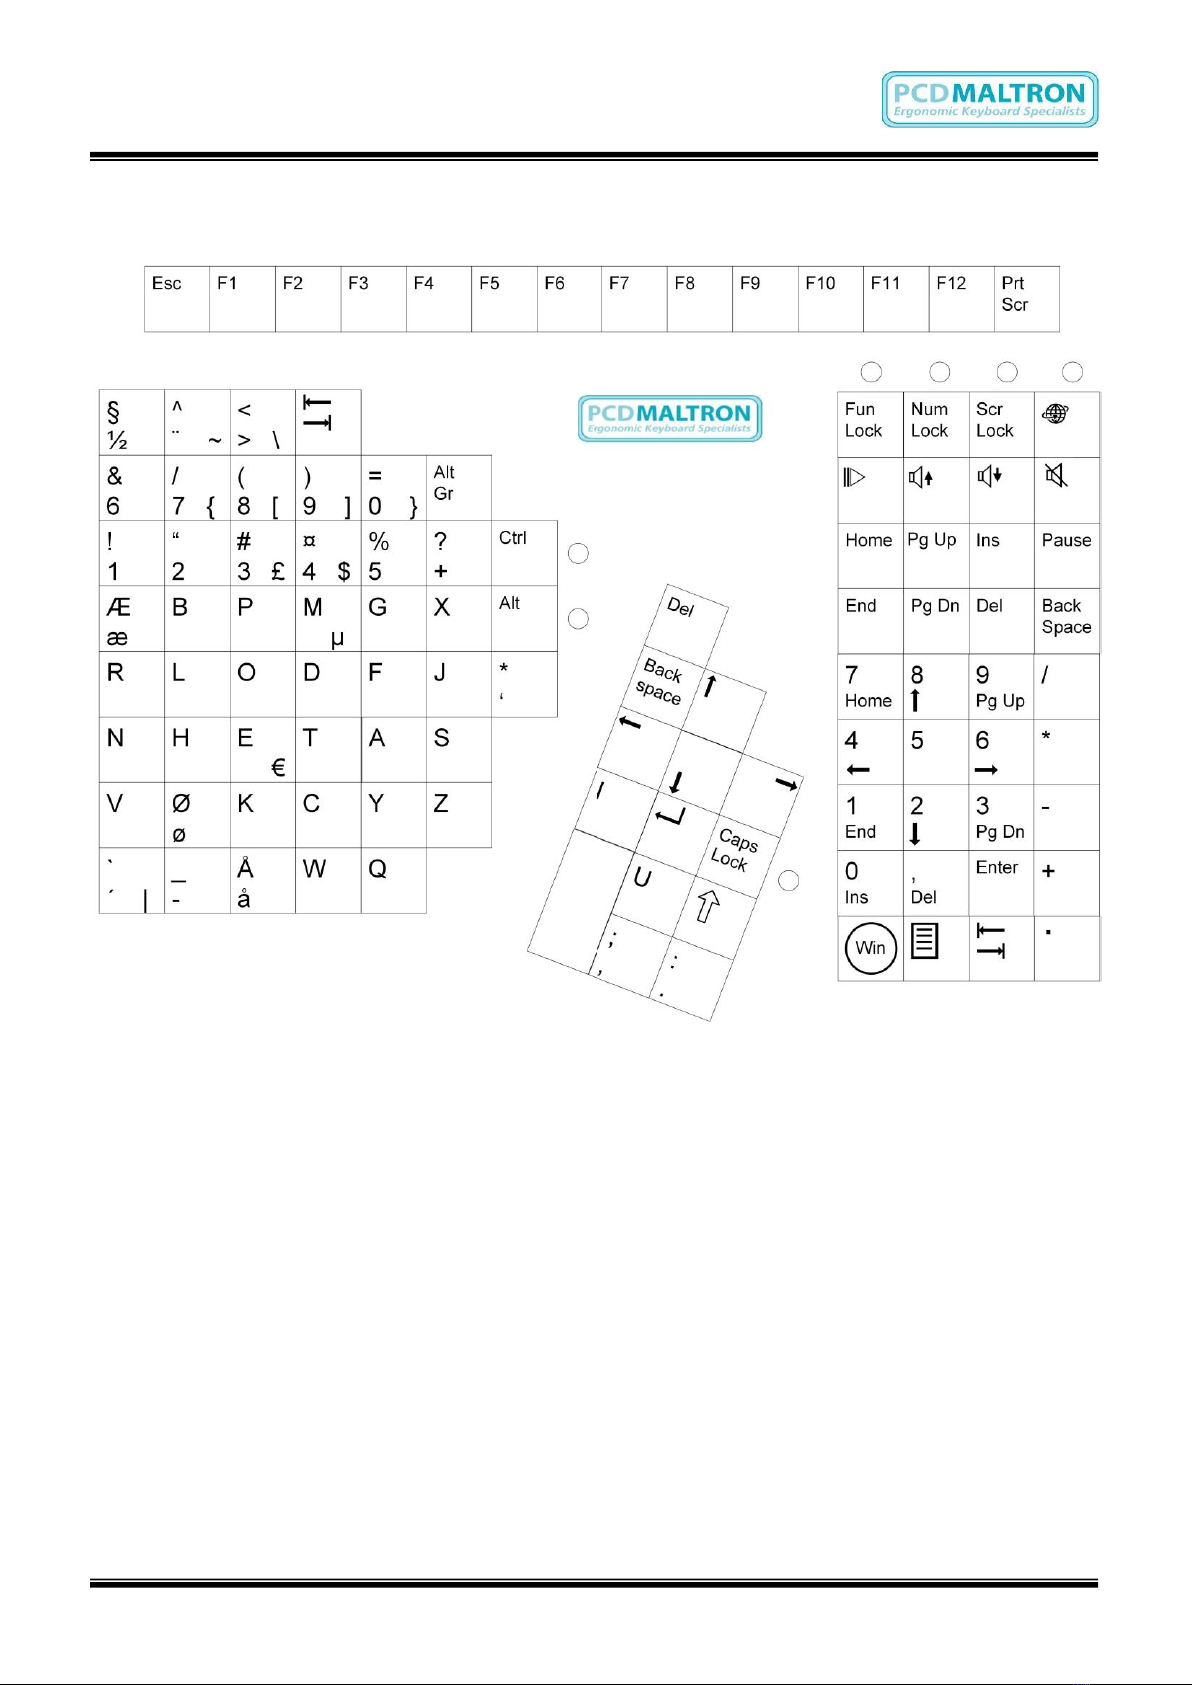
Single Left hand Keyboard –DK
Appendix B: Keyboard Specification
Dimensions: L300mm x W220mm x D110mm
Weight: approx. 0.75kgs
This manual suits for next models
3
Table of contents
Other PCD Maltron Keyboard manuals


