Bontempi Music Academy Genius User manual

Electronic Keyboard
61 keys
16 6110
GB - OWNER’S MANUAL ........................ 11
F - MANUEL D’ INSTRUCTIONS ................ 16
D - BEDIENUNGSANLEITUNG................. 21
E - LIBRO DE INSTRUCCIONES ................. 26
P - MANUAL DE INSTRUÇÕES................. 31
NL - GEBRUIKSAANWIJZING .................... 36
PL - INSTRUKCJA OBSŁUGI..................... 41
LT - NAUDOJIMOSI INSTRUKCIJA............ 46
LV - LIETOTĀJA INSTRUKCIJA................. 51
EE - KASUTUSJUHEND ............................. 56
CZ - NÁVOD K OBSLUZE ......................... 61
SK - NÁVOD NA OBSLUHU ....................... 66
RO - MANUALUL PRODUCATORULUI....... 71
DK - INSTRUKTIONSVEJLEDNING............ 76
GR - ΕΓΧΕΙΡΙΙΟ ΟΗΓΙΝ ..................... 81
SF - OHJEKIRJA ....................................... 86
S - BRUKSANVISNING............................. 91
M - Manwal TAL-ISTRUZZJONIJIET.......... 96
SLO - NAVODILA ZA UPORABO............101
H - FELHASZNÁLÓI KÉZIKÖNYV............. 106
BG - .......111
IRL - LÁMHLEABHAR TREORACHA......... 116
HR - PRIRUČNIK S UPUTAMA ...............121
I - MANUALE DI ISTRUZIONI .................. 126
E N G L I S H _________
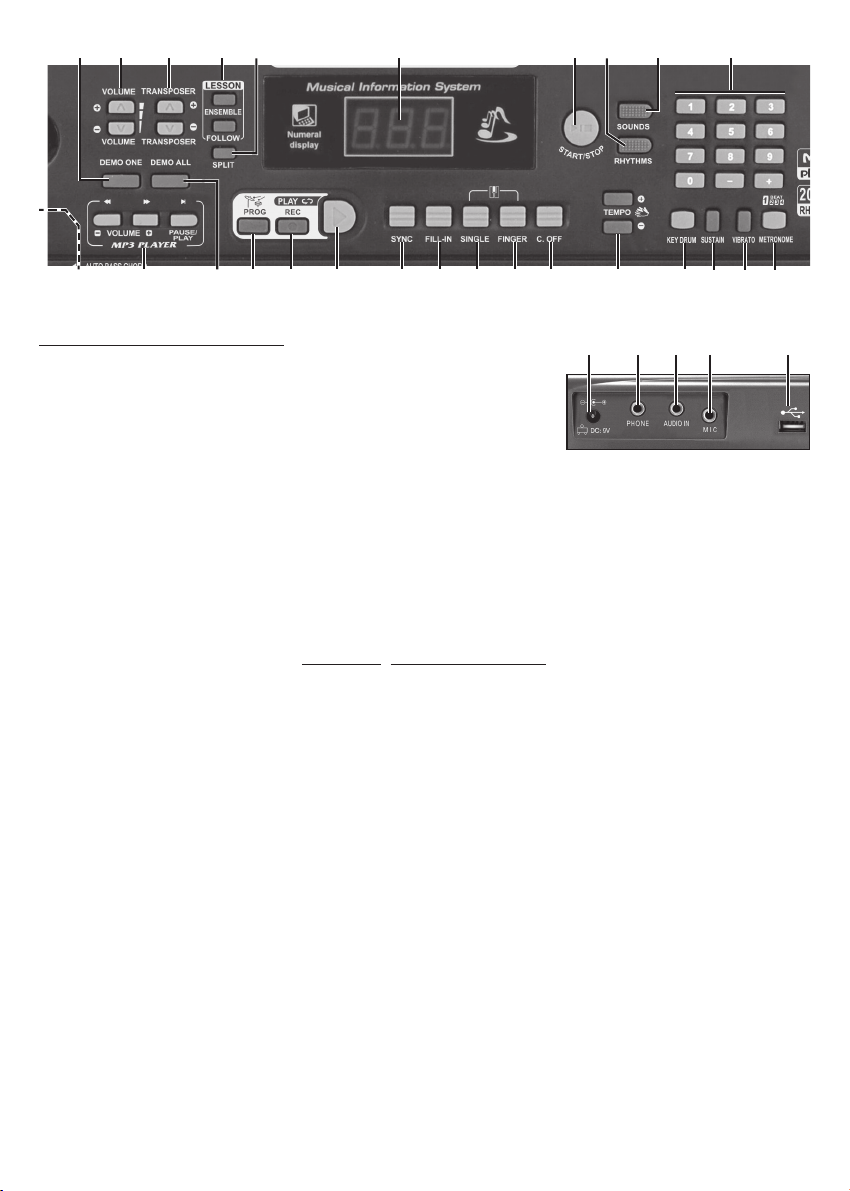
①
ON/OFF -Turns the instrument on and off
②MP3 Player -Adjusts MP3 songs read
by the USB port
③DEMO ALL -To listen to all pre-recorded
songs in sequence
④PROG -Records a rhythmic sequence
⑤REC -Records what is being played
⑥PLAY -Plays what has been recorded
⑦SYNC -The SYNC function allows you
to start the rhythm and the accom-
paniment as soon as the chord is
composed in either Single or Finger
mode
⑧FILL-IN -Enters a rhythmic variation
⑨SINGLE -Enables composition of
chords on the left side of the keybo-
ard according to the easy method
⑩FINGER -Enables composition of
chords on the left side of the keybo-
ard according to the classic method
⑪CHORD OFF -To exclude the arrange-
ment and exit the Single or Finger
mode
⑫TEMPO +/– -Sets the tempo for
RHYTHM performance, songs or
metronome
⑬KEY DRUM -Enables or disables per-
cussion instruments on white and
black keys
⑭SUSTAIN -Enables or disables the
SUSTAIN function (prolonged
sound)
⑮VIBRATO -Enables or disables the
VIBRATO function (sound modula-
tion)
⑯METRONOME -Switches on and off the
metronome beat
⑰Numeric keyboard 0-9/+/– - To select
functions, rhythms, songs and soun-
ds
⑱SOUNDS -To select the sounds on the
keyboard
⑲RHYTHMS -To select the rhythms
⑳START/STOP -Starts/Stops a rhythm or
a song
㉑DISPLAY
㉒SPLIT -Splits the keyboard into two
sections: one for accompaniment
and the other for melody
㉓LESSON -Learning levels following a
demosong
㉔TRANSPOSER +/– -Allows pitch of
notes to be changed
㉕
VOLUME +/– -Sets the master volume
㉖DEMO ONE -To listen to a pre-recorded
song in sequence
㉗Socket for adapter (included)
㉘Socket for headphones (not included)
㉙Socket for external audio source (MP3 play-
er, smartphone etc.)
㉚Socket for condenser microphone (not inclu-
ded)
㉛Socket for connecting a USB Flash Drive
F R A N ÇA I S ______
①ON/OFF -Pour allumer ou éteindre
l’instrument
②MP3 Player -Pour régler les chansons
MP3 lues via la prise USB
③DEMO ALL -Pour écouter toutes les
chansons préenregistrées en
séquence
④PROG -Pour enregistrer une séquen-
ce rythmique
⑤REC -
Pour enregistrer ce que l’on joue
⑥PLAY -
Pour réécouter l’enregistrement
⑦SYNC -La fonction SYNC permet de
lancer le rythme et l’accompagne-
ment dés que l’accord a été compo-
sé dans un des deux modes Single
ou Finger
⑧FILL-IN -Pour introduire une variation
rythmique
⑨
SINGLE -Pour activer la composition
des accords, dans la partie gauche du
clavier, selon la méthode simplifiée
⑩
FINGER -Pour activer la composition
des accords, dans la partie gauche du
clavier, selon la méthode classique
⑪CHORD OFF -Pour exclure l’arrange-
ment et quitter le mode Single ou
Finger
⑫TEMPO +/– -Pour le réglage de la
vitesse d’exécution du rythme, des
chansons ou du métronome
⑬KEY DRUM -Pour activer ou désactiver
les instruments de percussion sur les
touches blanches et noires
⑭SUSTAIN -Active/désactive la fonction
SUSTAIN (prolongation du son)
⑮VIBRATO -Active/désactive la fonction
VIBRATO (modulation du son)
⑯
METRONOME -Pour activer ou désacti-
ver le temps battu par le métronome
⑰Clavier numérique 0-9 -Pour la sélection
de fonctions, de rythmes, de chan-
sons et de sons
⑱SOUNDS -Pour sélectionner les sons
⑲RHYTHMS -Pour sélectionner les ryth-
mes
⑳START/STOP -Pour faire partir ou
arrêter un rythme ou une chanson
㉑DISPLAY
㉒SPLIT -Pour diviser le clavier en deux
sections: une pour l’accompagne-
ment et l’autre pour la mélodie
㉓LESSON -Niveaux d’apprentissage en
suivant une mélodie préenregistrée
㉔TRANSPOSER +/– -Permet de changer
la tonalité des notes
㉕VOLUME +/– -Pour le réglage du volu-
me général
㉖DEMO ONE -Pour écouter une chanson
préenregistrée en séquence
㉗Prise pour adaptateur de réseau (fourni)
㉘Prise pour casque (non fournie)
㉙Prise pour source musicale externe (lecteur
MP3, smartphone etc.)
㉚Prise pour micro à condensateur (non
fourni)
㉚Prise pour connecter une clé USB Flash
Drive (Clé USB)
② ④ ⑤ ⑥① ③ ⑦ ⑧ ⑨ ⑩ ⑪ ⑫ ⑬ ⑭ ⑮ ⑯
㉖ ㉔ ㉑㉓㉕ ㉒ ⑰⑱⑲⑳
㉗ ㉘ ㉙ ㉚ ㉛

D E U T S C H _______
①ON/OFF -Einschalten/Ausschalten des
Instruments
②
MP3 Player -Um die gelesenen Songs MP3
über die USB-Buchse zu einzustellen
③DEMO ALL -Um alle vorgespeicherten
Songs nacheinander anzuhören
④PROG -Um eine rhythmische Sequenz zu
speichern
⑤REC -Aufnahme des gerade Gespielten
⑥PLAY -Wiedergabe der Aufnahme
⑦SYNC -Die Funktion SYNC ermöglicht
den Start des Rhythmus und der
Begleitung, sobald der Akkord in einer
der beiden Modalitäten Single oder
Finger zusammengestellt wird
⑧FILL-IN -Um eine rhythmische Variation
einzufügen
⑨SINGLE -Um die Komposition der
Akkorde zu aktivieren, auf der linken
Seite der Tastatur, mit der vereinfachten
Methode
⑩FINGER -Um die Komposition der
Akkorde zu aktivieren, auf der linken
Seite der Tastatur, gemäßmit der klassi-
schen Methode
⑪CHORD OFF -Zum Ausschließen des
Musik-Arrangements und Verlassen des
Einzel- oder Fingermodus
⑫TEMPO +/– -Einstellung der
Geschwindigkeit der Stilausführung,
der Lieder oder des Metronoms
⑬KEY DRUM -Um die Schlaginstrumente
auf den schwarzen und weißen Tasten
zu aktivieren oder deaktivieren
⑭SUSTAIN -Aktiviert/deaktiviert die
Funktion SUSTAIN (Klangverlängerung)
⑮VIBRATO -Aktiviert/deaktiviert die
Funktion VIBRATO (Klangmodulation)
⑯METRONOME -Aktivieren oder
Deaktivieren des vom Metronom ange-
gebenen Tempos
⑰Zahlentastatur 0-9 - Wahl der Funktionen,
rhythmischen Stile, Lieder und Klänge
⑱SOUNDS -Wahl der Klänge
⑲RHYTHMS -Wahl der rhythmischen Stile
⑳START/STOP -Einschalten oder
Ausschalten eines rhythmischen Stils
oder eines Liedes
㉑DISPLAY
㉒SPLIT -Um die Tastatur in zwei Bereiche
zu unterteilen: einen für die Begleitung
und einen für die Melodie
㉓LESSON -Lernstufe nach einer vorher
aufgenommenen Melodie
㉔TRANSPOSER +/– -Oktavenveränderung
㉕VOLUME +/– -Wahl der allgemeinen
Geräte-Lautstärke
㉖DEMO ONE -Um einender nacheinander
gespeicherten Songs anzuhören
㉗Buchse für Netzadapter (enthalten)
㉘Buchse für Kopfhörer (nicht enthalten)
㉙Buchse für externe Musikquelle (MP3-Player,
Smartphone, usw.)
㉚
Buchse für Kondensatormikrofon (nicht enthalten)
㉛Buchse zur Verbindung an einen USB Flash
Drive (Pen-Drive)
E S P A Ñ O L _______
①ON/OFF -Para encender y apagar el
instrumento
②MP3 Player -Para regular las canciones
MP3 leídas a través de la toma USB
③DEMO ALL -Para escuchar todas las can-
ciones grabadas previamente en
secuencia
④
PROG -Para grabar una secuencia rítmica
⑤
REC -Para grabar lo que se está tocando
⑥
PLAY -Para escuchar lo que se ha grabado
⑦SYNC -La función SYNC permite iniciar
el ritmo y el acompañamiento una
vez compuesto el acorde en uno de
los dos modos Single o Finger.
⑧FILL-IN -Para introducir una variación
rítmica
⑨SINGLE -Para activar la composición de
los acordes, en la parte izquierda del
teclado, según el método simplifica-
do
⑩FINGER -Para activar la composición de
los acordes, en la parte izquierda del
teclado, según el método clásico
⑪CHORD OFF -Para excluir el arreglo y
salir de la modalidad Single o Finger
⑫TEMPO +/– -Para la regulación de la
velocidad de ejecución del ritmo, de
las canciones o del Metrónomo
⑬KEY DRUM -Para activar o desactivar los
instrumentos percutivos en las teclas
blancas y negras
⑭SUSTAIN -Activa/desactiva la función
SUSTAIN (prolongación del sonido)
⑮VIBRATO -Activa/desactiva la función
VIBRATO (modulación del sonido)
⑯METRONOME -Para activar o desactivar
el tiempo marcado por el Metrónomo
⑰
Teclado numérico de 0 a 9 - Para escoger
funciones, rítmos, canciones y sonidos
⑱SOUNDS -Para seleccionar los sonidos
⑲RHYTHMS -Para seleccionar los ritmos
⑳START/STOP -Para activar o detener un
ritmo o una canción
㉑DISPLAY
㉒SPLIT -Para dividir el teclado en dos
secciones: una para el acompaña-
miento y la otra para la melodía
㉓LESSON -Niveles de aprendizaje
siguiendo una melodía pre-grabada
㉔TRANSPOSER +/– -Permite cambiar la
tonalidad de las notas
㉕VOLUME +/– -Para la selección del
volumen general
㉖DEMO ONE -Para escuchar una canción
grabada previamente en secuencia
㉗Toma para adaptador de red (incluido)
㉘Toma para auriculares (no incluidos)
㉙Toma para fuente musical externa (lector
MP3, smartphone, etc.)
㉚Toma para micrófono de condensador (no
incluido)
㉛Toma para conectar una USB Flash Drive
(Pen-Drive)
P O R T U G U Ê S _______
①ON/OFF -Para acender ou apagar o
instrumento
②MP3 Player -Para regular as canções
MP3 lidas através da porta USB
③DEMO ALL -Para ouvir todas as canções
registadas em sequência
④PROG -Para gravar uma sequência
rítmica
⑤REC -Para gravar o que está a tocar
⑥PLAY -Para ouvir a gravação
⑦SYNC -A função SYNC permite ativar o
ritmo e o acompanhamento compo-
sto segundo uma das duas modali-
dades: Single ou Finger
⑧
FILL-IN -Para inserir uma variação rítmica
⑨SINGLE -Para ativar a composição dos
acordes, à esquerda do teclado,
segundo o método simplificado
⑩FINGER -Para ativar a composição dos
acordes, à esquerda, segundo o
método clássico
⑪CHORD OFF -Para excluir o arranjo e sair
da modalidade Single o Finger
⑫TEMPO +/– -Para a regulação da velo-
cidade de execução do ritmo, das
canções ou do metrónomo
⑬KEY DRUM -Para ativar ou desativar os
instrumentos de percussão nas teclas
brancas e pretas
⑭SUSTAIN -Ativa/desativa a função
SUSTAIN (prolongamento do som)
⑮VIBRATO -Ativa/desativa a função
VIBRATO (modulação do som
⑯
METRONOME -Para accionar ou descativar
o tempo marcado pelo metrónomo
⑰
Teclado numérico 0-9 -Para a selecção de
funções, estilos ritmos, canções e sons
⑱SOUNDS -Para selecionar o som no
teclado
⑲RHYTHMS -Para selecionar os ritmos
⑳START/STOP -Para accionar ou parar um
ritmo ou uma canção
㉑DISPLAY
㉒SPLIT -Para dividir o teclado em suas
secções: uma para o acompanha-
mento e outra para a melodia
㉓
LESSON -Níveis de aprendizagem
seguindo uma melodia demonstrativa
㉔TRANSPOSER +/– -Permite alterar a
tonalidade das notas
㉕VOLUME +/– -Para a selecção do volu-
me geral
㉖DEMO ONE -Para ouvir uma canção
registada em sequência
㉗Tomada para adaptador de rede (fornecido)
㉘Tomada para auscultadores (não fornecidos)
㉙Tomada para fonte musical externa (leitor
MP3, smartphone etc.)
㉚Tomada para microfone condensador (não
fornecido)
㉛Tomada para USB Flash Drive (Pen-Drive)

N E D E R L A N D S
①ON/OFF -Om het instrument aan of uit te
zetten
②
MP3 Player -Om de MP3- melodieën af te
stellen die via USB-aansluiting zijn gelezen
③DEMO ALL -Om naar alle vooraf geregistre-
erde melodieën in sequentie te luisteren
④PROG -Om een ritmische sequentie op
te nemen
⑤REC -Om op te nemen wat u aan het
spelen bent
⑥
PLAY -Om de opname opnieuw af te spelen
⑦SYNC -Met de functie SYNC kan, zodra het
akkoord is gecomponeerd, het ritme en
de achtergrondmuziek worden gestart,
in één van de twee modi Single of Finger
⑧FILL-IN -Om een ritmische variatie in te
schakelen
⑨SINGLE -Om de compositie van akkoor-
den te activeren, in het linker gedeelte
van de keyboard, volgens de vereen-
voudigde methode
⑩FINGER -Om de compositie van akkoorden
te activeren, in het linker gedeelte van de
keyboard, volgens de klassieke methode
⑪
CHORD OFF -Om het arrangement uit te slui-
ten en de modi Single of Finger te verlaten
⑫TEMPO +/– -Om de uitvoeringssnelheid
te regelen van de ritmische stijl, van de
melodieën of van de metronoom
⑬KEY DRUM -Om de percussie-instrumen-
ten op de witte en zwarte toetsen te
activeren of uit te schakelen
⑭SUSTAIN -Hiermee wordt de SUSTAIN-
functie (verlenging van het geluid)
geactiveerd of uitgeschakeld
⑮VIBRATO -Hiermee wordt de VIBRATO-
functie (modulatie van het geluid)
geactiveerd of uitgeschakeld
⑯METRONOME -Om het tempo dat de
metronoom aangeeft te activeren of
uit te schakelen
⑰Numeriek klavier 0-9/+/– - Voor de selectie
van functies, ritmische stijlen, melo-
dieën en geluiden
⑱SOUNDS -Om geluiden te selecteren
⑲RHYTHMS -Om de ritmische stijlen te
selecteren
⑳START/STOP -Om een ritmische stijl of
een melodie te starten of te stoppen
㉑DISPLAY
㉒SPLIT -Om het keyboard in twee secties
op te splitsen: een voor de begeleiding
en het andere voor de melodie
㉓LESSON -Leerniveaus volgens een vooraf
geregistreerde muziekstuk
㉔TRANSPOSER +/– -Hiermee kunt u de
tonaliteit van de noten aanpassen
㉕VOLUME +/– -Om het algemene volume
te regelen
㉖DEMO ONE -Om een vooraf geregistreerd
lied achtereenvolgens te beluisteren
㉗Aansluiting voor netadapter (meegeleverd)
㉘Aansluiting voor koptelefoon (niet meegeleverd)
㉙Aansluiting voor externe muziekbron (mp3,
smartphone enz.)
㉚Aansluiting voor microfoon met condensator
(niet meegeleverd)
㉛Aansluiting voor USB Flash Drive (Pen-Drive)
P O L S K I ________
①ON/OFF -Włącza i wyłącza instrument
②
MP3 Player -Dostosowuje nagrania w for-
macie MP3 odczytywane przez port USB
③DEMO ALL -Pozwala na odtworzenie
wcześniej nagranych utworów w
kolejności
④PROG -Nagrywa sekwencje rytmów
lub odgłosów zwierząt
⑤REC -Nagrywa to, co jest grane
⑥PLAY -Odtwarza nagranie
⑦SYNC -Włącza lub wyłącza auto-
matyczny akompaniament
⑧FILL-IN -Pozwala na zróżnicowanie
rytmu
⑨SINGLE -funkcja SYNC pozwala na
rozpoczęcie rytmu i akompaniamentu
tak szybko jak zostaje skomponowany
akord w trybie Single albo Finger
⑩FINGER -Pozwala na stworzenie
akordów po lewej stronie klawiatury
na podstawie klasycznej metody
⑪CHORD OFF -Aby odrzuć aranżację i
wyjść z trybu Single lub Finger
⑫
TEMPO +/– -Pozwala dopasować tempo
do wykonania, piosenki lub metronomu
⑬KEY DRUM -Włącza lub wyłącza instru-
menty perkusyjne na białych lub
czarnych klawiszach
⑭SUSTAIN -Włącza lub wyłącza funkcję
SUSTAIN (wydłużony dźwięk)
⑮VIBRATO -Włącza lub wyłącza funkcję
VIBRATO (modulacja dźwięku)
⑯METRONOME -Włącza i wyłącza metro-
nom
⑰Numeryczna klawiatura 0-9 - dla wyboru
funkcji, stylu rytmu i dźwięków
⑱SOUNDS -Wybór dźwięków na klawia-
turze
⑲
RHYTHMS -Wybór rytmów na klawiaturze
⑳START/STOP -Rozpoczyna/kończy styl
rytmu lub piosenkę
㉑DISPLAY
㉒SPLIT -Rozdziela keyboard na dwie
części: jedną dla akompaniamentu i
drugą dla melodii
㉓LESSON -Poziomy uczenia się przy
piosence demo
㉔TRANSPOSER +/– -Pozwala na
zwiększenie wysokości nut (transpo-
zer)
㉕VOLUME +/– -Dostosowanie głównej
(najlepszej) głośności
㉖DEMO ONE -Pozwala na odsłuchanie
wcześniej nagranego utworu w
kolejności
㉗Gniazdo zasilacza (dołączony)
㉘ Gniazdo dla słuchawek (nie dołączone)
㉙ Gniazdo do podłączenia zewnętrznego źródła
audio (odtwarzać MP3, smartfon, itp.)
㉚Gniazdko na mikrofon pojemnościowy (brak
w zestawie mikrofonu)
㉛Gniazdo dla podłączenia napędu USB
L I E T U V I Ų
①
ON/OFF -Norint įjungti arba išjungti
instrumentą
②
MP3 Player -Norint reguliuoti USB jung-
timi nuskaitytas MP3 dainas
③
DEMO ALL -Norint klausytis visų iš eilės
įrašytų dainų
④
PROG -Norint nustatyti ritminę seką
⑤
REC -Norint įrašyti tai, kas skamba
⑥
PLAY -Norint iš naujo klausytis įrašo
⑦
SYNC -Sinchrono funkcija leidžia palei-
sti ritmą ir akomponuoti, kai tik akor-
das yra sudarytas iš Single ar Finger
režimo
⑧
FILL-IN -Norint įvesti ritminį pakeitimą
⑨
SINGLE -Norint suaktyvinti akordų
kompoziciją klaviatūros kairiojoje
dalyje pagal supaprastintą metodą
⑩
FINGER -Norint suaktyvinti akordų
kompoziciją klaviatūros kairiojoje
dalyje pagal klasikinį metodą
⑪
CHORD OFF -Norint baigti aranžuotę ir
išjungti režimą„Single“ arba„Finger“
⑫
TEMPO +/– -Norint nustatyti stiliaus,
dainų atlikimo greitį ir metronomą
⑬
KEY DRUM -Norint suaktyvinti arba
išjungti perkusinius instrumentus bal-
tuose ir juoduose klavišuose
⑭
SUSTAIN -Suaktyvina/išjungia SUSTAIN
funkciją (garso prailginimą)
⑮
VIBRATO -Suaktyvina/išjungia VIBRATO
funkciją (garso moduliaciją)
⑯
METRONOME -Norint suaktyvinti arba
išjungti metronomo mušamą taktą
⑰
Skaičių klaviatūra 0-9/+/– -Norint pasirin-
kti funkcijas, ritminius stilius, dainas ir
garsus
⑱
SOUNDS -Norint pasirinkti garsus
⑲
RHYTHMS -Norint pasirinkti ritmus
⑳
START/STOP -Norint paleisti arba sustab-
dyti ritminį stilių arba dainą
㉑
DISPLAY
㉒
SPLIT -Norint padalyti klaviatūrą į dvi
dalis: vieną akomponavimui, o kitą –
melodijai
㉓
LESSON -Mokymosi lygiai vadovaujantis
iš anksto įrašytu kūriniu
㉔
TRANSPOSER +/– -Galima pakeisti natų
tonus
㉕
VOLUME +/– -Norint reguliuoti bendrą
garsumą
㉖
DEMO ONE -Norint iš eilės klausyti iš
anksto įrašytą dainą
㉗ Tinklo adapterio (pridėtas) jungtis.
㉘ Ausinių (netiekiamos) jungtis.
㉙ Išorinio muzikos šaltinio (MP3 skaitytuvo,
išmaniojo telefono ir pan.) jungtis
㉚Mikrofono su kondensatoriumi (netiekiamas)
jungtis.
㉛USB Flash Drive (rakto) jungtis.

L A T V I E Š U _________
①ON/OFF -Ierīces ieslēgšana vai
izslēgšana
②MP3 Player -MP3 kompozīciju
nolasīšanas iestatīšana, izmantojot
USB savienotāju
③DEMO ALL -Secīgi noklausīties visas
iepriekš ierakstītās kompozīcijas
④PROG -Ritmiskas secības ierakstīšana
⑤REC -Jūsu izpildāmas mūzikas
ierakstīšana
⑥PLAY -Ieraksta atskaņošana
⑦SYNC -SYNC funkcija ļaus Jums sākt
atskaņot ritmu un pavadījumu, tiklīdz
akords ir izveidots vai nu Single vai
Finger režīmā
⑧FILL-IN -Iekļaut ritmisku variāciju
⑨SINGLE -Aktivizēt akordu kompozīciju,
tastatūras kreisajā pusē, saskaņā ar
vienkāršoto metodi
⑩FINGER -Aktivizēt akordu kompozīciju,
tastatūras kreisajā pusē, saskaņā ar
klasisko metodi
⑪CHORD OFF -Paredzēts aranžēšanas
atslēgšanai un izejai no Single vai
Finger režīma
⑫TEMPO +/– -Stila, kompozīcijas vai
metronoma atskaņošanas ātruma
iestatīšana
⑬KEY DRUM -Sitaminstrumentu
ieslēgšana un izslēgšana baltos un
melnos taustiņos
⑭SUSTAIN -SUSTAIN funkcijas ieslēgšana/
izslēgšana (skaņas pagarinājums)
⑮VIBRATO -VIBRATO funkcijas ieslēgšana/
izslēgšana (skaņas modulācija)
⑯METRONOME -Ieslēgt vai izslēgt metro-
nomu
⑰Ciparu tastatūra 0-9/+/– - Funkciju, ritma
stilu, kompozīciju un skaņu izvēle
⑱SOUNDS -Skaņu izvēle
⑲RHYTHMS -Ritmu izvēle
⑳START/STOP -Sākt vai apturēt ritmisku
stilu vai kompozīciju
㉑DISPLAY
㉒SPLIT -Tastatūras sadalīšana divās
daļās: viena pavadījumam un otra
melodijai
㉓LESSON -Mācības līmeņi saskaņā ar
iepriekš ierakstītu audio ierakstu
㉔TRANSPOSER +/– -Ļauj mainīt nošu
tonējumu
㉕VOLUME +/– -Galvenā skaļuma
regulēšana
㉖DEMO ONE -Secīgi noklausīties iepriekš
ierakstītu kompozīciju
㉗Tīkla adaptera savienotājs (iekļauts komplektā)
㉘ Austiņu savienotājs (nav iekļauts komplektā)
㉙Ārēja mūzikas avota savienotājs (MP3
atskaņotājs, viedtālrunis, utt.)
㉚Kondensatora mikrofona savienotājs (nav
iekļauts komplektā)
㉛USB zibatmiņas diska savienotājs
E E S T I _________
①ON/OFF -Seadme sisse- ja väljalülita-
mine
②MP3 Player -MP3-radade lugemise
seadistamine USB-liidese kaudu
③DEMO ALL -Järjest kuulata kõik eelne-
valt salvestatud radad
④PROG -Rütmijärjestuse salvestamine
⑤REC -Mängitava salvestamine
⑥PLAY -Salvestuse kuulamine
⑦SYNC -SYNC funktsioon laseb sul
kohe pärast akordi koostamist män-
gida rütmi ja saadet
⑧FILL-IN -Sisestada rütmiline variatsioon
⑨SINGLE -Aktiveerida akordikomposit-
sioon klaviatuuri vasakul küljel
vastavalt lihtsustatud meetodile
⑩FINGER -Aktiveerida akordikomposit-
sioon klaviatuuri vasakul küljel
vastavalt klassikalisele meetodile
⑪CHORD OFF -Teksti välistada paigutuse
ja väljumise Single (ÜHTNE) või
Finger (SÕRME) režiimis
⑫TEMPO +/– -Stiili, kompositsiooni või
metronoomide kiiruse reguleerimine
⑬KEY DRUM -Löökpillide sisse- ja väljalüli-
tamine valgetel ja mustadel klahvidel
⑭SUSTAIN -SUSTAIN Funktsiooni sisse/
välja lülitamine (heli pikendamine)
⑮VIBRATO -VIBRATO Funktsiooni sisse/
välja lülitamine (heli modulatsioon)
⑯METRONOME -Metronoomi sisse- või
väljalülitamine
⑰Digitaalklaviatuur 0-9/+/–
-Funktsioonide, rütmiliste stiilide,
kompositsioonide ja helide valik
⑱SOUNDS -Helide valik
⑲RHYTHMS -Rütmide valik
⑳START/STOP -Käivitada või peatada
rütmilise stiili või kompositsiooni
㉑DISPLAY
㉒SPLIT -Klaviatuuri jagamine kaheks
osaks: üks saatmise ja teine meloo-
dia jaoks
㉓LESSON -Õppetasemed eelnevalt sal-
vestatud radal
㉔TRANSPOSER +/– -Võimaldab muuta
nootide tonaalsust
㉕VOLUME +/– -Üldise helitugevuse
reguleerimine
㉖DEMO ONE -Kuulata järjest eelnevalt
salvestatud rada
㉗Võrguadapteri pesa (kuulub komplekti)
㉘ Kõrvaklappide pesa (ei kuulu komplekti)
㉙Välise muusikaallika pesa (MP3-mängija,
nutitelefon jne)
㉚Pesa Kondensaatori mikrofoni jaoks (ei
kuulu komplekti)
㉛USB Flash Drive pesa (Pen-Drive)
Č E S K O _________
①ON/OFF -Pro zapnutí a vypnutí přístroje
②MP3 Player -Pro nastavení písní MP3
přehrávaných pomocí portu USB
③DEMO ALL -Pro poslech všech zazname-
naných písní posloupně
④PROG -Pro nahrávání rytmické sekven-
ce
⑤REC -Pro nahrávání toho, co se hraje
⑥PLAY -Pro poslech nahrávky
⑦SYNC -Funkce SYNC umožňuje spuštění
rytmu a doprovodu, jakmile dojde ke
zkomponování akordu v jednom z
režimů Single nebo Finger
⑧FILL-IN -Pro vložení rytmické variace
⑨SINGLE -Pro aktivaci složení akordů z
levé části klávesnice zjednodušenou
metodou
⑩FINGER -Pro aktivaci složení akordů z
levé části klávesnice klasickou meto-
dou
⑪CHORD OFF -Pro vyřazení doprovodu a
odejití z nastavení Single nebo Finger
⑫TEMPO +/– -Pro nastavení rychlosti
provádění stylu, písní nebo metrono-
mu
⑬KEY DRUM -Pro aktivaci nebo deaktivaci
perkusních nástrojů na bílých a
černých klávesách
⑭SUSTAIN -Aktivace/deaktivace funkce
SUSTAIN (prodloužení tónu)
⑮VIBRATO -Aktivace/deaktivace funkce
VIBRATO (tónová modulace)
⑯METRONOME -Pro aktivaci nebo deakti-
vaci reprodukce rytmu, udávaného
metronomem
⑰Numerická klávesnice 0-9/+/– - Pro výběr
funkcí, rytmických stylů, skladeb a
zvuků
⑱SOUNDS -Pro volbu zvuků
⑲RHYTHMS -Pro volbu rytmů
⑳START/STOP -Pro spuštění nebo zasta-
vení rytmického stylu nebo písně
㉑DISPLAY
㉒SPLIT -Pro rozdělení klávesnice na dva
oddíly: jeden pro doprovod a druhý
pro melodii
㉓LESSON -Úrovně znalostí při poslechu
nahrané skladby
㉔TRANSPOSER +/– -Umožňuje měnit
tonalitu not
㉕VOLUME +/– -Pro nastavení obecné
hlasitosti
㉖DEMOONE -Pro poslech skladby nahrané
v dané posloupnosti
㉗Port pro síťový adaptér (v příslušenství)
㉘ Port pro sluchátka (nejsou součástí)
㉙Port pro externí hudební zdroj (MP3
přehrávač, smartphone, atd.)
㉚Port pro kondenzátorový mikrofon (není
součástí)
㉛Port pro USB Flash Drive (Pen-Drive)

S L O V E N S K Ý _________
①ON/OFF -Pre zapnutie a vypnutie
prístroja
②MP3 Player -Pre nastavenie piesní MP3
prehrávaných pomocou portu USB
③DEMO ALL -Pre počúvanie všetkých
zaznamenaných piesní poradovým
④PROG -Pre nahrávanie rytmické
sekvencie
⑤REC -Pre nahrávanie toho, čo sa hrá
⑥PLAY -Pre počúvanie nahrávky
⑦SYNC -Funkcia SYNC umožňuje spuste-
nie rytmu a sprievodu, len čo sa skom-
ponuje akord v jednom z dvoch
režimov Single alebo Finger
⑧FILL-IN -Pre vloženie rytmické variácie
⑨SINGLE -Pre aktiváciu zloženie akordov
z ľavej časti klávesnice zjednodušenou
metódou
⑩FINGER -Pre aktiváciu zloženie akordov
z ľavej časti klávesnice klasickou
metódou
⑪CHORD OFF -Na vypnutie aranžmánu a
odchod z režimu Single alebo Finger
⑫TEMPO +/– -Pre nastavenie rýchlosti
vykonávania štýlu, piesní alebo
metronómu
⑬KEY DRUM -Pre aktiváciu alebo
deaktiváciu perkusných nástrojov na
bielych a čiernych klávesoch
⑭SUSTAIN -Aktivácia / deaktivácia funkcie
SUSTAIN (predĺženie tónu)
⑮VIBRATO -Aktivácia / deaktivácia funkcie
vibrato (tónová modulácia)
⑯METRONOME -Pre aktiváciu alebo
deaktiváciu reprodukcie rytmu,
udávaného metronómom
⑰NUMERICKÁ KLÁVESNICA 0-9/+/– - Pre výber
funkcií, rytmických štýlov, skladieb a
zvukov
⑱SOUNDS -Pre voľbu zvukov
⑲RHYTHMS -Pre voľbu rytmov
⑳START/STOP -Pre spustenie alebo zasta-
venie rytmického štýlu alebo piesne
㉑DISPLAY
㉒SPLIT -Pre rozdelenie klávesnice na dva
oddiely: jeden pre sprievod a druhý
pre melódiu
㉓LESSON -Úrovne znalostí pri počúvaní
nahraté skladby
㉔TRANSPOSER +/– -Umožňuje meniť
tonalitu nót
㉕VOLUME +/– -Pre nastavenie všeobecné
hlasitosti
㉖DEMO ONE -Pre počúvanie skladby
nahrané v danej postupnosti
㉗Port pre sieťový adaptér (v príslušenstve)
㉘ Port pre slúchadlá (nie sú súčasťou)
㉙Port pre externý hudobný zdroj (MP3
prehrávač, smartphone, atď.)
㉚Port pre kondenzátorový mikrofón (nie je
súčasťou)
㉛Port pre USB Flash Drive (Pen-Drive)
R O M Â N Ă _________
①ON/OFF -Pentru a porni sau opri instru-
mentul
②MP3 Player -Pentru a regla cântecele
MP3 citite prin mufa USB
③DEMO ALL -Pentru a asculta toate cânte-
cele preînregistrate în ordine
④PROG -Pentru a înregistra o secvență
ritmică
⑤REC -Pentru înregistrarea interpretărilor
⑥PLAY -Pentru a reasculta înregistrarea
⑦SYNC -Funcția SYNC vă permite să
începeți ritmul și acompaniamentul
de îndată ce acordul este compus fie
în mod unic, fie în modul Finger
⑧FILL-IN -Pentru a introduce o variație
ritmică
⑨SINGLE -Pentru a activa compunerea
acordurilor, în partea stângă a clavia-
turii, conform metodei simplificate
⑩FINGER -Pentru a activa compunerea
acordurilor, în partea stângă a clavia-
turii, conform metodei clasice
⑪CHORD OFF -Pentru a exclude aranja-
mentul și pentru a ieși din modalitatea
Single sau Finger
⑫TEMPO +/– -Pentru reglarea vitezei de
execuție a stilului, a cântecelor sau a
metronomului
⑬KEY DRUM -Pentru a activa sau dezactiva
instrumentele de percuție pe clapele
albe și negre
⑭
SUSTAIN -Activează/dezactivează funcția
SUSTAIN (prelungirea sunetului)
⑮
VIBRATO -Activează/dezactivează
funcția VIBRATO (modularea sunetului)
⑯METRONOME -Pentru a activa sau dezac-
tiva tempoul bătut de metronom
⑮Tastatură numerică 0-9/+/– - Pentru selec-
tarea de funcții, stiluri ritmice, cântece
și sunete
⑱SOUNDS -Pentru selectarea sunetelor
⑲RHYTHMS -Pentru selectarea ritmurilor
⑳START/STOP -Pentru a porni sau opri un
stil ritmic sau un cântec
㉑DISPLAY
㉒SPLIT -Pentru a împărți claviatura în
două secțiuni: una pentru acompania-
ment iar cealaltă pentru melodie
㉓LESSON -Niveluri de învățare urmând o
piesă preînregistrată
㉔TRANSPOSER +/– -Permite schimbarea
tonalității notelor
㉕VOLUME +/– -Pentru reglarea volumului
general
㉖
DEMO ONE -Pentru a asculta o melodie
preînregistrată în ordine
㉗Mufă per adaptor de rețea (din dotare)
㉘ Mufă pentru căști (neinclusă)
㉙Mufă pentru sursă muzicală externă (cititor
MP3, smartphone etc.)
㉚-Mufă pentru microfon cu condensator
(neinclusă)
㉛Mufă pentru memorie flash USB (Pen-Drive)
D A N S K _________
①ON/OFF -Tænd og sluk
②MP3 Player -For justering af sangene i
MP3, der læses gennem USB-stikket
③DEMO ALL -Alle forudindspillede numre i
rækkefølge
④PROG -For at optage en rytmesekvens
⑤REC -For at registrere de afspillede
noder
⑥PLAY -For at lytte til den sidste optagel-
se
⑦SYNC -Funktionen SYNC gør det muligt
at starte rytmen sammen med de
akkorder, der netop er blevet kompo-
neret i en af de to tilstande: Single
eller Finger
⑧FILL-IN -Funktionen aktiverer en varia-
tion af rytmen
⑨SINGLE -Aktiverer akkorder med
funktionen forenklede akkorder
⑩FINGER -Aktiverer de klassiske akkorder
(Classic Chord): Alle de primære akkor-
der vil blive genkendt
⑪CHORD OFF -For at udelukke akkorder og
gå ud fra tilstanden Single eller Finger
⑫TEMPO +/– -For justering af hastighe-
den hvormed rytmen gengives for
sangene eller metronomen
⑬KEY DRUM -For at aktivere eller deaktive-
re de rytmiske instrumenter på de
hvide og sorte taster
⑭SUSTAIN -Aktiverer/deaktiverer funktio-
nen SUSTAIN (forlængelse af lyden)
⑮VIBRATO -Aktiverer/deaktiverer funktio-
nen VIBRATO (modulering af lyden)
⑯METRONOME -For at aktivere eller deakti-
vere rytmen der gengives af metrono-
men
⑰
Numerisk tastatur 0-9/+/– -
For valg af
funktioner, rytmer, sange og lyde
⑱SOUNDS -For at vælge lydene
⑲RHYTHMS -For at vælge rytmerne
⑳START/STOP -For at starte eller stoppe en
rytme eller en sang
㉑DISPLAY
㉒SPLIT -For at opdele keyboardet i to
dele: En halvdel til akkorderne og en
halvdel til melodien
㉓LESSON -Niveauer for indlæring ved at
følge en forud registreret sang
㉔TRANSPOSER +/–
-Gør det muligt at
ændre tonelejet for noderne
㉕VOLUME +/– -For at justere den samle-
de lydstyrke
㉖
DEMO ONE
-Valg af forudindspillede
numre
㉗Stik til adapter (inkluderet)
㉘ Stik til høretelefoner (ikke inkluderet)
㉙Stik til ekstern musikkilde (MP3-afspiller,
smartphone, osv.)
㉚Stik til kondensatormikrofon (ikke inkluderet)
㉛USB-stik til flashdrev (ikke inkluderet)

Ε Λ Λ Η Ν Ι Κ Α _________
①ON/OFF -Ενεργοποίηση και
απενεργοποίηση
②MP3 Player -Για να ρυθμίσετε τα
τραγούδια MP3 που διαβάζονται
μέσω της υποδοχής USB
③DEMO ALL -Όλα τα προεγγεγραμμένα
κομμάτια στη σειρά
④PROG -Για την εγγραφή μιας ρυθμικής
ακολουθίας
⑤REC -Για να εγγράψετε τις νότες που
παίζονται
⑥PLAY -Για αναπαραγωγή της τελευταίας
εγγραφής
⑦SYNC -Η λειτουργία SYNC σάς επιτρέπει
να ξεκινήσετε τον ρυθμό και τη
συνοδεία μόλις συνθέσετε το ακόρντο
με έναν από τους δύο τρόπους Single
ή Finger
⑧FILL-IN -Η λειτουργία εισάγει μια
ρυθμική παραλλαγή
⑨SINGLE -Ενεργοποίηση της συνοδείας
με τη λειτουργία απλουστευμένων
ακόρντων
⑩FINGER -Ενεργοποιεί τη συνοδεία στην
κλασική λειτουργία (Classic Chord):
αναγνωρίζονται όλα τα κύρια ακόρντα
⑪CHORD OFF -Για να παρακάμψετε τη
διάταξη και να βγείτε από τη
λειτουργία Single ή Finger
⑫TEMPO +/– -Για να ρυθμίσετε την
ταχύτητα αναπαραγωγής του ρυθμού,
των τραγουδιών ή του μετρονόμου
⑬KEY DRUM -активира и деактивира
звук на ударни инструменти при
черните или бели клавиши
⑭SUSTAIN -Ενεργοποίηση/
απενεργοποίηση της λειτουργίας
SUSTAIN (παράταση ήχου)
⑮VIBRATO -Ενεργοποίηση/
απενεργοποίηση της λειτουργίας
VIBRATO (διαμόρφωση ήχου)
⑯METRONOME -ενεργοποίηση και
απενεργοποίηση μετρονόμου
⑰
Συνδυασμός νούμερων 0-9/+/– - Επιλογή
λειτουργιών,στυλρυθμού,τραγουδιών
και ήχων
⑱SOUNDS -επιλογή ήχων από τα πλήκτρα
⑲RHYTHMS – επιλογή στυλ ρυθμού
⑳START/STOP -Για να ξεκινήσετε ή να
σταματήσετε ένα ρυθμό ή ένα
τραγούδι
㉑DISPLAY
㉒SPLIT -χωρίζει τα πλήκτρα σε 2
τμήματα: το ένα για μουσική
υπόκρουση και το άλλο για μελωδία
㉓LESSON -εκμάθηση ακολουθώντας
demo κομμάτι
㉔TRANSPOSER +/–
-επιτρέπει την αλλαγή
του τόνου κάποιων νοτών
㉕VOLUME +/– -Για να ρυθμίσετε τη
γενική ένταση
㉖
DEMO ONE
-Επιλογή προεγγεγραμμένων
κομματιών
㉗Πρίζα για προσαρμογέα (περιλαμβάνεται)
㉘ Υποδοχή ακουστικών (δεν παρέχεται)
㉙Βύσμα εξωτερικής μουσικής πηγής
(αναπαραγωγή MP3, smartphone, κλπ.)
㉚Πρίζα για μικρόφωνο συμπυκνωτή (δεν
περιλαμβάνεται)
㉛Υποδοχή μονάδας USB Flash (δεν
περιλαμβάνεται)
S U O M I _________
①ON/OFF -Käynnistys ja sammutus
②MP3 Player -USB-liittimen kautta luet-
tujen MP3-kappaleiden säätämiseksi
③DEMO ALL -Kaikki peräkkäin valmiiksi
tallennetut kappaleet
④PROG -Rytmisarjan tallennus
⑤REC -Soitettujen nuottien tallennus
⑥PLAY -Viimeisen tallennuksen kuuntelu
uudelleen
⑦SYNC -SYNC-toiminnolla käynnistyy
rytmi ja säestys heti kun sointu muo-
dostetaan tavassa Single tai Finger
⑧FILL-IN -Toiminto asettaa rytmin-
vaihdon
⑨SINGLE -Kytkee päälle säestysautoma-
tiikan yksinkertaistetuilla soinnuilla
⑩FINGER -Kytkee päälle säestyksen klas-
sisella tavalla (Classic Chord): kaikki
pääsoinnut tunnistetaan
⑪CHORD OFF -Sulkee pois säestyksen ja
poistuu Single- tai Finger-tavasta
⑫TEMPO +/– -Säätää rytmin, kappalei-
den tai metronomin nopeutta
⑬KEY DRUM -Aktivoi tai deaktivoi
lyömäsoittimet valkoisissa ja mustissa
koskettimissa
⑭SUSTAIN -Kytkee päälle/pois toiminnon
SUSTAIN (äänen pidennys)
⑮VIBRATO -Kytkee päälle/pois toiminnon
VIBRATO (äänen modulaatio)
⑯METRONOME -Aktivoi tai deaktivoi
metronomin antaman tahdin
⑰
Numeronäppäimistö 0-9/+/– -Toimintojen,
rytmien, kappaleiden ja äänien valinta
⑱SOUNDS -Äänien valinta
⑲RHYTHMS -Rytmien valinta
⑳START/STOP -Käynnistää tai pysäyttää
rytmin tai kappaleen
㉑DISPLAY
㉒SPLIT -Jakaa näppäimistön kahteen
osaan: säestystä ja melodiaa varten
㉓LESSON -Oppimistasot valmiiksi tallen-
nettua kappaletta seuraamalla
㉔TRANSPOSER +/–
-Tämän avulla voit
muuttaa sävellajia
㉕VOLUME +/– -Yleisen äänenvoimakkuu-
den säätö
㉖
DEMO ONE
-Valmiiksi tallennettujen kap-
paleiden valinta
㉗Sovittimen liitäntä (toimitukseen)
㉘ Kuuloke -liitäntä (ei toimitettu)
㉙Ulkoinen liitin musiikkilähteelle (MP3-soitin,
älypuhelin jne.)
㉚Kondensaattorimikrofonin liitäntä (ei kuulu
toimitukseen)
㉛Liitin USB flash Drivelle (ei kuulu toimitukseen)
S V E N S K A _________
①ON/OFF -På- och avslagning
②MP3 Player -För att justera de MP3-spår
som registrerats via USB-uttaget
③DEMO ALL -Alla förinspelade spår i
sekvens
④PROG -Spelar in en rytmsekvens
⑤REC -Spelar in de spelade noterna
⑥PLAY -Lyssna på den senaste inspelnin-
gen
⑦SYNC -Med SYNC-funktion är det
möjligt att starta rytmen och ackom-
panjemanget när du har komponerat
ackorden i ett av de två funktionsläge-
na Single eller Finger
⑧FILL-IN -Funktionen tillfogar en rytmva-
riation
⑨SINGLE -Aktivera ackompanjemang
med den förenklade ackordfunktio-
nen
⑩FINGER -Aktivera ackompanjemang
med det klassiska funktionsläget
(Classic Chord): alla huvudackord
känns igen
⑪CHORD OFF -Utesluter arrangemanget
och avslutar spellägena Single eller
Finger
⑫TEMPO +/– -Justerar spelhastigheten
för rytm, låtar eller metronom
⑬KEY DRUM -Aktiverar eller avaktiverar
slaginstrumenten på de vita och svar-
ta tangenterna
⑭SUSTAIN -Aktiverar/Inaktiverar funktio-
nen SUSTAIN (ljudförlängning)
⑮VIBRATO -Aktiverar/Inaktiverar funktio-
nen VIBRATO (ljudändring)
⑯METRONOME -Aktiverar eller avaktiverar
metronomens temposlag
⑰
Numerisk knappsats 0-9/+/– - För val av
funktioner, rytmer, låtar och ljud
⑱SOUNDS -Val av ljud
⑲RHYTHMS -Val av rytmer
⑳START/STOP -Startar eller stoppar en
rytm eller en låt
㉑DISPLAY
㉒SPLIT -Delar upp tangentbordet i två
sektioner: den ena för ackompanje-
mang och den andra för melodin
㉓LESSON -Inlärningsnivåer genom att
följa ett förinspelat spår
㉔TRANSPOSER +/–
-Medger tonartsän-
dring
㉕VOLUME +/– -Justerar den totala
volymen
㉖
DEMO ONE
-Val av förinspelade spår
㉗Adapteruttag (ingår)

㉘ Hörlursuttag (medföljer ej)
㉙Uttag för extern musikkälla (MP3-spelare,
smartphone etc.)
㉚Uttag för kondensatormikrofon (ingår ej)
㉛Uttag till USB-flashenhet (ingår ej)
M A L T E S E _________
①ON/OFF -Tixgħel u titfi
②MP3 Player -Sabiex tirregola l-kanzu-
netti tal-MP3 li ddoqq permezz tal-
USB
③DEMO ALL -Id-diski rrekordjati minn
qabel kollha, wara xulxin
④PROG -Biex tirrekordja sekwenza ritmi-
ka
⑤REC -Biex tirrekordja n-noti li ndaqqu
⑥PLAY -Biex tisma’ mill-ġdid l-aħħar
rekording
⑦SYNC -Il-funzjoni SYNC tippermetti li
r-ritmu u l-akkumpanjament jibdew
hekk kif jiġi maħluq arranġament
f’waħda miż-żewġ modalitajiet Single
jew Finger
⑧FILL-IN -Din il-funzjoni ddaħħal
varjazzjoni tar-ritmu
⑨SINGLE -Tippermetti l-akkumpanja-
ment permezz tal-funzjoni simplifika-
ta tal-arranġamenti
⑩FINGER -Tippermetti l-akkumpanja-
ment fil-modalità klassika (Classic
Chord): jiġu magħrufa l-arranġamenti
ewlenija kollha
⑪CHORD OFF -Biex teskludi l-arranġament
u toħroġ mill-modalità Single jew
Finger
⑫TEMPO +/– -Biex tirregola l-veloċità tal-
eżekuzzjoni tar-ritmu, tad-diski jew
tal-metronomu
⑬KEY DRUM -Biex tattiva jew tiddiżattiva
l-istrumenti tal-perkussjoni fuq it-tasti
bojod jew suwed
⑭SUSTAIN -Attiva/Iddiżattiva l-funzjoni
SUSTAIN (it-titwil tal-ħoss)
⑮VIBRATO -Attiva/Iddiżattiva l-funzjoni
VIBRAT (modulazzjoni tal-ħoss)
⑯METRONOME -Biex tattiva jew tiddiżattiva
t-temp bit-taħbit tal-metronomu
⑰
Tastiera żgħira tan-numri 0-9/+/– -
Biex
tagħżel il-funzjonijiet, ir-ritmi, id-diski
jew il-ħsejjes
⑱SOUNDS -Biex tagħżel il-ħsejjes
⑲RHYTHMS -Biex tagħżel ir-ritmi
⑳START/STOP -Biex tibda jew twaqqaf
ritmu jew diska
㉑DISPLAY
㉒SPLIT -Biex taqsam it-tastiera f’żewġ
partijiet: waħda għall-
akkumpanjament u l-oħra għall-
melodija
㉓LESSON -Livelli ta’ taħriġ billi ssegwi
diska rreġistrata minn qabel
㉔TRANSPOSER +/–
-Iħallik tibdel it-ton
tan-noti
㉕VOLUME +/– -Biex tirranġa l-volum
ġenerali
㉖
DEMO ONE
-Għażla tad-diski rrekordjati
minn qabel
㉗Is-sokit għall-adapter (inkluż)
㉘ Sokit għall-headphones (mhux fornuti)
㉙Port għal sors mużikali estern (qarrej tal-MP3,
smartphone, eċċ)
㉚Is-sokit tal-mikrofono bil-kondensatur (mhux
inkluż)
㉛Port għall-USB flash Drive (mhux inkluż)
S L O V E N Š Č I N A _________
①ON/OFF -Prižiganje in ugašanje
②MP3 Player -Za nastavljanje MP3 pesmi,
branih z USB priključka
③DEMO ALL -Vse predhodno posnete
skladbe po vrsti
④PROG -Za snemanje ritmičnega zapo-
redja
⑤REC -Za snemanje igranih not
⑥PLAY -Za poslušanje zadnjega posnet-
ka
⑦SYNC -Funkcija SYNC omogoča zagon
ritma in spremljave, takoj po tem, ko
ste zaigrali akord v načinu Single ali
Finger
⑧FILL-IN -Funkcija vstavi variacijo ritma
⑨SINGLE -Omogoči poenostavljeno
spremljavo z akordi
⑩FINGER -Omogoči spremljavo v
običajnem načinu (Classic Chord): pre-
poznani so vsi glavni akordi
⑪CHORD OFF -Za izključitev priredbe in
izhod iz načina Single ali Finger
⑫TEMPO +/– -Za nastavljanje hitrosti
izvajanja ritma, pesmi ali metronoma
⑬KEY DRUM -Za vklop ali izklop tolkal na
belih in črnih tipkah
⑭SUSTAIN -Vklopi / izklopi funkcijo
SUSTAIN (podaljšanje zvoka)
⑮VIBRATO -Vklopi / izklopi funkcijo
VIBRATO (modulacija zvoka)
⑯METRONOME -Za vklop ali izklop tempa,
ki ga šteje metronom
⑰
Številčnica 0-9/+/- -
Za izbiro funkcij, rit-
mov, pesmi in zvokov
⑱SOUNDS -Za izbiro zvokov
⑲RHYTHMS -Za izbiro ritmov
⑳START/STOP -Za zagon ali zaustavitev
ritma ali pesmi
㉑DISPLAY
㉒SPLIT -Za delitev klaviatura na dva dela:
eden za spremljavo in drugi za melo-
dijo
㉓LESSON -Izobraževalne stopnje ob vna-
prej posneti skladbi
㉔TRANSPOSER +/–
-Omogoča spre-
minjanje tonalitete not
㉕VOLUME +/– -Za nastavljanje jakosti
㉖
DEMO ONE
-Izbira predhodno posnetih
skladb
㉗Vtičnica za adapter (priložen)
㉘Vtičnica za slušalke (niso priložene)
㉙Vhod za zunanji glasbeni vir (MP3 predvajal-
nik, pametni telefon itd.)
㉚Vtičnica za kondenzatorski mikrofon (ni
priložen)
㉛Priključek za USB pomnilnik (ni priložen)
M A G Y A R _________
①ON/OFF -Bekapcsolás és kikapcsolás
②MP3 Player -Az USB kulcson csatla-
kozón leolvasott MP3 dalok
beállításához
③DEMO ALL -Valamennyi sorrendben
rögzített darab
④PROG -Ritmikus sorrend rögzítése
⑤REC -Lejátszott hangjegyek rögzítése
⑥PLAY -Utolsó rögzítés meghallgatása
⑦SYNC -A SYNC funkcióval elindítható a
ritmus és a kíséret az akkor kom-
ponálása után a Single vagy a Finger
mód egyikében
⑧FILL-IN -A funkció egy ritmus variációt
illeszt be
⑨SINGLE -Engedélyezi a kíséretet az
egyszerűsített akkord funkcióval
⑩FINGER -Engedélyezi a kíséretet
klasszikus módban (Classic Chord):
valamennyi fő akkord felismerésre
kerül
⑪CHORD OFF -Hangszerelés kizárásához
és a Single vagy Finger módból való
kilépéshez
⑫TEMPO +/– -A ritmus lejátszás, a dalok
és a metronóm sebességének
szabályozásához
⑬KEY DRUM -Ütőhangszerek
aktiválásához vagy kikapcsolásához a
fehér és fekete gombokon
⑭SUSTAIN -Aktiválja/tiltja a SUSTAIN
funkciót (hang kiterjesztés)
⑮VIBRATO -Aktiválja/tiltja a VIBRATO
funkciót (hang modulálása)
⑯METRONOME -A metronóm ütési
idejének aktiválásához vagy kikapc-
solásához
⑰
Numerikus gomb 0-9/+/– -
Funkciók, rit-
musok, dalok és hangok kivála-
sztásához
⑱SOUNDS -Hangok kiválasztásához
⑲RHYTHMS -Ritmusok kiválasztásához
⑳START/STOP -Ritmus vagy dal
indításához vagy leállításához
㉑DISPLAY
㉒SPLIT -A billentyűzet két szakaszra
osztásához: egy a kísérethez, egy a
dallamhoz
㉓LESSON -Tanulási szintek előre beállított
darab szerint
㉔TRANSPOSER +/–
-Lehetővé teszi a
hangmagasságok módosítását
㉕VOLUME +/– -Általános hangerő
szabályozása

㉖
DEMO ONE
-Előre rögzített darabok
kiválasztása
㉗Csatlakozó adapterhez (készlet része)
㉘Fejhallgató csatlakozó (nincs mellékelve)
㉙Csatlakozó külső zeneforráshoz (MP3 leol-
vasó, okostelefon, stb.)
㉚Csatlakozó elem kondenzátor mikrofonhoz
(nem a készlet része)
㉛Csatlakozó USB flash meghajtóhoz (nem a
készlet része)
Б Ъ Л Г А Р С К И _________
①ON/OFF -Включване и изключване
②MP3 Player -За регулиране на MP3
мелодиите, които се четат от USB
устройство
③DEMO ALL -Всички предварително
записани мелодии последователно
④PROG -За записване на определена
серия от ритми
⑤REC -За записване на изсвирените
ноти
⑥PLAY -За прослушване на последния
запис
⑦SYNC -Функция SYNC позволява да
стартирате ритъма и акомпанимента
веднага след композиране на
акорда в един от двата режима
Single или Finger
⑧FILL-IN -Тази функция въвежда
вариация на ритъма
⑨SINGLE -Активира акомпанимента с
опростена функция с акорди
⑩FINGER -Активира акомпанимент по
класически начин (Classic Chord):
разпознават се всички основни
акорди
⑪CHORD OFF -За изключване на
аранжимента и излизане от режим
Single или Finger
⑫TEMPO +/– -За регулиране на
скоростта на изпълнение на ритъма,
песните или метронома
⑬KEY DRUM -активира и деактивира
звук на ударни инструменти при
черните или бели клавиши
⑭SUSTAIN -Активира/Деактивира
функция SUSTAIN (удължаване на
звука)
⑮VIBRATO -Активира/Деактивира
функция VIBRATO (модулиране на
звука)
⑯METRONOME -включване и изключване
на метронома
⑰
Комбинация от клавиши 0-9/+/– - Избор
на функция, ритъм, ,мелодия и
тембър
⑱SOUNDS -избор на тембър на
клавишите
⑲RHYTHMS -избор на ритъм
⑳START/STOP -начало и спиране на
възпроизвеждането на ритъм,
запис или demo изпълнение
㉑DISPLAY
㉒SPLIT -разделя клавишите на 2 дяла:
един за съпровод и един за мелодия
㉓LESSON -обучение, чрез следване на
demo изпълнение
㉔TRANSPOSER +/–
-позволява
промяната на тона на някои
клавиши
㉕VOLUME +/– -За регулиране на
общата сила на звука
㉖
DEMO ONE
-Избор на предварително
записани мелодии
㉗Букса за адаптер (е част от комплекта)
㉘Букса за слушалки (не е част от комплекта)
㉙Букса за включване на външно устройство
за музика (MP3 четец, смартфон или др.)
㉚Букса за включване на кондензаторен
микрофон (не е част от комплекта)
㉛Букса за USB флаш драйв (не е част от
комплекта)
G A E I L G E _________
①ON/OFF -Cas AIR/AS
②MP3 Player -Leis na hamhráin MP3 a
léitear tríd an soicéad USB a rialú
③DEMO ALL -Gach rian réamh-thaifeadta i
seicheamh
④PROG -Seicheamh rithime a thaifead
⑤REC -Nótaí seinnte a thaifead
⑥PLAY -Éist leis an taifead is déanaí
⑦SYNC -Cabhraíonn an fheidhm SYNC an
rithim agus tionlacan a thosú díreach i
ndiaidh an corda a chumadh sa
mhodh Singil nó Méar
⑧FILL-IN -Cuireann an fheidhm
athrúchán rithime leis
⑨SINGLE -Cumasaigh an tionlacan leis an
bhfeidhm chordaí simplithe
⑩FINGER -Cumasaigh tionlacan sa
mhodh clasaiceach (Classic Chord):
aithnítear gach príomh-chordaí
⑪CHORD OFF -Chun an cóiriú a eisiamh
agus dul amach as an mód Single nó
Finger
⑫TEMPO +/– -Chun luas seinnte na rithi-
me, na n-amhrán nó an mhéadranóim
a rialú
⑬KEY DRUM -Chun na cnaguirlisí a
ghníomhachtú nó a dhíghníomhachtú
ar na heochracha bána agus dubha
⑭SUSTAIN -Cumasaíonn/díchumasaíonn
sé an fheidhm COINNIGH (fadú fuai-
me)
⑮VIBRATO -Cumasaigh/Díchumasaigh an
fheidhm VIBRATO (modhnúchán fuai-
me)
⑯METRONOME -Chun bualadh ama an
mhéadranóim a ghníomhachtú nó a
dhíghníomhachtú
⑰
Eochaircheap uimhriúil 0-9/+/– -
Chun
feidhmeanna, rithimí, amhráin agus
fuaimeanna a roghnú
⑱SOUNDS -Chun na fuaimeanna a roghnú
⑲RHYTHMS -Chun na rithimí a roghnú
⑳START/STOP -Chun rithim nó amhrán a
thosú nó a stopadh
㉑DISPLAY
㉒SPLIT -Chun an méarchlár a roinnt ina
dhá chuid: ceann don tionlacan agus
an ceann eile don fhonn
㉓LESSON -Leibhéil foghlama i ndiaidh
rian réamhthaifeadta
㉔TRANSPOSER +/–
-Chun tonúlacht na
nótaí a athrú
㉕VOLUME +/– -Athraigh an airde fuaime
ginearálta
㉖
DEMO ONE
-Roghnaigh rianta réamh-
thaifeadta
㉗Soicéad chuibheora (dtagann leis)
㉘Seaic chluasán (ní thagann leis)
㉙Soicéad d'fhoinse sheachtrach ceoil (seinnte-
oir MP3, fón cliste, srl.)
㉚Soicéad Micreafóin Comhdhlúthadáin (nach
dtagann leis)
㉛Soicéad do Mhéaróg Chuimhne USB (nach dta-
gann leis)
H R V A T S K I _________
①ON/OFF -Uključivanje i isključivanje
②MP3 Player -Za reguliranje MP3 pjesa-
ma koje se čitaju putem USB priključka
③DEMO ALL -Slijed svih unaprijed snimlje-
nih pjesama
④PROG -Za snimanje ritmičkog slijeda
⑤REC -Za snimanje odsviranih nota
⑥PLAY -Za preslušavanje najnovijeg
snimka
⑦SYNC -SYNC funkcija omogućuje pokre-
tanje ritma, a pratnja je upravo sasta-
vila akord u jednom od dva načina
Single ili Finger
⑧FILL-IN -Funkcija unosi promjenu ritma
⑨SINGLE -Omogućite pratnju pomoću
funkcije pojednostavljenih akorda
⑩FINGER -Omogućuje pratnju u
klasičnom načinu (Classic Chord): svi
glavni akordi su prepoznati
⑪CHORD OFF -Za isključivanje aranžmana i
izlazak iz načina rada Single ili Finger
⑫TEMPO +/– -Za prilagođavanje brzine
izvođenja ritma, pjesama ili metrono-
ma
⑬KEY DRUM -Za aktiviranje ili deaktivi-
ranje udaraljki na crno-bijelim tipka-
ma
⑭SUSTAIN -Aktivira/Deaktivira funkciju
SUSTAIN (produljenje zvuka)
⑮VIBRATO -Aktivira/Deaktivira funkciju
VIBRATO (moduliranje zvuka)
⑯METRONOME -Za aktiviranje ili deaktivi-
ranje ritma koji otkucava metronom
⑰
Numerička tipkovnica 0-9/+/– - Za odabir
funkcija, ritmova, pjesama i zvukova
⑱SOUNDS -Za odabir zvukova

⑲RHYTHMS -Za odabir ritmova
⑳START/STOP -Za pokretanje ili zau-
stavljanje ritma ili pjesme
㉑DISPLAY
㉒SPLIT -Za podjelu tipkovnice u dva
dijela: jedan za pratnju a drugi za
melodiju
㉓LESSON -Razine učenja prateći una-
prijed snimljenu pjesmu
㉔TRANSPOSER +/–
-Omogućuje promje-
nu tona nota
㉕VOLUME +/– -Za prilagođavanje opće
glasnoće
㉖
DEMO ONE
-Odabir unaprijed snimljenih
pjesama
㉗Utičnica adaptera (uključen)
㉘Priključak za slušalice (nije isporučen)
㉙Priključak za vanjski izvor glazbe (MP3 uređaj,
pametni telefon, itd.)
㉚Utičnica za kondenzatorski mikrofon (nije
uključena)
㉛Utičnica za USB memoriju flash Drive (nije
uključena)
I T A L I A N O _________
①ON/OFF -Per accendere o spegnere lo
strumento
②MP3 Player -Per regolare le canzoni
MP3 lette attraverso la presa USB
③DEMO ALL -Per ascoltare tutte le canzoni
preregistrate in sequenza
④PROG -Per registrare una sequenza rit-
mica
⑤REC -Per registrare ciò che si suona
⑥PLAY -Per riascoltare la registrazione
⑦SYNC -Permette di far partire il ritmo o
l’accompagnamento automatico,
appena composto l'accordo nelle
modalità SINGLE e FINGER
⑧FILL-IN -La funzione inserisce una varia-
zione del ritmo
⑨SINGLE -Abilita l’accompagnamento
con la funzione accordi semplificata
⑩FINGER -Abilita l’accompagnamento
nella modalità classica (Classic Chord)
⑪CHORD OFF -Per escludere l'arrangia-
mento e uscire dalla modalità Single o
Finger
⑫TEMPO +/– -Per la regolazione della
velocità d’esecuzione del ritmo, delle
canzoni o del metronomo
⑬KEY DRUM -Per attivare o disattivare gli
strumenti percussivi sui tasti bianchi e
neri
⑭SUSTAIN -Attiva/disattiva la funzione
SUSTAIN (prolungamento del suono)
⑮VIBRATO -Attiva/disattiva la funzione
VIBRATO (modulazione del suono)
⑯METRONOME -Per attivare o disattivare il
tempo battuto dal metronomo
⑰
Tastierina numerica 0-9/+/– - Per la sele-
zione di funzioni, ritmi, canzoni e suoni
⑱SOUNDS -Per selezionare i suoni
⑲RHYTHMS -Per selezionare i ritmi
⑳START/STOP -Per avviare o fermare un
ritmo o una canzone
㉑DISPLAY
㉒SPLIT -Per dividere la tastiera in due
sezioni: una per l’accompagnamento
e l’altra per la melodia
㉓LESSON -Livelli di apprendimento
seguendo un brano preregistrato
㉔TRANSPOSER +/–
-Permette di cambiare
la tonalità delle note
㉕VOLUME +/– -Per regolare il volume
generale
㉖
DEMO ONE
-Selezione dei brani pre-regi-
strati
㉗Presa per adattatore da rete (fornito)
㉘ Presa per cuffia (non fornita)
㉙Presa per sorgente musicale esterna (lettore
MP3, smartphone, ecc.).
㉚Presa per microfono a condensatore (non for-
nito)
㉛Presa per USB Flash Drive (non inclusa)
② ④ ⑤ ⑥① ③ ⑦ ⑧ ⑨ ⑩ ⑪ ⑫ ⑬ ⑭ ⑮ ⑯
㉖ ㉔ ㉑㉓㉕ ㉒ ⑰⑱⑲⑳
㉗ ㉘ ㉙ ㉚ ㉛

11
MAINS SUPPLY
The instrument can be supplied by the AC/DC (Vdc =9V
/ I = 500 mA) positive central adapter (not
supplied) conforms to national and international safety
regulations covering electrical appliances. Insert the
jack in the DC 9V socket.
RECOMMENDATIONS: The socket (1) for the adapter plug
must be easily accessible. • Inserting the plug into the
socket at the back of the instrument automatically cuts off
supply from the batteries. • Ensure that the adapter is suffi-
ciently ventilated • Do not expose the adapter to drops or
splashes of water. • The AC/DC adaptor shall not be exposed
to dripping or splashing and that no objects filled with
liquids, such as vases, shall be placed on apparatus. • The
AC/DC adaptor is used as disconnect device. • The AC/DC
adaptor of apparatus should not be obstructed OR should
be easily accessed during intended used. •To be completely
disconnect the power input, the AC/DC adaptor of appara-
tus shall be disconnected from the mains. • Battery shall not
be exposed to excessive heat such as sunshine, fire or the
like. • minimum distances 15cm around the apparatus for
sufficient ventilations. • The ventilation should not be impe-
ded by covering the ventilation openings with items such
as newspaper, table-cloths, curtains etc. • No naked flame
sources such as lighted candles should be placed on the
apparatus. • Attention should be drawn to the environmen-
tal aspects of battery disposal. • The apparatus should only
be used in moderate climates.
WARNING: All batteries or transformers with safety insula-
tion must be checked regularly for faults in cable, wire, or
plug insulation or other parts.
NOTE: Rating plate information was located at bottom
enclosure of the apparatus.
BATTERY SUPPLY
Use a screwdriver to open the battery compartment.
Insert 6 x 1.5 V batteries R6/AA (not supplied), ensu-
ring correct polarity (+/–). Re-fit battery cover.
Replace batteries when the quality of sound beco-
mes bad. Use alkaline batteries to obtain a longer
duration.
ATTENTION – BATTERY CARE
• Non-rechargeable batteries are not to be recharged. •
Rechargeable batteries must be removed from the toy befo-
re being charged. • Rechargeable batteries are only to be
charged under adult supervision. • Different types of batteri-
es or new and old batteries are not to be mixed. • Use only
batteries of the same or equivalent type. • Batteries are to be
inserted with correct polarity. • Remove exhausted batteries
to prevent leakage. • Do not short-circuit supply terminals. •
Remove batteries during long periods of non-use.
WASTE DISPOSAL STANDARDS
For information regarding the disposal of the items mentio-
ned here below, please refer to Council Administration office
regarding specialised waste collection centres.
1. DISPOSAL OF BATTERIES:
Protect the environment by disposing of
batteries in the special containers provi-
ded for this use.
2. PACKAGING DISPOSAL:
Take the paper, cardboard and corrugated board to the
appropriate waste collection centres. Plastic material must
be placed in the relevant collection containers.
The symbols indicating the various types of plastic are:
Key for the different types of plastic materials:
PET = Polyethylene terephtalate • PE = Polyethylene, code
02 for PE-HD, 04 for PE-LD • PVC =Polyvinyl chloride • PP =
Polypropylene • PS = Polystyrene, Polystyrene foam • O=
Other polymers (ABS, Laminates, etc.)
3. DISPOSING OF ELECTRICAL APPLIANCES
The wheelie bin symbol with a cross indicates that
the product must not be disposed of in the dome-
stic waste at the end of its useful life. Instead, it
should be taken to your nearest designated collec-
tion point or recycling facility. Alternatively, check
with your retailer and return the product when buying a
replacement, on a one-to-one basis or as free of charge in
case the size is smaller than 25 cm. Appropriate disposal
promotes the recycling of parts and materials, as well as
helping to protect the environment and human health.
Under current legislation, strict penalties are enforced
against those disposing of products illegally. For more infor-
mation about the collection of special waste, contact your
Local Authority.
SWITCH ON AND SWITCH OFF
Move the switch to the ON/OFF position ①to turn the
instrument on or off. When turned on, the keyboard is
set to operate with the Acoustic Gran Piano sound, the
Fusion 1 rhythm and the song Auspicious Day.
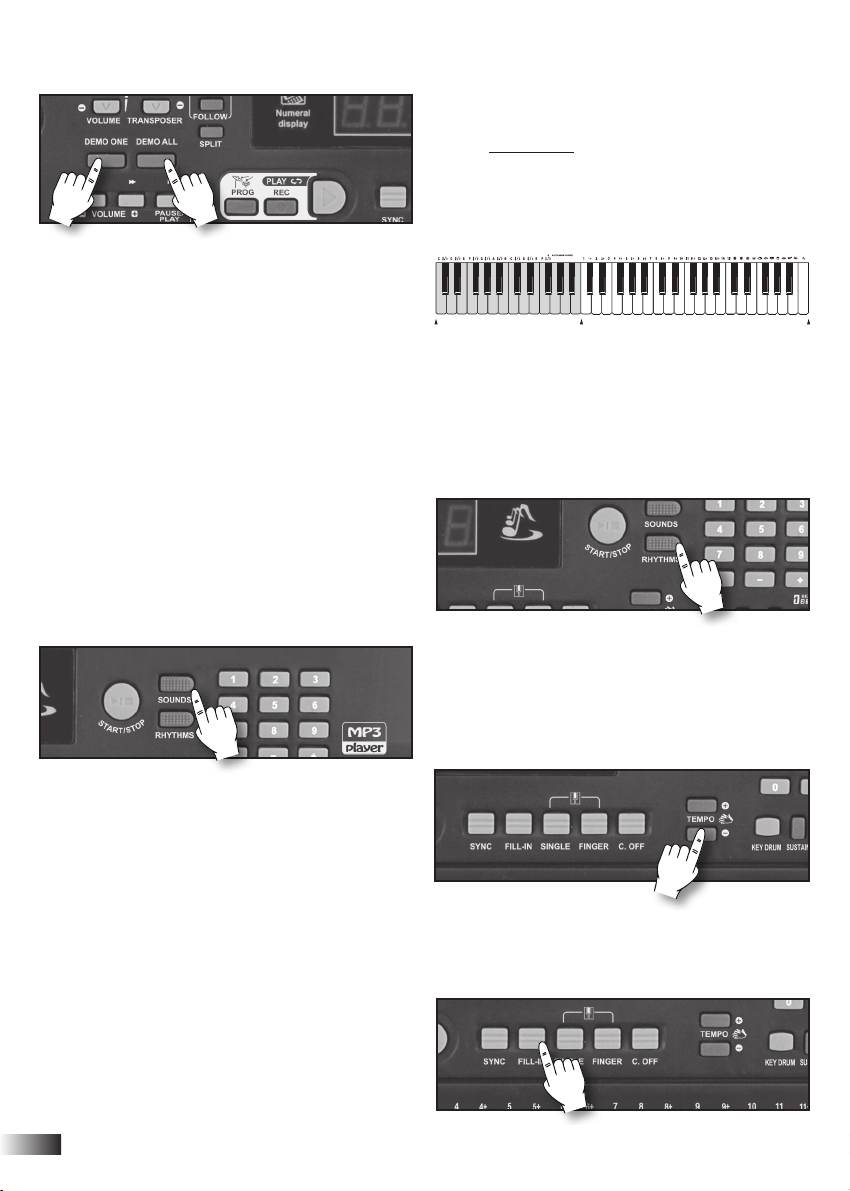
DEMO - Demo song
The instrument has 60 pre-recorded songs.
Press DEMO ONE to hear a song in sequence; the
display indicates the song number (e.g.: d 01). Press
START/STOP button ⑳to stop the song. Press DEMO
ONE again to hear the next song.
1
R6/AA 1.5V
R6/AA 1.5V R6/AA 1.5V
R6/AA 1.5V
R6/AA 1.5V
R6/AA 1.5V R6/AA 1.5V
R6/AA 1.5V
R6/AA 1.5V
R6/AA 1.5V R6/AA 1.5V
R6/AA 1.5V
01
PET
02
PE
03
PVC
05
PP
06
PS
07
O
E N G L I S H
12
The DEMO ALL button plays all 60 songs in sequence.
Press DEMO ALL again to stop the song.
When a song is playing, press +/– ⑰to select the next
or previous one, or enter a number from 0to 59 to select
one from the list at the end of this manual;
VOLUME
To regulate the volume of the instrument you must use
buttons VOLUME + (to turn up) or VOLUME – (to turn
down) ㉕. By holding the button pressed down, the
variation becomes continuous. To restore the standard
volume press both VOLUME + and VOLUME – buttons
together.
SOUNDS
To select one of the 200 sounds recorded in the instru-
ment, press SOUNDS ⑱and enter a number from 0to
199 to select one from the “LIST OF SOUNDS” table at
the end of this manual; the display indicates the selected
sound number (e.g.: 001).
To select the next or previous sound, press +/– from the
numerical keyboard.
Sustain
Prolongs the sound of a note when the key is released.
To enable or disable this function, press
SUSTAIN
⑭.
Vibrato
The vibrato effect is a sound modulation.
To enable or disable this function, press VIBRATO ⑮.
THE TRANSPOSER
The TRANSPOSER +/– controls ㉔shift the whole
keyboard tonality by +/– 6 semitones.
By pressing one of the two buttons, the display tempo-
rarily shows the current value.
By simultaneously pressing the “+/–“ buttons of
TRANSPOSER, you will return to the standard 0 value.
DIVISION OF THE KEYBOARD (SPLIT)
It has 61 keys and can be used in the following ways:
1. When simply turned on, one single sound is enabled
over the whole keyboard.
2. By entering SPLIT ㉒, the keyboard will be divided
into two sections: one dedicated to accompaniment
to form chords (24 keys on the left) and the other
one to play the melody (37 keys on the right). You
can select a different sound in the 37 keys on the
right by pressing the button SOUNDS ⑱and
entering a number from 0to 199.
RHYTHM SELECTION
The keyboard has 200 rhythms recorded.
To select them, press RHYTHMS ⑲followed by a num-
ber from 0to 199 to select one from the“RHYTHMS LIST”
table at the end of this manual; the display will indicate
the selected rhythm number (e.g.: 001).
To start or to stop a rhythm press the START/STOP but-
ton ⑳.
To increase or decrease the speed of the song press the
two buttons TEMPO + and TEMPO – ⑫.
By holding the button pressed down, the variation
becomes continuous. To go back to standard rhythm
press buttons TEMPO + and TEMPO – together.
The TEMPO + / – buttons are also used to adjust the
speed of a demo.
FILL-IN
Pressing this button ⑧while a rhythm is playing, repro-
duces a rhythmic variation of the drums.
24 37
13
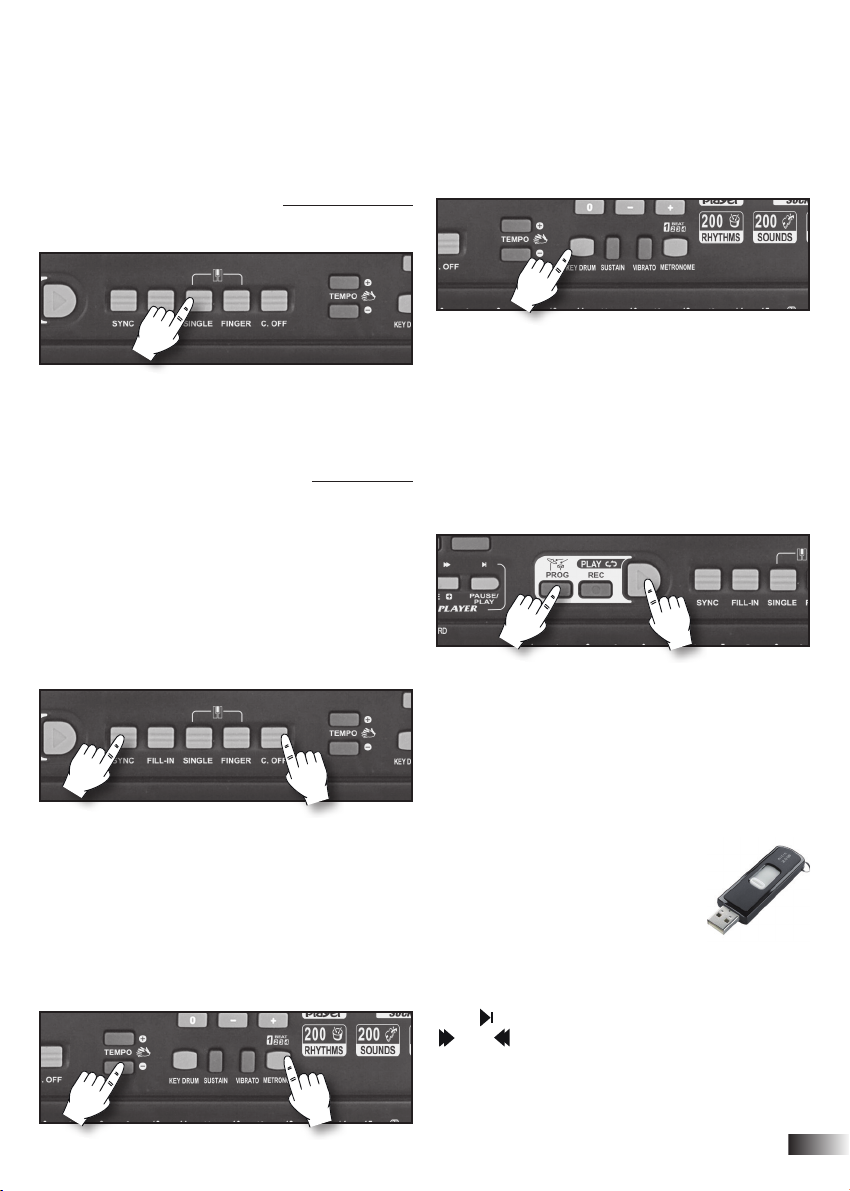
FACILITATED CHORDS
The facilitated chords for the accompaniment can be
played in 2 different ways:
SINGLE (EASY CHORD)
With a rhythm on, by pressing the button SINGLE ⑨the
keyboard is automatically divided into two sections, so
that the chords can be composed in the left part AUTO
BASS CHORD (from DO1 to FA#2) in facilitated mode
with one, two or three fingers (see the chords table at
the end of this manual).
FINGER (CLASSIC CHORD)
With a rhythm on, by pressing the button FINGER ⑩
the keyboard is automatically divided into two sections,
so that the chords can be composed in the left part
AUTO BASS CHORD (from DO1 to FA#2) in classic mode
(see the chords table at the end of this manual). All the
main chords consisting of at least 3 notes are
recognised; if you press only 2 notes, the chord will not
play.
AUTOMATIC ACCOMPANIMENT
With a rhythm off, in the SINGLE or FINGER mode, by
pressing the button SYNC ⑦, the automatic
accompaniment starts after having composed the
chord in the left part (from DO1 to FA#2).
By pressing the button C. OFF ⑪, you exclude the
arrangement and exit the SINGLE or FINGER modes.
THE METRONOME
The metronome helps you to learn the music, giving the
beat during musical exercises and simulating the tradi-
tional time-marking instrument.
It can be turned on and off with the METRONOME
button ⑯.
The divisions available are: 1/4, 2/4, 3/4, 4/4; to change
the tempo, use the TEMPO +/– buttons ⑫.
PERCUSSIONS
Pressing KEYDRUM ⑬enables 12 rhythmic percussions
on the white and black keys, which are repeated on all 5
octaves of the keyboard.
PROGRAMMING A RHYTHMIC SEQUENCE
The PROGRAM function enables you to record a
rhythmic sequence. Press PROG ④and compose a
rhythmic sequence through the keyboard’s white and
black keys. Press PLAY ⑥to listen to the programming
again and use TEMPO + / – ⑫to adjust the speed.
RECORD/PLAYBACK FUNCTION
This function enables you to record and playback a tune
played on the keyboard. Press REC ⑤before playing a
tune. When you have finished press PLAY ⑥to listen to
the tune.
MP3 Player
This keyboard enables you to read
MP3 songs on a USB Flash drive (Pen
Drive) when it is connected to a USB
port at the back of the instrument ㉛.
After connecting the device, the first
song will automatically start playing
and will be heard from the speakers on the keyboard. To
adjust the volume, keep the MP3 PLAYERVOLUME + or
–button ②pressed; to pause the song, press PAUSE/
PLAY ②; to go to the next or previous song, press
or ②.

14
Some of the songs written with the Bontempi method can be found at the end of this manual; another 60 songs
collected in the "SONG BOOK" can be downloaded at www.bontempi.com
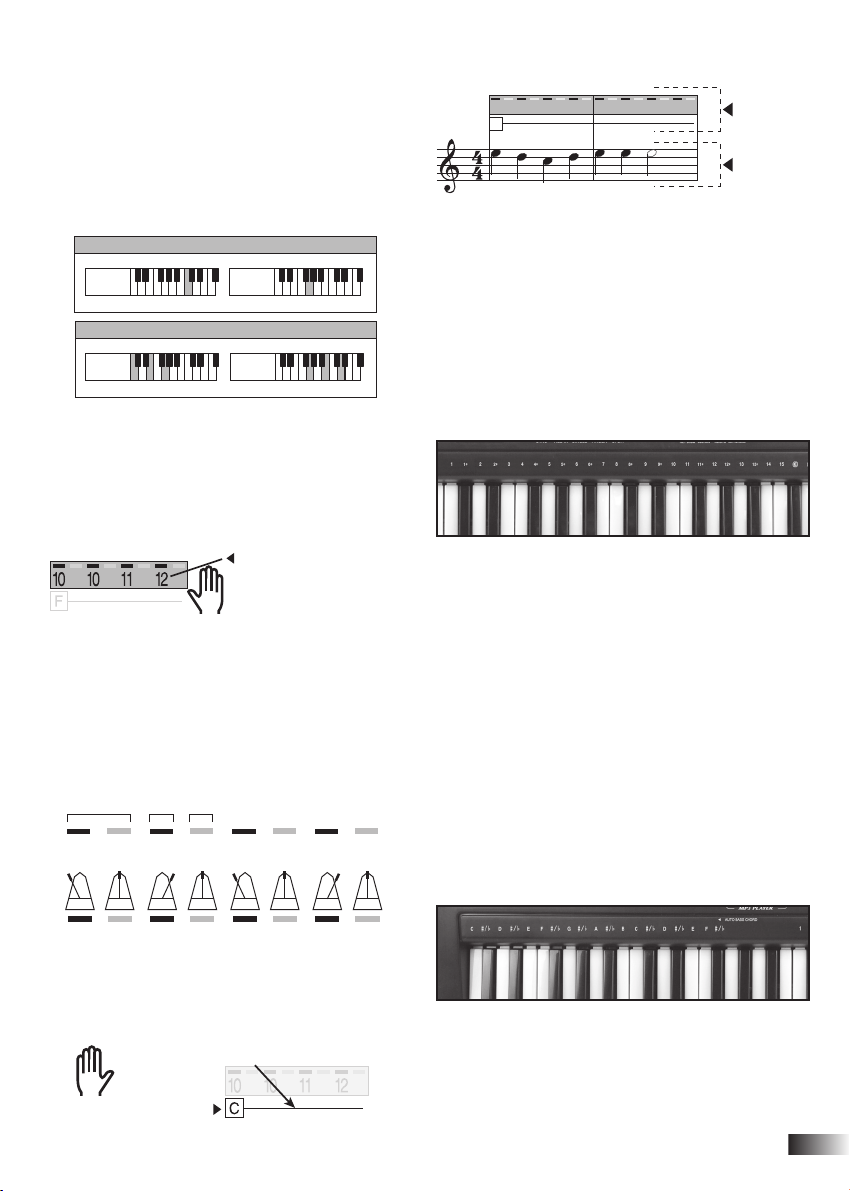
COMPOSING A SONG
Each song is printed on a separate page. Under the title there is information regarding:
SOUND: the sound needed to create the tune RHYTHM: the rhythm of the song
TEMPO: the speed of the song SONG: The song number recorded on the keyboard
LEARNING LEVELS
There are 2 learning levels: FOLLOW and ENSEMBLE.
FOLLOW
Press FOLLOW in the LESSON ㉓section. Select one of
the 60 songs found in the “LIST OF SONGS“ table at the
end of this manual by entering a number from 0to 59 in
the numerical keyboard ⑰.
Now try to play the melody by following the notes
shown on the display and then keep the time. Attention:
if you press the wrong key, it will make no sound and the
accompaniment will only advance when you will press
the right one.
How to read the display notes
Each note has a name: A, B, C, D, E, F, G, in anglo-saxon
notation which correspond to LA, SI, DO, RE, MI, FA, SOL,
in Latin notation and A, H, C, D, E, F, G, in German
notation. This correspondence is illustrated on the next
diagram.
This keyboard
displays the
notes in the
Anglo-Saxon
notation.
The display consists of 3 digits and each digit can show
a letter or a number. Example, when you choose demo
song n. 41 the will show: . The first digit will be
letter“d” (which means demo song), the second n. 4 and
the third n. 1.
When the display shows a musical note, its name appe-
ars in the second digit, e.g. which, in the
Anglo-Saxon notation is the C note, and in the Latin
notation is the DO note. Simultaneously, the third digit
shows the number of the position of that note, e.g.
; this means that the note is C (DO) in position
5 (see figure).
Sometimes, the first digit can show letter “b” (flat) to
indicate that the note corresponds to the black key
immediately to the left of the note. E.g.: b, d, 5
where “b”means flat, “d” is the D note (RE) and “5” is the
position of the note; therefore, the note to be played is
the following:
DO RE
RE
MI FA SOL LA SI DO
ENSEMBLE
Press ENSEMBLE in the LESSON section ㉓. Select one
of the 60 songs found in the “LIST OF SONGS“ table at
the end of this manual by entering a number from 0 to
59 in the numerical keyboard ⑰.
Press ENSEMBLE once again to stop the song. When
you are ready, press ENSEMBLE again and continue to
play. If you press the wrong key the song will be out of
tune. If you do not follow the right tempo the orchestra
does not wait for you and you will go out of time; adjust
the speed of the song using TEMPO + or TEMPO – ⑫.
Press ENSEMBLE again to exit the mode.
scrittura
classica
scrittura
semplificata
Accompagnamento
con la mano sinistra
Linea che indica la durata dell’accordo
Numeri che indicano le note
da suonare con la mano destra
MARY HAD A LITTLE LAMB
SOUND
19 HARMONICA RHYTHM 12 8-BEAT ROCK
TEMPO
08
SONG
59
Mar _ y had a lit _ tle lamb
9 98
10 1010 10
E E E
D D
C
C
E
EASY CHORD
CG
CLASSIC CHORD
CG
Accordi
anglo-saxon
latin
german
SONGS
15
You can use this information to configure the keyboard
and play the song at its best. This manual tells you how
to select sound, rhythm and tempo.
The song also indicates:
EASY CHORD: the easy chords for song accompaniment
CLASSIC CHORD: the classic chords for song accompa-
niment
The song is marked by a continuous grey strip that
indicates the numbers used to play the melody with
your right hand. Each key must be pressed for some
time, depending on the distance that separates each
number on the grey strip from the next.
Basically, above the numbers you will notice a sequence
of alternating black and grey sections within the grey
strip. The distance between one black section and
another represents the unit of musical time known as
“beat”, which corresponds to the movement of the
metronome pointer from one end to the other. Every
black and grey section represents a half“beat”.
The instructions (meaning squares with letters) are
found under this strip in order to use your left hand to
play the accompaniment chords.
All musical notes of the song, which use classical wor-
ding, are under the grey strip.
For now, it is sufficient to remember that each note has
a name: A, B, C, D, E, F, G, in anglo-saxon notation which
correspond to LA, SI, DO, RE, MI, FA, SOL, in Latin nota-
tion and A, H, C, D, E, F, G, in German notation.
HOW TO PLAY THE SONG IN EASY MODE
MELODY
Numbers 1 to 15 indicate the keys to play a melody with
the easy musical scores at the end of this manual.
Each note corresponds to a number on the grey strip.
To play the melody, read the sequence of numbers con-
tained in the grey band and press, one after the other,
the white keys which correspond to the same numbers
on the strip above the keyboard. The black keys corre-
spond to the numbers for example on the music method
grey band followed by the “+”. The black key after white
key 1 corresponds to the symbol 1+.
Now that you know which key corresponds to which
note, try and play the tune following the numbers on
the grey strip.
CHORDS
The letters on the left indicate the name of the notes in
order to compose a chord in EASY CHORD (from C1 to
F#2) and CLASSIC CHORD mode (from C1 to F#2) (refer
to the relative section).
To use accompaniment, press each chord with EASY
CHORD or CLASSIC CHORD mode for the time indicated
by the line next to the letter that represents the chord,
until you come to the next one.
traditional
writing
simplified
writing
Accompaniment
with left hand
Line showing how long the chord lasts
Numbers that indicate the notes
to be played with the right hand
MARY HAD A LITTLE LAMB
SOUND
19 HARMONICA RHYTHM 12 8-BEAT ROCK
TEMPO
08
SONG
59
Mar _ y had a lit _ tle lamb
9 98
10 1010 10
E E E
D D
C
C
E
EASY CHORD
CG
CLASSIC CHORD
CG
Name of
chord
ONE BEAT
HALF
A BEAT
HALF
A BEAT
andfourandthreetwo andandone - - - -
traditional
writing
simplified
writing
Accompaniment
with left hand
Line showing how long the chord lasts
Numbers that indicate the notes
to be played with the right hand
MARY HAD A LITTLE LAMB
SOUND
19 HARMONICA RHYTHM 12 8-BEAT ROCK
TEMPO
08
SONG
59
Mar _ y had a lit _ tle lamb
9 98
10 1010 10
E E E
D D
C
C
E
EASY CHORD
CG
CLASSIC CHORD
CG
Name of
chord

16
Ce clavier électronique peut fonctionner avec
alimentation par réseau ou par piles.
ALIMENTATION SUR SECTEUR
L’instrument peut être alimenté avec l’adaptateur de
réseau fourni. Cet appareil est conforme aux normes
nationales et internationales concernant la sécurité
électrique. Vdc = 9V; I = 500 mA (termi-
nal positif central).
RECOMMANDATION: La prise électrique (1) pour brancher la
fiche de l’adaptateur doit être facilement accessible •
L’introduction de la broche dans la prise située derrière
déconnecte automatiquement les piles • Garantir l’aération
suffisante de l’adaptateur • Ne pas exposer l’adaptateur aux
gouttes ou aux jets d’eau • Éviter d’exposer l’adaptateur AC/DC à
tout écoulement ou éclaboussure et ne poser aucun objet rempli
de liquide, comme un vase, sur l’appareil • L’adaptateur AC/DC
sert de sectionneur • S’assurer que l’adaptateur AC/DC de
l’appareil ne soit pas obstrué et qu’il soit facile d’accès pendant
l’utilisation • Pour sectionner complètement l’alimentation
électrique, débrancher l’adaptateur AC/DC de l’appareil du
secteur • Ne pas exposer la batterie à une chaleur excessive telle
que celle de la lumière du soleil, du feu, et éléments similaires •
Laisser un espace libre de 15 cm autour de l’appareil pour
permettre une ventilation correcte • Ne pas empêcher la
ventilation en couvrant les orifices de ventilation avec des objets
tels que des journaux, des nappes, des rideaux, etc. • S’assurer de
respecter l’environnement lors de l’élimination des batteries •
L’appareil est destiné à être utilisé uniquement dans des climats
tempérés.
ATTENTION: Tout accumulateur ou adaptateur/ transformateur
utilisé, pourvu d’un isolant de sûreté, doit être régulièrement
contrôlé pour éviter les risques dûs aux dommages concernant le
câble, le fil, la fiche, le dispositif d’isolation ou d’autres parties;
l’appareil ne pourra être utilisé, qu’ après la réparation du
dommage.
REMARQUE : La plaque signalétique est située sur le fond du
boîtier de l’appareil.
ALIMENTATION PAR PILES
Ouvrir l’emplacement porte-piles avec un tournevis.
Insérer 6 piles de 1,5 V type R6/AA (non fournies), en
faisant attention à la polarité correcte (+/–). Remettre le
couvercle à son emplacement. Substituer les piles quand
la qualité du son devient mauvaise. Utiliser des piles
alcalines pour obtenir une longue durée
.
CONSEILS POUR L’UTILISATION DES PILES
• Enlever les piles déchargées de l’emplacement porte-piles.
• NE PAS recharger des piles qui ne sont pas “rechargeables”.
• Pour recharger les piles, les enlever de leur emplacement. •
Recharger les piles avec la supervision d’un adulte. • Insérer
les piles avec la polarité correcte. • Ne pas utiliser des types
de piles différents ou des piles neuves et piles déchargées
en même temps. • Utiliser seulement des piles du type
recommandé ou équivalentes. • Ne pas court-circuiter les
terminaux d’alimentation. • Enlever les piles quand l’instru-
ment n’est pas utilisé pendant une longue période.
REGLES POUR ECOULEMENT DES ORDURES
Pour l’écoulement des matériaux indiqués ci-dessous, se
renseigner auprès des Administrations Communales au
sujet des centres d’écoulement spécialisés.
1 - ÉCOULEMENT DES PILES: Pour aider la
protection de l’environnement ne pas jeter
les piles déchargées parmi les ordures nor-
males, mais dans des conteneurs spéciaux
situés dans les centres de ramassage.
2 - ECOULEMENT DES EMBALLAGES:
Remettre les emballages en papier, carton et carton ondulé
dans les centres d’écoulement spécifiques. Les parties en pla-
stique de l’emballage doivent être placées dans les conteneurs
pour la récolte prévus à cet effet.
Les symboles qui repèrent les différents types de plastique
sont:
Légende relative au type de matériau plastique:
• PET= Polyéthylène téréphtalate • PE= Polyéthylène, le code
02 pour PE-HD, 04 pour PE-LD • PVC= Chlorure de Polyvinyle
• PP= Polypropylène • PS= Polystyrène, Polystyrène expansé
• O= Autres polymères (ABS, Couplés, etc.)
3. DISPOSITION POUR APPAREILS ÉLECTRIQUES:
Le symbole de la poubelle à roues avec une croix
indique que le produit ne doit pas être déposé dans
les ordures ménagères à la fin de son cycle. Il doit
être mis dans un point de collecte ou de recyclage
approprié. A défaut, vérifier avec votre revendeur et
retourner le produit lors de l’achat du produit de remplace-
ment ou, si la dimension est inferieur à 25 cm, on peut le
retourner gratuitement. La disposition appropriée promeut le
recyclage des parties et des matériels, aussi bien quel ‘aide
pour protéger l’environnement et la santé humaine.
Conformément à la législation actuelle, des pénalités strictes
sont faites contre ceux disposant des produits illégalement.
Pour plus d’informations sur la collecte de déchets spéciaux,
contacter la Collectivité locale.
MISE EN MARCHE ET ARRET
L’instrument s’allume en appuyant l’interrupteur sur
ON/OFF ①. A la mise en marche le clavier est prédisposé
pour fonctionner avec le son Acoustic Gran Piano, le
rythme Fusion 1 et la chanson Auspicious Day.
DEMO - Morceau de démonstration
L’instrument comprend 60 morceaux préenregistrés.
Enfoncer la touche DEMO ONE pour reproduire un
morceau en séquence; l’écran affiche le numéro du
morceau (ex: d 01). Enfoncer la touche START/STOP ⑳
pour arrêter le morceau. Si on enfonce une nouvelle fois
la touche DEMO ONE, le morceau suivant est reproduit.
1
R6/AA 1.5V
R6/AA 1.5V R6/AA 1.5V
R6/AA 1.5V
R6/AA 1.5V
R6/AA 1.5V R6/AA 1.5V
R6/AA 1.5V
R6/AA 1.5V
R6/AA 1.5V R6/AA 1.5V
R6/AA 1.5V
01
PET
02
PE
03
PVC
05
PP
06
PS
07
O
F R A N Ç A I S

17
Avec la touche DEMO ALL, les 60 morceaux sont
reproduits en séquence. Enfoncer de nouveau DEMO
ALL pour arrêter le morceau.
Lorsque le morceau est en cours d’exécution, enfoncer
les touches +/– ⑰pour sélectionner le morceau suivant
ou précédent ou bien taper un chiffre de 0à 59 pour en
choisir un dans la liste présente à la fin de ce manuel;
LE VOLUME
Pour régler le volume général de l’instrument, appuyer
sur les boutons VOLUME + (pour augmenter) ou
VOLUME – (pour diminuer) ㉕. En maintenant le bouton
appuyé, la variation devient continue. Pour retourner au
volume standard, appuyer sur les deux boutons
ensemble VOLUME + et VOLUME – .
LES SONS
Pour sélectionner un des 200 sons mémorisés dans l’in-
strument, enfoncer la touche SOUNDS ⑱et taper un
chiffre de 0à 199 pour en choisir un de la liste qui se
trouve sur le tableau « LISTE DES SONS » à la fin de ce
manuel; l’écran affiche le numéro du son saisi (ex : 001).
Pour sélectionner le son suivant ou précédent, agir sur
les touches +/– du clavier numérique.
Sustain
Prolonge le son d’une note quand la touche est relâchée.
Pour activer ou désactiver cette fonction, enfoncer la
touche
SUSTAIN
⑭.
Vibrato
L’effet de vibrato est une modulation du son.
Pour activer ou désactiver cette fonction, enfoncer la
touche
VIBRATO
⑮.
LE TRANSPOSER
Les commandes +/– de TRANSPOSER ㉔ permettent
de déplacer la tonalité de tout le clavier de +/– 6 semi
tons. En appuyant sur une des deux touches l’afficheur
visualise de façon temporaire la valeur courante.
En appuyant en même temps sur les touches +/– de
TRANSPOSER, on retourne à la valeur normale de 0.
LA DIVISION DU CLAVIER (SPLIT)
Il est composé de 61 touches et peut être utilisé des
façon suivantes:
1. A la mise en marche, sur tout le clavier un seul et
unique son est actif.
2. Avec la touche SPLIT ㉒, le clavier se partage en deux
sections: une réservée à l’accompagnement pour
composer les accords (24 touches de gauche) et
l’autre pour jouer le mélodie (37 touches de droite). Il
est possible de sélectionner un son différent dans les
37 touches à droite en appuyant sur le bouton
SOUNDS ⑱et en tapant un nombre de 0à 199.
SÉLECTION DES RYTHMES
Dans le clavier, 200 rythmes sont mémorisés.
On les sélectionne en enfonçant le bouton RHYTHMS
⑲et ensuite un chiffre de 0à 199 pour en choisir un de
la liste qui se trouve sur le tableau « LISTE DES RHYTHMS
» à la fin de ce manuel; l’écran affiche le numéro du ryth-
me saisi (ex: 001). Pour mettre en marche le rythme ou
pour l’arrêter, appuyer sur le bouton START/STOP ⑳.
Pour augmenter ou diminuer la vitesse d’exécution, uti-
liser les boutons TEMPO + ou TEMPO – ⑫.
En maintenant le bouton appuyé, la variation devient
continue. Pour retourner à la vitesse standard du ryth-
me, appuyer sur les deux boutons ensemble TEMPO +
ou TEMPO – . Les touches + / – de TEMPO, servent aussi
pour régler la vitesse d’une démo.
FILL-IN
Si on enfonce ce bouton ⑧lorsque le rythme est activé,
une variation rythmique de la batterie est reproduite.
24 37
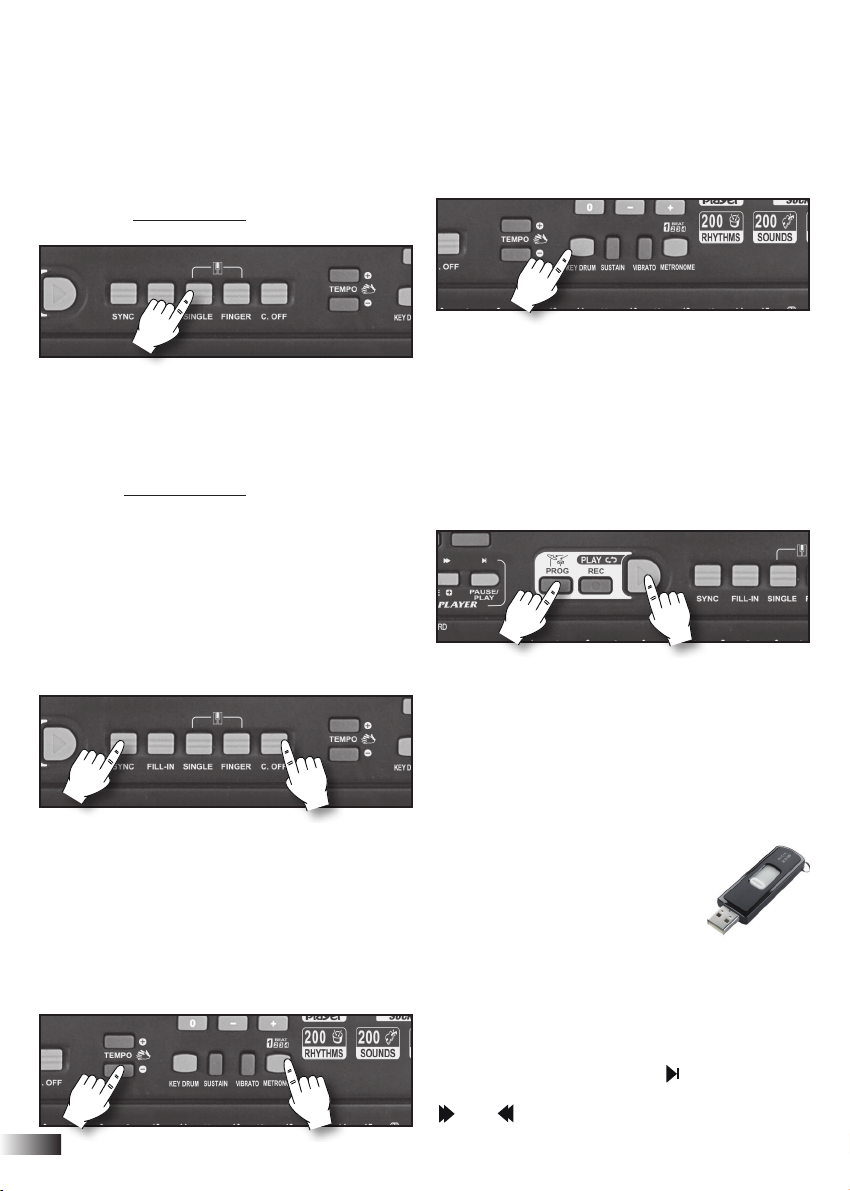
18
ACCORDS FACILITÉS
Les accords facilités pour l'accompagnement peuvent
être joués de 2 manières différentes:
SINGLE (EASY CHORD)
Avec un rythme en cours d’exécution, en appuyant sur
le bouton SINGLE ⑨le clavier est automatiquement
divisé en deux sections et il est possible de composer les
accords dans la partie gauche AUTO BASS CHORD (de
DO1 à FA#2) en mode facilité avec un, deux ou trois
doigts (voir tableau des accords à la fin de ce manuel).
FINGER (CLASSIC CHORD)
Avec un rythme en cours d’exécution, en appuyant sur le
bouton FINGER ⑩le clavier est automatiquement divisé
en deux sections et il est possible de composer les
accords, dans la partie gauche AUTO BASS CHORD (de
DO1 à FA#2) en mode classique (voir tableau des accords
à la fin de ce manuel). Tous les accords principaux formés
par au moins 3 notes sont reconnus; si seulement 2
notes sont enfoncées, l'accord ne sera pas joué.
ACCOMPAGNEMENT AUTOMATIQUE
Avec un rythme stationnaire, en mode SINGLE ou
FINGER, en appuyant sur le bouton SYNC ⑦,
l'accompagnement automatique s’exécute après avoir
composé l'accord dans la partie gauche (de DO1 à
FA#2).
Appuyer sur le bouton C. OFF ⑪pour exclure
l'arrangement et quitter les modes SINGLE ou FINGER.
LE METRONOME
Le métronome aide pendant l’apprentissage de la
musique, en battant la mesure pendant l’exécution des
exercices musicaux et simule l’instrument classique qui
bat l’écoulement du temps. On le met en marche et on
l’éteint en appuyant sur la touche METRONOME ⑯.
Les divisions disponibles sont : 1/4, 2/4, 3/4, 4/4; Pour
changer la vitesse, utiliser les touches TEMPO +/– ⑫.
PERCUSSIONS
Si on enfonce le bouton KEY DRUM ⑬, sur les touches
blanches et noires, on active 12 instruments rythmiques
de percussion répétés pendant toutes les 5 octaves du
clavier.
PROGRAMMATION D’UNE SÉQUENCE
RYTHMIQUE
Appuyer sur le bouton PROG ④et composer une
séquence rythmique à travers les touches blanches et
noires du clavier ; pour réécouter l’enregistrement,
appuyer sur PLAY ⑥pour réécouter la programmation
et régler la vitesse du rythme à l’aide des touches
TEMPO + / – ⑫.
FONCTION D’ENREGISTREMENT ET
D’ECOUTE
Cette fonction permet d’enregistrer et réécouter
l’exécution d’un morceau joué sur le clavier. Pour
enregistrer, presser la touche REC ⑤avant de
commencer l’exécution du morceau. Pour réécouter le
morceau enregistré, presser PLAY ⑥.
MP3 Player
Ce clavier permet de lire les morceaux
MP3 présents dans une clé USB Flash
drive (Pen Drive), lorsque celle-ci est
connectée au port USB situé à l’arrière
de l’instrument ㉛. Après avoir connecté le dispositif, le
premier morceau sera reproduit automatiquement à
travers les haut-parleurs du clavier. Pour régler le volu-
me, maintenir enfoncés les boutons MP3 PLAYER
VOLUME + ou – ②; pour mettre le morceau en pause,
enfoncer le bouton PAUSE/PLAY ②; pour passer au
morceau suivant ou précédent, appuyer sur les boutons
ou ②.
①②③④⑤⑥⑦⑧⑨⑩⑪⑫⑬⑭⑮⑯⑰⑱⑲⑳㉑㉒㉓㉔㉕㉖㉗
㉘㉙㉚㉛㉜㉝㉞㉟㊱㊲㊳㊴㊵㊶㊷㊸㊹㊺㊻㊼㊽㊾㊿

19
Certaines chansons écrites selon la méthode Bontempi se trouvent à la fin de ce manuel ; 60 autres chansons,
rassemblées dans le livre « SONG BOOK », peuvent être téléchargées sur le site www.bontempi.com
COMPOSITION DU MORCEAU MUSICAL
Chaque morceau est reporté sur une page. Sous le titre se trouvent les informations concernant:
SOUND: le son à utiliser pour jouer la mélodie RHYTHM: le rythme de batterie de la chanson
TEMPO: la vitesse de la chanson SONG: Le numéro de la chanson mémorisée sur le clavier
NIVEAUX D’APPRENTISSAGE
Il y a 2 niveaux d’apprentissage: FOLLOW et ENSEMBLE.
FOLLOW
Enfoncez la touche FOLLOW dans la section LESSON
㉓. Choisissez une des 60 chansons de la liste « LISTE
DES CHANSONS » à la fin de ce manuel en tapant un
chiffre de 0à 59 sur le clavier numérique ⑰.
Essayez maintenant de jouer la mélodie en suivant les
notes indiquées sur l’écran, tout en suivant le rythme.
Attention, si vous vous trompez de note la touche
n’émettra aucun son et l’accompagnement ne con-
tinuera que si vous appuyez sur la bonne note.
Comment lire les notes sur l’écran
Les notes ont un nom: A, B, C, D, E, F, G dans la notation
anglosaxone qui correspondent à LA, SI, DO, RE, MI, FA,
SOL dans la notation latine et A, H, C, D, E, F, G, dans la
notation allemande. Cette correspondance est indi-
quée sur le schéma à côté.
Ce clavier affi-
che les notes
anglo saxon-
nes.
Le clavier est formé de 3 digit et chaque digit peut affi-
cher une lettre ou un numéro. Par exemple si vous
choisissez la demosong n. 41 l’écran affiche : .
Dans le premier digit il y a la lettre «d» (qui signifie
demosong), dans le deuxième le n. 4 et dans le troisième
le n. 1.
Quand l’écran montre une note musicale, son nom s’af-
fiche dans le deuxième digit par ex. qui, dans
la notation anglo saxonne est la note C et dans la nota-
tion latine est la note DO. En même temps, dans le troi-
sième digit, c’est le numéro de la position de la note qui
s’affiche, par ex. ; cela veut dire que la note est
C (DO) dans la position n. 5 (voir figure).
Parfois, dans le premier digit, la lettre « b « (bémol) peut
s’afficher pour indiquer que la note correspond à la tou-
che noire tout de suite à gauche de cette note. Ex. :
c’est à dire b, d, 5 où « b » veut dire bémol, «d»
est la note D (RE) et « 5 » la position de la note ; donc la
note à jouer est la suivante :
DO RE
RE
MI FA SOL LA SI DO
ENSEMBLE
Enfoncez la touche ENSEMBLE dans la section LESSON
㉓. Choisissez une des 60 chansons de la liste « LISTE
DES CHANSONS » à la fin de ce manuel en tapant un
chiffre de 0 à 59 sur le clavier numérique ⑰.
Enfoncez de nouveau la touche ENSEMBLE pour arrêter
la chanson. Lorsque vous êtes prêt enfoncez de nouve-
au la touche ENSEMBLE et commencez à jouer. Si vous
vous trompez de note la chanson sera jouée avec des
fausses notes. Si vous ne gardez pas le bon rythme l’or-
chestre ne vous attendra pas et jouera à contretemps ;
régler la vitesse de la chanson avec les touches TEMPO
+ ou TEMPO – ⑫. Appuyez de nouveau sur la touche
ENSEMBLE pour sortir du mode.
anglo-saxonne
latine
allemande
écriture
classique
écriture
facilité
Accompagnement
avec la main gauche
Ligne qui indique la durée de l’accord
Numéros qui indiquent les notes
à jouer avec la main droite
MARY HAD A LITTLE LAMB
SOUND
19 HARMONICA RHYTHM 12 8-BEAT ROCK
TEMPO
08
SONG
59
Mar _ y had a lit _ tle lamb
9 98
10 1010 10
E E E
D D
C
C
E
EASY CHORD
CG
CLASSIC CHORD
CG
Nom de
l’accord
CHANSONS

20
Avec ces renseignements, il est possible de configurer
le clavier pour jouer la chanson le mieux possible. Dans
ce manuel on peut trouver la description de la fonction
de sélection du son, du rythme et du réglage du temps.
En outre, dans le morceau, est indiqué:
EASY CHORD: les accords dans le mode simplifié, pour
l’accompagnement de la chanson
CLASSIC CHORD: les accords dans le mode classique,
pour l’accompagnement de la chanson
Le morceau de musique est caractérisé par une bande
continue de couleur grise dans laquelle sont indiqués
les chiffres pour jouer la mélodie avec la main droite.
Chaque touche est enfoncée pendant un laps de temps
plus ou moins long, selon la distance qui sépare chaque
chiffre de la bande grise du chiffre suivant.
Plus particulièrement, au-dessus des chiffres, mais
toujours à l’intérieur de la bande grise, vous noterez une
séquence de traits alternés noirs et gris. La distance
entre un trait noir et l’autre représente l’unité de temps
musical, appelée « battue », correspondant au déplace-
ment de l’aiguille du métronome d’une extrémité à
l’autre. Chaque trait noir ou gris représente une demie «
battue ».
En-dessous de cette bande, sont reportées les indica-
tions (c’est-à-dire des cases contenant des lettres) pour
l’utilisation de la main gauche jouant les accords de
l’accompagnement.
En-dessous de la bande grise, sont reportées toutes les
notations musicales du morceau à l’aide de l’écriture
classique.
Pour le moment il suffit de se rappeler que les notes ont
un nom: A, B, C, D, E, F, G dans la notation anglosaxone
qui correspondent à LA, SI, DO, RE, MI, FA, SOL dans la
notation latine et A, H, C, D, E, F, G, dans la notation
allemande.
EXÉCUTION D’UN MORCEAU DANS LE
MODE SIMPLIFIÉ
LA MELODIE
Les chiffres de 1 à 15 indiquent les touches à utiliser
pour jouer la mélodie avec des partitions musicales
simplifiées, présentes à la fin de ce manuel. Sur la bande
grise de la méthode, à chaque note correspond un
numéro. Pour exécuter la mélodie, lisez la succession
numérique contenue dans la bande grise de la méthode
et appuyez, l’une après l’autre, sur les touches blanches
correspondant aux mêmes numéros reportés sur la pla-
quette au-dessus du clavier. Les touches noires corre-
spondent aux numéros de la bande grise de la méthode
suivis du signe “+”. Par exemple, au symbole 1+ corre-
spond la touche noire suivant la touche blanche 1.
Maintenant que l’on sait quelle touche est associée à
chaque note, essayer de jouer la mélodie en suivant les
numéros sur la bande grise.
LES ACCORDS
Les lettres à gauche indiquent le nom des notes pour
composer un accord dans le mode EASY CHORD (de
DO1 à FA#2) et CLASSIC CHORD (de DO1 à FA#2) (con-
sulter le paragraphe correspondant).
Pour jouer l’accompagnement, enfoncez chaque accord,
dans le mode EASY CHORD ou dans le mode CLASSIC
CHORD, pendant le temps indiqué par la ligne en face
de la lettre représentant l’accord, jusqu’à ce que vous
rencontriez le suivant.
écriture
classique
écriture
facilité
Accompagnement
avec la main gauche
Ligne qui indique la durée de l’accord
Numéros qui indiquent les notes
à jouer avec la main droite
MARY HAD A LITTLE LAMB
SOUND
19 HARMONICA RHYTHM 12 8-BEAT ROCK
TEMPO
08
SONG
59
Mar _ y had a lit _ tle lamb
9 98
10 1010 10
E E E
D D
C
C
E
EASY CHORD
CG
CLASSIC CHORD
CG
Nom de
l’accord
scrittura
classica
scrittura
semplificata
Accompagnamento
con la mano sinistra
Linea che indica la durata dell’accordo
Numeri che indicano le note
da suonare con la mano destra
MARY HAD A LITTLE LAMB
SOUND
19 HARMONICA RHYTHM 12 8-BEAT ROCK
TEMPO
08
SONG
59
Mar _ y had a lit _ tle lamb
9 98
10 1010 10
E E E
D D
C
C
E
EASY CHORD
CG
CLASSIC CHORD
CG
Accordi
scrittura
classica
scrittura
semplificata
Accompagnamento
con la mano sinistra
Linea che indica la durata dell’accordo
Numeri che indicano le note
da suonare con la mano destra
MARY HAD A LITTLE LAMB
SOUND
19 HARMONICA RHYTHM 12 8-BEAT ROCK
TEMPO
08
SONG
59
Mar _ y had a lit _ tle lamb
9 98
10 1010 10
E E E
D D
C
C
E
EASY CHORD
CG
CLASSIC CHORD
CG
Accordi
écriture
classique
écriture
facilité
Accompagnement
avec la main gauche
Ligne qui indique la durée de l’accord
Numéros qui indiquent les notes
à jouer avec la main droite
MARY HAD A LITTLE LAMB
SOUND
19 HARMONICA RHYTHM 12 8-BEAT ROCK
TEMPO
08
SONG
59
Mar _ y had a lit _ tle lamb
9 98
10 1010 10
E E E
D D
C
C
E
EASY CHORD
CG
CLASSIC CHORD
CG
Nom de
l’accord
écriture
classique
écriture
facilité
Accompagnement
avec la main gauche
Ligne qui indique la durée de l’accord
Numéros qui indiquent les notes
à jouer avec la main droite
MARY HAD A LITTLE LAMB
SOUND
19 HARMONICA RHYTHM 12 8-BEAT ROCK
TEMPO
08
SONG
59
Mar _ y had a lit _ tle lamb
9 98
10 1010 10
E E E
D D
C
C
E
EASY CHORD
CG
CLASSIC CHORD
CG
Nom de
l’accord
This manual suits for next models
1
Table of contents
Languages:
Other Bontempi Keyboard manuals


