Setup of the IR Blaster (optional)
If you have chosen a cable TV or satellite TV box with IR-
Blaster support as a TV source, you will now be taken
through the IR-Learning Wizard to set up the IR-Blaster.
The IR-Blaster automatically changes the channels on your
set top box.
Note: Make sure you have plugged the IR Blaster cable
and have positioned the IR Blaster over the receiver
on your set top box (see Step 3 - Connect the IR-Blaster
cable).
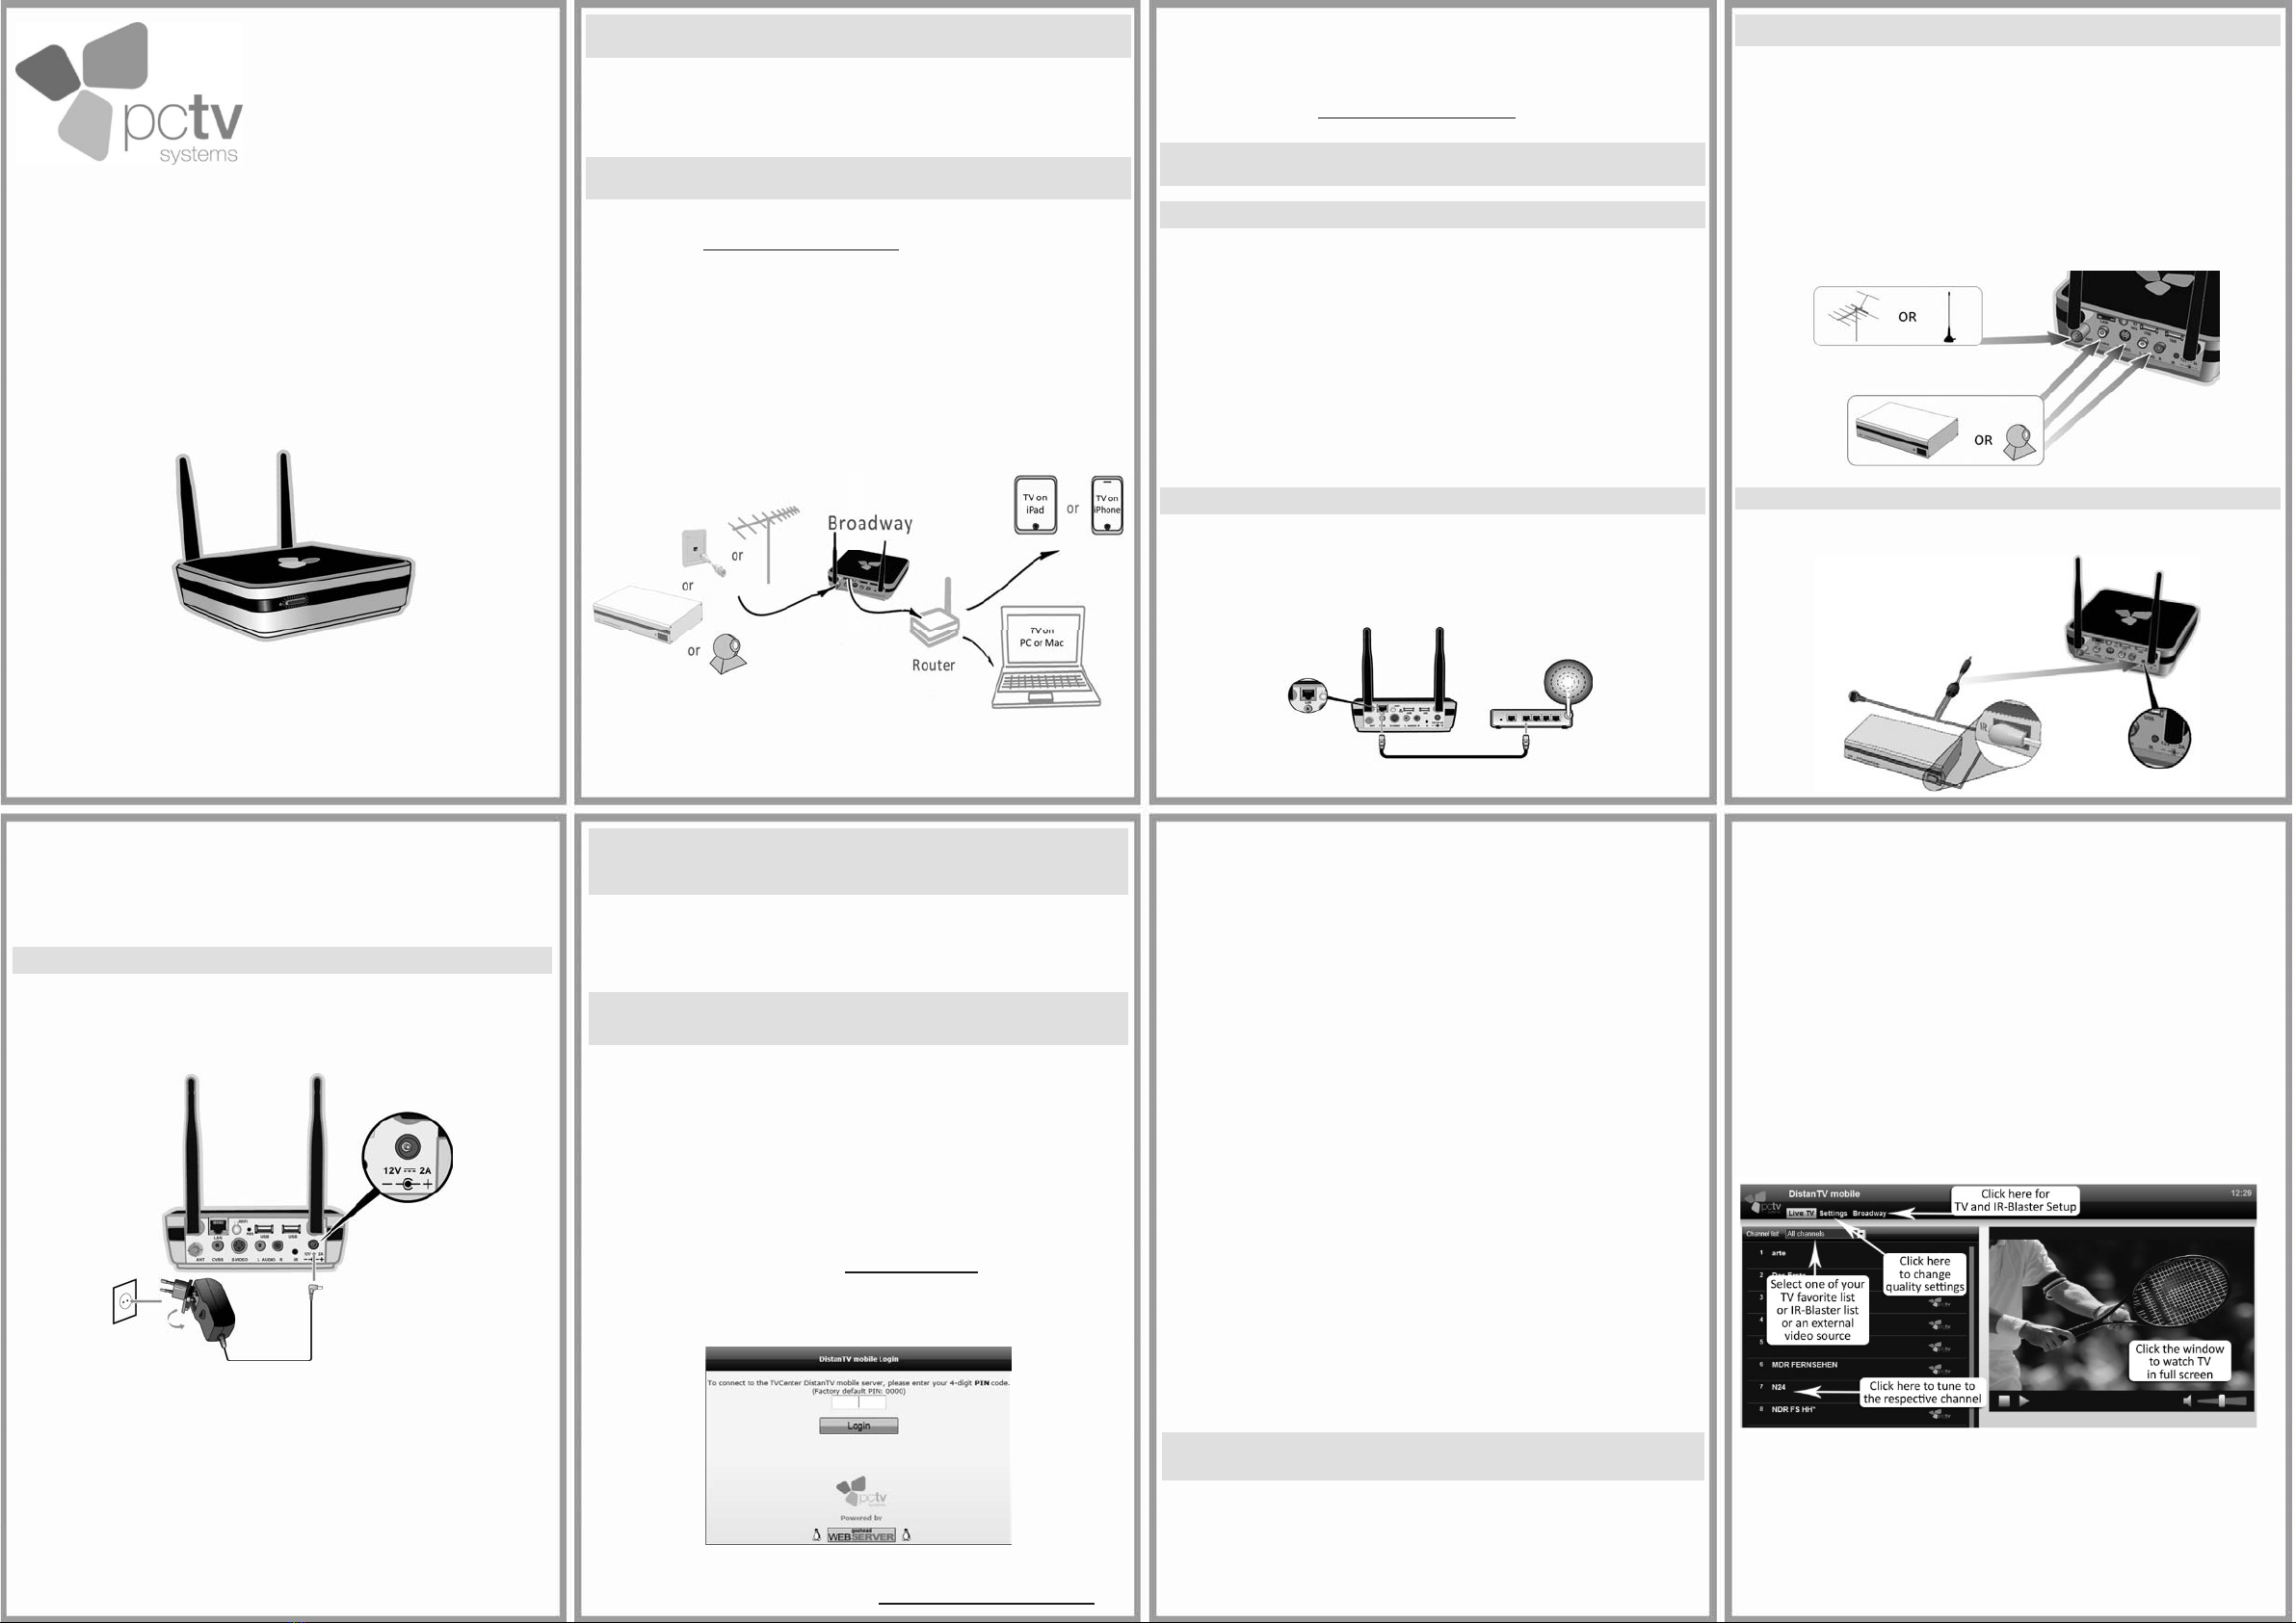
•The IR-Blaster Learning Wizard starts automatically.
•Choose your Location and if applicable your Service
Provider.
If the service provider is not listed select Unknown
service provider or uncheck Use Service provider list.
•Pick a Vendor and Model from our list of built-in vendors
and set top box models.
If your vendor/model is not listed, just type it in the
corresponding field and make sure to add it to the list
when asked.
•Confirm your choice by clicking the Enter button.
•Click Next to select the properties of your set top box.
•You will be taken to the IR Blaster Learn/Verify page now.
Learning IR-codes of a New Set Top Box
Note: If your set top box model is listed, the IR-codes
will be downloaded onto your Broadway 2T and you
can skip the learning process.
If you did not find your cable or satellite box model listed, you
will need to go through a “learning” process, so Broadway 2T
can learn your remote control. You need to “learn” the
numbers 0 to 9, plus Enter (if pushing an Enter button on your
remote control is required to change a channel).
Note: the IR learning process might need to be done
several times in order for Broadway 2T to learn each
number correctly. If needed you can re-learn one number
at a time.
•Hold the remote control of your set top box close to the IR
Learn/Receive sensor.
•In the Learn section, click the number you want to learn.
•Wait for the countdown to hit 0.
•On every dialog flash push the selected number on the
remote control of your set top box.
•Repeat this procedure for the numbers 0 to 9.
Test your IR-Blaster
If you have chosen a known set top box or you have already
gone through the learning process of a new set top box, you
need to test the IR-Blaster now.
Test a single number
•In the Verify section click the number you want to test.
•Verify the channel on your set top box has changed and is
correct.
•If the IR-code is correct confirm by clicking the Yes button
in the pop up dialog.
•Repeat the procedure until you tested all numbers.
Test a sequence of numbers
•In the Verify section click the Switch test mode button.
•From the numeric button row select the numbers of the
sequence you want to test.
•The sequence is displayed in the field below.
•Click the Send button
•Verify the channel on your set top box has changed and is
correct.
•Click Clear if you want to test another sequence.
•Click Next once you have verified all the numbers and
have re-learned the numbers, which did not work.
•If this is a new set top box, you may add the IR-codes of
this box to our database by clicking the Share button.
•Click Quit to open the IR-Channel Manager and create a
channel list for your IR-Blaster.
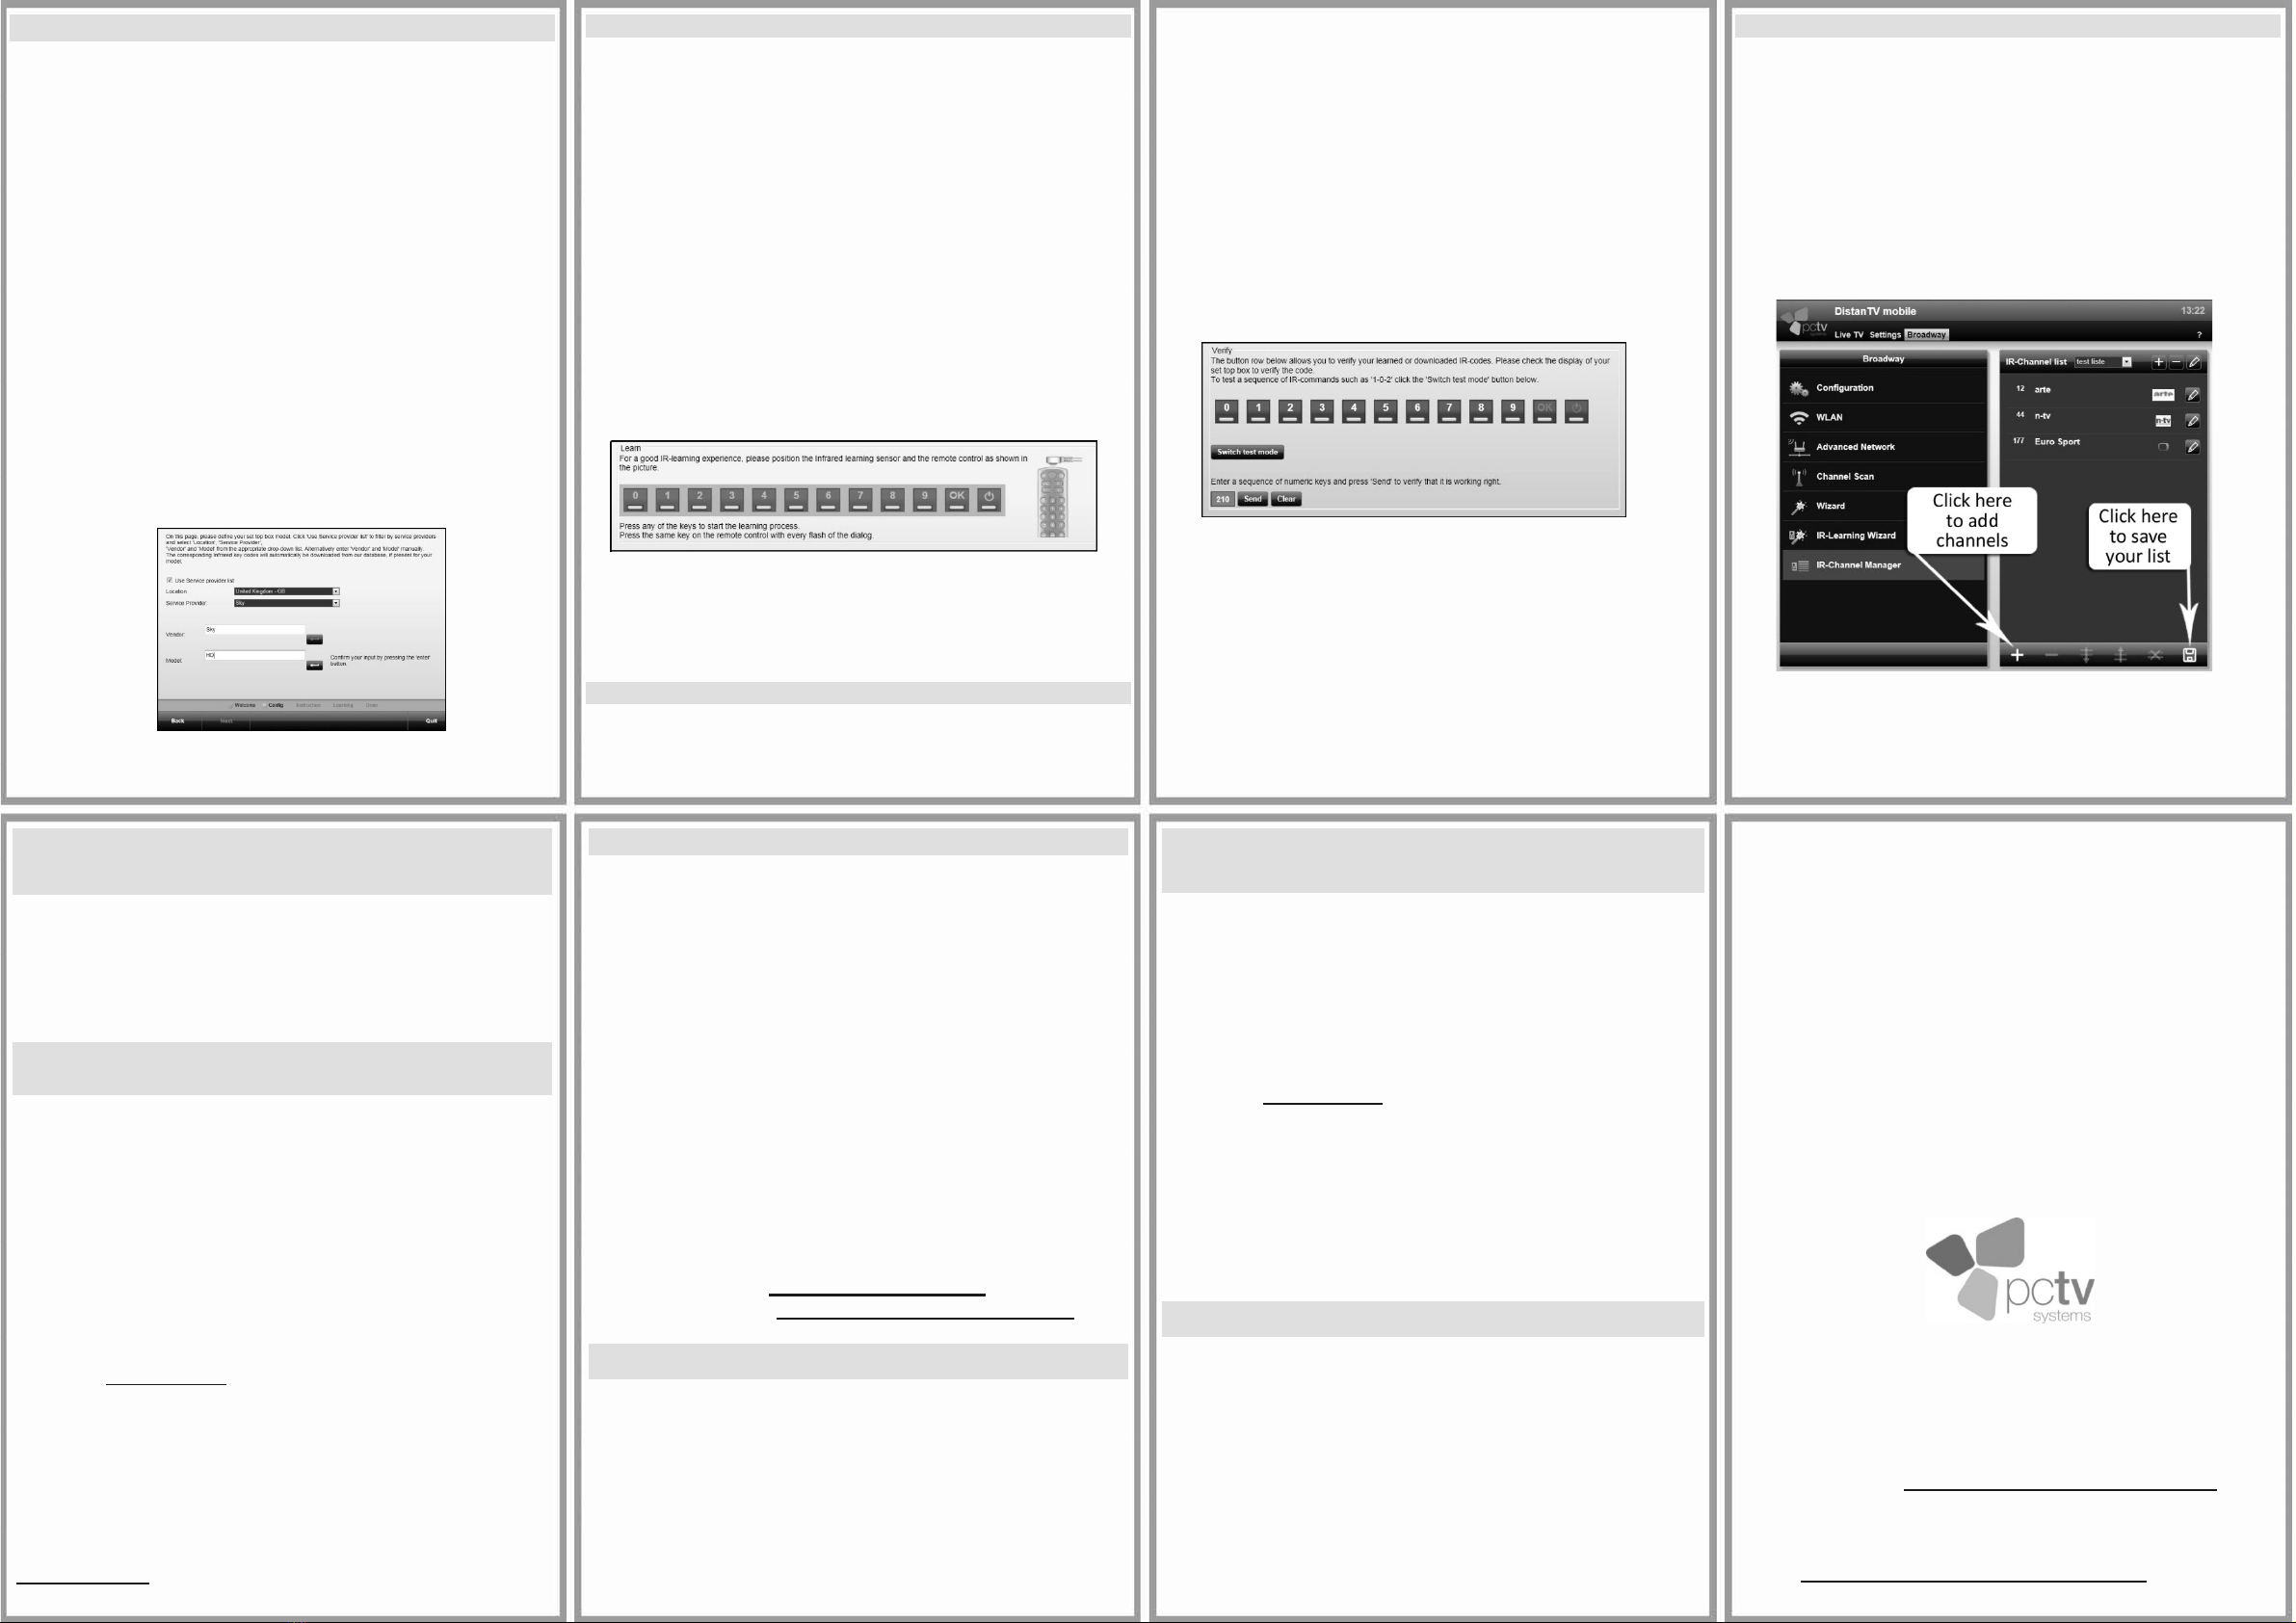
Create a Channel List for your IR-Blaster
Once you have “learned” your cable or satellite remote control
correctly, you may create a list of TV channels which can be
controlled by Broadway 2T's IR Blaster.
•The IR-Channel Manager opens automatically.
•In the pop up dialog enter the name of the channel list.
•Click the “+” at the lower control bar to add a channel.
•Enter the Channel number.
•Enter the Channel name.
•Click Save when you finished adding channels.
•Click the Live TV tab to watch TV.
Note: You can open the IR-Blaster Learnin
Wizard and
the IR-Channel Manager any time by clicking the
Broadway tab in the DistanTV mobile window.
Broadway 2T Setup for Live TV over the
Internet (optional)
Now that you have successfully installed Broadway 2T for
live TV over your home network, you may want to set it up to
watch live TV over the Internet.
Complete the following two steps and then you can access
Broadway 2T over the Internet and enjoy live TV anywhere.
Step 1: Register Broadway 2T and your
Mobile Client Device with DistanTV Server
Your client device needs to know the "phone number" of
Broadway 2T in your home. Technically speaking, this is the
IP address of your home Internet connection.
Our free Broadway "look up" web service, which is part of
Distan.TV, stores the IP address of your home Internet
connection on your client device. This way it is easier for
your client device to find your Broadway 2T when accessing
it over the Internet.
Note: To re
ister
our client device, first make sure it is
connected to your home network.
•Open the web browser on your client device.
•Go to http://distan.tv.
•In the Broadway login screen enter your password.
•Log in and your client device will be automatically
registered to be used with Broadway 2T.
•Repeat the procedure to register as many client devices
as you like.
Note: to use the Broadway "look up" service from your
registered client device, you need to access
http://distan.tv using the same web browser you used for
the registration of your client device.
Step 2: Map a Port on your Router
The second requirement for Broadway TV streaming, is the
so-called router "port forwarding" or "port mapping".
"Port mapping" requires you to configure your home Internet
router and assign the IP address of your Broadway 2T to
port 80 (port 80 is the default port used by Broadway 2T).
If you want to change the default port, refer to the manual.
•To find the IP address of your Broadway 2T, click the “?”
in the upper right hand corner within DistanTV mobile and
write down the IP address.
•Open the Settings pages of your router and assign to
port 80 the IP address of your Broadway 2T.
Unfortunately, the setup of port forwarding/port mapping
differs across the Internet router brands and models. You will
need to refer to your router’s manual or the manufacturer’s
website for detailed information on port mapping.
Note: You can find examples on how to configure port
mapping on common router models in our online
knowledge base at http://distan.tv/manualsor send your
Access Broadway 2T via Internet
N
ote: Make sure port 80 of your router is mapped, your
client device is registered to be used with
Broadway 2T and is connected to the Internet.
•Open the web browser on your client device.
•In the URL address field type in either:
distan.tv
the external IP-address of your network.
the dynamic DNS hostname of your network.
•Lo
in and en
o
live TV on
our client device.
Important Note
for Users without Internet Flat Rate
Broadway 2T stays connected to our DistanTV server via
the Internet to make sure that you can easily reach your
Broadway 2T - from your local network or the Internet.
If your Internet service provider is charging you by the minute
for Internet service, you should disable Broadway's Internet
access to avoid excessive connection charges.
To do so follow these steps:
•Open the internet browser of your client device.
•Go to http://distan.tv.
•Click on the Broadway tab.
•Select Advanced Network.
•Set the checkmark next to Use static IP address in the
LAN or WLAN section, depending on how Broadway 2T
is connected to your router.
•Make sure that the respective field next to Gateway
shows the value 0.0.0.0.
Broadway 2T Defaults
Login Data: Administrator Password: admin
TV viewing PIN: 0000
Communication port: 80 (TCP and UDP)
Access URLs: distan.tv (internet connection required)
Hostname (not supported by every router)
the default hostname is: broadway.box
IP Address of your Broadway 2T
DHCP environment: check your router
Static IP address: 10.20.30.50
TFTP-Server IP address: 10.20.30.40
Congratulations!
You have just completed the Quick Start
Guide. Enjoy!
For further information regarding the installation and usage of
Broadway 2T, please refer to the user’s guide or visit our
online support at: http://www.pctvsystems.com/support.
CE/FCC Conformity: The declaration can be downloaded
from: http://www.pctvsystems.com/compliance.