PDi GO-GO PDI-GO24 User manual

ASSEMBLY INSTRUCTIONS
Document Number: PD196-410R2
mymedTV.com
GO-GO™ Gamer Cart System
Games-On-the-GO™ Portable Patient Gamer System
PDI-GO24, Gamer Cart with 24" Hospital TV Display
PDI-GO32, Gamer Cart with 32" Hospital TV Display

MODEL NUMBER:
GO-GO™Gamer Cart
Document Number:
PD196-410R2
Assembly Instructions
Page 2 of 9
PDi Communication Systems, Inc. ▪40 Greenwood Ln ▪Springboro, Ohio 45066 USA ▪www.pdiarm.com and www.mymedTV.com ▪Phone 800.628.9870
SAFETY INFORMATION
Overhead Falling Hazard
TV can pose a striking hazard when mounted at an
elevated position. Use only PDi mounting brackets,
support arms, and appropriate hardware to assure
TV will not fall from the mounted position. Failure
to do so may cause injury or death.
Rain and Moisture
WARNING: To avoid the hazards of fire or electrical
shock, DO NOT expose this apparatus to rain or
moisture.
Note to Cable TV Installer
This reminder is provided to call the cable TV systems
installer’s attention to Article 820-40 of the National Electrical
Code. The code provides guidelines for proper grounding and,
in particular, specifies that the cable ground shall be connected
to the grounding system of the building, as close to the point of
the cable entry as practical. Canadian installations shall be
properly grounded in accordance with the Canadian Electrical
Code, Part 1.
Cleaning and Disinfection
Clean the exterior of this television by removing dust with a lint-
free cloth. Spot test a new disinfectant by test cleaning a non-
obvious small spot on the TV’s back cabinet, keypad, and LCD
panel. PDi recommends using a premoistened disinfectant cloth,
like PD600-001 Super Sani-Cloth or similar, or spraying cleaner
onto a dry cloth and then wiping the unit. Specific
recommendations can be found at www.pdiarm.com. CAUTION:
To avoid damage to the surface of the television, do not use
abrasive or chemical cleaning agents.
Oxygen Environment
WARNING: Do not use in any oxygen tent or
oxygen chamber. Such use may cause a fire
hazard.
Wet Location
Do not use this apparatus near water. Apparatus
shall not be exposed to dripping or splashing and
no objects filled with liquids, such as vases, shall
be placed on the apparatus.
Trademarks
© 2020 PDi Communication Systems, Inc. All rights reserved.
PDi®, medTV®and medTAB®are registered trademarks of PDi
Communication Systems, Inc. Manufactured under license from
Dolby Laboratories. Dolby, Dolby Audio, and the double-D symbol
are trademarks of Dolby Laboratories. The terms HDMI, HDMI
High-Definition Multimedia Interface, and the HDMI Logo are
trademarks or registered trademarks of HDMI Licensing
Administrator, Inc. Product logos, brands and other trademarks
displayed within PDi’s products are the property of their
respective trademark holders, who are not affiliated with,
endorsing, or sponsoring PDi Communication Systems, Inc. or our
products.
Disclaimer
The author and publisher have used their best efforts in
preparing this manual. PDi Communication Systems, Inc.
makes no representation or warranties with respect to the
accuracy or completeness of the contents of this manual and
specifically disclaims any implied warranties or
merchantability or fitness for any particular purpose and shall
in no event be liable for any loss of profit or any other damages.
The information contained herein is believed accurate, but is
not warranted, and is subject to change without notice or
obligation.

MODEL NUMBER:
GO-GO™Gamer Cart
Document Number:
PD196-410R2
Assembly Instructions
Page 3 of 9
PDi Communication Systems, Inc. ▪40 Greenwood Ln ▪Springboro, Ohio 45066 USA ▪www.pdiarm.com and www.mymedTV.com ▪Phone 800.628.9870
SAFETY INSTRUCTIONS
THIS INSTALLATION SHOULD BE MADE BY A QUALIFIED SERVICE PERSON AND SHOULD
CONFORM
TO ALL LOCAL
CODES.
READ AND FOLLOW THE SAFETY INSTRUCTIONS BEFORE ATTEMPTING
THIS INSTALLATION
1. Read these Instructions –All the safety and operating
instructions should be read before the product is operated.
2. Keep these Instructions –The safety and operating
instructions should be retained for future reference.
3. Heed all warnings –All warnings on the product and in the
operating instructions should be adhered to.
4. Follow all instructions –All warnings on the product and in
the operating instructions should be followed.
5. Do not use this apparatus near water –for example, near a
bathtub, wash bowl, in a wet basement; or near a swimming
pool; and the like.
6. Cleaning –Please see specific recommendations under
“Cleaning and Disinfection” on previous page.
7. Do not block any ventilation openings. Install in accordance
with the manufacturer’s instructions. The openings should
never be blocked by placing the product on a bed, sofa, rug, or
other similar surface.
8. Do not install near any heat sources such as radiators, heat
registers, stoves, or other apparatus (including amplifiers)
that produce heat.
9. DO NOT defeat the safety purpose of the polarized or
grounding-type plug. This product is equipped with a three-
wire grounding-type plug, a plug having a third (grounding)
pin. This plug will only fit into a grounding-type power outlet.
This is a safety feature. If you are unable to insert the plug
into the outlet, contact your electrician to replace your
obsolete outlet.
10. Protect the power cord from being walked on or pinched
particularly at plugs, convenience receptacles, and the point
where they exit from the product.
11. Attachments only use attachments/accessories specified by
the manufacturer.
12. Use only with the cart, stand, tripod,
bracket, or table specified by the
manufacturer, or sold with the
apparatus. When a cart is used, use
caution when moving the cart/apparatus
combination to avoid injury from tip-over.
13. Unplug this apparatus during lightning storms or when
unused for extended periods of time.
14. Refer all servicing to qualified service personnel. Servicing
is required when the apparatus has been damaged in any
way, such as power-supply cord or plug is damaged, liquid
has been spilled or objects have fallen into the apparatus,
the apparatus has been exposed to rain or moisture, does
not operate normally, or has been dropped.
15. Power Sources –This product should be operated only
from the type of power source indicated on the marking
label. If you are not sure of the type of power supply to
your home, consult your product dealer or local power
company. For products intended to operate from battery
power, or other sources, refer to the operating instructions.
16. Oxygen Environment –Do not use in an oxygen tent or
oxygen chamber. Such use may cause a fire hazard.
17. Lightning –For added protection for this product during a
lightning storm, or when it is left unattended and unused
for extended periods of time, unplug it from the wall outlet
and disconnect the antenna or cable system. This will
prevent damage to the product due to lightning and power-
line surges.
18. Servicing –Do not attempt to service this product yourself
as opening or removing covers may expose you to
dangerous voltage or other hazards. Refer all servicing to
qualified service personnel.
MODEL NUMBER:
GO-GO™Gamer Cart
Document Number:
PD196-410R2
Assembly Instructions
Page 4 of 9
PDi Communication Systems, Inc. ▪40 Greenwood Ln ▪Springboro, Ohio 45066 USA ▪www.pdiarm.com and www.mymedTV.com ▪Phone 800.628.9870
SAFETY INSTRUCTIONS (FRENCH)
Danger chute d’objets
AVERTISSEMENT: Afin d’éviter toute blessure, cet
appareil doit être solidement fixé au sol/mur
conformément aux instructions d'installation. Les
télévisions peuvent présenter un risque de heurt
lorsqu’elles sont montées en position élevée. Utiliser
uniquement des supports de montage, des bras de
support et le matériel approprié de PDi afin d’assurer
que la télévision ne tombe pas de sa position de
montage. Le non-respect de ces instructions peut causer
des blessures ou la mort.
Pluie et humidité
AVERTISSEMENT: Afin d’éviter les risques d'incendie ou de
choc électrique, NE PAS exposer cette télévision à la pluie ou
à l'humidité ou l’utiliser dans un endroit humide.
Environnement d'oxygène
AVERTISSEMENT: Ne pas utiliser dans une tente à oxygène
ou chambre à oxygène. Une telle utilisation peut causer un
risque d'incendie.
CONSIGNES DE SÉCURITÉ IMPORTANTES
CETTE INSTALLATION DOIT ÊTRE EFFECTUÉE PAR UN TECHNICIEN QUALIFIÉ ET DOIT ÊTRE CONFORME À TOUS LES CODES LOCAUX. LIRE ET
SUIVRE LES CONSIGNES DE SÉCURITÉ AVANT DE PROCÉDER À L’INSTALLATION.
1. Lire ces instructions. Toutes les consignes de sécurité et
d’utilisation doivent être lues avant d'utiliser le produit.
2. Conserver ces instructions. Les consignes de sécurité et
d’utilisation doivent être conservées pour référence future.
3. Respecter tous les avertissements. Tous les avertissements sur le
produit et dans les consignes d'utilisation doivent être respectés.
4. Suivre toutes les instructions. Tous les avertissements sur le
produit et dans les consignes d'utilisation doivent être suivis.
5. Ne pas utiliser cet appareil près de l'eau - par exemple près d'une
baignoire, d'un lavabo, dans un sous-sol humide, ou près d'une
piscine ou similaire.
6. Veuillez voir les recommandations sous “Nettoyage et Désinfection”
à la Page précédente.
7. Ne pas obstruer les ouvertures de ventilation.Installer
conformément aux instructions du fabricant. Les ouvertures ne
doivent jamais être obstruées en plaçant le produit sur un lit,
uncanapé, un tapis ou toute autre surface similaire.
8. NE PAS installer près de sources de chaleur telles que radiateurs,
registres de chaleur, poêles ou tout autre appareil (y compris les
amplificateurs) qui produit de la chaleur.
9. NE PAS neutraliser le dispositif de sécurité de la fiche polarisée ou
de terre. Ce produit est équipé d'une prise de terre à trois fils, une
fiche ayant une troisième broche (mise à la terre). Cette fiche ne
peut s'insérer que dans une prise de courant avec mise à la terre. Il
s'agit d'une caractéristique de sécurité. Si vous êtes incapable
d’insérer la fiche dans la prise, contacter votre électricien pour
remplacer votre prise obsolète.
10. Protéger le cordon d'alimentation pour qu’il ne soit pas piétiné ni
pincé, en particulier au niveau des fiches, des prises de courant et
au point de sortie de l’appareil.
11. Accessoires - Utiliser uniquement les attaches/accessoires
recommandés par le fabricant.
12. Utiliser uniquement avec un chariot, stand, trépied, support ou
table recommandé par le fabricant ou vendu avec l'appareil.
Lorsqu’un chariot est utilisé, faire attention lors du déplacement de
l'ensemble chariot/appareil afin d’éviter des blessures en cas de
basculement.
13. Débrancher cet appareil en cas d'orages ou lorsqu'il reste inutilisé
pendant de longues périodes.
14. Confier toute réparation à un personnel de service qualifié. Des
réparations sont nécessaires si l'appareil est endommagé d'une
façon quelconque, par exemple : cordon ou prise d'alimentation
endommagé, liquide renversé ou des objets sont tombés dans
l'appareil, l'appareil a été exposé à la pluie ou à l'humidité, ne
fonctionne pas normalement ou s'il est tombé.
15. Sources d'alimentation - Ce produit doit être utilisé uniquement à
partir du type de source d'alimentation indiqué sur l'étiquette. Si
vous n'êtes pas sûr sur le type d'alimentation de votre domicile,
consultez le détaillant de votre produit ou la compagnie d'électricité
locale. Pour les produits proposés de fonctionner par piles, ou
autres sources d’alimentation, reportez-vous aux consignes
d’utilisation.
16. Environnement d’oxygène - Ne pas utiliser sous une tente à oxygène
ou chambre à oxygène. Une telle utilisation peut causer un risque
d'incendie.
17. Foudre - Pour une protection supplémentaire pour ce produit lors
d’un orage, ou lorsqu'il est laissé sans surveillance et inutilisé
pendant de longues périodes de temps, le débrancher de la prise
murale et déconnecter l'antenne ou le système de câble. Cela
permettra d’éviter tout dommage à l'appareil causé par la foudre et
par les surtensions des lignes électriques.
18. Entretien - N'essayez pas de réparer vous-même ce produit, car
l'ouverture ou le retrait des capots peut vous exposer à des tensions
dangereuses ou à d'autres dangers. Confiez toute réparation à un
personnel qualifié.
MODEL NUMBER:
GO-GO™Gamer Cart
Document Number:
PD196-410R2
Assembly Instructions
Page 5 of 9
PDi Communication Systems, Inc. ▪40 Greenwood Ln ▪Springboro, Ohio 45066 USA ▪www.pdiarm.com and www.mymedTV.com ▪Phone 800.628.9870
This document provides the information for the assembly instructions for the GO-GO Gamer Cart. This instruction sheet includes a) the
standard configuration of the 24” PDi hospital TV flush mounted to the GO-GO Gamer Cart with a wire basket to store the game
controllers; b) a 32” PDi hospital TV flush mounted to the GO-GO Gamer Cart with a wire basket to store the game controllers; c) the
optional short arm installation on a 24” PDi hospital TV; and d) the optional storage bin installation.
Tool List
Safety glasses/goggles
Level
Cut Resistant Gloves
Phillips Screwdriver
Adjustable Wrench
Included in the box:
The following items are included in the packaging of the GO-GO Gamer Cart:
•Gaming Cart with Sony PlayStation®4 gaming console installed.
•TV Mounting Bracket
•Hospital TV (Standard 24” PDi TV or alternate PDi 32” TV)
•PDi TV Programming Remote
•Wire Basket and/or Optional Controller Bin
•Hardware Kit:
✓4mm Hex Wrench; 5mm Hex Wrench; 6mm Hex Wrench;
✓4 each; PDIPPHMSM4X710 –Screw, M4 x 10mm long, Phillips Pan Head (in small bag)
✓6 each; PDIBHSCSM6X10 –Screw, M6 x 10mm long, Hex Socket Button Pan Head
✓2 each; PDIBHSCSM6X14 –Screw, M6 x 14mm long, Hex Socket Button Pan Head
✓4 each; PDIBHSCSM8X20 –Screw, M8 x 20mm long, Hex Socket Button Pan Head
✓4 each; PD151-003-12 –Screw, M8 x 30mm long, Hex Socket Head
✓4 each; PDIETLWM8 –Lock Washer, M8, External Tooth
✓4 each; PD151-003-13 –Self-Threading Screw
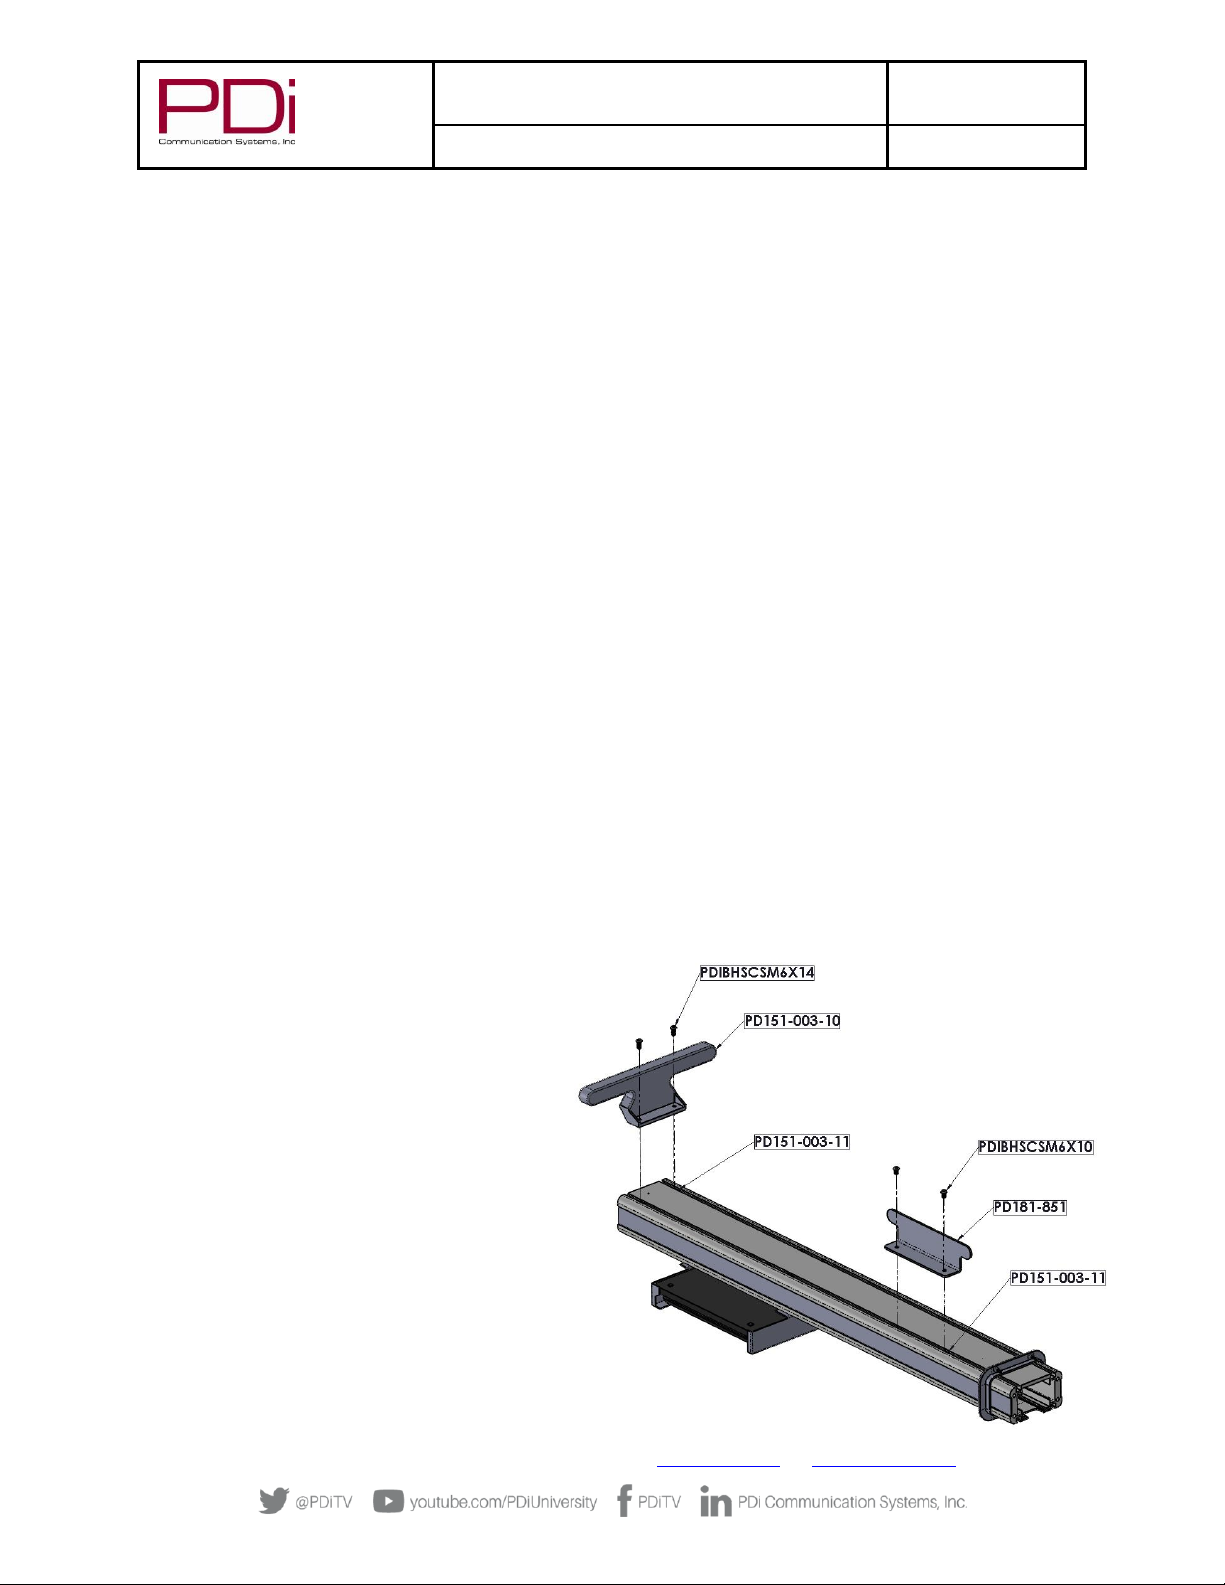
Cart Assembly
1. Set the Column sub-assembly on the workbench as
shown.
2. Attach the Handle, PD151-003-10, to the column
with the M6x14 screws (2). Thread the screws into
the pre-positioned t-nuts, pd151-003-11, and
tighten to torque of 6in-lbs.
3. Attach the Cord Wrap, PD181-851, to the column
with the M6x10 screws (2). Thread the screws into
the pre-positioned t-nuts, pd151-003-11, and
tighten to torque of 6in-lbs.

MODEL NUMBER:
GO-GO™Gamer Cart
Document Number:
PD196-410R2
Assembly Instructions
Page 6 of 9
PDi Communication Systems, Inc. ▪40 Greenwood Ln ▪Springboro, Ohio 45066 USA ▪www.pdiarm.com and www.mymedTV.com ▪Phone 800.628.9870
Mount the Column
1. Set the base on the workbench on its wheels and set the brakes to keep the base from rolling.
2. Turn over the column so it is resting on the handle and the bottom end is resting on the base.
3. Near the top of the column, remove the Cover Plate as shown by removing the four (4) M6 x 10mm screws with the 4mm Hex
Wrench provided. Do not completely remove from the assembly. This step will allow free movement of the Column Plate to
gain access to connect the cables.
4. Near the base of the column, connect the coax cable in the base to the coax cable in the column.
5. Connect the Molex connectors for the power cord.
6. Tip the column up and insert the bottom of column into the pocket in the base. Be sure that the column rests firmly at the
bottom of the pocket and is not pinching the cables (The Column Plate should still be moveable to ensure there is no
interference.).
7. Slide the Trim Collar down the column so it rests flush against the Base.
8. Attach the Column to the Base with the (4) M8 x 30 SHCS and Lock washers. Tighten to 100 in-lbs torque. The cart can now be
positioned upright on its casters.
9. Re-position the plate and re-install the cover plate that was removed in step 3. Tighten the screws to 6 in-lbs. torque.
10. Attach the Trim Collar to the Base with the (4) Self-
Threading screws, PD151-003-13, as shown here.

MODEL NUMBER:
GO-GO™Gamer Cart
Document Number:
PD196-410R2
Assembly Instructions
Page 7 of 9
PDi Communication Systems, Inc. ▪40 Greenwood Ln ▪Springboro, Ohio 45066 USA ▪www.pdiarm.com and www.mymedTV.com ▪Phone 800.628.9870
Mount the TV to the Bracket
1. Unpack TV and place on workbench
face down. If necessary, place
protective mat on workbench to ensure
the viewing surface is not damaged.
2. Attach the mounting bracket for the TV
as shown, with the four M4 x 10mm
screws.
Mount TV Bracket to the Cart
It is recommended that two people work together to mount the TV to the column of the cart. One person should hold the TV while the
other inserts the screws as shown in the photo.
1. While holding the TV in position, screw in the
four (4) M8 x 20 Button Head Socket Cap
Screws. The maximum tightening torque is
80in-lbs. Use the 5mm hex wrench to tighten
until setting the torque.
2. Using the 4mm hex wrench, insert the two
(2) M6 x 10 Button Head Socket Cap Screws.
The maximum tightening torque is 6in-lbs.

MODEL NUMBER:
GO-GO™Gamer Cart
Document Number:
PD196-410R2
Assembly Instructions
Page 8 of 9
PDi Communication Systems, Inc. ▪40 Greenwood Ln ▪Springboro, Ohio 45066 USA ▪www.pdiarm.com and www.mymedTV.com ▪Phone 800.628.9870
Mount the Wire Basket
1. Mount the wire basket on the back side of the column, as shown behind the PS4, using the 4mm hex wrench and four (4) M6 x
10 Button Head Socket Cap Screws. The maximum tightening torque for the screws is 6in-lbs.
Connect PlayStation
1. Plug the power cable and one end of the HDMI cable into the gaming console on the left side.
2. Plug the two gaming controllers into the USB ports on the right side of the gaming console.
3. Plug in the other end of the HDMI cable into the HDMI1 port on the TV.
4. Plug in the power cable for the TV.

MODEL NUMBER:
GO-GO™Gamer Cart
Document Number:
PD196-410R2
Assembly Instructions
Page 9 of 9
PDi Communication Systems, Inc. ▪40 Greenwood Ln ▪Springboro, Ohio 45066 USA ▪www.pdiarm.com and www.mymedTV.com ▪Phone 800.628.9870
Optional Assemblies
Model PDI-GO32
1. Mount Flush Mounted A32 TV.
2. Follow instructions above to Mount TV Bracket to the Cart.
Model PDI-GO24-A
1. Mount for the Arm Mounted A24 TV.
2. Follow instructions above to Mount TV Bracket to the Cart.
Model PDI-GOXX-B
1. Mount the optional Controller Bin in lieu of the wire basket.
Warranty
PDi Communication Systems Inc., (“PDi”) standard warranty information is found at pdiarm.com. For information regarding authorized
servicing and all other information pertaining to this warranty, please contact PDi COMMUNICATION SYSTEMS, INC. at 40 Greenwood Ln,
Springboro, Ohio 45066 or phone 800-628-9870 and ask for the PDi ProServices team.
This manual suits for next models
1
Table of contents
Popular Video Gaming Accessories manuals by other brands


Carmelli
Carmelli PATRIOT 5-ft AIR HOCKEY TABLE Assembly instructions

BCP
BCP SKY6252 instruction manual

Mightymast Leisure
Mightymast Leisure SPEEDSTER Assembly instructions

Lu Interactive Playground
Lu Interactive Playground MOBILE user manual

Steren
Steren COM-435 instruction manual

FORESIGHT
FORESIGHT FALCON quick start guide


