PEACOCK e-ther User manual

Introduction 3
Powering e-ther 3
Inputs, outputs and controls 4
Micro USB 4
MIDI output socket 4
Vertical sensor 4
Horizontal sensor 4
Rotary control 4
Octave buttons 5
Stereo / mono output 5
Reset button 5
Audio output 5
Configuration 6
Channel 7
Mode 7
Vertical control sends 7
Flip horizontal and vertical controls 7
Using e-ther with MIDISID 7
Updating the firmware 8
Troubleshooting 8
Appendices 10
Appendix A 10
Version control 10
Appendix B 10
MIDI over TRS 10
Appendix C 11
The PicoAudio module for audio output 11
Appendix Z 12
Planned features 12
2

Introduc)on
Thank you for your interest in e-ther. As its name suggests, it's played with gestures in the air like a
theremin and can output:
•MIDI over USB
•MIDI over TRS (a lead with the right pinout gives MIDI over 5-pin DIN, see Appendix B)
•audio at line level with a 'gain' control via configuration utility
The theremin was invented in 1920 by a Russian physicist named Leon Theremin. It works by
detecting changes in capacitance, so it responds to proximity of the player's body.
Today, cheaper theremin-like instruments use optical sensors.
e-ther's sensors don't use visible light and therefore aren't affected by changes in ambient light.
They measure distance very accurately (invisible, eye-safe) making e-ther very predictable and
consistent.
If you don't find the information you're looking for in this manual, I'll be very glad to discuss any
aspect.
!
https://peacockmedia.software/e-ther
~ Shiela
Powering e-ther
Power e-ther via its micro-USB port. Using MIDI over USB is the most convenient way to use e-
ther as you only need to plug in a single lead.
Pads are provided on e-ther 1's board for your own battery or alternative power. (3.3V - 5V making
it perfect for using rechargeable lithium cells.) These pads are so far absent from e-ther 2.
3

Inputs, outputs and controls
Micro USB
This is the most convenient way to use e-ther as you only need to connect one lead. e-ther can
take power from here as well as send MIDI. When plugged into a computer or other MIDI host with
a micro-USB cable, e-ther should power up and appear as 'e-ther', (or 'TinyUSB Device' with
earlier firmware). This socket is also used for updating the firmware. (see Updating the firmware.)
MIDI output socket
A 3.5mm jack socket for 'MIDI over TRS', using the 'Korg' or 'type A' configuration. For connecting
to a device with 5-pin DIN, you can buy or make a lead following this standard (pinout in Appendix
B).
!
Note that MIDI messages are sent by default on channel 2 but this can be changed to any of the
16 channels, see Configuration.
Vertical sensor
The vertically-facing sensor corresponds to a traditional theremin's volume antenna. When using
the optional PicoAudio device, the vertical sensor will control the volume. When using MIDI output,
it can be used for volume or expression. The internal jumper controls which type of message is
sent for the this sensor. (see Jumper settings.)!
Note that if set to 'expression', the vertical sensor reading has a curve applied so that the volume
change feels more natural. Modwheel changes are linear.
This control deliberately operates in the opposite way to a classic theremin, ie maximum volume or
expression is closest to the device, while moving higher or out of range is zero volume or
expression. After much experimentation, this way seemed more natural.
!
You can interrupt the vertical sensor's beam for a sharper attack, or bring your hand down slowly
and vertically from outside the beam's range for a 'niente' or crescendo from nothing.!
!
If using a MIDI sound patch without sustain and short attack (like a stringed instrument) then you
can use a plucking motion to 'pluck' the note.
Horizontal sensor
The horizontally-facing sensor corresponds to a traditional theremin's pitch antenna. It controls
pitch / frequency and has a very linear operation.
Both sensors have a useful range of around 10" / 25cm.
Rotary control
The rotary control at the side controls the frequency range, or 'spread'. At one extreme, the pitch
control will appear to do nothing. At the other extreme, the pitch control should give a range of two
octaves with a C approximately in the centre.
4

If using MIDI output, e-ther sends RPN 0 (Pitch Bend Sensitivity) messages, so your host must
respond correctly to these if this control is to be effective. (I believe that Garage Band does not).
Note that this control won't appear to change anything if a note is already sounding. Move clear of
both sensors, and then play a new note to hear the new setting.
Octave buttons
These two buttons are easy to tap while playing. With audio output, the change will be heard
immediately but with MIDI output, you won't hear the change until a new note is started.
7 octaves are possible, the frontmost button raising the output by an octave, the other lowering it.
Stereo / mono output
If using the audio output, a similar waveform will be given on both channels. If using MIDI,
obviously it's up to the host whether the audio it generates from the MIDI is mono or stereo.
Reset button
The main reason for including a reset button is so that you can update the firmware. It's easier to
access than the 'boot' or 'bootsel' button. (See Updating the firmware.)
If e-ther doesn't appear as a MIDI device over USB after a few seconds from power-up, try the
reset button.
Audio output
This is now built into e-ther 2. If you have an e-ther 1, please see Appendix C, The Audio
module.
!
The audio jack is on the left-hand side and is marked 'Audio out (stereo)'
You don't need to configure or switch anything. Audio will be present at this jack.
MIDI will also be sent to the micro-USB and TRS MIDI sockets at the same time, but note that the
audio output and midi output are unlikely to be 'in tune' and not meant to be. You could use both for
a ghostly (possibly unpleasant) effect, but it's intended that you use one or the other.
5

Configura)on
Visit https://peacockmedia.software/e-ther/configurator.html to find the configuration utility.
For information about using the utility scroll down the configurator's page and find Getting started.
There are some caveats about which browsers work best and allowing a plugin to be installed.
Then after plugging e-ther into your computer, the configurator should detect it.
A video showing the configurator being used is here:
https://youtu.be/xEWzqqkwKU4
Note that the configurator shows default values, but does not read your e-ther and does not show
its existing settings."
6

Channel
Simply choose another channel and press 'set channel' to change the channel that e-ther uses to
send MIDI.
Mode
This allows you to change the mode. The CC-only option allows you to use e-thers sensors as a
MIDI controller - Expression or Mod wheel plus pitch bend - without sending note on/off messages.
Vertical control sends
By default, expression messages - CC 11 - will be sent. (This was chosen for the default because
this tends to be used to control the volume of a patch.)
Alternatively, modulation wheel messages - CC 1 - can be sent. You can probably choose the
function of the modwheel on the host device. By default it's usually used for an effect such as
vibrato, but could also be set to control other expressions such as filter cutoff.
Flip horizontal and vertical controls
For some use cases (particularly with CC-only mode) it may be preferable to have pitch bend on
the left hand / vertical control and expression on the right hand / horizontal control.
Using e-ther with MIDISID
If using e-ther with MIDISID, configure e-ther to use mod wheel on the vertical control, and then
you'll be able to choose pulse width, vibrato strength or filter cutoff for modwheel (e-ther's vertical
sensor).
The SID chip doesn't really allow for on-the-fly changes in volume (other than master volume,
which is coarsely stepped and isn't suitable for this situation, and sustain level which can't be
changed while playing the note). So with the jumper in the default position, you'll only get note on/
note off.
For traditional theremin sound, use one of the organ sounds, or set ADSR to maximum sustain with
gentle attack and release.
Sounds with an attach and decay (such as the string instruments; guitar, bass, harp) can sound
very effective. The vertical beam can be interrupted, like plucking a string and will trigger the
envelope."
7

Upda)ng the firmware
When updates are available, it's easy to update the firmware.
With e-ther powered via the micro-USB, give a double-tap on the reset button. This should put the
device into boot mode.
Alternatively, with e-ther dismantled, keep the BOOTSEL or BOOT button pressed while plugging
in the USB cable.
Then you should see the device on your computer as a drive with a name like "RPI-RP2". Simply
drag the new firmware (.uf2 file) onto the new drive's icon. If successful, it should then unmount
itself from your computer and the new firmware should start.
Troubleshoo)ng
No MIDI output
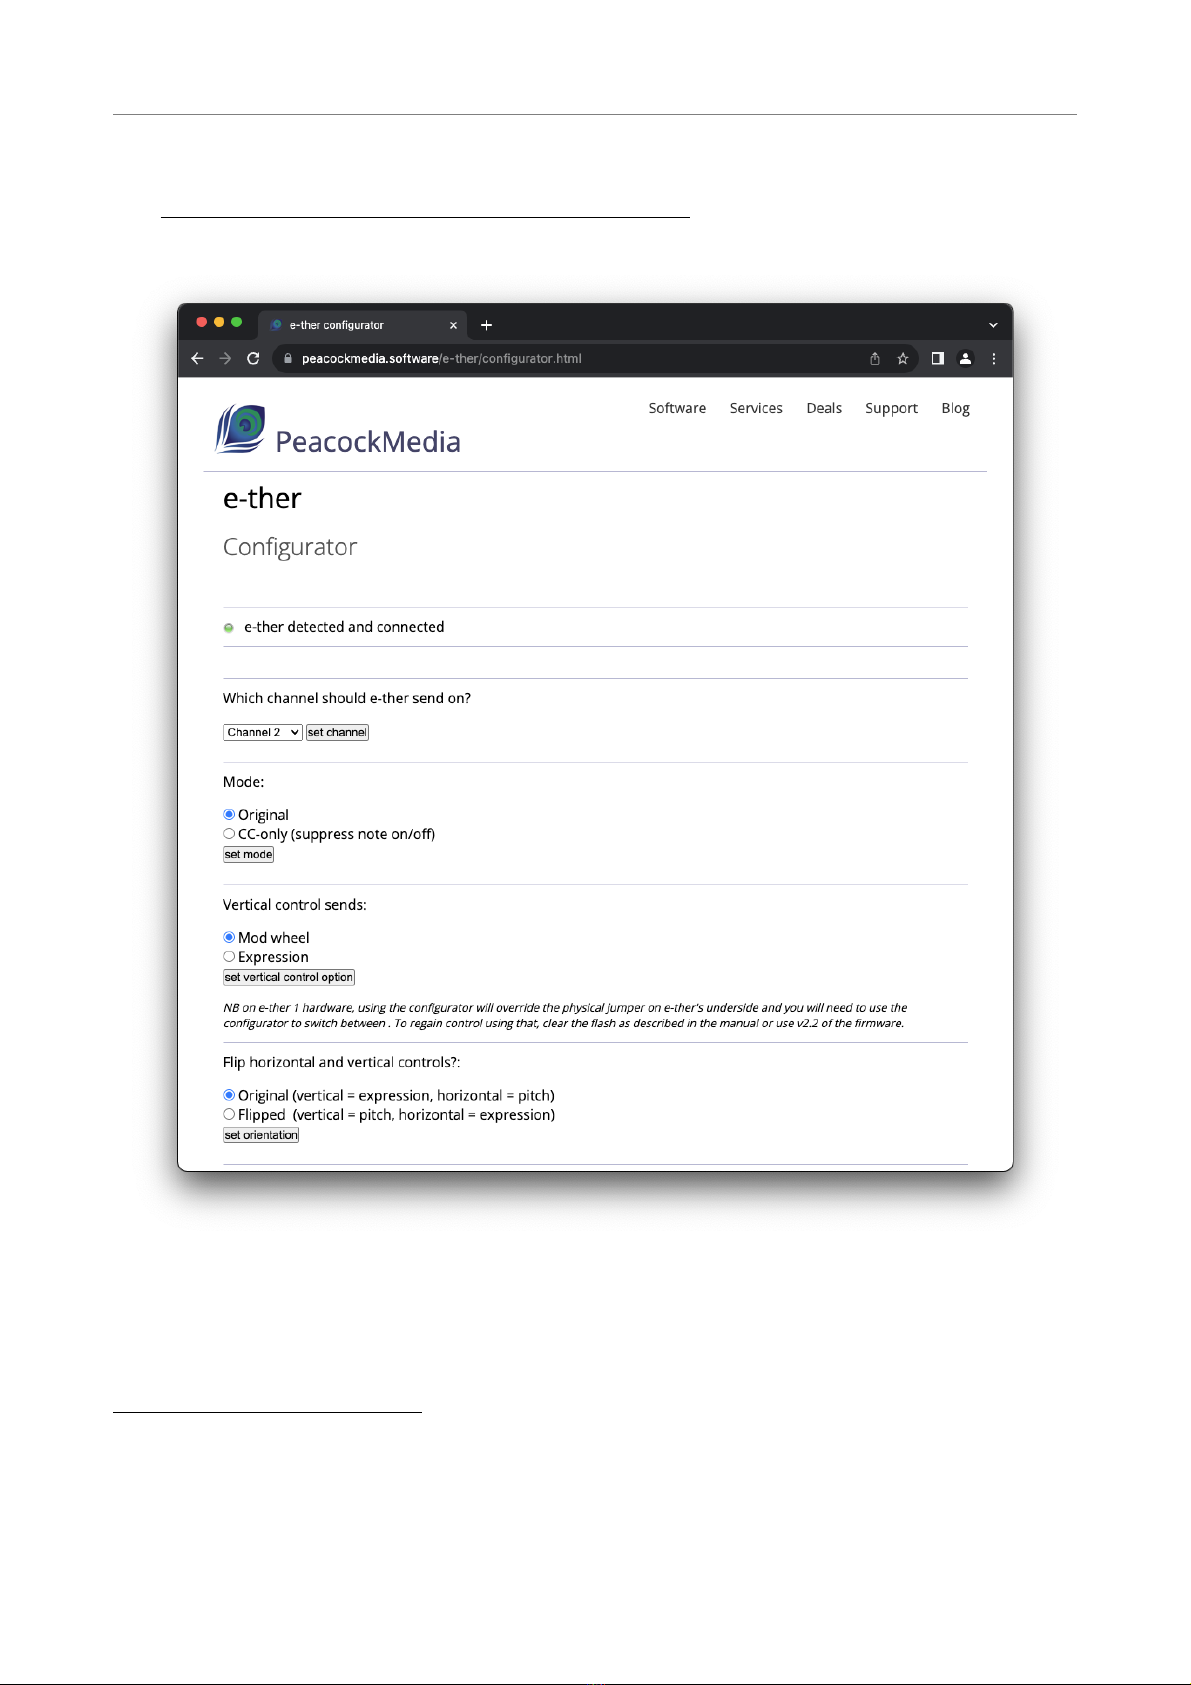
Note that e-ther sends on channel 2 by default.
The answer to this problem is almost always a bad or wrong USB lead. Note that some USB A-
>micro leads carry power but not data, ie they're made for charging. It's not unknown for USB
leads to go bad or not to make good connections. Please try other leads.
If this doesn't solve the problem, then do you have any software or device that can display the
MIDI? (eg MIDI Monitor on a Mac). The horizontal control should produce pitch bend messages
and the vertical control should initially produce a note on, then a series of either expression or
modwheel messages (depending on the jumper position) and finally a note off.
e-ther doesn't appear as a MIDI device or instrument
When e-ther appears, it'll be as 'e-ther' (or 'TinyUSB device' for early firmware). Power e-ther with
the USB cable and if nothing happens after a few seconds, tap the reset button once (on the
underside). Tapping it twice has a different purpose. Make sure to tap it once only and wait. then
try again!
If using a Mac, open the utility Audio MIDI Setup which will already be on your Mac. Go to
Window>MIDI Studio (cmd-2) and see whether 'e-ther' or 'TinyUSB device' has an icon there. If it
does, then the computer has connected with it at some point. If it's greyed out, then it's not
currently connected and when it does connect, the icon will light up.
MIDI output produces a single note / the range control doesn't appear to work
e-ther relies heavily on pitch bend messages, along with RPN0 (pitch bend sensitivity). If your host
or software doesn't support these messages then the horizontal control won't appear to work, or
the range will be fixed and limited.
Horizontal control works, but vertical control just produces a note on / off
Try different instruments. It's down to the software you're using to handle the expression messages
from the vertical control. In real life, instruments such as organs have no control over level, notes
8

are just on or off, so a software version of the instrument is likely to do the same. Some
instruments have an attack and decay with no sustain or release, like a guitar or bass. So again, a
software version is unlikely to modify the envelope of that note, only the pitch.
Note that you can configure e-ther to produce expression or modwheel messages with the vertical
control. Expression is the most likely to work by default, but there's a good chance that you can tell
your software what parameters to change for expression or modwheel messages.
9

Appendices
Appendix A
Version control
This document
Version 2.0 : Oct 2023 first public version
Circuit boards
Version 1.0 : First public version.
Version 2.0 : First version with microcontroller and DAC incorporated onto main board
Firmware ('E-ther OS')!
!
?? Nov 2022 release of major new version to coincide with e-ther2, confusingly numbered v3.0.
Compatible with all e-thers.
Appendix B
MIDI over TRS
The 3.5mm jack used for MIDI out follows the most official standard for MIDI over TRS. If buying a
lead, it may also known as 'Type A' and used by Akai Pro,#IK Multimedia,#Korg, Line 6,
littleBits,#Make Noise. (diagram from midi.org)
10

Note that it's very easy to mix up pins 4 and 5. The diagram above is looking at the user end of a
*socket*. If looking at the pins of a *plug*, or when looking at the inside/solder side of a socket, the
pins will be mirrored. If you're making a lead and it doesn't work right away, then it's likely that
you've reversed 4 and 5. (This shouldn't cause any harm.)
https://www.midi.org/midi-articles/updated-how-to-make-your-own-3-5mm-mini-stereo-trs-to-midi-5-
pin-din-cables
Appendix C
The PicoAudio module for audio output
If you have an e-ther 1 (which does not have the audio jack on the left-hand-side), unless you
bought the 'midi-only' compact version, then you can add audio output by plugging in a PicoAudio
module.
!
You must have the e-ther with long pins on the underside longer feet to accommodate this module. !
This is the module you need, PicoAudio from Pimoroni. It's wideley available for around £15 or
equivalent. Note that other audio modules are available for the pico, but may not work because the
pinouts may not be the same.!
This module plugs onto the underside of e-ther. (take care with the orientation - the audio module
has 'USB' marked on its underside, which should be at the same end as the USB socket on your e-
ther. The output sockets will be conveniently on the left-hand side of e-ther. Also take care not to
align the pins 'out by one'.)
This will give line out, headphones out and a lo and high gain switch. (The switch only works on the
'phones output.)
You don't need to configure or switch anything. If this module is present when e-ther is powered
up, the audio will be generated. MIDI will also be sent to the micro-USB and TRS MIDI sockets, but
note that the audio output and midi output are unlikely to be 'in tune' and not meant to be. You
could use both for a ghostly (possibly unpleasant) effect, but it's intended that you use one or the
other."
11

Appendix Z
Planned features
12
Table of contents