Pentair MBSP-3C User manual

©2014 MY983 (06/23/14)
PumpActivity
Activitéde pompe
Actividadde la bomba
SystemAlert
Alertedu système
Alertadel sistema
ACPower
CourantAC
CA
Charging
Recharge
Encarga
Battery Status
Étatde batterie
Estadode la batería
AlarmSilenced
Alarmearrêtée
Alarmaapagada
TestSystem
Tester
Probarsistema
SilenceAlarm
Arrêterl’alarme
Apagaralarma
Light
Lumière
Luz
CircuitBreaker
Disjoncteur
Disyuntor
Pump
Pompe
Bomba
FloatSwitch
Interrupteurà flotteur
Interruptordel flotador
Power
Courant
Encendido
ResetSystem
Réinitialise
Restrablecersistema
+
MBSP-3C
Device ID Key
OWNER’S MANUAL
Battery Backup System
NOTICE D’UTILISATION
Système de secours à batterie
MANUAL DEL USUARIO
Sistema de batería de respaldo
Installation/Operation/Parts
For further operating, installation,
or maintenance assistance:
888-987-8677 US
800-387-4386 CA
English........................... Pages 2-16
Installation/Fonctionnement/Pièces
Pour plus de renseignements
concernant l’utilisation,
l’installation ou l’entretien,
(888) 987-8677 US
(800) 387-4386 CA
Français .................... Pages 17-31
Instalación/Operación/Piezas
Para mayor información sobre el
funcionamiento, instalación o
mantenimiento de la bomba:
888-987-8677 US
800-387-4386 CA
Español..................... Paginas 32-46

Safety 2
Important Safety Instructions
SAVE THESE INSTRUCTIONS - This manual contains
important instructions that should be followed during
installation, operation, and maintenance of the product.
This is the safety alert symbol. When you see this
symbol on your pump or in this manual, look for one of
the following signal words and be alert to the potential
for personal injury!
indicates a hazard which, if not avoided,
will result in death or serious injury.
indicates a hazard which, if not avoided,
can result in death or serious injury.
indicates a hazard which, if not avoided,
can or may result in minor or moderate injury.
NOTICE addresses practices not related to personal injury.
Carefully read and follow all safety instructions in this
manual and on pumps.
Keep safety labels in good condition. Replace missing or
damaged safety labels.
Battery acid is corrosive. Do not spill on
skin, clothing, or battery charger. Wear eye and head
protection when working with battery. Connect and
disconnect DC output terminals only after removing the
charger from the AC outlet. Never allow the DC
terminals to touch each other.
Hazardous Voltage. Can cause severe or
fatal electrical shock. Do not plug in or unplug battery
charger while standing on a wet floor or in water. Be sure
one hand is free when plugging in or unplugging charger.
If basement floor is wet, disconnect power to basement
before walking on floor. If shut-off box is in basement,
call electric company or hydro authority to shut-off
service to house, or call your local fire department for
instructions. Remove pump and repair or replace. Failure
to follow this warning can result in fatal electrical shock.
Risk of flooding. Do not run pump dry. To
do so will damage seals and can cause leaking and
property damage.
Risk of electrical shock. Do not lift the
pump by the electrical cord; lift pump only by the
discharge pipe, lifting ring or handle on the pump. Lifting
by the cord can damage the cord.
California Proposition 65 Warning
This product and related accessories contain
chemicals known to the State of California to cause
cancer, birth defects or other reproductive harm.
1. Know the pump application, limitations, and potential
hazards.
2. Do not use in water with fish present. If any oil leaks
out of the motor it can kill fish.
NOTICE This unit is not designed as a waterfall or
fountain pump, or for applications involving salt water
or brine! Use with waterfalls, fountains, salt water or
brine will void warranty.
3. Disconnect power before servicing.
4. Drain all water from system before servicing.
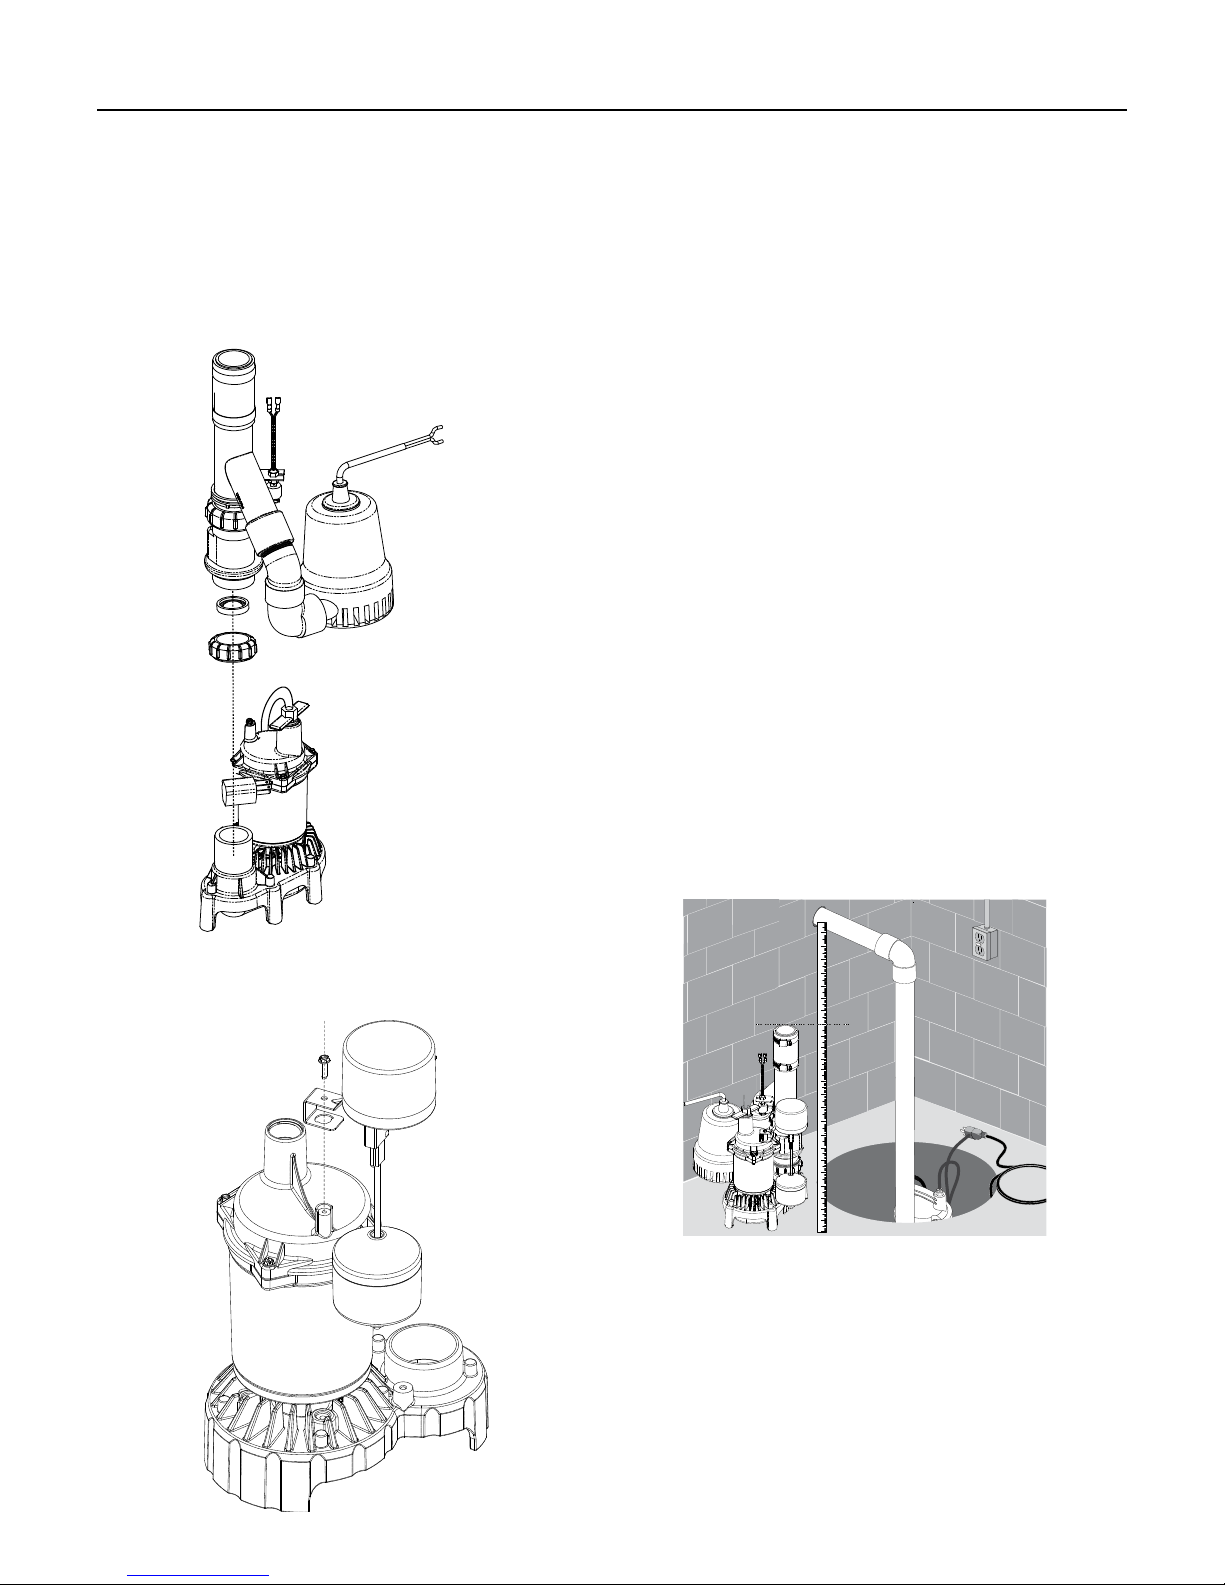
5. Secure discharge line before starting pump. An
unsecured discharge line will whip, possibly causing
personal injury and/or property damage.
6. Check hoses for weak or worn condition before each
use, making certain that all connections are secure.
7. Periodically inspect sump, pump and system
components. Keep free of debris and foreign objects.
Perform routine maintenance as required.
8. Provide means of pressure relief for pumps whose
discharge line can be shut-off or obstructed. Release all
pressure within system before servicing any component.
9. Personal Safety:
j. Wear safety glasses at all times when working with
pumps.
k. Keep work area clean, uncluttered and properly
lighted – replace all unused tools and equipment.
l. Keep visitors at a safe distance from work area.
m.Make workshop child-proof – with padlocks, master
switches, and by removing starter keys.
14. Follow local and/or national plumbing and electrical
codes when installing the system. A ground fault
circuit interrupter (GFCI) is recommended for use on
any electrical appliance submerged in water.
15. All wiring should be performed by a qualified
electrician.
16. This equipment is only for use on 115 volt
(single phase) and is equipped with an approved
3-conductor cord and 3-prong, grounding-type plug.
17. Where a 2-prong wall receptacle is encountered, it
must be replaced with properly grounded 3-prong
receptacle installed in accordance with codes and
ordinances that apply.
18. Make certain power source conforms to requirements of
your equipment.
19. Protect electrical cord from sharp objects, hot surfaces,
oil, and chemicals. Avoid kinking cord. Replace or
repair damaged or worn cords immediately.
20. Do not touch an operating motor. Modern motors can
operate at high temperatures.
21. Pump clear water only with this pump.
22. Pump is permanently lubricated at the factory. Do
not try to lubricate it!
23. This pump is designed for use in a residential sump
only.

GENERAL INFORMATION
The Battery Backup Combo Kit is pre-plumbed up to
the hose and clamp assembly. The system includes the
primary sump pump (PSP), backup sump pump (BSP)
assembly, and vertical float switch. The unit is equipped
with two check valves - one for the primary pump and
one for the backup pump.
The battery backup pump is not a substitute for your
primary sump pump. It is designed to temporarily backup
your primary sump pump during a power outage or other
problem which prevents normal operation of the primary
pump. Do not use this system to pump flammable liquids
or chemicals. Pump clear sump water only with this
pump. For residential use only.
Keep the battery charger dry and protected from damage.
This system is designed to work with either a sealed
lead-acid AGM battery or a flooded lead-acid battery.
Use of a true Gel Cell (often confused for AGM) or a
standard automotive battery with this charger is not
recommended. An automotive battery may require
charging after only 1-2 hours of continuous use, and the
repeated charging cycles may cause early plate failure in
the battery.
Specifications
Maximum vertical pumping distance is 15 feet (4.6M) for
Model MBSP-3C.
Power supply required
Primary Sump Pump..........................115V, 60 HZ.
Backup Sump Pump........................12V DC Battery
Liquid Temp. Range..........................32°F to 70°F(0°-21°C)
Individual Branch Circuit Required (min.).............15 Amps
Discharge:
Hose & Clamp Assembly...................1-1/4”Slip / 1-1/2”Slip
Minimum pit diameter ....................................................14”
Minimum depth...............................................................10”
NOTICE Do not reduce size of discharge pipe or hose
below 1-1/4” diameter. If discharge is too small, pump will
overheat and fail prematurely.
NOTICE: If a Carbon Monoxide (CO) sensor is installed,
it must be at least 15 feet away from battery charger
in order to avoid nuisance CO alarms. Please refer
to your CO detector’s installation guidelines for more
information.
Performance - PSP
GPM (LPM) at total feet (m) of lift
Series HP 5
(1.5m) 10
(3m) 15
(4.6m) 20
(6.1m) MAX.
LIFTr
Capacity Gallons(L)/Hour
Primary
(MS50V1) 1/2 66
(250) 56
(212) 44
(167) 28
(106) 25 ft
(7.6m)
Performance - BSP
GPM (LPM) at total feet (m) of lift
Series 5
(1.5m) 10
(3m) 14
(4.3m) MAX.
LIFT
Capacity Gallons(L)/Min
Backup
(PS17-2005) 34
(129) 21
(79) 6
(23) 15
(4.6m)
Electrical & Switch Specifications
Series HP
Motor
Full Load
Amps
Branch
Circuit
Req.
(Amps)
Switch Setting in
inches (cm)
On Off
MS50V1 1/2 4.1 15
7.5
(19.1) 3
(7.6)
PS17-2005 - - 10.5
(26.7) 25 sec.
Required Battery Capacity:
For best results, use the following AGM Storage Batteries:
Part Amp-Hour
Gal/Charge
at 10’
Approx Run
Time
BAT40 40 4,800 5 Hours
BAT75 75 11,500 11.5 Hours
• Unit equipped with dual battery capability
• Maximum amp-hour: 120
• 38-120 Ampere-Hour Storage or Deep Cycle Battery
Safety •Specifications 3

Backup Assembly Installation
Attach backup pump assembly to primary pump. To do
so, un-screw bottom nut on check valve and remove
rubber seal. Place nut from check valve around discharge
PVC pipe on primary pump, then place rubber seal.
Attach backup pump assembly to the primary pump by
tightening nut to the rest of the check valve unit.
Adjust backup pump to sit at an angle (approx. 10°).
Float Switch Installation
Assemble float switch as shown.
Combo Unit Installation
Suggested Materials Needed:
Screwdriver, tape measure, hacksaw, cable ties
1. Drain the sump pit as far as possible without running
the pump dry. Do this by:
A. Piggyback switch: Unplug the pump and switch
from the outlet, then unplug the pump from the
piggyback switch. Reset the circuit breaker or
reinstall the fuse and plug the pump directly into
the outlet. The pump will start. Drain the pit and
unplug the pump. OR
b. Nopiggyback switch: Reset the circuit breaker
or reinstall the fuse and use a non-conducting
broom handle or stick to raise the float switch;
the pump should start. Drain the pit and then
release the switch.
c. When the pit has drained, turn off (open) the
circuit breaker or remove the fuse again to avoid
electrical shock while working on the installation.
Unplug existing sump pump and place power cord
and piggyback switch out of the way of work and
water.
2. Measure height of MBSP-3C Combo Kit from base to
top of hose clamp assembly. Subtract 1”.
Drop the tape measure into the bottom of sump pit
and mark the cut line on the discharge pipe (1” less
than total height of the Combo Kit).
3. Use hacksaw to cut horizontally along cut line com-
pletely through pipe.
NOTICE Depending on where your current check
valve is located, there may be excess water. Let the
water drain/drip into the sump pit.
4. Remove old sump from sump pit.
NOTICE Remove all sand, clay, and gravel before
installing.
5. Place Combo Kit into sump pit. Make sure vertical
float switches can operate freely inside sump pit.
Pump Installation 4
(10° angle)

6. Once the Combo Kit is firmly seated in the base of the
pit, connect the hose and clamp switch to the existing
discharge pipe and clamp it securely.
7. Secure power cord (PSP & BSP), piggyback switch,
and reed switch cord high up and around pipe with
a cable tie. Plug the primary pump into a standard
household 15 amp outlet.
NOTICE The circuit should be dedicated to the sump
pump exclusively.
Remember: Do not handle the pump while it is
plugged in; whether it is running or not.
8. Connect BBU. See “BBU Wiring and Setup”.
9. Once all wiring is complete, fill your pit with water
and verify that the PSP removes the water and the
BBU doesn’t run. Then, unplug your PSP and refill
your pit with water. Verify that the BBU removes the
water.
10. Make sure that the power is on to both pumps, and
your system is ready to use.
Operation
Risk of electric shock. Can shock, burn or kill. Do
not handle a pump or pump motor with wet hands or when
standing on wet or damp surface, or in water.
1. Shaft seal depends on water for lubrication. Do not
operate pump unless it is submerged in water as seal may
be damaged if allowed to run dry.
2. Motor is equipped with automatic reset thermal protector.
If temperature in motor should rise, switch will cut off
all power before damage can be done to motor. When
motor has cooled, switch will reset automatically and
restart motor. If protector trips repeatedly, pump should be
removed and checked. Low voltage, long extension cords,
clogged impeller, very low head or lift, or a plugged or
frozen discharge pipe, etc., could cause cycling.
3. Pump will not remove all water. If operating a pump
manually and suddenly no water comes out of the
discharge hose, shut off the unit immediately. The unit has
broken prime due to a very low water level.
Risk of electric shock. Can shock, burn or kill.
Before attempting to check why unit has stopped operating,
disconnect power from unit.
Installation •Operation 5
Other manuals for MBSP-3C
1
Table of contents
Languages:
Other Pentair Camera Accessories manuals
Popular Camera Accessories manuals by other brands

Trojan
Trojan GC2 48V quick start guide

Calumet
Calumet 7100 Series CK7114 operating instructions

Ropox
Ropox 4Single Series User manual and installation instructions

Cambo
Cambo Wide DS Digital Series Main operating instructions

Samsung
Samsung SHG-120 Specification sheet

Ryobi
Ryobi BPL-1820 Owner's operating manual