PERLESSMITH PSSS2 User manual
V5.0
Speaker Floor Stand Instruction Manual
Model
/Modèle
: PSSS2
Thank you for choosing this PERLESMITH product! At PERLESMITH we
strive to provide you with the best quality products and services in the
industry. Should you have any issues, please don't hesitate to contact us at
Technical Support:
(US/CA)1-800-556-6806 Mon-Fri 8am - 8pm(CST)
(UK)44-808-196-3891 Mon-Fri 2pm - 10pm(UTC)
Website: www.perlesmith.com
English ------------------------ 01-05
Français ------------------------ 06-10

•Check package contents against Supplied Parts and Hardware List to assure that all
components were received undamaged. Do not use damaged or defective parts. lf you
require replacement parts, please contact customer service at
•Carefully read all instructions before attempting installation. If you do not
understand the instructions or have any concerns or questions, please contact our
•This product may contain moving parts. Use with caution.
•Do not use this product for any purpose that is not explicitly specified in this manual.
Do not exceed weight capacity. We cannot be liable for damage or injury caused by
improper mounting, incorrect assembly or inappropriate use.
IMPORTANT SAFETY INSTRUCTIONS
Phillips Screwdriver
TOOLS NEEDED (NOT INCLUDED)
SUPPLIED PARTS
Plastic Washer
[D] x2
Pad
[F] x4
Speaker Bracket
[03] x2
Upper Support Post
[02b] x2
Lower Support Post
[02a] x2
Decorative Cover
[04] x2
Foot with Nut
[A/B] x8 Bolt
[E] x2
PVC Washer
[C] x2
Base
[01] x2
01 02 03 04 05
06 07 08 09 10
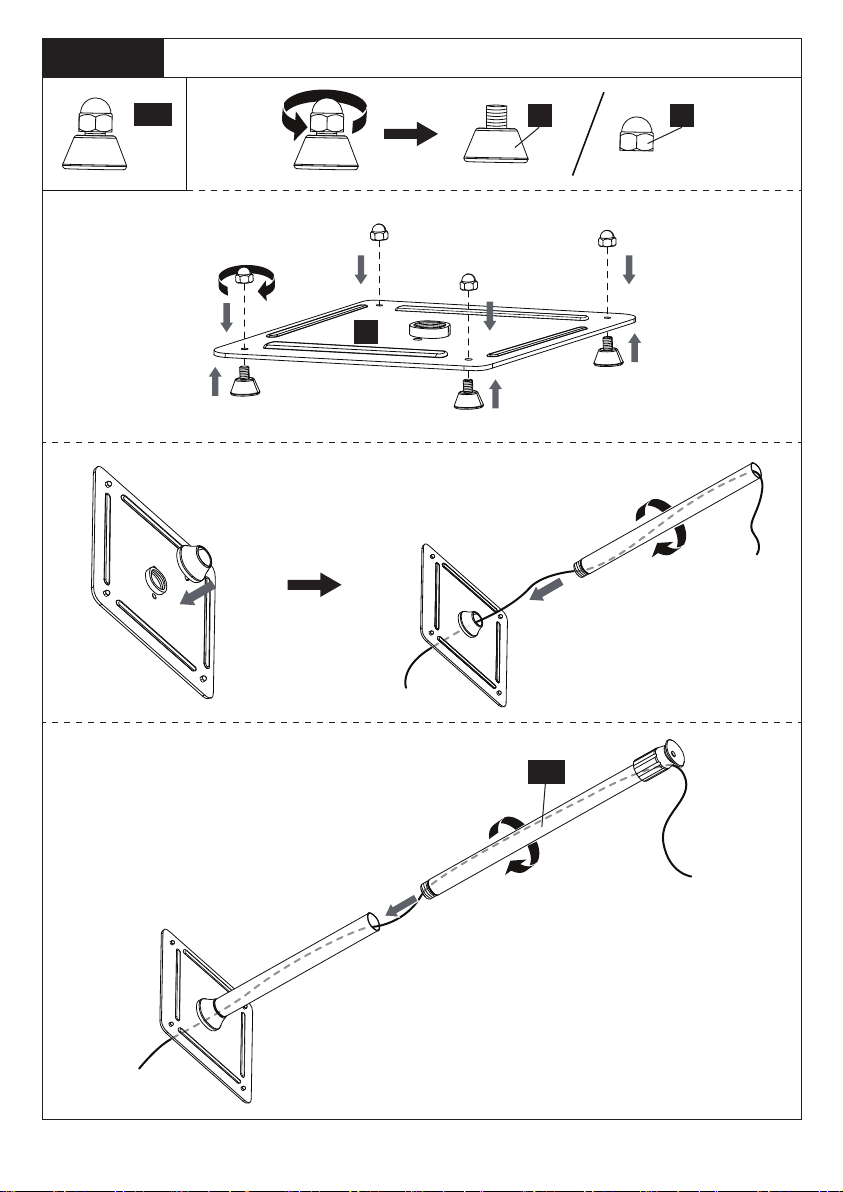
STEP 1 Secure the Feet and Support Posts to the Base
A/B A B
02b
01
01 02 03 04 05
06 07 08 09 10
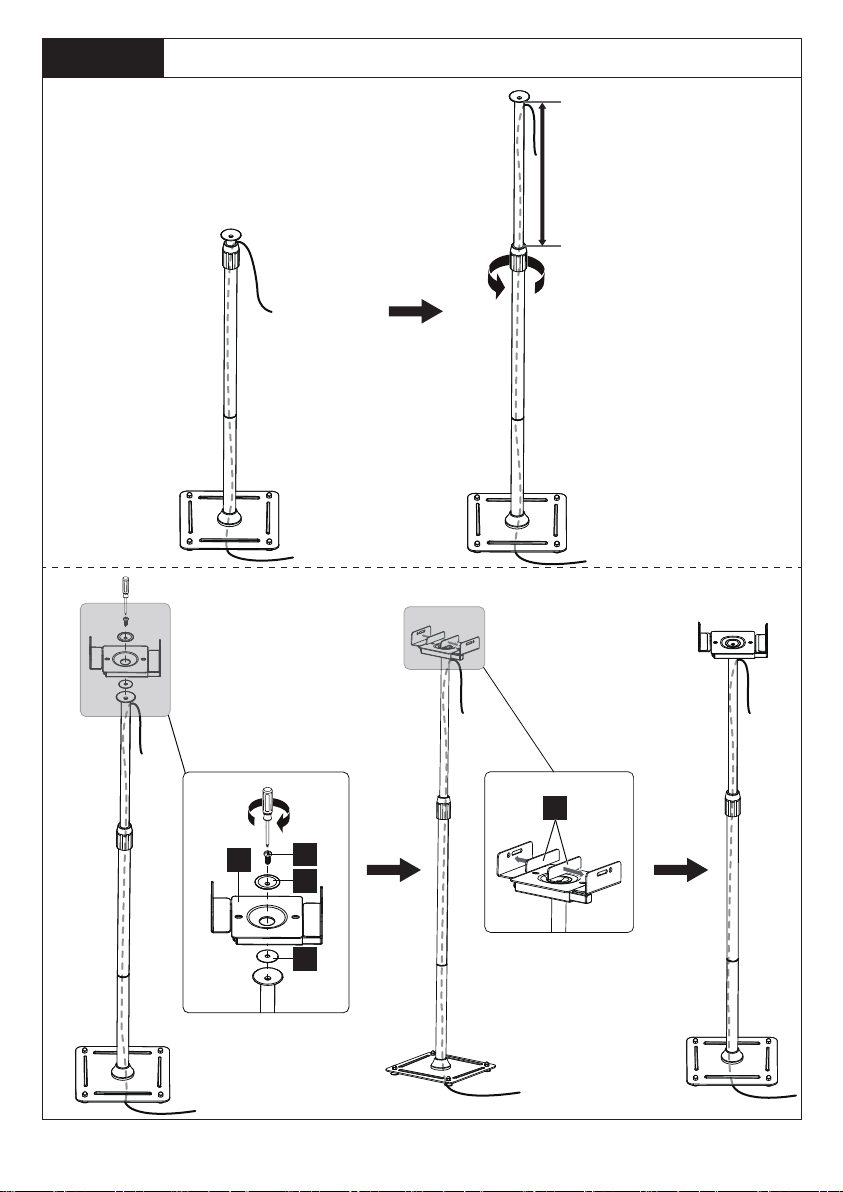
STEP 2 Secure the Speaker Bracket to the Upper Support Post
F
E
D
C
03
19/32 in-13 25/32 in
(15-350 mm)
01 02 03 04 05
06 07 08 09 10
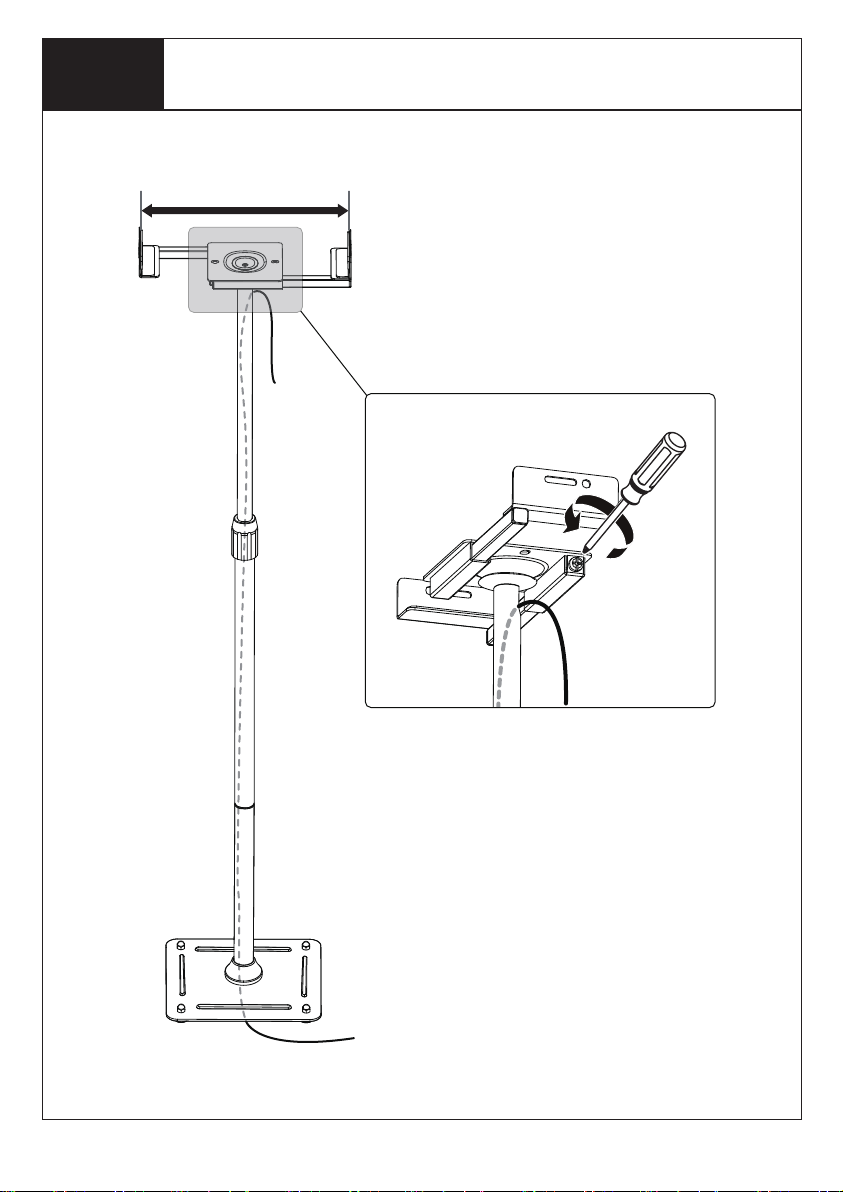
STEP 3 Secure the Speaker to the Stand and Tilt Adjustment
5 29/32 in-10 53/64 in
(150-275 mm)
Loosen
01 02 03 04 05
06 07 08 09 10

Speaker
(not included)
TightenTighten
Note: The speaker must be installed
on the middle of the speaker bracket.
360 Degree All-round Tilt Adjustment
If needed, the speaker angle can be adjusted.
1. Remove the speaker from the stand.
2. Slightly loosen the bolt [E].
3. Tilt the speaker bracket [03] to desired angle.
4. Tighten the bolt [E] to secure the speaker bracket
in place.
E03
01 02 03 04 05
06 07 08 09 10

•Vérifier le contenu de l'emballage par rapport à la liste des pièces et du matériel
fournis pour vous assurer que tous les composants ont été reçus sans dommage. Do
not use damaged or defective parts. Si vous avez besoin de pièces de rechange,
veuillez contacter notre service clientèle à l'adresse [email protected].
•Carefully read all instructions before attempting installation. If you do not
understand the instructions or have any concerns or questions, please contact our
•This product may contain moving parts. Use with caution.
•N'utilisez pas ce produit à des fins qui ne sont pas explicitement spécifiées dans ce
manuel. Ne dépassez pas la capacité de charge. Nous ne sommes pas responsables
des dommages ou blessures causés par un montage incorrect, un assemblage incor-
rect ou une utilisation inappropriée.
Consignes de sécurité importantes
Tournevis Phillips
Outils nécessaires (non inclus)
PIÈCES FOURNIES
Rondelle en plastique
[D] x2
Coussinet
[F] x4
Support d'enceinte
[03] x2
Support supérieur
[02b] x2
Poteau de
support inférieur
[02a] x2
Couvercle
décoratif
[04] x2
Pied avec écrou
[A/B] x8 Vis
[E] x2
Rondelle en PVC
[C] x2
Base
[01] x2
01 02 03 04 05
06 07 08 09 10

STEP 1 Fixer les pieds et les poteaux de soutien à la base
A/B A B
02b
01
01 02 03 04 05
06 07 08 09 10

Étape 2 Fixer le support de l'enceinte au poteau de support
supérieur
F
E
D
C
03
19/32 pouces -
13 25/32 pouces
(15-350 mm)
01 02 03 04 05
06 07 08 09 10

Étape 3 Fixer l'enceinte au support et au réglage d'inclinaison
5 29/32 pouces-10 53/64 pouces
(150-275 mm)
Desserrez
01 02 03 04 05
06 07 08 09 10
Table of contents
Languages:


