• When a check valve is used, a 3/16” (4.76mm) air bleed hole must be drilled in
the PVC pipe above the pump. Drill the hole at a 45º angle toward the bottom
of the pit to avoid splashing water outside the pit. Make sure the hole is above
the water line, and below the check valve. If a hole is not drilled
above the pump, an air lock may prevent the pump from operating.
• The control unit must receive 115V AC +/- 5% and 60 Hz from the AC outlet.
• Sewage pumps will not operate during a power outage. DO NOT use plumbing fixtures
that are connected to the sewage pit during a power outage. With the risk of
property damage, the addition of a high water alarm or sensor is highly
recommended.
• After the initial installation, be sure to check the operation by filling the pit with
water and observing the pump operation through several full cycles.
• For continuous duty operation, the pump must be submerged at least 3/4 of the
depth of the pump at all times. Do Not use the float switch and controller within
this application.
• In instances where the discharge line is exposed to freezing temperatures, the pipe
must be sloped downward so any remaining water will drain out. Failure to do so will
prevent water from exiting the pit and damage the pump if the line freezes.
Installation Instructions
Prior to Installation
1. Visually inspect your pump. Products may be damaged during shipping. If the
product has been damaged, contact your place of purchase or Glentronics, Inc.
before installation.
2. Thoroughly read the instructions provided to learn specific details regarding
installation and use. This manual should be retained for future reference.
Installing the Pump
1. Use a pit that conforms to all local codes
and is large enough to accommodate the
pump and float switch. Larger sewage pits
are preferred, since they will extend the
discharge cycle and reduce the number of
times the pump turns on.
2. Clean the pit of all debris. The pump’s
inlet must be kept clear.
3. The pump should not be set directly onto a
clay, earthen, or sand base. You should
install bricks or blocks under the pump to
provide a solid base.
4. The pump should be level.
5. Install discharge plumbing according to
local, regional and state codes. Rigid PVC
pipe is recommended.
6. An in-line check valve is recommended to
prevent back-flow. Note: When using a
check valve, an air bleed hole of 3/16”
(4.76mm) for the E7 Series needs to be
drilled in the discharge pipe. The hole must
be drilled below the check valve. A small
stream of water will escape through this air
bleed hole when the pump is running, so
the hole should be drilled on an angle toward the bottom of the pit. If a hole is not
drilled an air lock may prevent the pump from operating.
7. Install a gate valve or ball valve if required by any codes.
8. The horizontal discharge pipe must be positioned in a
downward slope so any remaining water will drain away.
Failure to do this will prevent water from exiting the pit
and damage the pump if the line freezes.
9. If you are replacing an old pump:
(a) Unplug the pump from the outlet.
(b) Loosen the check valve or rubber
union by unscrewing the bottom
hose clamp. (If the existing
system is installed without a
check valve or rubber union,
saw the pipe apart above
the pit.)
(c) Remove the old pump and
unscrew the pipe and adapter.
(d) If the adapter fits into the new
pump, screw the pipe into the
pump. If not, cut a piece of rigid
PVC pipe and connect it to the new adapter by cleaning and cementing the two
pieces together. (Follow the instructions on the PVC cleaner and cement.)
(e) Lower the pump into the pit by the handle.
(f) Connect the pipe on the pump to the existing discharge pipe with a rubber union
or check valve and tighten the hose clamps securely.
10. A cover is required in all sewage pump installations with gas-tight seals to contain
gases and odors. A vent pipe should be added in any sewage installation.
Installing the Vertical Float Switch
The vertical float switch contains a single large float.
Water will lift the float to the top of the lift rod which
will raise the lift rod and activate the pump. As the
pump evacuates the water from the pit the float will
drop, lowering the lift rod and turning off the pump.
Note: The vertical float switch must be moving
freely at all times. Make sure the float switch does
not come into contact with other pumps, wires,
pipe or any other object that may be in the pit.
The float switch must not come into contact with
the pit floor or wall. If the float switch does not
move freely the pump will not activate.
1. Fully open the metal hose clamp and insert it through the slots in the mounting
bracket of the float switch.
2. Place the hose clamp over the discharge pipe so that the gripping tabs are against
the pipe and select the desired activation level of the pump.
3. (a) When using the vertical float switch with either the Enhanced or Deluxe
Controller (Models VSC1.5 or VSC2), there are two rubber stoppers on the float switch
rod. Do not remove or alter their position as it will disrupt the timing of the
controller and how long the pump runs. (b) When using the vertical float switch
without a controller (Model VS), the pumping range can be adjusted by moving the
float stop up or down the lift rod. Note: It is important to mount the float so that the
activation level is below the drain tile that empties into the pit. Mounting it above the
drain tile would allow water to fill the drain tile before the pump is activated to pump
out the water.
4. To avoid debris from pouring onto the float, it should be positioned on the side of
the discharge pipe opposite the drain tile.
5. Once the float switch is in the desired position, securely tighten the hose clamp.
Note: The cable from the switch must remain outside the hose clamp.
Installing the Tether Float Switch
The tether float contains a single float connected to a
flexible tether. Water will raise the float to activate the
pump. As the pump evacuates the water from the pit the
float will fall and turn off the pump. Note: The tether
float switch must be moving freely at all times. Make
sure the float switch does not come into contact with
other pumps, wires, pipe or any other object that may
be in the pit. The float switch must not come into contact with the pit floor or wall.
If the float switch does not move freely the pump will not activate.
1. Locate the desired activation point. Note: It is important to mount the float so that
the activation level is below the drain tile that empties into the pit. Mounting it above
the drain tile would allow water to fill the drain tile before the pump is activated to
pump out the water.
2. Secure the float to the pipe with the enclosed hose clamp and bracket. Be sure the
bracket is positioned as shown. Do not overtighten the hose clamp. Overtightening
may cause damage to the mounting bracket.
3. To avoid debris from pouring onto the float, it should be positioned on the side of
the discharge pipe opposite the drain tile. Note: DO NOT adjust the tether length to
less than 4” as this can cause excessive stress on the cable or prevent the switch from
operating.
Connecting the Pump and Controller
Enhanced Controller
1. Mount the controller to the wall through the 2 holes on the cabinet using proper
mounting hardware for the application. The controller should be mounted at least 4’
from the floor and 1’ from the outlet.
2. Check to ensure the float switch is connected to the controller. The float switch wire
of the Enhanced Controller includes a connector that can be separated from the
controller when the wire needs to be threaded through small openings.
3. Plug the control box into a properly grounded, 3-prong receptacle. Then, plug the
pump into the receptacle on the control box. Do not use an extension cord.
4. Using a flathead screwdriver, adjust the dial on the front of the controller to select
the number of seconds that the pump will run after the float drops. The dial can be
adjusted from 5-45 seconds. The manufacturer default is about 10 seconds.
Deluxe Controller
1. Mount the controller to the wall through the 2
holes on the cabinet using the proper mounting
hardware for the application. The controller
should be mounted at least 4’ from the floor and
within 2’ of the outlet.
2. Check to ensure the float switch is connected to
the controller. The float switch wire of the
Deluxe Controller includes a connector that can
be separated from the controller when the wire
needs to be threaded through small openings.
3. Open the plastic door on the top of the Deluxe Controller and using a flat head
screwdriver adjust the dial to select the number of seconds that the pump will run
after the float drops. The timer can be adjusted from 5-45 seconds. The manufacturer
default is about 10 seconds. Install a 9V alkaline battery and replace the plastic door.
4. Plug the control box into a properly grounded, 3-prong receptacle. Then, plug the
pump into the receptacle on the control box. Do not use an extension cord.
5. Make sure the Power Failure Alarm slide switch is in the ON position.
Connecting to a Security System (Deluxe Controller Only)
The Deluxe Controller includes a terminal on the right side of the control box to connect
to a security system or other alarm devices. There are (3) three positions for wire
connections on this terminal: N.O. – normally open, N.C. – normally closed, and
Common.
1. Check your security system to determine whether an open (no contact) or closed
(making contact) connection is needed to activate the alarm.
2. The security system will provide (2) two connection terminals to extend wires to the
control terminal. Strip two wires 1/4” each. Connect either wire to the common
terminal. To secure the wire into the terminal, insert the exposed wire into the hole
on the side of the terminal next to the screw marked common. Turn the screw a few
turns to lock-in the wire.
3. If the security system requires a closing of a contact to activate the alarm, secure
the other wire into the terminal hole labeled N.O. (normally open). If the security
system requires an opening of a contact, secure the wire into the terminal hole
labeled N.C. (normally closed).
Connecting the Pump and Float Switch (Models VS and TS – No Controller)
1. Plug the float switch cord into a properly grounded 3-prong receptacle. Then, plug
the pump into the receptacle on the float switch cord. Do not use an extension cord.
Completing the Installation (all models)
1. After the initial installation, be sure to check the pump operation by filling the pit
with water and observing the pump through several full cycles. When using the
Enhanced or Deluxe Controllers, the pump should run for 10 seconds after the lower
float drops. Note: When the pump activates, it should have a “normal pumping”
sound. Any abnormal sound, vibration, or lack of output is the signal of a problem.
Stop the pump and refer to the troubleshooting guide. The vertical and tether float
switch must be moving freely at all times. Make sure the float switch does not
come into contact with other pumps, wires, pipe or any other object that may be
in the pit. The float switch must not come into contact with the pit floor or wall.
If the float switch does not move freely the pump will not activate.
2. Replace the pit cover with gas-tight seals making sure not to crimp any of the wires
within the cover.
Product Operation
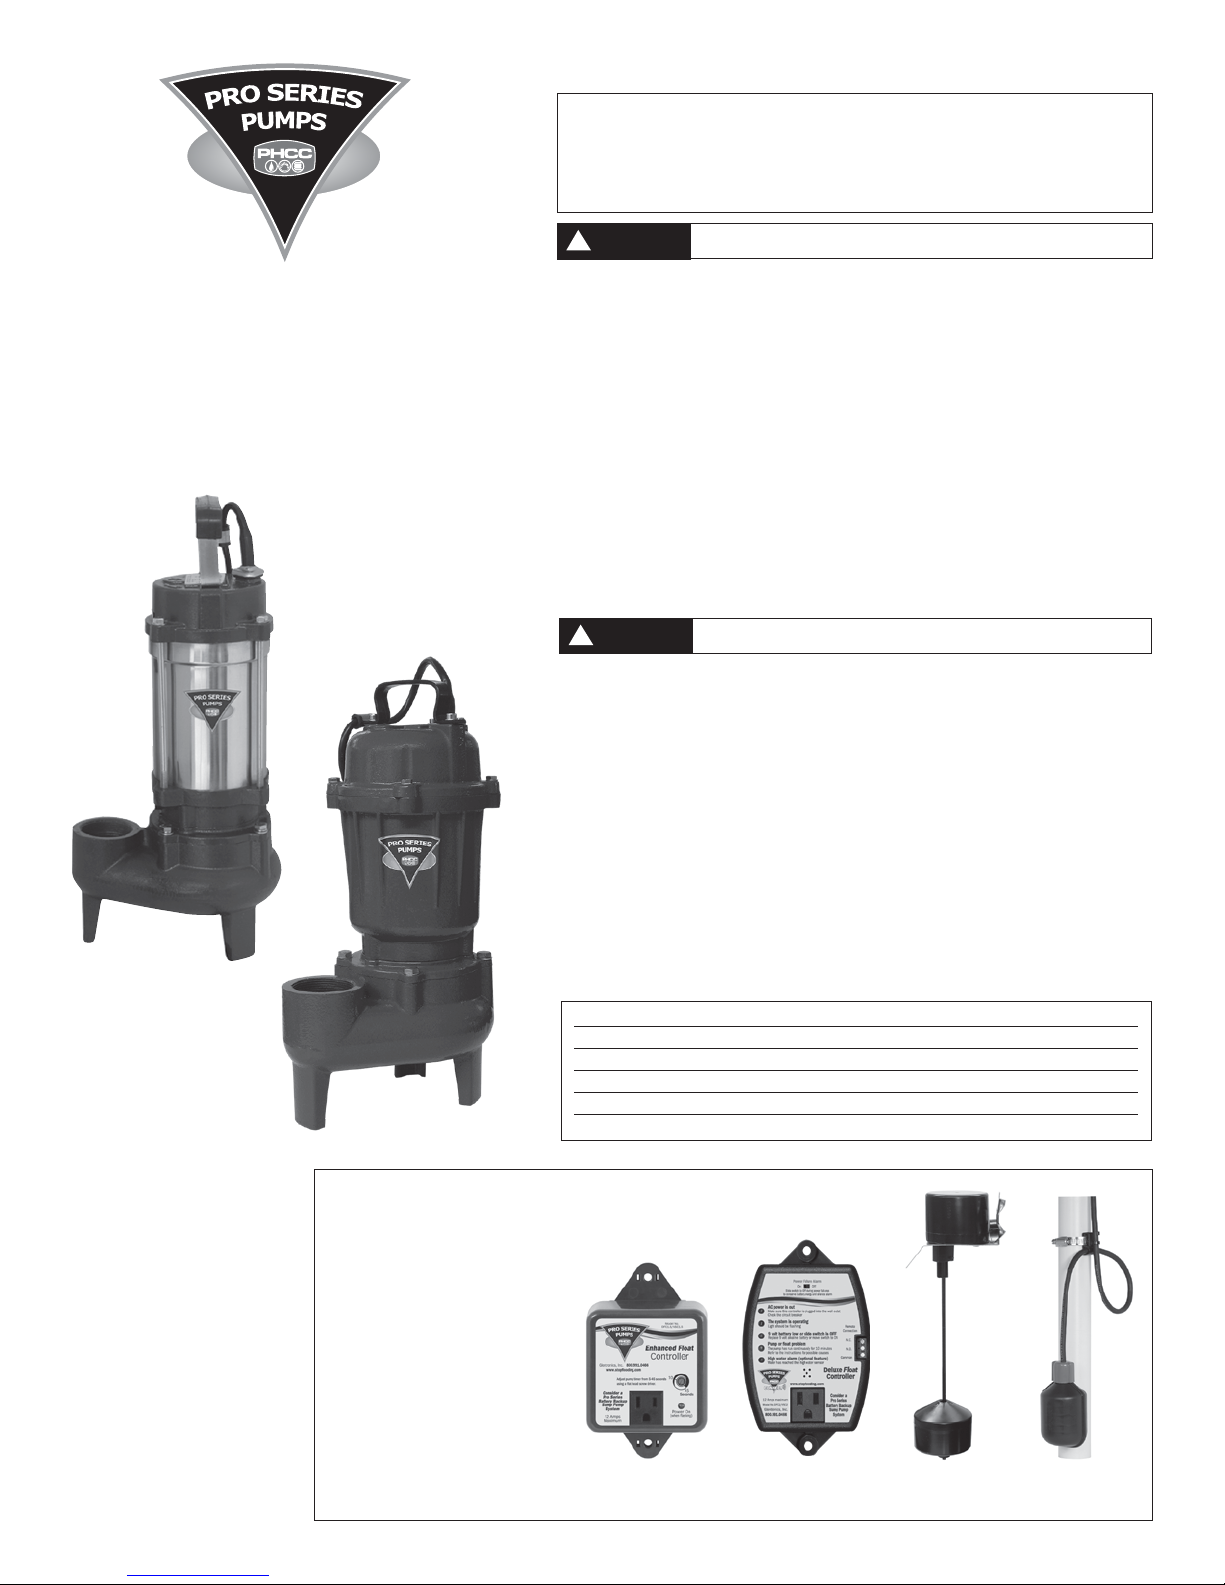
Vertical Float Switch with Enhanced or Deluxe Controllers
The vertical float switch contains a single large float. Water will lift the float by a 1⁄2”,
which will activate the pump. As the pump evacuates the water from the pit, the float
will drop. The pump will run for an additional 10 seconds to evacuate the pit completely
after the float drops. Note: There are two rubber stoppers on the float switch rod. Do not
remove or alter their position as it will disrupt the timing of the controller and how long
the pump runs. Note: When mounting the float switch, position the bottom of the float at
the height you want the pump to activate.
Tether Float Switch with Enhanced or Deluxe Controllers
The tether float contains a single float connected to a flexible tether. Water will raise
the float to activate the pump. As the pump evacuates the water from the pit the float
will fall and the pump will run for an additional ten seconds to empty the pit. Note: The
tether float switch must be moving freely at all times. If the float switch does not move
freely the pump will not activate.
Enhanced Controller
The Enhanced Controller features a dial to adjust the number of seconds that the pump
will run after the float drops. The dial can be adjusted from 5-45 seconds. The
manufacturer default is about 10 seconds. The LED on the front of controller will signal
the unit is receiving power. The controller will also run the pump once a week for
approximately four (4) seconds. This test will exercise the pump and help ensure the
pump is working properly.
Deluxe Controller
The Deluxe Controller features a series of warnings (audible and visual) that pinpoint
potential problems with the pump, switch and power conditions. The controller will
sound an alarm when power has been interrupted,
when the pump has run for more than 10 minutes
continuously, or when the 9V battery is low. The
9V battery (sold separately) runs the controller
during a power outage, allowing it to sound an
alarm if the circuit breaker trips, the controller is
not plugged in securely, or the home’s power is
interrupted. Note: The 9V battery will only power
the controller, not the pump. The Deluxe
Controller is equipped with a USB data port. The
purpose of this port is to allow communication
with the Pro Series Connect Modules. The Pro Series
Connect Modules are separately sold accessories
that will allow the user to stay connected and receive remote notifications of potential
problems and needed maintenance while away from home. The Deluxe Controller has a dial
(located in the battery compartment) to adjust the number of seconds that the pump will
run after the float drops. The Deluxe Controller will also run the pump once a week for
approximately four (4) seconds. This test will exercise the pump and help ensure the pump
is working properly.
Operating the Pump in a Continuous Duty Application
This pump is rated for continuous duty and may be used in applications requiring
continuous pumping including fountains or ponds. For use in any continuous duty
application the pump should be plugged directly into the wall outlet without the use of
the float switch or controller. The outlet must be a single phase properly grounded
3-prong receptacle, 115V, 60HZ. For continuous duty operation, the pump must be
submerged at least 3/4 of the depth of the pump at all times.
Understanding the Warnings & Alarms - Deluxe Controllers
AC power is out
There are several causes for power failure. The most common causes are a power outage
by the electric company or a tripped circuit breaker. Although the deluxe controller can
not run the pump, it will sound an alarm indicating the loss of power. This will allow
the homeowner to address the problem.
If this warning light and alarm are on, the control box is not receiving AC power for one
of many reasons:
1. The control box is not plugged in
2. The power to the house is out
3. The circuit breaker to that outlet has been tripped
4. The ground fault interrupter on that outlet has been tripped
5. A power brownout is taking place
Power Failure Alarm slide switch
When the controller is not receiving AC power, the monitoring features and the audible
alarms are powered by the 9-volt battery. This type of battery will power the controller
for many hours, but not indefinitely. Once the source of the AC power alarm is
determined, it is suggested that the Power Failure Alarm slide switch be turned to the
OFF position until the power is restored. This will preserve the battery and silence the
alarm. When AC power is restored, slide this switch back to the ON position. Note: If
the AC power is restored and the slide switch is in the OFF position, the alarm and light for
the 9-volt battery warning will activate, even if the battery is good. This is a reminder to
reset the alarm. Slide the switch to the ON position. If the battery is good, the light will
go out. If the alarm continues to sound, replace the battery.
The system is operating
This light should be ON and flashing at all times. It is included to indicate that the
system is monitoring the sump conditions. This light will not illuminate when:
1. The power is out and the Power Failure Alarm slide switch is in the OFF position
2. The power is out and the 9V battery is discharged
3. The controller is not functioning. Contact the Glentronics service department
The 9-volt battery low or slide switch is OFF
1. The 9-volt battery located in the top of the control box is coming to the end of its
useful life. Replace it with a new 9-volt alkaline battery.
2. The Power Failure Alarm switch is in the OFF position. It must be in the ON position
at all times, except when silencing an actual power failure condition.
Pump or float problem
This key feature monitors the time that the float switch is up continuously or in the
activated position. It is unusual for a pump run for 10 or more minutes continuously.
This can occur for many different reasons. Either the float is stuck in the up position,
there is a mechanical problem with the pump, or there is a problem with the plumbing
connections. Please refer to the Troubleshooting Guide on page 5.
High water alarm (optional feature*)
When water reaches the optional water sensor, it will activate the warning light, audible
alarm, and remote terminal. The activation of the water sensor could indicate that there
is a failure of the main pump or plumbing problem. Please refer to the Troubleshooting
Guide on page 5.
*This feature requires the additional purchase of the water sensor (Model PS-WS).
3
Accessories for the Deluxe Controller –
Connect Modules and High Water Alarm
Connect Modules - WiFi Module – Home Automation Module
(Requires purchase of PS-WiFi or PS-HZM)
The Deluxe Controller is equipped with a USB data port. The purpose of this port is to
allow communication with the Pro Series Connect Modules. The Pro Series Connect
Modules are separately sold accessories that will allow the user to stay connected and
receive remote notifications of potential problems and needed maintenance while away
from home.
High Water Alarm - Accessory for the Deluxe Controller
(Requires the additional purchase of Model PS-WS)
Water Sensor
The water sensor is designed to warn you of a potential flood. If you are installing it in
the sewage pit, it must to be installed between the basement floor and the primary float
switch. If there is a failure with either the main pump or the plumbing system, the water
level will rise past the primary float switch and activate the water sensor. When the
water sensor is activated, it will trigger a warning light, an audible alarm, and the
remote terminal on the controller. This water sensor is only designed to give you a
warning of a potential problem; it will not activate the pump.
Maintenance Check List
Maintenance should be performed 1-2 times per year.
1. Remove all debris from the bottom of the pit and make sure the
pump’s inlet is clear of debris.
2. Remove all debris floating in the water.
3. Remove all debris from the float switch.
4. Fill the pit with water. Make sure pump turns on at the intended level.
5. While the pump is running, make sure pump is evacuating water at a good pace.
6. While the pump is running, make sure a stream of water is escaping from the air
bleed hole. If not, clear the hole of any deposits or debris.
Visit our website www.stopflooding.com for more information about the Pro Series AC
sump pumps and battery backup sump pump products.
Slide switch to OFF during power failures
to conserve battery energy and silence alarm
Power Failure Alarm
Remote
Connection
N.C.
Common
N.O.
Glentronics, Inc.
800.991.0466
www.stopflooding.com
Model No. DFC2
On Off
12 Amps maximum
Consider a
Pro Series
Battery Backup
Sump Pump
System
AC power is out
Make sure this controller is plugged into the wall outlet
Check the circuit breaker
The system is operating
Light should be flashing
Pump or float problem
The pump has run continuously for 10 minutes
Refer to the instructions for possible causes
High water alarm (optional feature)
Water has reached the high water sensor
9 volt battery low or slide switch is OFF
Replace 9 volt alkaline battery or move switch to ON
Deluxe