manuals.online logo
Brands
  1. Home
  2. •
  3. Brands
  4. •
  5. Philips
  6. •
  7. Jukebox
  8. •
  9. Philips iBoom DLA78405/10 User manual

Philips iBoom DLA78405/10 User manual

4
Product overview
Your Philips iBoom JukeBox (DLA78405/10) is an
elegant iPod speaker dock for enjoying your iPod in
luxurious stereo sound, as well as an RF Display
Remote to view and control iPod around the house.
Featuring dual woofers and tweeters and an advanced,
low-distortion Class D amplifier, iBoom JukeBox is the
high-fidelity home sound solution for your iPod. Use
the Display Remote to browse your iPod music and
video lists on the bright display screen – including
color Album Art – even through walls and from up to
75 feet away! iBoom JukeBox also charges the Display
Remote as well as your iPod. Use the Aux-In Jack to
enjoy other audio devices out loud through the iBoom
JukeBox, or use the AV-Out Jack to connect your iPod
to yourTV to enjoy your iPod movies in stereo (cables
available separately). Philips offers an entire line of
products to enhance your iPod experience.
Product highlights
• Play your iPod music in high-fidelity sound
• Charge and cradle iPod
• RF remote with display screen
• Auxiliary Input for use with other audio devices
• Audio/Video Out for viewing iPod video content
on yourTV
• Dock inserts to secure your specific iPod
Your Philips iBoom JukeBox
Congratulations on your purchase and welcome
to Philips!
To fully benefit from the support that Philips offers,
register your product at www.philips.com/welcome.
ENGLISH
Important information
Take time to read this manual before you use your Philips
iBoom JukeBox (DLA78405/10). It contains important information
and notes about operating your Philips iBoom JukeBox.
© 2008 Koninklijke Philips Electronics N.V.
All rights reserved. Reproduction in whole or in part is prohibited
without the written consent of the copyright owner.Trademarks
are the property of Koninklijke Philips N.V. or their respective
owners. iPod is a trademark of Apple Inc., registered in the U.S.
and other countries.
Hereby, Philips, BG P&A, declares that this Philips iBoom JukeBox
is in compliance with the essential requirements and other
relevant provisions of Directive 1999/5/ C.
DNote:
Audio input limiting threshold is maximum 180 mVSS
Disposal of your old product:
Your product is designed and manufactured with high quality
materials and components, which can be recycled and reused.
WEEE logo: When this crossed-out wheeled bin
symbol is attached to a product it means the product
is covered by the uropean Directive 2002/96/ C.
Please inform yourself about the local separate collection system
for electrical and electronic products.
BWarnings
• Do not expose the product to rain or water.
• Keep away from sunlight to prevent heat build-up.
• Do not disassemble or repair.
• Keep away from high voltage devices.
Take the package to your local recycling center.
3
1
2
3
4
6
Getting started
CImportant: Read the safety precautions on page 3
carefully before connecting your Philips iBoom JukeBox.
This section helps you with installation of your Philips
iBoom JukeBox for the first time.
1. Plug iBoom JukeBox into a wall outlet using the
included multinational power supply.
2. Place the Display Remote on the charging base on the
back of the iBoom JukeBox, ensuring that all of the
charging contacts touch.Allow the Display Remote
to charge for at least four hours before using.
3. Place the appropriate Dock Insert for your iPod
model (if necessary) into the iBoom JukeBox
dock.Then, place your iPod into the dock.
4. Press the On/Off Button on the top of iBoom
JukeBox. Until the Display Remote is fully
charged, use the Play/Pause Button, Previous/
NextTrack Buttons andVolume Buttons on
your iBoom JukeBox as needed.
DNote:The volume control on your iPod is
disabled while docked. Instead, use the volume
controls on the Display Remote or the iBoom
JukeBox.
ENGLISH
5
What’s in the box
Included
1. Philips iBoom JukeBox
2. RF Display Remote
3. Dock inserts for iPod
4. Multinational power supply
5. Adapter for urope
-except the United Kingdom,
Ireland, Cyprus and Malta
6. Adapter for North America,
Central America and Japan
7. Adapter for Australia, New
Zeland, Pupa New Guinea
and Argentina
8. Adapter for United Kingdom,
Ireland, Cyprus, Malta, Malaysia,
Singapore and Hong Kong
9. CD ROM
10.Quick Start Guide
What you will also need
iPod
AC power outlet
CD-ROM
9
10
4
123
4
5 6 7 8
34561 2
8
ENGLISH
Using the Display Remote
Control your iPod content from room to room. iBoom
JukeBox comes with a state-of-the-art RF Display
Remote that enables you to view and control your iPod
content from afar.The Display Remote features a bright
screen that displays music and video lists just like on your
iPod, as well as Now Playing info with color Album Art.
The Display Remote is RF-based, with a range of
approximately 75 feet (22 meters). It can control iBoom
JukeBox through walls, floors, etc., as long as you are
within range of the base unit.
After allowing the Display Remote to charge on the
back of the iBoom JukeBox for at least four hours,
remove it from the charging base and press any button
to bring it out of “Sleep” mode.
hen the Display Remote is activated, the iPod will
display a blank screen or “Accessory Attached.”
DNote: There may be a slight delay as the Display
Remote queries your iPod to gather information.
Browsing music on the Display Remote
Using the inner ring on the Display Remote, press the
Next Menu/Select or Previous Menu Button to navigate
through the iPod menus, and the Menu Line Item Up or
Down Button to highlight your selection.To begin playing
the selected track, press the Next Menu/Select Button.
7
iBoom JukeBox controls
When iPod is docked
1. PREVIOUS TRACK: Press once to reset the current
track. Press twice to skip to the previous track. Press
and hold to rewind the current track.
2. NEXT TRACK: Press once to skip to the next track.
Press and hold to fast-forward the current track.
3. POWER ON/OFF: Press to turn iBoom JukeBox on
and off.
4. PLAY/PAUSE: Press to pause the current track. Press
again to resume playback
5. VOLUME DOWN: Press to lower the volume on
iBoom JukeBox.
6. VOLUME UP: Press to raise the volume on iBoom
JukeBox.
When an audio device is connected via Aux-In
1. PREVIOUS TRACK: No function. Control playback
using your device.
2. NEXT TRACK: No function. Control playback using
your device.
3. POWER ON/OFF: Press to turn iBoom JukeBox on
and off.
4. PLAY/PAUSE: Press to pause the current track. Press
again to resume playback
5. VOLUME DOWN: Press to lower the volume on
iBoom JukeBox.
6. VOLUME UP: Press to raise the volume on iBoom
JukeBox.
Play/Pause
Volume Up
Volume Down
Menu Line Item Up
Menu Line Item Down
Previous Menu
Next Menu/Select
Next Track/Fast-Forward
Previous Track/Rewind
10
Using with other audio devices
You can use iBoom JukeBox as an external speaker
for other audio devices using a standard 1/8”
(3.5mm) stereo mini-jack cable (available separately).
1. Connect one end of the 1/8” (3.5mm) stereo mini-
jack cable into the Aux-In Jack on the back of iBoom
JukeBox.
2. Connect the cable’s other end to your audio device’s
headphone or Line-Out jack.
3.Turn on iBoom JukeBox.Then use the Volume Buttons
on iBoom JukeBox to adjust your device’s volume.
DNote:To get the best sound quality from iBoom
JukeBox when using the Aux-In, carefully adjust the
volume level of your device until there is no distortion.
Then, control the overall volume of your music with the
iBoom JukeBox controls.
Using to enjoy iPod videos
You may use your iBoom JukeBox to enjoy the
audio of your iPod videos in stereo sound.
Simply connect iBoom JukeBox to yourTV or
video screen via the AV-Out Jack on the back of
the iBoom JukeBox (AV cable available
separately).Then you can use the Display
Remote to navigate your iPod video content
and control video playback.
CImportant: With the iPod docked to iBoom
JukeBox, make sure that the iPodTV Out setting
(found under theVideo Settings) is set to either
Ask or On.
ENGLISH
9
About
The About setting is mainly used for informational
purposes, but should you have a problem with
your Display Remote communicating with the
iBoom JukeBox base unit, you can pair the Display
Remote with iBoom JukeBox as follows:
1. nsure that there is no iPod connected.
2. With the iBoom JukeBox on, hold the Power
Button down for 5 seconds to enter “Pairing
Mode”.You will know you are in Pairing Mode
when the iBoom JukeBox touch panel flashes in
blue.
3. On the Display Remote, navigate to “About” in the
Settings Menu. Press the Next Menu/Select Button
to tell the Display Remote to pair with iBoom
JukeBox.The iBoom JukeBox base unit will
acknowledge by a quick flashing of the touch panel
in white.
4. Once the Display Remote is paired, you will see a
“no iPod” message on the display screen.
Settings and features
Settings menu
The Display Remote features a simple Settings Menu
with the following options:
Sleep
In the Sleep Menu, you can set the amount of time it
will take the Display Remote to enter Sleep Mode.
To change the time, navigate to “Sleep” in the
Settings Menu and press the Next Menu/Select
Button. Use the Menu Line Item Up or Down
Button to highlight the desired time setting, and
press the Next Menu/Select Button to select your
highlighted option.You may choose from: 30 sec,
1 min, 2 min, or 4 min.
Language
The Language Menu is used to configure the Display
Remote for a specific language.To change the
language selection, use the Menu Line Item Up or
Down Button to highlight the desired language, and
press the Next Menu/Select Button to select your
highlighted option. iBoom JukeBox supports nglish,
Spanish, Italian, French, German, Dutch, Korean,
Simplified Chinese,Traditional Chinese and Japanese.
12
Frequently asked questions
Here you will find the most frequently asked questions
and answers about your Philips iBoom JukeBox.
For further help, visit www.philips.com/support.To keep the warranty
valid, never try to repair the system yourself. If you encounter
problems when you use your iBoom JukeBox, check the following
points before you contact Philips. If the problem remains unsolved,
go to the Philips website www.philips.com/support.When you
contact Philips, make sure that your Philips iBoom JukeBox is nearby
and the model number and serial number are available.
What do I do if my iPod does not respond to iBoom
ukeBox when docked?
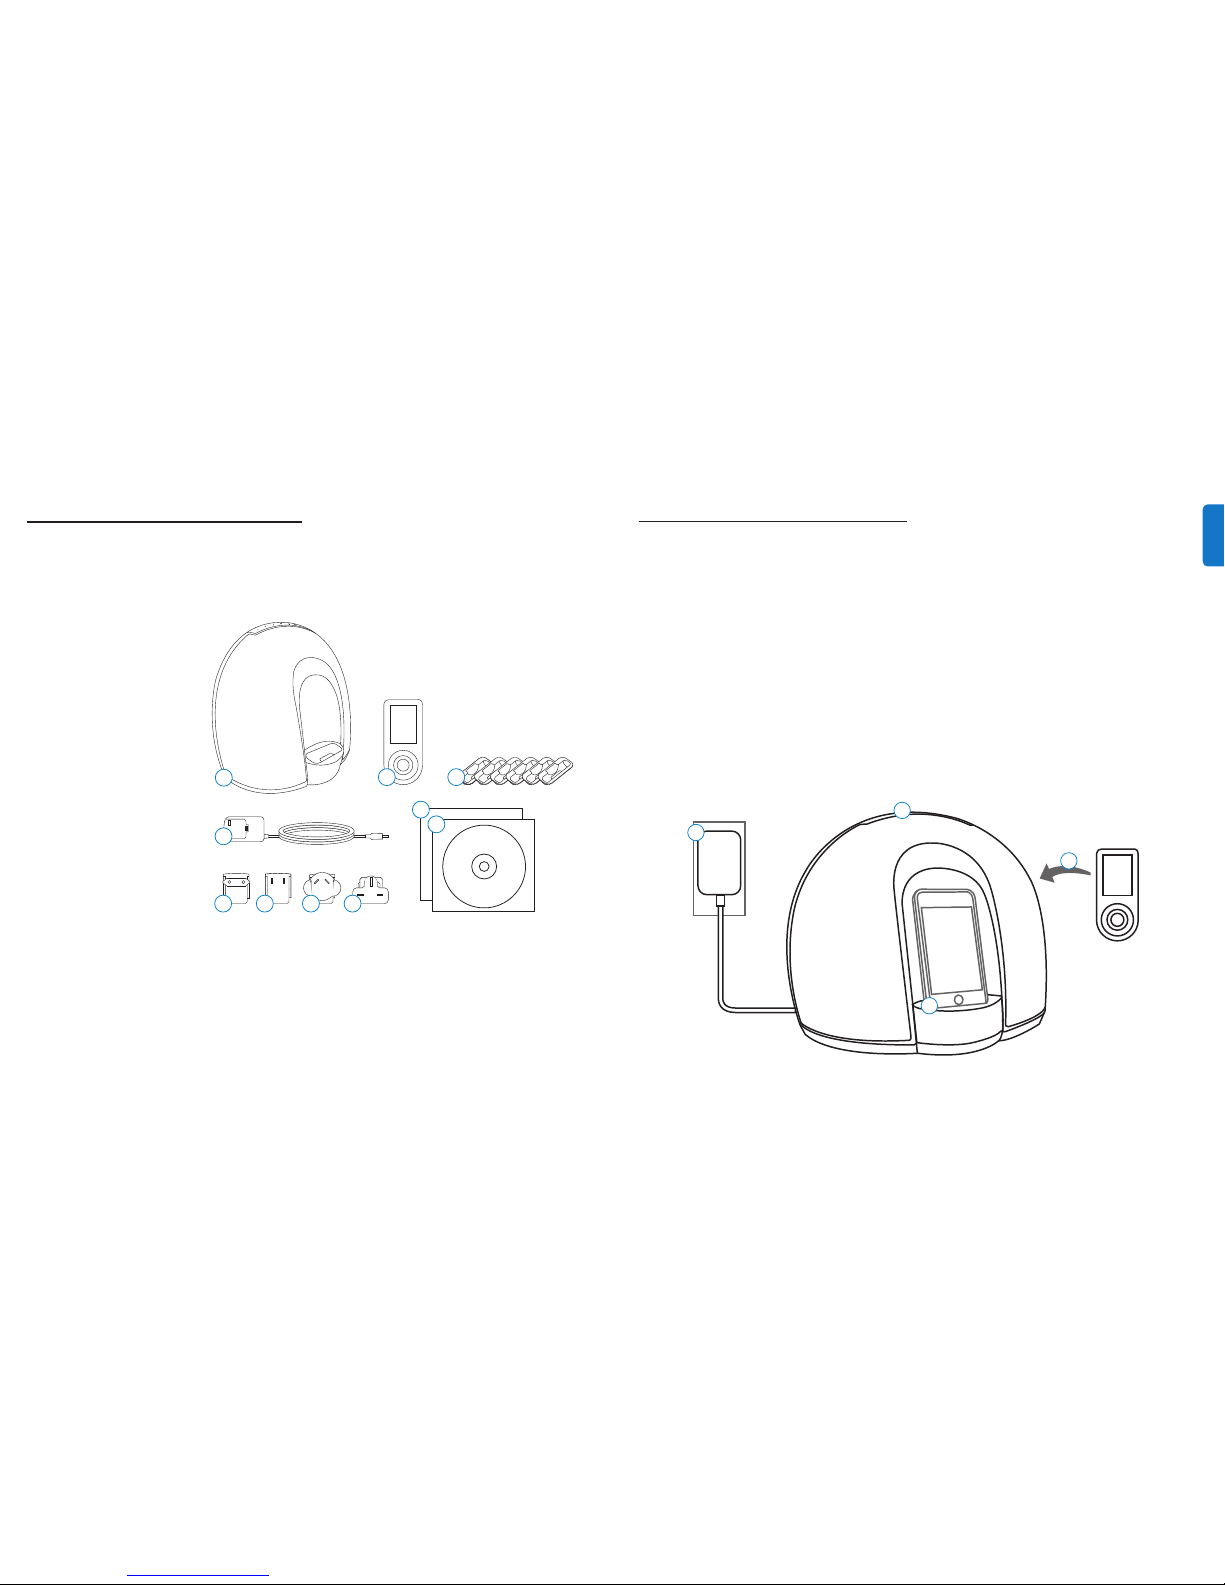
1. Your iPod may not be docked properly. Remove your
iPod from iBoom JukeBox and check for any
obstruction to the connector in the dock and on your
iPod.Then re-dock your iPod.
2. iPod software may need to be updated.To upgrade
software on your iPod, visit:
http://www.apple.com/iPod/download
3. Make sure your iPod is working properly before
docking into iBoom JukeBox. If your iPod is frozen and
will not respond, you may need to reset your iPod.To
do this, press and hold the Menu and Center Button
on your iPod for 10-12 seconds, or until your iPod
resets. Please refer to your iPod manual for details.
What do I do if my iPod did not charge while
docked in the iBoom ukeBox?
Your iPod may not be docked properly. Remove your iPod
from iBoom JukeBox and check for any obstructions to
the connector in the dock and on your iPod.Then re-dock
your iPod.
What do I do if my Display Remote is not
responding?
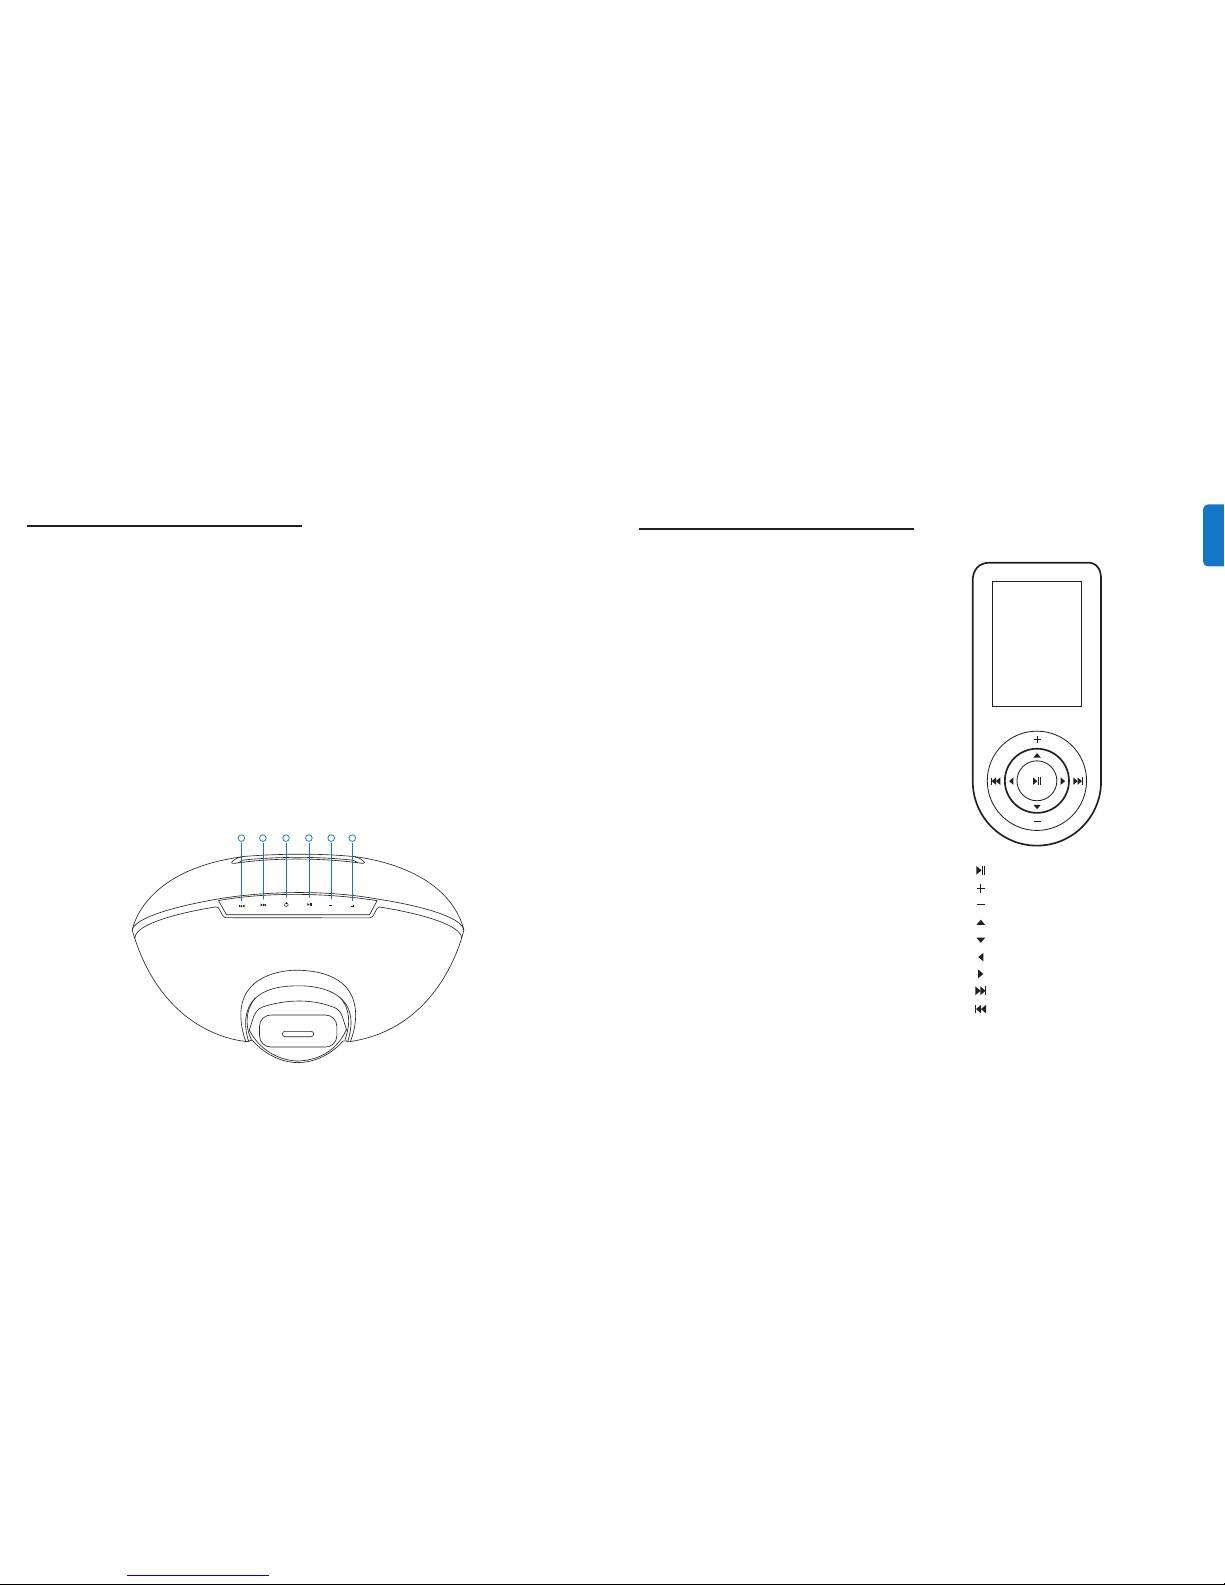
Check that your Display Remote has a full charge.
A full charge will last approximately four hours. Place
the Display Remote on the charging bay on the back
of the iBoom JukeBox and ensure that the “charging”
logo appears momentarily.
Also check that your Display Remote is properly
paired to the base unit.To pair the two, follow the
directions under the “About” section on page 9.
What do I do if my sound is distorted?
Remember that the volume output on your iPod
cannot be controlled when docked, so you should
control volume using the iBoom JukeBox Volume
Buttons.
1. The volume may be set too high. Decrease the volume on
iBoom JukeBox.
2. The sound source may be distorted. If the iPod original
sound source is of poor quality, distortion and noise are
easily noticed with high volume.
3. The Q settings on your iPod may need to be adjusted for
optimum sound quality.
DNote: When using an audio device via the iBoom
JukeBox’s Aux-In, the volume is controlled with both the
audio device and the iBoom JukeBox. Make sure to
adjust the volume level of your audio device until there
is no distortion.Then, control the overall volume of your
music with the iBoom JukeBox controls.
ENGLISH
11
Warranty and service
Limited One-Year Warranty
Philips warrants that this product shall be free from defects in
material, workmanship and assembly, under normal use, in
accordance with the specifications and warnings, for one year
from the date of your purchase of this product.This warranty
extends only to the original purchaser of the product, and is not
transferable.To exercise your rights under this warranty, you must
provide proof of purchase in the form of an original sales receipt
that shows the product name and the date of purchase.
Warranty information can be found at: www.philips.com/welcome.
For technical support, send us an email with the model number of
the product and a detailed description of your problem to:
accessorysuppor[email protected].TH R AR NO OTH R
XPR SS OR IMPLI D WARRANTI S. Philips’ liability is limited to
repair or, at its sole option, replacement of the product. Incidental,
special and consequential damages are disclaimed where
permitted by law.This warranty gives you specific legal rights.You
may also have other rights that vary from state to state.
Technical data
Compatibility
All iPods with Dock Connector
iBoom ukeBox
Output Power: 10 Watts/Channel into 4 ohms
Frequency Response: 80 Hz ~ 20 kHz
Signal to Noise Ratio: >85dB
Power Supply: 15VDC ~ 1.5 A
Display Remote
Transmitter Range:Approximately 75 feet (22.86 m)
Connections
30-Pin iPod Dock Connector
Auxiliary Input: 3.5 mm stereo mini-jack
Audio/Video Output: iPod AV out/stereo mini-jack
Power Supply
InputVoltage: 15VDC ~ 1.5 A
Product Dimensions (Width, Height, Depth)
11.8 in x 9.5 in x 7.5 in / 300 mm x 240 mm x 190 mm
Product Weight
iBoom JukeBox: 4.4 lbs. / 70.5 oz. / 2,000 g
AC Adapter: 0.5 lbs. / 8.5 oz. / 240 g
14
ENGLISH
13
CE016 8
Made in China
uropean regulations:
This product has been designed, tested and manufactured
according the uropean R&TT directive 1999/5/ C
© 2008 Koninklijke Philips Electronics N.V.
All rights reserved.
M-DLA78405/10-080903-A

This manual suits for next models

2

Other Philips Jukebox manuals

Philips GoGear HDD1635 User manual

Philips

Philips GoGear HDD1635 User manual

Philips HDD6330 GoGear User manual

Philips

Philips HDD6330 GoGear User manual

Philips HDD100 User manual

Philips

Philips HDD100 User manual

Philips HDD060 User manual

Philips

Philips HDD060 User manual

Philips HDD060/05 User manual

Philips

Philips HDD060/05 User manual

Philips HDD060 User manual

Philips

Philips HDD060 User manual

Philips HDD070/05 User manual

Philips

Philips HDD070/05 User manual

Philips GoGear HDD1420 User manual

Philips

Philips GoGear HDD1420 User manual

Philips HDD060 User manual

Philips

Philips HDD060 User manual

Philips HDD6330 GoGear User manual

Philips

Philips HDD6330 GoGear User manual

Philips HDD120 User manual

Philips

Philips HDD120 User manual

Philips HDD070/00 User manual

Philips

Philips HDD070/00 User manual

Philips HDD065 User manual

Philips

Philips HDD065 User manual

Philips HDD6330 GoGear User manual

Philips

Philips HDD6330 GoGear User manual

Philips DLA78405 User manual

Philips

Philips DLA78405 User manual

Philips HDD6330/17 User manual

Philips

Philips HDD6330/17 User manual

Philips HDD17B User manual

Philips

Philips HDD17B User manual

Philips micro jukebox HDD084 User manual

Philips

Philips micro jukebox HDD084 User manual

Philips GoGear HDD085 User manual

Philips

Philips GoGear HDD085 User manual

Philips DC1010/05 User manual

Philips

Philips DC1010/05 User manual

Philips HD6630 Configuration guide

Philips

Philips HD6630 Configuration guide

Philips HDD100/00 User manual

Philips

Philips HDD100/00 User manual

Philips HDD6320 User manual

Philips

Philips HDD6320 User manual

Philips micro jukebox HDD084 User manual

Philips

Philips micro jukebox HDD084 User manual

Popular Jukebox manuals by other brands

THOMSON PDP2812 user guide

THOMSON

THOMSON PDP2812 user guide

RCA RD2760 - Lyra 1.5 GB MP3 Player user guide

RCA

RCA RD2760 - Lyra 1.5 GB MP3 Player user guide

AMI NGX MINI 2 Installation & owner's manual

AMI

AMI NGX MINI 2 Installation & owner's manual

Ricatech RR900 Retro XXL user manual

Ricatech

Ricatech RR900 Retro XXL user manual

Denver MPJ-5000 user manual

Denver

Denver MPJ-5000 user manual

Excalibur RD66 user guide

Excalibur

Excalibur RD66 user guide

HQ HQ-JB100 manual

HQ

HQ HQ-JB100 manual

Chicago Gaming 1015 owner's manual

Chicago Gaming

Chicago Gaming 1015 owner's manual

Mr. Christmas 10524 instruction manual

Mr. Christmas

Mr. Christmas 10524 instruction manual

Crosley Crosley Full Size Jukebox CR12-10 instruction manual

Crosley

Crosley Crosley Full Size Jukebox CR12-10 instruction manual

RCA RTD750 user guide

RCA

RCA RTD750 user guide

manuals.online logo
manuals.online logoBrands
  • About & Mission
  • Contact us
  • Privacy Policy
  • Terms and Conditions

Copyright 2025 Manuals.Online. All Rights Reserved.