Philips PREMIERE DCR 2021 User manual

DCR 202
1
Benutzerhandbuch
2
DE
User manual
48
EN
DCR 2021_Premiere_indice 1b 7/03/06 11:45 Page 1

49
EN
Dear Customer,
Thank you for choosing the DCR 2020 digital receiver.With your new DCR 2020 digital
receiver, the whole world of television is open to you for top-quality viewing!
This User Manual will help you get the best out of the extensive and fascinating functions
of your new digital receiver.
As a latest generation digital receiver, the DCR 2020 is also designed to receive and use
Premiere services.With a subscription to Premiere, a whole new dimension in digital
television is opened up to you:
•PREMIERE FILM offers great entertainment to suit all tastes with a selection of 100 films
aday with no commercial interruption. DISNEY CHANNEL provides great family
entertainment.
•PREMIERE SPORT & PREMIERE FUSSBALL LIVE offer the best in sports - and you can
enjoy your game in unique broadcast quality.
•PREMIERE THEMA includes a wide variety of theme channels for all your moods and
interests with documentaries, interactiveadvice programmes, children's programmes,
music channels and adult channels, as well as the best programmes for fans of sci-fi,
thrillers, action and classic movies.
•On PREMIERE DIREKT, you can easilybook, by telephone, SMS or via the Internet, the
best current films, exclusive sports events, special events and adult television for
whatever time you want and enjoythem at home.
Subscribe to the best in television and experience moreexclusiveness, more variety and
morecomfort-with Premiere.
When installing Premiere, please observe the installation instructions that come with the
Premieresmartcard. If you haven’t got a Premiere smartcard yet, you can find further
information on current Premiere offers on:
0180/55100 00* - www.premiere.de 01/49166 200 - www.premiere.at
for Germany for Austria
or at specific dealers.
We wish you great viewing with your Philips DCR 2020!
Your Philips Team
*0.12euros/min on the Deutsche Telekom Ltd. fixed network
Foreword
DCR 2021_Premiere_indice 1b 7/03/06 11:45 Page 49

50
EN
Please read the safety section before connecting your receiver.
1Disconnect your TV set and recorder from the mains.
2Integrate your receiver in your existing installation as shown on the diagram.
3Insert your smart card in your receiver with the
golden contacts facing up.
4Insertthe twobatteries supplied in your remote
control.
Batteries are removable from the remote using
common household tools (like a screwdriver…).
The batteries supplied do not contain hazardous
substances such as Mercury, Cadmium, or Lead.
However, they must not be disposed of with your
household waste but to a local separate collection
system.
5Reconnect your TV set and recorder to the mains. Do
not connect your receiver to the mains yet!
6Switch on your TV set and select a channel.
7Plug the receiver's power supply cord into the mains.
The welcome screen appears, then the First
Installation screen.
8Set your favourite Language setting.
9Set your TV display format.
Quick installation
TV set
EXT 1 EXT 2
Cable Wall socket
Cable Receiver
to AC outlet
Supplied
DCR 2021_Premiere_indice 1b 7/03/06 11:45 Page 50

51
EN
10Press OK to start scanning for channels.
When scanning has been successfully completed, a
completion message is displayed.
11 Press OK; a new screen appears, indicating that a
search for new software is in progress.
12Press EXIT to stop searching and tune the receiver
to the first channel in the main TV list.
13Alternatively, wait for software detection, and then
proceed as described in paragraph 10.5.5.2
For detailed information on first installation, see chapter 5.
DCR 2021_Premiere_indice 1b 7/03/06 11:45 Page 51

52
EN
Meaning of symbols
02
Important information:
Must be read and understood.
Your product has been designed and manufactured with high quality materials and
components, which can be recycled and reused.
When this crossed-out wheeled bin symbol is attached to a product or his
packaging, it means the product is covered by European Directive 2002/96/EC.
Please inform yourself about the local separate collection system for electronic
products.
Please act according to your local rules and do not dispose of your old products
with your normal household waste.The correct disposal of your old product will
help prevent potential negative consequences for the environment and human
health.
The “Material recyclability symbol” affixed on package cardboard and user manual
means these parts are recyclable.
So do not dispose of them with your normal household waste.
The “Material recyclability symbol” affixed on plastic packaging parts means these
parts are recyclable.
So do not dispose of them with your normal household waste.
The “Green Dot” affixed on cardboard means PHILIPS pays a financial duty to the
“Avoidance and Recovery of Packaging Waste” organization.
DCR 2021_Premiere_indice 1b 7/03/06 11:45 Page 52

53
EN
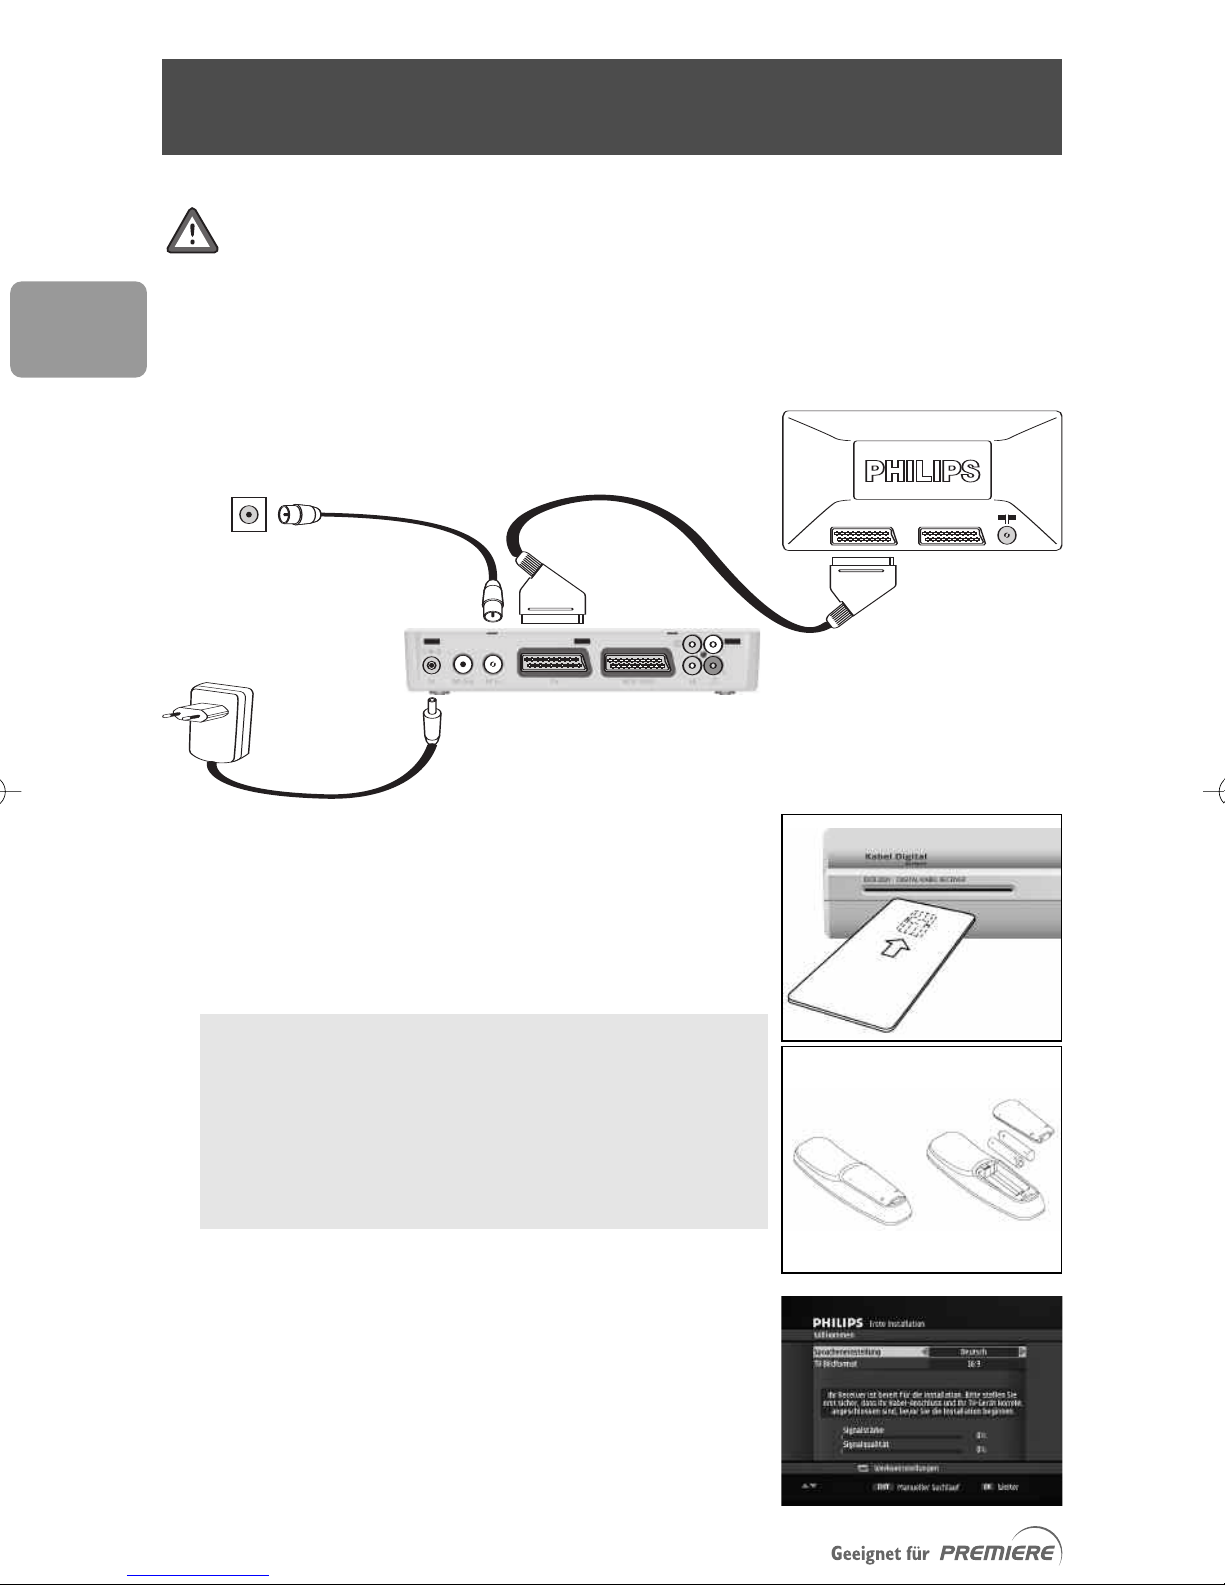
Your receiver is powered using an AC adaptor.This equipment has been
manufactured to meet the appropriate safety standards, but the instructions
below must be followed to operate it safely.These instructions must be kept
for future reference.
-Before connecting the AC adaptor to the mains, check that the mains supply voltage
corresponds to the voltage printed on it. If the mains voltage is different, consult
your dealer.
-The AC adaptor has been designed for indoor use only.
-The receiver and AC adaptor do not contain any user-serviceable parts. Do not
attempt to open them.All maintenance work must be carried out by qualified
personnel.
-Periodically inspect the AC adaptor for damage. Do not use if damage is found.
Refer to qualified personnel.
-Unplug the AC adaptor from the mains during lightning storms.
-To prevent fire or shock hazard, do not expose this equipment to rain or moisture.
-The receiver should be placed on a firm surface, and the ventilation openings must
not be covered with items, such as newspapers, table clothes, curtains, etc.
-Do not install this equipment near anyheat sources such as radiators, stoves or
other apparatus that produce heat. Protect it from direct sunlight.
-When installing the receiver, ensure there is a gap of approximately 2 cm around it
to enable air to circulate freely and prevent overheating.
-Leave access to the AC adaptor in case emergency shutdown is required.
-Do not place any combustible objects on the receiver (candles, etc.).
-No objects filled with liquids, such as vases, shall be placed on the receiver. It shall
not be exposed to dripping or splashing. Should this happen, disconnect the AC
adaptor from the mains and consult qualified personnel.
-Makesurethat children do not place anyforeign objects in any of the openings.
-For cleaning, use a soft, damp (not wet) cloth. Never use any abrasive cloth and
aerosol cleaners.
Your receiver, as any electronic equipment, consumes power. In order to
reduce power consumption, please switch your receiver to standby or
“Low Power” whenever you are not using it.
For maximum energy saving we recommend you switch off the receiver by
unplugging it from the mains if you are not using it for a long time.
Safety instructions
DCR 2021_Premiere_indice 1b 7/03/06 11:45 Page 53

54
EN
Foreword 49
Quick installation 50
Meaning of symbols 52
Safety instructions 53
1 Product description 56
1.1 Front panel 56
1.2 Rear panel 57
2 Inserting your Smart Card 58
3 Remote control 59
4 Connecting your Digital-receiver 60
4.1 Connecting to a TV and VCR both fitted
with SCART sockets 60
4.2 Connecting to your audio equipment
(analogue or digital) 61
4.3 Connecting of a video projector
to watch digital TV 62
5 First installation 63
5.1 First installation settings 63
5.2 Channel scan 63
5.3 Search failure 64
6 Day-to-day operation 65
6.1 Using Low Power mode 65
6.2 Switching from watching digital TV
to listening to digital radio 65
6.3 Changing channels while watching digital TV
or listening to digital radio 66
6.4 PIN code 66
6.5 Banner 67
6.6 Volume control - / + / 67
6.7 Current programme options 68
6.8 Electronic Programme Guide (EPG) 68
6.9 Recording timers 69
Contents
DCR 2021_Premiere_indice 1b 7/03/06 11:45 Page 54

55
EN
6.10 Switching to analogue TV 70
6.11 Viewing teletext 70
6.12 How do I reset my receiver
in case of unstable or frozen picture? 70
7 Premiere features 71
7.1 Premiere Multifeed 71
7.2 PREMIERE DIREKT 71
8 Menu Tree 72
8.1 Menu tree 72
8.2 Menu navigation 73
9 Premiere Service Menu 74
9.1 PIN-Code Change 74
9.2 Smartcard 74
9.3 System 74
9.4 Scan 74
9.5 Display 75
9.6 DolbyDigital 75
9.7 Wake-up channel 75
10 Setting your receiver 76
10.1 Timer Manager 76
10.2 Channel Manager 77
10.3 Settings 79
10.4 For Parents 80
10.5 Advanced settings 81
10.6 Channel Search 83
11 Other settings 84
11.1 Restoring factory settings 84
11.2 Changing the remote control configuration 84
11.3 VCR/DVD Recorder Control 84
12 Troubleshooting 88
13 Technical specifications 90
DCR 2021_Premiere_indice 1b 7/03/06 11:45 Page 55

56
EN
1.1 Front panel
1Smart Card slot: .......................see chapter Inserting your Smartcard
2I........................................... channel -
3U........................................... channel +
4............................................... remote control receiver window
5........................................... ON/ Low Power/Reset (5 second key press)
The front panel button includes a colour LED indicating the receiver status.The
LED blinks at remote control command reception.
STATUS INDICATOR TABLE
If you have put your receiver in “standby” and the LED is blinking red, it indicates that
an upgrade of your receiver is taking place. Do not interrupt this operation.Wait for
the LED to blink green, indicating successful download.You can then continue as normal.
When your receiver is in lowpower mode, software functions are no longer
supported.Therefore EPG data may not be up-to-date when waking-up from
lowpower (see paragraph 6.8).
Indicator LED
Mode
Low power red
Standby orange
TV/Radio mode green
Timer active in running mode Dimmed green
Timer activein standby Dimmed orange
Download in progress Blinking red
1 Product description
QW E R T
DCR 2021_Premiere_indice 1b 7/03/06 11:45 Page 56

57
EN
1.2 Rear panel
15V (*): .................................. Socket used to connect the power cord.
2RF Out (*): ............................ RF output used to connect your receiver to a
VCR/TV set to watch analogue channels only, or
to connect another receiver.
3RF In (*): .............................. RF input used to connect the antenna cord from
the wall socket. Refer to chapter Connecting
your Digital-Receiver.
4TV (*): ................................. SCART(1) socket used to connect your TV set.
5VCR/DVD (*): ....................... SCART(1) socket used to connect your video
recorder or DVD player/recorder.
6(*): ................................. Digital audio cinch output used to connect your
HiFi/audio receiver system.
7IR ........................................ Not active on this receiver system.
8L/R (*): ........................... Left/Right analogue audio cinch outputs used to
connect your HiFi/audio receiver system.
The label showing the type and serial number is underneath the receiver.
(1) SCART is also called Euroconnector or Peritel.
*Safety ExtraLow Voltage
Note: if you consider using a video projector, refer to its user manual for the best
video format to feed it. If necessary, refer to paragraph System Settings to properly
set the TV/VCR SCART output.
WT
Q E R U I
Y
DCR 2021_Premiere_indice 1b 7/03/06 11:45 Page 57

58
EN
To de-scramble digital encrypted channels, you need a smartcard from your cable TV
supplier, which you will be delivered when taking up a subscription.
Insert the smartcard with the golden chip facing up.
Push the smartcard into the slot as far as it will go.Approximately 1cm of the card
will be visible outside the slot.
New and updated information may be downloaded onto the smartcard from time to
time.
The smartcard status can be checked from the Smartcard item of the Premiere menu.
2 Inserting your Smart Card
DCR 2021_Premiere_indice 1b 7/03/06 11:45 Page 58

59
EN
3 Remote control
TV/STB
Toggle between digital TV/radio
and analogue TV
List
-Open current channel list.
-Then switch between channel
lists
SUBTITLE
Subtitle selection
I-II
Soundtrack selection
MENU
Open/Close menu
CURSOR keys
t/y
Move up/down within menus
and lists.
u/i
Set a setting
OK
-Call up current channel list
while watching digital TV or
listening to the radio
-Confirm selection
VOLUME +/-
T
urn the volume up/down.
P+ / P-
-Select next/previous channel
-Wake up the receiver from
standby
EPG
Open/close EPG
INFO
-Open info banner
-Then show extended
programme information
-Then close banner
TIMER
-Set a recording timer when
watching digital TV or from
the EPG
Note: press TIMER then 0 to
delete the active timer.
EXIT
-Recall last channel while
watching digital TV or
listening to the radio
-Or go back one step in the
menu.
TV/RADIO
-Toggle between digital TV and
digital Radio
-Wake up the receiver from
standby
0-9
-Select a channel while
watching digital TV or
listening to the radio
-Directlyselect a menuitem
-Wakeup the receiver from
standby
MUTE
Mute/Demute the sound on
your TV or receiver
Standby
Switch receiver to standby
RED, GREEN,YELLOW,
BLUE
Contextual keys
OPT (yellow)
Open option menu for selection
in multifeed or NVOD application
(blue) resp. (white)
Scroll one page up or one page
down in EPG or channel lists.
DCR 2021_Premiere_indice 1b 7/03/06 11:45 Page 59

60
EN
There are several ways you can connect and integrate your Digital-Receiver into your
existing audio/video equipment setup.
Warning!
Before starting:
1Unplug all equipment (TV set as well as VCR and/or DVD) from the mains. Do not
connect your Digital-Receiver to the mains supply now.
2Check your current wiring because you might keep existing connections of your
current Audio/Video setup.
3Choose the relevant connection method for incorporating your Digital-Receiver
into your existing audio/video setup
4.1 Connecting to a TV and VCR both fitted
with SCARTsockets
Incorporate your receiver in your existing installation as described below.
4 Connecting your
Digital-receiver
to AC outlet
TV set
VCR/DVD
ANT IN
ANT OUT
EXT 1
EXT 2
EXT 1EXT 2
Cable Receiver
Cable Wall socket Supplied
Supplied
DCR 2021_Premiere_indice 1b 7/03/06 11:45 Page 60

61
EN
-Connect the “RF In” socket of your Digital-Receiver to the cable wall socket using
the RF coaxial cable supplied.
-Connect the “TV” SCART socket of your Digital-Receiver to the RGB capable
SCART socket of your TV using the SCART lead supplied with your Digital-
Receiver.
This connection also applies if your VCR has two SCART sockets.
With this connection set up, you can:
•Watch digital TV while you record analogue TV.
•Record the digital TV channel you are watching.
•Watch play-back from your VCR.
4.2 Connecting to your audio equipment
(analogue or digital)
Depending on your audio equipment, you might have several options to connect your
Digital-Receiver.
ANALOGUE CONNECTION (A)
Connect the L/R audio output sockets to the relevant L/R audio input sockets of your
audio equipment using a double CINCH cable (not supplied). Consult the user manual
of your audio equipment to locate the proper analogue audio inputs.
With this connection set up you can control the volume (up/down and mute) using
either your Digital-Receiver or audio equipment remote control.
AB
LR
AUDIO
Digital
input
Analogue
input
Audio equipment
to AC outlet
Cable Receiver
DCR 2021_Premiere_indice 1b 7/03/06 11:45 Page 61

62
EN
DIGITAL CONNECTION (B)
Connect the audio output socket to the relevant digital audio input socket of
your audio equipment using a single CINCH cable (not supplied). Consult the user
manual of your audio equipment to locate the proper digital audio input.
With this connection set up you can only control the volume (up/down and mute)
using your audio equipment remote control; refer to the user manual of your audio
equipment.
4.3 Connecting of a video projector to
watch digital TV
Connect the “TV” SCART socket of your Digital-Receiver to your video projector.
Video projectors are often fed with S-Video format video signals. If this is the case
with your projector, follow the instructions below for connection and installation:
1Connect a SCART/S-Video adapter to the “TV” SCART of your receiver (not
supplied), and connect the adapter to the S-Video input of your video projector by
means of a S-Video cable.
2Installation: refer to chapter 10.5.2 to change the “TV/VCR SCART output” setting
of your Digital-Receiver to S-VIDEO/PAL-CVBS.
DCR 2021_Premiere_indice 1b 7/03/06 11:45 Page 62

63
EN
Your receiver is connected to the cable wall socket,TV
set and other equipment according to the diagrams in
chapter Quick installation.
1Switch on your TV set and select a channel.
2Plug your receiver into the mains.Wait for
approximately 20 seconds for the welcome screen
to appear.
3Wait for a few seconds for the First installation
screen to appear.
5.1 First installation settings
4Set your favourite Language setting.
5Set your TV display format.
6Press OK to start scanning for channels.
5.2 Channel scan
During the scanning process, the following information
is reported on screen:
• number of TV and radio channels detected
•scanning progress, indicated as a percentage
•strength of the signal and the quality of reception.
Channel scan maytakeup to twenty minutes. If you press
EXIT during the scanning process, you interrupt the
scanning. In this case, none of the channels found are
stored.
When scanning has been successfully completed, a
completion message is displayed.
7Press OK; a new screen appears indicating that a
search for new software is in progress.
8Press EXIT to stop searching and tune the receiver
to the first channel in the main TV list.
Alternatively,wait for software detection, and then
proceed as described in paragraph 10.5.5.2.
5 First installation
DCR 2021_Premiere_indice 1b 7/03/06 11:45 Page 63

64
EN
5.3 Search failure
In case of channel search failure a failure message is
displayed.
Before starting a new scan
The following checks are recommended:
•antenna cable,
•antenna connection to your receiver (see chapter 4.1),
•number of channels available from your cable TV
supplier.
1Press EXIT to return to the First installation screen.
2Press OK to launch a new scan.
If the same failure message appears after a while, refer
to chapter Troubleshooting. Contact your cable TV
supplier if the problem remains.
DCR 2021_Premiere_indice 1b 7/03/06 11:45 Page 64

65
EN
6.1 Using Low Power mode
6.1.1Your cable receiver is on.
-The front panel LED indicator is lit in green.
-To put your receiver in Low Power mode, press the
front panel button: the LED indicator turns red
and power consumption drops to 2 W.
-To wake up your receiver from Low Power, press the
front panel button: the LED indicator turns green
to indicate that the receiver is on.
6.1.2Your cable receiver is in standby
mode.
-The front panel LED indicator is lit in orange.
-To put your receiver in Low power mode, press the
front panel button: the LED indicator remains
orange and power consumption drop to 2 W.
At this stage, if you press the P+ or P- key of the
remote control to wake up your receiver, the command
will be ignored because the receiver is in Low Power
mode.To wake up your receiver, first press the front
panel button, and then press the P+ or P- key.
-Towakeup your receiver from Low Power, press the
front panel button.The LED indicator remains
orange to indicate standbymode. Press P+ or P- to
wake up your receiver.
6.2 Switching from watching
digital TV to listening to
digital radio
To switch your receiver from TV to RADIO and RADIO
to TV, press the TV/RADIO key.
6 Day-to-day operation
DCR 2021_Premiere_indice 1b 7/03/06 11:45 Page 65

66
EN
6.3 Changing channels while
watching digital TV or
listening to digital radio
6.3.1 Using number keys
Dial a number using the remote control number keys to
select the corresponding channel.
6.3.2 Using P+/P- keys
-Press P+ to select the next channel in the current
channel list.
-Press P- to select the previous channel in the current
channel list.
-Alternatively, press tor yon the front panel.
6.3.3 Using channel lists
Toselect a channel from a channel list:
1Press List to display the current channel list (either
the Main TV list or a bouquet list previously selected).
2Press List repeatedly to switch to the list containing
the channel you want to select if need be.
3Scroll to the channel you want to select using the
tor ykey. Scroll from one page to another using
the white or blue remote control key.
4Press OK to preview the selected channel on the
right hand side of the screen or listen to the
selected radio channel.
5Press OK again to watch in full screen view.
6.4 PIN code
Child protection is a high priority. By entering your PIN
code, you can watch programmes that have been locked
for child protection at any time of the day or night -
without neglecting the issue of child protection. For a
programme to be passed for universal viewing, a
certificate is required by law from the FSK (Free Self
Control) on behalf of the State Child Protection
Authorities. For a locked programme to be broadcast, a
4-digit PIN code has to be entered.You receive your
PIN code together with your smartcard.
Please note that this code is different from your
password (also called “system password”).
DCR 2021_Premiere_indice 1b 7/03/06 11:45 Page 66

67
EN
The PIN code is used to access programmes to which a
maturity rating is assigned. Such programmes are
systematically locked so as to prevent unsuitable
audiences from watching them.When a maturity rating
is associated to the current programme, a specific icon
appears in the channel banner.
To view a locked programme, enter your PIN code
when prompted.
Keep your PIN code secret to prevent children from
using it.
To modify your PIN code, refer to paragraph PIN-Code
Change.
6.5 Banner
An information banner is used to display information
about the current channel and programme. Each time
you change channel, the banner appears at the bottom
of the screen.
1Todisplaythe banner anytime while watching digital
TV or listening to digital radio, press INFO.
2For more info about the current programme while
the banner is on, press INFO asecond time.
3Toclose the banner,press INFO athirdtime.
6.6 Volume control
-/+/
While watching digital TV or listening to digital radio:
-Press - to decrease the volume.
-Press + to increase the volume.
-Press to mute the sound and press again to
de-mute.
Change of volume is signalled using a bargraph, while
audio mute is signalled with an icon.
icon description
alternate audio
language/format
current channel list
maturity rating locked
scrambled channel
locked channel
subtitles presence
teletext presence
AC-3 audio
Multifeed/NVOD
presence
OPT
DCR 2021_Premiere_indice 1b 7/03/06 11:45 Page 67
Table of contents
Other Philips Receiver manuals

Philips
Philips PFS0001 User manual

Philips
Philips DCR 2021 User manual

Philips
Philips HTS3500K/51 User manual

Philips
Philips AE 3650 User manual

Philips
Philips FR 752 User manual

Philips
Philips LBB 6186 User manual

Philips
Philips Matchline FR970 User manual

Philips
Philips FR999 User manual

Philips
Philips 3750 User manual

Philips
Philips STU130A User manual

Philips
Philips 90RL412 User manual

Philips
Philips DTR200/00 User manual

Philips
Philips HTS9800W User manual

Philips
Philips DSR320 User manual

Philips
Philips STU 1120 User manual

Philips
Philips Streamium SL50i User manual

Philips
Philips FR-975 User manual

Philips
Philips DSR2210 User manual

Philips
Philips AW2000 User manual

Philips
Philips MRD100/78 User manual