Phonic NEXUS 915SB User manual

User’s Manual
Manual del Usuario
使用手册
NEXUS 915SB
NEXUS 935SB
Active Subwoofer Speaker
Altavoz Subwoofer Activo
有源超低音喇叭
English / Español / 简体中文

CONTENTS CONTENIDO 目录
Phonic preserves the right to improve or alter any information within this document without prior notice
Phonic se reserva el derecho de mejorar o alterar cualquier información provista dentro de este documento sin previo aviso
PHONIC保留不预先通知即可更新本手册的权利
V1.0 12/26/2008
NEXUS 915SB / 935SB
Active Subwoofer Speaker
Altavoz Subwoofer Activo
有源超低音喇叭
INTRODUCTION4
FEATURES4
SAFETY INSTRUCTIONS4
SUBWOOFER5
POWER AMPLIFIER OUTPUT6
SPECIFICATION6
DIMENSIONS15
INTRODUCCIÓN8
CARACTERÍSTICAS8
INSTRUCCIONES DE SEGURIDAD8
SUBWOOFER9
SALIDA DE AMPLIFICADOR DE POTENCIA
10
ESPECIFICACIONES10
DIMENSIONES 15
简介 12
特色 12
安全说明 12
超低音喇叭 13
功放输出 14
规格 14
尺寸 15
1. Read these instructions before operating this
apparatus.
2. Keep these instructions for future reference.
3. Heed all warnings to ensure safe operation.
4. Follow all instructions provided in this document.
5. Do not use this apparatus near water or in locations
where condensation may occur.
6. Clean only with dry cloth. Do not use aerosol or liquid
cleaners. Unplug this apparatus before cleaning.
7. Do not block any of the ventilation openings. Install
in accordance with the manufacturer
’
s instructions.
8. Do notinstallnearany heatsources suchas radiators,
heat registers, stoves, or other apparatus (including
.
9. Do not defeat the safety purpose of the polarized or
grounding-type plug.A polarized plug has two blades
with one wider than the other. A grounding type plug
has two blades and a third grounding prong. The wide
blade or the third prong is provided for your safety. If
the provided plug does not into your outlet, consult
an electrician for replacement of the obsolete outlet.
10. Protect the power cord from being walked on or
pinched particularly at plug, convenience receptacles,
and the point where they exit from the apparatus.
11. Only use attachments/accessories by the
manufacturer.
12. Use only with a cart, stand, tripod, bracket, or
table by the manufacturer, or sold with
the apparatus. When a cart is used, use caution
when moving the cart/apparatus
combination to avoid injury from tip-
over.
13. Unplug this apparatus during lighting
storms or when unused for long
periods of time.
14. Refer all servicing to service personnel.
Servicing is required when the apparatus has been
damaged in any way, such as power-supply cord or
plug is damaged, liquid has been spilled or objects
have fallen into the apparatus, the apparatus has
been exposed to rain or moisture, does not operate
normally, or has been dropped.
IMPORTANT SAFETY INSTRUCTIONS
CAUTION: TO REDUCE THE RISK OF ELECTRIC SHOCK,
DO NOT REMOVE COVER (OR BACK)
NO USER SERVICEABLE PARTS INSIDE
REFER SERVICING TO QUALIFIED PERSONNEL
The lightning flash with arrowhead symbol, within an
equilateral triangle, is intended to alert the user to the
presence of uninsulated
“
dangerous voltage
”
within the
product
’
magnitude to constitute a risk of electric shock to persons.
The exclamation point within an equilateral triangle is in-
tended toalert the usertothepresence ofimportant operat-
ingandmaintenance(servicing)instructionsintheliterature
accompanying the appliance.
WARNING: To reduce the risk of or electric shock, do
not expose this apparatus to rain or moisture.
CAUTION: Use of controls or adjustments or performance
of procedures other than those may result in
hazardous radiation exposure.
The apparatus shall not be exposed to dripping or splashing and that no objects with liquids, such as vases,
shall be placed on the apparatus. The MAINS plug is used as the disconnect device, the disconnect device shall
remain readily operable.
Warning: the user shall not place this apparatus in the area during the operation so that the mains switch
can be easily accessible.
CAUTION
RISK OF ELECTRIC SHOCK
DO NOT OPEN

4 NEXUS 915SB / 935SB
INTRODUCTION
Congratulations on your purchase of one of the
quality Nexus Subwoofer speakers. Each of these
units features stereo XLR inputs and outputs, while
the 935SB goes further to include two powered 1/4"
outputs. These subs will undoubtedly provide you
with many years of faithful use. However, to make
the most out of the Nexus Subs, ensure you read
this manual thoroughly – including all warnings and
safety instructions. This will help prolong the life of
the sub, as well as ensure the safety of you and
those around you.
FEATURES
• Built-in 450 Watt (RMS) amplier
• Balanced XLR input and output
• Two 1/4” phone jack outputs for powering
passive speakers with 100 Watts of power (per
channel) (Nexus 935SB)
• Built-in protection circuitry
• Lightweight cabinet with dynamic sound
• 128 dB Max SPL (1 Watt @ 1 meter)
(Nexus 915SB)
• 123 dB Max SPL (1 Watt @ 1 meter) (Nexus
935SB)
• 22k ohm input impedance
• 35mm pole mounting point
SAFETY INSTRUCTIONS
1. Read all instructions carefully before using your Nexus Subwoofer Speakers.
2. Keep this user’s manual for future reference.
3. Ensure you follow all instructions carefully.
4. Do not use in conjunction with power ampliers or powered mixers.
5. Warning – The Nexus Speakers generate extremely high sound pressure levels. Ensure you take care
in the placement and operation to avoid exposure to extremely high sound levels, to reduce to risk of
causing permanent hearing damage.
6. Mounting – The suspending, rigging and mounting of the Nexus Speakers can cause members of
the public to be exposed to serious health risk, as well as the possibility of death. If you are NOT fully
qualied and certied to mount these speakers by relevant local, state, or national authorities, do not
under any circumstances try to rig, suspend or mount this system. All relevant safety regulations must
be followed. If you are not completely qualied or do not know of said regulations, ensure you consult
qualied personnel for assistance.
7. Servicing – Do not under any circumstances try to service this product by yourself. If servicing is
required, contact your local service center.
5NEXUS 915SB / 935SB
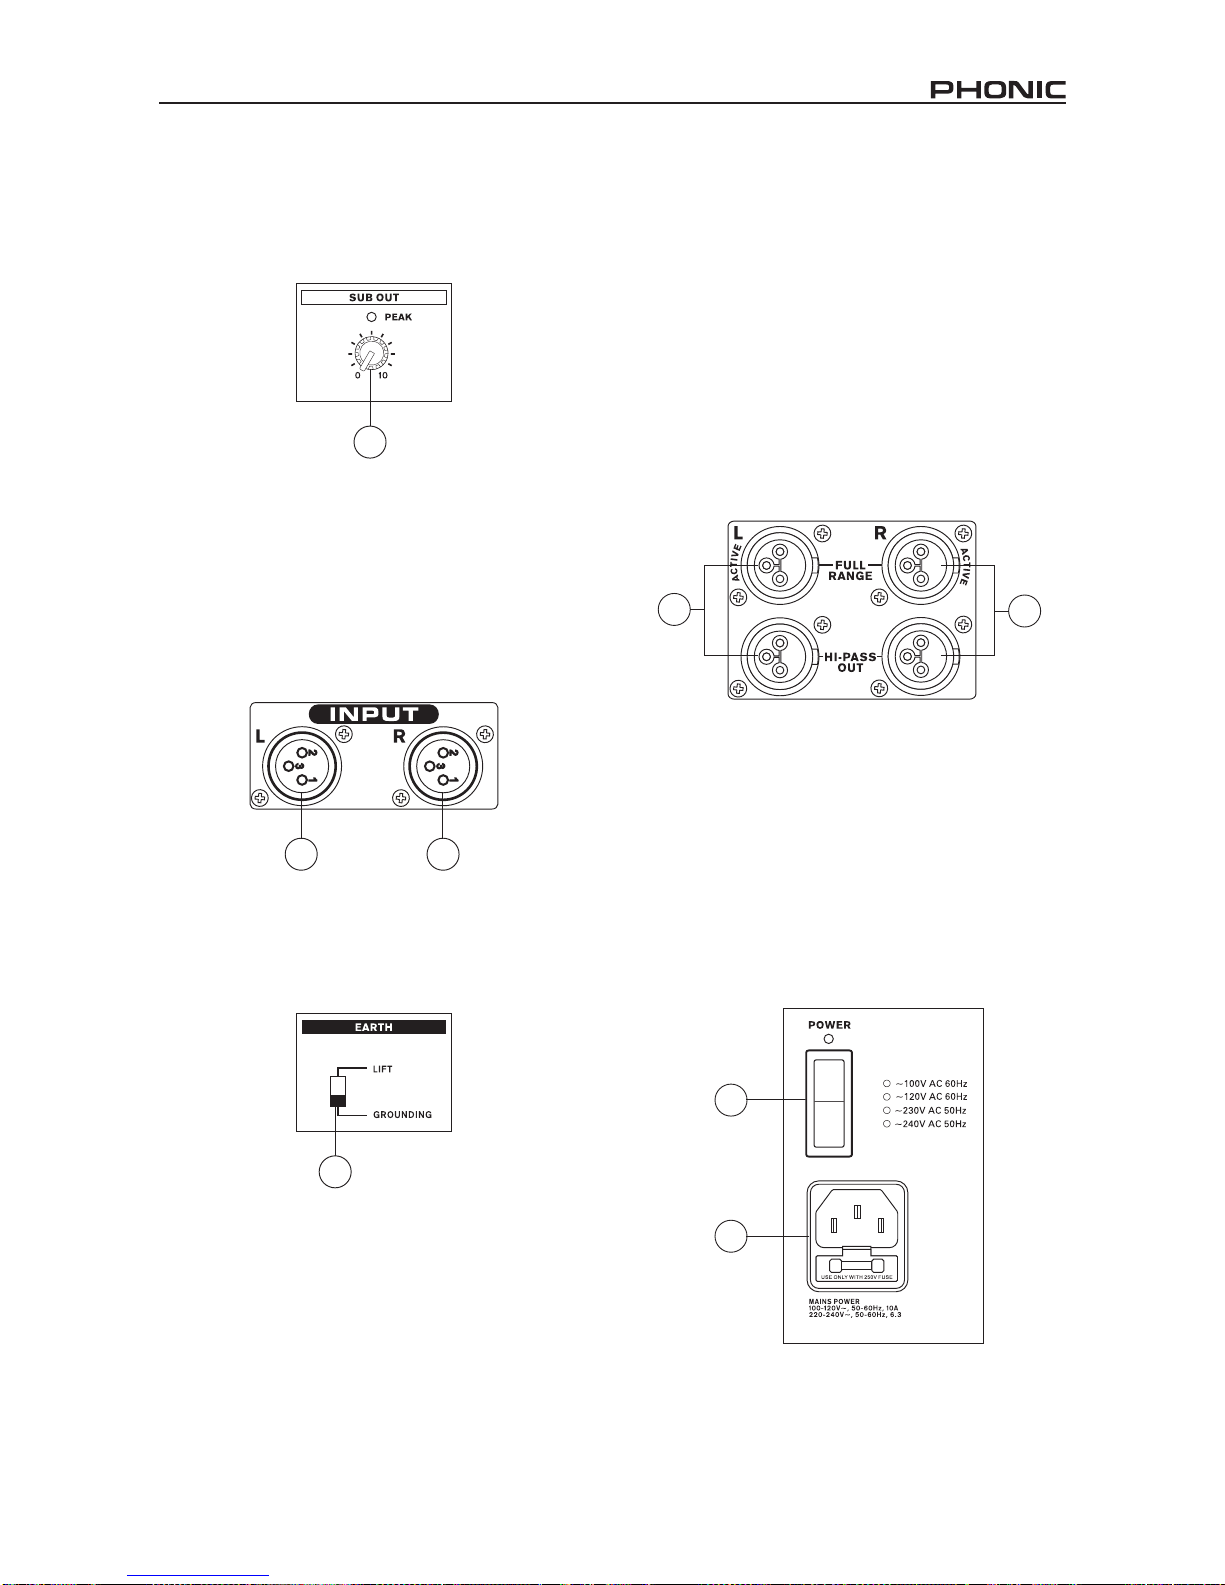
SUBWOOFER
1. Subwoofer Gain Control
This control allows users to adjust the level of the
subwoofer.
2. Left / Mono Mic Input
Connect the left channel from your signal source
to this female XLR input. If you wish to use a mono
source with the Nexus Subwoofer, this connection
can be used.
3. Right Input
Connect the left channel from your signal source to
this female XLR input.
4. Ground / Lift Switch
This switch removes the earth ground from circuit to
eliminate excessive hum caused by ground loops.
5. Left Speaker Outputs
These male-XLR output connectors are for sending
the left speaker signal to external active speakers.
The uppermost jack will output a full-range signal,
whereas the lower jack will output a signal affected
by a high-pass lter, suitable for tweeters.
6. Right Speaker Outputs
These male-XLR output connectors are for sending
the right speaker signal to external active speakers.
The uppermost jack will output a full-range signal,
whereas the lower jack will output a signal affected
by a high-pass lter, suitable for tweeters.
7. Power Connector
This input is for the connection of anAC power cord,
allowing power to be supplied to the device. For
safety reasons, it’ssuggestedthatyouusethepower
cord provided with this unit only.
8. Power Switch
This switch turns the Nexus Subwoofer on and off.
Activation of this unit will be accompanied by an
illuminated LED.
1
2 3
4
6
5
7
8
This manual suits for next models
1
Table of contents
Languages:


