PIKO PiKo-1 User manual

Electronic Lung Health Monitor
User’s Manual
English, German, Spanish,
French, Italian
Models
PiKo-1
PiKo-6
Redening the way the world
detects and treats respiratory diseases
TM
Inspiring Respiratory Health
Monitors
ATS/EU Scale Compliant
PiKo® Monitors


Language Page
English.............................................................. 1
Deutsch............................................................. 11
Español............................................................. 21
Français............................................................ 31
Italiano............................................................. 41
Table of Contents

- 1 -
The PiKo-1 and PiKo-6 devices are designed to monitor respiratory conditions
such as COPD and asthma.
The PiKo-1 measures the Peak Expiratory Flow (PEF) and the Forced Expiratory
Volume in the first second of expiration (FEV1). The PiKo-6 measures the
Forced Expiratory Volume in the first second of expiration (FEV1) and the
Forced Expiratory Volume accumulated in the first six seconds of expiration
(FEV6).
The devices display the test results and also show the respective colour zone
relative to the patient’s reference values.
PiKo-1 - PEF or FEV1
PiKo-6 - FEV1, FEV6 or FEV1/FEV6
In addition, the blow quality is evaluated to notify the patient to repeat the
test in case of a cough or any suspect blow.
PEF - The fastest speed a person can blow air out of their lungs.
FEV1 - The amount of air blown out in the first second of a forced exhalation.
FEV6 - The amount of air blown out in the first six seconds of a forced
exhalation (or the maximum amount if six seconds of exhalation was not
achieved by the patient).
FEV1/FEV6 - The amount of air blown out in the first second of a forced
exhalation, expressed as a ratio relative to the amount of air blown out in
the first six seconds of a forced exhalation (or the maximum amount if six
seconds of exhalation was not achieved by the patient).
Colour Zones - Display the test results in a “traffic light” colour format relative
to the patient’s reference value (PEF or FEV1 for the PiKo-1, and FEV1, FEV6 or
FEV1/FEV6 for the PiKo-6)
Q-Factor - Quality Factor notifies the patient to repeat the test in case of
cough or any suspect blow.
Intended Use

- 2 -
The user should be under the care of a licensed healthcare professional.
Healthcare professionals may recommend the PiKo as part of a disease
management plan.
PiKo monitors are not designed or intended to be used as a primary
diagnostic tool for asthma, COPD, or any other pulmonary disease.
Regardless of displayed test results, if signs or symptoms of chest
tightness, shortness of breath, coughing or wheezing occur, contact your
healthcare professional immediately.
Follow instructions carefully to get a correct reading.
If you use the PiKo above 1000ft elevation (300m), adjust your values by
adding 1.5% of the measured value per 1000ft of additional altitude.
NOTE: Please read all the information in this manual before using the
PiKo-1 or PiKo-6. When the name PiKo is used, specific content applies
to both PiKo-1 and PiKo-6. If the information only applies to one model
of PiKo, it will be noted by its specific product name (PiKo-1 or PiKo-6).
Warnings!

- 3 -
PiKo Description
1. Removable mouthpiece
2. Vent holes
3. Operate button
4. Colour zones
5. Zone indicator
6. Q-Factor indicator
7. Low battery indicator
8. IR communication window
9. PEF data, LPM (applies to
PiKo-1 only)
10. PEF indicator (applies to
PiKo-1 only)
11. Memory counter
12. FEV1 (or FEV6) indicator
13. FEV1 (or FEB6) data, litres
14. Battery cover, (behind)
12
13
1
6
7
10
3
2
11
8
Head
Body
14
TM
9
4
5

- 4 -
1. Stand up. Hold the PiKo horizontally in your right hand with
the display pointing up. DO NOT COVER THE VENT HOLES
2. Bring the PiKo up close to your mouth and press the Operate
Button momentarily with your index finger. A short beep will
be heard.
3. Inhale as much air as you can when a second beep is heard
and the blow animation appears.
4. Place the mouthpiece in your mouth and blow as hard as you
can for at least 1.5 seconds (for the PiKo-1). In the case of the
PiKo-6, continuously blow out for as long as possible,
attempting to exceed a total of 6 seconds until an “end of
blow” beep sounds. Keep the PiKo horizontal.
Your test results will be displayed and the Zone Indicator will show your
colour zone if a reference value was set. If you wish to perform 2 or
more tests, the PiKo will select and save the best results from all tests
performed within 3 minutes of each other.
Using the PiKo
NOTE: If the LCD display is blank, press the Operate Button once and the PiKo
display will show the last test results.
NOTE: Q-Factor Indicator ( ! ) - a “!” symbol may show next to the
reading, indicating one or more of the following occurred during the test:
- A cough was detected.
- The blow effort was not long enough. (FEV1 - 1 second)
- The blow effort had a slow start.
- The result of the test was unnaturally low or high for your reference.
When you have finished, always return the PiKo to its case. It will turn off
automatically.

- 5 -
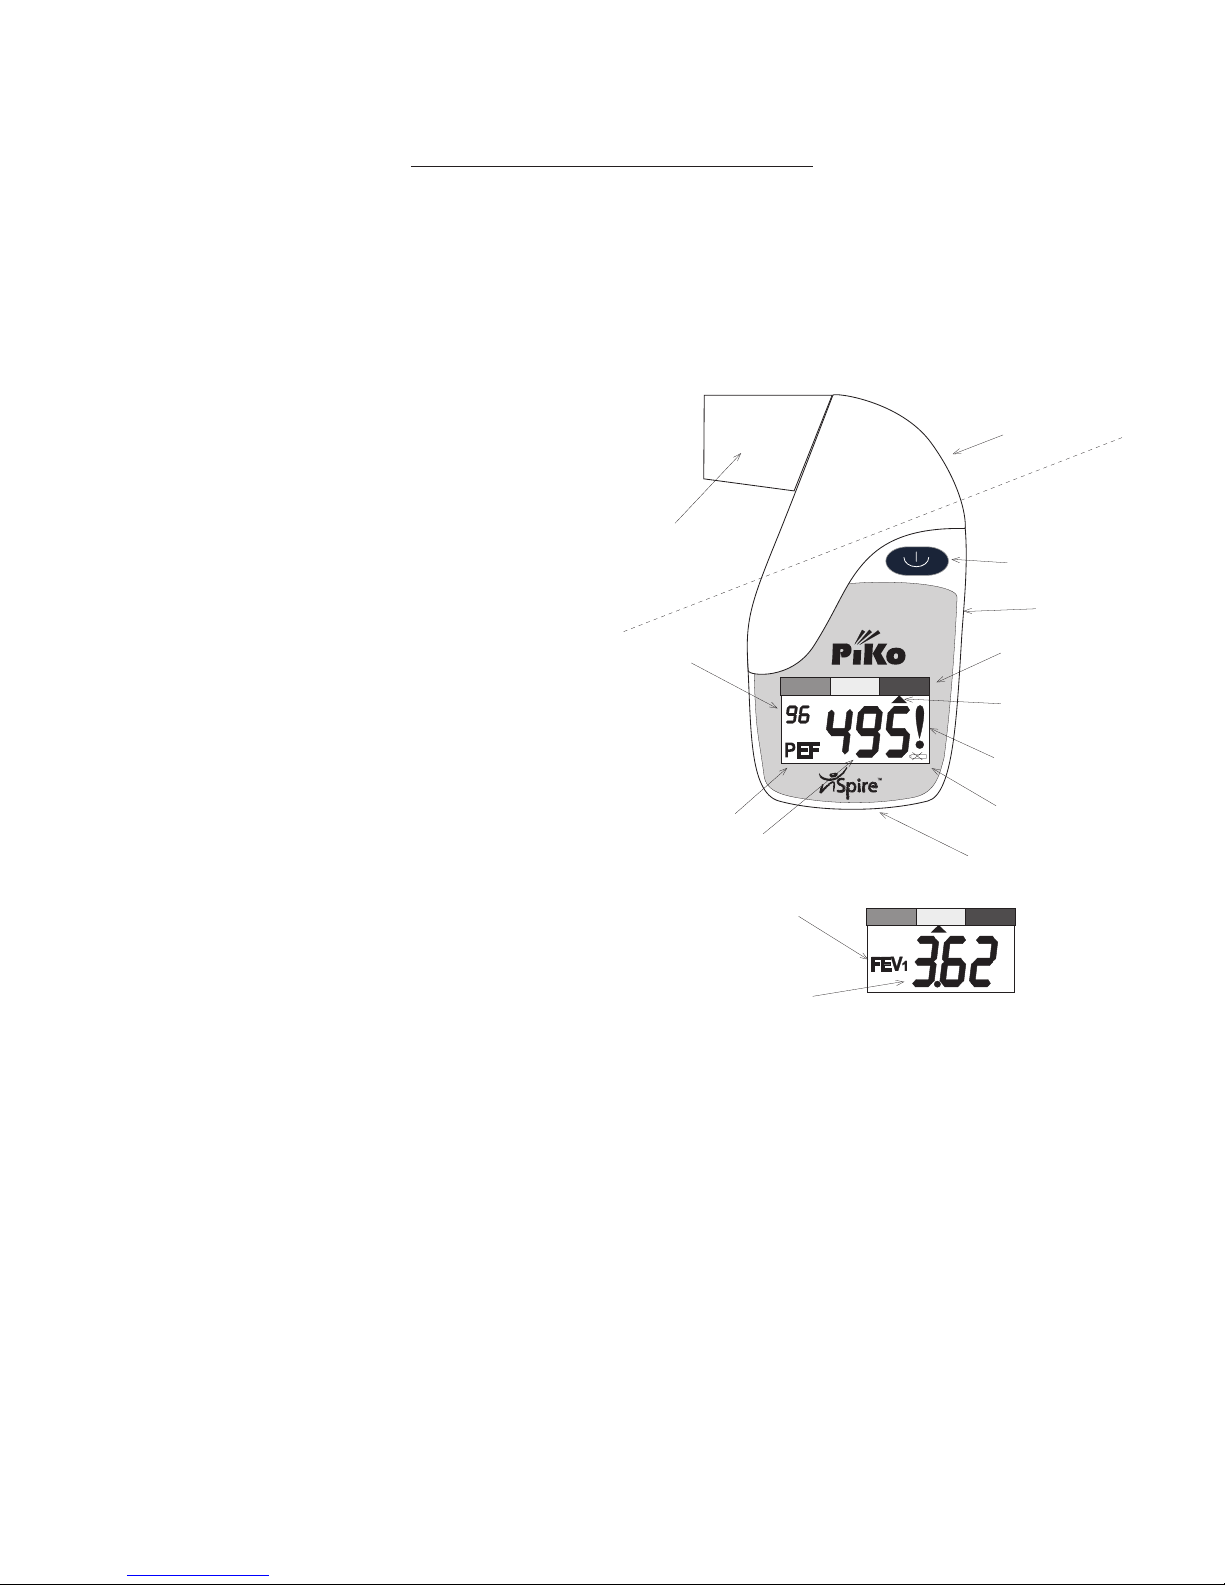
One parameter (PEF or FEV1 for the PiKo-1, and FEV1, FEV6 or FEV1/FEV6 for the
PiKo-6) may have been selected at the factory to have a reference value assigned
by the user in conjunction with their physician. Unless otherwise specified, the
PiKo-1 is set up with the PEF as the reference type and the PiKo-6 is set up with
the FEV1/FEV6 ratio as the reference type. After the reference value has been
assigned, the selected parameter will then be compared with its reference and
the result indicated by an arrow pointing to the appropriate colour on the colour
zone. The zone indication may be turned off by setting the reference value to ‘0’.
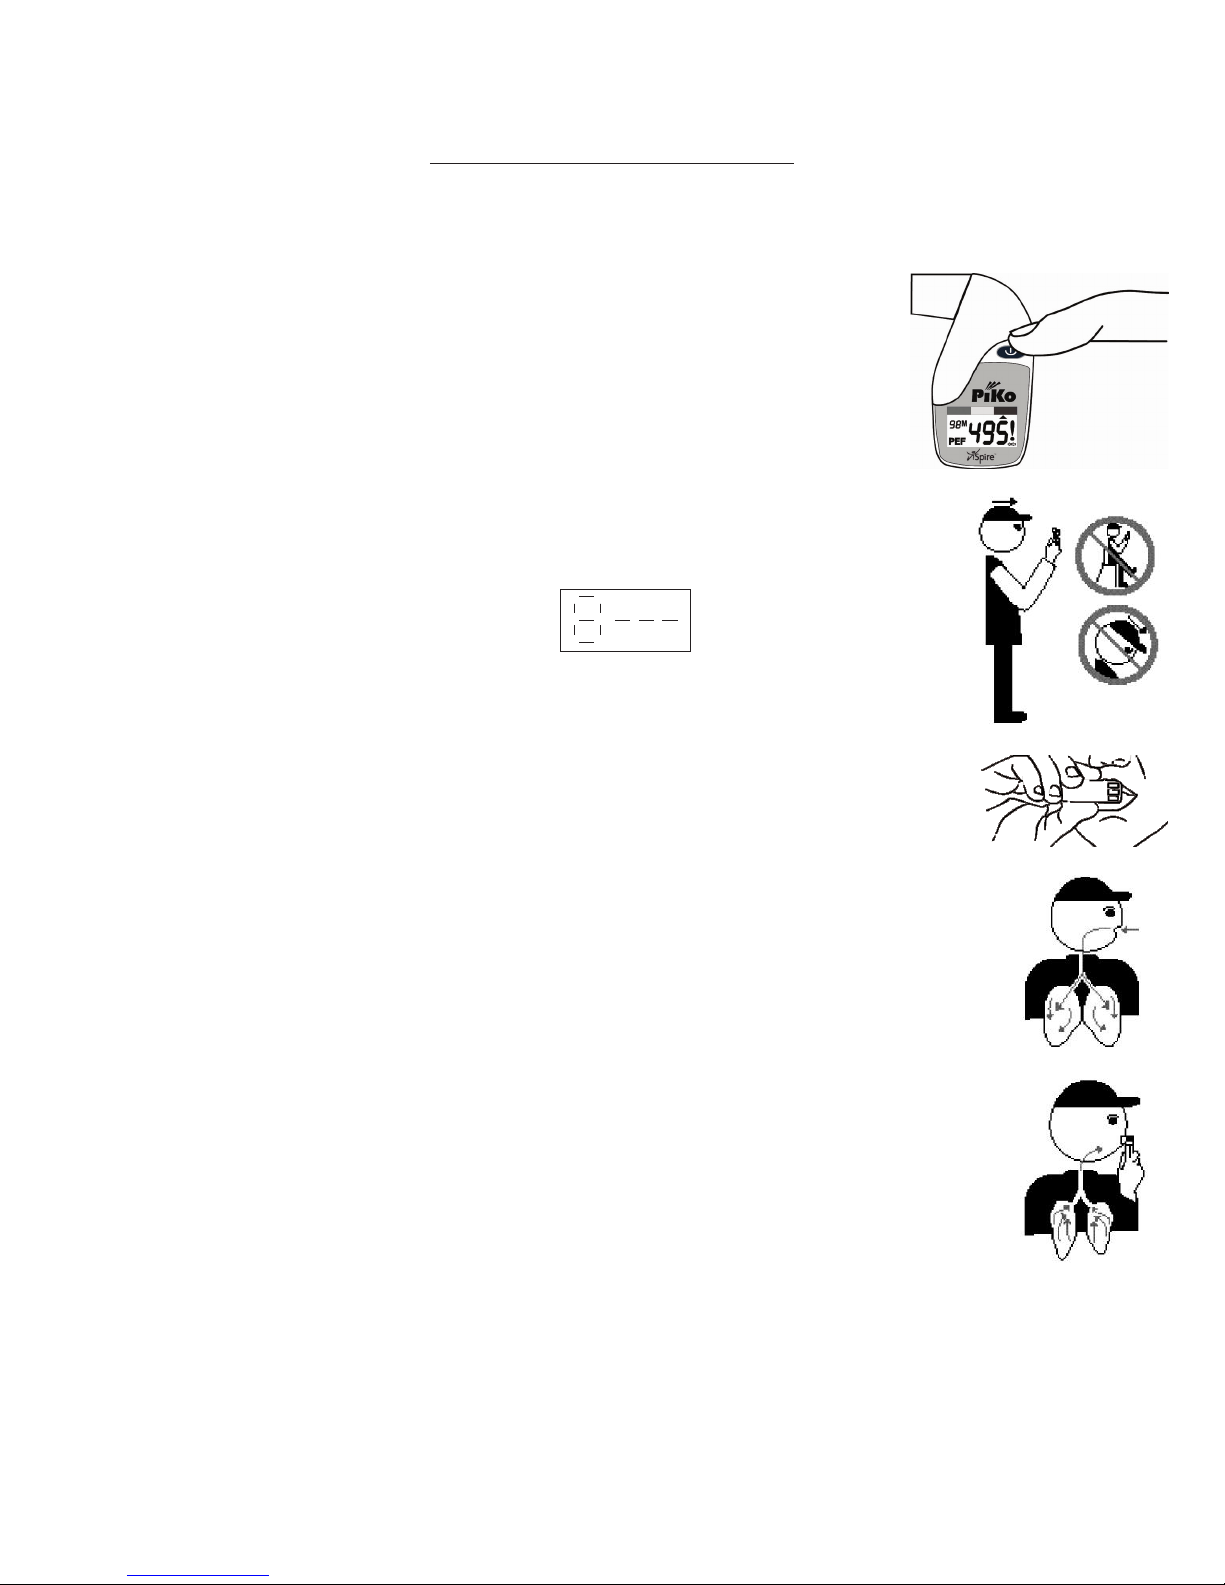
1. Press the operate button quickly - 4 times within 2 seconds. The factory set
reference type indicator will start blinking (FEV1, FEV6 or the FEV1/FEV6). The
display will also show the stored reference value.
2. Release the button. Each additional press will advance the reference value
display by 0.10 L for FEV1 or FEV6, or 0.01% for FEV1/FEV6.
3. Hold the button for 5 seconds to save the desired reference value. The
appropriate indicator will stop blinking and a beep will sound.
4. The display will briefly show the new reference value and then the last
test results. The Colour Zone in the memory review mode will reflect the new
reference value.
NOTE: During the reference setting process, if the Operate Button is not pressed
within 5 seconds, the PiKo will exit the setting mode without modifying the old
reference.
The following colour zone parameters are used:
GREEN, YELLOW, RED
Green = test results over 80% of the reference value
Yellow = test results between 50 - 80% of the reference value
Red = test results under 50% of the reference value
Setting Reference Values

- 6 -
The PiKo stores the last 96 test values and other data associated with
the tests in its memory. If the memory becomes full with 96 tests and
another test is done, the oldest test will be eliminated from memory.
The newest test will then be number 96.
To scroll through the memory:
1. Press and hold the operate button for 5 seconds. The display will
show the last test results containing the PEF (PiKo-1 only), FEV1, FEV6
(PiKo-6 only), FEV1/FEV6 ratio (PiKo-6 only), colour zone and the Q
factor, if any. It will also show the respective memory counter location.
2. Release the button. Each additional press of the button will now
display the next oldest stored test.
To exit the Memory Review Mode either press and hold the operate
button for 5 seconds or avoid pressing the operate button for 20
seconds. The PiKo will then display the latest test result and will be
ready for a new test.
All the test data stored in the PiKo memory can be downloaded to a PC
using the optional PiKoNET Software (interface cradle included).
This software can be purchased on the www.nspirehealth.com website.
NOTE: For the PiKo-1 the entire memory can be erased by setting the
PEF reference to 010, or the FEV1 reference to 0.10. For the PiKo-6, the
entire memory can be erased by setting the FEV1 or the FEV6 reference
value to 0.10 or the FEV1/FEV6 ratio to 0.01.
Memory Review

- 7 -
Meaning of Sounds
Press Operate Button: Short beep
Error during initialization: Long beep
Blow command: Short beep
End blow acknowledge: Short beep
Acknowledge reference setting: Short beep
Result within green zone (PiKo-1): No beep
Result within green zone (PiKo-6): Short beep
Result within yellow zone: 2 short beeps
Result within red zone: Long beep
Any result containing (!): Long beep
Meaning of Symbols
This symbol indicates that this device provides a certain
level of protection against electrical shock.
This symbol indicates that this Class I equipment with
measurement function complies with the European Union
Medical Device Directive.
This symbol indicates that this device is splash proof.
IPX4
This symbol indicates that the user must read and
understand all instructions and warnings.

- 8 -
Maintenance
NOTE: This product is NOT user serviceable.
Cleaning the mouthpiece:
1. Detach the mouthpiece by ‘snapping’ it off.
2. Wash the mouthpiece with washing up liquid (a mild detergent) in cold water.
3. Rinse and dry thoroughly. DO NOT use heat to dry.
Cleaning the body of the PiKo:
1. Rinse with low flow/pressure water at room temperature. The top part of the
unit may be cleaned with a solution of 5% washing up liquid (a mild detergent)
in cold water, followed by rinsing.
2. Hold the PiKo upside down and shake to remove the water.
3. Wipe exterior with a clean, dry towel.
4. Allow to dry naturally and completely before further usage or storage.
5. To avoid damage to the PiKo: DO NOT immerse in water or use a dishwasher.
DO NOT use a high-pressure water flow. DO NOT use any sort of active solvent
for cleaning. DO NOT dry by heat, hair dryer, or a dishwasher. DO NOT insert
anything into the vent holes or the mouthpiece opening.
Battery Replacement and Insertion:
PiKo units are supplied with batteries but they are not inserted. Please insert
them per the following instructions:
1. Replace batteries when “Low Battery” indicator appears.
2. Open the battery door using a small coin. Insert the coin
in the slot and turn counter clockwise. Line up
the coin slot with the arrow on the body of the PiKo.
DO NOT try to turn past the arrow.
3. Remove plastic spacer and discard
4. Use 2 type 357, silver oxide button cell batteries
or equivalent.
5. Replace the battery cover by lining up the coin slot with the arrow on the body
of the PiKo and turning to the right to the other indicator on the body of the
PiKo. DO NOT turn past the lock (-) indicator.

- 9 -
Technical Specifications
PEF: Range 15 - 999 LPM, (1 LPM resolution)
FEV1: Range 0.15 - 9.99 litre, (0.01 litre resolution)
FEV6: Range 0.15 - 9.99 litre, (0.01 litre resolution)
FEV1/FEV6: Range 0.01 - 0.99, (0.01 resolution)
Accuracy: PEF: 5% or +/- 20 LPM, (whichever is greater)
FEV1: +/- 3.5% or 0.1 litre, (whichever is greater)
FEV6: 4% or 0.1 litre (whichever is greater)
Sensor: Pressure/flow sensor technology (patented)
Memory : 96 test scores containing: PEF, FEV1, FEV6,
FEV1/FEV6, Colour Zone, Q-Factor
Colour zones: 3 colour zones (Green, Yellow, Red)
Reference values: Set by user for PEF (for PiKo-1) and FEV/FEV6
(for PiKo-6); Default settings: PiKo-1 = PEF 500 LPM,
PiKo-6 = FEV1/FEV6 0 (disabled)
Quality factor: Warning and indicator for cough or abnormal blow
Sounds: 4 patterns for different indications and warnings
Communication: Bi-Directional IR port
External settings: Possible settings using the optional PiKoNET
Professional software:
- Colour zone limits (in 10% increments)
- Use of FEV1 for PiKo-1 and FEV1 or FEV6 for PiKo-6
as an alternate reference type
Battery: 2x type 357 silver oxide button cells (or equivalent)
Battery life: PiKo-1: approx. 1 year; PiKo-6: approx. 6 months
(based on average of 6 blows/day)
Dimensions: 75 X 35 X 20 mm, (3 X 1.3 X 0.8 inches)
Weight: 35 grams (1.25 oz)
Accessories: Plastic Mouthpieces - part number:393535
Resistance: < 2.5 cm H2O/l/S @ 14 LPS or lower
Operating temp.: 10 to 38oC (50 to 100 oF)
Storage temp.: (-20) to 60 oC (-4) to 140oF)
Humidity: 0 - 100% relative humidity
Barometric: 550 to 780 mmHg
Performance: ATS1994 (monitoring), AS/NZS-4237: 1994,
EN13826: 2003
Safety: EN60601-1, EN60601-1-1, EN60601-1-2, EN13826:2003,
Type BF patient applied part, and IPX4
Regulatory: PiKo-6 FDA 510(k); PiKo-1 FDA 510 (k) for OTC;
CE (0086), Class I with measurement function
Contracts: GSA V797P-4063a; UK NHS Drug Tariff prescribable on
FP10
USA Patent: US # 6,447,459 B1

- 10 -
For many years there have been two standards for peak flow
measurement - the Wright Standard, and the American Thoracic
Society’s standard (ATS). In 2004 a new European Union
Standard was adopted, known as the EU Standard, EN13826:
2003. The PiKo-1 complies with both the ATS and the new EU
Standards. The PiKo-1 measures PEF in litres per minute BTPS
(Body Temperature and Pressure Saturated). There is a difference
between the earlier Wright Scale devices and this PiKo-1, which
complies with the ATS and the EU scales. Do not directly compare
readings of the PiKo-1 with readings from a unit using the Wright
Scale.
Warranty
The PiKo is warranted for 6 months against faulty parts or
workmanship. Batteries are not covered by warranty. Failure to
use in accordance with the instructions could render the warranty
invalid. This does not affect statutory rights.
Measurement Scale

- 11 -
Die Geräte PiKo-1 und PiKo-6 wurden entwickelt um Atmungserkrankungen,
wie z.B. COPD und Asthma, zu überwachen.
Das PiKo-1 misst den Höchstwert des Ausatmungsstromes (PEF) und die
Sekundenkapazität (FEV1). Das PiKo-6 misst die Sekundenkapazität und die in
den ersten sechs Sekunden des Ausatmens anfallende Kapazität.
Die Geräte zeigen die Testresultate, sowie die entsprechenden Farbzonen,
bezogen auf die Richtwerte des Patienten, an. Qualität
PiKo-1 - PEF oder FEV1
PiKo-6 - FEV1, FEV6 oder FEV1/FEV6
Außerdem wird die Atemqualität überwacht um dem Patienten anzuzeigen,
dass der Test wiederholt werden muss, falls er während des Tests gehustet
oder irgendwie verdächtig geatmet hat.
PEF – Die höchste Geschwindigkeit mit der jemand Luft aus seinen Lungen
ausatmen kann.
FEV 1 – Die Luftmenge, die in der ersten Sekunde eines Atemstoßes
ausgeatmet wird.
FEV6 – Die Luftmenge, die in den ersten sechs Sekunden eines Atemstoßes
ausgeatmet wird (bzw. die Maximalmenge, wenn der Patient keinen sechs
Sekunden langen Atemstoß erreicht hat).
FEV1/FEV6 – Die Luftmenge, die in der ersten Sekunde eines Atemstoßes
ausgeatmet wird, als Verhältnis zur Luftmenge, die in den ersten sechs
Sekunden eines Atemstoßes (bzw. die Maximalmenge, wenn der Patient
keinen sechs Sekunden langen Atemstoß erreicht hat), ausgedrückt.
Farbzonen – Zeigen die Testresultate in einem “Ampel” Farbformat bezogen
auf die Richtwerte des Patienten (PEF oder FEV1 für den PiKo-1 und FEV1,
FEV6 oder FEV1/FEV6 für den PiKo-6) an.
Q-Faktor – Qualitätsfaktor: zeigt dem Patienten an, dass der Test wiederholt
werden muss, falls er während des Tests gehustet oder irgendwie verdächtig
geatmet hat.
Bestimmungszweck

- 12 -
Der Benutzer sollte sich in der Obhut eines zugelassenen Beschäftigten
im Gesundheitswesen befinden. Beschäftigte im Gesundheitswesen
können den PiKo als Teil eines Planes zum Management einer
Erkrankung empfehlen.
PiKo Überwachungsgeräte wurden nicht dafür entwickelt – und sind
nicht dazu bestimmt – als Hauptdiagnosegerät für Asthma, COPD, oder
irgendeine andere Lungenerkrankung, zu dienen.
Unabhängig von den angezeigten Testresultaten sollten Sie , bei
Engegefühl in der Brust, Atemlosigkeit, Husten oder Stenoseatmung bitte
sofort einen Arzt benachrichtigen.
Befolgen Sie die Anleitung genau um eine korrekte Anzeige zu erhalten.
Falls Sie das PiKo auf mehr als 300m Seehöhe (1000 Fuß) verwenden,
passen Sie bitte ihre Werte an, indem Sie 1,5% des gemessenen Wertes
pro 300m zusätzlicher Höhe hinzuzählen.
ANMERKUNG: Bitte lesen Sie sämtliche Informationen in dieser
Bedienungsanleitung sorgfältig durch bevor sie das PiKo-1 oder PiKo-6
verwenden. Wenn der Name PiKo verwendet wird, gilt der Inhalt sowohl
für PiKo-1 als auch für PiKo-6. Falls die Information nur auf ein PiKo
Modell zutrifft, wird dies durch den entsprechenden Produktnamen (PiKo-
1 oder PiKo-6) angezeigt.
Warnungen!

- 13 -
PiKo Beschreibung
1. Abnehmbares Mundstück
2. Belüftungslöcher
3. Bedienungsknopf
4. Farbzonen
5. Zonenanzeige
6. Q-Faktor Anzeige
7. Anzeige für niedrigen
Batteriestatus
8. IR Kommunikationsfenster
9. PEF Daten, LPM (nur für
PiKo-1)
10. PEF Anzeige (nur für PiKo-1)
11. Zähler für Datenspeicher
12. FEV1 (oder FEV6) Anzeige
13. FEV1 (oder FEV6) Daten, Liter
14. Batterieabdeckung (hinten)
12
13
1
6
7
10
3
2
11
8
Oberteil
Gehäuse
14
TM
9
4
5

- 14 -
1. Stehen Sie auf. Halten Sie das PiKo waagrecht in Ihrer rechten Hand,
mit der Anzeige nach oben. DECKEN SIE DIE BELÜFTUNGSLÖCHER
NICHT AB.
2. Bringen Sie das PiKo nahe an Ihren Mund heran und drücken Sie den
Bedienungsknopf kurz mit Ihrem Zeigefinger. Sie werden einen kurzen
Piepton hören.
3. Sobald Sie einen zweiten Piepton hören und die Blasanimation erscheint,
atmen Sie soviel Luft wie möglich ein.
4. Stecken Sie das Mundstück in Ihren Mund und blasen Sie so stark wie
möglich mindestens 1,5 Sekunden lang (für den PiKo-1). Für den PiKo-6,
atmen Sie so lang wie möglich kontinuierlich aus, und versuchen Sie eine
Gesamtdauer von 6 Sekunden zu überschreiten bis der „Ende des
Ausatmens“ Piepton ertönt. Belassen Sie das PiKo in waagrechter Lage.
Ihre Testresultate werden der Reihe nach angezeigt und die Zonenanzeige zeigt
ihre Farbzone an wenn ein Richtwert eingestellt wurde. Wenn Sie zwei oder mehr
Tests machen möchten, wird das PiKo die besten Resultate aller Tests auswählen
und speichern, die innerhalb von drei Minuten durchgeführt wurden.
Verwendung des PiKo
ANMERKUNG: Wenn die LCD Anzeige leer ist, drücken Sie den Betriebsknopf einmal und die
Anzeige des PiKo zeigt die letzten Testresultate an.
ANMERKUNG: Q-Faktor Anzeige ( ! ) – ein „!“ Symbol kann neben einer Anzeige
auftauchen. Es zeigt an dass eine oder mehrere der folgenden Fälle während des
Tests aufgetreten sind:
- Ein Husten wurde entdeckt.
- Die Ausatmung war nicht lang genug. (FEV1 - 1 Sekunde)
- Der Blasversuch wurde zu langsam gestartet.
- Das Resultat des Tests war unüblich niedrig oder hoch im Vergleich zu Ihren Richtwert.
Nach Beendigung der Messungen, legen Sie das PiKo immer in seinen Behälter zurück. Es
schaltet sich automatisch ab.

- 15 -
Ein Parameter (PEF oder FEV1 für das PiKo-1, sowie FEV1, FEV6 oder FEV1/
FEV6 für das PiKo-6) wurde ab Werk voreingestellt, sodass ein Sollwert vom
Benutzer, zusammen mit dem Arzt, eingestellt werden kann. Wenn nicht anders
angegeben, wurde im PiKo-1 der PEF als Sollwert und im PiKo-6 das Verhältnis
FEV1/FEV6 als Sollwert eingestellt. Nachdem der Sollwert zugeordnet wurde,
wird der ausgewählte Parameter dann mit seinem Sollwert verglichen und das
Resultat durch einen Pfeil, der auf die entsprechende Farbe in der Farbzone zeigt,
angegeben. Die Zonenanzeige kann ausgeschaltet werden indem der Sollwert auf
„0“ gestellt wird.
1. Drücken Sie den Bedienungsknopf innerhalb von zwei Sekunden viermal
hintereinander. Die Anzeige des ab Werk eingestellten Sollwertes fängt
an zu blinken (FEV1, FEV6 oder der FEV1/FEV6). Die Anzeige zeigt auch den
gespeicherten Sollwert an.
2. Lassen Sie den Knopf los. Jeder weitere Knopfdruck wird die Anzeige des
Richtwertes um 0.10 L für FEV1 oder FEV6, oder 0.01% für FEV1/FEV6 erhöhen.
3. Halten Sie den Knopf 5 Sekunden lang gedrückt um den gewünschten
Sollwert zu speichern. Die entsprechende Anzeige hört zu blinken auf und ein
Piepton ertönt.
4. Die Anzeige zeigt kurz den neuen Sollwert, danach die letzten Testresultate
an. Die Farbzone im Speicherwiedergabebetrieb gibt den neuen Sollwert wieder.
ANMERKUNG: Wenn der Betriebsknopf nicht innerhalb von 5 Sekunden während
des aktivierten Richtwerteinstellmodus gedrückt wird, beendet das PiKo den
Einstellmodus ohne den alten Richtwert zu ändern.
Die folgenden Farbzonenparameter werden verwendet:
GRÜN, GELB, ROT
Grün = Testresultat mehr als 80% des Sollwertes
Gelb = Testresultat zwischen 50-80% des Sollwertes
Rot = Testresultat weniger als 50% des Sollwertes
Sollwerte einstellen

- 16 -
Das PiKo speichert die letzten 96 Testwerte und andere, mit den
gespeicherten Tests verbundene Daten. Wenn der Speicher mit 96 Tests
voll ist und ein weiterer Test gemacht wird, wird der älteste Test aus dem
Speicher entfernt. Der neueste Test wird dann die Nummer 96.
Um durch den Speicher zu scrollen:
1. Drücken Sie den Betriebsknopf und halten Sie ihn 5 Sekunden lang
gedrückt. Die Anzeige zeigt die letzten Testresultate, welche den PEF
(nur PiKo-1), FEV1, FEV6 (nur PiKo-6), oder das FEV1/FEV6 Verhältnis
(nur PiKo-6), die Farbzone und, falls vorhanden, den Q Faktor.
Zusätzlich wird die entsprechende Speicherplatzposition angezeigt.
2. Lassen Sie den Knopf wieder los. Jeder weitere Knopfdruck zeigt jetzt
den nächstältesten, gespeicherten Test an.
Um den Speicherwiedergabemodus zu beenden, drücken Sie entweder
den Bedienungsknopf und halten ihn 5 Sekunden lang gedrückt, oder
drücken Sie 20 Sekunden lang nicht den Bedienkopf. Das PiKo zeigt
dann die letzten Testresultate an und ist für einen neuen Test bereit.
Alle im Speicher des PiKo gespeicherten Testdaten können auf einen PC
mit dem optionalen PiKoNET Programm (Dockingstation ist beigepackt)
heruntergeladen werden.
Dieses Programm kann auf der Website www.nspirehealth.com bestellt
werden.
ANMERKUNG: Im PiKo-1 kann der gesamte Speicher gelöscht werden in-
dem der PEF Richtwert auf 010, bzw. der FEV1 Richtwert auf 0.10, gestellt
wird. Für den PiKo-6 kann der gesamte Speicher gelöscht werden indem
der FEV1 oder FEV6 Richtwert auf 0.10#, bzw. das FEV1/FEV6 Verhältnis
auf 0.01, gestellt wird.
Speicherwiedergabe

- 17 -
Bedeutung der Laute
Bedienungsknopf gedrückt: kurzer Piepton
Fehler bei der Initialisierung: langer Piepton
Blasaufruf: kurzer Piepton
Ende des Blasens bestätigt: kurzer Piepton
Einstellung des Richtwertes bestätigt: kurzer Piepton
Resultat in der grünen Zone (PiKo-1): kein Piepton
Resultat in der grünen Zone (PiKo-6): kurzer Piepton
Resultat in der gelben Zone: 2 kurze Pieptöne
Resultat in der roten Zone: langer Piepton
Jedes Resultat, das (!) enthält: langer Piepton
Symbol Bedeutung
Dieses Symbol zeigt an, dass dieses Gerät einen
gewissen Grad des Schutzes gegen elektrischen Schock
bietet.
Dieses Symbol zeigt an, dass der Benutzer alle
Anleitungen und Warnungen lesen und verstehen muss.
Dieses Symbol zeigt an, dass dieses Gerät der Klasse
I mit Maßfunktion die Anordnung über medizinische
Geräte der Europäischen Union erfüllt.
Dieses Symbol zeigt an, dass dieses Gerät
spritzwassergeschützt ist.
IPX4
This manual suits for next models
1
Table of contents
Languages: