PIQUADRO CALORE CARBONARA CAR80D User manual

PELLET STOVE:
CARBONARA
OPERATING, INST
PELLET STOVE:
CARBONARA
OPERATING, INST
ALLATION AND MAINTENANCE MANUAL
MOD. CAR80D
CARBONARA
ALLATION AND MAINTENANCE MANUAL

Operating, installation an maintenance manual CARBONARA - CAR80D
2
Table of contents
1. GENERAL NOTICE ...................................................................................................................................... 4
1.1 SYMBOLS ........................................................................................................................................... 4
1.2 PURPOSE AND CONTENTS OF THIS MANUAL .................................................................................. 4
1.3 INTENDED USE................................................................................................................................... 4
2. GENERAL INFORMATION .......................................................................................................................... 4
3. SAFETY STANDARDS .................................................................................................................................. 4
4. WARRANTY ............................................................................................................................................... 4
5. MANUFACTURER'S LIABILITY .................................................................................................................... 5
5.1 DELIVERY AND CHECK OF THE STOVE .............................................................................................. 5
6. SAFETY INFORMATION ............................................................................................................................. 5
6.1 RECOMMENDATIONS FOR THE TECHNICIAN ................................................................................... 5
6.2 WARNINGS FOR THE USER ............................................................................................................... 5
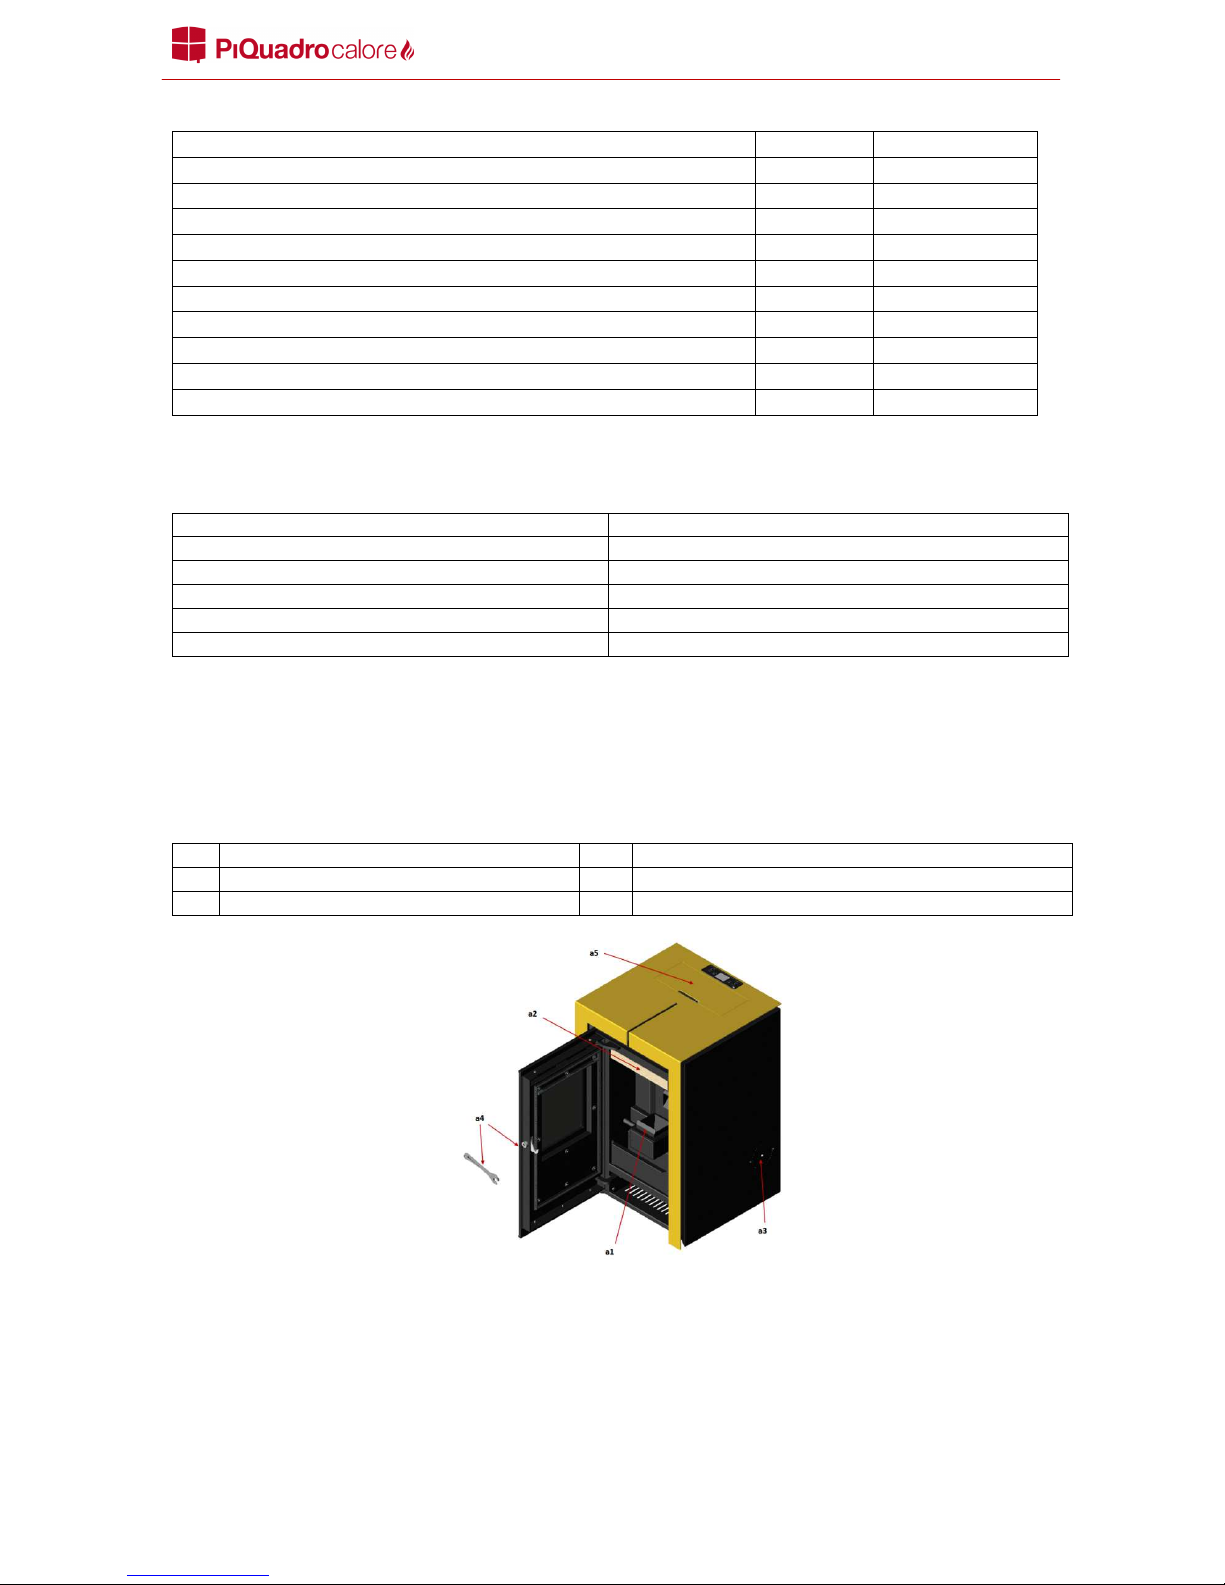
. STOVE DESCRIPTION ................................................................................................................................. 6
.1 TECHNICAL INFORMATION ............................................................................................................... 7
.2 FUEL TYPE AND QUANTITY ............................................................................................................... 7
.3 VISUAL MATCH OF THE STOVE ......................................................................................................... 7
8. INSTALLATION ........................................................................................................................................... 8
8.1 INSTALLATION REQUIREMENTS ....................................................................................................... 8
8.2 POSITIONING OF THE STOVE ............................................................................................................ 8
8.3 SAFELY CONNECT/OPERATE THE STOVE .......................................................................................... 9
8.4 EXTERNAL AIR INTAKE AND CONNECTION TO THE FLUE ................................................................. 9
8.5 CONNECTION TO AN INSULATED OR DOUBLE-WALL FLUE ........................................................... 10
8.6 CONNECTION TO THE FLUE ............................................................................................................. 10
8. CONNECTION TO THE FLUE ............................................................................................................. 10
8.8 USEFUL INFORMATION ABOUT CHIMNEYS ................................................................................... 11
9. COMMISSIONING .................................................................................................................................... 11
9.1 FUEL CHARGE .................................................................................................................................. 11
9.2 IGNITION ......................................................................................................................................... 11
10. ROUTINE MAINTENANCE .................................................................................................................... 13
11. CONTROL PANEL ( Mod. CAR80D) ...................................................................................................... 13
12. MENU .................................................................................................................................................. 14
12.1 USER MENU ..................................................................................................................................... 14
12.2 MENU 02 – SET TIME AND DATE .................................................................................................... 15
12.3 MENU 03 - SET CHRONO SUB MENU 04-01 ENABLE CHRONO ..................................................... 16
12.4 SUB MENU 04-02 DAILY PROGRAMMING ...................................................................................... 16
12.5 SUB MENU 04-03 WEEKLY PROGRAMMING .................................................................................. 17

Operating, installation an maintenance manual CARBONARA - CAR80D
3
12.6 SUB MENU 04-04 WEEK-END PROGRAMMING ............................................................................. 19
12. MENU 04 CHOOSE LANGUAGE ....................................................................................................... 19
12.8 MENU 05 STAND-BY MODE ............................................................................................................ 19
12.9 MENU 06 BUZZER MODE ................................................................................................................ 19
12.10 MENU 0 INITIAL CHARGE .......................................................................................................... 19
12.11 MENU 08 STOVE STATUS ............................................................................................................ 19
12.12 OPERATING MODE ...................................................................................................................... 19
12.13 SWITCHING THE STOVE ON ........................................................................................................ 19
12.14 START-UP STAGE ......................................................................................................................... 19
12.15 FAILED SWITCHING ON ............................................................................................................... 19
12.16 OPERATING STOVE ...................................................................................................................... 20
12.1 SETTING ROOM TEMPERATURE AND POWER ........................................................................... 20
12.18 USE OF THERMOSTAT/EXTERNAL CHRONO-THERMOSTAT ...................................................... 20
12.19 WHEN THE ROOM TEMPERATURE HAS REACHED THE SET VALUE ........................................... 20
12.20 RESTART AFTER SWITCHING OFF
WHEN TEMPERATURE REACHES SET ROOM TEMPERATURE
............... 20
12.21 CLEANING THE BRAZIER .............................................................................................................. 20
12.22 SWITCHING THE STOVE OFF ....................................................................................................... 20
12.23 SWITCHING THE STOVE ON AGAIN ............................................................................................ 20
13. WHAT IF... THE PELLET DOES NOT IGNITE .......................................................................................... 21
13.1 THERE IS A POWER SUPPLY FAILURE .............................................................................................. 21
13.2 FUME PROBE ALARM ...................................................................................................................... 21
13.3 HOT TEMP ALARM .......................................................................................................................... 21
13.4 FAILED IGNITION ALARM ................................................................................................................ 21
13.5 SWITCHING OFF DURING THE WORK STAGE ALARM .................................................................... 21
13.6 SAFETY PRESSURE SWITCH ALARM ................................................................................................ 21
13. GENERAL THERMOSTAT ALARM..................................................................................................... 21
13.8 FAULTY FAN IN THE FLUE GASES EXHAUSTION SYSTEM ............................................................... 21
13.9 GENERAL INSTRUCTIONS ................................................................................................................ 22
14. MAINTENANCE BY YOUR SERVICE RETAILER (LOCAL AUTHORIZED RETAILER) ................................ 22
14.1 OPERATIONS TO BE CARRIED OUT EVERY YEAR
BY YOUR SERVICE RETAILER (Local Authorized Retailer)
. 22
14.2 RECOMMENDATIONS FOR TECHNICIANS ...................................................................................... 22
15. WARRANTY CONDITIONS AND CLAIMS ............................................................................................. 23
16. WARRANTY CERTIFICATE PiQuadro A+3 S.r.l. ................................................................................... 25

Operating, installation an maintenance manual CARBONARA - CAR80D
4
1. GENERAL NOTICE
This manual is intended for owners, installers, users and maintenance personnel of the Carbonara series stoves and is an
integral part of the product. PiQuadro A+3 heating appliances are built and tested in accordance with the safety requirements
specified by the European directives. Faulty stoves or mechanical an electrical components are covere un er a two-year
warranty. During the warranty, isassembling or replacement of the stove spare parts must be carrie out by your Service
Retailer.Unauthorize isassembling or replacements voi the manufacturer's warranty. Any amage ue to improper use of the
stove will not be covere un er warranty. The present manual contains instructions for the following stove mo els: PELLET STOVE
CAR80D
1.1 SYMBOLS
The following is a report of the symbols use in the manual.They raw the rea er's attention to possible angers uring
installation an use.
WARNING/DANGER: The texts marked by this symbol contain relevant safety information and imply
potentially dangerous situations or operations.
VOLTAGE: High voltage and danger of electricity shock.
GLOVES MANDATORY: This symbol means that gloves are compulsory for the operator in order to avoid
accidents.
WARNING: Hot surfaces
1.2 PURPOSE AND CONTENTS OF THIS MANUAL
The purpose of this manual is to provi e the fun amental information for a correct installation, maintenance an use of the
pro uct. By delivering the present manual we decline any legal liability for accidents that may occur because the user has not
followed, or only partly followed, the instructions of the present manual.
1.3 INTENDED USE
CARBONARA is a woo pellet stove for omestic use. Comply with the following instructions concerning the use of the stove:
Do not open the door when the stove is operating. The appliance is not intended for use by persons with limited physical,
sensory or mental capacities, or with insufficient experience or knowledge. The appliance is not intended for use by children.
Make sure children do not get close to the stove while it is operating. The above described intended use of the stove and the
relative configurations are the only ones permitted by the manufacturer: never use the stove in ways not described in the
provided instructions.
2. GENERAL INFORMATION
The i entification label on the back of the stove (figure 1) contains all the relevant information to clearly an univocally i entify
the manufacturer, the serial number an the EC marking. Extraor inary maintenance must be carrie out by qualifie personnel
authorize by the manufacturer. The manufacturer is not responsible for the consequences of improper installation, therefore
the installer is fully responsible for the above mentioned non-complaint installation, unauthorized changes and/or repairs and
use of non-original spare parts. The stove is to be use in compliance with the instructions containe in this manual an safety
stan ar s set by the specific local legislation where the stove is installe .
3. SAFETY STANDARDS
A)Directive 2006/95/EC: "Electrical equipment esigne for use within certain voltage limits; B) Directive 2004/108/EC;
"Approximation of the laws of the Member States relating to electromagnetic compatibility". C)Directive 89/391/EEC:
"Intro uction of measures to encourage improvements in the safety an health of workers at work". D)Directive 89/106/EEC:
"Approximation of laws, regulations an a ministrative provisions of the Member States relating to construction pro ucts".
E)Directive 85/3 4/EEC: "Approximation of the laws, regulations an a ministrative provisions of the Member States concerning
liability for efective pro ucts". F)Directive 1999/5/EC: "Ra io equipment an telecommunications terminal equipment an the
mutual recognition of their conformity". G) UNI 14 85/2006: "Resi ential space heating appliances fire by woo pellets -
Requirements an test metho s". EN 60335-1; EN 50165; EN 50366; EN 55014-1; EN 61000-3-2; EN 14785; EN 61591; EN 60704-
3; EN 60704-2
4. WARRANTY
Faulty stoves or mechanical an electrical components are covere un er a two-year warranty. During the warranty,
isassembling or replacement of the stove spare parts must be carrie out by your Service Retailer.Unauthorize isassembling or
replacements voi the manufacturer's warranty. Any amage ue to improper use of the stove will not be covere un er
warranty.

Operating, installation an maintenance manual CARBONARA - CAR80D
5
5. MANUFACTURER'S LIABILITY
By provi ing this manual, PIQUADRO A+3 S.r.l, ecline all liability, both civil an criminal, irect or in irect, eriving from:
1. Non compliant installation
2. Partial or total failure to follow the instructions provided in this manual
3. Installation by unqualified or untrained personnel
4. Use not in compliance with safety directives
5. Modifications and repairs on the stove which are not authorised by the manufacturer
6. Use of spare parts which are not original or not specific for the model of the stove
. Lack of maintenance
8. Exceptional events
5.1 DELIVERY AND CHECK OF THE STOVE
When receiving the pro uct, check that the elivere material is compliant with the or ere goo s.Also make sure that both the
User Instructions an the Installation instructions are in the shipping box. Check that there are no amage or missing parts. In
the event of amages or missing parts, please contact your area manager, your retailer or the manufacturer.
6. SAFETY INFORMATION
6.1 RECOMMENDATIONS FOR THE TECHNICIAN
Comply with the requirements hereafter specifie :
-
Installation must be carrie out by qualifie an authorize technicians.
-
Laws, regulations an irectives relating to chimney configuration, ventilation/exhaustion, power supply an other
systems must be respecte .
-
The stove must be installe an use in settings that are eeme suitable in compliance with current regulations.
-
The manufacturer eclines any responsibility for acci ents ue to improper installation, parts removal, ba maintenance,
failure to observe current regulations an incorrect use of the evice.
-
The chimney must have a flue raught of at least 12 PA.
-
There are neither ampers nor valves.
6.2 WARNINGS FOR THE USER
-Prepare the stove installation site in accor ance with local, national an European regulations;
-Do not touch or get too close to the glass oor;
-Do not touch the flue;
-Do not perform any type of cleaning when the stove is operating;
-Do not remove ash;
-Do not open the glass oor;
-Do not open the ash pan;
-Keep chil ren away from the stove;
-Comply with the requirements specifie in this manual;
-Labels must always be perfectly legible. If labels are illegible, contact the manufacturer for an original spare label;
-Strictly follow the routine an special maintenance plan;
-Do not switch the stove off by unplugging the power cor ;
-Do not clean the stove until it has coole own completely;
-Touch the oor only when the stove has coole own;

Operating, installation an maintenance manual CARBONARA - CAR80D
6
. STOVE DESCRIPTION
The pellet stove was built with materials conceive an esigne especially for this purpose. The stove main parts an
controls are escribe in figure 1 an in table 1.
TABLE. 1
A
Combustion chamber door
N
Pellet tank lid
B
Combustion chamber door handle
O
Fume exhaustion outlet
C
Air louvers
P
Air duct door
D
Combustion chamber/fire box
Q
Door handle hook
E
Pellets outlet channel
R
Alternative hot air outlet
F
Brazier
S
Toxic air inlet
G
Spark plug
T
Adjustable legs
H
Brazier support
U
Explosion
proof plug
I
Ash pan
V
Environment probe
L
Vermiculite flame retardant plate
Z
Combustion chamber door handle
M
Flame trap
A1
Power supply input/master switch
A1
Power supply input
-
master switch
-
Fuse holder
A2
Control panel (Mod.CAR80D)
A3
Serial link
A4
Identification label on the back of the stove
Figure 1

Operating, installation an maintenance manual CARBONARA - CAR80D
7
.1 TECHNICAL INFORMATION
STOVE MODEL CAR80D
Min./max. rated power Kw 4.1 - 8
Min./max. consumption Kg/h 0.5 – 1.6
Pellet tank capacity Kg 15
Fume exhaustion outlet diameter mm 80
Voltage/Frequency V/Hz 230/50
Average power consumption when in use W 130
Min/Max fume temperature C° 144 – 212.9
Min./max. heat output % 88.2 – 8 .3
CO emission at 13% of min./max. O² P. % 0.012 – 0.020
Dimensions H x l x P 835x525x505
.2 FUEL TYPE AND QUANTITY
Use fuel compliant with UNI EN 14785/2006. Pellets with the following features are recommen e :
Type of pellet: VIRGIN WOOD
Diameter 6 mm
Average length 15/20 mm
Moisture < 8%
Heating power Max. 4,500 Kcal/Kg
Power/Weight Max. 5.3 Kw/Kg
.3 VISUAL MATCH OF THE STOVE
The technician must visually an manually match the stove parts portraye in figure 2 an in table 2 with the pro uct
escription.He/she will also check that the parts are compliant with current regulations an haven't been amage whatsoever.
For any oubts regar ing amages to the evice please contact PiQua ro A+3s.r.l.
TABLE 2
a1
Brazier/Crucible a4 Combustion chamber door handle
a2
Vermiculite panel a5 Pellet tank lid
a3
Right/left side plug

Operating, installation an maintenance manual CARBONARA - CAR80D
8
8. INSTALLATION
Only skilled and authorised technicians can install and connect the stove verifying that it functions properly, in compliance
with current regulations and assembling instructions.PiQua ro A+3s.r.l. eclines any responsibility for amages to objects
an /or persons cause by improper installation.
8.1 INSTALLATION REQUIREMENTS
Before installing the stove carefully rea the following instructions. More specifically:
•Connect it to the flue for fume exhaustion.
•Connect it to your power supply system.
•Connect it to your heating system.
•Connections must be compliant with current regulations; PiQua ro A+3 s.r.l. eclines any responsibility for
amages cause by improper connections an systems.
8.2 POSITIONING OF THE STOVE
-Position the stove so that the plug is easily accessible.
-In or er to ensure a goo functioning an an even istribution of temperature, leave a equate clearance an air for the
pellets to burn, in compliance with installation instructions an national regulations.
-Air will flow through the permanent inlets on the outsi e walls of the stove.
-Position the stove far from inflammable objects such as woo en furniture, curtains an sofas.
-If the stove is to be supporte by a woo en floor, use a floor-protection plate in compliance with national regulations.
-Make sure that the room can provi e at least as much air as require by the evice normal burning an by room
ventilation.
-For your own safety an comfort, please make sure that the room has a suitable air scoop. (UNI10683)
-Do not install the stove in be rooms or bathrooms.
-The stove cannot be installe in the same room whit another heating evice if two in epen ent air pipes are not
available.
-Do not position the stove in explosive environments.
-Check that the floor can support the total weight of the stove.
For a correct positing of the stove follow the instructions below:
-Put the stove on the floor in a place where it can be easily connecte to the flue an to the exhausting an thermal
system.
-Connect the flue checking that the fume exhaustion outlet, on the back or on the right si e of the stove, is positione
correctly.
MEASURES FOR REAR FUME EXHAUSTION PIPE CONNECTION (Figure 4)
f1 = 215 mm
e1 = 80 mm
Diameter = 80 mm
MEASURES FOR SIDE FUME EXHAUSTION PIPE CONNECTION (Figure 5)
f2 = 215 mm
e2 = 95 mm
Diametre = 80 mm FIG 5
FIG 4 FIG 5

Operating, installation an maintenance manual CARBONARA - CAR80D
9
8.3 SAFELY CONNECT/OPERATE THE STOVE
The stove is connecte to the power supply system through a cable provi e by the manufacturer.The technician is responsible
for its correct an safe connection to the power system. Please check that:
•
The system supports the stove’s maximum power voltage, specifie in the i entification label (Figure 1) on the
back of the evice.
•
The output voltage is between the values escribe in Table 4.
•
There is an earthe wall socket just behin the stove, compliant with current regulations.
•
The stove cable is not ragging on the floor causing potential hazar s to users.
•
The cable is not fol e or presse .
•
Once the stove has been installe , make the power cable an socket easy to reach by a ults.
•
Do not a extension cor s to the stove power cable; in case you nee extension cor s imme iately contact your
PiQua ro A+3 s.r.l. Service Retailer.
•
Perio ically check that the cable has not been amage .
•
Never plug the stove power cable to the power supply system by using power strips or multiple sockets.
•
Never touch the cable with amp or wet han s.
•
Keep the chil ren away from the stove.
PiQuadro A+3 s.r.l. declines any responsibility for damages caused by the failure to meet the above mentioned
requirements.
8.4 EXTERNAL AIR INTAKE AND CONNECTION TO THE FLUE
Any connection between the stove an the flue must be protecte for your chil ren's safety. For your own safety and comfort,
please make sure that the room has a suitable air scoop (UNI10683). For the goo functioning of the stove, leave a equate
clearance an air for the pellets to burn.To a an external air scoop make a hole on the external wall, close to the stove.It must
have a free section of at least 50 cm² an be protecte by an internal an external gri . The air scoop must also:
•
Communicate directly with the room in which the stove has been installed.
•Be correctly positioned, so that it cannot be blocked from the inside or the outside.
Do not connect the stove to flues that have already been used for other heating devices. Open the hole for the fume exhaustion
pipe far from inflammable materials. Before opening the hole in a woo en or thermolabile wall, the technician must use
appropriate wall fitting an a equately caulk the stove pipe crossing it, using the insulating materials require by current
regulations. The same happens if the stove pipe is lai vertically or horizontally, near the thermolabile wall (Figure 26 Position 2)
Alternatively, we suggest you use in ustrial insulate pipes.These can be use on the outsi e without causing con ensation
problems.
WARNING
Always use pipes an connections with appropriate close-fitting gaskets. All the sections of a flue must be easily controlle an
remove for perio ic internal cleaning.
WARNING
Each 90° ben in the fume exhaustion pipe must be fixe , if possible, with a equate "T" fittings.
WARNING
Inserting a grating at the en of the fume exhaustion pipe is forbi en.It coul cause the stove to break own.

Operating, installation an maintenance manual CARBONARA - CAR80D
10
8.5 CONNECTION TO AN INSULATED OR DOUBLE-WALL FLUE
The internal imensions of the external flue pipe must be of minimum 10 x 10 cm, or 10 cm iameter, an of maximum 20 x 20
cm, or 20 cm iameter.
•
By using a equate tools, check that there is a flue raught of at least 12 PA.
•
Only use insulate stainless-steel pipes ( ouble-wall) with a smooth insi e lining (flexible stainless steel pipes are not
allowe ) securing them to the wall.
•
Allow space for perio ic checks an annual cleaning at the lower en of the flue.
•
Connect the stove to the flue by using a equate pipes an fittings.
•
Make absolutely sure to install an anti- raught chimney in compliance with current regulations.
•
It is forbi en to install flues as shown in Figure
8.6 CONNECTION TO THE FLUE
For the best possible stove functioning, the connection to the flue exhaustion pipe or system must have a positive gra ient of no
less than 3% in horizontal pipes. The overall length shall not be more than 2 m whereas, in vertical pipes, between a “T” fitting
an other fittings (change of irections) there must be a istance of minimum 1.5 m an maximum 3 m By using a equate tools,
check that there is a flue raught of at least 12 PA. Allow space for perio ic checks an annual cleaning at the lower en of the
flue. Connect the stove to the flue by using a equate pipes an fittings. Make absolutely sure to install an anti- raught chimney in
compliance with current regulations.
8. CONNECTION TO THE FLUE
The internal imensions of the flue must be of maximum 20 x 20 cm, or 20 cm iameter.In case of a bigger flue or ba functioning
(cracks, poor insulation, etc.) insert a stainless steel pipe with a equate iameter, for the entire flue length, from the bottom to
the top. By using a equate tools, check that there is a flue raught of at least 12 PA. Connect the stove to the flue by using
a equate pipes an fittings. Make absolutely sure to install an anti- raught chimney in compliance with current regulations.

Operating, installation an maintenance manual CARBONARA - CAR80D
11
8.8 USEFUL INFORMATION ABOUT CHIMNEYS
The flue must be compliant with current buil ing regulations. The picture below shows how to connect the fume exhaustion pipe
to a pre-existing flue (Figure A1 Figure A2).
9. COMMISSIONING
The stove commissioning can only be carrie out after installation an assembling.The evice must then be connecte to the
power supply, water an fume exhaustion system. The stove's finishing varnish ries after the stove has been use for a couple of
times. During the first few ays, the evice coul cause unpleasant smells. Air out the room to get ri of smells. Remove the tools
store in the pellet tank uring packaging.Make sure there is nothing left insi e the tank.
9.1 FUEL CHARGE
When loading the fuel, make sure the bag containing the pellets doesn't touch the stove. The fuel has to be loa e in the tank,
in the stove upper area. To loa the fuel open up the fuel tank li , wearing a equate protection gloves to avoi burning your skin
when touching the hot parts in the evice. In or er to avoi the fire to go out, make sure that the level of pellets insi e the tank
remains constant. Make sure that the tank li is always close .Only open it when loa ing the fuel. Be careful not to acci entally
insert tools an objects, besi es the fuel, insi e the fuel tank.
9.2 IGNITION
Before switching the stove on, perform the following checks:
•Check that the pellet tank is full.
•
Remove, clean an thoroughly check the vermiculite flame retar ant plate, the brazier an the ash pan then reposition
them correctly.

Operating, installation an maintenance manual CARBONARA - CAR80D
12
WARNING
Be careful:there may be burning residues.
•
Reposition the flame retar ant plate an the ash pan;
•
Reposition the ash pan making sure that the bigger hole on its right si e its with the ignition resistance pipe.
•
Close the fire box oor.
•
Make sure the evice is connecte to the power supply system.
•
Check that the back switch is on "I".

Operating, installation an maintenance manual CARBONARA - CAR80D
13
10. ROUTINE MAINTENANCE
clean the brazier every time you switch the stove on (Position F), once every 2-3 ays have the ash pan (Position I), the
vermiculite flame retar ant plate (Position L) an the brazier support cleane (Position H). We suggest you isassemble the
flame retar ant plate (Position M) an the inspection plug once a month (Position M1) cleaning up the area by using an
appropriate vacuum cleaner.
PARTS/FREQUENCY
TYPE OF CLEANING
1 DAY
Routine cleaning
2-3 DAYS
Routine cleaning
1 MONTH
Routine cleaning
1 YEAR
Extraordinary
cleaning
*
*
Warning
for
extraordinary
maintenance
please refer
to section
Bra ier (F)
Ash pan (I)
Flame trap (M)
Bra ier support (H)
Flame retardant plate
(L)
Inspection plug
Fumes(M
1
)
11. CONTROL PANEL ( Mod. CAR80D)
The control panel isplays information on the stove functioning. Through the menu the user can choose the esire isplay mo e
an obtain available information epen ing on the ifferent working stages of the stove. On the basis of the operating mo e,
messages can take a ifferent meaning accor ing to the position they have on the isplay.The figure escribes the ifferent status
in icators on the left si e of the isplay. If an icon shows up in the "STATE" area of the isplay, the correspon ing evice is
activate on the basis of the list appearing right below the icon.

Operating, installation an maintenance manual CARBONARA - CAR80D
14
12. MENU
Press P3 key (MENU) for menu. The menu is ivi e in ifferent entries an levels allowing you to access settings an boar
programming options. The menu entries for technical programming are protecte by a key.
12.1 USER MENU
The following section briefly escribes the functioning of the menu, touching on the options available to users.
Level 1 Level 2 Level 3 Level 4 Value
Select value
02-set time and
date
01 ay Day of the week
02 hours Hour
03 minutes Minute
04 ay Day of the month
05-month Month
06-year Year
03-setchrono
01-enable chrono
01-enable chrono On /off
02- aily prog.
01- aily chrono On /off
02- 02- start ay 1 Hour
03- stop ay 1 Hour
04- start ay 2 Hour
05- stop ay 2 Hour
03-weekly prog.
01- weekly chrono On /off
02- Start Prog. 1 Hour
03- Stop Prog. 1 Hour
04- Mon ay Prog. 1 On /off
05- Tues ay Prog. 1 On /off
06 - We nes ay Prog.
1
On /off
06- We nes ay Prog.
1
On /off
08-Fri ay prog. 1 On /off
09-Satur ay prog. 1 On /off
10 - Sun ay Prog. 1 On /off
11-start prog. 2 Hour
12-stop prog. 2 Hour
13-Mon ay prog. 2 On /off
14-Tues ay prog. 2 On /off
15-We nes ay prog. 2
On /off
16-Thurs ay prog. 2 On /off
17-Fri ay prog. 2 On /off
18-Satur ay prog. 2 On /off
19-Sun ay prog. 2 On /off
20-start prog. 3 Hour
Level 1 Level 2 Level 3 Level 4 Value
21-stop prog. 3 Hour
22-Mon ay prog. 3 On /off
23-Tues ay prog. 3 On /off
24-We nes ay prog. 3
On /off

04-week-
en
programming
04-choose
language
01-Italian
02-French
03-English
04-German
05-stand-by
mode
06-buzzer mode
0 -initial pellet
charge
08-stove status
12.2 MENU 02 –
SET TIME AND DATE
Set the current time an ate. The boar is equippe with a lithium battery, allowing a clock life span of more than 3
ay program your stove, follow the instructions in
Press P3
once to enter
the clock menu
Press P3
once to enter
the clock menu
Operating, installation an maintenance manual CARBONARA
25-Thurs ay prog. 3
26-Fri ay prog. 3
27-Satur ay prog. 3
28-Sun ay prog. 3
29-start prog. 2
30-stop prog. 2
31-Mon ay prog. 2
32-Tues ay prog. 2
33-We nes ay prog. 2
34-Thurs ay prog. 2
35-Fri ay prog. 2
36-Satur ay prog. 2
37-Sun ay prog. 2
en
programming
01-week-en chrono
02-start 1
03-stop 1
04-start 2
05-stop 2
SET TIME AND DATE
Set the current time an ate. The boar is equippe with a lithium battery, allowing a clock life span of more than 3
ay program your stove, follow the instructions in
the graphic.
Press P3
01 day set.
P1 + P2 -
Press P3
02 hours
P1 + P2 -
Press P3
01 day set.
P1 + P2 -
Press P3
02 hours
P1 + P2 -
Operating, installation an maintenance manual CARBONARA
- CAR80D
15
On /off
On /off
On /off
On /off
Hour
Hour
On /off
On /off
On /off
On /off
On /off
On /off
On /off
Set
Set
Set
Set
On /off
On /off
Set
-
Set the current time an ate. The boar is equippe with a lithium battery, allowing a clock life span of more than 3
-5 years. To
Press P3
03 minutes
P1 + P2 -
Press P3
03 minutes
P1 + P2 -

12.3 MENU 03 -
SET CHRONO SUB MENU 04
It allows you to globally enable an isable all chrono
graphic, the operation oesn't elete previous settings (Daily
12.4 SUB MENU 04-
02 DAILY PROGRAMMING
Allows you to enable, isable an set aily chrono
switching-
off operations. You can enable or isable the aily programming without changing the set programming. To ay
program your stove, follow the instructions in the graphic.
selection
START 1
STOP 1
START 2
STOP 2
Start Press P3 once
P1 - P2
on -- off
Start
Press P3 once
Press P3 once
then press P1-P2
on off Daily
Press P3 once
then press P1-P2
switching on time
switching off time
Operating, installation an maintenance manual CARBONARA
SET CHRONO SUB MENU 04
-01 ENABLE CHRONO
It allows you to globally enable an isable all chrono
-thermostat functions. To set the chrono
follow the instructions in the
graphic, the operation oesn't elete previous settings (Daily
- weekly - week-en programming).
02 DAILY PROGRAMMING
Allows you to enable, isable an set aily chrono
-thermostat functions. Two slots can
be set, base on 2 ignition an 2
off operations. You can enable or isable the aily programming without changing the set programming. To ay
program your stove, follow the instructions in the graphic.
meaning
possible
Activation time Hour-
ON
Deactivation time Hour-
OFF
Activation time Hour-
ON
Deactivation time Hour-
OFF
Press P5 once Press P3
twice
Press P4
3 times to exit
Press P5
once
Press P3
once
Press P5
once
Prog. Daily
Press P3 once
then press P1-P2
switching on time
Press P3 once
then press P1
switching off time
Press P3 once
then press P1-P2
switching off time
Press P4 3 times
to exit
Operating, installation an maintenance manual CARBONARA
- CAR80D
16
follow the instructions in the
be set, base on 2 ignition an 2
off operations. You can enable or isable the aily programming without changing the set programming. To ay
possible
values
ON
OFF
ON
OFF
Press P3
once
Press P3 once
then press P1
-P2
switching off time

12.5 SUB MENU 04-
03 WEEKLY PROGRAMMING
Allows you to enable, isable an set weekly chrono
whose final result is the combination of the 4 single programming options. The weekly programming can be enable an isable
as shown in the graphic. Moreover, by selecting OFF in the hour file
!Attention! Carefully carry out programming and check that activation hours, within the same
day, do not overlap in the different programming options.
Start
Press P3 once
Press P3 once
then press P1-P2
on off Weekly
Press P3 once
then press P1-P2
on off Daily-Weekly
according to your needs
enabling or disabling the
Operating, installation an maintenance manual CARBONARA
03 WEEKLY PROGRAMMING
Allows you to enable, isable an set weekly chrono
-thermostat
functions.The weekly programming has 4 in epen ent programs,
whose final result is the combination of the 4 single programming options. The weekly programming can be enable an isable
as shown in the graphic. Moreover, by selecting OFF in the hour file
, the clock ignores the correspon ing comman .
!Attention! Carefully carry out programming and check that activation hours, within the same
day, do not overlap in the different programming options.
Press P5
once
Press P3
once
Press P5
twice
Prog. Weekly
Press P3 once
then press P1-P2
switching on time
Press P3 once
then press P1
switching off time
Repeat all settings
according to your needs
enabling or disabling the
different functions
Press P4 3 times
to exit
Operating, installation an maintenance manual CARBONARA
- CAR80D
17
functions.The weekly programming has 4 in epen ent programs,
whose final result is the combination of the 4 single programming options. The weekly programming can be enable an isable
, the clock ignores the correspon ing comman .
!Attention! Carefully carry out programming and check that activation hours, within the same
Press P3
once
Press P3 once
then press P1
-P2
switching off time

Operating, installation an maintenance manual CARBONARA - CAR80D
18
Program 1
Menu level Selection Meaning Possible values
03-03-02 Start Prog. 1 Activation time Hour-OFF
03-03-03 Stop Prog. 1 Deactivation time Hour-OFF
03-03-04 Mon ay Prog. 1
Reference ays
On /off
03-03-05 Tues ay Prog. 1 On /off
03-03-06 We nes ay Prog. 1 On /off
03-03-07 Thurs ay Prog. 1 On /off
03-03-08 Fri ay Prog. 1 On /off
03-03-09 Satur ay Prog. 1 On /off
03-03-10 Sun ay Prog. 1 On /off
Program 2
Menu level Selection Meaning Possible values
03-03-11 Start Prog. 2 Activation time Hour-OFF
03-03-12 Stop Prog. 2 Deactivation time Hour-OFF
03-03-13 Mon ay Prog. 2
Reference ays
On /off
03-03-14 Tues ay Prog. 2 On /off
03-03-15 We nes ay Prog. 2 On /off
03-03-16 Thurs ay Prog. 2 On /off
03-03-17 Fri ay Prog. 2 On /off
03-03-18 Satur ay Prog. 2 On /off
03-03-19 Sun ay Prog. 2 On /off
Program 3
Menu level Selection Meaning Possible values
03-03-20 Start Prog. 3 Activation time Hour-OFF
03-03-21 Stop Prog. 3 Deactivation time Hour-OFF
03-03-22 Mon ay Prog. 3
Reference ays
On /off
03-03-23 Tues ay Prog. 3 On /off
03-03-24 We nes ay Prog. 3 On /off
03-03-25 Thurs ay Prog. 3 On /off
03-03-26 Fri ay Prog. 3 On /off
03-03-27 Satur ay Prog. 3 On /off
03-03-28 Sun ay Prog. 3 On /off
Program 4
Menu level Selection Meaning Possible values
03-03-29 Start Prog. 4 Activation time Hour-OFF
03-03-30 Stop Prog. 4 Deactivation time Hour-OFF
03-03-31 Mon ay Prog. 4
Reference ays
On /off
03-03-32 Tues ay Prog. 4 On /off
03-03-33 We nes ay Prog. 4 On /off
03-03-34 Thurs ay Prog. 4 On /off
03-03-35 Fri ay Prog. 4 On /off
03-03-36 Satur ay Prog. 4 On /off
03-03-37 Sun ay Prog. 4 On /off

12.6 SUB MENU 04-
04 WEEK
Allows you to enable, isable an set chrono
The week-
en programming can be enable an isable as shown in the graphic.
NOTE: In order to avoid unwanted start
programming option at a time.
12.
MENU 04 CHOOSE LANGUAGE
Allows you to choose the language you prefer among the available ones.
12.8 MENU 05 STAND-
BY MODE
Activate the STAND-
BY mo e which shuts own the stove when the room temperature is above the temperature SE
of time longer than the one efine by Pr44. If the stove shuts own for this reason, you will be able to switch it on only w
following con ition is fulfille :
T set < (room T
12.9
MENU 06 BUZZER MODE
When OFF it isables the acou
stic signalling.
12.10
MENU 0 INITIAL CHARGE
When the stove is switche off an col , it allows you to pre
12.11
MENU 08 STOVE STATUS
Displays the current stove status an the status of the evices
12.12 OPERATING MODE
The stan ar operating mo e of a controller installe on an air stove is escribe below. The escriptions below refer to a
controller with chrono-
thermostat options.
12.13
SWITCHING THE STOVE ON
Press P4 for a couple of secon s to switch the stove on. The isplay signals that the stove is switche on.
12.14 START-UP STAGE
The stove start-
up phases are carrie out in sequence, following the set time parameters.
12.15 FAILED SWITCHING
After Pr01 time, if the fume temperature hasn't reache 50°C, the alarm goes off.
Start
Press P3 once
Press P3 once
then press P1-P2
on off Week End
then press P1
switching on time
Press P3 once
then press P1-P2
switching on time
Push P3 once, then
switching off time
Operating, installation an maintenance manual CARBONARA
04 WEEK
-END PROGRAMMING
Allows you to enable, isable an set chrono
-thermostat functions uring the week-
en ( ays 6 an 7, i.e. Satur ay an Sun ay).
en programming can be enable an isable as shown in the graphic.
NOTE: In order to avoid unwanted start
-ups or shut-
downs of the stove, enable one
programming option at a time.
MENU 04 CHOOSE LANGUAGE
Allows you to choose the language you prefer among the available ones.
BY MODE
BY mo e which shuts own the stove when the room temperature is above the temperature SE
of time longer than the one efine by Pr44. If the stove shuts own for this reason, you will be able to switch it on only w
T set < (room T
– Pr43)
MENU 06 BUZZER MODE
stic signalling.
MENU 0 INITIAL CHARGE
When the stove is switche off an col , it allows you to pre
-
loa the pellet for 90”. Start up with key P1 an stop with key P4.
MENU 08 STOVE STATUS
Displays the current stove status an the status of the evices
connecte to it. Scroll own to see the ifferent pages available.
The stan ar operating mo e of a controller installe on an air stove is escribe below. The escriptions below refer to a
thermostat options.
SWITCHING THE STOVE ON
Press P4 for a couple of secon s to switch the stove on. The isplay signals that the stove is switche on.
up phases are carrie out in sequence, following the set time parameters.
ON
After Pr01 time, if the fume temperature hasn't reache 50°C, the alarm goes off.
Press P5
once
Press P3
once
Press P5
three times
Prog. Week End
Press P3 once
then press P1
-P2
switching on time
Press P3 once
then press P1-P2
switching off time
Push P3 once, then
push P1-P2
switching off time
Press P4 3 times
to exit
Operating, installation an maintenance manual CARBONARA
- CAR80D
19
en ( ays 6 an 7, i.e. Satur ay an Sun ay).
downs of the stove, enable one
BY mo e which shuts own the stove when the room temperature is above the temperature SE
T for a perio
of time longer than the one efine by Pr44. If the stove shuts own for this reason, you will be able to switch it on only w
hen the
loa the pellet for 90”. Start up with key P1 an stop with key P4.
connecte to it. Scroll own to see the ifferent pages available.
The stan ar operating mo e of a controller installe on an air stove is escribe below. The escriptions below refer to a
Press P4 for a couple of secon s to switch the stove on. The isplay signals that the stove is switche on.
Press P3
once

Operating, installation an maintenance manual CARBONARA - CAR80D
20
12.16 OPERATING STOVE
After having been successfully switche on, the stove shifts to normal working phase. If the fume temperature is higher than
Pr15, heat exchangers are automatically activate .
12.1 SETTING ROOM TEMPERATURE AND POWER
To set room temperature, select the CHANGE TEMP SET by pressing P2 key. Use P1 an P2 keys. The isplay shows the status of
the current temperature SET. To set power select the CHANGE POWER SET by pressing P6 key. Use P6 an P5 keys. The isplay
shows the status of the current power SET.
12.18 USE OF THERMOSTAT/EXTERNAL CHRONO-THERMOSTAT
You can use an external thermostat. We strongly suggest that you contact a qualifie technician for installation.
•Thermostat: program a temperature SET of 7°C
•External chrono-thermostat: program a temperature SET of 7°C an isable the chrono functions in the menu.
12.19WHEN THE ROOM TEMPERATURE HAS REACHED THE SET VALUE
When the room temperature has reache the set value, or the fume temperature gets to Pr13, the heat power is automatically
brought own to minimum value, calle MODULATION. If the STAND-BY mo e is activate , the stove starts to working again until
Pr13 value is reache . Restart is possible when the above con itions are fulfille .
12.20 RESTART AFTER SWITCHING OFF
WHEN TEMPERATURE REACHES SET ROOM TEMPERATURE
After the STAND-BY switching off, the stove cools own an the fume exhaustion spee is brought to maximum level. After the
switching off, the stove cools own an the exhaustion spee is brought to the level etermine by Pr29. Restart is possible once
the following con ition is fulfille : Room T < (T set - Pr43)
12.21 CLEANING THE BRAZIER
In normal working con itions an at intervals set by Pr03, the CLEANING BRAZIER mo e is activate for a perio of time
etermine by P12.
12.22 SWITCHING THE STOVE OFF
Simply press P4 key for 2 secon s to shut the stove own. The auger is imme iately blocke an the fume exhaustion system is
brought to a high spee working mo e. A FINAL CLEANING phase is thus carrie out. The fume exhaustion stops after a time set
by Pr39, after the fume temperature rops below the value etermine by Pr13.
12.23 SWITCHING THE STOVE ON AGAIN
You cannot restart the stove until the fume temperature is un er P13 value an the safety time etermine by Pr38 has elapse .
Table of contents
Other PIQUADRO CALORE Pellet Stove manuals
Popular Pellet Stove manuals by other brands

Centrometal
Centrometal CentroPelet ZS10 Technical instructions

England's Stove Works
England's Stove Works 25-PDV Installation & operation manual

MCZ
MCZ PHILO COMFORT-AIR Use and installation manual

ADURO
ADURO H1 user manual

Quadra-Fire
Quadra-Fire CB1200M-MBK installation manual

USSC
USSC Ashley AP5660 Installation and operating manual