PITT Outdoor kit User manual

NL Gebruikshandleiding - Outdoor
EN User manual - Outdoor
Outdoor UM-OUTDOOR-23-6-PC/NL-EN

Voorwoord
Geachte klant,
Gefeliciteerd met de aankoop van uw PITT®cooking Outdoor kit! Het Outdoor kit is opgebouwd uit verschillende
onderdelen die het kooksysteem zowel tijdens als na het koken beschermen tegen weersinvloeden, en u daarnaast
voorzien van optimaal kookgemak in uw buitenkeuken.
Dankzij de verschillende brandercapaciteiten kunt u elk gerecht op de juiste wijze bereiden. De geïntegreerde
vonkontsteking in de bediening zorgt er voor dat u met één hand de branders en de ontsteking kunt regelen.
Deze handleiding beschrijft hoe u optimaal gebruik kunt maken van alle functies van dit (buiten)kooktoestel. Wij raden u
aan de gebruikershandleiding en montage-instructies zorgvuldig door te lezen, voordat u het apparaat in gebruik neemt.
Bewaar deze handleiding goed, zodat een eventuele volgende gebruiker er ook zijn voordeel mee kan doen. Bovendien
dient deze handleiding ook als naslagwerk voor de servicedienst.
Wij wensen u veel kookplezier in de buitenlucht!
PITT®cooking
Inhoud
Hoofdstuk Onderwerp Pagina
1 Inbouwmaten PITT®cooking kooksysteem 3
2 Aansluiting gas en elektrisch 4
3 Algemene instructies 5
4 Overzicht PITT®cooking Outdoor 6
5 Bediening PITT®cooking 7
6 Optimaal gebruik van het PITT®cooking systeem 7
7 Onderhoud van het PITT®cooking systeem 8
8 Storingen in het PITT®cooking systeem 9
9 PITT®cooking Outdoor assortiment 10
10 Links & contactinformatie 11
2
PITT®cooking Outdoor
Informatie
NL

1 Inbouwmaten PITT®cooking kooksysteem
• Een PITT®cooking module mag nooit over de scheiding van twee kasten gemonteerd worden. De kookplaat moet te
allen tijde demontabel zijn in geval van service.
• Zodra de PITT®cooking module bijvoorbeeld boven een lade wordt gepland, dient u rekening te houden met de totale
dikte van de unit en ondersteuningsset van 119 mm, gemeten vanaf de bovenkant van het blad (afb. 2).
• Om doorbuigen van het keukenblad te voorkomen, dient de module ondersteund te worden met de PITT®cooking
ondersteuningsset (afb. 3).
3
Ondersteuningsbalk1afb. 2
Inbouwmaten kooksysteem in mm:
Min. 47 Min.
150
Min. 50
Min. 600
Min. 4
Max. 35
afb. 1
Ondersteuningsset
89 mm
119 mm
Min.
450
Min.
650
afb. 2
1 Van toepassing bij PITT®cooking Outdoor kit: controleer de installatiehandleiding om de ondersteuningsbalken op
de juiste maatvoering te installeren. Dit is noodzakelijk om de beschermbak op de juiste wijze te installeren.
PITT®cooking kooksysteem
Installatie- en verwerkings-
voorschriften
PITT®cooking Outdoor
Montagehandleiding
Ondersteuningsbalk1
afb. 3
NL
PITT®cooking kooksysteem
Montagehandleiding
PITT®cooking kooksysteem
Montagevideo

4
Aanwijzingen gebruik van gas en aansluiting
• Controleer voor installatie of de lokale distributie condities (soort gas en gasdruk) overeenkomen met de
instellingwaardes van dit apparaat. De instellingwaardes van dit apparaat zijn vermeld op de typeplaat.
• Dit apparaat is niet uitgerust met een verbrandingsgasafvoer installatie.
• De gasaansluiting dient te voldoen aan de algemeen geldende voorschriften. Wij adviseren de kookplaat met een vaste
gasleiding aan te sluiten. Gebruik van een goedgekeurde, speciaal daarvoor bestemde, gasslang is ook toegestaan.
• Gebruik achter een oven altijd een volledige metalen slang.
• Bij gebruik van een goedgekeurde gasslang mag deze niet geknikt zijn en niet in aanraking komen met bewegende
delen van het keukenmeubel.
• De aansluitkraan moet op een makkelijk bereikbare plaats geplaatst worden.
• Gebruik een gasslang met een maximale lengte van twee meter in het geval van LPG (flessengas).
• Vul een LP gascilinder nooit meer dan 80%.
• Controleer voor ingebruikname alle aansluitingen op lekken, dit kan met behulp van zeepsop.
• Bewaar of gebruik geen gascilinders of andere ontvlambare dampen of vloeistoffen in de nabijheid van het PITT®
cooking kooksysteem.
• De elektrische installatie dient te voldoen aan de nationaal en plaatselijk geldende voorschriften.
• Wandcontactdoos en stekker moeten te allen tijde bereikbaar zijn.
• Het toestel aansluiten met de meegeleverde geaarde stekker op een geaard stopcontact.
• Bij beschadiging van de aansluitkabel mag deze alleen vervangen worden door de fabrikant of een door hen aan te
wijzen installateur. Dit is aanbevolen om gevaarlijke situaties te voorkomen.
Aanwijzingen elektrische aansluiting 230 V – 50 Hz – 0,6 VA
2 Aansluiting: gas en elektrisch
Overzicht Outdoor modellen
Model PITT Totaal kW Bel. gr/h
Akan 1,8 Kw Hs 130
Altar 3 kW Hs 220
Azuma 5 kW Hs 360
Air 5 kW Hs 360
Baluran 8 kW Hs 580
Bennett 6,8 kW Hs 490
Baula 8 kW Hs 580
Bely 6,8 kW Hs 490
Capital 9,8 kW Hs 710
Cima 9,8 kW Hs 710
Overzicht gas - sproeier combinatie
Gas Gasdruk Brander
0,3 - 1,8 kW
sproeier
Brander
0,3 - 3 kW
sproeier
Brander
0,2 - 5 kW
buitenring
sproeier
Brander
0,2 - 5 kW
binnenring
sproeier
G25 25 mbar 1.02 1.32 2x 1.18 1x 0,71
G25.3 25 mbar 1.02 1.32 2x 1.18 1x 0,71
G25 20 mbar 1.07 1.45 2x 1.28 1x 0,74
G20 20 mbar 1.01 1.29 2x 1.15 1x 0,70
G30 30 mbar 0.66 0.87 2x 0.72 1x 0.46
G30 50 mbar 0.58 0,79 2x 0.68 1x 0.40
G31 30 mbar 0.70 0.94 2x 0.80 1x 0.48
G31 37 mbar 0.66 0.87 2x 0.72 1x 0.46
G31 50 mbar 0.62 0.80 2x 0.70 1x 0.42
Gas I2H/E/LL
G20/25
I2L/I2EK
G25/G25.3
I3+
G30/31
I3B/P
G30/31
I3P
G31
Gasdruk 20
mbar
25
mbar
30/37
mbar
50
mbar
50
mbar
Toestel klasse: 3
Toestel categorieën
• De vonkontsteking werkt middels een AA-batterij.
• De batterij bevindt zich aan de onderzijde in de behuizing.
* afhankelijk van het model
Batterij vonkontsteking* 1,5V DC
NL

Waarschuwingen met betrekking tot veiligheid
Lees de instructies uit deze gebruikershandleiding zorgvuldig door. Pas daarna kunt u het PITT®cooking systeem op de juiste manier
gebruiken. Bewaar zowel de montagehandleiding als de gebruikershandleiding goed. Bij het overdragen van het PITT®cooking
systeem aan een andere gebruiker dient u deze documentatie mee te leveren.
Controleer het PITT®cooking systeem direct na het verwijderen van de verpakking. Indien er sprake is van transportschade dient u
contact op te nemen met PITT®cooking en de veroorzaakte schade schriftelijk vast te leggen.
Veiligheidsvoorschriften
1. Gebruik de kookplaat uitsluitend voor het bereiden van gerechten. Het toestel is niet geschikt om ruimtes mee te
verwarmen.
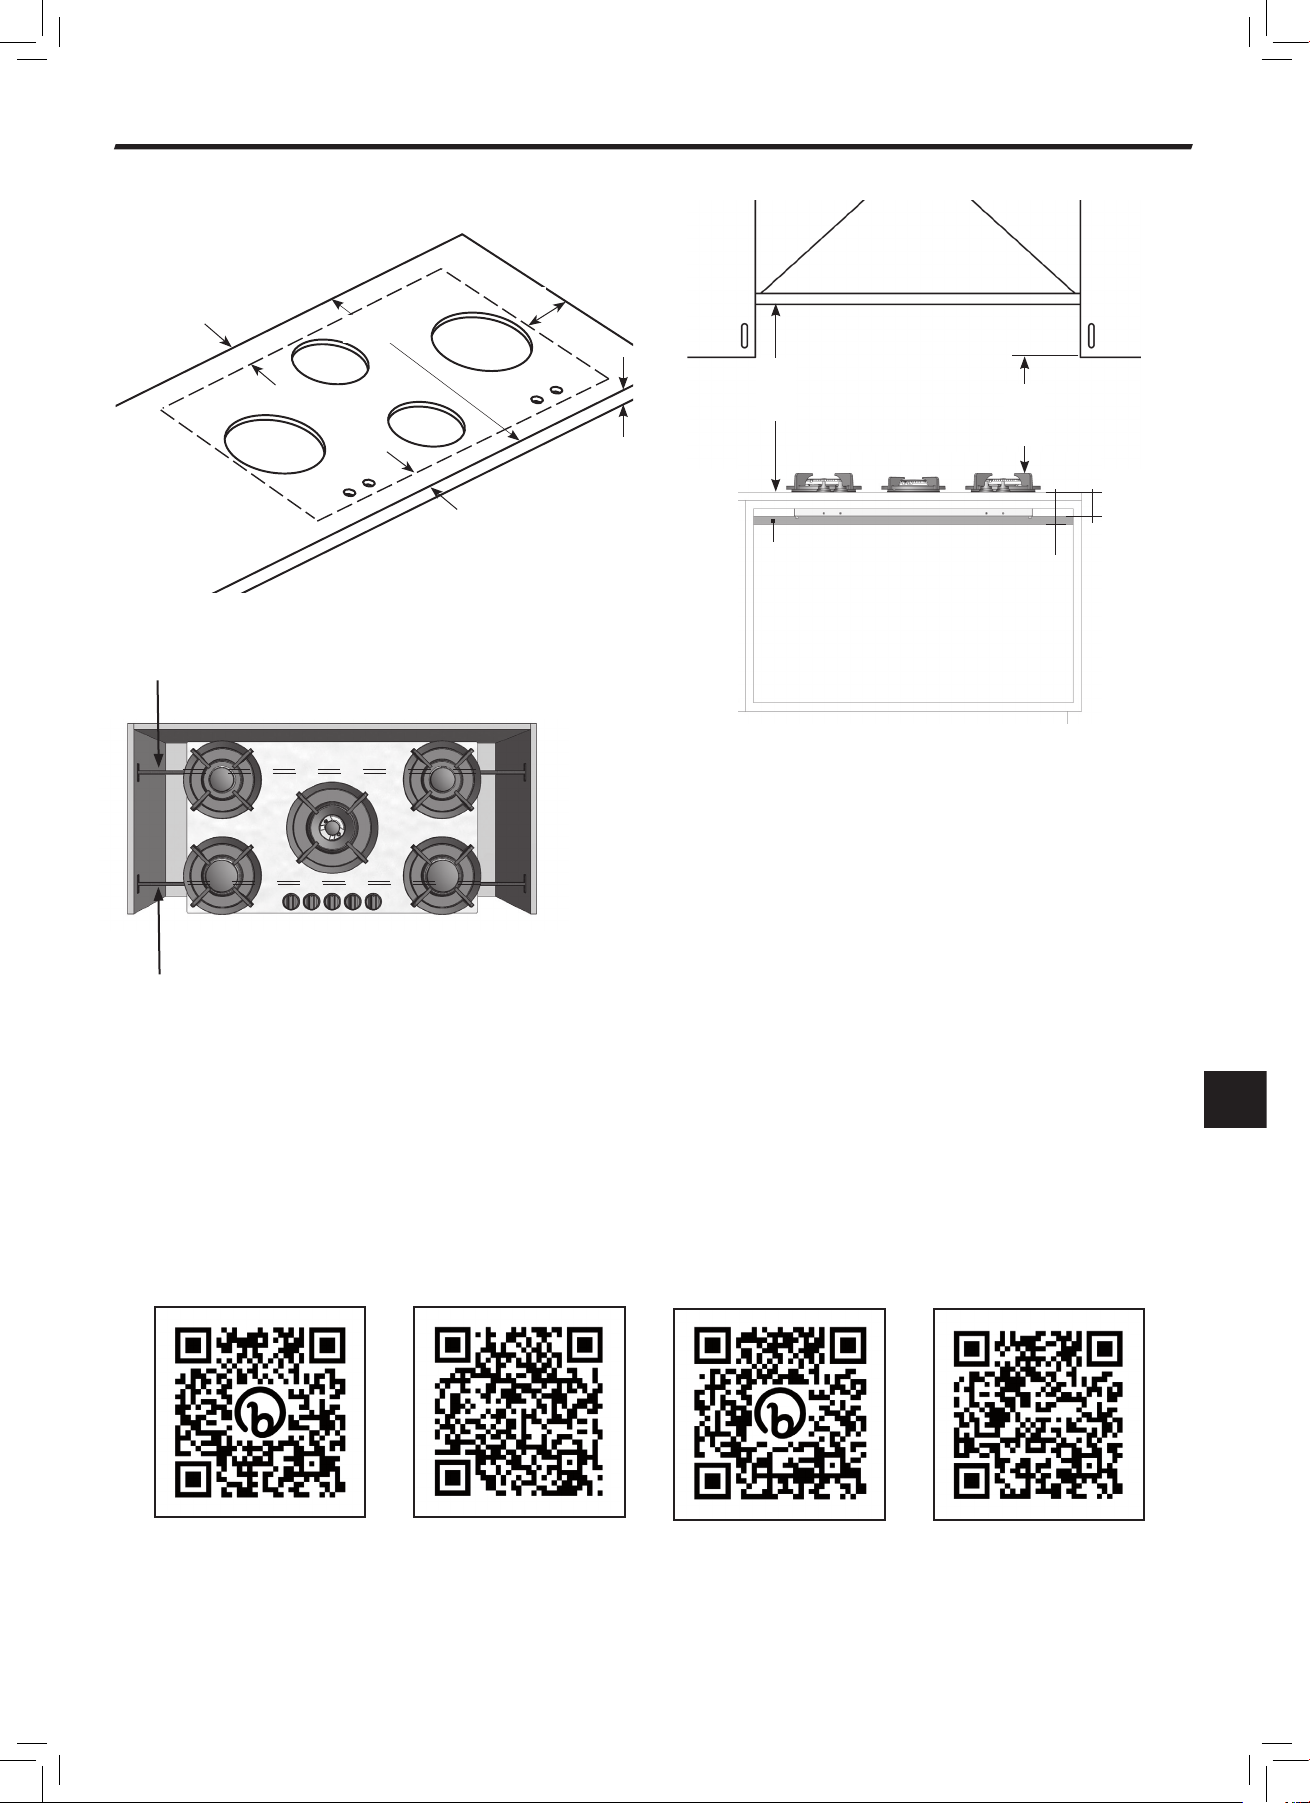
2. Let op dat alle branderonderdelen op de juiste, voorgeschreven manier zijn geplaatst.
3. Zorg voor voldoende ventilatie tijdens het gebruik.
4. Afstand van de pan tot een niet-hittebestendige wand of bedieningsknop dient minimaal 2 centimeter te zijn.
5. Plaats pannen altijd op de pandragers, plaats deze nooit rechtstreeks op de branderdop.
6. Controleer het product regelmatig op beschadigingen. Neem het apparaat niet in gebruik wanneer het beschadigd is,
maar laat het repareren.
7. De gebruiker is zelf verantwoordelijk voor het juiste gebruik en de goede staat van het systeem. Bij onjuist gebruik kan
de fabrikant niet aansprakelijk worden gesteld voor eventuele schade.
8. Bij het kiezen van een plaats voor het PITT®cooking systeem, of het nu een verrijbare of ingebouwde toepassing
betreft, moet rekening worden gehouden met de blootstelling aan wind, de nabijheid van verkeerswegen en de lengte
van de gastoevoerleiding.
9. Steek het PITT®cooking systeem nooit aan met de afdekkap op zijn plaats.
10. Plaats de afdekkap nooit over het PITT®cooking systeem wanneer de branders aan staan en wanneer de
branderonderdelen heet zijn.
11. Gebruik het PITT®cooking systeem nooit met harde wind(stoten).
12. Gebruik het PITT®cooking systeem nooit als verwarming.
13. Gebruik het PITT®cooking systeem alleen op een harde, vlakke, onbrandbare ondergrond die het gewicht van de
opstelling veilig kan dragen.
14. Laat het PITT®cooking systeem niet onbeheerd achter wanneer deze in gebruik is.
15. Verplaats het PITT®cooking systeem niet wanneer deze in gebruik is.
Oververhitting en brandgevaar
16. Schakel de brander alleen in als u er een pan of wok op heeft geplaatst. Bij het verhitten van een lege pan kan er
oververhitting optreden.
17. Oververhitte olie of boter kunnen gemakkelijk vlam vatten. Nooit blussen met water. U kunt de vlammen smoren door
de pan af te dekken met een deksel.
18. Flambeer nooit onder een afzuigkap, dit kan brand veroorzaken.
19. Leg nooit ontvlambare of metalen voorwerpen op de kookplaat.
20. Plaats nooit een grill of bakplaat over twee branders.
21. Gebruik geen pannen met een grotere bodemdiameter dan de pandrager. Wij adviseren bij de kleine en medium brander
een pan met een bodemdiameter van maximum 230 mm en bij de wok-/sudder brander een maximum van 270 mm.
Hete onderdelen
22. Branderdelen en het keukenblad rondom de branders worden heet tijdens gebruik en blijven dit nog geruime tijd na het
koken. Raak deze hete delen niet aan.
23. Bij gebruik van pannen met een grotere diameter dan aanbevolen (punt 21) kunnen de bedieningsknoppen bij langdurig
en intensief gebruik heet worden.
24. Zorg ervoor dat de vlam altijd onder panbodem blijft (geldt niet bij wokken). Vlammen langs de panwand zijn niet
effectief en veroorzaken ongewenste oververhitting.
25. Het is van groot belang dat kinderen op afstand blijven. Zorg ervoor dat de vlam altijd onder panbodem blijft (geldt niet
bij wokken). Vlammen langs de panwand zijn niet effectief en veroorzaken ongewenste oververhitting.
26. De branderonderdelen, Outdoor kit en objecten die dichtbij de gasbrander staan kunnen heet worden tijdens gebruik
van de brander. Met zorg gebruiken.
27. Als de bewegende branderondelen warm zijn, gebruik dan beschermende handschoenen of daarvoor bedoeld
gereedschap om de branderonderdelen te verplaatsen.
!
!
3 Algemene instructies
5
NL

1
2
3
4
1
23
4
5
1-PITT®cooking kooksysteem
(1-PITT®cooking kooksysteem Azuma weergegeven)
2-/3-PITT®cooking kooksysteem
(3-PITT®cooking kooksysteem Capital weergegeven)
PITT®cooking Outdoor set
Type A1
PITT®cooking Outdoor set
Type B/C1
4 Overzicht PITT®cooking Outdoor
Onderdelen
Afdekkap 1-PITT
1
2
3
4
Windscherm Groot
1-PITT cooking kooksysteem
Beschermbak 1-PITT
Afdekkap 2-/3-PITT
1
2
3
4
5
Windscherm Klein
Windscherm Groot
2-/3-PITT cooking kooksysteem
Beschermbak 2-/3-PITT
6
Compatibele PITT®cooking kooksystemen voor buitengebruik
PITT®cooking Outdoor set PITT®cooking kooksysteem
Type A1Akan, Altar, Azuma en Air
Type B1Baula, Bely, Baluran en Bennett
Type C1Capital en Cima
NL

7
5 Bediening PITT®cooking
Branders PITT®cooking
Branders ontsteken en instellen
Om storingen te voorkomen dient u voor het ontsteken van de brander te controleren of alle onderdelen op de juiste manier
gemonteerd zijn. Voor het ontsteken van de brander dient u een pan op de gaspit te plaatsen. Elke brander kan traploos
worden ingesteld tussen hoge en lage stand.
Inschakelen
Om de brander te ontsteken dient u de vonkontsteking te activeren. Dit doet u door de bedieningsknop helemaal in te
drukken en deze ingedrukt te houden. Draai de bedieningsknop naar links (afbeelding 5). Houdt de knop vervolgens nog 5
tot 8 seconden ingedrukt. Op deze manier wordt de temperatuursensor warm, waardoor gastoevoer mogelijk is. U kunt de
grootte van de vlam reguleren door langzaam aan de bedieningsknop te draaien tussen de hoge en lage stand (afbeelding 5
en 6).
Let op: mocht de vlam na 2 tot 4 seconden niet ontsteken, dan dient u de bedieningsknop door te draaien naar de lage
stand (afbeelding 6). Een kleine vlam ontsteekt vaak sneller dan een grote vlam.
Uitschakelen
Om de brander uit te schakelen draait u de bedieningsknop terug tot de stand weergegeven op afbeelding 4.
Brander uitgeschakeld Hoge stand Lage stand
afb. 4 afb. 5 afb. 6
6 Optimaal gebruik van het PITT®cooking systeem
• Voorkom dat de vlammen om de pan heen gaan, dit zorgt ervoor dat er veel energie verloren gaat. Ook handgrepen van
de pannen kunnen hierdoor te heet worden.
• Voor het doorkoken van grote hoeveelheden en wokken kunt u het beste de wokbrander gebruiken. Bereiding van
sauzen, doorkoken en sudderen kan het beste gebeuren op de sudderbrander. Voor het doorkoken dient deze wel op de
hoogste stand te staan.
• Kook met het deksel op de pan, hiermee spaart u energie.
• Gebruik pannen met een vlakke, schone en droge bodem. Vlakke pannen staan stabieler en een schone bodem zorgt
voor een betere warmteoverdracht naar het gerecht.
Wokbrander
Met de wokbrander kunt u gerechten op een zeer hoge temperatuur bereiden. Hierbij is het echter belangrijk om op een
aantal dingen te letten:
• Zorg ervoor dat u de ingrediënten van te voren snijdt.
• Gebruik bij het roerbakken olie van goede kwaliteit. Olijfolie, zonnebloemolie of arachideolie zijn zeer geschikt voor het
wokken. Gebruik geen boter of margarine, deze verbranden door hoge temperaturen.
• Om alle ingrediënten tegelijk gaar te laten worden, dient u eerst de ingrediënten met de langste bereidingstijd in de pan
te doen.
Kleine brander
0,3 - 2 kW
Medium brander
0,3 - 3 kW
Wok-/sudderbrander
0,2 - 5 kW
NL

8
7 Onderhoud van het PITT®cooking systeem
Het PITT®cooking systeem is vervaardigd uit hoogwaardige materiaalsoorten, die eenvoudig gereinigd kunnen worden.
Let hierbij op de volgende aandachtspunten:
1. Reinig branderdelen nooit in de vaatwasser, het vaatwasmiddel kan deze aantasten. Voorkom reiniging met teveel vocht,
dit kan de brander en ventilatieopeningen binnen dringen.
2. Gebruik een doekje om de elektrische vonkontsteking (zie afb. 7) te reinigen. Bij zware vervuiling kan de punt met een
fijn borsteltje worden gereinigd. Doe dit wel voorzichtig, voorkom dat de afstand van de vonkontsteking tot de brander
wijzigt. Het gevolg kan zijn dat de brander slecht of niet ontsteekt.
3. Plaats de pandragers direct op de branders, zonder deze over uw werkblad te schuiven.
4. Let bij het in elkaar zetten van de branderdelen op de geleidingsnokken (zie afb. 8).
5. Reinig de kookplaat direct na gebruik, dan voorkomt u dat overgekookt voedsel lange tijd kan inwerken en later lastig
te verwijderen zal zijn.
6. Begin met het reinigen van de knoppen, branders en pandragers. Reinig daarna het werkblad, zo voorkomt u dat deze
na reiniging opnieuw vuil wordt.
7. Gebruik een mild schoonmaakmiddel en zachte doek om de verwijderbare branderdelen te reinigen. Hardnekkige
vlekken op pandrager en branderdoppen kunnen het beste worden verwijderd met een vloeibaar reinigingsmiddel.
8. Gebruik in geen geval schuurpoeders, schuurpads, scherpe voorwerpen of agressieve reinigingsmiddelen.
9. Voor onderhoud en reiniging van uw werkblad verwijzen wij naar de handleiding van het desbetreffende product.
10. Zorg ervoor dat alle branders zijn uitgeschakeld wanneer het toestel schoongemaakt wordt.
11. Gebruik geen schoonmaakmiddelen, ook geen water, wanneer het PITT®cooking toestel heet is.
Let op: Het PITT®cooking systeem mag niet met een stoom- of hogedrukreiniger worden schoongemaakt. Op deze ma-
nier kan de elektrische veiligheid niet worden gewaarborgd.
Let op: Verwijder nooit de schroeven van het hitteschild (fig. 8a).
Elektrische vonkontsteking Pandrager met geleidingsnok
afb. 7 afb. 8 afb. 8a
Schroeven hitteschild
PITT cooking Indoor kooksysteem
PITT cooking Outdoor kit
De PITT®cooking Outdoor kit is, net zoals het PITT® cooking systeem, vervaardigd uit hoogwaardige materiaalsoorten, die
eenvoudig gereinigd kunnen worden.
Let hierbij op de volgende aandachtspunten:
1. Reinig de Outdoor onderdelen nooit in de vaatwasser, het vaatwasmiddel kan deze aantasten.
2. Reinig de Outdoor onderdelen direct na gebruik (en na het afkoelen), dan voorkomt u dat overgekookt voedsel lange
tijd kan inwerken en later lastig te verwijderen zal zijn.
3. Gebruik een mild schoonmaakmiddel en zachte doek om de Outdoor onderdelen te reinigen.
4. Gebruik in geen geval schuurpoeders, schuurpads, scherpe voorwerpen of agressieve reinigingsmiddelen.
5. Zorg ervoor dat alle branders zijn uitgeschakeld wanneer het toestel schoongemaakt wordt.
6. Gebruik geen schoonmaakmiddelen, ook geen water, wanneer de Outdoor onderdelen heet zijn.
NL

Let op: Het PITT®cooking kooksysteem en Outdoor kit mogen alleen worden aangesloten door een erkend installateur.
Om de veiligheid en garantie te waarborgen mogen reparaties alleen worden uitgevoerd door erkende vakmensen. U
dient uitsluitend gebruik te maken van originele onderdelen.
Storing Oorzaak Oplossing Hoofdstuk / Pagina
Een brander ont-
steekt en gaat direct
weer uit.
De bedieningsknop is niet lang
genoeg ingedrukt om de vlambe-
veiliging te activeren.
Houd de knop na ontsteken
enkele seconden ingedrukt.
Hoofdstuk 4 / pagina 6
De bedieningsknop is niet op de
juiste hoogte afgesteld.
Stel de bedieningsknop goed af. Montagehandleiding**
TS: 13 t/m 15
De bedieningsknop
loopt aan op de
afdichtingsschaal.
Kookplaat is niet vlak onder het
werkblad gemonteerd.
Stel de bedieningsknop goed af. Montagehandleiding**
TS: 13 t/m 15
Afdichtingsschaal niet gecentreerd
t.o.v. bedieningsknop.
Afdichtingsschaal loshalen en
opnieuw vastplakken.
Montagehandleiding**
TS: 19 t/m 20
Vonkontsteking blijft
hangen
Kookplaat is niet vlak onder het
werkblad gemonteerd.
Stel de bedieningsknop goed af. Montagehandleiding**
TS: 13 t/m 15
Afdichtingsschaal niet gecentreerd
t.o.v. bedieningsknop.
Afdichtingsschaal loshalen en
opnieuw vastplakken.
Montagehandleiding**
TS: 19 t/m 20
Een brander
ontsteekt niet.
De bedieningsknop is niet op de
juiste hoogte afgesteld.
Stel de bedieningsknop goed af. Montagehandleiding**
TS: 13 t/m 15
De stekker zit niet in het
stopcontact.
Steek de stekker in het stopcon-
tact.
Zekering defect of de zekering
ring in de meterkast is uitgescha-
keld.
Monteer een nieuwe zekering of
schakel de zekering weer in.
Vonkontsteking is vervuild of
vochtig.
Reinig of droog de vonkontste-
king.
Hoofdstuk 6 / pagina 7
Branderdelen zijn niet juist gemon-
teerd.
Zet de branderdelen via de
centreernokken in elkaar.
Hoofdstuk 6 / pagina 7
Branderdelen zijn vervuild of voch-
tig.
Reinig/droog de
branderdelen. Let hierbij op of
de uitstroomgaten open zijn.
Hoofdstuk 6 / pagina 7
Hoofdgaskraan is gesloten. Open de hoofdgaskraan. Hoofdstuk 2 / pagina 4
Bedieningsknop is niet lang of diep
genoeg ingedrukt.
Houd de bedieningsknop lang
genoeg en voldoende ingedrukt
tussen vol- en kleinstand.
Hoofdstuk 4 / pagina 6
Batterij leeg* Batterij vervangen
Een brander brandt
niet egaal.
Branderdelen zijn niet juist ge-
plaatst.
Zet de branderdelen via de
centreernokken in elkaar.
Hoofdstuk 6 / pagina 7
Branderdelen zijn vervuild of voch-
tig.
Reinig/droog de
branderdelen. Let hierbij op of
de uitstroomgaten open zijn.
Hoofdstuk 6 / pagina 7
Gaslucht in omge-
ving van het kook-
toestel.
Aansluiting kookplaat lekt. Controleer de aansluiting. Indien
de oorzaak niet gelijk te verhel-
pen is sluit dan onmiddellijk de
hoofdgaskraan.
Er is een brander ingeschakeld,
maar niet ontstoken.
Sluit de bedieningsknop en
wacht enkele minuten met op-
nieuw ontsteken.
Hoofdstuk 4 / pagina 6
8 Storingen in het PITT®cooking systeem
Krijgt u de storing niet verholpen aan de hand van de bovenstaande punten? Neem contact op met uw vakhandelaar of de
PITT®cooking klantenservice. Zie contactgegevens op pagina 11.
9
* Afhankelijk van het model / ** TS = PITT®cooking Top Side manual
NL

10
9 PITT®cooking Outdoor assortiment
Cima Capital
1 Het PITT®cooking kooksysteem is in combinatie met de Outdoor kit enkel toegankelijk voor de Professional en Black
edition.
Akan Altar Azuma Air
Baluran Bennett Baula Bely
PITT®cooking systeem - Outdoor kit Type A1
PITT®cooking systeem - Outdoor kit Type B1
PITT®cooking systeem - Outdoor kit Type C1
NL

10 Links & contactinformatie
Links
Contactinformatie
PITT®cooking Nederland
Damzigt 54
3454 PS De Meern
The Netherlands
T: +31 (0)88 088 70 70
www.pittcooking.com
NL
11
PITT®cooking kooksysteem
Installatie- en verwerkings-
voorschriften
PITT®cooking Outdoor
Montagehandleiding
PITT®cooking kooksysteem
Montagehandleiding
PITT®cooking kooksysteem
Montagevideo
PITT®cooking Outdoor
Informatie

Notes

EN User manual - Outdoor
Outdoor UM-OUTDOOR-23-1-PC/NL-EN

Foreword
Dear customer,
Congratulations on the purchase of your PITT®cooking Outdoor kit! The Outdoor kit is made up of several components
that protect the cooking system from weather circumstances both during and after cooking, while also providing you with
optimal cooking convenience in your outdoor kitchen.
Thanks to the different burner capacities, you can cook any dish the right way. The integrated spark ignition in the
controls allows you to control the burners and ignition with one hand.
This manual describes how to make optimal use of all the functions of this (outdoor) cooking system. We recommend
that you read the user manual and assembly instructions carefully before using the appliance.
Keep this manual in a safe place so that any subsequent user can also benefit from it. In addition, these instructions will
also serve as a reference in case of servive.
We wish you lots of fun cooking outdoors!
PITT®cooking
Content
Chapter Subject Page
1 PITT®cooking Installation dimensions 15
2 Connection: gas and electrical 16
3 General instructions 17
4 Overview PITT®cooking Outdoor 18
5 Control PITT®cooking 19
6 Optimal use of the PITT®cooking system 19
7 Maintenance of the PITT®cooking system 20
8 Failures in the PITT®cooking system 21
9 PITT®cooking Outdoor assortment 22
10 Links & contact information 23
14
EN
PITT®cooking Outdoor
Information

1 PITT®cooking Installation dimensions
Support beam1afb. 2
Installation dimensions in mm:
Min. 47 Min.
150
Min. 50
Min. 600
Min. 4
Max. 35
fig. 1
Support beams
89 mm
119 mm
Min.
450
Min.
650
fig. 2
1 Note: Check the installation manual to install the support beams according to the correct dimensions. This is
necessary in order to install the bottom cover correctly.
Support beam1
fig. 3
• A cooking module cannot be installed over a partition of cabinets. It has to be accessible in case it needs servicing.
• When PITT®cooking is combined with a drawer cabinet, always be aware of the measurements of the unit and the
support bar. The height of the unit and the support bar is 119 mm, measured from the top of the worktop (Fig.2).
• To prevent bending of the worktop the appliance need to be supported by two PITT®cooking support bars
(Fig. 2 and 3).
EN
PITT®cooking system
Installation and handling
instructions
PITT®cooking Outdoor
Installation manual
PITT®cooking system
Installation manual
15
PITT®cooking system
Installation video

Directions for use of gas and gas connection
• Check that installation or local distribution regulations (type of gas and gas pressure) match the setting value of this
device. The setting values of this device are indicated on the type plate.
• This device is not equipped with a combustion gas drain installation.
• Installation and connection must comply with the regulations in force locally and nationwide. You must check the
regulations in regards to ventilation requirements.
• The gas connection must comply with the general regulations. We recommend to connect the hob with a fixed gas pipeline
or to use an approved gas hose.
• Always use a full metal hose behind the oven.
• An approved gas hose should not be kinked and should not come into contact with moving parts of the kitchen furniture.
• The main gas supply must be in an easily accessible place.
• Use a gas hose with a maximum length of two meters in the case of LPG (bottled gas).
• Never fill an LP gas cylinder more than 80%.
• Before using the cooking unit check all the connections for leaks with soapy water.
• Do not store or use gas cylinders or other flammable vapors or liquids near the PITT®cooking system.
• The electrical installation must conform to the national and local regulations.
• Power socket and plug must always be reachable.
• Connect the unit with the supplied plug to an earthed socket.
• Damage to the connection cable may only be replaced by the manufacturer, or an approved Installer. This to prevent
dangerous situations.
Electrical connection instructions* 230 V – 50 Hz – 0,6 VA
2 Connection: gas and electrical
Overview Outdoor assortment
Model PITT Totaal kW Bel. gr/h
Akan 1,8 Kw Hs 130
Altar 3 kW Hs 220
Azuma 5 kW Hs 360
Air 5 kW Hs 360
Baluran 8 kW Hs 580
Bennett 6,8 kW Hs 490
Baula 8 kW Hs 580
Bely 6,8 kW Hs 490
Capital 9,8 kW Hs 710
Cima 9,8 kW Hs 710
Gastype - nozzle combination overview
Gas Supply
pressure
Burner
0,3 - 2 kW
nozzle
Burner
0,3 - 3 kW
nozzle
Burner
0,2 - 5 kW
outer ring
nozzle
Burner
0,2 - 5 kW
inner ring
nozzle
G25 25 mbar 1.02 1.32 2x 1.18 1x 0,71
G25.3 25 mbar 1.02 1.32 2x 1.18 1x 0,71
G25 20 mbar 1.07 1.45 2x 1.28 1x 0,74
G20 20 mbar 1.01 1.29 2x 1.15 1x 0,70
G30 30 mbar 0.66 0.87 2x 0.72 1x 0.46
G30 50 mbar 0.58 0,79 2x 0.68 1x 0.40
G31 30 mbar 0.70 0.94 2x 0.80 1x 0.48
G31 37 mbar 0.66 0.87 2x 0.72 1x 0.46
G31 50 mbar 0.62 0.80 2x 0.70 1x 0.42
Gas I2H/E/LL
G20/25
I2L/I2EK
G25/G25.3
I3+
G30/31
I3B/P
G30/31
I3P
G31
Supply
pressure
20
mbar
25
mbar
30/37
mbar
50
mbar
50
mbar
Class of appliances: 3
Unit category
• The spark ignition operates through a battery AA. Replace the battery if the spark ignition does not operate
• The battery is positioned in the casing at the underside.
* Depending on the model
Battery spark ignition* 1,5V DC
EN
16

Safety warnings
- Read the instructions in this user manual carefully. Only then you can use your PITT®cooking gas hob the right way.
- Save both the assembly instructions and the user manual. If the PITT®cooking system transfers to another user, they need this
documentation.
- Check the PITT®cooking system immediately after removing the packaging. If there is any shipping damage you should contact
PITT®cooking immediately by e-mail or in writing.
Safety rules
1. PITT®cooking is intended for domestic use only. Only use the gas hob for the preparation of dishes. This appliance is
not suitable for heating your home.
2. Please ensure that all burner parts are placed correctly.
3. Ensure adequate ventilation during use.
4. Distance from the pan to a non-heat resistant wall or control knob must be at least 2 cm or 0,8 inches.
5. Always place pans on the pan support, never directly on the burner top.
6. Check the product regularly for damage. Do not use the product when damaged, repair it immediately.
7. The user is responsible for the proper use and good state of the system. When used incorrectly, the manufacturer is not
liable for any damages.
8. When choosing a location for the PITT®cooking system, whether it is a movable or built-in application, wind exposure,
proximity to traffic routes and the length of the gas supply line must be considered.
9. Never activate the PITT®cooking system with the top cover still in place.
10. Never place the top cover over the PITT®cooking system when the burners are on and/or when the burner parts are still
hot after use.
11. Never use the PITT®cooking system with strong wind(s).
12. Never use the PITT®cooking system as a heater.
13. Use the PITT®cooking system only on a hard, flat, noncombustible surface that can safely support the weight of the
setup.
14. Do not leave the PITT®cooking system unattended when in use.
15. Do not move the PITT®cooking system when in use.
Overheating and fire hazards
16. Use the burner only with a pan or a wok on the pan support. Warning: an empty pan may overheat.
17. Overheated oil or butter can easily ignite. Never put out with water. You can smother the flames by closing the pan with
a lid.
18. Do not flambé under a cooker hood, this can cause a fire.
19. Never put flammable objects on the hob.
20. Never place a grill or griddle over two burners.
21. Do not use pans with a larger base diameter than the pan support. We recommend for the 2 and 3KW burners a pan
with a maximum base diameter of 230 mm and for the 5KW burner a maximum base of 270 mm.
Hot parts
22. Parts of the burner and the worktop surrounding the burner may become hot during use and will remain hot for a long
period after use. Please take care not to touch these parts until they have fully cooled.
23. Please be aware that if you use a pan with a larger base diameter than the pan support (see point 21) there is a possi-
bility that the control knobs may become hot.
24. Please be aware that the flame should always remain beneath the base of the pan (unless you are stir frying with a
wok). Flames rising against the side of the pan will not be effective and will produce unwanted overheating.
25. It is very important that children remain at a distance.
26. The burner parts, Outdoor kit and objects close to the gas burner can become hot while using the burner. Use with care.
27. If the moving burner parts are hot, use protective gloves or appropriate tools to move the burner parts.
!
!
3 General instructions
EN
17

1
2
3
4
2
5
1-PITT®cooking system
(Shown model: 1-PITT®cooking sytem ‘Azuma’)
2-/3-PITT®cooking system
(Shown model: 3-PITT®cooking sytem ‘Capital’)
PITT®cooking Outdoor set
Type A1
PITT®cooking Outdoor set
Type B/C1
4 Overview PITT®cooking Outdoor
Parts
Top cover 1-PITT
1
2
3
4
Windshield Big
1-PITT cooking system
Bottom cover 1-PITT
Top cover 2-/3-PITT
1
2
3
4
5
Windshield Small
Windshield Big
2-/3-PITT cooking system
Bottom cover 2-/3-PITT
Compatible PITT®cooking systems for outdoor use
PITT®cooking Outdoor set Compatible PITT®cooking system
Type A Akan, Altar, Azuma & Air
Type B Baula, Bely, Baluran & Bennett
Type C Capital & Cima
EN
18

5 Control PITT® cooking
Burners PITT®cooking
Burners ignite and set
Before you ignite the burner verify that all components are mounted in the right way to prevent unwanted interference.
Before igniting the burner you need to place a pan on the hob. Each burner can be set easily between high and low.
Igniting
To ignite the burner you need to activate the spark ignition. You do this by pressing the control knob all the way and hold.
Turn the control knob to the left (Fig. 5). Keep the button pressed for another 5 to 8 seconds. This way the temperature
sensor warms and gas can be distributed. You can regulate the size of the flame by turning the control knob slowly between
the high and low position (Fig. 5 and 6).
Caution: If the flame does not ignite after 2 to 4 seconds, you need to return the knob to the low position (Figure 6).
A small flame often kindles faster than a large flame.
Turning off
To turn off the burner, turn the control knob back to the state displayed on Fig. 4.
Burner off High flame size Low flame size
fig. 4 fig. 5 fig. 6
6 Optimal use of the PITT®cooking system
• Avoid flames rising around the pan to minimise the loss of energy. Be careful as the handles of the pans can become
hot.
• To cook large quantities you best use the stir-fry cooker. For preparation of sauces and simmering dishes best use the
side burner. To cook through it should be on the highest level.
• Cooking with the lid on the pan conserves energy.
• Use cookware with a flat, clean and dry bottom. Flat pans are more stable and a clean bottom makes for a better heat
transfer.
High burner
With the cooker you can prepare dishes at a very high temperature. It is important, however, to pay attention to a number of
things:
• Make sure you have the ingredients cut in advance.
• Use an oil of good quality for frying, for example: olive oil, sunflower oil or peanut oil. Do not use butter or margarine
as these will be overheated and blackened by high temperatures.
• To ensure all the ingredients are ready at the same time, you must put the ingredients with the longest preparation time
in the pan first.
0,3 - 3 kW 0,2 - 5 kW0,3 - 2 kW
EN
19

7 Maintenance of the PITT® cooking system
PITT®cooking is manufactured with high-quality materials, that can be very easily cleaned.
Please take the following into consideration:
1. Never clean in the dishwasher as the detergent can affect the materials. Avoid cleaning with too much moisture as the
can enter the burner outlet and cause damage.
2. Use a cloth to clean the electric spark ignition (Fig. 7). In case of heavy use it can be cleaned with the point of a fine
brush. Do this carefully as an accidental change in the distance between the burner and spark ignition may result in the
burner being damaged or failing to ignite.
3. Place the pan support directly onto the burners without scratching your countertop.
4. Assemble the burner parts via the centring cams in each part (see Fig. 8).
5. Clean the cooker immediately after use (but after cooling). This prevents overcooked food settling on the burner and
becoming difficult to remove.
6. Start with cleaning the buttons, burners and pan support. Then clean the countertop to prevent it from being stained
again.
7. Use a mild detergent and a soft cloth to clean the removable burner parts. Stubborn stains on pan carriers and burner
tops are best removed with a liquid cleanser.
8. Never use scouring powders, pads, sharp objects or aggressive cleaning agents.
9. For maintenance and cleaning of the countertop refer to the manual of the particular product.
10. Make sure all burners are turned off when cleaning the appliance.
11. Do not use cleaning agents, including water, when the PITT®cooking appliance is hot.
Caution: The PITT®cooking system must not be steam cleaned or high-pressure cleaned. If cleaned this way the
electrical safety is not ensured.
Caution: Never unscrew the screws of the heat shield(s) (see Fig. 8a).
Electric spark ignition Pan support with centering cams
fig. 7 fig. 8 fig. 8a
Screws heat shield
PITT®cooking Outdoor kit
The PITT®cooking Outdoor kit, like the PITT®cooking system, is made of high-quality materials that can be easily cleaned.
Please take the following into consideration:
1. Never clean the Outdoor parts in the dishwasher as the detergent can affect the materials.
2. Clean the Outdoor parts immediately after use (but after cooling). This prevents overcooked food settling on the burner
and becoming difficult to remove.
3. Use a mild detergent and a soft cloth to clean the Outdoor parts.
4. Never use scouring powders, pads, sharp objects or aggressive cleaning agents.
5. Make sure all burners are turned off when cleaning the appliance.
6. Do not use cleaning agents, including water, when the Outdoor parts are still hot.
PITT®cooking Indoor kooksysteem
EN
20
This manual suits for next models
10
Table of contents
Languages:
Popular Burner manuals by other brands

Riello
Riello RX 500 S/PV Modulating operation

Unigas
Unigas HTP2000 installation manual

AESYS
AESYS TurboFire II Installation, operation and maintenance manual

Riello
Riello RDB 3.2 BX 32/50 Installation, use and maintenance instructions

baltur
baltur BT 17N Instruction manual for installation, use and maintenance

GGM
GGM GHK46-E instruction & operation manual

Riello
Riello DB 6 SM CO1 A0 Installation, use and maintenance instructions

GB
GB SSBA18N-S Supplemental instructions

Firegear
Firegear PRO Series Installation and operating instructions

Riello
Riello 3438964 Installation, use and maintenance instructions

Pelltech
Pelltech PV1000agri user manual

KitchenAid
KitchenAid LP instructions