PiXORD PB731I User manual

PB731P / PB731I
Wi-Fi Network Camera
Getting Started
Handbook
Version 1.21
PiXORD Corporation
May 2013

Trademark Acknowledgments:
PiXORD is a registered trademark of PiXORD Corporation.
All other trademarks used in this handbook are registered trademarks of their respective
companies.
Copyright © 2013 by PiXORD Corporation
All Rights Reserved
Printed in Taiwan
PiXORD Corporation reserves the right to make corrections, modifications, enhancements, improvements, and
other changes to its products and services at any time and to discontinue any product or service without notice.
Customers should obtain the latest relevant information before placing orders and should verify that such
information is current and complete. All products are sold subject to PiXORD Corporation’s terms and conditions
of sale supplied at the time of order acknowledgment.
PiXORD is not responsible or liable for the resale of its products with statements different from or beyond the
specification/parameters stated by PiXORD. Customers are responsible for their applications using PiXORD
products. To minimize the risks associated with customer applications, customers should provide adequate
operating safeguards. PiXORD is under no obligation to provide any further technical support service or
product/software alteration beyond PiXORD's representation.
PiXORD products are not authorized for use in safety-critical applications where a failure of the PiXORD product
would cause severe personal injury or death, unless officers of the parties have executed an agreement specifically
governing such use.
Reproduction of PiXORD information or datasheets with alteration is prohibited. PiXORD is not responsible or
liable for any of such altered statements.
Every care has been taken in editing this manual. If there are any inaccuracies or omissions, please inform your
local PiXORD office. PiXORD Corporation cannot be held responsible for any typographical or technical errors.
PiXORD Corporation is not liable or responsible for incidental or damages caused by any misinterpretation of this
publication.
PiXORD Corporation
6F, 12 Innovation 1st Road
Hsinchu Science Park
Hsinchu, TAIWAN 30076
Tel:+886 3 567-8818
Fax:+886 3 567-8990
marketing@pixord.com

Contents
PB731P/PB731I User’s Manual iii
Contents
Contents iii
Important Notes ..................................................................................................................v
Customer Support..............................................................................................................vi
1Introduction 1
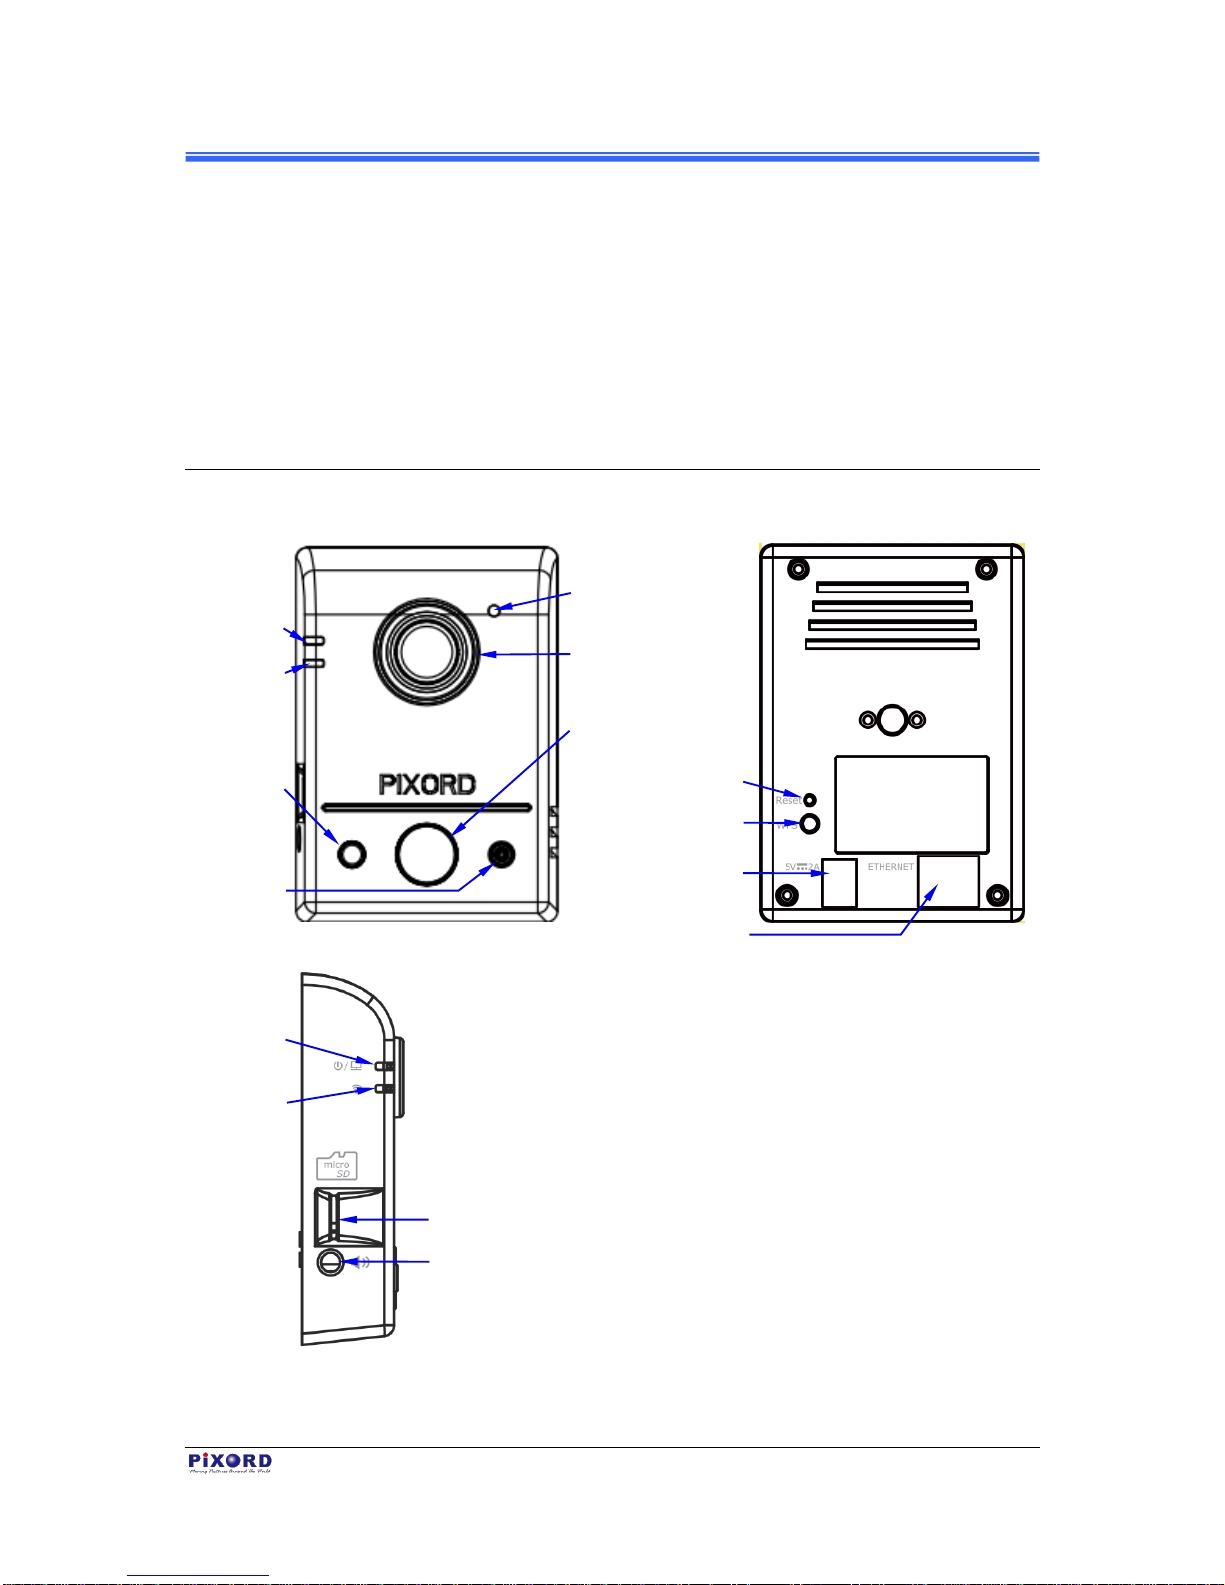
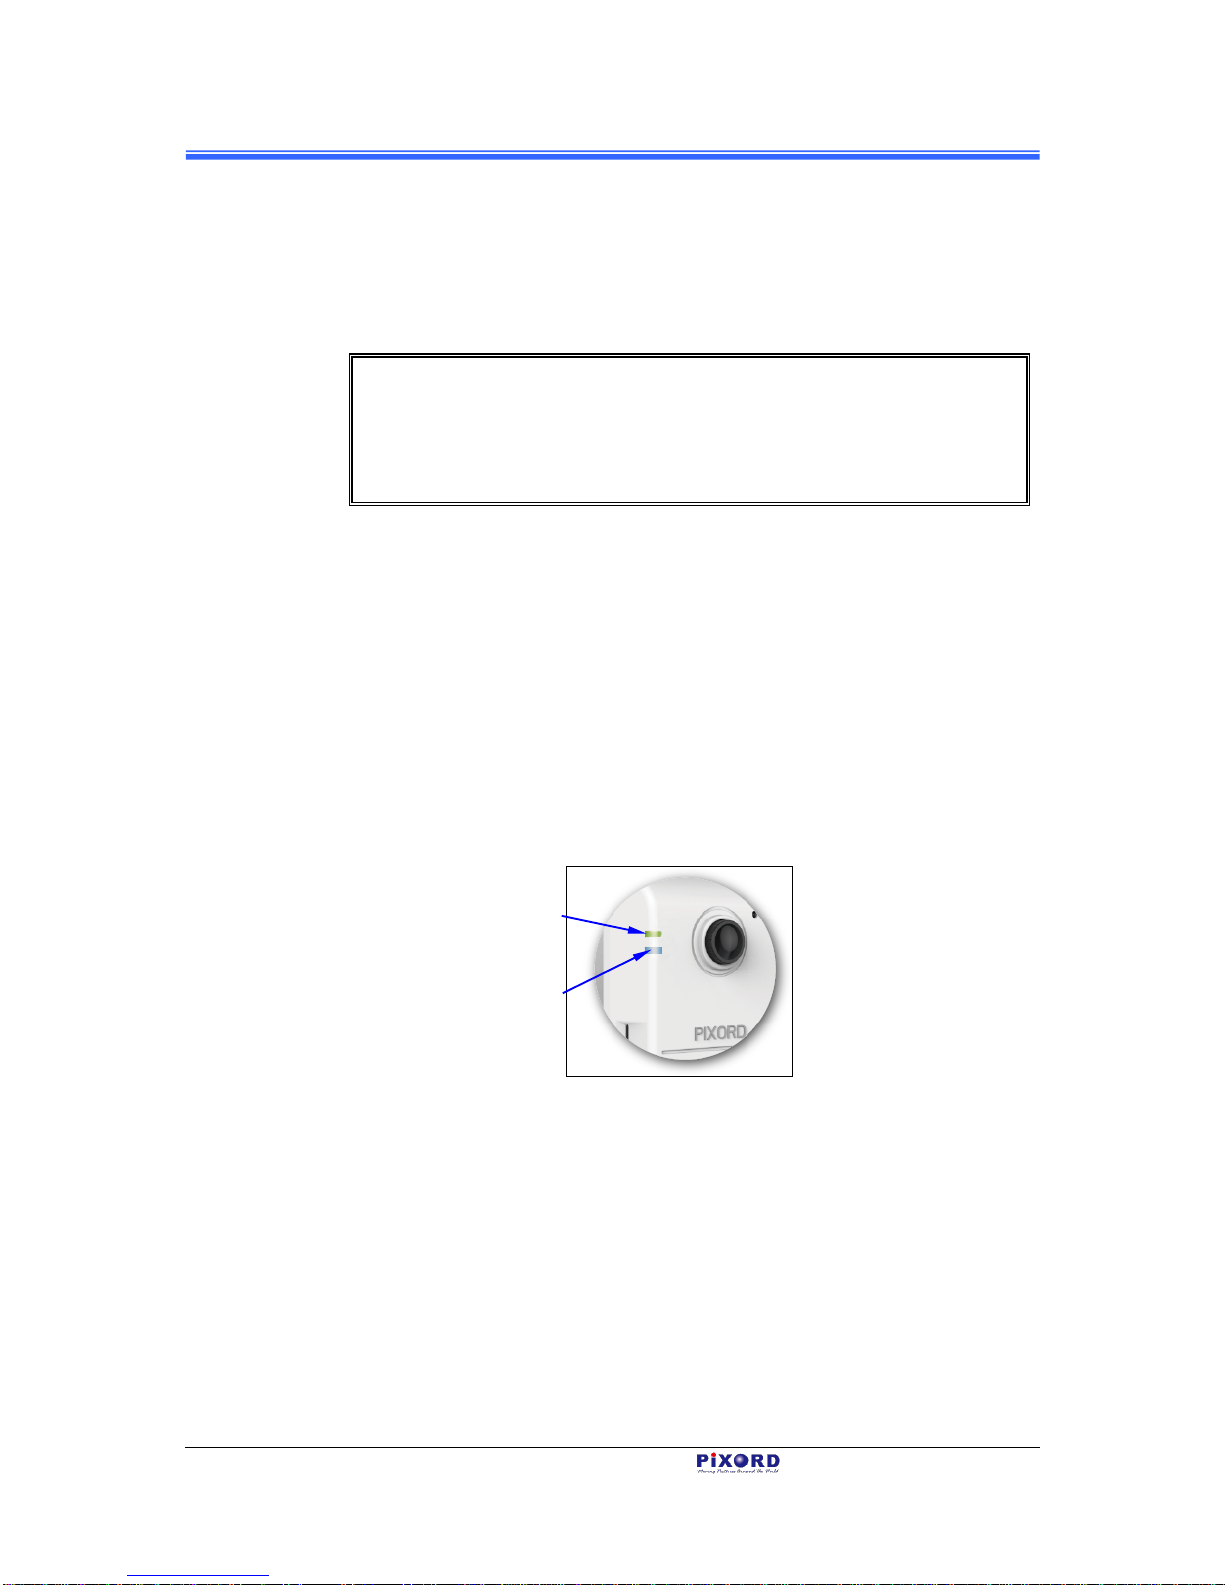
1.1 Hardware Overview....................................................................................................1
1.1.1 Package Contents...........................................................................................2
2Installation and Setup 3
2.1 Table, Ceiling, and Wall Mounting of Camera............................................................3
2.2 Connecting Camera to Network ..................................................................................3
2.2.1 Through LAN Router Cable..........................................................................3
2.2.2 Through Wi-Fi Protected Setup (WPS).........................................................5
3 Registration and Binding of Camera 7
3.1 iPIXORDAccount Registration by PC/Notebook......................................................7
3.1.1 Registration through iPIXORD “Create Account”........................................8
3.1.2 Registration through GoogleAccount...........................................................9
3.2 Binding Camera into iPIXORD by PC/Notebook ......................................................9
3.2.1 Binding Camera for the First Time................................................................9
3.2.1 Binding More Cameras into iPIXORD Account.........................................13
3.2.2 Modifying Camera Default Names..............................................................15
3.3 iPIXORDAccount Registration by Smartphones /Tablets.......................................17
3.3.1 Downloading iPIXORD App.......................................................................17
3.3.2 iPIXORD Registration through “Create Account”......................................18
3.3.3 iPIXORD Registration through “Google Account”.....................................19
3.4 Binding Camera into iPIXORD by Smartphones /Tablets........................................20
4 Camera Live View UI Settings 23
4.1 Quick Access Buttons...............................................................................................25
4.2 Camera Live View UI Setting Tools.........................................................................26

Contents
iv PB731P/PB731I User’s Manual
Revision History
Doc. Version
Revision Description
Date
1.0
Initial Official Release
2013/01/18
1.1
Rearranged and Reformatted Contents
2013/04/29
1.2
Correct some descriptions for more detail
2013/05/14

Read Me First!
PB731P/PB731I User’s Manual v
Read Me First!
Important Notes
This handbook is intended for administrators and users of the PiXORD
PB731P/731I Cloud Wi-Fi Network Camera, including instructions for using
and managing the camera on your network. The use of surveillance devices may
be prohibited by law in your country or area. It is therefore the user’s
responsibility to ensure that the operation of such devices is legal before
installing this unit for its intended use.
Before the Network Camera is installed, carefully read and follow all the safety
and operating instructions to avoid damage due to faulty assembly and
installation. This also ensures that the device is used properly as intended.
Heed All Warnings
Do not drop or hit the device.
Sensitive electronics inside the camera are vulnerable to excessive impact.
Do not install the device under high temperature (less than 45C)
environment (45.
Excessive heat could damage the equipment.
Do not cover device with any object or install it in a poorly ventilated
vicinity.
Overheating could damage the camera.
Do not expose the device to rain or moisture. Do not touch the power
connection with wet hand.
Risk of short circuit, electric shock, or fire
Do not damage the power cord or leave it under pressure.
Risk of fire or circuit electric shock
To reduce the risk of electric shock or damage, do not remove the front
or back cover.
There is no user-serviceable parts inside. Misusage, improper, or negligent
handling could damage the device. Refer to qualified service personnel from
PiXORD distibutor/dealer for any device related trouble shooting need.

Read Me First!
vi PB731P/PB731I User’s Manual
Do not continue to operate the device if it appears to malfuntion.
Contact qualified service personnel from PiXORD distibutor/dealer for help.
Installation of the product should be made by qualified service
personnel or system installers from PiXORD distibutor/dealer.
Customer Support
If you require any technical assistance, please contact your nearest PiXORD
distributor/dealer. You may also access the PiXORD website at
www.pixord.com for following supports:
Find answers to resolved your problems from FAQ database or contact our
FAE at technical support (http://www.pixord.com/contact2.asp).
Download latest user documentation and firmware updates at PiXORD
Support (http://www.pixord.com/support/support.asp)
Registration
To receive the latest updates of product information in the future, register your
equipment at http://register.pixord.com/register/.

Chapter 1
PB731P/PB731I User’s Manual Introduction 1
1 Introduction
PiXORD PB731P/731I Cloud Wi-Fi Network Camera delivers superior
H.264-AVC performance, state of the art design, and function. It is specifically
designed for maximum performance at cost-effective indoor applications, such
as elderly care monitoring, overseeing baby, home security, convenient store
/office surveillance, etc.
1.1 Hardware Overview
Front View
Rear View
Left Side View
Figure 1-1 PB731P/731I Cloud Wi-Fi Network Outer Shell Profiles
Network
Connector
DC5V Input
WPS Button
Reset Button
Label
Power/Network
LED Indicator
Wireless LED
Indicator
Micro SD Card Slot
Speaker
Light Sensor
Focus
Adjustment Ring
Infrared LED (PB731I)
PIR Sensor (PB731P)
LED (PB731P)
Non-LED (PB731I)
Built-in
Microphone
Power/Network
LED Indicator
Wireless LED
Indicator

Chapter 1
2 Introduction PB731P/PB731I User’s Manual
1.1.1 Package Contents
Each PB731P/731I Network Camera comes with the following accessories:
A mounting bracket with 2 sets of wood screws & anchors
A power adaptor (Output: DC5V, 2A; Input: 100~240V 50/60Hz)
A network RJ45 cable (2.0M)
A printed copy of “PB731P/731I Quick Guide”
A CD containing the “Installation Guide Wizard” (a step-by-step guide to
camera installation/setup, iPIXORD cloud NVR registration process, etc.). It
also contains the PDF file of this handbook and other documentations.
An iPIXORD reference card containing the default user name/password,
barcode, QR code, alphanumeric code, etc. to use for iPIXORD cloud NVR
(network video recorder) registration.

Chapter 2
PB731P/PB731I User’s Manual Installation and Setup 3
2 Installation and Setup
2.1 Table, Ceiling, and Wall Mounting of Camera
1. Use the 2 supplied screws to mount the mounting bracket to a flat surface.
2. Loosen the lock ring to adjust the Camera to the desired angle.
3. Tighten the lock ring to firmly fix the angle position.
Table Mounting
Ceiling Mounting
Wall Mounting
Figure 2-1 Camera Mounting Methods
NOTE
Always mount the Camera on mounting bracket to prevent over heating.
2.2 Connecting Camera to Network
2.2.1 Through LAN Router Cable
Figure 2-2 Connecting IP Camera to Network
Lock Ring
LAN Router
Power Adaptor
The PC host is required only
to set up the camera with
“Installation Guide Wizard”
program when the camera
Power/Network LED
Indicator does not light up in
green within few seconds
after power on.
Mounting Bracket

Chapter 2
4 Installation and Setup PB731P/PB731I User’s Manual
1. Prepare a smartphone/tablet or PC/notebook/ultrabook with Ethernet link to
the network.
2. When PC/notebook/ultrabook is used, connect the LAN port of the device to
the network router with an RJ45 network cable ().
NOTE
If you are going to use smartphone/tablet as monitoring device the
PC/notebook/ultrabook is required only to set up your camera with the
“Installation Guide Wizard” program from the CD (included in the
camera package).
3. Plug the DC power jack of the power adaptor () to Camera and connect
the power adaptor to power outlet (110V or 220V).
4. Connect the network router to the LAN port of Camera with an RJ45
network cable ().
5. With power switched on, check the status of the two LEDs at the left corner
of camera:
If the Power/Network indicator (upper LED) turns into green color, it
confirms that the Camera has successfully linked with the Internet. Then
proceed to start iPIXORD registration and binding process as discussed in
Chapter 3.
Figure 2-3 Power/Network (Upper LED) & Wireless LED (Lower LED) Indicators
If the upper LED does not turn green, refer to the “Installation Guide Wizard”
application program in the CD which will further guide you in detail on how to
properly setup your camera for Internet connection.
Power/Network LED Indicator
should light up in green to indicate
successful link to the Internet
Wireless LED Indicator
(see Section 2.2.2 below)

Chapter 2
PB731P/PB731I User’s Manual Installation and Setup 5
2.2.2 Through Wi-Fi Protected Setup (WPS)
To connect the Camera in wireless mode, you need to have a Wi-Fi router with
WPS button.
1. With Camera power connected and switched on, press and hold the WPS
button (at the back of the Camera) for 3 to 4 seconds and then release button.
The Wireless LED Indicator (lower LED) will then start to flash and keep on
flashing in blue once every second.
2. Within one minute, press the Wi-Fi router WPS button to interface with the
Camera.
Figure 2-4 WPS Buttons on Both Camera & Wi-Fi Router
3. When successful connection is established between Camera and Wi-FI
Router, the lower LED Indicator will then stabilize and lights up in blue
while the upper LED remains lit in green. Then proceed to start iPIXORD
registration and binding process as discussed in Chapter 3.
Figure 2-5 Wireless LED (Lower LED) Indicator
If the LED does not turn steadily in blue, refer to the “Installation Guide
Wizard” application program in the CD which will further guide you in detail on
how to properly setup your Camera for Internet Wi-Fi connection.
With wireless setup, the
Power/Network LED Indicator
should remain light up in green
When the Camera is successfully
connected to Wi-Fi, the Wireless
LED Indicator stops flashing & lights
up steadily in blue

Chapter 2
6 Installation and Setup PB731P/PB731I User’s Manual

Chapter 3
PB731P/PB731I User’s Manual Registration and Binding of Camera 7
3 Registration and
Binding of Camera
iPIXORD is a Cloud NVR (Network Video Recorder) server that provides
multiple Live View and Event Recording, and Playback of videos taken by your
Camera. It also allows you to make changes to your settings remotely.
There are two methods with which you can register and bind your Camera into
iPIXORD, i.e., through your Internet connected PC/notebook (see Sections 3.1
& 3.2) or byusing your smartphone/tablet (see Section 3.3 &3.4). However, it is
highly recommended that you create the Camera account through PC/notebook
as it is more convenient to use than smartphone/tablet which has limited
functions and smaller screen size.
3.1 iPIXORD Account Registration by PC/Notebook
Visit iPixord website http://www.ipixord.com. When the following dialog
displays, click Create Account button. If you already have an existing Google
account, you may click Google Login button to use it as stand-in for your
iPIXORD account.
Figure 3-1 iPIXORD Account Registration Initial Dialog

Chapter 3
8 Registration and Binding of Camera PB731P/PB731I User’s Manual
3.1.1 Registration through iPIXORD “Create Account”
1) After clicking Create Account button, the following dialog will then
display to prompt you to define your own User Name, Password, and valid
Email address to start the account registration process.
Figure 3-2 iPIXORD “Create Account” Sign-in Dialog
2) After you have filled-in all the necessarydata, click Applybutton (see figure
above). A few minutes later, iPIXORD will send you an Email message
(shown below) into your mailbox to advise you of your newly created
account number with instruction to verify your registration.
Figure 3-3 Email Message from iPIXORD Advising the Newly Created Account Number
3) Click the hypertext “Please click to verify your registration” and you will
be automaticallyconnected to iPIXORD and prompt you with the process of
binding the new Camera into iPIXORD as discussed see Section 3.2.

Chapter 3
PB731P/PB731I User’s Manual Registration and Binding of Camera 9
3.1.2 Registration through Google Account
iPIXORD server allows you to use your Google account “User Name”and
“Password”for your iPIXORD account. This method is recommended and is
easier and faster. Furthermore, iPIXORD can use 5GB free space of your
Google account to store backup video recorded in your Camera SD card.
1) After clicking Google Login button (see Figure 3-1), the following dialog
will then display to prompt you to sign in your Gmail address and password.
Figure 3-4 Google Account Sign-in Dialog
NOTE
Google Account provides 5GB free space for recorded video storage.
With “Google Account”used to create the iPIXORD account, you have to
use your Gmail Address as Email addres and click the “Google Login”
button every time you need to log-in into iPIXORD again.
2) Click the Sign in button and you will be prompt with the process of binding
the new Camera into iPIXORD as discussed in the following section
(Section 3.2).
3.2 Binding Camera into iPIXORD by PC/Notebook
3.2.1 Binding Camera for the First Time
At this stage, you already have your personal account registered with iPIXORD
but with no Camera attached to your account. So the next step is to bind the
Camera that you have just setup into your new iPIXORD account in order to
establish link with the network.
Sign in
Your Gmail Address is required

Chapter 3
10 Registration and Binding of Camera PB731P/PB731I User’s Manual
1) After clicking the hypertext “Please
click to verify your registration”
under Create Account (see Section
3.1.1), or clicking the Sign in button
under Google Account (see Section
3.1.2), the “Connect IP Camera”
window (shown at right) will pop-up
after confirming your name &
password. This is to remind you
again to properly connect the
Camera to power and router. If
connection is okay, click the Next
button.
2) The “Bind IP Camera”window
(shown at right) will pop-up to
remind you to get ready with your
Camera’s MAC Address and
Activate Code. Then click the Next
button.
Figure 3-5 “Connect IP Camera” Window
Figure 3-6 “Bind IP Camera” Window
3) The Binding dialog will then displayto prompt you to provide the Camera’s
MAC Address and Activate Code (serial number).
Figure 3-7 New Camera MAC Address & Activate Code Registration
Note that the required data are available from the Activation Card
(illustrated below) provided with your Camera and/or on the label at the
back of the Camera. Note that these numbers are unique for each Camera.

Chapter 3
PB731P/PB731I User’s Manual Registration and Binding of Camera 11
Figure 3-8 Unique Activation Card for Individual Camera
4) After the MAC Address and Activate Code are entered, click the Apply
button at the right end of the row and the button position will switch from
“Apply” to “Success” to indicate successful binding of the Camera with
iPIXORD as illustrated below.
Figure 3-9 Sample Display of Successful Binding of the Camera
Note that if error occurs, an error message is displayed to the right end of the
MAC Address value as shown below.
Figure 3-10 Sample Display of Unsuccessful Binding of the Camera
MAC Address
Activate Code
Close button

Chapter 3
12 Registration and Binding of Camera PB731P/PB731I User’s Manual
5) After successful
binding, click
the Close button
(see Figure 3-9
above) at the
top-right corner.
The Setting
Table then
displays. Click
the Matrix
button at the
bottom of the
window to
display the live
view Camera
surveillance
Figure 3-11 “Setting Table” Window
from the Matrix window (shown below).
Figure 3-12 Live Surveillance Display Sample of a Successfully Bound Camera
6) Click the Full Screen
button to zoom and
view the live display in
full screen.
Figure 3-13 Surveillance Live Display “Full Screen”
Button
Full Screen button
Matrix button

Chapter 3
PB731P/PB731I User’s Manual Registration and Binding of Camera 13
3.2.1 Binding More Cameras into iPIXORD Account
To add more installed
Cameras into your
iPIXORD account,
perform the following
steps.
1) Click the Setting
button at the
right-bottom of the
Matrix window. The
Setting dialog
(Figure 3-14) will
then display.
Figure 3-14 “Setting” Button at the Bottom of Matrix Window
Figure 3-15 “Setting” Dialog Display of a Successfully Bound Camera
2) From the Setting dialog,
click the Add button. The
pop-up “Connect IP
Camera”window (shown
at right) will display after
confirming your name &
password to remind you
again to properly connect
the Camera to power and
router. If connection is
okay, click the Next
button.
3) The “Bind IP Camera”
window (shown at right)
will pop-up to remind you
to get ready with your
Camera’s MAC Address
and Activate Code. Then
click the Next button.
Figure 3-16 “Connect IP Camera” Window
Figure 3-17 “Bind IP Camera” Window
Add button
Setting button

Chapter 3
14 Registration and Binding of Camera PB731P/PB731I User’s Manual
4) When the Binding dialog appears, fill in the MAC Address and Activated
Code of the to be added Camera. Note that the required data are available
from theActivation Cardprovided with each Camera or from the label at the
back of the Camera.
Figure 3-18 “Binding” Dialog for Registration of Additional Camera(s)
5) After the MAC Address and Activate Code of the new Camera is entered,
click the corresponding Apply button at the right end column and the button
position will switch into “Success” display to indicate successful binding of
the new Camera with iPIXORD as illustrated below. Then click the Close
button.
Figure 3-19 Sample Display of Successful Binding of the Newly Added Camera
NOTE
The example in the above figure, shows only one new Camera is added.
Actually you can simultaneously add several Cameras into the dialog at the
same time
Close button
This manual suits for next models
1
Table of contents
Other PiXORD IP Camera manuals