Plawa MOVO.1 User manual


Safety Instructions Table of Contents
SafetyInstructions TableofContents
2 3
ENG
Pleaseread the safetyinstructions below beforeusing the player.
• Donot overload theMains outlet withtoo many powercords at anytime . (Itmay cause thegen-
erationof abnormal heatand/or fire.)
• Donot excessively bendthe power cordor be squeezedby heavy objects.(It may causefire.)
• Donot handle thepower plug withwet hands. (Itmay cause electricshock.)
• Plugthe player properlyso that itcan be stable.(If it isnot properly plugged,it may causefire.)
• Neverdisassemble or modifythe player inany way.
• Donot let chemicals,such as benzene,thinner,andetc.,come in contact with the player.
• Donot use theplayer near amagnetic material (magnet,and etc.).
• Donot let dirtor foreign materialsgo in theplayer.
• Avoidusingthe player in a place where has high temperature (40°… or higher) or low tempera-
ture(5°… or lower),or has muchmoisture.
• Donot drop theplayer or givea shock.
• Keepthe player awayfrom a placewhere has severevibration or amagnetic material.
• Interruptionby electromagnetic wavemay damage theplayer.Besureto completely untie the
adaptorcable before usingit.
• Avoidusingthe player near a direct ray of light or heat-generating device.
• Avoidusingthe player near a place where has much dirt or soot.
• Unplugthe power cordwhen cleaning theadaptor.
• Donot drop theadaptor or givea severe shock.
• Donot use anotheradaptor (Use asupplied adaptor.)
Warning
Caution
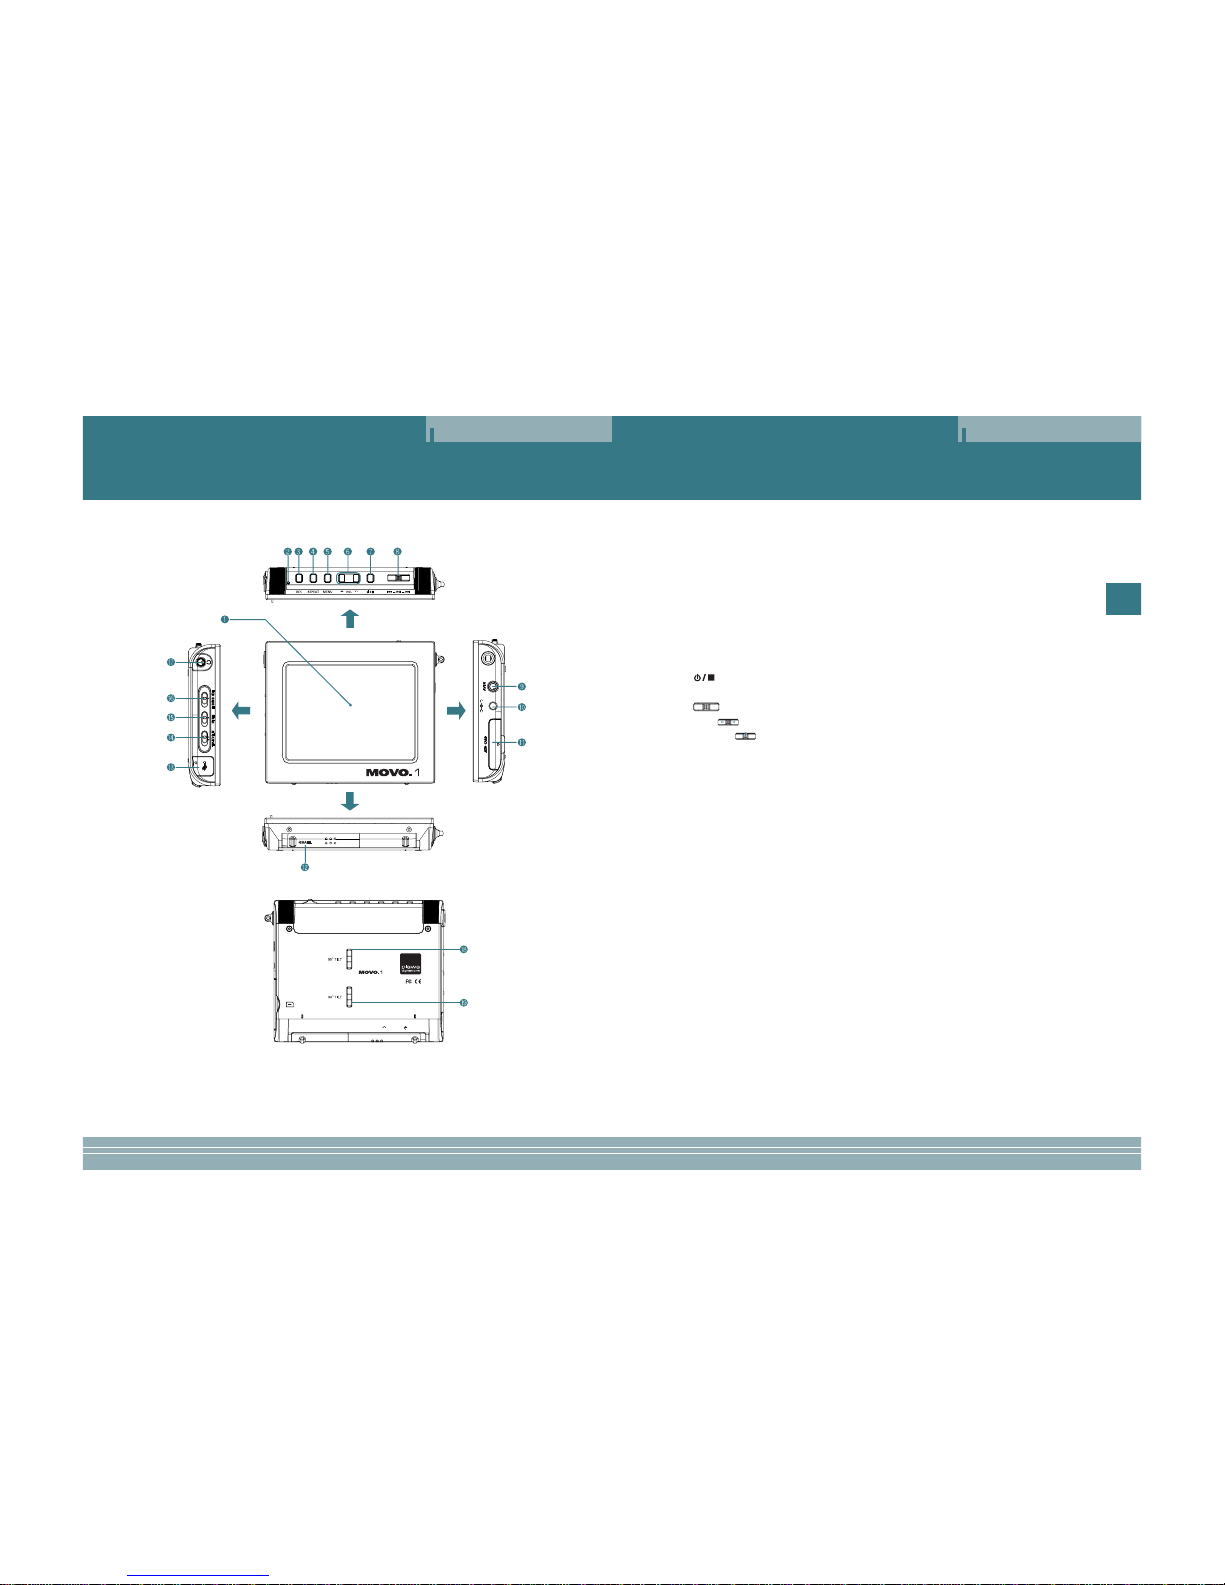
Descriptionof each part.................................................................................................................. 4
Viewinganexternal source ............................................................................................................6
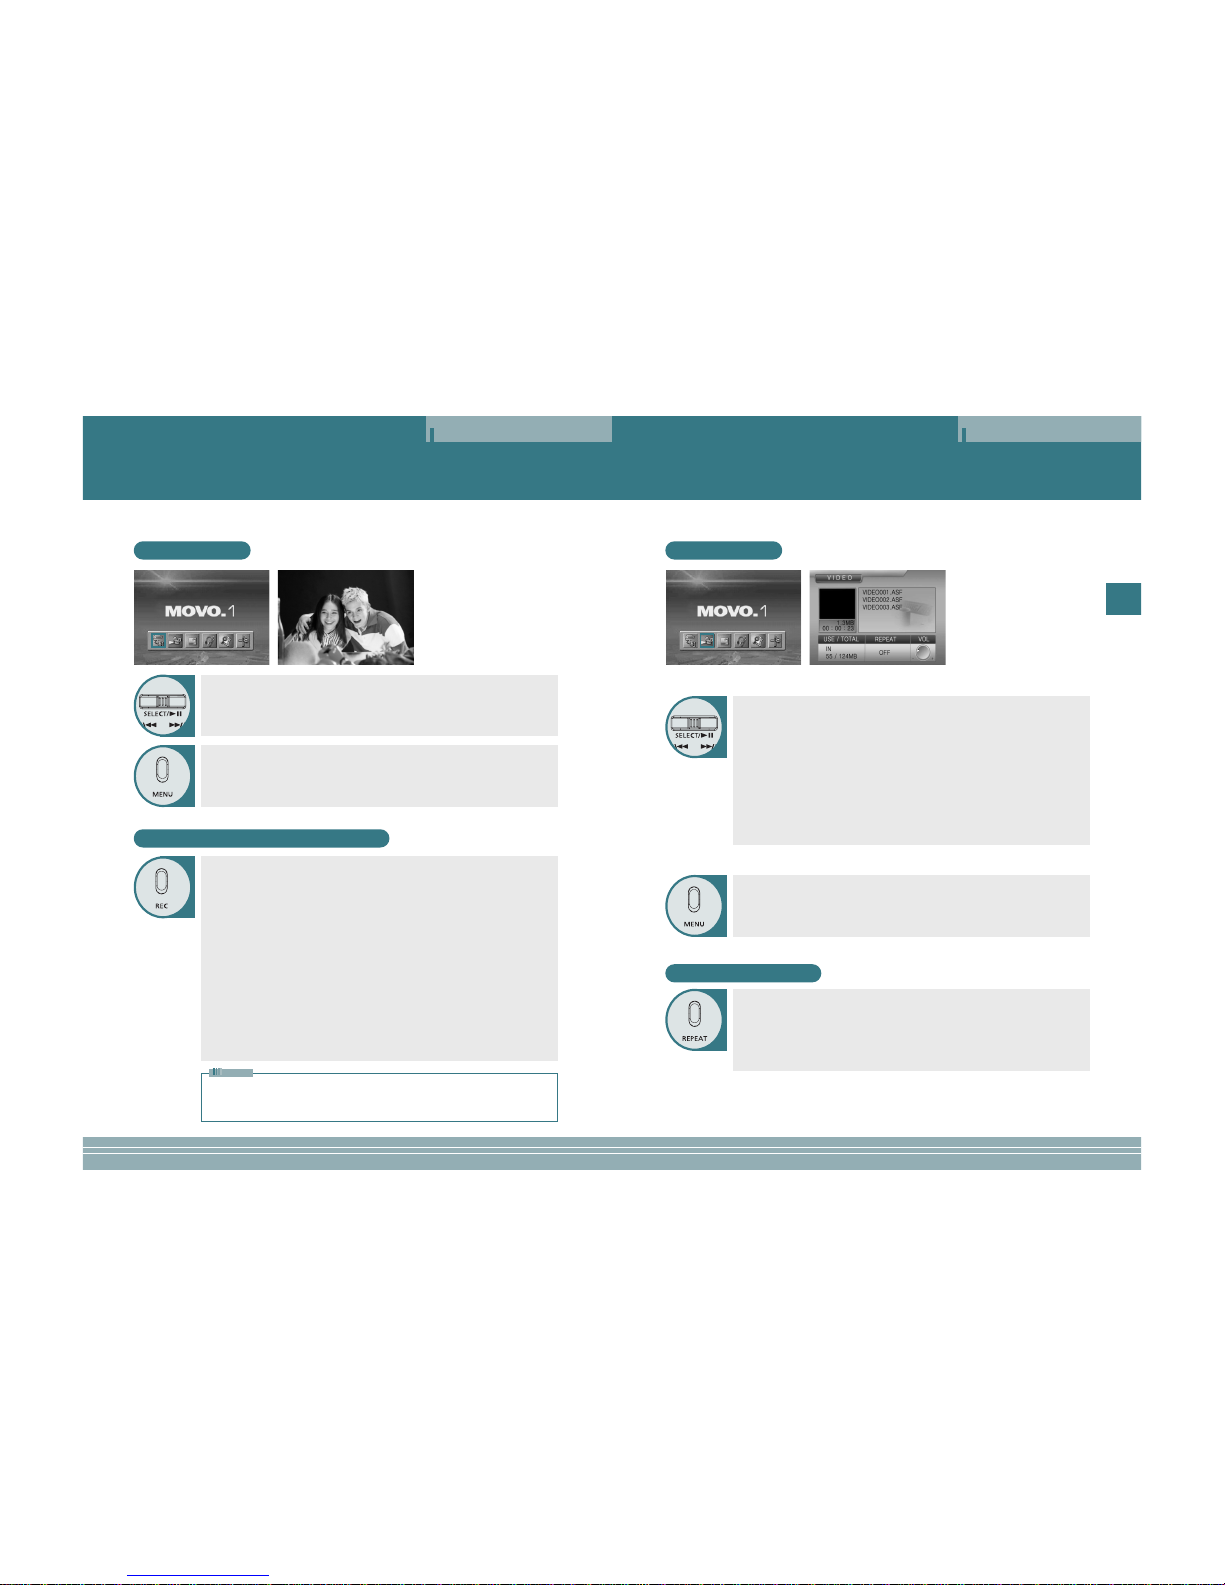
Viewing video .................................................................................................................................7
Viewinganimage ........................................................................................................................... 8
Listeningto the music................................................................................................................... 10
TextViewer....................................................................................................................................12
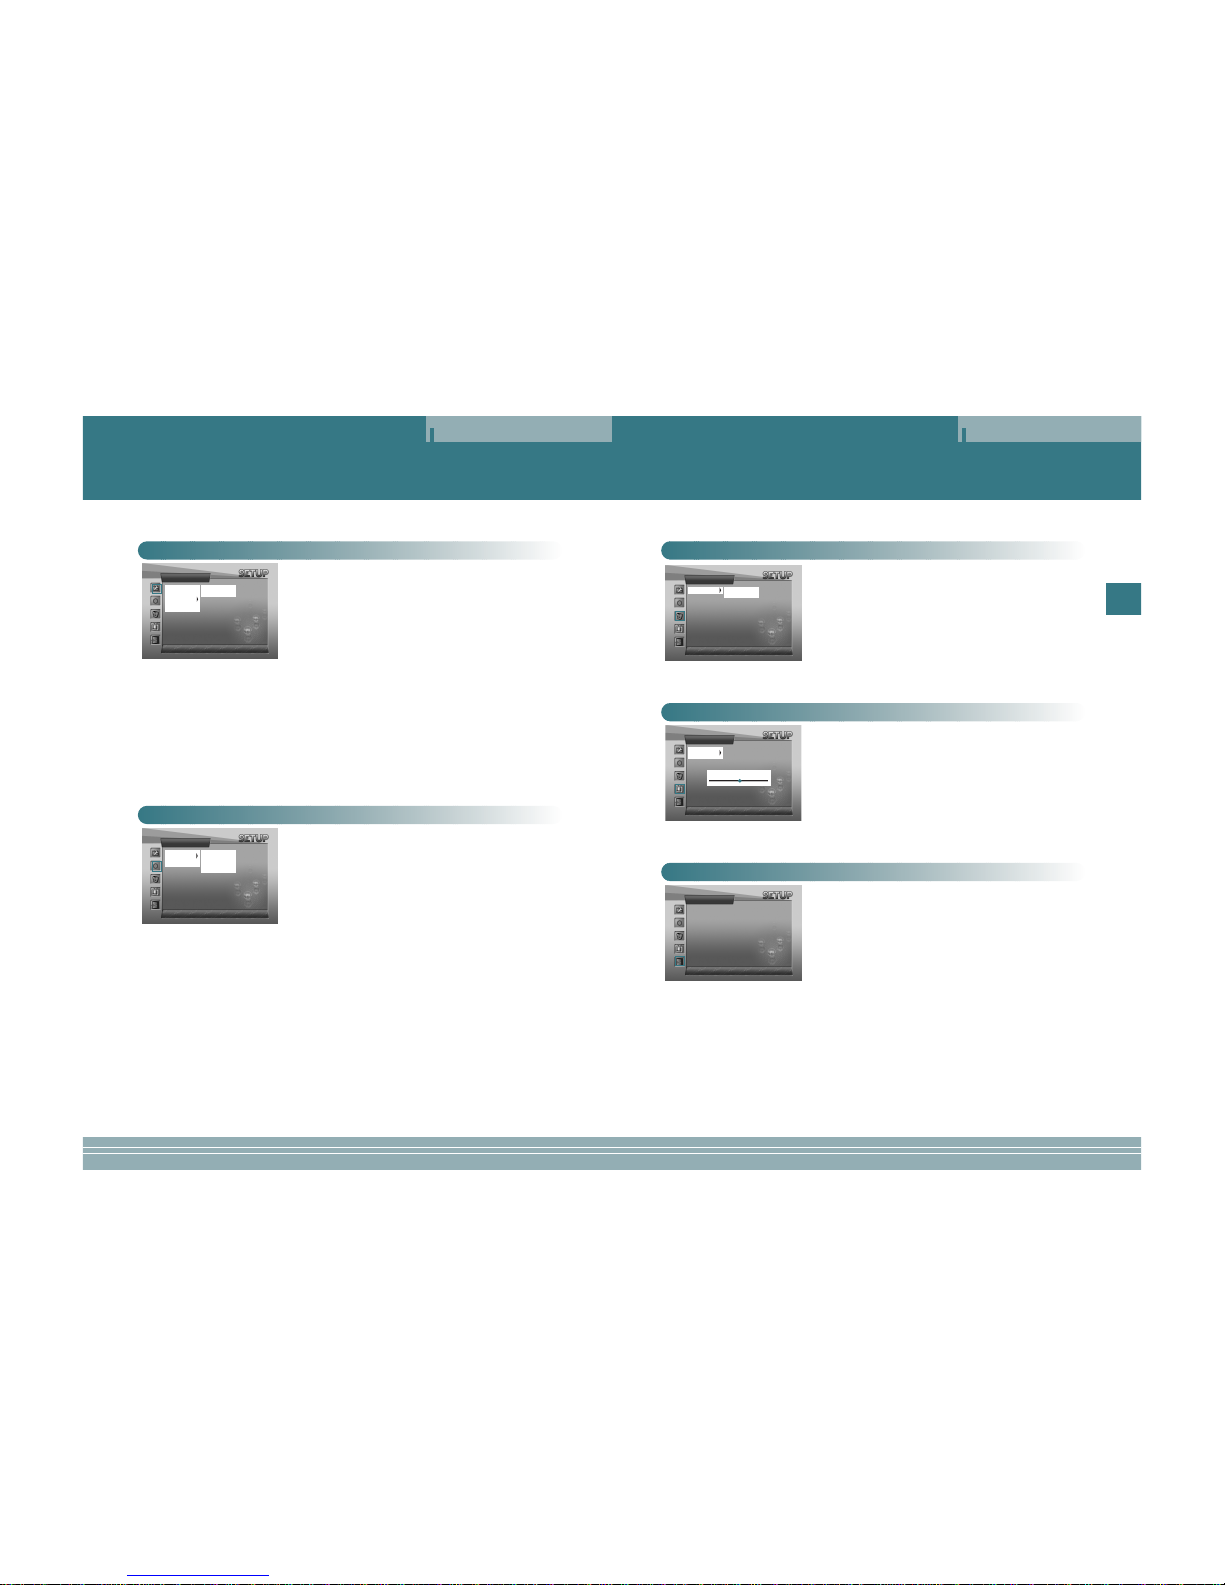
Usinga setup menu ..................................................................................................................... 13
Connectingan external componentand USB .............................................................................. 16
Settingand using atranscoder..................................................................................................... 17
Miscellaneous .............................................................................................................................. 24
Specifications .............................................................................................................................. 26
Notes when using an earphone
Traffic safety
• Donot use theearphone while ridinga bicycle or driving a car or motorcycle. It is not only danger-
ous,but also illegaldepending on theregion. If the earphone is used while walking on the road,
keepingits volume highon the crosswalkis very dangerous.
Protection for hearing ability
• Donot keep theearphone volume high.Most doctors point out that keeping the volume high for a
longtime is veryharmful to ears.
• Ifears ring, turndown the volumeor stop using the earphone.
Environmental information
• Separatepacking materials, batteries,and/or old electronicproducts when disusing.
• Packingmaterials are classifiedinto cardboard, polyethylene,and etc. Unnecessary packing
materialshave not beenused for thisplayer.
Accessories
OPTION
Owner’s Instructions Lithium ion battery
InstallationCD
(Transcoderprogram)
Powercable
Video/Audiocables Audiocable
USBcable AC adaptor
Earphone Handstrap Carrying case

ENG
Overview
5
Overview
Overview
4
DC 5VDC 5V
Personal Multimedia Player
Designed for plawa '2004
1LCD display
2Charge indication lamp: This lights on when the battery is charged by the input of DC power or
connectinga USB cable.
3REC button: Useto record anexternal input signal.Use to displayoperating time whilevideo play-
backand recording.
4REPEAT button: Use to repeat playback.
5MENU button: Useto return tothe menu screen.
6VOL -,+ buttons: Usetoadjust the volume.
SLIDE TIME buttons: Use to select a showing time of the slide show.
7(Power/Stop) button: Useto turn onor off the powerof the mainset, or useto stop play-
back.
8(JOG/Select/Play/Pause/Search/Skip) button
JOG ( ): Moveit left orright to goto, search, orskip the desiredposition in themenu.
SELECT ( ): Useto select amenu, or play/pausethe player.
9AV IN (external input) jack: Use to connect an external component.
10 DC IN (DC power input) jack: Use to input power.
11 SD CARD insertion slot
12 Charger insertion slot
13 USB Connection jack
14 NTSC/PAL switch: Use to select a display format on LCD display.
15 HOLD switch: Ifthe HOLD functionis set, the player does not operate even in the entry of another
buttonduring playback.
16 LCD ON/OFF switch: Useto turn on or off the LCDdisplay.
17 Headphone jack: Useto connect a headphone.
18 55° TILT: Install hand strap circular stand into 55°slot.
19 30° TILT: Install hand strap circular stand into 30°slot.

Viewing Video
Operation
VIDEO LIST
7
ENG
Viewing an External Source
Operation
INPUT MODE
Recording External Signals
6
Thisplayer allows youto view anexternal input signal.For connection ofan external component,see
page16.
After moving to "INPUT MODE" by using the JOG key, press the JOG key.
Theexternal component thatis being currentlyconnected will play and the playback
screenwill be displayed.
Press the MENU button to exit.
Themenu screen willbe displayed.
Press the MENU button to move from the FILE LIST to the MENU SCREEN.
Themenu screen willbe displayed.
ŒŒAfter moving to "VIDEO LIST" by using the JOG key, press the JOG key for
selection.
Videofilesin the built-in memory or SD card will appear.
´´After moving to a desired video file by using the JOG key, press the JOG key
for playback.
- Theselected video filewill play.
- Whenthe STOPbutton is pressed, playback will stop and the list of files will be
displayed.
- Ifthe JOG keyis used shortduring playback, theprevious file ornext file willplay.
- Ifthe JOG keyis used long(two seconds orlonger) during playback,forward
playbackor reverse playbackwill be available.
Note:Ifthe message "N/A" appears duringthe operation of Fast Forward(FF)or Fast Reverse
(FR),itmeans the information on theFF or FR operation (Index)isnot included in thefile.
ŒŒVideo Recording:PresstheREC button onceto start videorecording.
Pressthe REC buttonagain during videorecording to set a recording time.
Ifthe REC buttonis pressed duringvideo recording, "TIME:000" appears in
therecording time sectionat the topof the screen. Move the JOG key to the
leftor right toset the recordingtime in units of one minute and press the JOG
key. The recording continues for the set time and automatically stops when
theset time haslapsed.
Ifyou press theREC button aftersetting the recording time during video
recording,the time settingis released.
Pressthe STOPbutton to stop recording.
´´MP3 Recording: Holddown the REC button to record MP3.
Pressthe STOPbutton to stop recording.
ˇˇJPEG Recording:Press the JOGbutton to savea JPEG image.
Pressthe STOPbutton to pause or to release the current image and operate
theJOG key tosave the currentimage.
Holddown the JOGkey to consecutivelyrecord images atan interval of1~1.5
seconds.
Repeating Playback
Press the REPEAT button.
Everyentry of theREPEATbuttonwill select the following sequence of modes:
"OFF"→"ONE" →"ALL".
OFF:After thecurrent file isplayed, the nextfile plays automatically.
ONE: Repeatsthe file whichis currently playing.
ALL: Repeatsall the videofiles in thecurrent folder.
•Videorecordingand JPEG recording are only possible in external input mode.
•IfMacrovision has beenset, the Recordingfunction does notoperate.
Themessage "Macrovision detectcannot record”will bedisplayed.
Note

9
ENG
Viewing an Image
Operation
IMAGE LIST
ŒŒAfter moving to "JPEG LIST" by using the JOG key, press the JOG key for
selection.
JPEGfiles in thebuilt-in memory orSD card willappear.
´´After moving to a desired JPEG file by using the JOG key, press the JOG
key.
- Theselected JPEG filewill appear onthe whole screen.
- You can view the previous file or next file by using the JOG key.
- Whenthe STOPbutton is pressed, playback will stop and the list of files will
return.
Setting a Slide Show
ŒŒPress the REPEAT button to switch to the "SLIDE" mode.
´´Press the SLIDE TIME + or – button to select the showing time of the slide
show.
- You can select the time up to 30 seconds.
- Thedefault time is3 seconds.
Press the MENU button to exit.
Themenu screen willbe displayed.
Deleting a File
ŒŒWhen deleting a file from the list of files, select the file you want to delete by
using the JOG key and hold the key for at least two seconds. (When select-
ingall the filesin the folder, press and hold the REPEATbutton for two seconds or
longer.)
´´When the STOP button is pressed, the selected files will be deleted.
ˇˇDeletion of the selected files can be cancelled in the same way as the selec-
tion of files.
Viewing Video
Operation
8
Repeat Section
ŒŒRepeats a section selected from the currently playing file.
´´Press the MENU button to select the start (point A).
ˇˇPress the MENU button again to select the end (point B). Section A-B will be
played repeatedly.
¨¨If you press the MENU button during the REPEAT SECTION, the REPEAT
SECTION is canceled.
Deleting a File
ŒŒWhen deleting a file from the list of files, select the file you want to delete by
using the JOG key and hold the key for at least two seconds. (When select-
ingall the filesin the folder, press and hold the REPEATbutton for two seconds or
longer.)
´´When the STOP button is pressed, the selected files will be deleted.
ˇˇDeletion of the selected files can be cancelled in the same way as the selec-
tion of files.

11
ENG
Operation
10
Listening to the Music
Operation
Search Function
ŒŒHold the JOG key to the left or to the right to move the playback position of
the current file forwards or backwards.
´´A search can be executed at a maximum speed of 16´. The sound is muted
during a search.
ˇˇIf you press the JOG key during a search, the file is played.
Repeat Section
ŒŒRepeats a section selected from the currently playing file.
´´Press the MENU button to select the start (point A).
ˇˇPress the MENU button again to select the end (point B).
Section A-B will be played repeatedly.
¨¨If you press the MENU button during the REPEAT SECTION, the REPEAT
SECTION is canceled.
Deleting Files
ŒŒSelect a file to delete from the file list using the JOG key and hold down the
JOG key for more than 2 seconds. (Holddown the REPEATbutton for more
than2 seconds toselect all filesin a folder)
´´Press the STOP button to delete the selected file(s).
-You can cancel the selection in the same manner as when you select files.
Listening to the Music
MP3 LIST
ŒŒAfter moving to "MP3 LIST" by using the JOG key, press the JOG key for
selection.
MP3files in thebuilt-in memory orSD card willappear.
´´After moving to a desired MP3 file by using the JOG key, press the JOG key.
- Theselected MP3 filewill play.
- Whenthe JOG keyis used duringplayback, the previous file or next file will
play.
- Whenthe STOPbutton is pressed, playback will stop the list of files will return.
Press the MENU button to exit.
Themenu screen willbe displayed.
Repetitive Playback
Press the REPEAT button.
Wheneveryou press theREPEATbutton,the repeat mode changes in the order of
“OFF”→“ONE”→“ALL”→“SHUFFLE”→“PROGRAM”.
OFF:After thecurrent file hasplayed, the nextfile is playedautomatically.
ONE: Thecurrent file isrepeated.
ALL: AllMP3 files inthe current folderare played repeatedly.
SHUFFLE: AllMP3 files ina current folderare played repeatedlyin random order.
PROGRAM: SelectedMP3 files arerepeated sequentially.
-Select a fileand hold downthe JOG key. The icon of the selected file is
changedand the fileis added tothe PROGRAM LIST.
-Select a filefrom the PROGRAMLISTand hold down the JOG key.
Theicon of theselected file ischanged and thefile is releasedfrom the
PROGRAMLIST.
-Whenever you holddown the REPEAT key,all files are alternately
addedto and releasedfrom the PROGRAMLIST.
-If you changerepeat mode, thePROGRAM LIST is released.
Note:In program playmode, you cannotdelete a file.

13
ENG
Operation
12
Using a Setup Menu
Operation
How to use a Setup Menu
ŒŒSelect the item you want to set among GENERAL SETUP, RECORD SETUP,
MEMORYSETUP, DISPLAY SETUP, SETUP EXIT by using the JOG key.
´´Move to a detailed setup item in the selected setup menu by using the JOG
key.
ˇˇAfter moving to a desired menu by using the JOG key, press the JOG key
for selection.
¨¨After moving to or adjusting a desired menu by using the JOG key, press
the JOG key to save the state of setup.
- Pressthe STOPbutton to move to the upper menu.
- Pressthe MENU buttonto move tothe menu screen.
GENERALSETUP
✓MEMORY
LANGUAGE
POWER SAVE
RESET
UP GRADE
GENERALSETUP
✓MEMORY
LANGUAGE
POWER SAVE
RESET
UP GRADE
✓INTERNAL
EXTENDED
TEXT VIEWER
TEXT VIEWER
ŒŒOperate JOG to move to the “TEXT VIEWER LIST” and press the JOG key.
Textfiles saved inthe internal memoryor the SDcard will appear.
´´Operate JOG to move to a text file and press the JOG key.
-Thetext file willappear.
-You can view the previous or next text file, using JOG.
-Press the STOPbuttontogo back to the FILE LIST.
Note:If you reloadthe last file,the file is displayed starting from the last
sectionviewed.
Press the MENU button to exit.
Themenu screen willbe displayed.
Search Mode
If you press the JOG button while playing a text file, you can start the search mode.
If you press the JOG key in search mode, the search mode window appears. Select
the position of the file you want to find in the search mode window by moving the JOG
key to the left or right and press the JOG key to move to the selected position.
Deleting Files
ŒŒSelect a file to delete from the file list using the JOG key and hold down the
JOG key for more than 2 seconds. (Holddown the REPEATbutton for more
than2 seconds toselect all filesin a folder)
´´Press the STOP button to delete the selected file(s).
ˇˇYou can cancel the selection in the same manner as when you select files.

15
ENG
Operation
14
Using a Setup Menu
Operation
• FORMAT
INTERNAL: Useto delete allthe files inthe built-in memory.
EXTENDED: Useto delete allthe files inthe external SDcard.
MEMORY FORMAT
• BRIGHTNESS
Useto adjust thebrightness of theLCD window.
• CONTRAST
Useto adjust thesharpness of theLCD window.
DISPLAY SETUP
TheSetup menu willdisappear and themenu screen willbe dis-
played.
SETUP EXIT
SETUPEXIT
MEMORYFORMAT
✓FORMAT ✓INTERNAL
EXTENDED
DISPLAYSETUP
✓BRIGHTNESS
CONTRAST
LCD BRIGHTNESS SETUP
• MEMORY
INTERNAL: Usewhen playing, recording,deleting, and format-
tingthe contents ofthe built-in memory.AnSD card cannot be
used.
EXTENDED: Usewhen playing, recording,deleting, and format-
tingthe contents ofan external SDcard.The built-in memory
cannotbe used.
• LANGUAGE
Useto select alanguage.
• POWER SAVE
Useto set thepower saving function.When the functionis set,
powerwill be shutdown after acertain time (fiveminutes) elaps-
esin the stateof stop.
• RESET
Useto initialize allsettings (factory default).
• UPGRADE
Useto upgrade thefirmware that hasbeen downloaded through
USB.
GENERAL SETUP
• MPEG4
Useto select thepicture quality ofvideo recording.
S-FINE: Highestquality
FINE: Highquality
NORMAL : Normalquality
ECONOMY : Lowestquality
✽Pleaserefer to thepage 26 regardingeach recording time.
• MP3
SAMPLE RATE/BIT RATE: Usetoselectthe quality of recording.
CHANNEL: Useto select MONOor STEREO duringrecording.
• INPUT
Sets the level of the input audio.
RECORD SETUP
RECORDSETUP
✓MPEG4
MP3
INPUT
✓S-FINE
FINE
NORMAL
ECONOMY
GENERALSETUP
✓MEMORY
LANGUAGE
POWER SAVE
RESET
UP GRADE
✓INTERNAL
EXTENDED

17
ENG
Connection
16
Installing and Using Transcoder
InstallingandUsingTranscoder
Using Environment
[PC requirements]
•PentiumIII 1G atleast
•Memory:256MB at least
•MicrosoftDirectX supported VGA
•Soundcard-required
[OS]
•MicrosoftWindows ME/Windows 2000/WindowsXP
[Codec]
•Divx5.1.1
Visitatthe web site
http://download.divx.com/divx/DivX511.exe and download Divx codec for installa-
tion.
•Aunified codec for running media files on a PC.
Aunified codec must be installed on the PC to run a file normally.
[Others]
•MicrosoftDirectX 8.0 atleast
•MicrosoftWindows Media Player9.0
Connecting an External Component and USB
Connecting an AV Component
•Connecta Video/Audio cable between the
A/Vcomponent (DVD/VCR) andthe player.
•Connectan USB cablebetween a PC(Windows ME, Windows2000, Windows XP)and
theplayer.
•EnterWindows Explorer afterUSB is recognizedby the PC.
•Thisplayer is displayedas a portabledisc in thelist of foldersof Windows Explorer.
•Methodsof copying ordeleting a filewith a portabledisc are samewith the usingmeth-
odsin Windows.
A/V component (DVD/VCR)Right side of
the player
Video/Audiocable
Connecting an Audio Component
•ConnectanAudio cable between the audio
componentand the player.
Audio component
(Portable CD Player,
Portable Cassette Player,
PC Audio output)
Right side of
the player
Audiocable
Connecting USB
PC
Left side of the player
USBcable
•Whenmoving, copying, ordeleting a
filethrough USB, removethe USB
aftermaking sure thatthe USB con-
nectionmessage window disap-
pears.During the connectionof
USB,all the buttonson this player
donot operate.
Note

19
ENG
18
InstallingandUsingTranscoder
Installing Transcoder
Executing Transcoder
Insertthe supplied installationCD and execute
"TransCoder.EXE".
1
Select"Next".
2
Asshown in thefigure right, theprocess of pro-
graminstallation is displayed.
3
Afterinstallation is complete,select "Finish" to
endinstallation.
4
Selectthe menus atthe right bottomof Windows
inthe following sequence:"Start" → "Program
(P)"→ "TRANSCODER"→"TRANSCODER".
Ordouble click "TRANSCODER( )"on the
Windowsbackground screen.
InstallingandUsingTranscoder
Installation Guide
Transcodersoftwaredecodesfiles such as WMV,ASF,AVI, MPEG, MPG, WMA,
MPGA,VOB and DAT so that the files can be played.
Mostfiles having thevideo formats, MPEG4-SPandDivX Ver3.11, and audio for-
mats,4.0, 5.03 SPandMPEG1 Layer3 (MP3), can be played without being trans-
formed.
UseaTranscoderforfiles that do not play,
Thefollowing programs willbe installed toyour PC.
1.DivX 5.1.1 Bundle
2.All Codec Packs Link
3.Microsoft Windows MediaPlayer 9.0
4.DirectX9.0
5.Transcoder
Insertthe CD thatcame with theproduct into yourPC to startthe installation process.
You can download files from the Internet by using the enclosed CD.
Thedownload time maydifferaccording to the kind of Internet connection.
Ifyou insert theCD into yourPC, the followingmenu will appear.
Note
Makesure to selectthe icons sequentiallystarting from thetop of theMENU window
inthis order toinstall all fiveprograms.
Referto the InstallationGuide and theQ&Aat the bottom of the MENU for the instal-
lationmethods
Note

21
ENG
InstallingandUsingTranscoder
20
InstallingandUsingTranscoder
• File
- Newschedule: Calls anew file inthe list oftranscoded files.
- Openschedule:Applies the saved *.dmt files in the list of transcod-
edfiles.
- Save:Saves the contentsof the operationwhich is underprogress.
inthe list oftranscoded files.
- SaveAs: Saves as another name.
- Exit:Exits the program.
• Build
- Startstranscoding.
• Option
- Sami:If there isa caption file,whether to applyor not willbe deter-
mined.
- Mediafile: Only mediafiles are appliedin the list.
- MediaInfo: Displays thefiles which canplay without change.
Thisis not availablein any versionafter Windows XP.
- Refresh:Re-applies the file.
- SavefilePath:Applies the path of a file to be transcoded.
• Help
- About:Guides product informationand the wholeweb site.
Menu
- Newschedule: Builds anew list oftranscoded files.
- Openschedule: Calls alist of savedtranscoded files.
- Save:Saves the contentsof the listof transcoded filesunder operation.
- StartFile Switching: Startsthe schedule whichis applied tothe list of
transcodedfiles.
Tool Bar
Newschedule
Openschedule
Save
StartFile
Switching
Installing and Using Transcoder
Configuration and Function of Transcoder Screen
ŒŒ
´´
ˇˇ
ˆˆ
ØØ
∏∏””
¨¨
ŒŒMenu
´´Function icon
ˇˇFile search window: Thishas the same function as Windows Explorer.
¨¨File list window: Thishas the samefunction as WindowsExplorer.
ˆˆTranscoded files list window: The files to be transcoded are displayed.
ØØLocation where the transcoded files are saved: This displays the location where
thetranscoded files aresaved.
∏∏Capacitance of memory: Thisdisplaysthe capacitance of the location where the
transcodedfiles are saved.
””Display of transcoding progress: This displays the progress rate.

23
ENG
InstallingandUsingTranscoder
22
InstallingandUsingTranscoder
Note
•IfCodec does notexist, the playerwill notice youthrough a messagewindow.The message win-
dowdisappears three secondslater and anicon in redappears on thelist.
•Ifthe saving spaceis not enough,the player willnotice you througha message window.Themes-
sagewindow disappears threeseconds later andan icon inred appears onthe list.
•IfCaption does notexist, the playerwill operate withoutcaption.
•DivXCodec can beinstalled only afterthe user downloadsFreeware.
•CombinedCodec can beinstalled only afterthe user downloadsFreeware.
•IfInter Video Sound Codec has been installed, the player may not play normally.
•Ifthere are anyerrors in thefiles to beconverted, this mayresult in thefile being corrupted.
•Whenthe quality ofan original fileis not good,errors may occurin the transformedfile.
Filesthat are interruptedwhen playing inWindows Media Playeror do nothave index information
mayhave poor quality.
•Referto the INSTALLATIONGUIDEandthe Q&Aonthe CD for installation details and possible
problems.
Installing and Using Transcoder
Transcoding files
Selectthe location wherehas a fileto be transcodedin the FileSearch window.
1
Draga file tobe transcoded inthe File Listwindow and moveit into theTranscodedFiles
Listwindow.
Select the "Transcoding ( )" function icon for execution.
2
3
Thecursor in bluewill be locatedon the fileunder transcoding andtranscoding
willproceed.
4
Aftertranscoding is complete,the transcoded filewill be savedin the specifiedlocation.
Thedefault folder is"C:\My Media".
5
Thetranscoded file canplay by downloadingit with aportable disc.
6

25
ENG
Miscellaneous
24
Miscellaneous
Troubleshooting
Symptom
Theplayer is dead.
Whenconnecting anA/Vcable,
theplayback screen ofan exter-
nalcomponent is notdisplayed
normally
Earphonevolume is notoutput
normally.
Chargingdoes not workor the
chargeindication lamp doesnot
lighton.
Anexternal memory (SDcard) is
notrecognized normally.
Adownloaded moving image file
doesnot play
Solution
1. Checka battery orAC adaptor is installed
2. Checkthe battery isfully charged. Ifnot, charge itwith anAC
adaptoror USB cable.
3. Checkthe HOLD keyor LCD OFFkey is turnedon.
4. Pressthe POWER button.
1. CheckanA/V cable is properly connected.
2. Ifthe screen isbiased upper orlower,check for the broadcast-
ingsystem (NTSC orPAL)
1. Checkfor the levelof volume.
2. Checkfor the connectionof the earphone.(If there isa dirt or
foreignmaterial in theterminal, noise mayoccur.)
3. Ifthe data ofthe file whichis playing isdamaged, noise may
occuror sound maybe interrupted. Checkwith another file.
1. Checkfor the connectionof anACadaptor.
2. Checkfor the installationof a battery.
3. Checkwhether the playeris fully chargedor not.
1. Checkfor the installationof an externalmemory.
2. Checkfor the WRITEPROTECTswitch of an SD card.
3. Thisplayer supports only“FAT and FAT16”formats.
Playthe moving imagefile after transcodingit through the includ-
edTRANSCODERPROGRAM.
Miscellaneous
Battery and Power
•Theplayer uses anexclusive Lithium-Ion batterywhich can befully charged withintwo hours of
beingcompletely discharged.
•Whenvideo plays whilethe player isfully charged, theplayer can keepplaying for abouttwo
hours.When only MP3plays, the playercan keep playingfor about fourhours.
•Dependingon the user'sconvenience, the playercan be chargedby using aUSB cable oradap-
tor.
- Chargingwith a USBcable
Connecta USB cablebetween a PCand the player.Thenthe player willbe charged automati-
callywhile it isturned off.
Note:Thecharge indication lamp lights on only during charging.Aftercharging is complete, the
lamplights off.
- Chargingwith anACadaptor
Theplayer can becharged with aAC adaptor included in the player.
Note:Even though theplayer is turnedoff,charging will continue.
Thecharge indication lamplights on onlyduring charging.Aftercharging is complete, the lamp
lightsoff.
Cautions on use
•Theremay be abnormalityin a savedfile when removingUSB after thePC USB downloading
operationis complete. Removeit safely aftermaking sure thatthe message "USBCONNECTED
TRANSFERRINGFILES" disappears.
•Becareful that anAC adaptor is not connected to theAV IN jack.
•Whileplaying a filein the externalmemory,do not remove the external memory forcedly.
•Thisplayer supports USB2.0.If PC environmentis USB1.1, however,this player willoperate in
USB1.1.
•Whenconnecting USB, theoperation of thisplayer will belimited.
•Donot remove abattery forcedly duringplayback or recording.
•Whencharging the playerwith USB, turnit off first.

Miscellaneous
26
Model
Size(Wx D xH)
Weight
Frequencycharacteristics
Audio Headphoneoutput
S/N
Video
Supportedfiles Audio
Image
Encoding Video/Audio
Audio
Recordingtime ECONOMY
(basedon the NORMAL
built-inmemory) FINE
S-FINE
Picturedisplay
PCconnection
Memorytype Built-in
Extended
Batteryuse time
Powerspecification
Recommended OS
system CPU
specification Memory
MOVO_1
96x 18 x79(mm) / 3.8x 0.7 x3.1(inch)
Includingbattery: 133 g/ 4.7 lbs
Withoutbattery: 107 g/ 3.8 lbs
20Hz~ 20KHz
20mW,Impedance: 16ohm
Typical90 dB (basedon MP3)
Directplayback:AVI(Video:ISOMPEG-4,Audio: MP3)
TransS/Wused:WMV,ASF,AVI, MPEG, MPG, WMA
MP3,ID3Tag ver1.1
JPEG
MPEG-4/MP3,Extension = asf
MP3
3.5"ColorTFTLCD, 480 x 234 dot
NTSC/PAL(selectable)
USB2.0
128MB/256MB/512MBFLASH MEMORY
SDcard slot (8MB~ 1GB)
Videoplayback:two hours
Audioplayback: four hours(LCD OFF mode)
DC5V 2.0Aadaptor
DC3.7V, 1100mAlithium ion battery
WindowsME/Windows 2000/Windows XP
PentiumIII 1 GHzor faster
256MB
128MB 256MB 512MB
90minutes 180minutes 360 minutes
50minutes 100minutes 200 minutes
30minutes 60minutes 120 minutes
20minutes 40minutes 80 minutes
Specifications
Table of contents