Polar Electro DB331 User manual

Model • Modèle • Modell • Modello • Modelo • Malli:
DB331 / DB332 / DB843
Slush machine
Instruction manual
DB331_DB332_DB843_UK_A5_v1_20200110.indb 1 2020/1/10 16:39

2
UK
Safety Tips
THE APPLIANCE MUST ONLY BE USED BY
TRAINED PERSONNEL IN ACCORDANCE WITH
THESE INSTRUCTIONS.
• Position on a flat, stable surface.
• Install the appliance where it can be overseen by trained
personnel.
• Always carry, store and handle the appliance in a vertical
position.
• A service agent/qualified technician should carry out
installation and any repairs if required. Do not remove any
components or service panels on this product.
• Consult Local and National Standards to comply with the
following:
- Health and Safety at Work Legislation
- BS EN Codes of Practice
- Fire Precautions
- IEE Wiring Regulations
- Building Regulations
• DO NOT immerse in water, or use jet/pressure washers to
clean the appliance.
• Not suitable for outdoor use.
• Always switch off and disconnect the power supply to the
appliance before cleaning.
• This appliance is not intended for use by persons (including
children) with reduced physical, sensory or mental capabilities,
or lack of experience and knowledge, unless they have been
given supervision or instruction concerning the use of the
appliance by a person responsible for their safety.
• Children should be supervised to ensure that they do not play
with the appliance.
DB331_DB332_DB843_UK_A5_v1_20200110.indb 2 2020/1/10 16:39

3
UK
• Keep all packaging away from children. Dispose of the
packaging in accordance to the regulations of local authorities.
• If the power cord is damaged, it must be replaced by an
POLAR agent or a recommended qualified technician in order
to avoid a hazard.
• DO NOT attempt to modify the appliance in any way.
• NEVER leave the appliance unattended when in use.
• Never use accessories which are not recommended by the
manufacturer. They could pose a safety risk to the user and
might damage the appliance. Only use original parts and
accessories.
• Polar recommends that this appliance should be periodically
tested (at least annually) by a Competent Person. Testing
should include, but not be limited to: Visual Inspection,
Polarity Test, Earth Continuity, Insulation Continuity and
Functional Testing.
Caution Risk of Fire
• Do not store explosive substances such as aerosol cans with a
flammable propellant in this appliance.
Warning: Keep all ventilation openings clear of
obstruction. Unit should not be boxed in without
adequate ventilation.
• Warning: Do not use mechanical devices or other means
to accelerate the defrosting process, other than those
recommended by the manufacturer.
• Warning: Do not damage the refrigerant circuit.
• Warning: Do not use electrical appliances inside the food
storage compartments of the appliance, unless they are the
type recommended by the manufacturer.
Product Description
DB331 - Polar slush machine - 1 x 12Ltr Bowl
DB332 - Polar slush machine - 2 x 12Ltr Bowl
DB843 - Polar slush machine - 3 x 12Ltr Bowl
DB331_DB332_DB843_UK_A5_v1_20200110.indb 3 2020/1/10 16:39

4
UK
Introduction
Please take a few moments to carefully read
through this manual. Correct maintenance and
operation of this machine will provide the best
possible performance from your POLAR product.
This appliance is intended for making drinks and
cold beverages. If used with dairy-based products
and/or when envisaged by law in accordance to
the type of product used, it must be equipped
with the optional extra of a temperature gauge
for the product in the bowl. It is also obligatory to
comply with the current regulations and standards
concerning the products used.
Note: Only two types of persons
can access the appliance:
• User: A person who has adequate technical
training on how to use the appliance correctly,
and full knowledge of routine work on how to
maintain, clean and sanitize the appliance.
• Specialized technician: A person who has
the full knowledge of the appliance concerning
the installation, use and servicing of the
appliance.
Pack Contents
The following is included:
• Polar slush machine
• Drip Tray:
DB331 x 1 / DB332 x 2 /
DB843 x 3
• Coupler x 2
• Connector of axis x 2
• Seal of auger x 1
• Seal of evaporator x 2
• Seal of Tap x 10
• Seal of axis x 2
• Vaseline (for lubrication of the appliance)
• Instruction Manual
POLAR prides itself on quality and service, ensuring
that at the time of packaging the contents are
supplied fully functional and free of damage.
Should you find any damage as a result of transit,
please contact your POLAR dealer immediately.
Installation
Note: If the unit has not been
stored or moved in an upright
position, let it stand upright for
approximately 12 hours before
operation. If in doubt allow to
stand.
1. Remove the appliance from the packaging.
Make sure that all protective plastic film and
coatings are thoroughly removed from all
surfaces.
2. Maintain a distance of 20cm (7 inches)
between the unit and walls or other objects for
ventilation. NEVER LOCATE NEXT TO OR
NEAR A HEAT SOURCE.
Before installation,ensure to
check that:
• The appliance is installed indoors.
• The room is adequately lit, well-
ventilated and hygienic.
• The location of the appliance is flat and
solid, and can support its weight.
• The appliance may only operate in
places with an ambient temperature
ranging between 20°C and 32°C.
• Adequate clearance is kept around
the appliance to enable personnel to
operate without constraints.
Assembly
Hang the drip tray onto the slot on the front.
DB331_DB332_DB843_UK_A5_v1_20200110.indb 4 2020/1/10 16:39

5
UK
Control panel (Model featured: DB843)
Bowl indicator light
Bowl Temperature
display
Mode selection button
Increase button
Decrease button
Slush hardness/
Juice temperature
display
On/off switch
SET button
Light button
OFF mode icon
Juice mode icon
Slush mode icon
Note: The SET button is designed for adjusting parameters by professional
technicians only, which is password protected. Ordinary uses/operators should
not access it for any purpose.
Note: Before the first time use, ensure to let specialized technician check the
appliance functions properly.
Appliances have varied quantity of bowls (Model DB332 has 2 and Model DB843
has 3), so Bowl I means the one on the left hand side of the unit when looking
from the front. Bowl II means the middle one...
DB331_DB332_DB843_UK_A5_v1_20200110.indb 5 2020/1/10 16:39

6
UK
Operation
Filling
1. Ensure to switch Off and unplug the appliance.
2. Preparing your product: Dilute and mix the
concentrate with water in a container, following
the manufacturer’s instructions. The mixture
obtained must have a minimum sugar content
of 13% - lower sugar content mixture may
damage the augers and gear motors.
3. Removing the lid: Lift the rear part to
release. Then remove directly.
4. Pour the mixture into the bowl.
WARNING: Do not fill the tank
with hot liquid.
Do not let the level exceed the
‘MAX’ level line marked on the
front of the bowl.
5. Re-locate the lid.
WARNING: There are moving
parts inside the bowl, which
may cause injuries. Therefore,
ensure to turn off and unplug
the appliance before carrying
out any operations inside the
bowl.
Getting started
1. Connect the appliance to a mains power
supply.
2. Press the on/off switch .
Selecting the working mode
• Press the mode button to select the
working mode.
• There are 3 modes in total:
Mode Mode icon Description
Slush Slush mode is selected
Juice Juice mode is selected
OFF The bowl will stop
stirring and refrigerating.
To serve with slush
1. Press the mode button to select the slush
mode. The icon illuminates.
2. Press buttons “+” and “-” to select the
slush hardness setting from 1 (softest) to 7
(hardest).
To serve with cold drinks
1. Press the mode button to select the juice
mode. The icon illuminates.
2. Press buttons “+” and “-” to select the juice
temperature from 1°C to 7°C.
Note: When the shop is out
of service and there is still
remaining product in the bowl,
we highly recommend setting
all bowls to Juice mode, as in
this mode bowl stirring and
refrigerating are still ON so
as to keep the product fresh
(Temperature from 1°C to 7°C).
To simply clean the desired bowl
1. Press the mode button for six seconds.
2. “C” will be shown on the display.
Notes:
• In this mode no refrigerant gas will flow
into, but the auger is still rotating to assist
the cleaning process. Please fill warm and
clean water into the corresponding bowl (not
exceeding the maximum level marked on the
bowl).
• If desired to perform a thorough cleaning or
sanitization to the machine, please ensure the
machine is powered off. For details, please see
Section “Cleaning, Care & Maintenance”.
DB331_DB332_DB843_UK_A5_v1_20200110.indb 6 2020/1/10 16:39

7
UK
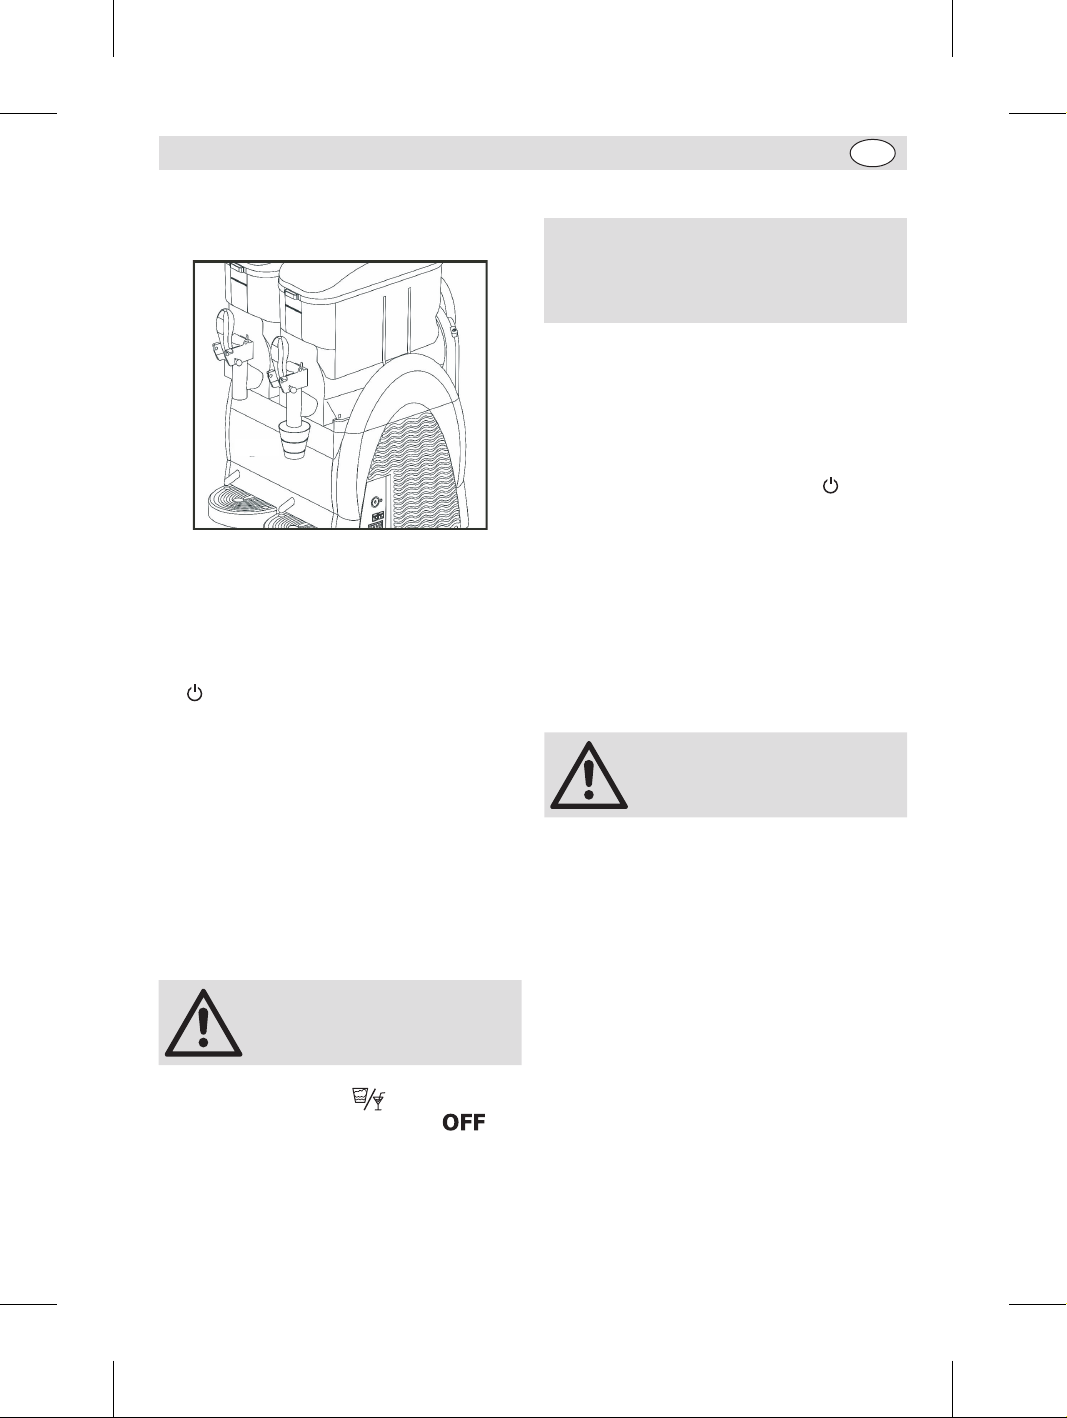
To use the dispenser
Once the liquid is sufficiently cooled, use the tap
lever for dispensing.
Notes:
• Regularly check the temperature of the product
in the bowl, using a standard thermometer, to
make sure the product is always kept below
the storage temperature.
• NEVER disconnect the machine from the power
supply or switch it off using the on/off switch
when there is still product for consuming
inside the bowl.
• If the appliance is not used continuously, when
used with milk-based products, make sure to:
- spray sanitizer solution around the spigot
area and on the spigot itself (alternatively,
wipe with a clean cloth and sanitizer);
Or
- Dispense a small amount of the product from
the spigot and discard before dispensing the
serving for the customer.
To turn off a certain bowl (for Model
DB332/DB843)
Note: The bowls work
independently. To stop a certain
bowl, you just need to turn it
off.
1. Press the mode button to select the
OFF mode for the desired. The icon
illuminates.
2. Under OFF mode, the bowl will stop stirring
and refrigerating.
To empty the bowl
Note: The bowl must be cleaned and
sanitized at least once a day and more
frequently depending on the products used,
and in any case, in compliance with the
applicable hygiene regulations.
1. Before a bowl is cleaned, it must be emptied.
2. Set the bowl to juice mode. Then release
all the liquid from the bowl into a suitable
container.
3. Switch off and unplug the appliance.
To turn off the appliance
• After use: press the on/off switch for 3
seconds to turn off the appliance.
• In case of freezing, switch off and unplug the
appliance. Then call POLAR agent or qualified
technician.
• Should a fire break out, clear the area
immediately to make way for the trained
personnel for proper handling.
Cleaning, Care &
Maintenance
Warning: Switch off and
disconnect from the power
supply before any cleaning and
maintenance.
• Before cleaning or maintenance, ensure to
wear proper personal protections (gloves,
glasses, etc. .
• Do not use abrasive cleaning agents as they
may leave harmful residues.
• DO NOT rinse the base unit. Instead just wipe
the outer surface with a damp cloth.
• Empty and clean the drip trays regularly.
• DO NOT wash any parts in a dishwasher.
• DO NOT dry any parts in a conventional or
microwave oven.
• Ensure to carry out any cleaning and
sanitization with utmost care and on a regular
basis to guarantee the quality of the product
dispensed and compliance with mandatory
hygiene standards.
• A POLAR agent or qualified technician should
carry out repairs if required.
DB331_DB332_DB843_UK_A5_v1_20200110.indb 7 2020/1/10 16:39

8
UK
• To carry out easy cleaning and maintenance,
the upper parts of the side protectors can be
removed. When necessary, lift the upper part
to remove. Once done with cleaning, re-locate
the part in place.
Disassembling the tap assembly
1. Disassemble the tap and remove the pin (F)
from its seat to release all the other parts.
2. Wash the parts thoroughly and let them dry.
Removing the bowl
1. Remove the bowl lid.
2. Raise the front part of the bowl to release it.
3. Remove the bowl from its seat by pushing and
tapping lightly on the rear part.
4. Take out the auger. Then remove the seals (A
and B).
5. Clean and sanitize all the dismantled parts
(excluding the lid), following below instructions:
• Wipe the parts with a sponge soaked
with a sanitizer solution.
• Rinse the parts thoroughly with clean
water.
• Soak the parts into the sanitizer solution
for about 30 minutes.
• Wash the parts again with clean water.
• Let dry thoroughly.
DB331_DB332_DB843_UK_A5_v1_20200110.indb 8 2020/1/10 16:39

9
UK
Cleaning the lid
Caution:
• As the lid is equipped with
LED lights, NEVER soak
it in any type of liquid for
cleaning.
• During cleaning, Never
let water or any liquid
come into contact with the
electrical parts of the light.
1. Use a clean damp cloth to wipe clean the
bottom part of the lid.
2. Wipe clean the whole outer part.
3. Sanitize the bottom part with a sponge
previously damped with sanitizer solution..
4. Allow to act for 30 minutes.
5. Wipe the bottom part twice or more with a
clean sponge soaked with clean water.
6. Let the lid dry well.
Caution: NEVER attempt to
clean/sanitizer the lid while it is
installed in the appliance.
Re-assembly
1. Apply the seal (A) onto the auger as shown.
Always ensure to check the
seal integrity. Should it be
worn, replace with a new one
immediately. Replace the seal
(A) at least once a year.
2. Using the Vaseline provided, lubricate the seal
(A) in the area as shown.
3. Apply the seal (B), lubricating the entire
surface as indicated by the arrows.
DB331_DB332_DB843_UK_A5_v1_20200110.indb 9 2020/1/10 16:39

10
UK
4. Introduce the auger, engaging head (C) with
shaft (D). If necessary, rotate the auger to
engage it.
5. Setting the bowl back in place: Slightly
raise head (C) of the auger so that it meets the
seat (E) provided in the bowl.
6. Press the bowl downward until it get engaged
as shown.
7. To refit the tap assembly, follow below
instructions:
• Using the vaseline provided, adequately
lubricate the cap (Y), and refit the
components.
• Introduce the pin (F) while keeping the
tap lever steady.
Always ensure to lubricate the
cap. Otherwise, product leakage
from the tap may occur.
Rinsing cycle
Caution: After re-assembly and
before re-starting the appliance
for serving, make sure to carry
out the rinsing cycle.
1. Fill the bowl with clean water.
2. Run the cleaning mode. For details, please
see Section “To simply clean the desired
bowl”.
3. Turn off the appliance. Then empty the bowl.
Replacing the light bulb
Light bulb replacement should be carried out only
by professional technician. For details, please refer
to our service manual available online.
Cleaning the condenser
Periodically cleaning the condenser can extend the
life of the appliance.
POLAR recommend that a POLAR agent or qualified
technician should clean the condenser.
DB331_DB332_DB843_UK_A5_v1_20200110.indb 10 2020/1/10 16:39

11
UK
Troubleshooting
If your Drinks Dispenser develops a fault, please check the following points before making a call to the
Helpline.
Fault Probable Cause Solution
The appliance is not
working
The appliance is not switched on Check the appliance is plugged in correctly
and switched on
Plug and lead are damaged Call POLAR agent or qualified Technician
Fuse in the plug has blown Replace the fuse
Power supply Check power supply
Internal wiring fault Call POLAR agent or qualified Technician
The dispenser is not
cooling
Coolant leak Call POLAR agent or qualified technician
Fan motor failed Call POLAR agent or qualified technician
Airflow obstructed to the
condenser
Increase the gap between appliance and
obstacles/heat source
Tap leaks Tap piston not lubricated well Lubricate the tap piston
Tap piston is defective Replace the Tap piston
Product leaks from the
back of the bowl
Bowl not fitted correctly Check the positioning of the bowl
Bowl seal not lubricated well Lubricate the bowl seal
Bowl seal is defective Replace the Bowl seal
Loud noises Front seal is not applied correctly Put the seal correctly
Seal not lubricated well Lubricate the seal
Tap does not distribute Ice blocked inside the bowl Turn off the unit to let ice melt
Technical Specifications
Model Voltage Power
(W)
Current
(A) Bowls Capacity
(litres) Refrigerant
DB331 220-240V~
50Hz
400W 2.1A 1 12 R290 85g
DB331 220-240V~
50Hz
740W 3.5A 2 24 R290 135g
DB843 220-240V~
50Hz
1150W 5.8 3 36 R290 148g
Model Dimensions
H x W x D mm
Weight
(kg) Noise level
DB331 810 x 270 x 515 31.9
<70 dBDB331 810 x 470 x 515 50.7
DB843 810 x 670 x 515 66.2
DB331_DB332_DB843_UK_A5_v1_20200110.indb 11 2020/1/10 16:39

12
UK
Electrical Wiring
POLAR appliances are supplied with a 3 pin BS1363 plug and lead.
The plug is to be connected to a suitable mains socket.
POLAR appliances are wired as follows:
• Live wire (coloured brown) to terminal marked L
• Neutral wire (coloured blue) to terminal marked N
• Earth wire (coloured green/yellow) to terminal marked E
This appliances must be earthed.
If in doubt consult a qualified electrician.
Electrical isolation points must be kept clear of any obstructions. In the event of any emergency
disconnection being required they must be readily accessible.
Disposal
EU regulations require refrigeration product to be disposed of by specialist companies who remove or
recycle all gasses, metal and plastic components.
Consult your local waste collection authority regarding disposal of your appliance. Local authorities are
not obliged to dispose of commercial refrigeration equipment but may be able to offer advice on how to
dispose of the equipment locally.
Alternatively call the POLAR helpline for details of national disposal companies within the EU.
Compliance
The WEEE logo on this product or its documentation indicates that the product must
not be disposed of as household waste. To help prevent possible harm to human
health and/or the environment, the product must be disposed of in an approved and
environmentally safe recycling process. For further information on how to dispose of
this product correctly, contact the product supplier, or the local authority responsible for
waste disposal in your area.
POLAR parts have undergone strict product testing in order to comply with regulatory
standards and specifications set by international, independent, and federal authorities.
POLAR products have been approved to carry the following symbol:
All rights reserved. No part of these instructions may be produced or transmitted in any form or by any means, electronic,
mechanical, photocopying, recording or otherwise, without the prior written permission of POLAR.
Every effort is made to ensure all details are correct at the time of going to press, however, POLAR reserve the right to
change specifications without notice.
DB331_DB332_DB843_UK_A5_v1_20200110.indb 12 2020/1/10 16:39

DECLARATION OF CONFORMITY
• Conformiteitsverklaring • Déclaration de conformité • Konformitätserklärung • Dichiarazione di conformità •
• Declaración de conformidad • Declaração de conformidade
Equipment Type • Uitrustingstype • Type d'équipement • Gerätetyp •
Tipo di apparecchiatura • Tipo de equipo • Tipo de equipamento
Slush Machine 1 x 12L Bowl
Slush Machine 2 x 12L Bowl
Slush Machine 3 x 12L Bowl
Model • Modèle • Modell • Modello • Modelo • Malli
DB331
DB332
DB843
Application of Council Directives(s)
Toepassing van Europese Richtlijn(en) • Application de la/des
directive(s) du Conseil • Anwendbare EU-Richtlinie(n) • Applicazione
delle Direttive • Aplicación de la(s) directiva(s) del consejo • Aplicação
de directiva(s) do Conselho
Machinery Directive 2006/42/EC
EN 60335-1:2012 +A11:2014 +A13:2017
EN 60335-2-75:2004 +A1:2005 +A11:2006 +A2:2008
+A12:2010
EN 62233:2008
Electro-Magnetic Compatibility (EMC) Directive
2014/30/EU
EN 55014-1:2017
EN 55014-2:2015
EN 61000-3-3:2013
EN 61000-3-2:2014
Restriction of Hazardous Substances Directive
(RoHS) 2015/863 amending Annex II to Directive
2011/65/EU
Producer Name • Naam fabrikant • Nom du producteur • Name des
Herstellers • Nome del produttore • Nombre del fabricante • Nome do
fabricante
Polar
Producer Address • Adres fabrikant • Adresse du producteur •
Anschrift des Herstellers • Indirizzo del produttore • Dirección del
fabricante • Morada do fabricante
Fourth Way,
Avonmouth,
Bristol,
BS11 8TB
United Kingdom
42 North Point Business
Park
New Mallow Road
Cork
Ireland
I, the undersigned, hereby declare that the equipment specified above conforms to the above Directive(s) and Standard(s).
Ik, de ondergetekende, verklaar hierbij dat de hierboven gespecificeerde uitrusting goedgekeurd is volgens de bovenstaande
Richtlijn(en) en Standaard(en).
Je soussigné, confirme la conformité de l'équipement cité dans la présente à la / aux Directive(s) et Norme(s) ci-dessus
Ich, der/die Unterzeichnende, erkläre hiermit, dass das oben angegebene Gerät der/den oben angeführten Richtlinie(n) und Norm(en)
entspricht.
Il sottoscritto dichiara che l'apparecchiatura di sopra specificata è conforme alle Direttive e agli Standard sopra riportati.
El abajo firmante declara por la presente que el equipo arriba especificado está en conformidad con la(s) directiva(s) y estándar(es)
arriba mencionadas.
Eu, o abaixo-assinado, declaro que o equipamento anteriormente especificado está em conformidade com a(s) anterior(es) Directiva(s)
e Norma(s)
Date • Data • Date • Datum • Data • Fecha • Data
4th December 2019
Signature • Handtekening • Signature • Unterschrift
Firma • Firma • Assinatura
Full Name • Volledige naam • Nom et prénom • Vollständiger Name •
Nome completo • Nombre completo • Nome por extenso
Ashley Hooper
Position • Functie • Fonction • Position • Qualifica • Posición • Função
Technical & Quality Manager
DB331_DB332_DB843_UK_A5_v1_20200110.indb 13 2020/1/10 16:39

UK 0845 146 2887
NL 0800 – 29 1 29
040 – 2628080
FR 0800 - 29 2 29
01 60 34 28 80
DE 0800 – 1860806
IT N/A
ES 901-100 133
DB331_DB332_DB843_UK_A5_v1_20200110.indb 14 2020/1/10 16:39

DB331_DB332_DB843_UK_A5_v1_20200110.indb 15 2020/1/10 16:39

DB331_DB332_DB843_UK_A5_v1_20200110
http://www.polar-refrigerator.com/
DB331_DB332_DB843_UK_A5_v1_20200110.indb 16 2020/1/10 16:39
This manual suits for next models
2
Table of contents
Other Polar Electro Beverage Dispenser manuals
Popular Beverage Dispenser manuals by other brands

By The Glass
By The Glass Standard Series Instructions for use

Cornelius
Cornelius ENDURO-150 6 VALVE Operator's manual

Marco
Marco 1000831 Service manual

Cornelius
Cornelius MILLENNIUM MJ30-4 PB Installation and service manual

Danby
Danby Designer Chill'n Tap DKC645BLS owner's manual

Crathco
Crathco Simplicity CS-2E-16 Operator's manual