poly-planar MRD87i IPX6 User manual

OWNER’S MANUAL
MRD87i IPX6 Marine Radio
Poly-Planar IPX6 Marine Grade digital media entertainment
system with ultimate audio 4X45 sound.
• SiriusXM-Ready™(SiruisXM Connect Tuner and Subscription required)
• Made For iPhone®/iPod®
• Bluetooth
• USB music player & USB charger
• SD card reader
• AM/FM digital tuner
• NOAA weather band
• USB and 3.5mm aux input inside drawer/dock
• Front and rear RCA line out
• NMEA 2000® certified
• Remote control interface
Disclaimer
•Sirius,XM and all related marks and logos are trademarks of Sirius XM Radio Inc. All rights reserved.
•iPad, iPhone, iPod, iPod classic, iPod nano, iPod touch, and Retina are trademarks of Apple Inc., registered in the U.S. and
other countries. iPad Air, iPad mini, and Lightning are trademarks of Apple Inc
Version 5.0

2
TA B L E O F C O N T E N T S
Installation
3
Wiring Diagram
5
Button Description
7
Basic Operation
8
Radio Operation
10
SiriusXM® Operation
10
iPod®/iPone® Operation
21
Bluetooth Operation
21
Auxiliary Operation
22
USB Operation
22
SD Card Operation
24
Compatible Accessories
26
Troubleshooting
27
Technical Specifications
29
Warranty Information
30
Warranty Registration
33

3
I N S TA L L AT I O N
IMPORTANT! Before mounting be sure there is sufficient room to
accommodate the unit and that there is sufficient ventilation.
Before installing the unit, connect the wiring temporarily making sure
the system works properly.
Only use the parts included with the unit to ensure proper installation.
Avoid installing the unit where it would be subject to high temperatures
such as direct sunlight or hot air from heaters or the engine or where it
would be subject to dust, dirt or excessive vibration.
Use the template provided to make the cutout.
With the front panel down insert the 4 provided screws. Use the 5mm
nut and bracket provided to stabilize the rear of the radio.
Be sure to mount the unit to a strong, solid surface which will not give
way under the stress of waves pounding the hull.

4
Optional Mounting Techniques
Optional gimbal mount
bracket installation
Model # GM-MRD80
Optional Overhead / Under
Dash mount installation
Model # RM-10

5
W I R I N G D I A G R AM
…
Wiring Details:
Use the wired plug end (Pigtail) provided to make power and speaker
connections according to the diagram below. Using this connector will
make it easy to disconnect the radio for adding additional features or
service. Removing the factory plug end will void warranty.
SiriusXM® Tuner
(Tuner and Subscription sold separately)
MR45R (Blue)

6
Wire Color Function
Yellow 1 B+ (+12VDC)
Green w/stripe 2 Rear Left Speaker-
Green 3 Rear Left Speaker+
Red 4 ACC (+12VDC)
White w/stripe 5 Front Left Speaker-
White 6 Front Left Speaker+
Blue 7 Relay Trigger
Gray w/stripe 8 Front Right Speaker-
Gray 9 Front Right Speaker+
Black 10 Ground (Neg)
Violet w/stripe 11 Rear Right Speaker-
Violet 12 Rear Right Speaker+
Power Wire Specifications:
Yellow Wire - Connect this wire to a constant +12V source.
Red Wire - Connect this wire to a switched +12V source such as an ignition
or accessory switch. (Must be connected to +12V source for unit to
operate.)
Black Wire - Connect this wire to the negative battery terminal or other
good power ground.
Blue Wire - This wire outputs a 12V signal when the MRD87i turns on. It is
used to remotely turn on external amplifiers.
Notes:
•Use the included plug/wire bundle to connect to the power source
and speakers.

7
B U T T O N D E S C R I PT I O N
•The Yellow, Red and Black power wires should be 14AWG or larger
depending on the length to the battery. NEVER operate the unit
without the proper power and ground wire.
•NEVER ground the speaker leads and NEVER allow the speaker
leads to come in contact with each other. The speaker wire should
be at least 16 gauge or larger. Be sure to observe the correct
polarity on the speaker connections
•Use quality crimp connectors to connect wires together. Seal the
connection well with electrical tape.
•NEVER operate the unit without proper fusing. Fuse holder must be
located within 2 feet from the battery. This fuse is to protect the
vessel, not the electronics. In case of a short, the fuse will blow
instead of the wire burning up. Using other than the recommended
fuse ratings at the battery and at the unit may cause damage to the
unit and will void your warranty.
•Whenever possible, use cable ties, mounting clamps and similar
wiring aids. Adding stress relief loop to wiring is also advisable to
prevent straining or breakage.
•If after reading the directions you feel uncomfortable about installing
the unit, or not equipped or competent to do so, you should have
this installed by a professional installer

8
BAS I C O P E R AT I O N
1. Volume UP/DOWN Knob
2. - Power Button
3. IR Receiver
4. Front Panel Latch Button
5. LCD Display
6. MODE - Mode Button
7. BAND –Band Button
8. /–Control Button
9. MUTE –Mute Button
10. MENU/DISP –Menu/Display Button
11. 1/INTRO - Preset 1/Scan Button
12. 2/RANDOM - Preset 2/Random Button
13. 3/REPEAT - Preset 3/Repeat Button
14. 4/ - Preset 4/(Play/Pause) Button
15. 5/ - Preset 5/Folder down (optional)
16. 6/ - Preset 6/Folder up (optional)
17. SCAN- Scan Button
18. Live Functions/Select Knob
19. AS/PS - Auto Store and Preset Scan Button
20. SD Card Slot
21. DMD Drawer
23. RESET
SWITCHING ON/OFF THE UNIT
Press button to turn on the unit. Press and hold button for 4 sec
to turn off the unit
OPENING THE FRONT PANEL
Place thumb on the front panel latch button. Firmly depress the button
while pulling the front panel open. Keep door firmly closed except when
accessing inside drawer.
ADJUSTING THE AUDIO LEVELS
Press Volume knob to enter audio level menu
then use the Volume Knob to adjust to your desired setting. Press
Volume knob again to select different functions. Unit will return to normal
previous display if left untouched for 5 seconds.
RSpker (Rear Speaker) –can be set to either full range or low

9
pass full range for conventional speaker power or low pass for
MS56 subwoofer
RLineOut (Rear Line Out) –can be set to variable or fixed as
required by amplifier
EQUALIZER SETTING
Press volume knob repeatedly until EQUALIZER menu appears then
rotate the volume knob to select EQUALIZER setting selection.
Current Equalizer Preset Chart below. Choose one that sounds best with
your speakers:
To customize your own EQUALIZER setting, please press volume knob
repeatedly until EQUALIZER menu appears then rotate the volume knob
to locate “CUSTOM EQ” then press the volume knob to enter your own
setting. You can set each EQ Band by rotating the volume knob left or
right from -10 to +10 scale
MODE SELECTION
Press MODE button to choose desired listening mode. (e.g. Radio mode to
USB mode to AUX IN mode… etc.)
MUTE
Press MUTE button to mute the sound. Press again to return to previous
volume level.
DIMMER CONTROL
Press and hold MENU button for 3 seconds to display current setting.
Then use the Volume Knob to adjust to different setting.

10
R A D I O O P E R AT I O N
Note: Firmware version level will also be displayed
RESET FUNCTION
Open front panel to display reset button. Use a ballpoint pen to press the
reset button. The reset function is used in the following situations:
- All the function buttons do not operate.
- Error sign on the display.
FACTORY DEFAULT RESET
Press and hold MENU button for 3 seconds to access DIMMER CONTROL
then press MENU and AS/PS button simultaneously to reset factory default
settings. A warning screen will appear –press the Select knob to confirm
and MENU button to cancel.
SWITCHING TO RADIO MODE
Press MODE button to select radio mode.
SELECTING THE FREQUENCY BAND
In radio mode, press BAND button to locate the desired band. The
reception band will change in the following order:
FM1 FM2 FM3 AM1 AM2 WeatherBand
SELECTING STATION
Press /button to select a station. To do manual tuning use
Function/Select knob.
AUTOMATIC MEMORY STORING & PRESET SCAN (AS/PS)
The PRESET buttons can be used to store 6 stations in each band (FM 1,
FM 2, FM 3 and AM1, AM2) for convenient access to your favorite stations.
Automatic Storing
Press AS/PS button, the radio searches and checks the signal strength
until one cycle search is finished then the strongest stations are stored into
the corresponding preset number button automatically.
Manual Storing
1. Select the desired band.
2. Select the station you want to store in memory, then press and hold one
of the preset buttons for 3 seconds until the corresponding preset button
number appears.

11
S i r i u s X M ® O P ER AT I O N
3. Repeat steps 1 and 2 to program additional stations.
SCAN FUNCTION
Press SCAN button to scan a station. The unit will keep on scanning
every 7 seconds until you press the SCAN button again to stop scan
function.
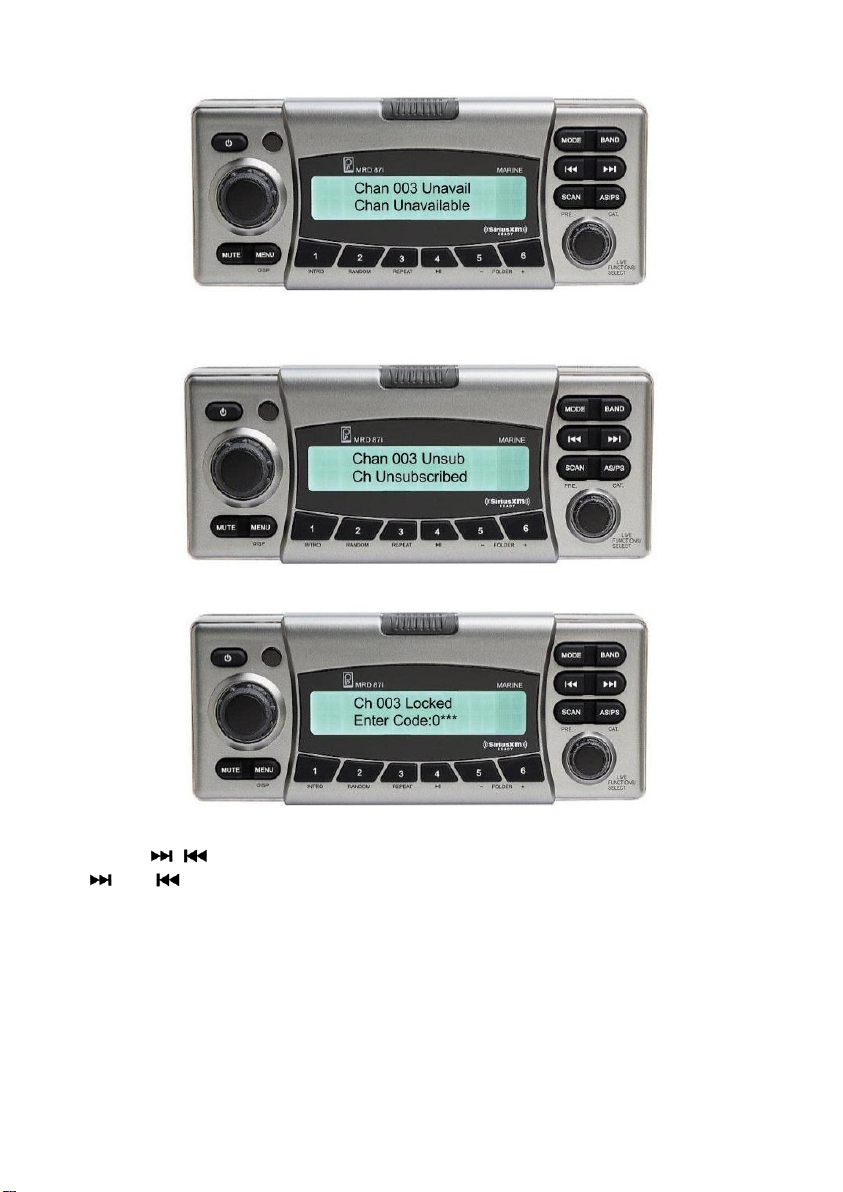
Please Note: You need SiriusXM® Tuner (sold separately) and you
must activate your SiriusXM® Tuner before you can begin to receive
the SiriusXM® service.
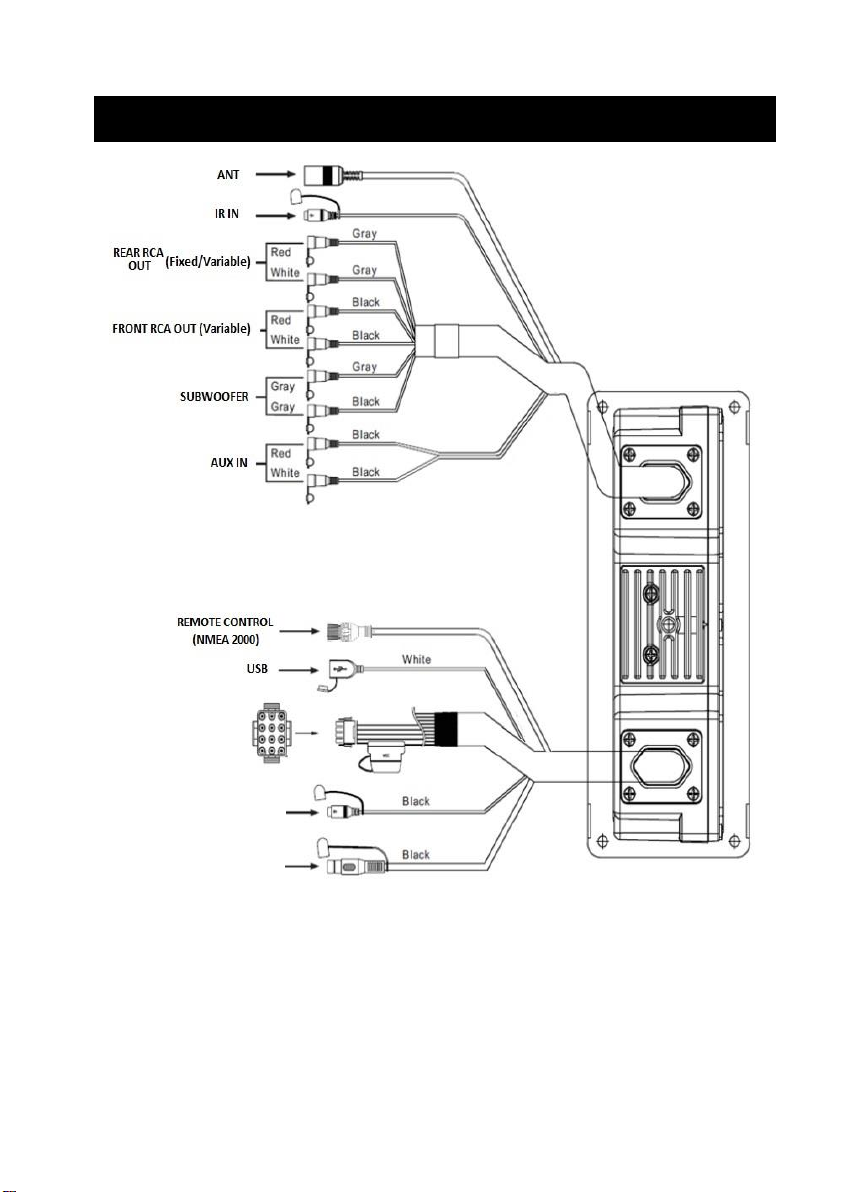
Please connect your SiriusXM® Tuner to the SiriusXM® Tuner port located
at the back of the unit.
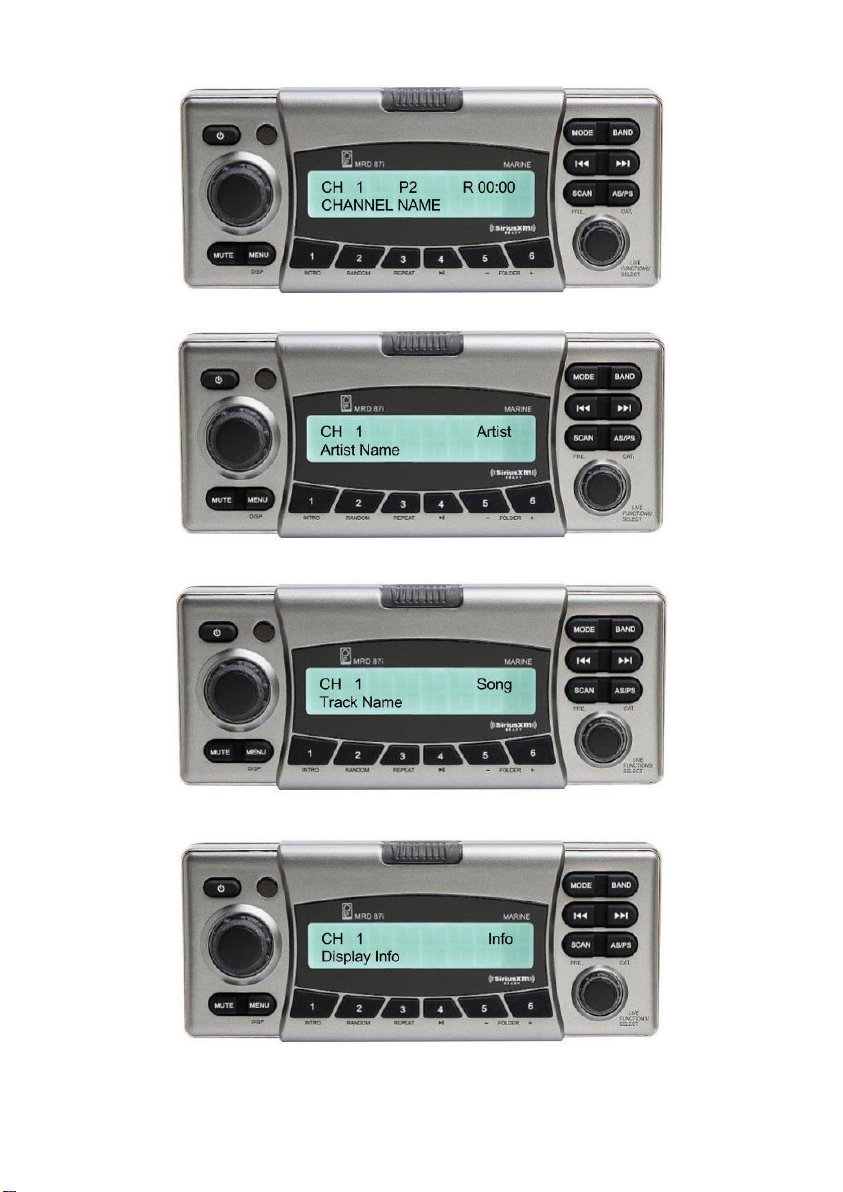
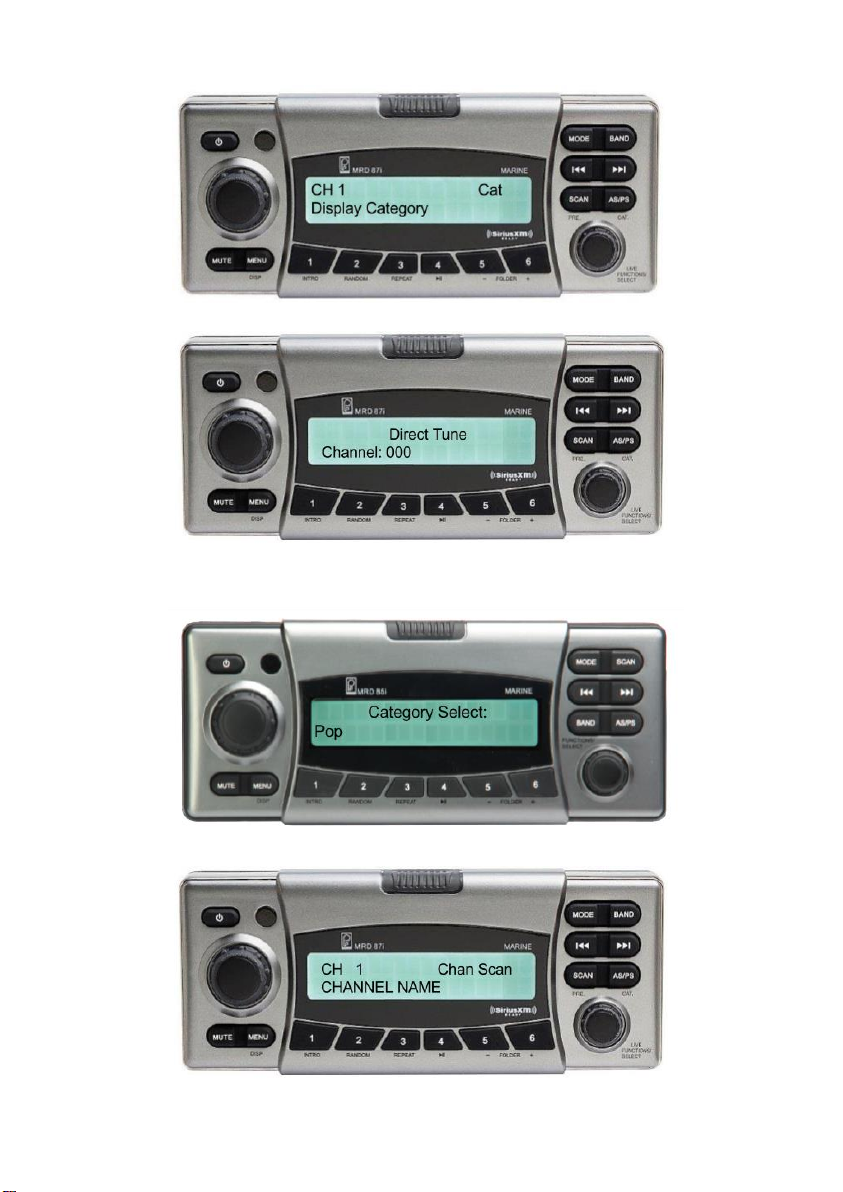
After installing your SiriusXM® Tuner and antenna, power on your radio and
then press MODE button to change to SiriusXM® mode. You should be
able to hear the SiriusXM® preview channel on Channel 1. If you cannot
hear the preview channels, please check the installation instructions to
make sure your SiriusXM® Tuner is properly installed.
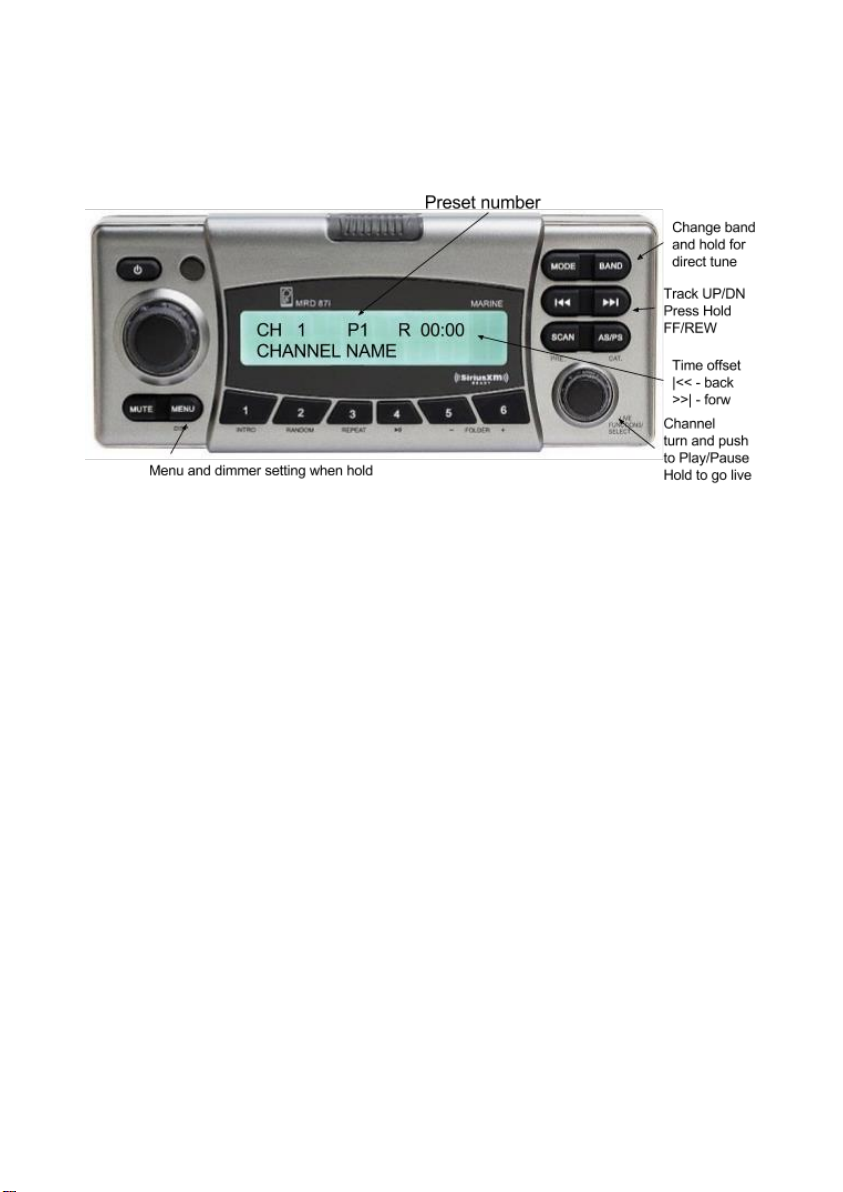
After you can hear the Preview channel, tune to Channel 0 to find the Radio
ID of your tuner. In addition, the Radio ID is located on the bottom of the
SiriusXM® Tuner and its’ packaging. You will need this number to activate
your subscription. Write the number down for reference.
Note: the SiriusXM® Radio ID does not include the letters I, O, S or F.
In the USA, you can activate online or by calling SiriusXM® Listener care:
• Visit www.siriusxm.com/activatenow
• Call SiriusXM® Listener Care at 1-‐866-‐635-‐2349
For Canadian Subscriptions, please contact:
• Visit www.siriusxm.ca/activatexm
• Call XM customer Care at 1-‐877-‐438-‐9677
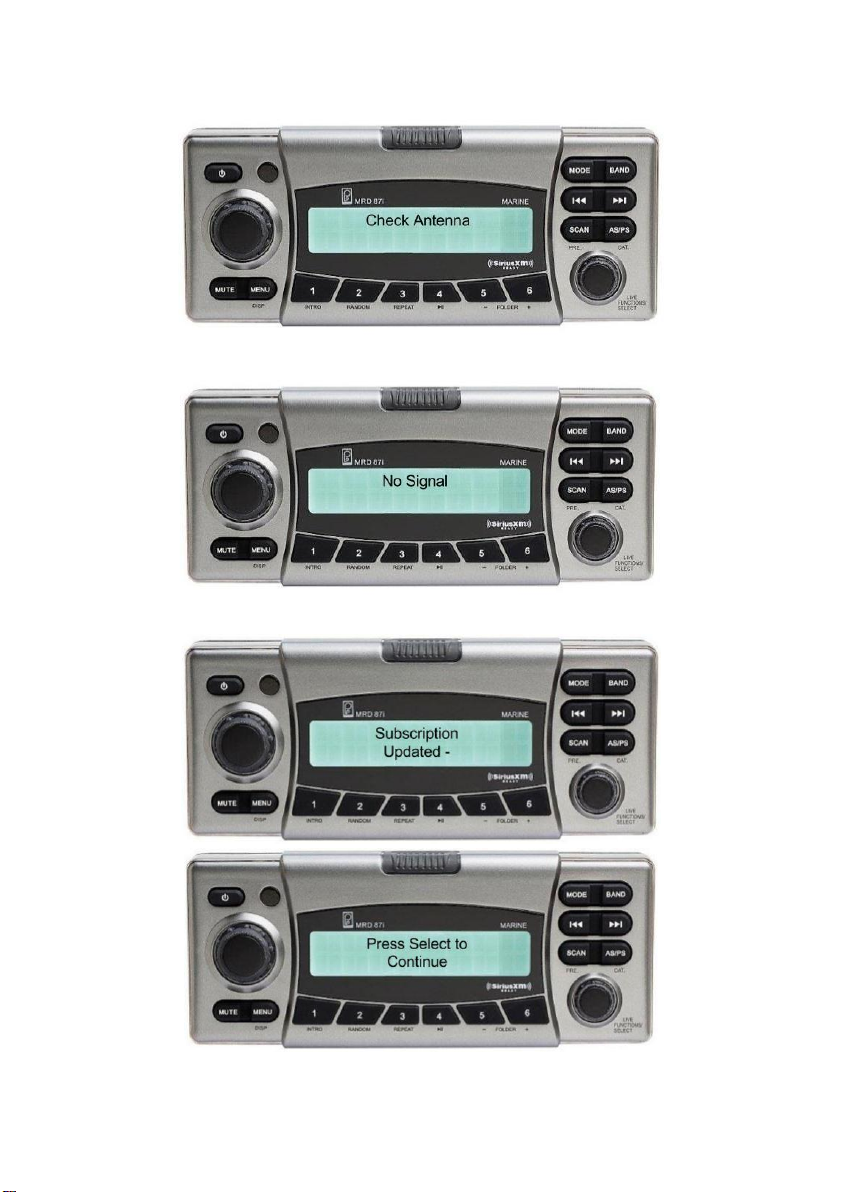
As part of the activation process, the SiriusXM® satellites will send an
activation message to your tuner. When your radio detects that the tuner
has received the activation message, your radio will display: “Subscription
Updated”. Once subscribed, you can tune to channels in your subscription
plan. Note, the activation process usually takes 10 to 15 minutes, but may
take up to an hour. Your radio will need to be powered on and receiving the
SiriusXM® signal to receive the activation message.

12
Some button functions are different when in SiriusXM® mode:
Faceplate button function assignments
SiriusXm® Function of buttons:
Live - push to Play/Pause, hold to return to Live play
|<< - Track Back (Replay Function), hold to Rewind
>>| - TrackUp or Live if is playing last track, hold to Fast Forward
ASPS - Display (change displaying info Ch#/Name -> Artist -> Track ->
Content - Category
Scan - push to scan all channels, hold to scan channels in current
category
Band - push to change band, hold for Direct Tune
But 1-6 - Presets. Push - tune to preset, hold - save preset.
Mute - Audio Mute
Menu - push to enter Menu, hold to enter dimmer settings. In menu
navigate with right encoder, select by pushing it. Press menu
again to return to main screen.
SiriusXM® Mode:
Initial Channel screen (Channel Number, Preset, Time Offset and Channel
Name)

13
Press AS/PS to change metadata to Artist
Press AS/PS to change metadata to Song
Press AS/PS to change metadata to Info
Press AS/PS to change metadata to Category

14
Press and hold BAND for Direct Tune then use the Function/Select Knob to select the digits
Press and hold AS/PS to select category, use Function/Select Knob to navigate category
then press Function/Select Knob to enter in selected category and browse channels using
Function/Select Knob
Press SCAN to scan all channels

15
Press and hold SCAN to scan channels in current category
Press MENU to enter then use Function/Select Knob to navigate through the available 5
options: New Password, Lock, Unlock All Ch and Signal Strength.

16
To enter password, rotate Function/Select Knob to the left to change current digit then push
to go to next digit
If password is wrong, there is a Wrong password warning
ADVISORY MESSAGES:
Check tuner advisory message

17
Check antenna advisory message
No signal advisory message
Subscription update advisory message
Channel unavailable advisory message

18
Channel unsubscribed advisory message
Channel locked advisory message
SELECTING A TRACK
Press /button to select a track in Replay buffer. Press and Hold
or button to go faster.
HOW TO DIRECT TUNE
Press and hold AS/PS button “Select: 000” will show on the display.
Rotate FUNCTION/SELECT knob to change current digit, push to go to
next digit. When finished, press FUNCTION/SELECT knob to confirm and
play.
Example:
- If you want to search channel number 151, rotate left encoder to get 1,

19
then push left encoder to go to next digit and rotate to get 5, then push left
encoder again and rotate to get 1.
- Press FUNCTION/SELECT knob to confirm and play.
SELECT A CHANNEL BY CATEGORY
Press and hold AS/PS button to enter category selection menu. Use the
FUNCTION/SELECT knob to navigate to all the categories available then
when done selecting a category press FUNCTION/SELECT knob once to
confirm. The unit will only play the selected category channels until you go
back in category select menu and select “All channels” category.
SELECTING THE FREQUENCY BAND
In SiriusXM® mode, press BAND button to locate the desired band. The
reception band will change in the following order:
S1 S2 S3
AUTOMATIC MEMORY STORING
The PRESET buttons can be used to store 6 channels in each band (S1,
S2 and S3) for convenient access to your favorite channels.
1. Select the desired band.
2. Select the channel you want to store in memory, then press and hold one
of the preset buttons for 3 seconds until the corresponding preset button
number appears.
3. Repeat steps 1 and 2 to program additional channels.
PARENTAL CONTROL
You can lock any SiriusXM® channels you do not want others to have
access without your permission. The default code is "0000". In case you
forget your code please perform FACTORY DEFAULT RESET.
- GUIDE ON HOW TO ENTER THE CODE USING THE
FUNCTION/SELECT KNOB
Rotate FUNCTION/SELECT knob to enter first digit, push
FUNCTION/SELECT knob once and rotate to enter second digit, press
FUNCTION/SELECT knob to enter third digit and push
FUNCTION/SELECT knob again and rotate to enter last digit. When done,
press FUNCTION/SELECT knob to confirm.
- TO LOCK A CHANNEL
Select a channel that you wish to lock then enter in menu and select “Lock
Channel”. Enter the code then press FUNCTION/SELECT knob to
confirm.

20
i P o d ® / i P h o n e ® O P E R AT I O N
- TO UNLOCK A CHANNEL
Tune to desired locked channel by entering the correct password. Then
press MENU button to enter in the menu and select “Unlock Channel” then
enter code again to permanently unlock channel.
- TO UNLOCK ALL LOCKED CHANNEL
Enter in menu and select “Unlock All Ch”. You will be prompted to enter the
code. After entering the code all channels will be unlocked
- TO EXIT RESTRICTED MODE
Press BAND button to manually enter the channel you wish to unlock then
press FUNCTION/SELECT knob. Enter the code then press
FUNCTION/SELECT knob to confirm. Now you can access all locked
channels without entering password until shutdown the unit.
- TO CHANGE THE CODE
Enter in menu and select “New Code” “Enter Code” will show on the display.
Enter the old code then press FUNCTION/SELECT knob to confirm “New
Code” will show on the display. Enter your new code then press
FUNCTION/SELECT knob again “Repeat Code” will show on the display.
Repeat the code and press FUNCTION/SELECT knob to confirm.
- TO RESET SIRIUS FACTORY DEFAULT SETTINGS
Press Menu button and select “Factory Default” then enter parental control
code to confirm. If you forget parental control code, please use FACTORY
DEFAULT RESET to reset radio.
DISPLAY INFORMATION
Press AS/PS button to change current displayed info on display. You can
rotate through Channel Info, Artist Info, Track Info, Content info, Category
info.
SWITCHING TO iPod®/iPhone® MODE
If a device is already connected:
Press MODE button to change to iPod®/iPhone® mode.
If there is no device connected the display will show “No Device”please
follow instructions below on how to connect your devices
Turn on your DMD device then open the front panel to connect the
accessory cable to the connector on the right side of the device drawer then
Table of contents
Other poly-planar Marine Radio manuals
Popular Marine Radio manuals by other brands

Rhotheta
Rhotheta RT-1000 Maintenance manual

Honeywell
Honeywell ESSER IQ8FCT Installation instruction

Funkwerk
Funkwerk TRT800H-OLED Operation and installation

Lowrance
Lowrance LVR-850 Installation and operation instructions

Garmin
Garmin VHF 110 AIS series installation instructions

MicroAir Avionics
MicroAir Avionics T2000ADSB user manual