Polyend Tracker User manual

I
The Tracker Notebook : Reference & Guide
Polyend
Tracker
Manual
An Ofcial Reference for The Polyend Tracker

The Polyend Tracker is a modern hardware
implementation of a classic software music
application. Trackers emerged in the late 80’s
as music making tools mainly on gaming
machines. Later in the early 90’s Trackers also
became popular on personal computers. A
Tracker is a utility that assembles a linear
series of notes that typically triggers samples
and associated parameters. Unlike standard
digital audio workstations (DAW’s), Trackers
generally run top to bottom when playing
tracks. Trackers usually had a niche community
of followers and never reached the same height
of popularity as other DAW’s. Polyend Tracker
goes a long way to reignite interest and
presents the composition features of a Tracker
in a modern and user friendly way. Don't be
fooled by this quirky programming style of
music making which may appear unusual, but
does provide a very powerful and creative
approach to production. Polyend Tracker
presents this vintage application in a modern
and stylish box with 8 sequenced tracks and a
variety of effects, MIDI and Audio In / Out and
multiple workow environments. With a small
form factor and low energy usage Tracker is an
ideal portable ‘all in one’ workstation. The feature
set is wide with some interestingly creative and
unexpected elements such as retro games and a
radio. Tracker isn't a particularly difcult
instrument to use but the unusual and less
familiar core concept and workow may mean
that getting started is a little confusing and the
learning curve drawn out. This may be a different
twist on music production but hey, that’s what
makes it fun. This guide aims to help with the
speed up of learning and also to get the very best
from the device. As always the Synthdawg
notebook style allows for your notes to be added
and to make the guidebook personal for you. The
Tracker journey is unusual, yet fun and at the
same time a powerful music making unit giving
some rewarding results. Enjoy.
Overview
5
Polyend Tracker Manual
IV Polyend Tracker Manual
1

Overview1
7
Polyend Tracker Manual
6Polyend Tracker Manual
Overview
1
Out Line In Mic MIDI Out MIDI In Micro SD USB Power
On / Off
Switch
Reset
Switch
USB Power Input
USB-C to USB-A Cable Supplied
3.5mm Stereo
Audio Input &
Output
Stereo audio output also serves as headphone out.
3.5mm MIDI
Input & Output Micro SD Card Slot.
Pins face down.
16GB Micro SD Card Supplied
3.5mm Male Stereo TRS Jack
to 2 x 6.3mm TR Mono Female
adapter supplied.
Micro SD Card to USB-A
adapter supplied.
Input is TR Mono and output
TRS Stereo, also supports
headphones.
Supply is 5V, 1A so can use
the supplied mains to USB or a
battery power bank.
3.5mm Jack to 5 Pin MIDI
adapter (type B) supplied
1.1 How to Use This Notebook
This book combines a formal reference alongside your own notes and
comments, collectively bringing together a comprehensive guide to Tracker.
Sections are laid out to cover the full workow with walkthroughs, step by
step guides and tips. Some pages carry a wide margin and some are
intentionally blank enabling you to make your own notes.
Control conventions.
(Jog)
Rounded parentheses represent the large single rotary control jog wheel.
Selected functions can be navigated or changed depending on the context.
[Function]
Square parentheses contain functions that are selectable by a physically
dedicated button - either as a primary or secondary function. Examples are
[Rec], [Play]. The arrow symbol buttons will be represented by [Left],
[Right], [Up], [Down] text.
[Function] + [Option]
Functions which require multiple button selections simultaneously are
shown with a + symbol between each required button. An example is the
[Shift] + [Copy/Paste] command.
[PAD]
Each of the 48 pad buttons will be simply represented by [PAD]. These
functions will depend on the mode and function selected.
[Dynamic Screen Key]
The 8 dynamic screen buttons located under the display will be written in
this book using italic text. The actual function that each button serves will
change depending on the current context. The function it serves will be
labelled on the screen above each button on the device. Currently
unavailable options will show on the tracker screen as dimmed text. An
example is [Create Project].
1.2 Hardware Overview
Your Notes Can be written here Here
Did you know?
Music trackers emerged
in the late 1980’s on
gaming computers?
282 mm
207 mm
33 mm
NOTES

9
Polyend Tracker Manual
8Polyend Tracker Manual
LCD Display
7 Inch, LCD TFT 800 x 480 Display.
Screen Buttons
Dynamic [Screen buttons] are dependant on the
function displayed above each button.
Grid Pads
4 x 12 grid of silicon multifunctional [PADS].
Dedicated Note Button
Selection of the [Note] element of a step.
Jog Wheel
Rotary (Jog) wheel used for navigation and
parameter adjustment.
Dedicated Instrument Button
Selection of the [Instrument] for a step.
Dedicated FX1 Button
Effect selection for [FX1] of a step.
Instrument Parameter Button
Opens the [Instrument Parameter] options.
Cong Button
Opens the [Cong] options.
Play Button
Plays when pressing [Play] the pattern or song. Pressing
again stops playback. Play again restarts.
Insert / Home Button
Pressing [Insert/Home] will insert. Pressing [Shift] +
[Insert/Home] will return ‘home’, to the top of the pattern.
Rec Button
Pressing [Rec] will toggle the record mode on or off for
editing patterns and perform settings.
Navigation Buttons
Four navigation buttons [Up], [Down], [Left], [Right]. Used
to manoeuvre through menus and options.
Dedicated Pattern Button
[Pattern] mode / page selection.
Sample Loader Button
[Sample Loader] opens browser for
sample selection.
Sample Playback Button
[Sample Playback] opens playback
option menu.
Sample Editor Button
[Sample Editor] opens editor options.
Sample Recorder Button
[Sample Recorder] mode / page
selection.
Song Mode Button
[Song] mode / page selection.
Dedicated FX2 Button
Effect selection for [FX2] of a step.
Perform Mode Button
Selects the [Perform] mode / page. File Button
Selects the [File] management options.
Master Button
Selects the [Master] mode / page containing master
effects and the mixer functions.
Copy / Paste Button
Pressing [Copy/Paste] will copy the selected item.
[Shift] + [Copy/Paste] will paste any copied item.
Delete / Backspace Button
Pressing [Delete/Backspace] will reset or step back.
[Shift] + [Delete/Backspace] will delete the selected item.
Shift Button
Pressing [Shift] + Another button will select its
secondary function.
Note that while the screen brightness is adjustable, the
command buttons are not backlit which may be an issue in dark
environments and during live gigs and performances.
Overview1
Overview
1
Instrument
Parameters
Sample
Loader
Note
Play
Rec
Master
Song
Pattern
Backspace
Delete
File
Sample
Editor
FX1
Insert
Home
Perform
Sample
Playback
Instrument
Copy
Paste
Shift
Config
Sample
Recorder
FX2
1
4
5
10
15
20
24
5
7
15
16
18
20
24
22
26
9
10
11
12
13
14
6
11
16
21
25
7
12
17
22
8
13
18
26
9
14
19
23
8
17
19
21
23
25
6
4
2
2
3
3
1NOTES 1.3 Start Up
Tracker is a low power user and can therefore be powered from the
supplied mains USB adapter or from a rechargeable battery power bank.
When restarting Tracker the previously open project will be be re-opened
▌ POWERING ON / OFF TRACKER
1. Connect the supplied USB-C Mains cable between Tracker and the
supplied USB plug. Also Tracker can operate with a portable USB
power bank*. Tracker uses a 5V, 1A rated supply.
2. Ensure the SD Card is installed correctly for Tracker to operate.
3. Quickly press the small power button located on the rear left (looking
from the top). Tracker will start up and the previous project reopened.
4. To power off, press and hold the small power button located on the rear
left (looking from the top) until the timer bar ends. Tracker will power off.
Supply is 5V, 1A from the supplied mains to USB adapter.
Alternatively use a battery power bank.
Start up instantaneous current is approx 1.2A with normal state around 0.5A
* It is recommended by Polyend to use a standard power bank without smart
features. Intelligent / smart power banks or PC / Mac power may have features
that interfere with the continuous supply required by Tracker. USC - C to USB - B
cable supplied. USB - C to USB - C is usable on later Tracker models.

11
Polyend Tracker Manual
10 Polyend Tracker Manual
1.4 First Steps with Factory Projects.
At rst glance, operation of Tracker appears unusual. However the
workow is quite simple once a few fundamentals are clearly understood.
The quick start button commands shown here can be applied with the
factory projects to get familiar with the essential processes to help speed
up the learning curve. Ensure the SD Card is installed.
▌ OPENING A PROJECT
1. When powering on the previous project will be restored. Projects can be
changed or new ones created. Tracker has a maximum 100 Projects
visible and accessible from the SD Card.
2. Press [File] to open the le browser.
3. Press [Open] - 2nd screen button from left. The list of available projects
will be displayed on the screen.
4. Turn (Jog) or Press [Up] or [Down] to navigate the list of project options.
Also press [Up] - 1st screen button or [Down] - 2nd screen button to scroll
the list selection. The highlighted option will show with a bounding box.
5. With the desired project highlighted, Press [Open] - 8th / last screen
button.
6. If the currently active project has been edited a prompt ‘Do you want to
save the changes to ‘xxxx’’ will be presented. Press [Save] - 8th / last
screen button to save or [Don’t Save] - 7th screen button from left to
proceed without saving.
7. Although not essential, it is usually good practice to display the pattern
page at this stage. If required, Press [Pattern] to display pattern page.
▌ ADJUSTING THE MASTER VOLUME.
The master volume may be set loud when initially starting up. Care should
be taken when playing songs and especially if listening with headphones. It
is advised to rstly set the master volume lower.
1. Hold [Master] + Turn (Jog). Alternatively the [Up] and [Down] buttons
can be used instead of the Jog wheel.
Press [Master] + [Delete/Backspace] to incrementally increase.
2. The Volume, as displayed on the left bar, can be adjusted between -
51.5dB to +12dB.
▌ PLAYING A PATTERN FROM THE PATTERN OR GENERIC PAGE.
1. Ensure a project with patterns is loaded.
2. Although not essential, it is usually good practice to display the pattern
page at this stage. If required, Press [Pattern] to display pattern page.
Note that this will play and loop the currently selected pattern, not the
entire song, unless the Song page is on display when pressing [Play].
3. Press [Play] to play the currently active pattern.
4. Press [Play] to stop playback on the current step.
• Pressing [Play] again restarts from the pattern beginning.
• Pressing [Shift] + [Play] will restart playback from the current
paused position.
• Press [Shift] + [Insert/Home] when play is stopped to reset the
playhead to the start without commencing play.
▌ PLAYING A SONG FROM SONG OR PERFORM PAGE.
1. Select song mode, Press [Song]. This will be applicable when a song
structure has previously been created for example in factory projects.
2. Press [Play] to play the currently active song. Playback in the Song or
Perform page is different to the generic pattern play from within other
page views. Each row will represent a series of patterns across the 8
tracks and play rows top to bottom.
3. Press [Play] to stop playback on the current row.
• Pressing [Play] again restarts playback starting from the beginning
of the current row.
• Pressing [Shift] + [Play] will loop playback for the current row. If
playback is in a stopped state, playback will start at the beginning of
the current row.
• Press [Shift] + [Insert / Home] when play is stopped to reset the
playhead to the start of the song without commencing play.
NOTES
Overview1
Overview
1
NOTES

13
Polyend Tracker Manual
12 Polyend Tracker Manual
NOTES
Overview1
Overview
1
NOTES 1.6 QWERTY Keyboard.
Some pages will require text editing for naming tracks or projects etc. The
same functionality applies whenever the Alpha numeric pop-up editor is
used. The screen will display the QWERTY keys and the text to edit, while
the 4 x 12 pad grid will act as the keyboard’s keys. The screen buttons are
used to enter, cancel or save.
The characters and the title can be selected by using [Up], [Down],
[Left] or [Right] to navigate and Press [Enter] - 1st Screen Button to
select the character.
Option to [Cancel] - 7th from Left Screen Button is also possible. Save
when complete using [Save] - 8th Screen Button to save the name.
QWERTY Keyboard is represented by the 4 x 12 Grid Pads. The ‘f’ and
‘j’ keys are highlighted. The selected character using arrows will also
be highlighted bright. and lit on the pads to serve as a reference. Using
the pads is a simpler method in entering characters.
Enter
-- --- ---- ---- -- --- ---- ---- -- --- ---- ---- -- --- ---- ----
15 15
Cancel Save
The screen will display the keys which are represented by the grid
pads. The ‘f’ and ‘j’ keys are highlighted to give a reference between
the pads and the screen characters.
The following Tracker buttons operate in the naming editor when the
naming screen is presented:-
• [Up], [Down], [Left], [Right] will navigate the selection across the
keyboard. Will navigate left / right in the text of the name when
the name is highlighted .
• [Insert/Home] will insert the currently highlighted character into
the name at the cursor position.
• [Delete/Backspace] to delete characters and backspace in the
name from the text cursor position.
1
q
a
z
4
r
f
v
7
u
j
m
0
p - +
@
2
w
s
x
5
t
g
b
8
i
k
Backspace
Caps Lock
Space
3
e
d
c
6
y
h
n
9
o
l
1.5 Introduction to Tracks
Tracker has 8 tracks, each of which can be congured with unique patterns
made up of one or more instrument combinations. Tracks are structural
elements and the track mixer is found in the master section. However some
track commands are also available in the pattern pages, for example
muting tracks. By default 4 tracks are displayed for patterns.
▌NAVIGATING TRACKS IN THE PATTERN PAGE
1. Press [Pattern] to ensure pattern page is selected. 4 Tracks are
displayed by default.
2. Press [Left] or [Right] to navigate across all 8 tracks. The green or red
highlighted step will anchor the navigation point.
▌MUTING TRACKS IN PATTERN PAGE
1. Press [Pattern] to ensure pattern page is selected. 4 Tracks are
displayed by default.
2. To mute / unmute, Press [Shift] + The screen button for the respective
track. All 8 tracks are presented by the screen buttons when holding the
shift button. Muted tracks display in the screen keys dimmed.
3. Muting will be applied immediately the screen button is pressed. This is
different in the track mixer, where muting is applied when the mute
button is released.
▌CHANGING TRACK VIEW IN THE PATTERN PAGE
• 8 Tracks with only Note parameter: Press [Pattern] + [Note].
• 8 Tracks with Instrument parameter: Press [Pattern] + [Instrument].
• 8 Tracks with only FX1 parameter: Press [Pattern] + [FX1].
• 8 Tracks with only FX2 parameter: Press [Pattern] + [FX2].
• 8 Tracks with 2 selected parameters: Press [Pattern] + [P1] + [P2],
where ‘P1’ and ‘P2’ are 2 from; [Note], [Instrument], [FX1], FX2].
• Revert to 4 track mode, Press [Pattern]

15
Polyend Tracker Manual
14 Polyend Tracker Manual
1.8 Example Workow.
The workow adopted with Tracker will of course develop to t your personal approach. To get
started a typical journey is described below.
NOTES
Overview1
Overview
1
S
E
1
2
3
4
5
6
7
8
10
11
12
13
15
14
9
Create & Save New Project
Set Project Tempo
Load Samples to SD Card
Sample Audio into Tracker
Select Audio Sample for Project
Create Instruments
Create Pattern
Add Steps and Develop Pattern
Add Master Effects
Mix the Tracks
Congure Performance Options
Render Audio Out
Housekeeping
Save Project
Arrange Patterns into a Song
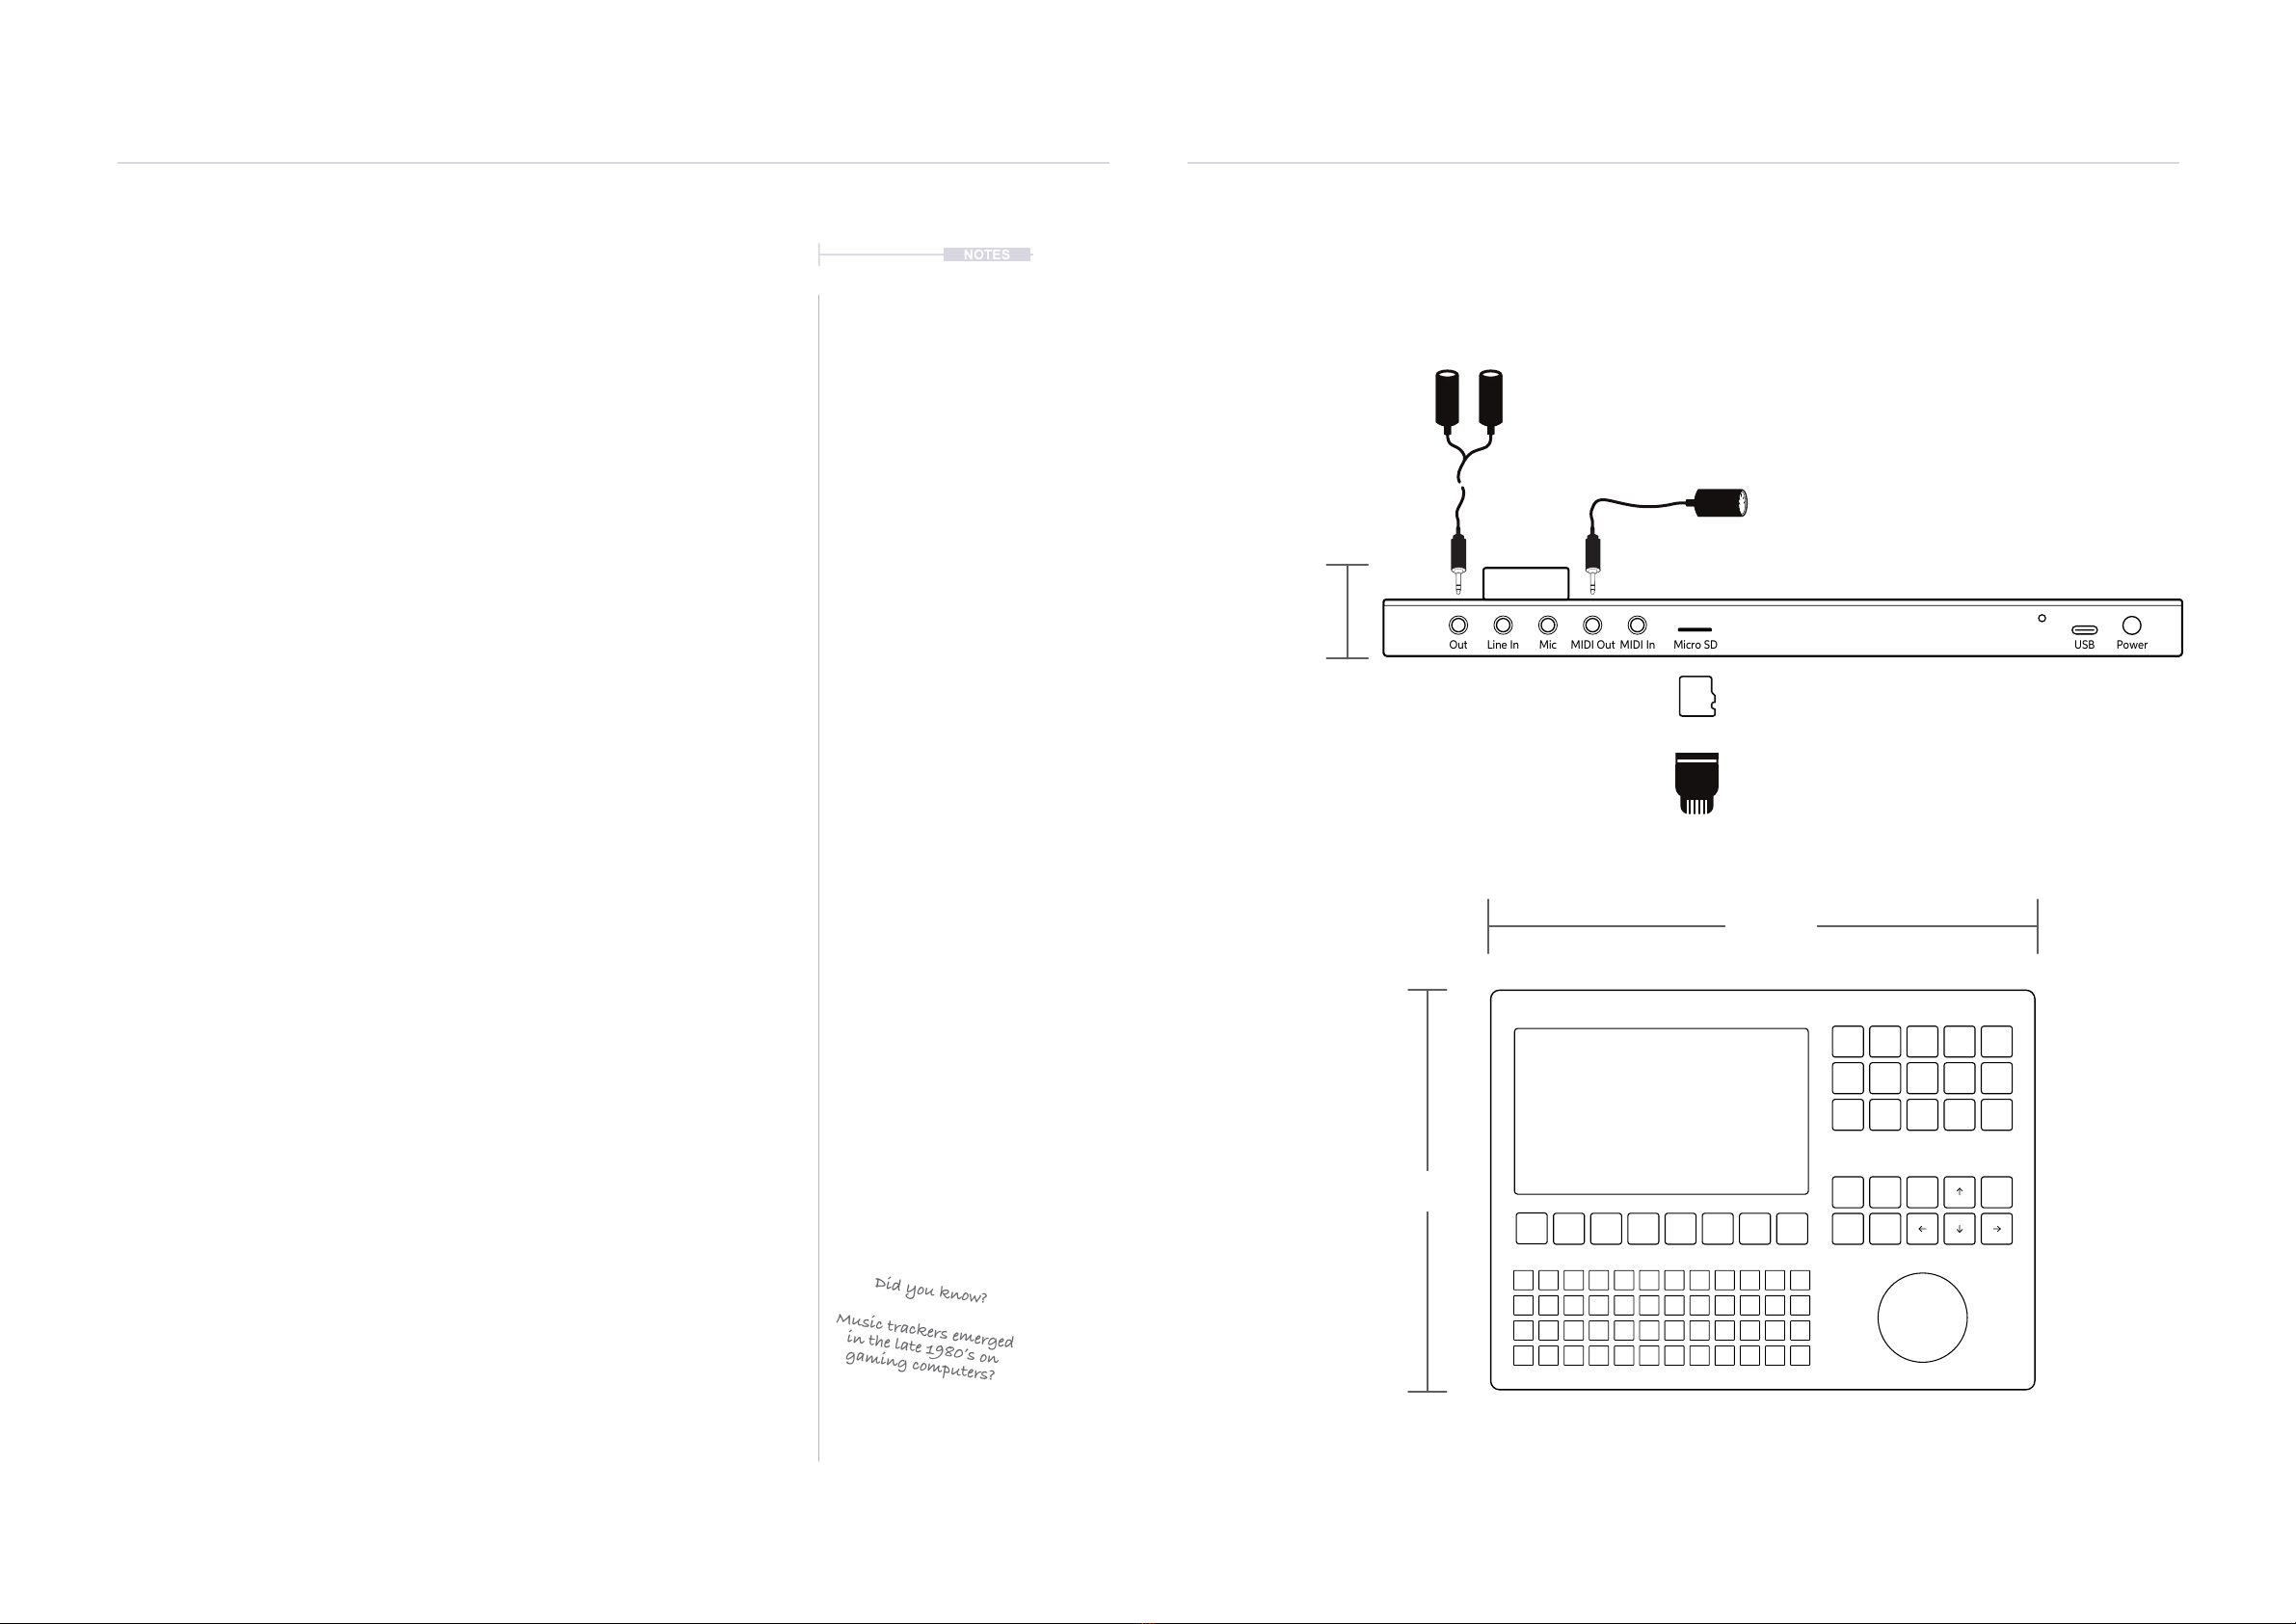
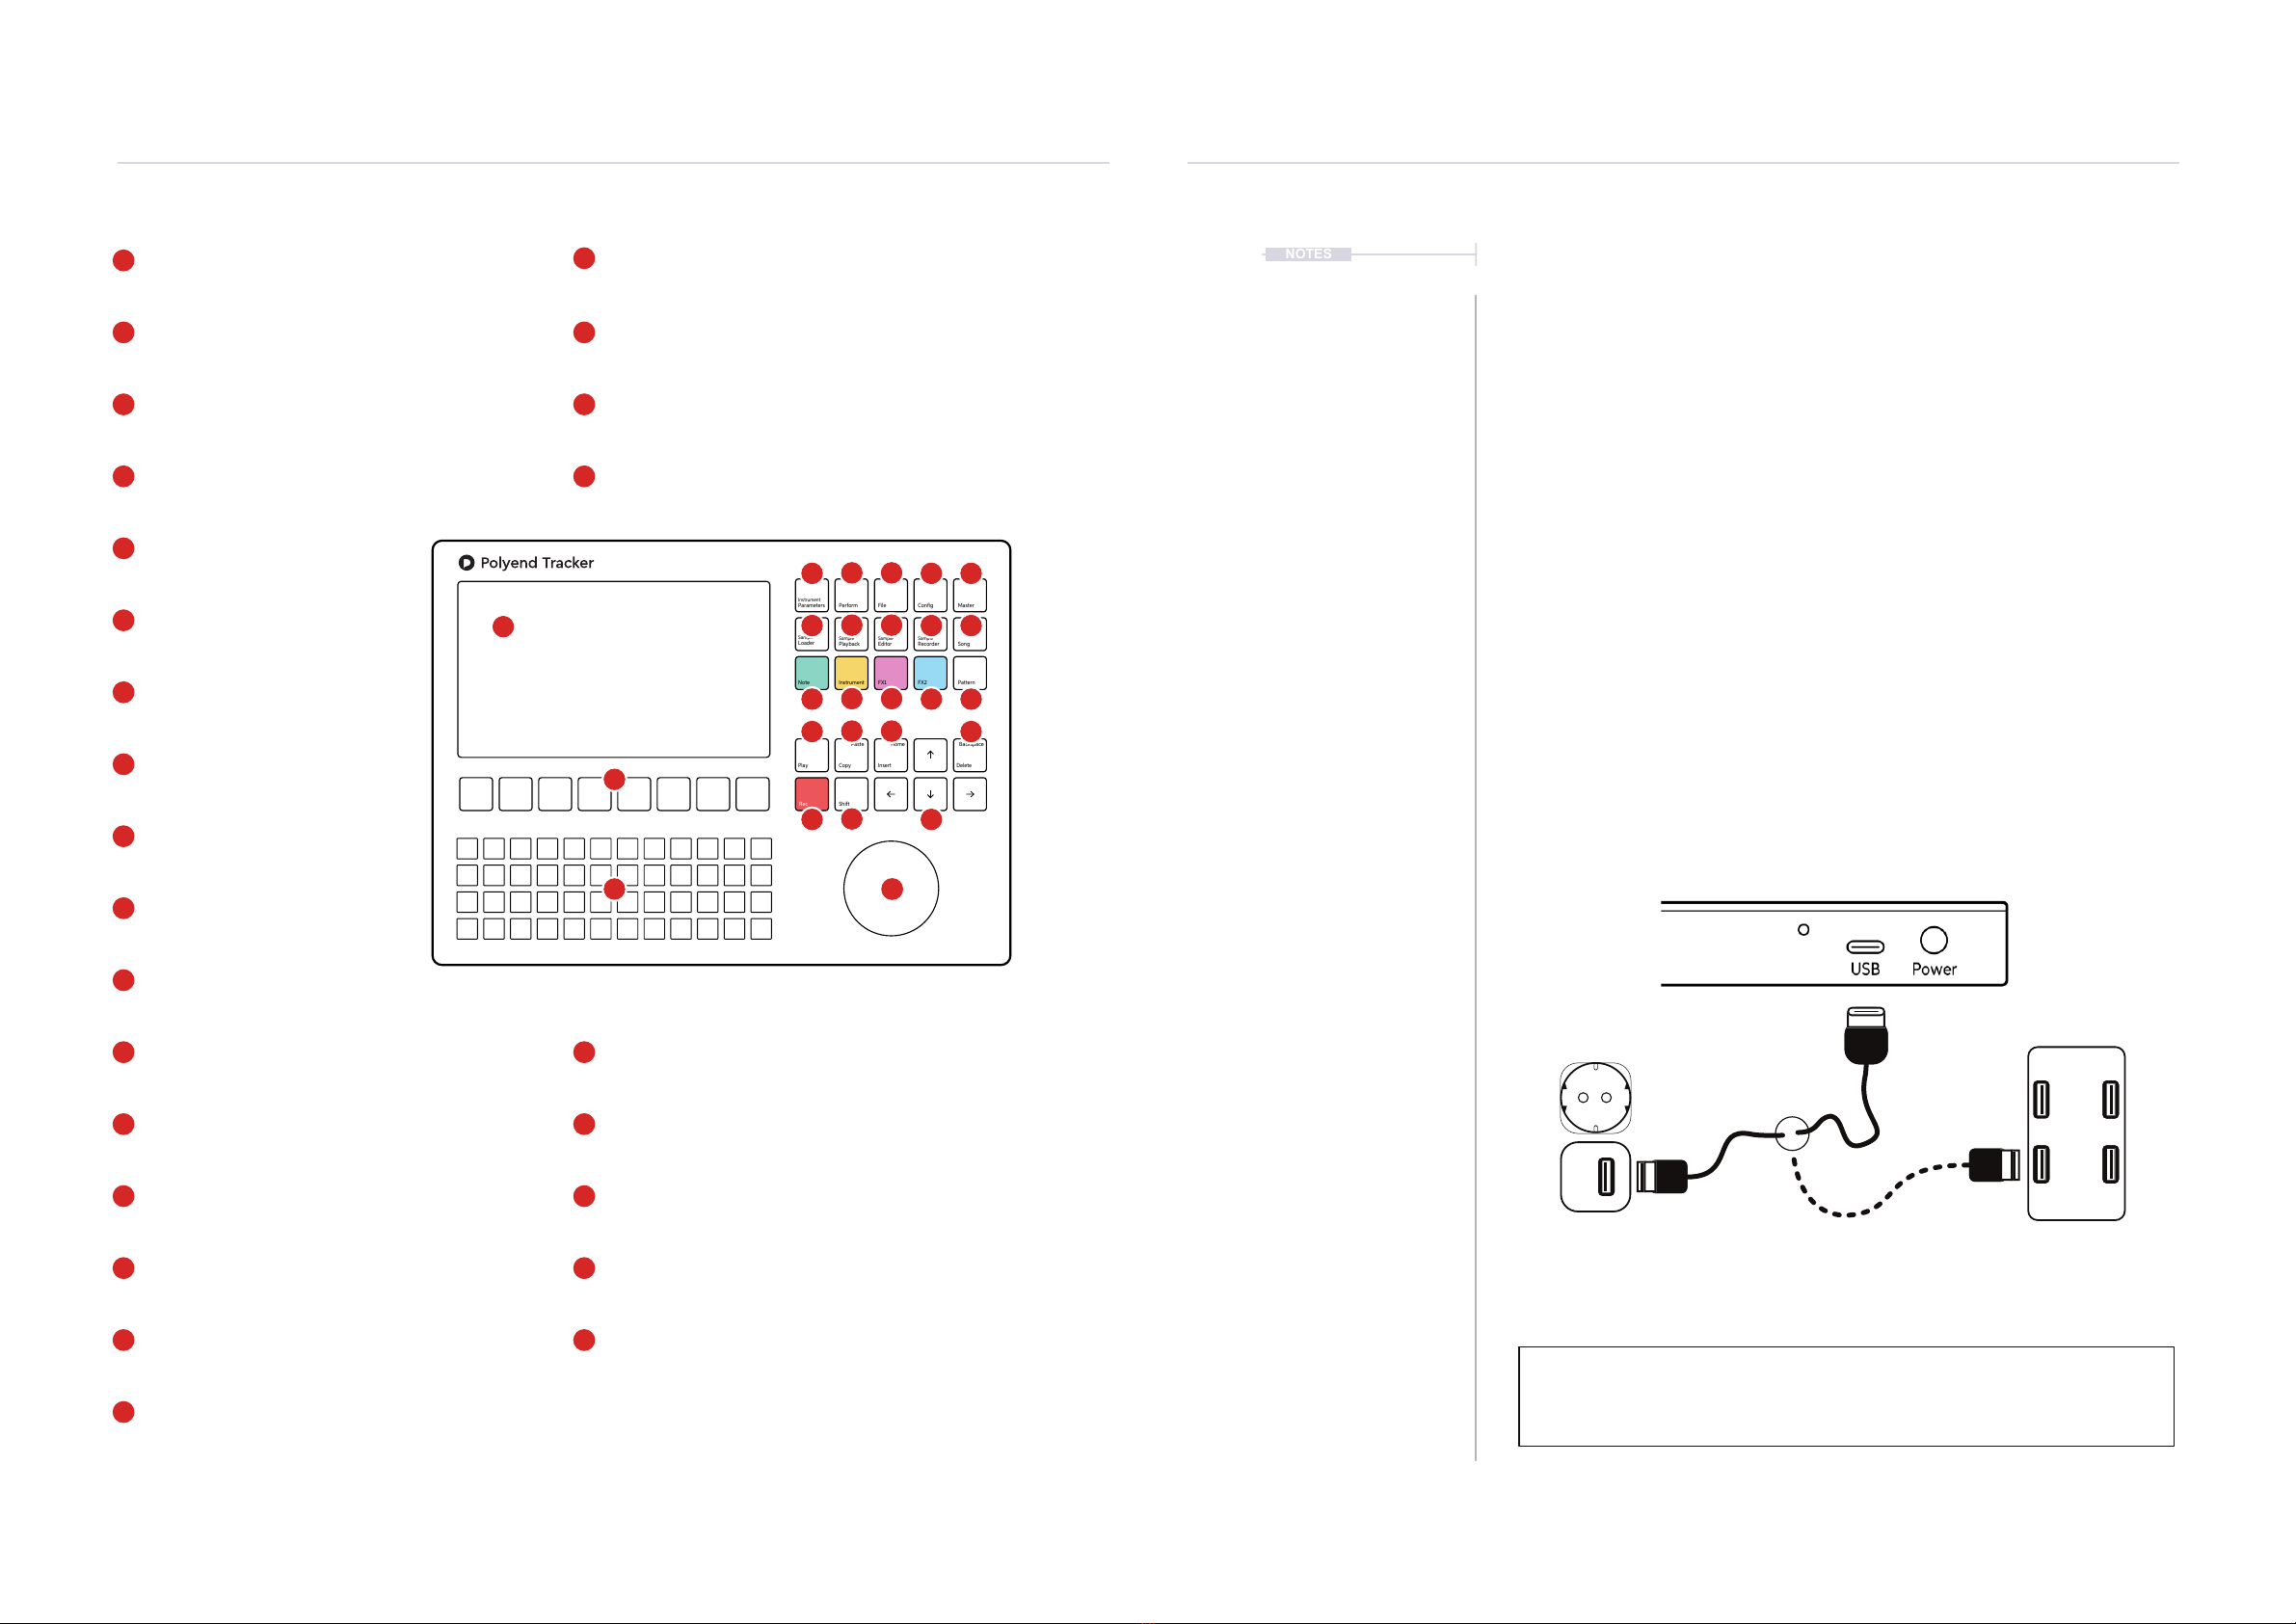
The SD Card must be installed to start a new
project and use Tracker. Projects are stored on
the SD Card. Create a new project
Project Tempo 40-800BPM. FX can apply
variations as the patterns develop.
Global settings usually setup or
performed once before or at the
start of a new project.
Instruments are created by
conguring samples with
additional settings and features.
Steps are assembled to create
beats and melodies in a
number of patterns.
Patterns arranged into a song.
Master effects can be adjusted
as can a mix of all 8 tracks to
nalise the complete song
production.
Performance settings can be
applied, ideal for a live set.
The project can be saved (is in
fact auto saved) and audio
rendered if required by bouncing
to audio stems.
Project
Instruments
Pattern
Song
Master & Mix
Perform
Output
Option to manually load uncompressed 44.1KHz,
16bit WAV samples to the SD card from PC or
Mac and accessible to Tracker projects.
Also audio can be recorded as monophonic les
and stored in the audio pool.
Samples can be stored on the SD Card and then
loaded into the project audio pool. Up to 48
instruments can be created in a project.
Instruments are created using a sample as the
source. Editing of parameters are applied.
Example instruments include a wavetable or
granular synth or a sample of sliced beats.
An empty pattern can be created by setting the
tracks, length etc. A project can holds up to 255
patterns. Multiple patterns can be created.
An empty pattern is populated with steps. A step
contains a Note, Instrument and has 2 FX slots.
Assemble steps by track into beats, bass-lines,
leads, pads etc.
While effects can be added to instruments, a
master effect section handles the combined
audio at the output stage. Effects include a
limiter, space, bass boost and EQ
Mix and balance the 8 tracks.
Perform mode allows conguration and live
performances with dened control over specic
elements. Adds variety and improvised creativity.
Render out audio stems to mix and master further
in DAWs or to share with others maybe to create
remixes.
Although projects are auto-saved, it is always
good practice to manually save a nished
production. Maybe rename with ‘Save As’.
Yeah yeah…. The boring bit. But it will help as
projects develop to keep things tidy. Maybe delete
old projects or backup the SD Card.
A song is the arrangement of patterns into a
single track. This is the arrangement of a
complete song where patterns are played in a
dened order.
ACTION COMMENTSPROCESS
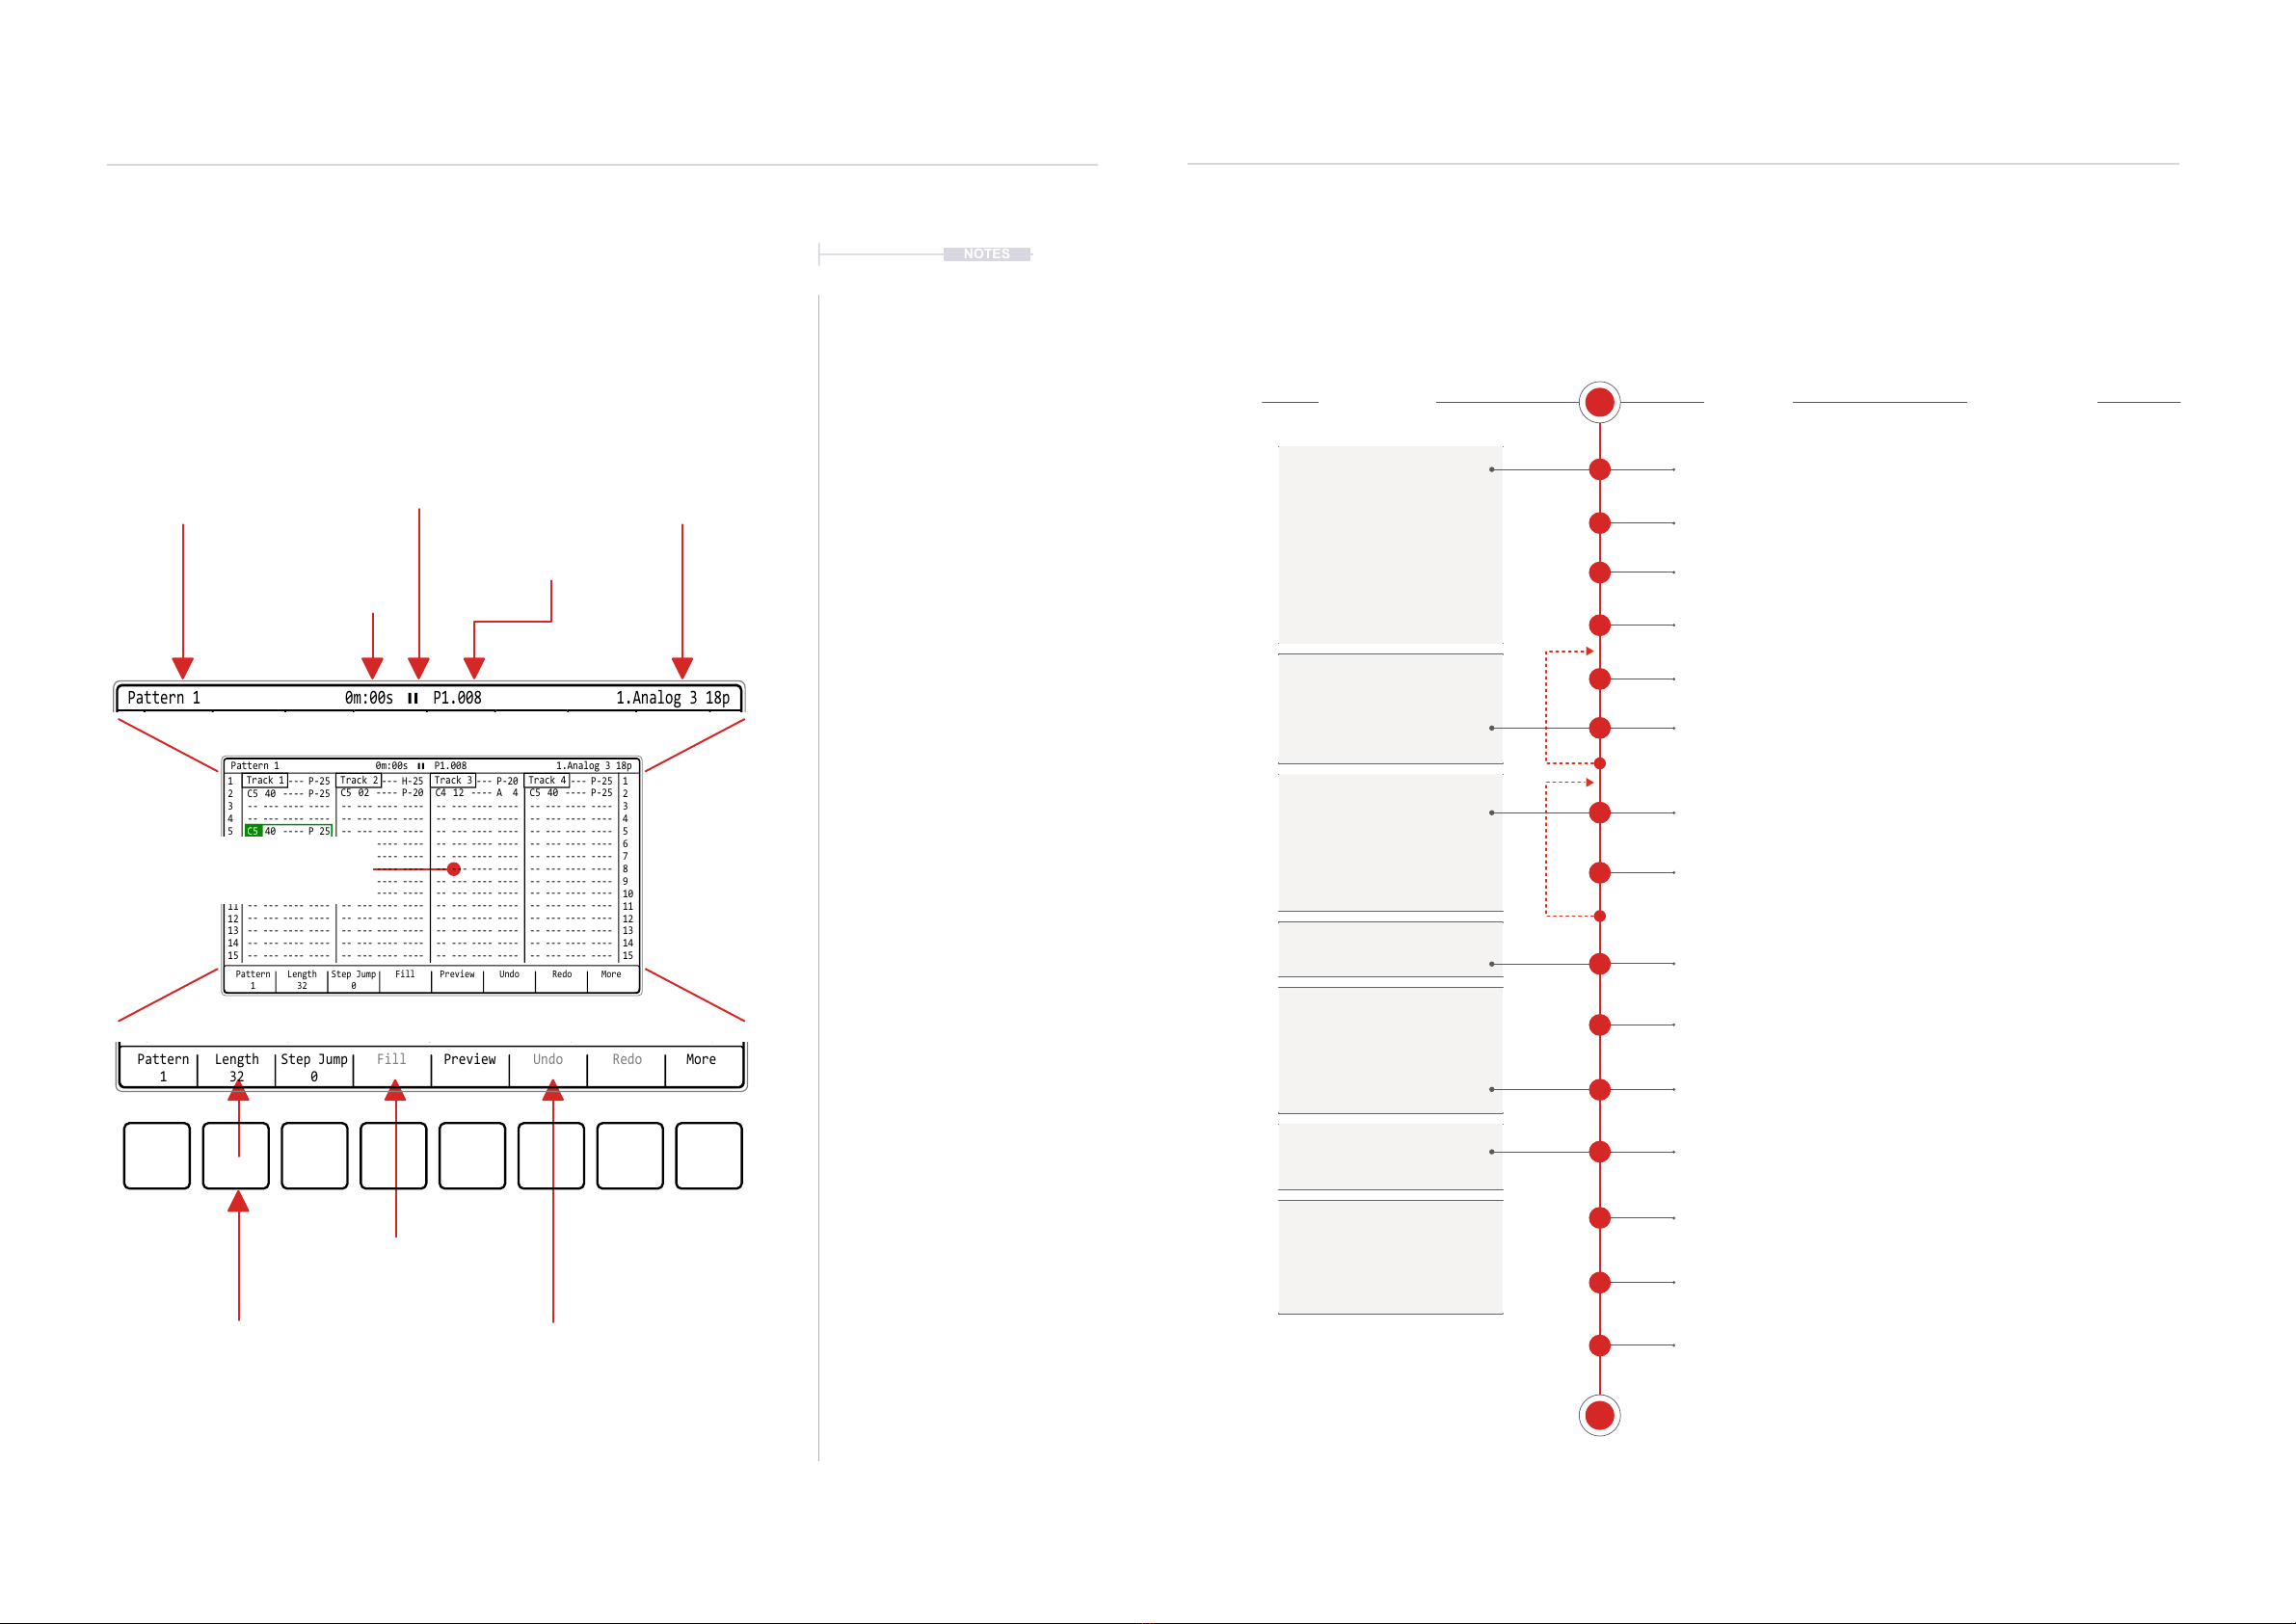
1.7 Page Layout.
Each page will display the information and control options for the selected
function. While this may be unique to the context there are some common
features and navigation principles that apply across all (or most) of the
generic pages of Tracker.
Function / Page currently
selected and represented on the
page. Where multiple pages exist
this will also be shown i.e. 2/3
Time position in Minutes &
Seconds of the current
playhead. This is total play time
not time in a pattern or song
Current Pattern and
Step position
Transport status
Physical Screen Buttons
represent the command displayed
on the screen directly above.
Up to 8 selectable context based
options. These can be menu options,
navigation commands or blank.
Options are dimmed when not currently
available. For example, these may need
an item to be selected rst.
Selected instrument displayed,
although not shown on all pages.
This shows current project when in
the ‘File’ menu page.
Pattern
1
1 1
2C5 40 ---- P-25
C5 40 ----
C5 40 ---- P-25
-- --- ---- ---- -- --- ---- ---- -- --- ---- ---- -- --- ---- ----
-- --- ---- ---- -- --- ---- ---- -- --- ---- ---- -- --- ---- ----
P 25 -- --- ---- ---- -- --- ---- ---- -- --- ---- ----
-- --- ---- ---- -- --- ---- ---- -- --- ---- ---- -- --- ---- ----
-- --- ---- ---- -- --- ---- ---- -- --- ---- ---- -- --- ---- ----
-- --- ---- ---- -- --- ---- ---- -- --- ---- ---- -- --- ---- ----
-- --- ---- ---- -- --- ---- ---- -- --- ---- ---- -- --- ---- ----
-- --- ---- ---- -- --- ---- ---- -- --- ---- ---- -- --- ---- ----
-- --- ---- ---- -- --- ---- ---- -- --- ---- ---- -- --- ---- ----
-- --- ---- ---- -- --- ---- ---- -- --- ---- ---- -- --- ---- ----
-- --- ---- ---- -- --- ---- ---- -- --- ---- ---- -- --- ---- ----
-- --- ---- ---- -- --- ---- ---- -- --- ---- ---- -- --- ---- ----
-- --- ---- ---- -- --- ---- ---- -- --- ---- ---- -- --- ---- ----
C5 02 ---- P-20
C5 40 ---- H-25
C4 12 ---- A 4
C5 40 ---- P-20
C5 40 ---- P-25
C5 40 ---- P-25
2
3 3
4 4
5 5
6 6
7 7
9 9
11 11
13 13
15 15
8 8
10 10
12 12
14 14
Length
32
Step Jump
0
Fill Preview Undo Redo More
Track 2 Track 3 Track 4Track 1
Pattern 1 0m:00s P1.008 1.Analog 3 18p
Pattern
1
-- --- ---- ---- -- --- ---- ---- -- --- ---- ---- -- --- ---- ----
15 15
Length
32
Step Jump
0
Fill Preview Undo Redo More
1 1
C5 40 ---- P-25 C5 40 ---- H-25 C5 40 ---- P-20 C5 40 ---- P-25
Track 2 Track 3 Track 4Track 1
Pattern 1 0m:00s P1.008 1.Analog 3 18p
Central area contains specic
information to the selected function
and settings.

17
Polyend Tracker Manual
16 Polyend Tracker Manual
Overview1
Overview
1
Function Action Tracker Buttons Description
Master Master Volume [Master] + Turn (Jog) Adjusts the master output
Master Master Tempo [Song] + Turn (Jog) Adjusts the master tempo
Master General Navigation [Up], [Down], (Jog) Generally navigate, scroll menu selections and options
Master General Navigation [Left], [Right] Generally navigate, across page windows, sub menu’s,
functions and display columns.
Master Copy / Paste [Copy/Paste] Depending on the context, will copy and paste between
functions ie copy patterns.
Master Delete / Backspace [Delete/Backspace] Depending on the context, will delete / backup. Will also reset
any selected parameter to its default state.
Pattern Pattern Mode Page [Pattern] Selects the pattern mode page.
Pattern Play Pattern [Play] Plays the pattern from the start. Stops / Pauses the pattern if it
is already playing
Pattern Continue Play [Shift] + [Play] Restarts play of the pattern from the currently paused position
Pattern Play Song [Song] + [Play] Play song from within the pattern mode page.
Pattern 8 Track Note View [Pattern] + [Note] Display all 8 tracks with only notes instead of default 4 tracks.
2 elements can be displayed i.e. + [FX1], [FX2], [Instrument]
Pattern 8 Track Inst View [Pattern] + [Instrument] Display 8 tracks with only instrument instead of 4 tracks.
2 elements can be displayed i.e. + [FX1], [FX2], [Note]
Pattern 8 Track FX View [Pattern] + [FX1] or [FX2] Display all 8 tracks with only FX instead of default 4 tracks.
2 elements can be displayed i.e. + [Note], [Instrument]
Pattern 4 Track View [Pattern] Restores default 4 tracks when viewing 8 tracks
Pattern Check Patterns Hold [Pattern] Screen Button Hold pattern screen button to display the available patterns
reected by the lit pads.
Pattern Select Pattern [Pattern] + [Up], [Down], (Jog) Select Pattern number
Pattern Sequential change [Pattern] + [Left] or [Right] When playing, selects a new pattern to cue playback to start
when the current pattern ends. Pattern blinks red.
Pattern Sequential change [Pattern] + [Left] or [Right] When playing, selects a new pattern to cue playback to start
when the current pattern ends. Pattern blinks red.
Pattern Immediate change [Pattern] + [Up] or [Down] When playing, selects a new pattern to trigger a start
immediately.
Pattern Immediate change [Up] or [Down] or (Jog) or [PAD] When playing, selects a new pattern to trigger a start
immediately.
Pattern Multiple Step Select [Shift] + [Up] [Down] [Left] [Right] Will select groups of multiple steps for editing collectively.
Pattern Multiple Step Select [Shift] + [Up] On rst step Will select all steps for the current the track
Pattern Multiple Step Select [Shift] + [Up] + [Up] On rst step Will select all steps for all of the tracks
Pattern Mute Tracks [Shift] + Screen Button Screen button 1 - 8 will toggle mute / unmute tracks 1 - 8
respectively when in pattern mode page.
Pattern Lock Parameter
Selection Tap Dedicated Param Btn Will lock the selection of the Note, Instrument, FX1 or FX2
parameter when editing or navigating. Also [Shift] +
Function Action Tracker Buttons Description
Pattern Arm / Disarm [Shift] + [Rec] + Screen Btn Arms or Disarms the track for recording. Disarmed tracks will
not allow recording. Screen buttons represent tracks.
Pattern Live Rec > Play [Rec] When live recording, pressing [Rec] will continue to play but
leave recording mode.
Pattern Live Rec Start [Shift] + [Rec] Start Live Recording
Pattern Select Top Row [Shift] + [Insert/Home] When stopped, resets the playhead to the top row start of the
song or start of the pattern.
Song Mode Song Press or Hold [Song] Pressing [Song] switches to song page. Holding [Song] button
will temporarily display song page from within another page.
Song Mode Play Song [Play] Plays the song from the start of the current song row.
Song Mode Stop Song [Play] Stops / Pauses the song playback.
Song Mode Loop Row [Shift] + [Play] Loops the current song row / pattern playback
Song Mode Select Top Row [Shift] + [Insert/Home] When stopped, resets the playhead to the top row start of the
song or start of the pattern.
Song Mode Tempo [Song] + Turn (Jog) Adjust project tempo, 40 - 800 BPM in 1 BPM increments.
Also option to use [Up] or [Down] Instead of (Jog)
Song Mode Tempo [Shift] + [Song] + Turn (Jog) Adjust project tempo, 40 - 800 BPM in 0.1 BPM increments.
Also option to use [Up] or [Down] Instead of (Jog)
Perform Play [Play] Plays pattern
Perform Play [Shift] + [Play] Plays song
Perform In Rec Mode [Shift] + [Up], [Down] or (Jog) Change performance effect in current slot
Perform In Rec Mode [Shift] + [Left] or [Right] Swap effects between slots
Perform In Rec Mode [PAD] + Turn (Jog) Edit the effect value offset for the respective pad row
Perform Not In Rec Mode [PAD] + Turn (Jog) Temporary change effect value for the respective pad row
Perform Select [Track x] Selects tracks to apply any triggered effect. Track labelled red.
Perform Perform [PAD] Triggers the selected value for the effect for the selected track.
Perform Remix [Track x] + Turn (Jog) Load a new pattern for the selected track(s) once the current
pattern completes. Also use arrow keys. Live remix mode.
Perform Remix [Track x] + [Left] or [Right] Load a new pattern for the selected track(s) once the current
pattern completes. Also use Jog wheel. Live remix mode.
Perform Remix [Track x] + [Up] or [Down] Immediately load a new pattern for the selected track(s). Live
remix mode.
Perform Mute / Unmute [Shift] + [Track x] Mute or unmute the selected track
Sample
Loader Navigate Hold [Left] In the sample loader browser hold [Left] to jump to start of the
left side SD card browser.
Sample
Loader Batch Select [Shift] + Arrows Batch select sample in the sample loader
1.9 Quick Reference Commands 1.9 Quick Reference Commands

Make no mistake, Tracker is a unique yet
comprehensive device. There are so many
features that are less obvious to producers
more familiar with more traditional sequencers
and DAW’s. The overall structure of Tracker
can seem at rst glance, confusing. However
spending a little time to understand the overall
architecture and its terminology will set a good
starting foundation. For this reason there are
no apologies for taking time to get intimate with
the architecture of the overall device and
bringing this summary upfront in this guide.
Getting a solid understanding and awareness
of the Tracker’s structure will help enormously
in getting to grips later with the rest of the
device. The three basic elements needed is
Tracker itself (of course), a USB power source
(Power-pack or mains adapter) and the
correctly congured Micro SD Card which is
integral to Trackers operation. While more in
depth details for specic topics are covered in
the following sections of this notebook, the
overall foundation and structure is laid out in this
section. The hierarchical structure and
organisation of data and functions such as
Projects, Patterns and Steps are summarised
collectively and how they work together. It is
therefore worth the investment of time and focus
in understanding the architectural hierarchy.
Developing a fundamental workow and efcient
process will help get the most out of Trackers
features.
Architecture
19
Polyend Tracker Manual
18 Polyend Tracker Manual
NOTES
2

Architecture2
21
Polyend Tracker Manual
20 Polyend Tracker Manual
2.1 Glossary of Terms
While you may think this should be hidden at the back of this book, understanding the terminology
associated with these topics and especially the Tracker will help unlock it’s power and performance.
It makes sense to become familiar early with the essential terms to help embed into your workow
Architecture
2
Beta: A term normally used for pre-release
software versions used for testing purposes.
Polyend often release beta versions of Tracker.
Effects: Refers to the master effects used across
the overall output audio.
Envelope: An envelope is used to modulate and
shape parameters and audio over time. Tracker
has Envelopes which can be assigned
FX: A number of assignable effects are provided to
steps in the pattern. These are not traditional style
effects but more like mini-applications and
automation controls.
Instrument: In Tracker, an instrument starts with a
sample as its source. Various parameter
congurations can be applied including wavetable
or granular synth applications to operate as the
sound within a step. MIDI instruments to set
channel and settings also can be congured.
Instrument List: Also called an instrument pool or
audio pool. This is the internal memory. Samples
and instruments are loaded here to be accessed
by patterns.
LFO: Low frequency oscillator which is not
specically used for sound generation but more so
to modulate parameters for sound design and
movement. Tracker has LFO’s which can be
assigned.
Looping: The process of replaying audio or a
pattern continuously in a dened cycle e.g. start to
end then start to end.
MIDI: MIDI stands for Musical Instrument Digital
Interface and is a standard protocol used for
communicating between equipment. MIDI is
normally applied using 5 Pin MIDI DIN connections
which in some cases (i.e. with Tracker) are
interfaced via a MIDI 5 Pin to 3.5mm MIDI Dongle.
Mod File. Legacy tracker les such as .mod and .it
were used in classic trackers. Not compatible with
current Polyend Tracker OS versions.
Mute: Muting offers variations that can be created
by silencing the play out of tracks and patterns for
sound design purposes and especially when
playing live sets.
Note: A musical note assigned to a samples pitch
and assigned to track steps to create a melody or
percussive beat.
OS: Operating System is the core software that
makes Tracker work. It handles how it operates
and periodic updates from Polyend bring new
features into use.
Parameter: The individual value of a specic
function or control element. A parameter can be
adjusted to affect a sound or a functions operation.
Pattern: This is the backbone and core of a
Tracker sequence and contains all steps in a
sequence. Patterns control how steps are played.
Perform: A mode in Tracker that provides an
environment with 12 selectable effects which can
be triggered live and during improvisations.
Power Bank. A portable rechargeable battery
devices used to power or recharge portable
equipment.
Project: The overall structural container for
patterns, samples, instruments etc. A project
should always be loaded to work with Tracker.
RAM Memory: While Tracker operates with the
Micro SD card, on board RAM memory is also
used for instruments and samples in the project.
Render: This is like internal sampling. To internally
capture patterns, tracks or songs into an
exportable audio sample. Sometimes render is
also called ‘bounce’ in the producer community.
Reset: The process of restarting Tracker by loading
a random OS rmware.
Sample: The basic audio element recorded or
loaded into Tracker and used to create an
instrument.
Sampling: The act (and art) of recording and
capturing audio to be edited and creatively
assembled into a new musical composition.
SD Card: A storage device that is used in Tracker
for holding data, samples, project etc. Tracker is
supplied with a 16GB Micro SD Card.
Solo: The ability to select an individual track to play
alone and effectively mutes other tracks.
Song: A combination of tracks and patterns
combined and structured into a full arrangement.
Step: In Tracker a step is the building blocks for
creating melodies and beats. Each step contains a
note, instrument and 2 FX slots per track and is
displayed in the track rows.
Track: Tracker contains 8 tracks each which
controls a voice. Tracks are used for structuring the
sequencing of steps. These can be congured with
steps to play a variety of instruments and develop
a complete melody and beat across the 8 tracks.
Tracker: Tracker is a digital audio workstation for
music production. Trackers use a linear top to
bottom sequencing environment where elements
are programmed into lines of tracker code.
Update: The process of installing the newest
rmware. This brings new features and xes bugs
associated with previous versions.

2.2 Tracker Audio Structure
Architecture2
23
Polyend Tracker Manual
22 Polyend Tracker Manual
Architecture
2
Track 1
Bit-crusher
Overdrive
Filter
Delay Reverb
Reverb
Send & Return
Delay
Send & Return Mix & Pan
MIDI Engine &
Parameters
Instrument
Instrument
Instrument
FX
FX
FX
Sample
+
Wavetable Granular
Out Right
MIDI Out
Line in
MIDI In
Mic In
Out Left
Step
Mix
Note Instrument FX1 FX2
Step
Step
Track 8
Track 8
1
128
Project
Firmware Instruments Mod trackerLog
Micro SD Card
Tracker
Games Manual Projects Samples
Project
Project
Pattern
Song
Master
Instrument Audio Engine
FX Applications
Sampler
A correctly formatted SD Card must be installed to
operate Tracker fully. Card default folder shown.
Loaded Project
Maximum 255 Patterns per Project
Maximum 48 Instrument slots are available per Project
A variety of effects are selectable from the list of 29 FX.
E.g. G
E.g. T
E.g. m
….. 8 Tracks / Voices per Project …..
….. Max 128 Steps per Track …..
.…. .….
100 Projects are visible and accessible from within Tracker.
More than 100 could be stored on the SD Card.
Track 1
Pattern
Pattern
Pattern
Pattern
Pattern
Pattern
2.3 SD Card Structure.
The Micro SD Card is an integral part of Tracker and must be inserted to
operate correctly. An alert message is displayed if Tracker is powered up
without an SD Card installed. It is important that the correct format is
applied to the Micro SD Card. This should be FAT32 with Master Boot
Record (MBR) Partitioning.
The default le structure will expand as different functions are used. For
example a snapshots folder is created when capturing screen images, also
export and recording folders crated once these les are rstly generated.
Files and folders can be accessed with a PC or Mac. A USB adapter is
supplied with Tracker.
Micro SD Can be connected to a
PC / Mac with the USB adapter.
NOTES
Root
Limiter
Space
Bass Boost
EQ
Saturation

Architecture2
25
Polyend Tracker Manual
24 Polyend Tracker Manual
Architecture
2
Sub Folders
SD Card
/Root Directory
/Firmware
Default SD Card Structure
/Drum Kits
/Quick Start
/ProjectName
/FactoryPacks
Tracker comes with 9 factory packs installed onto the SD Card.
/ARC Noise, /Jamie Lidell, /Legowelt, /Loops n trouble, /Oneven FM, /Plughugger,
/Simulacrum Sounds, /Stazma & Concrete Collage, /Wavetables_2048.
/Instruments
/Samples
/Patterns
/Progressions
/Instrument Kits
/Synths
/Games
/Instruments
/Manual
/Mod
/Projects
/Samples
/TrackerLog
PolyendTracker_1.6.0.ptf
New OS versions can be located here to update Tracker
Alter_Ego.nes, Chase.nes, Lan.nes
Lawnmower.nes, Utaco.nes, ZoomingSecretary.nes
Contains xxx.pti instrument les in the sub-folders
1.jpg, 2.jpg, 3.jpg, 4.jpg, 5.jpg, 6.jpg, 7.jpg, 8.jpg
Contains project les located in sub-folders
Legacy .mod or .it tracker les - may not exist on newer SD cards
Sample Packs located in sub-folders
Project.mt
2.4 Internal Help & Tips.
Tracker has a series of built in tips and instructions to help get started with
the functions and features. These are automatically available as text hints
which appear at various stages of navigating and manoeuvring through the
options and menus.
The ofcial manual and Q&A is available on the Polyend website. A limited
version of quick start is also available as the onboard manual.
▌VIEWING THE ONBOARD QUICK START
1. Press [Cong] to open the conguration settings.
2. Navigate with the 1st and 2nd Screen Buttons to select the ‘Manual’.
3. In the middle page pane, Press the 4th or 5th Screen Buttons to navigate
to ‘Quick Start’.
4. Press [Select], 6th Screen Button to select the options. The pop-up
window will appear.
5. Navigate pages, Press [Left] or [Right].
6. Select any other function or page to exit.
NOTES NOTES
Lo1.ptl

Architecture2
27
Polyend Tracker Manual
26 Polyend Tracker Manual
Architecture
2
[Song]
[Perform]
[Master]
1/3 2/3 3/3
[Reverb]
[Delay]
[Limiter]
[EQ]
[Master] [Master]
2.5 Page Map
As a quick guide to the page hierarchy in Tracker the following diagram
illustrates the main pages.
NOTES NOTES
[File]
[Cong]
[Sample Playback]
[Sample Editor]
[Sample Recorder]
[Pattern]
The Pattern page is the place where most time will be spent in the Tracker workow
Audio
Project Settings, General, MIDI,
Metronome, Firmware, Manual, Credits
1/2 2/2
[Instrument Parameters]
[Sample Loader]
[Export]
[Games]
[Select Effect]
[More]
[Effects]
[Instrument Parameters]

Projects are the highest order structural
element in Tracker. A project contains all the
elements of a full track. Think of each project
as a fully arranged song for an album or a song
for live set. Tracker auto saves projects, which
are stored, on the installed Micro SD Card.
Although the card itself can contain more,
Tracker will have up to 100 projects visible and
accessible. A project should be opened for
playback and editing and new projects can be
created from scratch. Each project contains a
maximum of 255 patterns across 8 tracks.
While patterns are the musical composition
functions, some elements, such as the 48
available instruments are managed at project
level, and hence accessible to all patterns.
Projects are structural and organisational
functions more so than part of the creative
environment but nevertheless serve an
important purpose in the Tracker workow.
Project memory for sampling is approx 133
seconds as standard although this may vary
depending on the audio quality and format.
Samples are stored on the Micro SD Card but
can be also are held in the Tracker on board
sample pool where samples effectively become
instruments. Projects have an instrument pool
populated with samples or instruments to be
available when creating steps. This is
prerequisite to creating sequences. This section
covers the general project management in
Tracker and it’s SD card plus some key specic
project level functions such as tempo.
Projects
3
29
Polyend Tracker Manual
28 Polyend Tracker Manual
NOTES

31
Polyend Tracker Manual
30 Polyend Tracker Manual
3.1 Project Overview
A project is the highest order of Tracker’s functions. It allows projects to
managed, saved and loaded and new projects to be created. Think of a
project as container for a complete song for an album or live set. Access to
project level features exists in various parts of Trackers functions and does
not have a dedicated single point of access.
3.2 Opening & Saving a Project - File Menu.
Projects are auto saved but can also be manually saved and renamed etc.
Loading of a saved project is also possible, although on power up the
previously active project will be restored. These project management
functions are in the le menu. Note that projects copied to the SD card
must be in the main project folder. Sub folders are not viewed directly from
the ‘le’ menu.
▌ CREATING A NEW PROJECT
1. Press [File] to open the le browser menu.
2. Press [New Project] - 1st screen button.
3. A blank project named ‘NewProject’ is created.
▌ OPENING AN EXISTING PROJECT
1. Press [File] to open the le browser menu.
2. Press [Open] - 2nd screen button. The project list is displayed.
3. Turn (Jog) or Press [Up] or [Down] to navigate the list of projects to
load. Also press [Up] - 1st screen button or [Down] - 2nd screen button to
scroll the list. The highlighted option will show with a bounding box.
4. With the desired project highlighted, Press [Open] - 8th screen button.
5. If the currently active project has been edited a prompt ‘Do you want to
save the change to ‘xxxx’’ will be presented. Press [Save] - 8th / last
screen button to save current project or Press [Don’t Save] - 7th screen
button from left to proceed without saving.
6. If the current pattern is new, a ‘Save As’ command is activated.
7. If required, Press [Pattern] to display pattern page.
▌ MANUALLY SAVING THE CURRENT / EXISTING PROJECT
1. Press [File] to open the le browser menu.
2. Press [Save] - 5th screen button from left.
3. The project will be saved and overwrite the previous version.
NOTESNOTES
Projects3
Projects
3
Project - Max 100 Available in Tracker.
More projects can be available on the SD Card but tracker can access 100.
Tracks - 8 Per Project
Tracks are used to organise parts of a pattern such as bass, drums, etc
Patterns - 255 Patterns Per Project
Patterns are sequenced into tracks to create musical elements.
Steps - 128 Steps per pattern
These are the discrete building blocks each with a note, instrument and effects
Song - 255 Slots (Slots = Rows for the 8 Tracks)
A song is an arrangement of patterns to create a complete production

33
Polyend Tracker Manual
32 Polyend Tracker Manual
▌ SAVING THE CURRENT PROJECT - FIRST TIME
1. Press [File] to open the le browser menu.
2. Press [Save] - 5th screen button from left or Press [Save As] - 6th screen
button from left. If using ‘Save’ for the rst time the ‘Save As’ function is
triggered to request a name.
3. The naming function will appear to allow a new name to be created.
The [PAD] buttons will represent the alpha-numeric keyboard. Type in
the name required using the [PAD] buttons.
4. Alternatively, press [Auto Name] - 6th screen button from left. This will
generate a random name for the project and present it in the editor.
5. With the desired name created, Press [Save] - 8th / last screen button.
6. The project is saved and the keyboard editor function is closed.
Enter
-- --- ---- ---- -- --- ---- ---- -- --- ---- ---- -- --- ---- ----
15 15
Auto Name Cancel Save
QWERTY Keyboard is represented by the 4 x 12 Grid Pads. The ‘f’ and
‘j’ keys are highlighted and lit on the pads to serve as a reference. The
Screen buttons offer the main commands in the context of the editor.
The following Tracker buttons also operate in the naming editor when
the naming screen is presented:-
• [Up], [Down], [Left], [Right] will navigate the selection across the
keyboard. Will navigate left / right in the text of the name when
the name is highlighted .
• [Insert / Home] will insert the currently highlighted character into
the name at the cursor position.
• [Backspace] to delete characters and backspace in the name
from the text cursor position.
3.3 Deleting a Project - File Menu.
The option to delete a project can be performed in the project browser. The
currently active project cannot be deleted. Change to another project to
delete. Note that deleting a project will also remove it from the SD Card.
▌ DELETING A PROJECT
1. Press [File] to open the le browser menu.
2. Press [Open] - 2nd screen button from left. The list of available (max
100) projects will be displayed on the left of the screen.
3. Turn (Jog) or Press [Up] or [Down] to navigate the list of projects. Also
press [Up] - 1st screen button or [Down] - 2nd screen button to scroll the
list selection. The highlighted option will show with a bounding box.
4. With the desired project highlighted, Press [Delete] - 3rd screen button
from the left.
5. A prompt ‘Do you want to delete project ‘xxxx’’ ?’ will be presented.
6. To conrm, Press [Delete] - 8th / last screen button to conrm deletion.
Alternatively, Press [Cancel] - 7th screen button from left to exit without
deleting the project.
7. Project will be deleted from the SD Card and no longer visible in the
project list on Tracker *.
* Projects also manually deleted externally from the SD Card using a PC or Mac
will no longer be visible in Tracker.
1
q
a
z
4
r
f
v
7
u
j
m
0
p - +
@
2
w
s
x
5
t
g
b
8
i
k
Backspace
Caps Lock
Space
3
e
d
c
6
y
h
n
9
o
l
NOTESNOTES
Projects3
Projects
3

35
Polyend Tracker Manual
34 Polyend Tracker Manual
3.4 Project Tempo
The overall tempo of the project is set in the ‘Song’ section of Tracker and
has a dened range of 40 - 800 BPM. Tempo can also be modulated by
using the FX slots in a step with the ‘T’ Tempo effect. Note that the MIDI
clock output is based on the project tempo.
Note: Pressing [Delete/Backspace] when tempo is selected will reset to the default
130 BPM. This is generic behaviour, where the [Delete/Backspace] button will
reset any selected parameter to it’s default value.
Tap tempo can be applied in Song Mode by tapping the Tempo
Screen key a minimum of 4 times at the BPM desired. Count
will be displayed when tapping.
Hold [Song] + Turn (Jog) to adjust
the tempo.
In Song Mode,
Hold [Tempo] + Turn (Jog)
Adjust in 0.1BPM Increments
Hold [Shift] + [Tempo] + Turn (Jog)
BPM Range
800 BPM
40 BPM
Tempo
130.0 BPM
▌ QUICK ADJUSTMENT OF THE PROJECT TEMPO
1. Press [Song] + Turn (Jog) or Press [Up] or [Down] to change the tempo
in 1 BPM steps. Range is 40 - 800 BPM.
2. Press [Shift] + Press [Song] + Turn (Jog) or Press [Up] or [Down] to
change the tempo in 0.1 BPM steps.
▌ GENERAL ADJUSTMENT OF THE PROJECT TEMPO
1. Press [Song] to select the Song Mode page.
2. Hold [Tempo] - Last screen button + Turn (Jog) or Press [Up] or [Down]
to change the tempo in 1 BPM steps. Range is 40 - 800 BPM.
3. Hold [Shift] + [Tempo] - Last screen button + Turn (Jog) or Press [Up] or
[Down] to change the tempo in 0.1 BPM steps.
▌ TAP TEMPO ADJUSTMENT
1. Press [Song] to select the Song Mode page.
2. Tap [Tempo] - Last screen button, a minimum of four taps. The tap
count will be displayed during tapping.
3. The tempo recorded is based on the speed of the taps recorded.
Note that the FX option ‘T’ Tempo triggers a tempo change between 10% - 400%
which can therefore extend the project base tempo range.
NOTESNOTES
Projects3
Projects
3
Play
Pattern
Play
Song
Undo Add
Slot
Delete
Slot
Pattern Tempo
130.0 BPM
Track 1 Track 5Track 3 Track 7Track 2 Track 6Track 4 Track 8 Slot
1
Pattern
1
Song 0m:00s P1.008

37
Polyend Tracker Manual
36 Polyend Tracker Manual
3.5 Metronome
Tracker has a metronome which operates when live recording (not normal
playback). This is congurable and selectable on/off within the ‘Cong’
menu under the ‘Metronome’ options.
Option Parameters Description
State On, Off
Default Off Toggles the metronome on or off.
Pre Roll On, Off
Default Off
Sets a count in before the sequencer starts to
help timing of punch in recording.
Ideal for live recording.
Time signature num 1 - 12
Default 4
Number of beats in a measure / bar. Upper
number in the normal time signature value.
Example 4/4 set to 4 beats per measure.
Time signature denum 1 - 12
Default 4
Beat value, division of note. Lower number in
the normal time signature value. Example 4/4
has a quarter note per beat.
Volume 1 - 100
Default 50 Volume of the metronome’s ‘tick’ sound
Press [Left] or [Right] to navigate between the option windows
and use [Up] or [Down] to navigate to the desired option.
Metronome Settings.
▌ SETTING THE METRONOME
1. Press [Cong] to open the project conguration menu.
2. Ensure the left window is highlighted red i.e. in focus. Navigate windows
by pressing [Left] or [Right]. Menu windows will automatically be
selected when pressing the relevant screen keys below the window to
navigate [Up] or [Down].
3. Press [Up] [Down] or Turn (Jog) to highlight with the bounding box over
the ‘Metronome’ option. Alternatively press the relevant screen keys
below the window to navigate [Up] or [Down].
4. Press the relevant screen keys below the window to navigate [Up] or
[Down] under the central options to highlight with the bounding box over
the required Metronome option.
5. To change the selected parameter / setting, Press [Change], 6th Screen
button. The parameter pop-up window listing the available options will
appear.
6. Turn (Jog) or Press [Up] / [Down] or [Up] / [Down] Screen Buttons to
highlight the desired option.
7. Press [Apply], 6th Screen button to conrm selection or [Cancel], 3rd
Screen button to exit without changing.
8. The metronome will operate at the chosen time signature and volume
when live recording is activated using [Rec] + [Play]. The Pre roll will
provide a count in of 4 and show the ‘Recording in 4. 3. 2. 1.’ message
before starting to record.
NOTESNOTES
Projects3
Projects
3
Change
Project Settings State Off
General Pre Roll Off
MIDI Time signature num 4
Metronome Time signature denum 4
Firmware Volume 50
Manual
Credits
Cong 0m:00s P1.008
Config

39
Polyend Tracker Manual
38 Polyend Tracker Manual
3.6 Project Pool & Instrument List
A pre-requisite for creating patterns is to have a series of instruments
available to record or program into steps. Instruments are based on the
samples loaded into the project pool and parameters applied to create
instruments. Instruments can also be loaded from other projects but must
exist in the current project instrument list to be accessible to the pattern
steps. A maximum of 48 instruments are available per project depending on
the sample size and hence memory usage.
An instrument or sample from the SD Card libraries can be added into the
active project instrument list. The instrument list is used to congure steps.
Basics of setting up a project instrument list using the [Sample Loader]
function is shown here and further details on the sample management is
detailed later.
Sample
Loader
Enter
Preview Vol
0.00 dB
Memory
17%
Rename Delete
Unused
PreviewAdd Next Import
Sample Loader 0m:00s P1.008
SD Card Instruments
/Firmware 1. Strange Sample Number 1
2. Deep Kick
4. Snare One
5. Closed Hat 1
6.
7.
8.
9.
10.
11.
12.
13.
3. Transient Kick
/Games
/Instruments
/Manual
/Mod
/Samples
/Projects
/trackerLog
Press [Left] or [Right] to navigate between the option windows a red
bounding box will indicate the selected window. Press [Up] or
[Down] or Turn (Jog) to navigate to the desired listed option.
Window display pains between SD Card
and Instrument List. Max 48 instruments
can be stored in a Tracker project.
Project memory available based on the
selected samples / instruments in the
instrument list.
The bar will show an additional red
element - if memory will increase and
green bar - if memory will decrease
when browsing a sample / instrument
indicating potential memory impact if
sample / instrument is added.
NOTES
Projects3
Projects
3
NOTES
▌ CREATING A PROJECT INSTRUMENT LIST
1. Press [Sample Loader] to open the sample browser and instrument list
utility page.
2. Navigate to the central ‘Instruments’ window and highlight either an
empty slot or an existing instrument. If an existing instrument is
highlighted it will be replaced by the newly selected choice.
3. Navigate to the left ‘SD Card’ window and highlight either instruments or
samples. Use the [Up] or [Down] or Turn (Jog) to navigate and Press
[Enter] screen button to select folder. Use [Shift] + Arrows to batch
select multiple samples / instruments.
4. With a sample or instrument highlighted in the left window, press the
[Add], 1st Screen button. This will add or replace in the selected
instrument slot. Using [Add Next], 2nd Screen button will add a sample
and will automatically jump the cursor to the next slot.
5. The memory bar chart will indicate the available project memory in
tracker. This will depend on the type and size of samples selected and
may limit the amount of instruments available in the instrument list.
6. Additional samples / instruments can be added. The instruments in the
list will be available to add to a step.
Notes:
• A prompt will be offered if replacing an existing instrument.
• When navigating, the /.. symbol indicates folders and subfolder
with a name. Selecting /.. alone will navigate up a level of the SD
Card folder structure.
• Instruments have a .pti lename.
• The memory bar will show an additional red band (increases
memory usage) or green band (decreases memory usage)
indicating the potential memory impact when highlighting a sample
/ instrument to add. Should this be added to the instrument pool it
will affect the memory usage as indicated by the red/green bar.
Other manuals for Tracker
2
Table of contents