PolyKeg Fusto PREMIUM 30L Ambra valvola S User manual

This document is the property of PolyKeg S.r.l. - Unauthorised copying and use is prohibited
MI01 Rev. 06 dated 08/11/2019
USER MANUAL
FOR POLYKEG
KEGS

- 2 /18 - MI01 Rev. 06 dated 08/11/2019
This document is the property of PolyKeg S.r.l. - Unauthorised copying and use is prohibited
USER MANUAL FOR POLYKEG KEGS
INTRODUCTION
The Polykeg®one-way keg is for professional use for the tapping of drinks.
This manual provides information, instructions and warnings for the correct management and use of the
Polykeg®one-way keg.
CONTENTS
1. TRACEABILITY AND LABELLING page 3
2. WARNINGS AND RULES FOR SAFETY page 4
3. HANDLING - STORAGE - TRANSPORT OF EMPTY KEGS page 5
4. HANDLING - STORAGE - TRANSPORT OF FULL KEGS page 6
5. INSTRUCTIONS FOR THE SANITISING OF THE KEG page 7
6. INSTRUCTIONS FOR THE MANUAL FILLING OF KEGS WITH AND WITHOUT BAGS page 8
7. INSTRUCTIONS FOR THE AUTOMATIC FILLING OF KEGS WITHOUT BAGS page 10
8. INSTRUCTIONS FOR THE AUTOMATIC FILLING OF KEGS WITH BAGS page 11
9. INSTRUCTIONS FOR TAPPING page 12
10. INSTRUCTIONS FOR DEPRESSURISATION page 13
11. INSTRUCTIONS FOR DISPOSAL page 14
12. MATERIAL AND SYMBOL INFORMATION SHEET page 12
13. ACCESSORIES page 16
14. OPTIONAL EQUIPMENT page 17

- 3 /18 - MI01 Rev. 06 dated 08/11/2019
This document is the property of PolyKeg S.r.l. - Unauthorised copying and use is prohibited
USER MANUAL FOR POLYKEG KEGS
1. TRACEABILITY AND LABELLING
STANDARD IDENTIFICATION OF THE PALLET
The complete traceability of the product is guaranteed by an identification label attached to every single pack.
Fig. 1 shows the data provided on the label in detail.
VALVE SERIAL NUMBER
Each valve is identified by a unique serial number (Fig. 2).
KEG SERIAL NUMBER
Each keg is identified by a unique serial number (Fig. 3).
Fig. 1
Code
Description
Production date / time
Batch / Quantity
Fig. 2
Fig. 3
numero seriale fusto manuale pag4

- 4 /18 - MI01 Rev. 06 dated 08/11/2019
This document is the property of PolyKeg S.r.l. - Unauthorised copying and use is prohibited
USER MANUAL FOR POLYKEG KEGS
2. WARNINGS AND RULES FOR SAFETY
The PolyKeg®one-way keg is for professional use. Before use, consult this manual, the warning label and
instructions carefully (Fig. 1) as well as the symbols (Fig. 2) on the keg.
If you are inexperienced in the use of the PolyKeg®keg or tapping systems, contact your suppliers in order to
organise appropriate training. The tapping system must be fitted with a suitable pressure reducer complete
with a safety valve in order to not exceed the maximum operating pressure indicated on the label.
The incorrect use of the PolyKeg®keg and/or tapping system may damage the keg or lead it to burst, causing
harm to persons and/or things. The one-way PolyKeg®keg cannot be re-used, must not be incorrectly
disposed of and must be delivered empty and depressurised to an authorised collection centre.
Check the integrity of the keg before and during use.
Do not remove or render illegible the labels on the keg.
Keep away from
children.
Do not perforate
and/or cut.
Do not roll and/or
allow to fall.
Do not expose to
sunlight.
Do not remove
or tamper with
the valve.
Keep away from
corrosive/chemical
substances.
Do not use detergents.
HAZARD CO2 AND N2
Read the instructions regarding
the use of CO2 and N2 available
from your suppliers.
Suffocation hazard.
KEG TEMPERATURE
0°C < T < 35°C (32°F < T < 95°F)
WORKING PRESSURE
Max 3.5 bar (50 psi)
If over-pressurised, the keg may cause harm
to persons and/or things.
Fig. 1
Fig. 2

- 5 /18 - MI01 Rev. 06 dated 08/11/2019
This document is the property of PolyKeg S.r.l. - Unauthorised copying and use is prohibited
USER MANUAL FOR POLYKEG KEGS
3.
HANDLING - STORAGE - TRANSPORT OF EMPTY KEGS
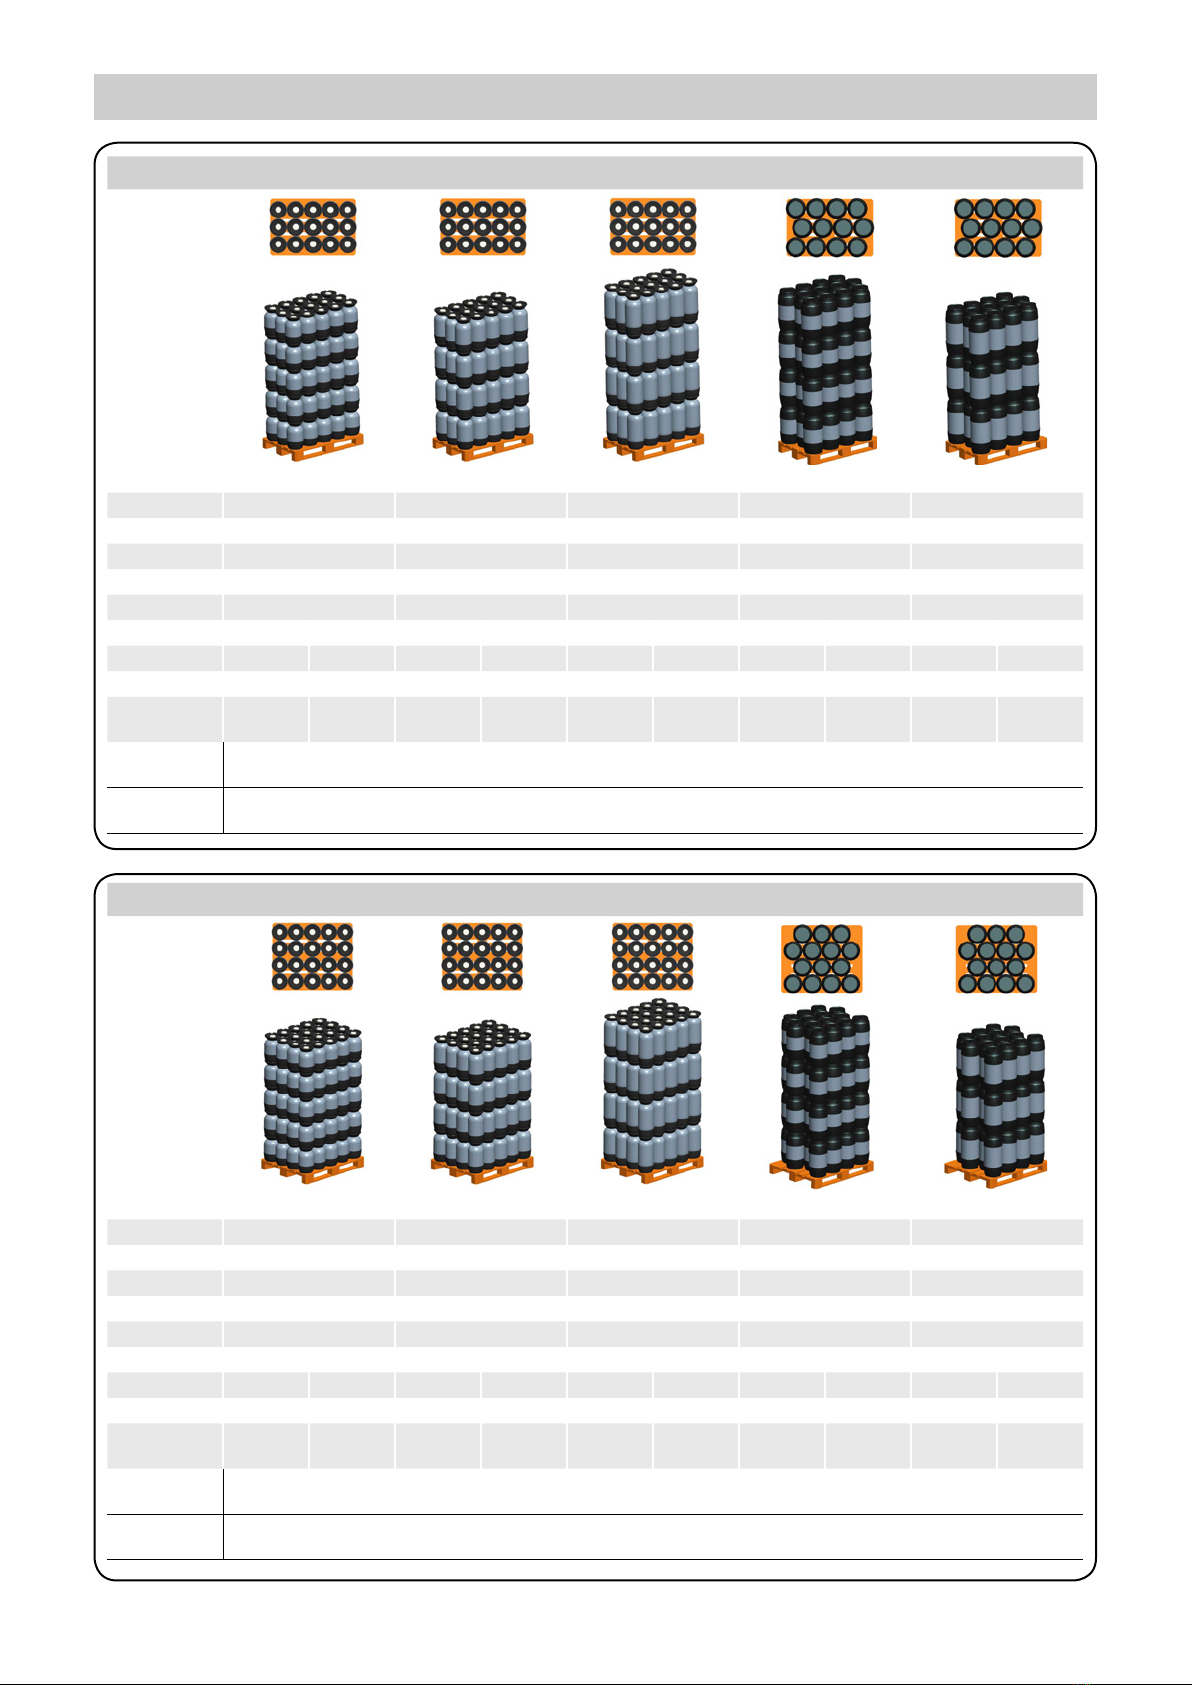
Empty kegs 800x1200 mm PALLETS
Palleting
12 L 16 L 20 L 24 L 30 L
N° layers 5 4 4 4 3
Kegs per layer 15 15 15 12 12
Kegs per pallet 75 60 60 48 36
Height (mm) 2124 mm 2090 mm 2442 mm 2402 mm 2152 mm
Height (inch) 83.62” 82.28” 96.14” 95.56” 84.72”
n° pallets n° kegs n° pallets n° kegs n° pallets n° kegs n° pallets n° kegs n° pallets n° kegs
Lorry (13.6m) 33 2475 33 1980 33 1980 33 1584 33 1188
Container 20 ft 11 825 11 660 11 660 11 528 11 396
Container 40 ft
High Cube 24 1800 24 1440 24 1440 24 1152 24 864
Notes The pallets are wrapped and covered with white stretch film. For the Basic version, a cardboard layer pad is inserted between the
various layers. Position of kegs: valve upwards.
Recommendations
Any stacking of pallets must be carried out in consideration of the mechanical properties of the kegs as shown on the technical sheet,
of local regulations, of the vehicles and methods for handling and the conditions of the storage areas.
Empty kegs 1000x1200 mm PALLETS
Palleting
12 L 16 L 20 L 24 L 30 L
N° layers 5 4 4 4 3
Kegs per layer 20 20 20 14 14
Kegs per pallet 100 80 80 56 42
Height (mm) 2124 mm 2090 mm 2442 mm 2402 mm 2152 mm
Height (inch) 83.62” 82.28” 96.14” 95.56” 84.72”
n° pallets n° kegs n° pallets n° kegs n° pallets n° kegs n° pallets n° kegs n° pallets n° kegs
Lorry (13.6m) 26 2600 26 2080 26 2080 26 1456 26 1092
Container 20 ft 10 1000 10 800 10 800 10 560 10 420
Container 40 ft
High Cube 21 2100 21 1680 21 1680 21 1176 21 882
Notes The pallets are wrapped and covered with white stretch film. For the Basic version, a cardboard layer pad is inserted between the
various layers. Position of kegs: valve upwards.
Recommendations
Any stacking of pallets must be carried out in consideration of the mechanical properties of the kegs as shown on the technical sheet,
of local regulations, of the vehicles and methods for handling and the conditions of the storage areas.

- 6 /18 - MI01 Rev. 06 dated 08/11/2019
This document is the property of PolyKeg S.r.l. - Unauthorised copying and use is prohibited
USER MANUAL FOR POLYKEG KEGS
4.
HANDLING - STORAGE - TRANSPORT OF FULL KEGS
Full kegs 800x1200 mm PALLETS
Palleting
12 L 16 L 20 L 24 L 30 L
N° layers 4 3 2 2 2
Kegs per layer 15 15 15 12 12
Kegs per pallet 60 45 30 24 24
Height (mm) 1730 mm 1606 mm 1298 mm 1278 mm 1486 mm
Height (inch) 68.11” 63.22” 51.10” 50.31” 58.50”
Recommendations
Any stacking of pallets must be carried out in consideration of the mechanical properties of the kegs as shown on the technical sheet,
of local regulations, of the vehicles and methods for handling and the conditions of the storage areas.
Full kegs 1000x1200 mm PALLETS
Palleting
12 L 16 L 20 L 24 L 30 L
N° layers 4 3 2 2 2
Kegs per layer 20 20 20 14 14
Kegs per pallet 80 60 40 28 28
Height (mm) 2293 mm 1606 mm 1298 mm 1278 mm 1488 mm
Height (inch) 68.11” 63.22” 51.10” 50.31” 58.50”
Recommendations
Any stacking of pallets must be carried out in consideration of the mechanical properties of the kegs as shown on the technical sheet,
of local regulations, of the vehicles and methods for handling and the conditions of the storage areas.
A3
Drawing N°
Version
THIS DRAWING IS PROPERTY OF PolyKeg s.r.l. UNAUTHORIZED COPY OR USES ARE STRICTLY FORBIDDEN
Assieme Pallettizzazione Filled Premium Epal3
Date 02-05-2019
0,050
ScaleWeight
02
Zuliani
Drawing byFinish
1/1
SheetMaterial
24L 30L
A3
Drawing N°
Version
THIS DRAWING IS PROPERTY OF PolyKeg s.r.l. UNAUTHORIZED COPY OR USES ARE STRICTLY FORBIDDEN
Assieme Pallettizzazione Filled Premium Epal3
Date 02-05-2019
0,050
ScaleWeight
02
Zuliani
Drawing byFinish
1/1
SheetMaterial
24L 30L
A3
Drawing N°
Version
THIS DRAWING IS PROPERTY OF PolyKeg s.r.l. UNAUTHORIZED COPY OR USES ARE STRICTLY FORBIDDEN
Assieme Pallettizzazione Filled Slim Epal1
Date 02-05-2019
0,050
ScaleWeight
02
Zuliani
Drawing byFinish
1/1
SheetMaterial
12L 16L 20L
A3
Drawing N°
Version
THIS DRAWING IS PROPERTY OF PolyKeg s.r.l. UNAUTHORIZED COPY OR USES ARE STRICTLY FORBIDDEN
Assieme Pallettizzazione Filled Slim Epal3
Date 02-05-2019
0,050
ScaleWeight
02
Zuliani
Drawing byFinish
1/1
SheetMaterial
12L 16L 20L
A3
Drawing N°
Version
THIS DRAWING IS PROPERTY OF PolyKeg s.r.l. UNAUTHORIZED COPY OR USES ARE STRICTLY FORBIDDEN
Assieme Pallettizzazione Filled Slim Epal3
Date 02-05-2019
0,050
ScaleWeight
02
Zuliani
Drawing byFinish
1/1
SheetMaterial
12L 16L 20L
A3
Drawing N°
Version
THIS DRAWING IS PROPERTY OF PolyKeg s.r.l. UNAUTHORIZED COPY OR USES ARE STRICTLY FORBIDDEN
Assieme Pallettizzazione Filled Slim Epal3
Date 02-05-2019
0,050
ScaleWeight
02
Zuliani
Drawing byFinish
1/1
SheetMaterial
12L 16L 20L
A3
Drawing N°
Version
THIS DRAWING IS PROPERTY OF PolyKeg s.r.l. UNAUTHORIZED COPY OR USES ARE STRICTLY FORBIDDEN
Assieme Pallettizzazione Filled Slim Epal1
Date 02-05-2019
0,050
ScaleWeight
02
Zuliani
Drawing byFinish
1/1
SheetMaterial
12L 16L 20L
A3
Drawing N°
Version
THIS DRAWING IS PROPERTY OF PolyKeg s.r.l. UNAUTHORIZED COPY OR USES ARE STRICTLY FORBIDDEN
Assieme Pallettizzazione Filled Slim Epal1
Date 02-05-2019
0,050
ScaleWeight
02
Zuliani
Drawing byFinish
1/1
SheetMaterial
12L 16L 20L

- 7 /18 - MI01 Rev. 06 dated 08/11/2019
This document is the property of PolyKeg S.r.l. - Unauthorised copying and use is prohibited
USER MANUAL FOR POLYKEG KEGS
5. INSTRUCTIONS FOR THE SANITISING OF THE KEG
The PolyKeg®keg cannot be re-used and is supplied ready to use. The following indications must be
followed in order to guarantee the utmost hygiene of the product.
SUGGESTED PRODUCTS
• Peracetic acid solution (max 2%)
• Hydroalcoholic solution (max 20%) in accordance with the product placed in the keg
• Hot water / steam
WARNINGS:
Check that the detergent / sanitiser is compatible with the product to place in the keg and with the
PolyKeg®keg in accordance with the material sheet (section 12 of this manual).
In the case of sanitisation with hot water and/or steam:
• Maximum pressure: 0.8 bar
• Maximum temperature: 100°C
• Exposure time: a few seconds
WHAT TO SANITISE
It is necessary to sanitise all of the surfaces that will come into contact with the product to place in the
keg, such as the keg valve, the filling and tapping connector, etc.
It is also necessary to rinse the surfaces treated with the sanitising products with water.

- 8 /18 - MI01 Rev. 06 dated 08/11/2019
This document is the property of PolyKeg S.r.l. - Unauthorised copying and use is prohibited
USER MANUAL FOR POLYKEG KEGS
6.INSTRUCTIONS FOR MANUAL FILLING OF KEGS WITH AND WITHOUT BAG
For the manual filling of the kegs, please use the PolyKeg®filling kit compatible with the keg valve (please
find the available filling kits list in section 14 of the user manual). In case of A and G type kegs with bag,
Micro Matic couplers are recommended.
6.1 PREPARATION
• Clean and sanitise all connection surfaces (Fig. 1), following
the instructions given in section 5 of the user manual.
• Assemble the filling kit as shown in Fig. 2.
• Secure the gas regulator connection % Fig. 2.
• Close the pressure top – up valve #and the product filling
valve (Fig. 2.
NOTE For the K - valve coupler, open the red valve (Fig. 2 A).
• Close the counter – pressure regulator ^ Fig. 2.
• Connect the product tube &to the product filling connection
*Fig. 3.
• Check that the gas pressure in the system does not rise above
the maximum value allowed as mentioned in section 2 of the
user manual.
• Connect the gas tube ! as shown in Fig. 3.
NOTE Use CO2or N2for Polykeg®without bag.
It is possible to use air for Polykeg®with bag.
• Purge product through the tube &to ensure no air is left in the
tube using product filling valve ( Fig. 3.
• Proceed with the filling as per procedure 6.2.
!Gas tube
@Pressure top-up connection
#Pressure top-up valve
$Pressure gauge
%Gas regulator connection
^Counter-pressure regulator
&Product tube
*Product filling connection
(Product filling valve
)Keg coupler
Micro Matic is recommended.
@
!
#
$
^
*
&
(
)
Fig.1
%
Fig. 2 Manual filling kit
Fig. 2A KK coupler
Fig. 3

- 9 /18 - MI01 Rev. 06 dated 08/11/2019
This document is the property of PolyKeg S.r.l. - Unauthorised copying and use is prohibited
USER MANUAL FOR POLYKEG KEGS
6.2 FILLING PROCEDURE
• Place PolyKeg®to be filled on a stable level surface.
• Clean and sanitise coupler and valve following the instructions given in section 5 of the user manual.
• Connect the filling head to the valve.
• Lower completely the coupler’s handle ) Fig. 1. The pressure gauge $ will now display PolyKeg’s
internal pressure.
• To set the counter-pressure, open the pressure top-up valve # until reaching the desired counter-
pressure value (approximately 0.5 bar less than the product filling pressure) and then close it.
• Open the product filling valve (Fig. 1 to start the filling process.
• Work on the counter-pressure regulator ^ Fig. 1 to set and/or change the product filling speed.
• Once reached the desired product level, close the product filling valve (Fig. 1.
NOTE Do not exceed the filling nominal volume to avoid any potential spilling.
NOTE For kegs with bag, before lifting the coupler’s handle at the end of the filling process:
- Close the counter-pressure regulator ^.
- Open the pressure top-up valve # to reach a counter-pressure value equal or superior
to the product filling pressure.
- Close the pressure top-up valve #.
• Lift quickly the coupler’s handle ) Fig. 1.
• Disconnect the filling head from the keg.
• Remove any leftover product from the keg.
• Clean and sanitise the valve.
• Place the tamper evident cap on the valve Fig. 2.
#
$
^
(
)
Fig. 1 Fig. 2

- 10 /18 - MI01 Rev. 06 dated 08/11/2019
This document is the property of PolyKeg S.r.l. - Unauthorised copying and use is prohibited
USER MANUAL FOR POLYKEG KEGS
7. INSTRUCTIONS FOR THE AUTOMATIC FILLING OF KEGS WITHOUT BAGS
For the use of the PolyKeg®keg with automatic filling systems, please bear in mind the following indications:
1. The PolyKeg® keg can be filled with the valve facing either upwards or downwards.
2. PolyKeg® kegs are supplied pressurised to 1 bar with nitrogen (ready to be filled).
3. The maximum axial load of the PolyKeg®keg (clamping force) varies in accordance to the internal
pressure. Reference values:
• 100 kg at 1 bar (as supplied).
• 60 kg at 0 bar (if depressurised during filling).
4. The contact surfaces on the PolyKeg®valve must be sanitised by following the indications in section 5
of this manual.
• Maximum water pressure: 1 bar
• Maximum water temperature: 100°C
5. PolyKeg®valves are compatible with the industrial standards for tapping systems. For detailed infor-
mation regarding filling, request the PolyKeg®technical drawings relative to each specific valve.
FILLING PROCEDURE
1. Connect the filling head to the PolyKeg®valve.
2. Clean and sanitise the valve.
3. Open the keg valve.
4. If necessary, adjust the counter-pressure according to the parameters of pressure/temperature for
the product used for filling.
5. Begin filling - the fluid will enter the keg.
6. Once the desired quantity has been reached, stop filling.
7. Close the keg valve.
8. Disconnect the filling head.
9. Remove any product residue from the valve.
10. Clean and sanitise the valve.
11. Apply the protective seal to the valve.

- 11 /18 - MI01 Rev. 06 dated 08/11/2019
This document is the property of PolyKeg S.r.l. - Unauthorised copying and use is prohibited
USER MANUAL FOR POLYKEG KEGS
8. INSTRUCTIONS FOR THE AUTOMATIC FILLING OF KEGS WITH BAGS
In order to use the PolyKeg®keg with an inner bag in automatic filling systems, the indications below
must be followed:
1. The Polykeg®keg with bag can be filled with the valve pointing either upwards or downwards.
2. The filling of the bag must take place exclusively via the central channel of the valve (or rather the exit
channel for the product during tapping).
3. Polykeg®kegs with bag are supplied filled with:
• Pressure of 1 bar between the keg and the bag
• Pressure of 0.5 bar with CO2 in the bag.
4. The maximum axial load of the PolyKeg®keg (clamping force) varies in accordance to the internal
pressure. Reference values:
• 100 kg at 1 bar (as supplied).
• 60 kg at 0 bar (if depressurised during filling).
5. The surfaces on the PolyKeg®valve must be sanitised according to the indications in section 5 of this
manual.
6. PolyKeg®valves are compatible with the industrial standards for tapping systems. For detailed
information regarding filling, request the PolyKeg®technical drawings relative to each specific valve.
IMPORTANT: For the filling of PolyKeg®kegs with bags with A, G or K valves:
• Use the correct filling head stroke - refer to the PolyKeg®technical drawings
• After filling, bring the counter-pressure between the keg and the bag to a level which is equal to or
slightly higher than that used for filling.
8.1 FILLING PROCEDURE
1. Connect the filling head to the PolyKeg®valve.
2. Clean and sanitise the valve.
3. Open the keg valve.
4. If necessary, adjust the counter-pressure in accordance with the product pressure/temperature
parameters for the product used for filling in order to set and/or vary filling speed.
5. Begin filling - the fluid will enter the keg.
6. Once the desired quantity has been reached, stop filling.
7. Bring the counter-pressure between the keg and the bag to a level which is equal to or slightly higher
than that used for filling.
8. Close the keg valve.
9. Disconnect the filling head.
10. Remove any product residue from the valve.
11. Clean and sanitise the valve.
12. Apply the protective seal to the valve.

- 12 /18 - MI01 Rev. 06 dated 08/11/2019
This document is the property of PolyKeg S.r.l. - Unauthorised copying and use is prohibited
USER MANUAL FOR POLYKEG KEGS
9. INSTRUCTIONS FOR TAPPING
ATTENTION:
One-way keg for professional use; consult this manual for the PolyKeg®keg and your tapping system
before use. If you are inexperienced in the use of the PolyKeg®keg or tapping systems, contact your
suppliers in order to organise appropriate training.
The tapping system must be fitted with a suitable pressure reducer complete with a safety valve, in order
to not exceed the maximum working pressure indicated on the label.
The incorrect use of the PolyKeg®keg and/or tapping system may damage the keg or lead it to burst,
causing harm to persons and/or things.
9.1 TAPPING PROCEDURE:
• Wear personal protective equipment (goggles, gloves...).
• Ensure that the area is well-ventilated.
• Check that the calibrated and working pressures of your tapping system have been correctly set.
• Clean and sanitise all connection surfaces in accordance with the indications in section 5 of this
manual.
• Fit the connector to the valve of the PolyKeg®keg (Fig. 1-2-3 ) and proceed with tapping.
• To disconnect the keg from the tapping system, proceed as indicated in Fig. 1-2-3 .
If it is necessary to temporarily disconnect the keg, it must be handled and stored in accordance with the
indications in section 2 of this manual.
In order to once again proceed with tapping, repeat the connection procedure according to the indica-
tions in section 9.1 of this manual.
When the keg is empty, it will be necessary to immediately depressurise it according to the instructions
in section 10 of this manual.
Fig. 1
A-M valve
Fig. 2
G-K valve
Fig. 3
S-D valve
2
23 3
1 1
2
11 1
3 3
1
2 2
1 1

- 13 /18 - MI01 Rev. 06 dated 08/11/2019
This document is the property of PolyKeg S.r.l. - Unauthorised copying and use is prohibited
USER MANUAL FOR POLYKEG KEGS
10. INSTRUCTIONS FOR DEPRESSURISATION
Once tapping has finished, it is mandatory for the keg to be depressurised with the dedicated key
(Fig. 2) or by breaking the PRV if there (fig. 3). The dedicated key shown in Fig. 2 is suitable for all
types of Polykeg®valves: A, D, G, K, M, S and can be fixed to the top as shown in Fig. 1.
It is forbidden and dangerous to dispose of the keg with residual internal pressure as it may burst and
cause harm to persons and/or things.
10.1 DEPRESSURISATION PROCEDURE
1. Wear personal protective equipment (goggles, gloves...).
2. Ensure that the area, where PolyKeg®will be depressurised, is well-ventilated.
3. Once the PolyKeg®is disconnected from the tapping system, remove any residual product from the
keg valve.
4. Completely depressurise the keg (0 BAR 0 PSI) with the dedicated key (fig. 4) and/or by breaking the
PRV (fig. 5).
Fig.1
Fig. 3
Fig. 4 Fig. 5
Fig. 2

- 14 /18 - MI01 Rev. 06 dated 08/11/2019
This document is the property of PolyKeg S.r.l. - Unauthorised copying and use is prohibited
USER MANUAL FOR POLYKEG KEGS
11. INSTRUCTIONS FOR DISPOSAL
The PolyKeg®keg cannot be re-used, must
not be incorrectly disposed of and must be
delivered empty, depressurised and dismantled
to an authorised collection centre.
For a sustainable approach, the PolyKeg®
keg must be separated with the dedicated
dismantling key (Fig. 1) into its individual parts
as indicated in the procedure.
11.1 DISMANTLING PROCEDURE
1. Check that the keg is empty.
2. Proceed with depressurisation (as indicated in section 10 of the PolyKeg®user Manual).
3. Proceed to unscrew the valve with the dedicated dismantling key (Fig. 2-3).
4. Separate the keg into its parts (A-B-C) (Fig. 4).
5. Compact the bottle as much as possible in order to reduce the environmental impact of transportation.
6. Dispose of the parts (A-B-C) (Fig. 4) separately in authorised centres according to the classification of
materials as defined in section 12 of the instruction manual and/or regulations in force.
Fig.1
Fig. 2 Fig. 3
A
B
C
Fig. 4

- 15 /18 - MI01 Rev. 06 dated 08/11/2019
This document is the property of PolyKeg S.r.l. - Unauthorised copying and use is prohibited
USER MANUAL FOR POLYKEG KEGS
12. MATERIAL AND SYMBOL INFORMATION SHEET
In order to obtain the highest possible level of recycling, and more sustainable models, every single
component of the PolyKeg® keg including the valve spring is made of plastic, facilitating recycling.
Below are indications of the symbols and materials used in accordance with the requirements set out by
Directive 94/62/EC (article 8) and the Decision of the European Community 97/129/EC.
!
@
#
$
%
&
^
DESCRIPTION
IDENTIFICATION
(Decision
97/129/EC)
MATERIAL
SYMBOLS
(CR 14311:2002)
OTHER
VALVE
ALTRO
OTHER
PLASTICS
BOTTLE PET
BAG KIT
PP, LLDPE
OPA, ALU,
OPA, PE
TUBE PP
TOP, BASE,
TAMPER POLYPROPYLENE
SLEEVE LDPE
5
PP
5
PP
5
PP
4
LDPE
4
LDPE
90
C/LDPE
41
ALU
1
PET
7
OTHER
7
OTHER
@
%
#
^
!
$
&

- 16 /18 - MI01 Rev. 06 dated 08/11/2019
This document is the property of PolyKeg S.r.l. - Unauthorised copying and use is prohibited
USER MANUAL FOR POLYKEG KEGS
13. ACCESSORIES
Polykeg®has developed a number of accessories available on request which allow the keg to be handled
correctly.
DEPRESSURISATION KEY
This accessory allows for the complete and safe
elimination of the residual pressure contained in
the keg before disposal.
For a correct use of the depressurisation key,
please refer to the instructions in section 10 of this
user manual.
SECURITY SEAL
Applied immediately after filling, this device protects
the valve from tampering and / or shocks during
transport and storage.
DISMANTLING KEY
This tool allows the unscrewing of the valve and
the separation of the keg in its various parts in
order to facilitate and optimize recycling. For a
correct use of the disassembly key, please refer
to section 11 of this user manual.

- 17 /18 - MI01 Rev. 06 dated 08/11/2019
This document is the property of PolyKeg S.r.l. - Unauthorised copying and use is prohibited
USER MANUAL FOR POLYKEG KEGS
14. OPTIONAL EQUIPMENT
In order to guarantee the ideal manual filling of the keg, PolyKeg®recommends using Micro Matic con-
nectors, which are available for all PolyKeg®valves A S G D M K.
In order to facilitate operations, PolyKeg®has developed a professional filling kit for each valve (Fig. 1).
All the kits are available with practical cases.
!
#
@
Each kit is composed of:
!Micro Matic connector
(for A - S - G - D - M - K valves).
@Gas connection.
#Reading gauge.
MANUAL FILLING KIT - A VALVE
MANUAL FILLING KIT - S VALVE

- 18 /18 - MI01 Rev. 06 dated 08/11/2019
This document is the property of PolyKeg S.r.l. - Unauthorised copying and use is prohibited
USER MANUAL FOR POLYKEG KEGS
MANUAL FILLING KIT - G VALVE
MANUAL FILLING KIT - K VALVE
MANUAL FILLING KIT - M VALVE
MANUAL FILLING KIT - D VALVE

- 19 /18 - MI01 Rev. 06 dated 08/11/2019
This document is the property of PolyKeg S.r.l. - Unauthorised copying and use is prohibited
USER MANUAL FOR POLYKEG KEGS
NOTE

This document is the property of PolyKeg S.r.l. - Unauthorised copying and use is prohibited
www.polykeg.com
POLYKEG S.R.L.
Via P. Nenni, 51 - 24050 Calcinate (BG) - Italy -
Tel. +39 035 4522245 - www.polykeg.com
IT290152-1
IT290152-1
Table of contents
Other PolyKeg Kegerator manuals