PORODO PD-HDPRJAN-BK User manual


Contents
Chapter 1: Warm Reminder p.01
Chapter 2: Projector Overview p.02
Chapter 3: Remote Control/Key Overview p.04
Chapter 4: Equipment Connection Settings p.05
Chapter 5: Android Interface p.07
Chapter 6: External Channel (OSD) Settings p.15
Chapter 7: Projection Distance and Screen Size p.17

Chapter 1 Warm Reminder
Accessories
Do not operate the unit before reading the instru tion manual.
Dis onne t the power able from the outlet if the proje tor
overheats or emits smoke.
Avoid looking dire tly into the lens to prevent eye damage.
Keep hildren away from the proje tor to prevent them from
looking into the lens.
Conne t the proje tor to other omponents before turning it on.
Do not attempt to repair the proje tor; unauthorized repairs ould
void the warranty.
Do not use the proje tor in wet onditions and avoid pla ing liquids
near it.
Ensure the air inlet is unblo ked and the proje tor is situated in a
well-ventilated area.
Proje tor
Remote Control
Power Adapter
Power Cable
User Manual
Page 1

Chapter 2 Projector Overview
Projector Bac View
Projector Top View
1Power Switch
219VDC in
3USB port
4HDMI in
5Indicator light
6Infrared receiving Window
7AV in 8.3.5mm audio earphone in
8Lens Focus
9Projector Handle
12
3 4
5
6
7
8
9
Page 2

1Lens 3Machine Corner Gasket*4
2Dual Channel Speaker 4Bracket Screw Hole
Attention
Please do not look into the lens directly to avoid harm to your
eyes.
Projector Front View Projector Bottom View
1
2
3
4
3
2
Page 3

Page 4
Chapter 3 Remote Control / Key Overview
Power
2Rewind
3Sound Off
4Fast Forward
5Play/Pause
6Up
7Right
8Down
9Left
0 Ok
Channel
2 Return
3 Menu
4 Volume+
5 Volume-

Page 5
Chapter 4 Equipment Connection Settings
Warning: To be safe, cut power between projector and relative equipment
before connectin cables.
Turn on
Select the Channel for the Projector
Hi h-Version with battery in, lon press the menu key to call up
the projector. (The lower version does not have a battery-in).
If the battery is low, please use the matchin 19V DC adapter to
connect the projector DC input for battery char in .
The indicator li ht is on durin ener izin . After pressin the
power button, the indicator li ht ashes for several seconds
and then oes out. The projector starts to work.
Press the remote control Channel key,
which can brin up the channel menu
from any interface.
Use up and down direction keys for
choosin the channel.
The projector should choose the correct channel when connected
with different devices, such as HDMI, AV.
1
2
3
1
2

Page 6
Press OK to conrm the channel.
Press the return key to cancel the connection or press the channel
key to choose another channel.
3
4
Equipment Connection Settin s
Connect with HDMI Device
Use an HDMI cable to connect the projector with an HDMI
device (such as a computer, HD player, DVD, and so on).
Connect the USB
Insert the USB into the projector, move the icon on the main
interface to the corresponding options to open the video,
audio, text, images, and other documents.
Connect the AV Devices
Prepare a 3-in-1 3.5mm AV cable. The red, yellow, and white end
connected with the output end, while the 3.5mm end connect with
the AV interface of the projector. Then enter to the AV input channel
with the projector signal selection key.
1Connect USB
2Connect HDMI
3Connect AV
1 2 3

Page 7
Chapter 5 Android Desk
Overview
All App
Press the "power on" button, it will
enter the main interface after the
"power on" logo appeared for a
few seconds.
Use the remote control to select all applications to view pre-installed
applications and downloaded applications.
Main interface review:
Pre-installed Applications and downloaded applications
EShare: Enables android phones to share the screen with the
projector quickly.
Source: Select the HDMI signal or AV signal
Browser: Connect USB ash drive to local play
Add App: Common applications can be added to the main
interface

Page 8
Main interface review:
Local Player: Connect the USB drive to play local audio, video,
and text.
EShare: Facilitates multi screen interaction between mobile
phones, computers, and other electronic devices and the
projector.
Aptoide TV: Access a variety of live TV channels.
Miracast: Enables fast screen sharing between mobile phones
and the projector.
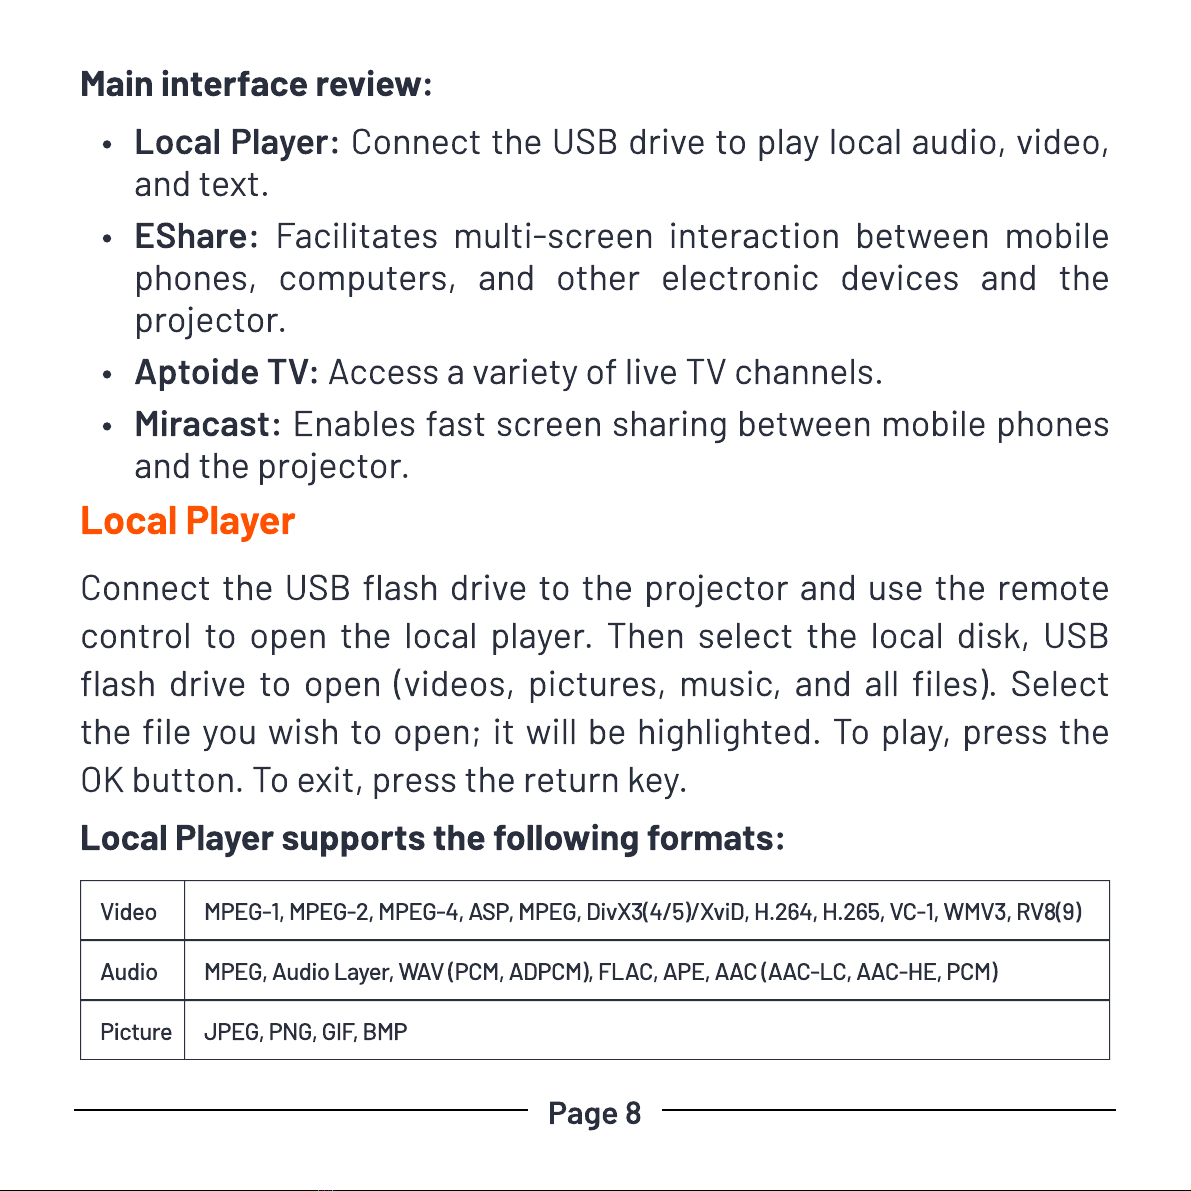
Local Player supports the following formats:
Local Player
Connect the USB ash drive to the projector and use the remote
control to open the local player. Then select the local disk, USB
ash drive to open (videos, pictures, music, and all les). Select
the le you wish to open; it will be highlighted. To play, press the
OK button. To exit, press the return key.
Video MPEG-1, MPEG-2, MPEG-4, ASP, MPEG, DivX3(4/5)/XviD, H.264, H.265, VC-1, WMV3, RV8(9)
Audio MPEG, Audio Layer, WAV (PCM, ADPCM), FLAC, APE, AAC (AAC-LC, AAC-HE, PCM)
Picture JPEG, PNG, GIF, BMP

Page 9
Text les supported: ord (DOC, DOCX, DOT), PowerPoint
(PPT, PPTX), Excel (XLS, XLT, XLSX)
Please open the WPS software to open the text le.
Android Settings >> System Settings
Navigate using the left and right arrow keys on the remote control
to access the system settings. Use the up, down, left, and right
arrow keys to select the desired Settings, then press the OK key to
enter.

Page 10
From the main page, go to settings → network settings → WIFI
settings. Press O to enter WIFI settings. Select the WIFI network
you wish to join, press O to enter the settings, input the password
when prompted, and press the return key to exit the WLAN
interface.
To enable Bluetooth, navigate
to the main menu and select
Settings > Bluetooth. Press
O to activate Bluetooth and
choose the device you wish to
pair with. Once paired, press
the Return key to exit the
settings menu.
1. Network Settings
2.Bluetooth Settings

Page 11
To access Application Settings, go to the main menu and select
Settings > APP. Press OK to enter the Application Settings menu.
Select the desired application and choose either Open or Uninstall
from the options.
To modify the language settings, access the Language Settings
menu by navigating to the main page and selecting Settings >
Language Setting. Press OK to conrm your selection. Choose the
desired language from the available options and press Enter to
apply the selected language.
To change the input method, go to the main page and select
Settings > Input Method. Choose between the System Input or a
Downloaded Input method.
3.Application Settings
4.Language Settings
Input Method

Page 12
To customize the Android keyboard
settin s, navi ate to the main pa e and
select Settin s > Android Keyboard
Settin . Enable or disable Sound on
Keypress and Auto-Capitalize options as
per your preference.
Android Keyboard Settings
Navi ate to the main menu and select
"Date Settin ." Press OK to enter the date
and time settin s. You have the option to
enable "Auto Settin " to synchronize with
internet time or to set the time manually if
automatic settin is disabled.
Boot Source Option: In the main menu, o
to "Other Settin ," then to le the "Boot
Source" to ON or OFF, allowin the device
to boot from internal or external sources.
Power On Option: Choose "Standby" or
"Power on" to set the device's behavior
upon connectin to power.
5.Date Setting
6.Other Settings

Page 13
Projection Mode: Access this feature by selectin "Projection" under
the settin s in the main menu. You can choose from various
projection orientations such as Front, Rear, Upside-down Front, or
Upside-down Rear projection.
Keystone Correction: For keystone correction, navi ate to "Projection"
within the "Ima e Settin ." If keystone correction is needed, activate
the 4-directional (left, ri ht, up, or down) adjustment to normalize the
ima e. This process employs di ital technolo y for ima e ali nment.
Keystone Correction Guide: Enter the manual keystone adjustment
mode. Use the directional keys to select the corner requirin
adjustment, and press the conrm key. After selectin a corner, use
the directional keys to adjust the parameters. Conrm adjustments
by pressin OK. To switch to another corner, use the arrow keys. To
quickly reset to the default, press the menu key.
Projection Setting

Page 14
To erform a system u date, go to
the main menu and select "System
U date." Use a ash memory disk for
local u dates. The "Restore Factory"
o tion reverts the rojector to its
original factory settings.
Access system information by
navigating to "Settings" and selecting
"System Info" from the main menu.
This section rovides details about
the device name, system version,
memory ca acity, ROM, and other
relevant information.
8.System Update
9.System Information

Page 15
Chapter 6 External Channel (OSD Settings
To adjust settings when the projector is connected to an external
device like an HDMI, use the following steps:
1. Long-press the menu key to bring up the OSD (On-Screen Display).
2. Use the directional keys or to select the desired menu for
settings.
3. Navigate with the directional keys or to choose the specic
item you wish to adjust and press OK to modify.
4. After making adjustments, press the return key to save your
settings.

Page 16
Main Menu Functions:
Item Descriptio
Picture Mod Adjusts contrast, brightness, color, sharpness,
hue Color Temperature: Options include Cool,
Warm, Standard, Custom
Aspect Ratio Choose between 4:3, 16:9
Surround Sound Can be turned Off or ON
Sound Mode Selections include Film, Standard, User, Music

Page 17
Chapter 7 Projection Distance and Screen Size
Image Size (Inch) Projection Screen L+W (cm) Lens–Screen (M)
40 0.91*0.5 1.1
50 1.13*0.62 1.36
60 1.36*0.75 1.62
70 1.57*0.86 1.85
80 1.78*0.98 2.09
90 2.0*1.11 2.32
100 2.20*1.2 2.53
Disclaimer:
Our company reserves the right to make changes to the
instruction manual's contents without prior notice. Software
updates may lead to discrepancies between the OSD (On-Screen
Display) operation menu and the pictures shown in this manual.
These changes will not impact the actual operational functions as
described within the manual. We apologize for any inconvenience
this may cause and ask for your understanding.

Table of contents