PowerCare Universal SL User manual

52-208-010401-PL
THANK YOU
We appreciate the trust and confidence you have placed in PowerCare through the purchase of this snow thrower cab. We strive to
continually create quality products designed to enhance your home. Visit us online to see our full line of products available for your home
improvement needs. Thank you for choosing PowerCare!
Questions, problems, missing parts?
Before returning to the store, call PowerCare Customer Service 8 a.m.–6 p.m, EST, Monday-Friday
1-866-308-3976
HOMEDEPOT.COM
1 17cH55_20778
USE AND CARE GUIDE
POWERCARE: Universal SL Snow Thrower Cab

Safety Information ...................................................................................................................................................................................................................2
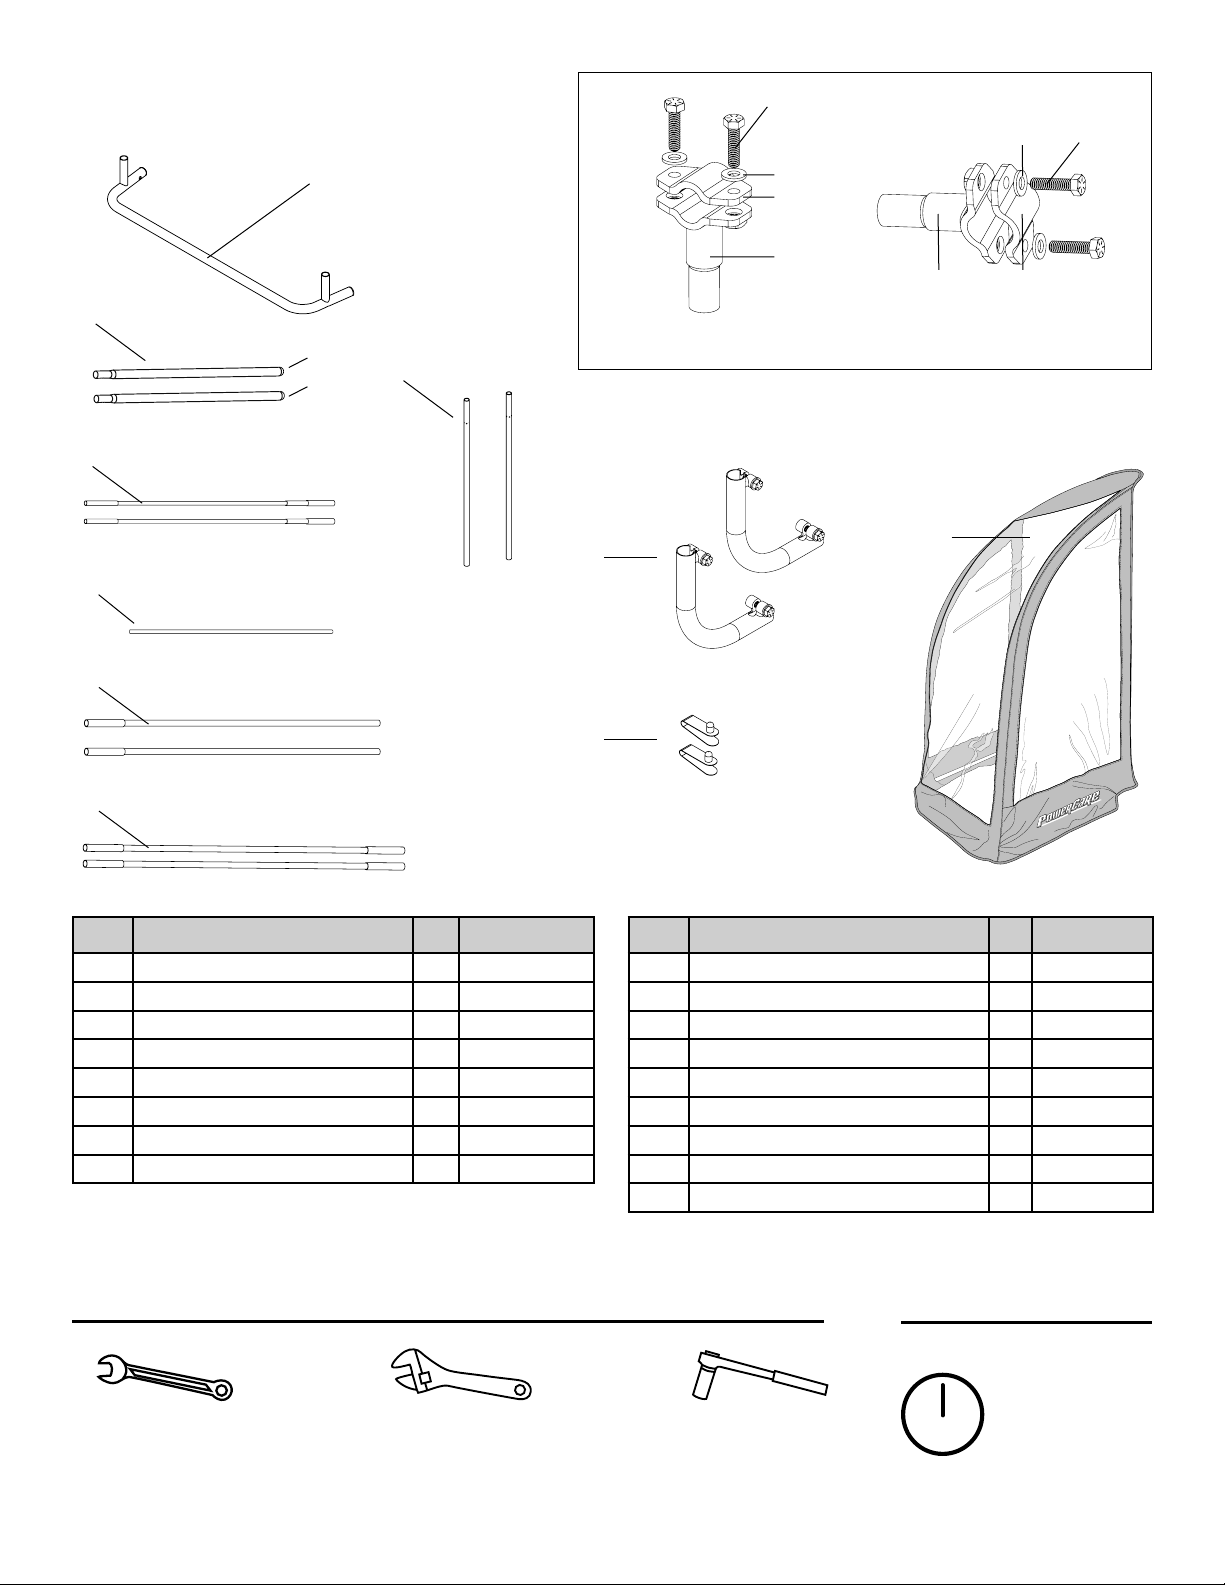
Package Contents List (Parts and Hardware) .........................................................................................................................................................................3
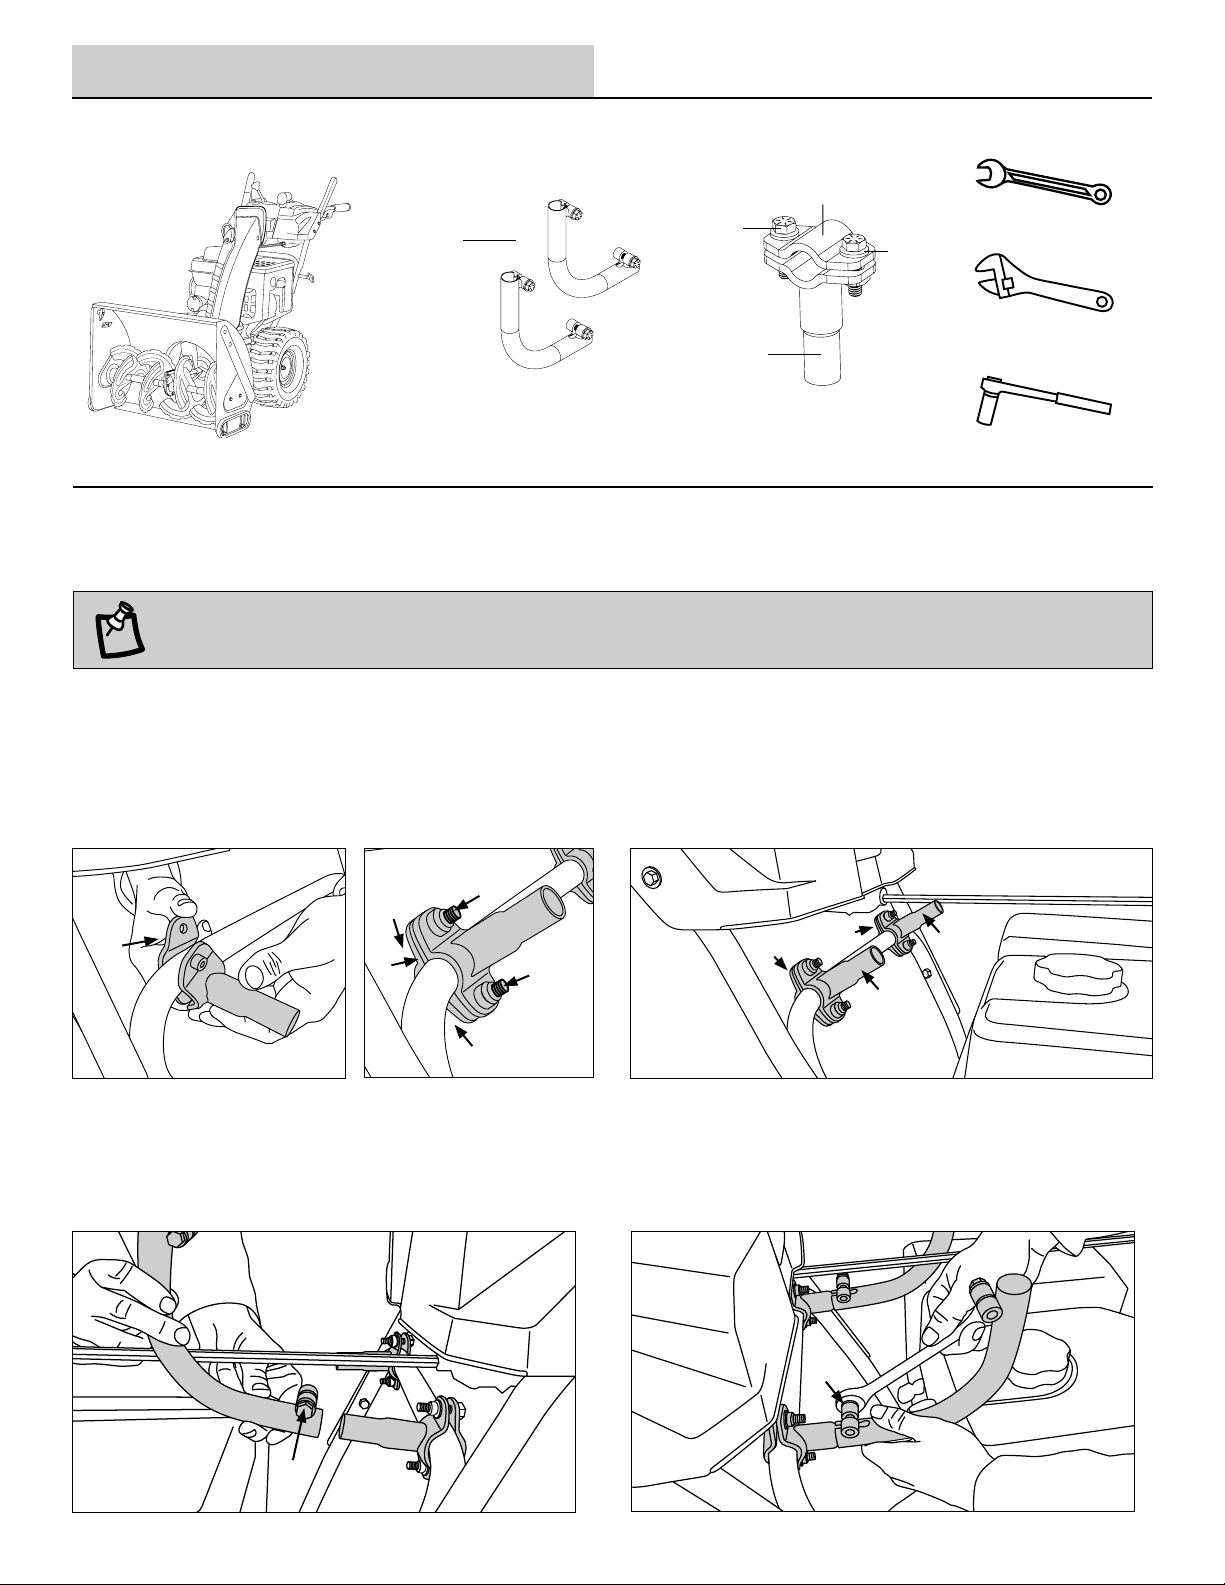
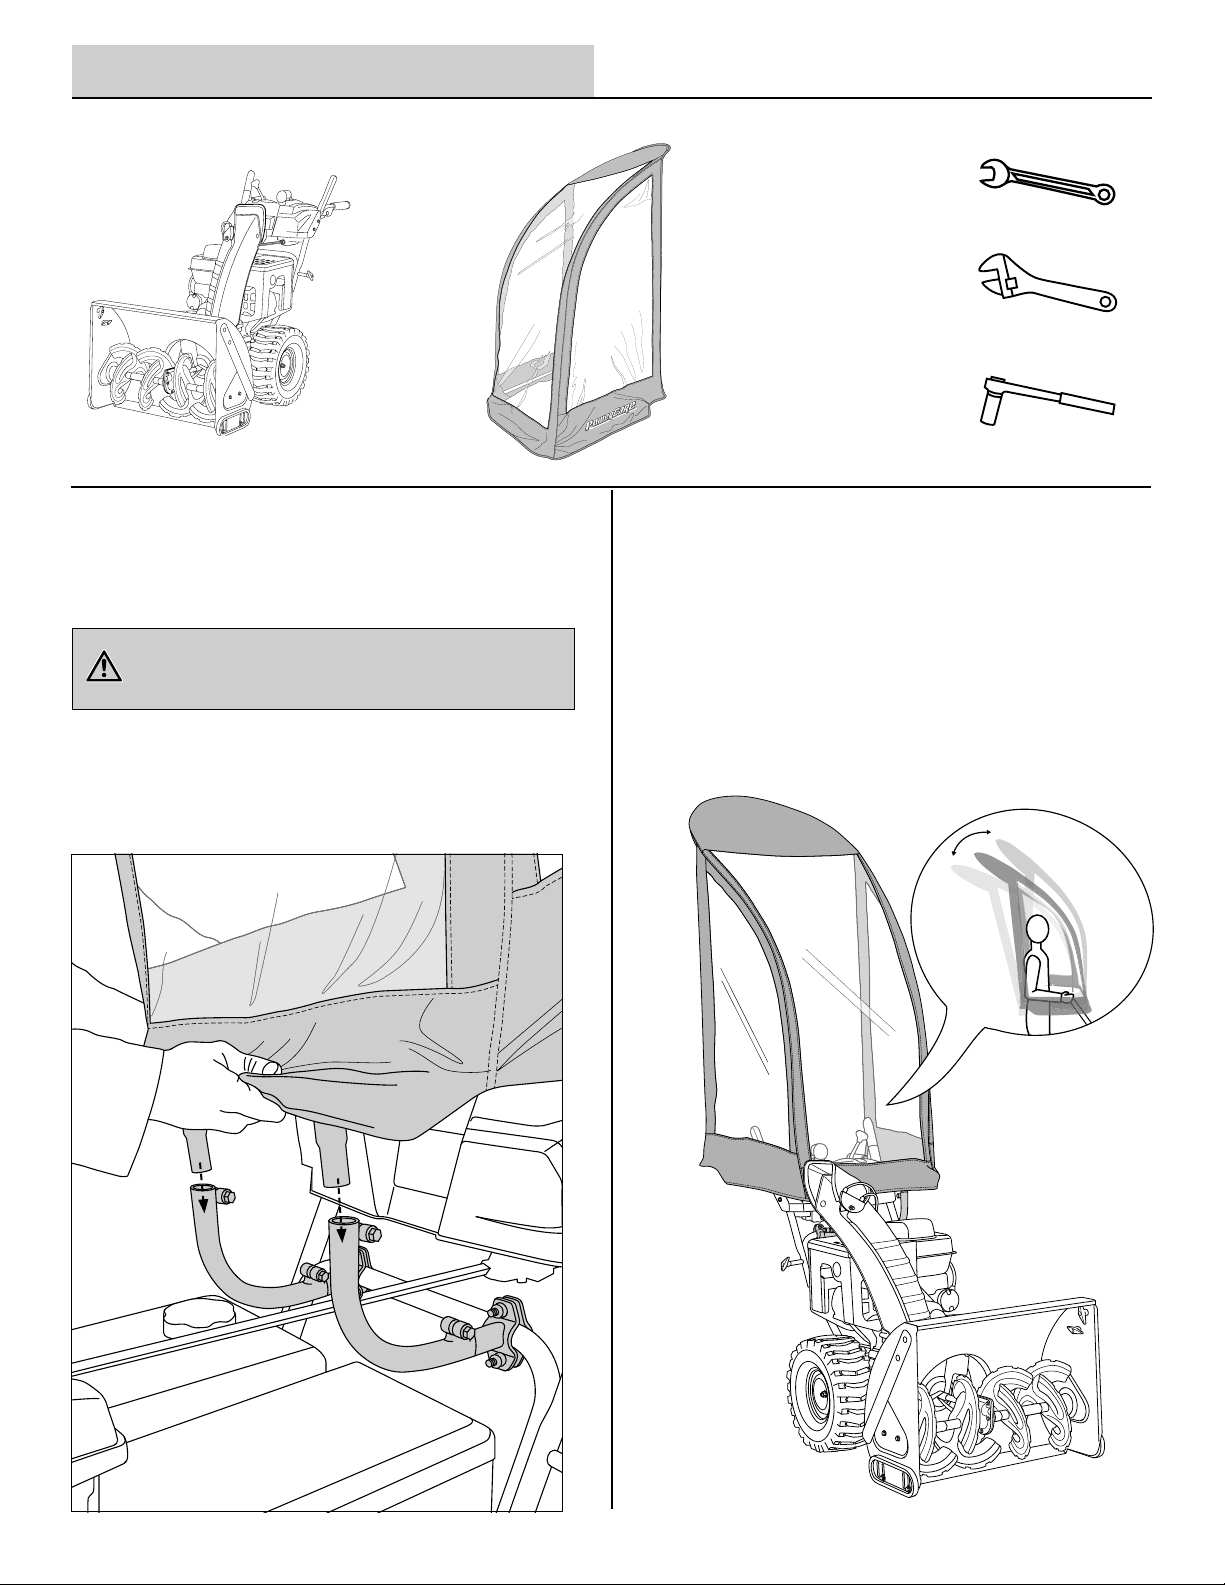
Tools Needed............................................................................................................................................................................................................................3
Assembly Time.........................................................................................................................................................................................................................3
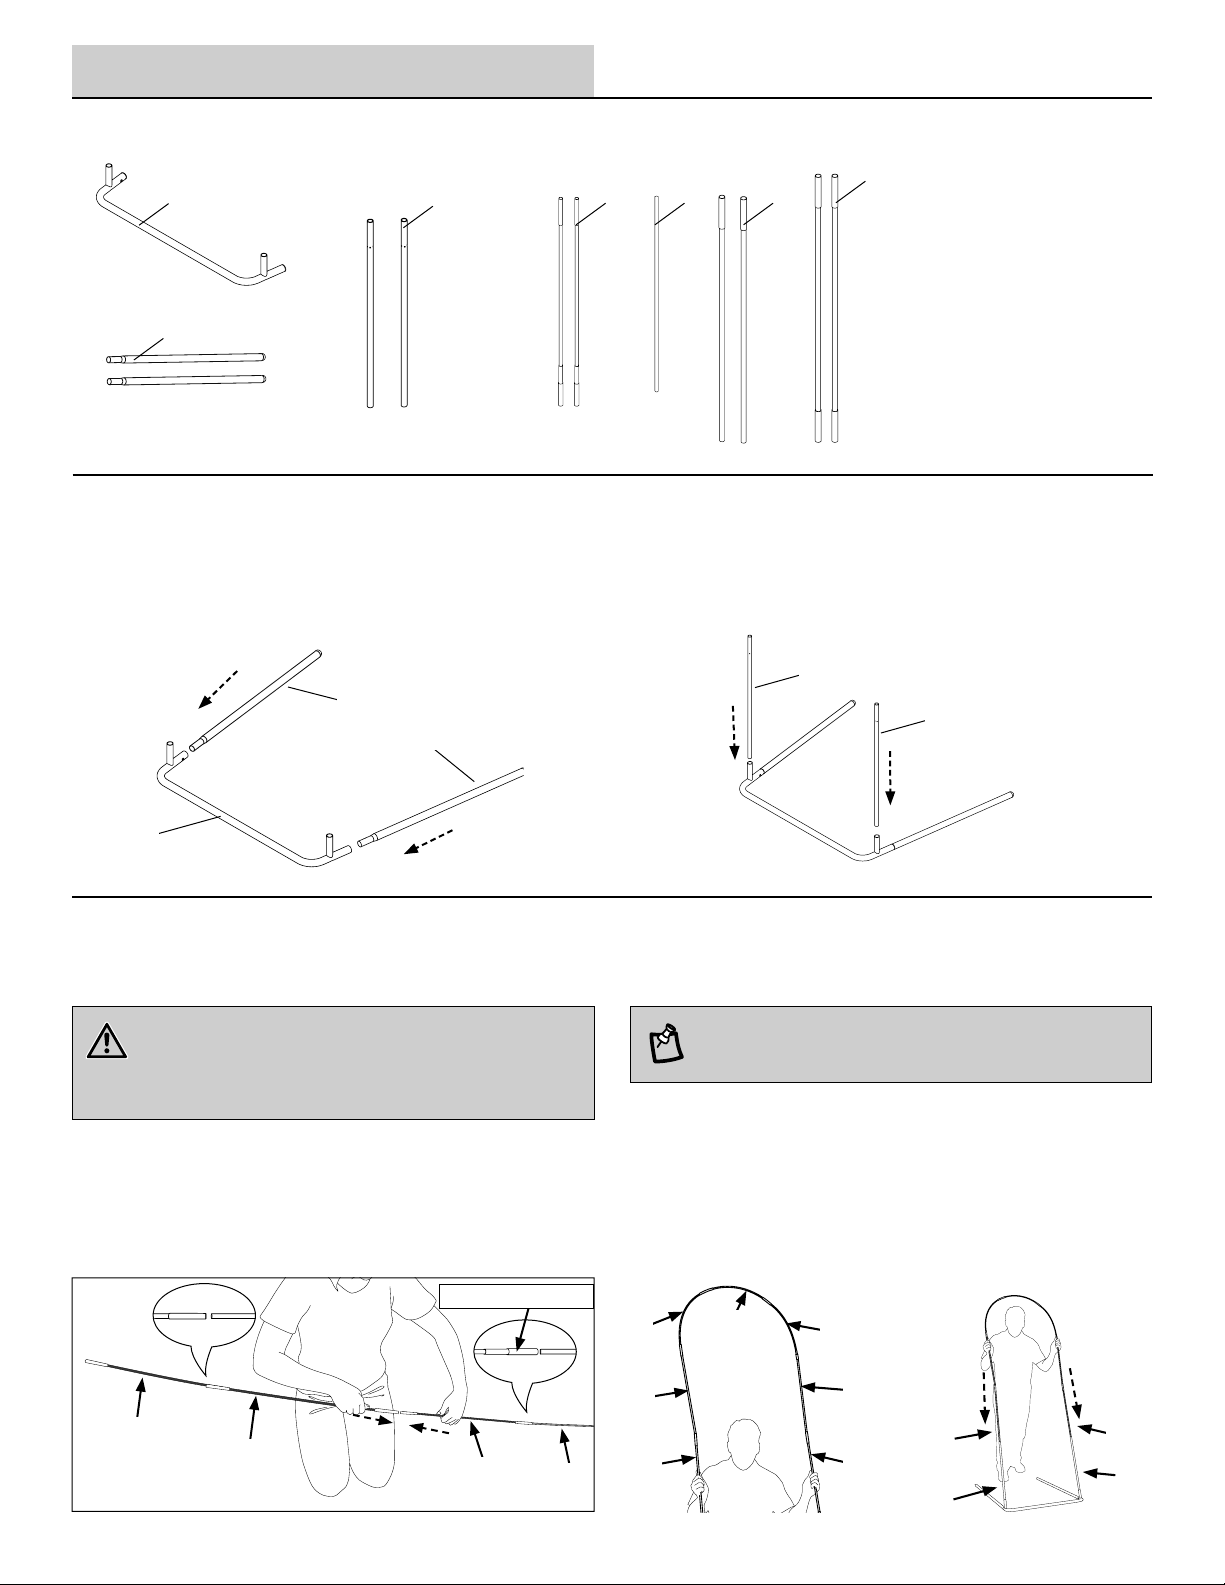
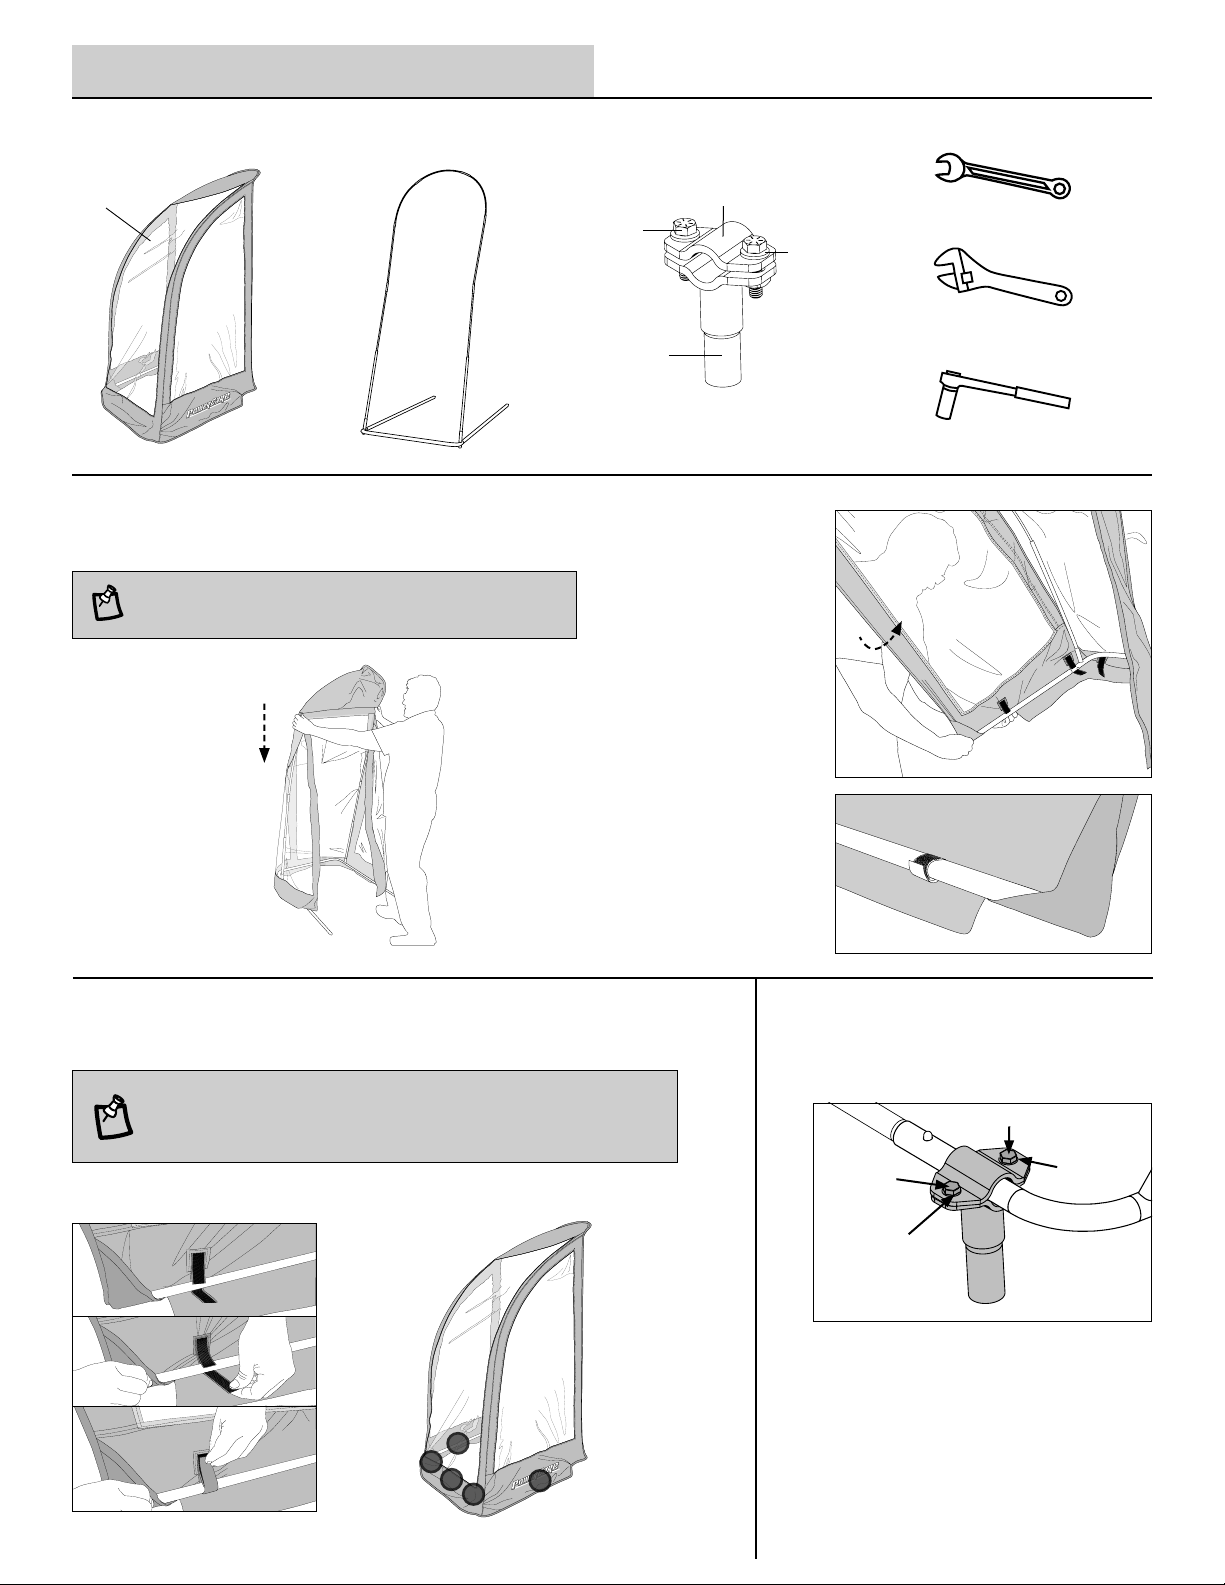
Assembly Instructions ......................................................................................................................................................................................................... 4-7
Care and Maintenance.............................................................................................................................................................................................................8
Troubleshooting .......................................................................................................................................................................................................................8
Replacement Parts...................................................................................................................................................................................................................8
TABLE OF CONTENTS
SAFETY INFORMATION
Please read and understand this entire manual before attempting to
assemble, operate or install the product. If you have any questions
regarding the product please call PowerCare customer service at
1-866-308-3976,
8a.m.– 6p.m, PST, Monday–Friday.
THE CAB IS NOT A PROTECTIVE DEVICE.
The cab will NOT protect against noise, engine exhaust, chemicals,
collision, roll-over or other accidents.
Follow all your snow thrower manufacturer’s recommended safety
instructions.
Operating a snow thrower with this cab will restrict your field of vision.
Watch carefully for people, children, obstructions or obstacles.
The cab adds height to your snow thrower. Remember the height of
your cab. Watch carefully for tree limbs or other items overhead that
you could previously go under without a cab.
Do not transport snow thrower with the cab attached
Before use be sure that all bolts are tight. If one or more bolts comes
loose failure of cab parts may occur.
Warranty void if product used for commercial or rental purposes or if
the snow thrower cab is transported on an open trailer or truck.
Only qualified, trained adults should service your machine.
Understand service procedure before doing work.
Keep area clean and dry.
Do not operate the engine in a confined space where dangerous carbon
monoxide fumes can collect.
Never lubricate, service or adjust the machine or attachment while it is
moving. Keep safety devices in place and in working condition.
Keep hardware tight.
Keep hands, feet, clothing, jewelry, and long hair away from any
moving parts to prevent them from getting caught.
Disconnect battery or remove spark plug wire (for gasoline engines)
before making any repairs.
Keep all parts in good condition and properly installed. Fix damage
immediately. Replace worn or broken parts. Replace all worn or
damaged safety and instruction decals.
Check all hardware at frequent intervals to be sure the equipment is in
safe working condition.
Do not modify machine or safety devices. Unauthorized modifications
to the machine or attachment may impair its function and safety.
WEAR APPROPRIATE CLOTHING
Always wear eye protection when operating the machine.
Wear close fitting clothing and safety equipment appropriate for
the job.
Always wear substantial footwear and long trousers.
Wear a suitable protective device such as earplugs.
Loud noise can cause impairment or loss of hearing.
PRACTICE SAFE MAINTENENCE
2

Part Description Qty Part No.
AMain Frame 1PRT-52-208A
BMain Frame Leg 2PRT-52-086B
EVertical Steel Posts 2PRT-52-086E
FUpper Fiberglass Rods 2PRT-52-086F
GCenter Fiberglass Rod 1PRT-52-086G
HLower Fiberglass Rods w/Single Ferrule 2PRT-52-086H
ILower Fiberglass Rods w/Double Ferrule 2PRT-52-086I
JDomed nylon plug 2PRT-52-086J
Part Description Qty Part No.
K.75 Mounting Post Upper Clamp w/Weld Nut 2PRT-52-208K
L.75 Mounting Post Upper Clamp w/Weld Nut 2PRT-52-086L
M6/7" Mounting Post 2PRT-52-208M
QHex Bolt – Grade 8 Steel 8PRT-52-087Q
SWasher – Steel 8PRT-52-087S
T1.0 Mounting Post Upper Clamp w/Weld Nut 4PRT-52-208T
U1.0 Mounting Post Upper Clamp Top Plate 2PRT-72102600L
VSpring clip - Installed 2PRT-52-086K
QCab Skin 1PRT-52-086Q
*PVC tubes on the ends of the hoop poles are used in assembly, DO NOT remove.
PACKAGE CONTENTS LIST (PARTS)
I
A
J
J
F
E
G
B
H
Q
TOOLS NEEDED
1/2 in. Box Wrench Adjustable Wrench 1/2 in. Socket WrenchOROR
ASSEMBLY TIME
One Hour (60 Minutes)
V
SPRING CLIP
INSTALLED AT FACTORY
KNOB WITH M8 STUD
4MM ALLEN WRENCH
M8 X 30 HEX BOLT
M8 WASHER
SPRING CLIP
INSTALLED AT FACTORY
KNOB WITH M8 STUD
4MM ALLEN WRENCH
M8 X 30 HEX BOLT
M8 WASHER
M
3
S
L
K
Q
SQ
T U
(2 each)(2 each)

4
NO TOOLS NEEDEDPARTS NEEDED
1ASSEMBLE THE FRAME
2ASSEMBLE THE HOOP
ASSEMBLY AND INSTALLATION
A
B
B
E
E
Insert vertical posts [E] into the main frame bar [A] making
sure the notch in the post is at the top.
Insert main frame legs [B] into the main frame [A] until the spring
button pops through hole in the main frame bar.
While grasping both ends of
the assembled hoop, insert
poles into the ends into the
vertical posts [E].
Grasp the hoop pole assembly
by the outside set of poles and
bend into a curve.
Lay the fiberglass rods on a flat surface to assemble.
Connect the seven hoop rods [H], [I], [F],[G] together as shown.
The plastic PVC sleeve of rod [F] must attach to rod [G].
E
H
E
H
H
H
I
FG
I
F
G
F
I
H
Plastic PVC Sleeve
WARNING! Use care when assembling the fiberglass
rods. Under tension they can slip out of the metal/PVC
sleeves causing serious injury. Safety goggles
are recommended.
+
AE
B
G H
F
I
Note: Make sure that fiberglass rods are fully seated in
neighboring plastic PVC sleeves when joined together.

5
Slide the top
pocket of the
fabric shell
[Q] over the
installed hoop
assembly.
Secure the skin to the frame with the sewn-in rip-n-grip strips (5 total).
Assemble .75" mounting post upper clamp
[K] to the top plate [L] on the forward edge
of the frame [A]. Secure with two washers
[S] and two hex bolts [Q].
Repeat with the other mounting post set on
the opposite side of the frame.
ASSEMBLY AND INSTALLATION
TOOLS NEEDEDPARTS NEEDED
Note: Fabric skin will be tight when properly assembled.
Note: When attaching the rip-and-grip strip, push the frame up while
pulling the strip around the frame to increase tension in the shell.
+ +
Q
3INSTALL THE CAB SKIN ONTO THE FRAME
4SECURE THE FABRIC SKIN TO THE FRAME 5INSTALL MOUNTING
POSTS ON CAB FRAME
Q
(Snow cab skin not shown for visibility.)
K
Q
S
S
L
A
5
2
3
4
1
1/2 in. Box
Wrench
OR
OR
1/2 in. Socket
Wrench
Adjustable
Wrench
Pull down the lower corner of the
shell and slide over the end of the
side frame bars [B].
Repeat with the other elastic corner,
making sure frame is secure in
elastic pocket.
K
L
S
Q
(2 each)

6
PARTS NEEDED
Note: Exact positioning may vary depending on your machine. Note: If your machine does not have a horizontal crossbar, it may be
necessary to mount the 1" mounting post upper clamp pieces (U) and (T) on the vertical side frame.
6ATTACH THE MOUNTING SYSTEM TO YOUR SNOW THROWER
ASSEMBLY AND INSTALLATION
Attach 6/7" mounting posts (M) to the 1" mounting post upper
clamp (T).
Tighten until snug.
Repeat on opposite side with the remaining 6/7" mounting
post (M).
TOOLS NEEDED
1/2 in. Box
Wrench
OR
OR
1/2 in. Socket
Wrench
Adjustable
Wrench
Q
Attach the 1" mounting post upper clamp (T) to the mounting
post upper clamp top plate (U) on the horizontal crossbar of the
snow cab.
Install it so that it is snug but not tight.
Repeat on opposite side of the crossbar with the remaining
1" mounting post matching the angle with the previously
installed post.
T
UU
T
T
U
T
Q
Q
U
S
S
M
T
Q
M
T
+
M
T
U
S
Q
+
(2 each)

PARTS NEEDED
7
Lift up the cab and drop the .75" mounting post upper clamps (K)
into the mounting posts (M) tighten both sides until snug.
Adjust the cab and mounting system until parts look level.
Once installed it may be necessary to adjust the cab to
make it level. Adjust the angle of the cab until you are happy
with the angle.
Tighten all bolts down.
CAUTION: No part of the fabric cab skin should touch the
engine or exhaust system of your snow thrower.
7 INSTALL ASSEMBLED CAB ON
LOWER MOUNTING POSTS 8 ADJUSTING THE
SNOW THROWER CAB ANGLE
ASSEMBLY AND INSTALLATION
TOOLS NEEDED
1/2 in. Box
Wrench
OR
OR
1/2 in. Socket
Wrench
Adjustable
Wrench
M
M
K
K
+

8
© 2018 • 17cH54_20778
STORAGE
Store in a clean dry place.
Never store a wet cab in an enclosed area as it can develop mildew.
Avoid folding the plastic windows of the cab for long periods.
BOLTS
Check all bolts before each use to see that they are tight. If one or more bolts come loose, failure of cab parts may occur.
WINDOWS
Don't clean the plastic windows when they are dry—you can scratch them.
Hose them with water and rub them with your bare hands. Liquid soap may be used.
During freezing weather an automotive windshield cleaner and a soft cloth will work (don't use your bare hands with the cleaner).
Fabric areas of the cab may be washed with a rag. Don't use soap as it may remove protective coatings added by the factory.
CARE AND MAINTENENCE
TROUBLESHOOTING
Problem Possible Cause Corrective Action
Cab front interferes with the
snow thrower controls.
Main frame [A] is mounted
too low.
Adjust the position of mounting posts (T)
so cab clears controls. Note: it may be
necessary to mount the 1" mounting post
upper clamp pieces (T) on the vertical
side frame.
REPLACEMENT PARTS
PARTS
See page 3 for part description and part numbers.
Table of contents