Powermate PM2015 User manual

Look Inside for:
Page
Safety Definitions 2
Important Safety Information 3-6
Product Specifications 7
Parts & Features 7
Safety Decals 8
Assembly 9-12
Operation 13-15
Routine Maintenance 16-19
Common Repair Parts 19
Storage 19
Troubleshooting 20
Technical Service 21
Warranty 21-24
07/14/2016 Printed in China A203240
Operator’s Manual
WALK-BEHIND
LAWN MOWER
Record the following for future reference:
Model No: ___________________
Mfg. Date Code: ______________________
Date of Purchase: Attach a copy of your sales receipt.
Consumer Toll Free Number: 1-800-737-2112
KEEP THIS MANUAL FOR FUTURE REFERENCE
MODEL NO.
PM2015
If you have a question or problem...
CALL TOLL FREE: 1-800-737-2112
Refer to the website for electronic manual and parts book.
www.powermateoutdoor.com
WARNING
CALIFORNIA PROPOSITION 65 WARNING
Engine exhaust, some of its constituents, and certain product components contain or emit chemicals known to the State
of California to cause cancer and birth defects or other reproductive harm.
IMPORTANT:
This manual provides complete instructions for safely operating and
maintaining your mower. Read and save these instructions. Refer to
this manual each time before using your mower.

Questions? Call Toll Free at 1-800-737-2112 Copyright © 2016 MAT Engine Technologies, LLC
ENG - 2
PUSH TO PRIME
Push primer 3 times before starting a
cold engine . Important: Do not prime
to restart a warm engine.
Oil Fill Location
Do Not Overfill
Indicates WARNING, DANGER,
or CAUTION. It means: Attention! Become
Alert! Your Safety Is Involved.
Do not mow when children or others
are around.
Read operator’s manual before operating
this machine. Failure to follow directions
could result in serious injury.
This mower can throw small objects at
high speed causing personal injury or
property damage. Remove objects that
could be thrown by the blade.
Keep hands and feet away from rotating
parts.
Wear eye protection that meets or
exceeds the requirements of ANSI
Z87.1.
Do not mow slopes greater than 15°. Mow
across slopes, never up and down.
Hot surface. The muffler and engine
become hot and can burn you. Do not
touch.
DANGER
KEEP HANDS and FEET AWAY
DANGER The mower is capable of amputating
hands and feet. To avoid risk or seri-
ous injury, do not put hands or feet near
or under the mower. Keep clear of the
discharge opening at all times.
Gasoline is flammable. Handle with care.
Engine exhaust contains large amounts
of poisonous carbon monoxide (CO)
gas.
Engine exhaust contains carbon monox-
ide, an odorless and deadly gas. NEVER
run unit indoors or in a poorly ventilated
area.
Safety Definitions
• Save all instructions
SAFETY WARNING SYMBOLS
CONTROL AND OPERATING SYMBOLS
Indicates an imminently hazardous situation which, if not avoided, will result in death or serious injury.
Indicates a potentially hazardous situation which, if not avoided, could result in death or serious injury.
Indicates a potentially hazardous situation which, if not avoided, may result in minor/moderate injury.
NOTICE
Indicates a situation which may result in equipment / property damage or may relate to
general safety messages.
DANGER
CAUTION
WARNING
The symbols below identify important safety information in this manual. Become familiar with these symbols and the
warnings associated with these symbols.
SAFETY ALERT SYMBOLS
Become familiar with and understand the meaning of the warning symbols found on your mower.
Important Safety Information

Questions? Call Toll Free at 1-800-737-2112 Copyright © 2016 MAT Engine Technologies, LLC
ENG - 3
Important Safety Information
• Save all instructions
BEFORE OPERATING THE MOWER
1. READ AND UNDERSTAND ALL INSTRUCTIONS BEFORE OPERATING THE MOWER.
DANGER
The mower is capable of amputating hands and feet and throwing objects. Read and follow all warnings and safety instructions
on the mower and in this manual. Failure to do so can result in serious injury or death to you or bystanders.
2. Avoid Dangerous Environments
a. Do not operate the mower while under the influence of alcohol, medications, or drugs.
b. Do not operate the mower when you are tired.
c. Do not use this mower if you are mentally or physically unable to operate safely.
3. Make sure all fasteners are tight and safety devices (guards, shields, blade control, etc.) are in place and working
correctly. Inspect mower for damaged parts. Replace any damaged parts.
4. Dress properly when operating the mower.
a. Always wear substantial footwear that provides protection and reliable footing. Never operate the mower in
bare feet or sandals.
b. Heavy long pants, steel-toed boots, gloves, and a long-sleeve shirt are recommended.
c. Do not wear loose clothing or jewelry that can get caught in the moving parts of the mower.
5. Always wear eye protection that meets or exceeds the requirements of ANSI Z87.1.
6. Operate the mower only in daylight or good lighting conditions.
7. Thoroughly inspect the area where the mower is to be used and remove all foreign objects such as rocks, wire,
toys, etc., which could be thrown by the blade.
WARNING
This mower can throw small objects at high speed causing personal injury or property damage.
WHILE OPERATING THE MOWER
1. Stay alert. Watch what you are doing.
2. Do not operate the mower if it is damaged or not securely and fully assembled.
DANGER
Never start or run the mower inside a closed room or building; breathing exhaust fumes can kill.
WARNING
Tragic accidents can occur if you are not alert to the presence of children. Children are often attracted to the mower and mow-
ing activity. Never assume that children will remain where you last saw them.
3. Only well instructed and responsible adults should operate the mower. Never allow children to operate the mower.
4. Keep children and bystanders out of the mowing area. Keep children under the watchful care of a responsible adult
other than the operator.
5. Be alert and turn the mower engine off if anyone enters the mowing area.
6. Use extreme care when approaching blind corners, shrubs, trees or other objects that may block your view of a
child.
7. Never leave a running mower unattended.
8. Do not pull the mower backwards unless absolutely necessary. When moving the mower backwards, look down
and behind for small children and foreign objects. Take extreme care when moving the mower backwards to keep
your feet clear of the mower and to maintain your footing and balance.
DANGER
Do not put hands or feet near or under the mower. Keep clear of the discharge opening at all times.
9. Do not operate mower without the entire discharge guard, trailing rear shield, blade control or other safety
protective devices in place and working.
Important Safety Information

Questions? Call Toll Free at 1-800-737-2112 Copyright © 2016 MAT Engine Technologies, LLC
ENG - 4
Important Safety Information (Continued)
• Save all instructions
WARNING
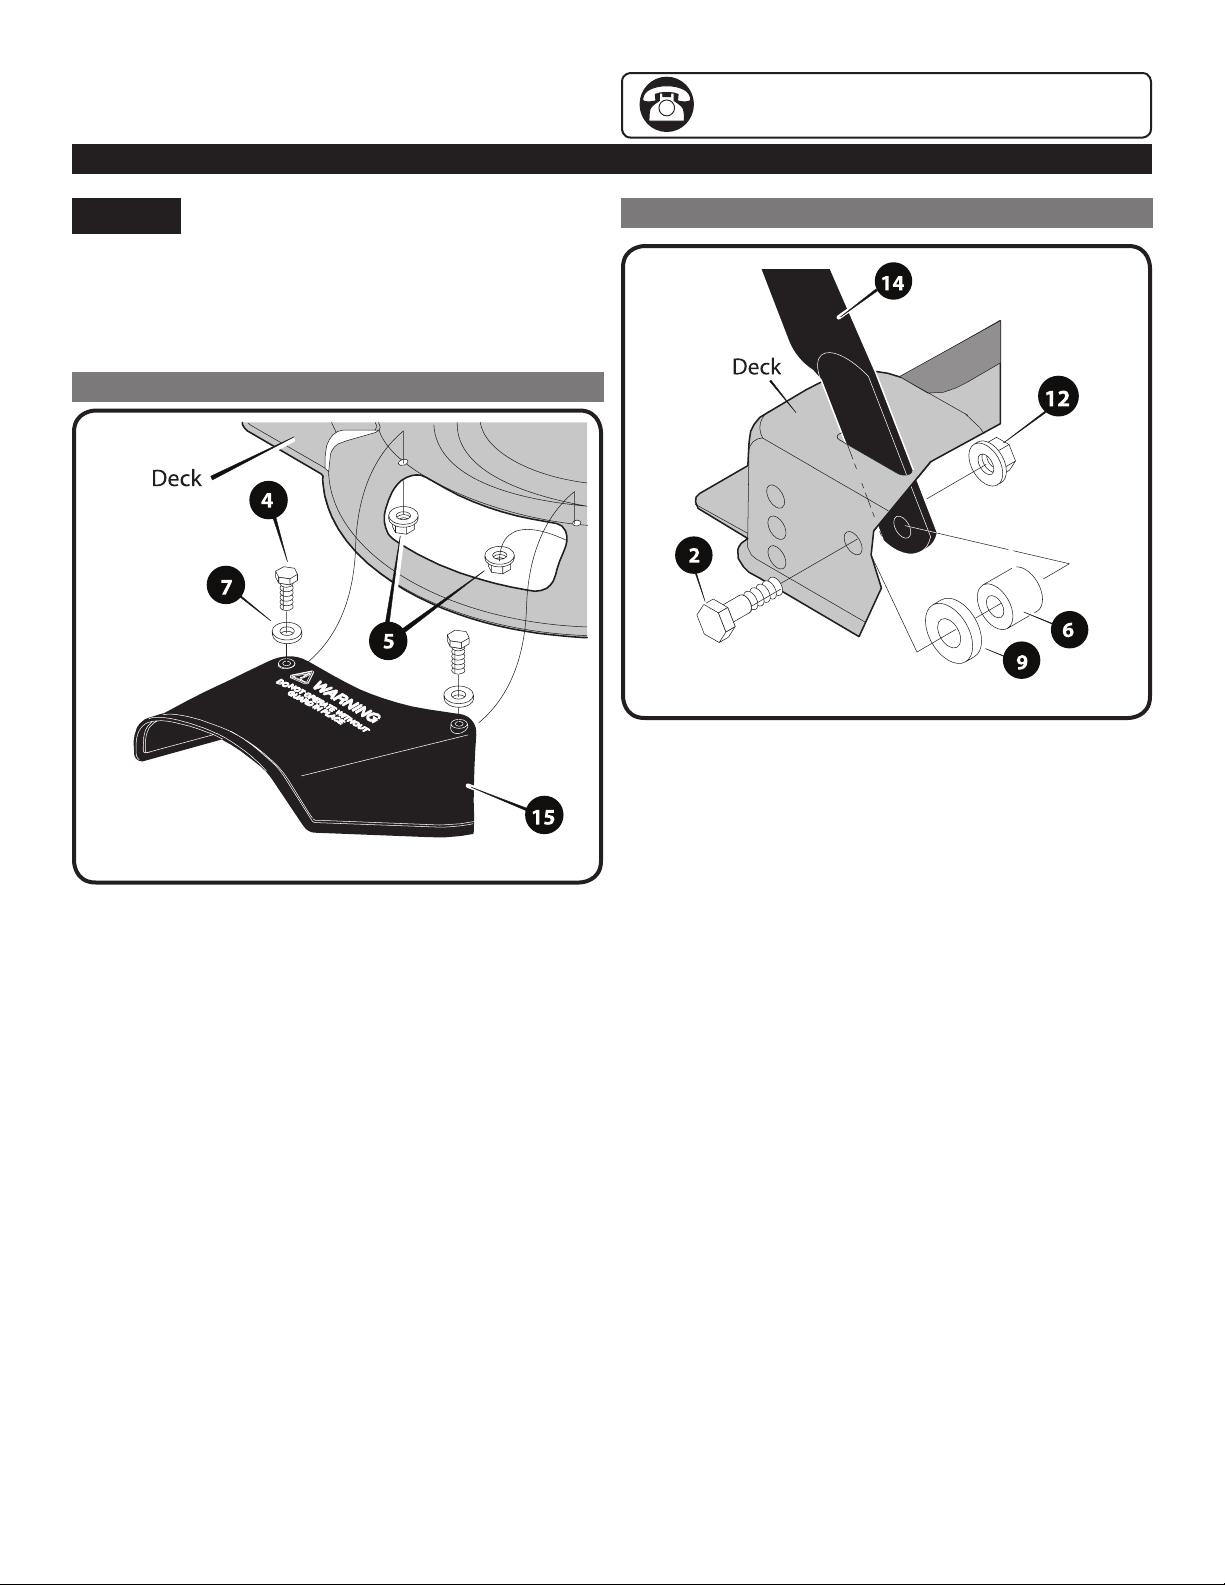
Disconnect spark plug wire before servicing blade or cleaning underneath mower deck. Failure to disconnect spark plug wire
could lead to incidental engine starting resulting in serious injury or death.
10. Stop the engine (motor) and wait for the blade to completely stop before cleaning the mower or unclogging the
discharge guard.
11. Maintain your balance and proper footing at all times. Always be sure of your footing; walk; never run.
12. The blade control lever is a safety device. Do not attempt to bypass or override the blade control lever. Doing so
may cause severe personal injury from contact with a rotating blade. Stay behind the handle when the engine is
running.
13. Never direct the mower’s discharge toward anyone. Avoid discharging the mower against a wall or other
obstruction. Objects may ricochet back toward the operator or bystanders. Stop the engine when crossing gravel
drives and walkways.
14. Do not force mower. It will do the job better, last longer and with less likelihood of a risk of injury at the rate for
which it was designed.
15. If the mowers starts to vibrate abnormally, stop the engine and check for the cause immediately. Vibration is
generally a warning of trouble.
16. The muffler and engine become hot and can burn you. Do not touch.
WHILE OPERATING THE MOWER ON SLOPES
WARNING
Slopes are a major factor related to slip and fall accidents, which can result in severe injury. Operation on all slopes requires
extra caution. If you feel uneasy on a slope, do not mow it.
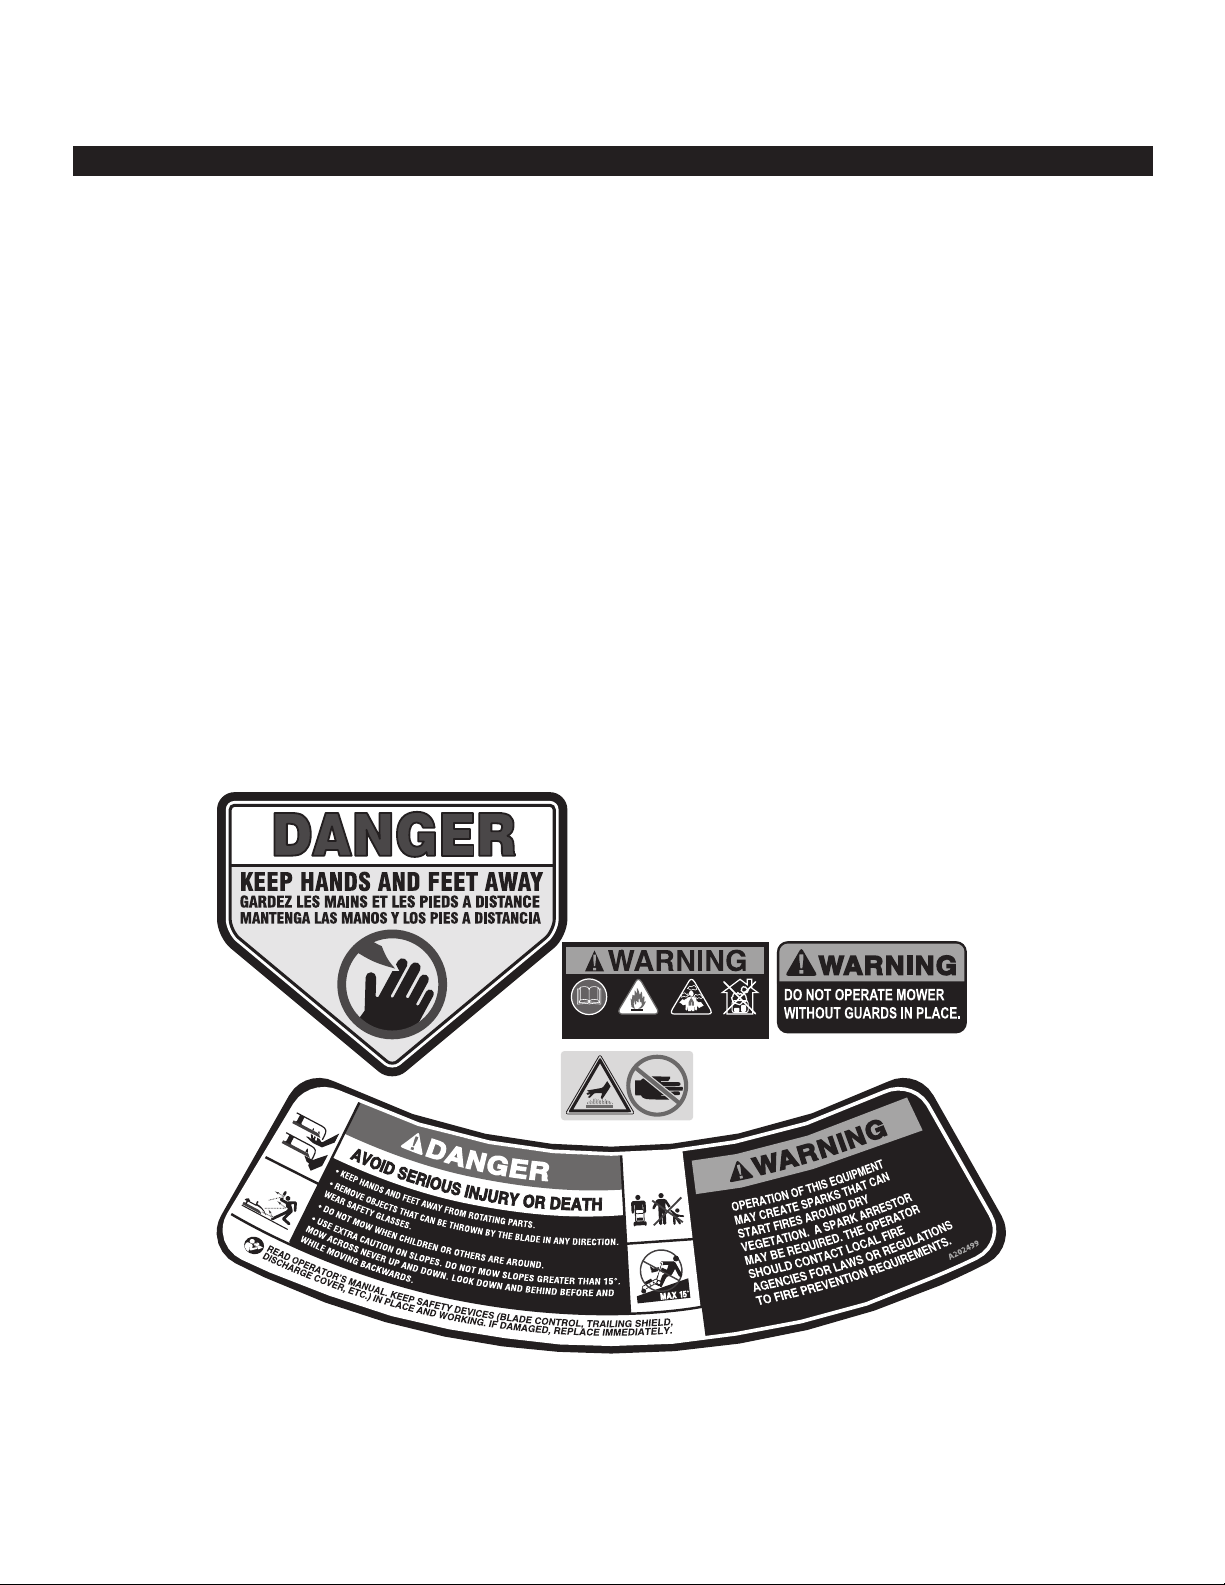
1. If a slope is greater than 15 degrees, do not mow. Use the slope gauge inside this manual (see pg. 6) to measure
slopes before operating this mower on a slope or hilly area.
2. Mow across the face of slopes; never up and down. Exercise extreme caution when changing direction on slopes.
3. Watch for holes, ruts, bumps, rocks, or other hidden objects. Uneven terrain could cause a slip and fall accident.
Tall grass can hide obstacles.
4. Do not mow on wet grass or excessively steep slopes. Poor footing could cause a slip and fall accident.
5. Do not mow near drop-offs, ditches, or embankments. You could lose your footing or balance.
6. If you do lose your balance, release the handle and blade control lever immediately.
FUEL SAFETY
WARNING
To avoid personal injury or property damage, use extreme care when handling gasoline. Gasoline is extremely flammable and
the vapors are explosive.
1. Do not smoke or allow smoking near fuel or the mower. Extinguish all cigarettes, cigars, pipes and other sources
of ignition.
2. Never refuel the mower indoors. Refuel outdoors WHERE THERE ARE NO SPARKS OR FLAMES.
3. Use a container approved for gasoline.
4. Never fill containers inside a vehicle or on a truck or trailer bed with a plastic liner. Always place containers on the
ground away from your vehicle before filling.
5. Do not lock the fuel dispensing nozzle in the open position.
6. Remove gas-powered equipment from the truck or trailer and refuel it on the ground. Always refuel the mower using
a portable container. Never refuel mower from a fuel dispensing nozzle.
7. Never remove the fuel cap or add fuel with the engine running. Always stop engine and allow to cool before
removing fuel cap. Remove fuel cap slowly.
8. Never overfill fuel tank. Avoid spilling fuel or oil. Wipe up all fuel spills.
9. After refueling, replace fuel cap and tighten securely.
10. If fuel is spilled on clothing, change clothing immediately.
11. Move at least 10 feet (3 meters) away from fueling site before starting engine.
Important Safety Information

Questions? Call Toll Free at 1-800-737-2112 Copyright © 2016 MAT Engine Technologies, LLC
ENG - 5
MAINTENANCE AND STORAGE OF THE MOWER
1. Disconnect the spark plug before performing maintenance.
2. Maintain the mower with care. Inspect the mower periodically. If the mower is not working properly or damaged,
have it repaired by a qualified service center.
3. Check for misalignment of moving parts, binding of moving parts, broken parts, mounting, and any other condition
that may affect its operation.
4. Check guards frequently and keep guards in place and in working order.
5. A guard or other part that is damaged should be properly repaired or replaced by a qualified service center.
6. Use only genuine Powermate®replacement parts and accessories. Use of any non-Powermate®parts or
accessories could lead to injury, damage to the unit, and void your warranty.
7. Maintain or replace safety and instruction labels as necessary. Do not remove safety or any labels from the mower
for any reason.
8. Do not change engine governor setting or overspeed the engine.
9. Do not remove or modify any parts. Removing or modifying parts could lead to injury, damage the mower and will
void the warranty.
10. Keep machine free of grass, leaves or other debris build-up. Clean up oil or fuel spills and remove any fuel-soaked
debris.
11. Allow engine to cool and empty the fuel tank before storing or transporting in vehicle. Use up remaining fuel in the
carburetor by starting the engine and letting it run until it stops.
12. Use extra caution when servicing mower blades. Disconnect spark plug wire before servicing blade or cleaning
underneath mower deck. Blades are sharp. To protect your hands, wrap the blade or wear gloves when handling.
13. Store unit and fuel in area where fuel vapors cannot reach sparks or open flames from water heaters, electric
motors or switches, furnaces, or where power tools are operated.
14. When not in use, store the mower in a clean, dry and well ventilated area.
Important Safety Information
Important Safety Information (Continued)
• Save all instructions

Questions? Call Toll Free at 1-800-737-2112 Copyright © 2016 MAT Engine Technologies, LLC
ENG - 6
15 Degrees
10 Degrees
FOLD ALONG DOTTED LINE
SLOPE GUIDE
SIGHT AND HOLD THIS GUIDE LEVEL WITH A VERTICAL TREE, A
CORNER OF A STRUCTURE, A POWER LINE POLE, OR A FENCE.
Use this guide and do not mow on a slope greater than 15 degrees.
A 15-degree slope is a hill that increases in height at approximately 2.5 feet in 10 feet.
WARNING!
Slopes are a major factor related to slip and fall accidents, which can
result in severe injury. Operation on all slopes requires extra caution.
If you feel uneasy on a slope, do not mow it. Mow across the face of
slopes; never up and down. Exercise extreme caution when chang-
ing direction on slopes.

Questions? Call Toll Free at 1-800-737-2112 Copyright © 2016 MAT Engine Technologies, LLC
ENG - 7
Product Specifications
• Save all instructions
To be able to operate your mower safely and get the best
performance, become familiar with the key product features
(shown below) and all warning and instructions in this manual.
1. Blade Control Lever
2. Primer Bulb
3. Starter Rope Handle
4. Starter Rope Guide
5. Discharge Guard
6. Gasoline Fill
7. Oil Fill
8. Lower Handle
9. Upper Handle
10. Air Filter
11. Muffler
12. Spark Plug
Parts & Features
If you need assistance or have any questions,
CALL TOLL FREE: 1-800-737-2112.
Cutting Width . . . . . . . . . . . . . . . . . . . . . . . . 20 in (510 mm)
Cutting Heights . . . . . . . . . . . . . . . .2.25-3.5 in (57-89 mm)
Engine Speed. . . . . . . . . . . . . . . . . . . . . . . . . . . .3000 RPM
Unit Weight. . . . . . . . . . . . . . . . . . . . . . . . . 48.5 lb (22.0 kg)
Gasoline Type....... Regular
Unleaded – 87 Octane (min.)
Gasoline Capacity . . . . . . . . . . . . . . . . . . . . . . . 1.06 qt (1L)
Oil Type (API SG, SH, SJ or higher) 10W-30 is
recommended for all service temperatures. See page 11 for
additional information.
Oil Capacity . . . . . . . . . . . . . . . . . . . . . . . . . .15 oz (450 ml)
Spark Plug Model...TORCH K7RTC / Champion RC9YC4
Spark Plug Gap . . . . . . . . . .0.028-0.031 in (0.70-0.80 mm)
Engine Type ............. 4 stroke, single cylinder, OHV
Displacement . . . . . . . . . . . . . . . . . . . . . . . . . . . . . . . 150cc
Torque Rating . . . . . . . . . . . . . . . . . . . . . 5.75 ft-lb (7.8 N.m)
. . . . . . . . . . . . . . . . . . . . . . . . gross torque per SAE J1940
Intake Valve Clearance. . . . 0.004 - 0.008 in (0.1 - 0.2 mm)
Exhaust Valve Clearance 0.006 - 0.010 in (0.15 - 0.25 mm)
Wheel Size . . . . . . . . . . . . . . . . . . . . . . . . . . . . . . . . . . . 7 in
3
1
2
4
5
6
7
8
9
10
11 12

Questions? Call Toll Free at 1-800-737-2112 Copyright © 2016 MAT Engine Technologies, LLC
ENG - 8
Safety Decals
• Save all instructions
This mower has been designed and manufactured to
provide you with the safety and reliability you would expect
from an industry leader in outdoor power equipment manu-
facturing.
Although reading this manual and the safety instructions it
contains will provide you with the necessary basic knowl-
edge to operated this equipment safely and effectively, we
have placed several safety labels on the mower to remind
you of this important information while you are operating
the unit.
These important safety labels are illustrated below, and are
shown here to help familiarize you with the location and
content to the safety messages you will see as you per-
form normal mowing operations. Please review these la-
bels now. If you have any questions regarding their mean-
ing or how to comply with these instructions, reread the
complete safety instruction text on the preceding pages, or
contact your local dealer.
Should any of the safety labels become unreadable be-
cause of being worn, faded, or otherwise damaged during
the use of your mower, please contact your local autho-
rized dealer to order replacement label.
The safety labels are easily applied, and will act as a con-
stant visual reminder to you and others who may use the
equipment. Following the safety instructions is necessary
for safe, effective operation of your mower.
See “Safety Definitions” section of this manual for
explanations of the safety symbols.
A202448
A202325
• Gasoline is flammable. Allow engine to cool at least 2 minutes
before refueling.
• Operation of this equipment may create sparks that can start
fires around dry vegetation. A spark arrestor may be required.
The operator should contact local fire agencies for laws or
regulations relating to fire prevention requirements.
Read Userʼs Manual Before Operation

Questions? Call Toll Free at 1-800-737-2112 Copyright © 2016 MAT Engine Technologies, LLC
ENG - 9
Assembly
• Save all instructions
NOTE: ALL REFERENCES TO RIGHT OR LEFT SIDE OF THE MOWER ARE FROM THE OPERATOR’S POSITION
BEHIND THE UNIT.
IMPORTANT: THE ASSEMBLY INSTRUCTIONS WERE WRITTEN FOR PERSONS WITH SOME MECHANICAL
ABILITY AND EXPERIENCE. ALL STEPS ARE NOT INCLUDED IN THESE INSTRUCTIONS. PERSONS WITH SOME
MECHANICAL ABILITY ARE FAMILIAR WITH TIGHTENING FASTENERS SO THESE STEPS ARE NOT INCLUDED. DO
NOT ATTEMPT TO ASSEMBLE BEYOND YOUR ABILITY.
WARNING
Do not operate the mower if it is damaged or not securely and fully assembled.
PARTS INCLUDED WITH THE PACKED MOWER
Item in Figure 2 QTY
13 Upper Handle 1
14 Lower Handle 1
15 Discharge Guard 1
16 Wheels 4
not
shown
Parts Bag 1
Operator’s Manual 1
Quick Start Guide 1
4-Stroke Engine Oil 15 oz (450 ml) 1
Item in Figure 1 QTY
1 Bolt, Axle - 3/8 in 4
2 Bolt, Hex Head - 3/8-16 X 1 1/2 inch 2
3
Bolt, Round Head Square Neck - 3/8
in
2
4 Bolt, Hex Head -1/4 in 2
5 Locknut - 1/4 in 2
6 Spacer 2
7 Washer - 1/4 in 2
8 Clip, Cable 1
9 Washer - 3/8 in 6
10 Wingnut, Plastic 2
11
Nut, Flange (Serrated Bottom) - 3/8 in
4
12 Nut, Flange (Smooth Bottom) - 3/8 in 2
If you need assistance or have any questions,
CALL TOLL FREE: 1-800-737-2112.
Figure 1
Figure 2

Questions? Call Toll Free at 1-800-737-2112 Copyright © 2016 MAT Engine Technologies, LLC
ENG - 10
Assembly (Continued)
• Save all instructions
NOTICE DO NOT ADD ENGINE OIL BEFORE
COMPLETING THE ASSEMBLY STEPS BELOW.
DURING ASSEMBLY THE ENGINE MAY BE TIPPED
FOR EXTENDED TIMES. OIL CAN DRAIN INTO THE
UPPER PART OF THE ENGINE CAUSING DIFFICULTY IN
STARTING ENGINE.
TO ASSEMBLE THE DISCHARGE GUARD
Item numbers in assembly instructions and figure correspond
to parts list on page 9.
NOTE: Use 7/16 in. wrenches, sockets or adjustable
wrenches to complete the following steps.
1. Holding the holes on the discharge guard (item 15)
aligned with corresponding holes in the mower deck,
insert hex bolts (item 4) through the washer (item 7),
discharge guard (item 15) and through the deck.
2. Secure each bolt with a lock nut (item 5) as shown in
Figure 3.
TO ASSEMBLE THE LOWER HANDLE
Item numbers in assembly instructions and figure correspond
to parts list on page 9.
NOTE: Use 9/16 in. wrenches, sockets or adjustable
wrenches to complete the following steps.
1. Support the rear of the mower deck on a block of
wood or similar support.
2. Insert the lower handle (item 14) into and through the
slots on each side of the rear of the deck, and align
the holes in the deck with the holes in the lower
handle. See Figure 4.
3. On each side of the lower handle and deck, insert
the hex head shoulder bolt through the deck, the
washer (item 9), the spacer (item 6) and through
handle (item 14).
4. Secure the hex head shoulder bolt using the flange
nuts (item 12).
If you need assistance or have any questions,
CALL TOLL FREE: 1-800-737-2112.
Figure 3
Figure 4

Questions? Call Toll Free at 1-800-737-2112 Copyright © 2016 MAT Engine Technologies, LLC
ENG - 11
Assembly (Continued)
• Save all instructions
Item numbers in assembly instructions and figure correspond
to parts list on page 9.
1. Place the upper handle (item 13) in position over the
lower handle (item 14). See Figure 5.
2. Insert the round head, square neck bolts (item 3)
through the holes in each side of the upper and lower
handles, and secure with the large wing nuts (item 10).
3. Pull the recoil starter and thread the rope through the
rope guide, as shown in Figure 5.
If you need assistance or have any questions,
CALL TOLL FREE: 1-800-737-2112.
Figure 5
TO ASSEMBLE THE BLADE CONTROL ASSEMBLY
Recoil Handle
Rope Guide
1. Insert the T-Bar pin into the Bracket as shown in Figure 6.
NOTE: It may be necessary to temporarily remove the
pre-assembled cable clip from the upper handle, to get
enough slack in the cable. Reassemble the clip after the
pin is inserted.
2. Secure the cable to the upper handle with the cable clip
(item 8). See Figure 7.
3. Insert the opposite side (left) end of the blade control
lever into the hole in the upper handle. See Figure 5.
IMPORTANT: After completing these steps, pull the Blade
Control Lever down against the upper handle. This should
actuate the spring loaded brake lever on the engine. The
Blade Control Lever should spring back to the upper posi-
tion when released.
WARNING
The Blade Control Assembly is required to be able to stop
the engine and brake the blade. Never run the lawn mower
without the Blade Control Assembly correctly assembled.
Figure 6
Pre-assembled
Cable Clip
Bracket
TO ASSEMBLE THE UPPER HANDLE
Figure 7
T-Bar Pin
Blade Control
Lever

Questions? Call Toll Free at 1-800-737-2112 Copyright © 2016 MAT Engine Technologies, LLC
ENG - 12
Assembly (Continued)
• Save all instructions
If you need assistance or have any questions,
CALL TOLL FREE: 1-800-737-2112.
TO ASSEMBLE THE WHEELS (See Figure 8)
IMPORTANT: Before assembling the wheels, consider your
lawn and decide which available cutting height is best for
your lawn. For best results, never cut off more than one-
third of the total length of the grass.
NOTE: Use 3/4 and 9/16 in. wrenches, sockets or adjust-
able wrenches to complete the following steps.
Each corner of the mower deck has a group of 3 vertical
holes representing the 3 possible cutting height settings.
The cutting height is fixed and adjusted with the choice of
hole the wheels are assembled. Make sure to assemble
the wheels in the same choice of hole for each corner of
the deck.
Item numbers in assembly instructions and figure correspond
to parts list on page 9.
1. Secure each wheel to the deck by inserting the
axle bolt (item 1) into and through the wheel (item 16),
washer (item 9), and hole in the deck. Secure with
flange nut (item 11).
a. To adjust the cutting height, disassemble each wheel
and re-assemble to your new choice of hole location /
cutting height.
NOTE: Make sure all four (4) wheels are assembled in the
same wheel height position.
Figure 8
Hole for 2.25”
cutting height
Hole for 2.88”
cutting height
Hole for 3.5”
cutting height

Questions? Call Toll Free at 1-800-737-2112 Copyright © 2016 MAT Engine Technologies, LLC
ENG - 13
Operation
• Save all instructions
BEFORE STARTING ENGINE
NOTICE
Your mower’s engine is shipped from the factory without
engine oil. A bottle of engine oil (15 fluid oz.) is included
with your mower’s packaging. Check oil level before starting
engine. If you start the engine without oil, the engine will be
damaged beyond repair and will void your warranty.
Checking and Adding Engine Oil
Types of Oil to Use
Use high detergent motor oil having an API service classifi-
cation of SG, SH, SJ or higher. Choose motor oil viscosity
according to Fig. 15. For most range of service tempera-
tures, 10-30 viscosity oil is recommended.
NOTICE
Use of non-detergent oil or 2-stroke engine oil may damage
the engine and void your warranty.
1. Check oil level each time before starting engine.
Check oil level daily or every eight (8) hours of
operation. Keep oil level at UPPER LEVEL on dipstick
(See Figure 9).
2. Always check oil level with engine cool and mower on
flat, level surface.
3. Clean around oil fill spout, remove dipstick and wipe
clean with a cloth.
4. Replace dipstick – without tightening. Make sure
dipstick is fully inserted into oil fill spout. Remove and
check oil level.
5. Oil level should be at UPPER LEVEL on dipstick. See
Figure 9.
6. If oil is needed, add oil slowly through the oil fill
spout and recheck. Do not overfill.
NOTICE
Overfilling with oil may cause hard starting, spark plug fouling,
and engine smoking.
Figure 15
Recommended oil viscosity for ambient service temperatures.
SAE
TEMP 100° F
40° C
-20
-20-30 -10
0
0
20
2010
40 60 80
30
Ambient Service Temperature
SAE 10W-30
SAE 30
Figure 9
Upper Limit
Lower Limit

Questions? Call Toll Free at 1-800-737-2112 Copyright © 2016 MAT Engine Technologies, LLC
ENG - 14
Primer Bulb
Push 3
Times
Operation (Continued)
• Save all instructions
BEFORE STARTING ENGINE
Filling the Fuel Tank
DANGER
To avoid personal injury or property damage, use extreme care when handling gasoline. Gasoline is extremely flammable and
the vapors are explosive. Do not smoke or allow smoking near fuel or the mower. Extinguish all cigarettes, cigars, pipes and
other sources of ignition. Never refuel the mower indoors. Refuel outdoors WHERE THERE ARE NO SPARKS OR FLAMES. Never
remove the fuel cap or add fuel with the engine running. Always stop engine and allow to cool before removing fuel cap.
Remove fuel cap slowly. Never overfill fuel tank. Avoid spilling fuel or oil. Wipe up all fuel spills.
Use fresh, clean regular unleaded gasoline with a minimum 87 octane. Fresh fuel prevents buildup of varnish and gum
in the carburetor and fuel system. Commonly available fuel additives which reduce varnish and gum in your engine’s
fuel system can be added according to the manufacturer’s instructions. Do not use gasoline which contains methanol.
Do not mix oil with gasoline.
1. Remove cap slowly. Fill tank to approximately 1-1/2 inches below the top of the filler neck to allow for fuel
expansion. Never overfill fuel tank.
2. After refueling, replace fuel cap and tighten securely.
3. If fuel is spilled on clothing, change clothing immediately.
4. Move at least 10 feet (3 meters) away from fueling site before starting engine.
STARTING THE ENGINE
DANGER
Never start or run the mower inside a closed room or build-
ing; breathing exhaust fumes can kill. Do not put hands or feet
near or under the mower. Keep clear of the discharge opening
at all times. Keep children and bystanders away when starting
the engine and out of the mowing area.
1. Push the primer slowly three times – waiting about 2
seconds between each push (see fig. 10a) When tem-
peratures are below 55ºF, press primer five times.
When restarting a warm engine, do not use the primer.
2. Stand behind the mower handle, grasp the blade control
lever – holding it firmly against the upper handle. See
fig. 10b.
3. Grasp the starter rope handle and pull slowly until
resistance is felt, then pull rapidly to start engine.
WARNING
Rapid retraction of the starter rope (kickback) may pull your
hand and arm back toward the engine faster than you can let
go. Kickback is typically caused by improper ignition timing. If
kickback is evident, have the engine examined and repaired by
an authorized Service Dealer.
4. Slowly return starter rope handle to the starter rope
guide and release.
IMPORTANT: To avoid damage to the engine’s starter, do not
allow the starter rope to snap back against the rope guide.
Figure 10a
Figure 10b
Recoil Handle Starter
Upper Handle
Blade Control Lever

Questions? Call Toll Free at 1-800-737-2112 Copyright © 2016 MAT Engine Technologies, LLC
ENG - 15
Operation (Continued)
• Save all instructions
STOPPING THE ENGINE AND BLADE
WARNING
Wait for the blade to come to a complete stop before
attempting to perform any work on the mower.
1. Release blade control lever to stop the engine and the
blade.
ADJUSTING CUTTING HEIGHT
Reassemble the wheels in the desired wheel height posi-
tion. Refer to the “To assemble the wheels” section in the
assembly portion of the manual
MOWING TIPS
Thoroughly inspect the area where the mower is to be
used and remove all foreign objects such as rocks, wire,
toys, etc.
WARNING
This mower can throw small objects at high speed causing
personal injury or property damage.
CAUTION
If you strike a foreign object or if the mower starts to vibrate
abnormally, stop the engine. Remove spark plug boot from the
spark plug, thoroughly inspect the mower for any damage, and
repair the damage before restarting and operating the mower.
Vibration is generally a warning of trouble.
For best results:
a) Do not cut wet grass
b) Never cut off more than one-third of the total length of
the grass.
c) Plan ahead and use a mowing path in a counterclock
wise direction that discharges the new grass clippings
away from the remaining area to mow.
d) Adjust your mowing speed to the condition of the lawn.
Do not force mower. It will do the job better, last longer
and with less likelihood of a risk of injury at the rate for
which it was designed.
e) New grass, thick grass or wet grass may require you to
use less than the mower’s full advertised cutting width.
f) When mowing very tall grass, adjust the mower height
to its highest setting and make a first cut. Adjust mower
to the desired height for a second cut.

Questions? Call Toll Free at 1-800-737-2112 Copyright © 2016 MAT Engine Technologies, LLC
ENG - 16
Routine Maintenance
• Save all instructions
WARNING
Disconnect the spark plug before performing maintenance.
Maintain the mower with care. Inspect the mower periodi-
cally. If the mower is not working properly or damaged,
have it repaired by a qualified service center. Do not
change engine governor setting or overspeed the engine.
Do not remove or modify any parts. Removing or modify-
ing parts could lead to injury, damage the mower and will
void the warranty. Use only genuine Powermate®replace-
ment parts and accessories. Use of any non-Powermate®
parts or accessories could lead to injury, damage to the
unit, and void your warranty.
GENERAL MOWER CARE
1. After each use, remove any grass clippings or debris
from the top of the mower deck and engine area with a
brush or lawn and garden blower.
2. Periodically clean underside of the mower deck to pre
vent buildup of grass clippings, etc.
a) Before cleaning the underside of the deck, always
drain the fuel tank by running the engine till the tank
is empty. Disconnect the spark plug wire before
performing this or any other maintenance.
b) Tip the mower to expose the underside of the
mowing deck.
NOTICE
Always tip the mower so it is resting on the side of the deck
and the air filter side of the engine is facing up. Make sure the
lawn mower is resting in a stable position before beginning to
clean the deck. Never tip the mower more than 90 degrees in
any direction and do not leave the mower tipped for extended
periods of time. Oil can drain into the top part of the engine
and cause starting problems.
c) Scrape excess grass clippings with an appropriate
tool. Do not spray deck with water.
3. Using a light lubricating oil:
a) lubricate pivot points on the blade control lever at
least once each season.
b) lubricate the wheels at least once each season.
BLADE CARE
CAUTION
Use extra care when servicing mower blades. Blades are
sharp. To protect your hands, wrap the blade or wear gloves
when handling.
1. Periodically inspect the blade and blade adapter for
wear or damage, especially if you strike a foreign object.
Replace when necessary.
a. Before tipping the mower to inspect the blade area,
always drain the fuel tank by running the engine until
the tank is empty. Disconnect the spark plug wire
before performing this or any other maintenance.
b. Tip the mower to expose the underside of the
mowing deck.
To remove / replace the blade:
1. Remove the bolt and the washers holding the blade and
the blade adapter to the engine crankshaft.
See Figure 11
2. Remove blade and adapter from the crankshaft.
3. The blade can be sharpened with a file or on a grinding
wheel. Do not attempt to sharpen the blade while it is
still on the mower. When sharpening the blade, follow
the original angle of grind. Grind each cutting edge
equally to keep the blade balanced. To check for blade
balance, place blade on a round shaft screwdriver.
Remove blade material from the heavy side until it
balances evenly.
CAUTION
An unbalanced blade will cause excessive vibration when
rotating at high speeds. It may cause damage to mower and
could break causing personal injury.
4. Lubricate the engine crankshaft and the inner surface
of the blade adapter with light oil. Slide the blade
adapter onto the engine crankshaft.
Blade Adapter
Blade Adapter
Blade
Blade
Disk Spring Washer
Disk Spring Washer
Flat Washer
Flat Washer
Bolt
Bolt
Crankshaft
Figure 11

Questions? Call Toll Free at 1-800-737-2112 Copyright © 2016 MAT Engine Technologies, LLC
ENG - 17
Routine Maintenance (Continued)
• Save all instructions
5. Position the blade onto the blade adapter in the correct orientation. On each end of the blade, a blade “lift” portion
lies on the opposite side of the blade from the sharpened edge. When positioning the blade onto the blade adapter,
make sure the blade “lift” portion is facing towards the mower deck. See Figure 11.
6. Assemble the retaining bolt through the flat washer, (2) disc spring washers, blade, and blade adapter. Make sure the
flat washer and (2) disc spring washers are in the proper order and orientation shown in fig. 11.
7. Tighten the retaining bolt to 30 – 37 ft –lbs (40-50 N-m).
8. To ensure safe operation of your mower, periodically check the blade bolt for correct torque
ENGINE CARE
A list of key engine maintenance items required for good performance by the mower is given below.
1. Check engine oil level before each use and maintain oil level to the full mark on the dipstick. See section titled
“Checking and Adding Engine Oil” on page 13.
2. Service air filter every 25 hours under normal conditions. Clean every few hours under extremely dusty
conditions. Poor engine performance and flooding usually indicates that the air cleaner should be serviced.
Never run the engine without an air filter installed. Running the engine without the filter can cause excessive
engine wear and damage.
3. Clean engine regularly with a cloth or brush. Keep the top of the engine free of debris to permit proper air
circulation. Remove all grass, dirt and combustible material from muffler area.
Service Item Each Use First 5 to 8
hours
Every Season or
25 hours
Every Season or
50 hours
Every Season or
100 hours
Service Date
Record
Check Engine Oil √
Change Engine Oil √ √
Check Air Filter √
Service Air Filter √
Check Spark Plug √
Service Spark Plug √
Clean Around Muffler √

Questions? Call Toll Free at 1-800-737-2112 Copyright © 2016 MAT Engine Technologies, LLC
ENG - 18
Routine Maintenance (Continued)
• Save all instructions
TO SERVICE THE AIR FILTER
A dirty air filter will restrict air intake. Periodic maintenance
of the air filter will help improve engine performance and
reduce emissions.
WARNING
Never clean air filter with gasoline or an easy ignited sol-
vent because it may create a fire hazard.
1. Remove the air filter cover, and carefully remove the
filter element. (See Figure 12)
2. Clean all parts. Clean filter element by gently tapping it
on a flat surface. Replace if very dirty
3. Reinstall the filter element and air filter cover.
TO SERVICE THE SPARK PLUG
1. Clean the spark plug and reset the gap once a season.
Spark plug replacement is recommended at the start of
each mowing season. See “PRODUCT
SPECIFICATIONS” on page 6 for correct plug type and
gap specifications.
WARNING
Do not check for spark with spark plug removed. Do not crank
engine with spark plug removed.
For good engine operation, the spark plug must be free of
deposits or excessive electrode wear.
2. Remove the spark plug wire and remove spark plug with
a spark plug wrench.
CAUTION
If the engine has been running, the muffler will be very hot. Be
careful not to touch the muffler.
3. Visually inspect the spark plug. Discard the spark plug
if there is apparent wear, or if the insulator is cracked or
chipped. Clean the spark plug with a wire brush if it is to
be reused.
4. Measure the spark plug gap with a feeler gauge. Adjust
plug gap as required by bending electrode. See Figure 13
5. Reinstall the spark plug – starting by hand to prevent
cross-threading.
6. After the spark plug is seated, tighten with a spark plug
wrench an additional ¼ turn (18 ft-lbs)
0.028 - 0.031 in.
0.7 - 0.8 mm
Figure 13
Filter Element Air Filter Cover
Figure 12
NOTICE
The spark plug must be securely tightened. An improperly
tightened spark plug can become very hot and may dam-
age the engine.

Questions? Call Toll Free at 1-800-737-2112 Copyright © 2016 MAT Engine Technologies, LLC
ENG - 19
TO CHANGE THE OIL
1. Change engine oil after every season or 50 hours of
operation.
2. Drain the fuel tank by running the engine till tank is
empty.
3. Clean around oil fill spout, remove dipstick.
4. Place a suitable container next to mower to catch the
used oil, and then tilt the mower on its right side. The
used oil will drain through the filler neck. Allow oil to
drain completely. See Figure 14.
NOTE: Oil will drain more freely when warm.
IMPORTANT: Used oil is hazardous waste. Place oil in a
sealed container and take to your local recycling center.
Do NOT discard with household waste.
5. Refill engine with oil. Pour slowly. Do not overfill. See
“Checking and Adding Engine Oil” on page 13.
Routine Maintenance (Continued)
• Save all instructions
STORAGE
Mowers stored over 30 days need to be drained of fuel to
prevent deterioration and gum from forming in the engines
fuel system. If the gasoline in your engine deteriorates
during storage, you may need to have the carburetor,
and other fuel system components, serviced or replaced.
Commonly available fuel additives which reduce var-
nish and gum in your engine’s fuel system can be added
according to the manufacturer’s instructions.
1. Remove all fuel from tank by running engine until it
stops from lack of fuel.
2. Change oil. See the section “ To Change the Oil”.
3. Remove spark plug and pour about 1/2 an ounce of
engine oil into cylinder. Replace spark plug and slowly
pull the starter rope several times to distribute oil.
4. Clean grass and debris from around engine, and under,
around and behind muffler.
5. Store in a clean, dry and well ventilated area away from
water heaters, electric motors or switches, furnaces, or
where power tools are operated.
6. Keep the engine level in storage. Tilting can cause fuel
or oil leakage.
Figure 14
COMMON REPAIR PARTS
1. Air Filter A203228
2. Spark Plug A203244
3. Blade A202068
4. Wheel A202052

Questions? Call Toll Free at 1-800-737-2112 Copyright © 2016 MAT Engine Technologies, LLC
ENG - 20
Troubleshooting
• Save all instructions
PROBLEM POSSIBLE CAUSE(S) SOLUTION(S)
Engine will not start 1.
Fuel tank is empty
2. Blade control lever is not depressed
3. Engine not primed
4. Spark plug wire disconnected
5. Fouled spark plug
6. Clogged air filter
7. Engine is flooded
8. Clogged fuel filter
9. Blocked fuel line
10. Stale or contaminated fuel
11. Other
1. Add fresh fuel.
2. Grasp and hold blade control lever firmly
against handle while pulling starter rope handle.
3. Prime engine as instructed in “Starting The
Engine” on page 14.
4. Attach spark plug wire to spark plug
5. Service spark plug as instructed on page 18.
6. Service air filter as instructed on page 18.
7. Wait a few minutes and restart engine without
priming.
8. Remove fuel filter. Inspect. Replace if
necessary.
9. Clear or replace fuel line.
10. Drain fuel tank. Clean fuel tank. Fill with fresh
fuel.
11. Take unit to an authorized service center.
Engine runs rough 1. Loose spark plug wire
2. Fouled spark plug
3. Incorrect spark plug gap
4. Clogged air filter
5. Clogged vent in fuel cap
6. Clogged fuel filter
7. Partially blocked fuel line
8. Stale or contaminated fuel
9. Other
1.
Securely attach spark plug wire to spark plug
2. Service spark plug as instructed on page 18.
3. Service spark plug as instructed on page 18.
4. Service air filter as instructed on page 18.
5. Clear vent in fuel cap
6. Remove fuel filter. Inspect. Replace if necessary
7. Clear or replace fuel line
8. Drain fuel tank. Clean fuel tank. Fill with fresh fuel
9. Take unit to an authorized service center
Low Engine Power 1. Grass too high, too thick or wet grass
2. Buildup of grass and debris under
mower deck
3. Clogged air filter
4. Engine oil level too high
5. Other
1. Raise cutting height or reduce cutting width
as instructed in “Mowing Tips” on page 15. Let
grass dry before cutting.
2. Clean debris on the underside of the mower
deck as instructed in “General Mower Care” on
page 16.
3. Service air filter as instructed in “To Service the
Air Filter” on page 18.
4. Check engine oil as instructed in “Checking
and Adding Engine Oil” on page 13; drain and
adjust oil level as necessary.
5. Take unit to an authorized service center.
Engine overheats 1. Engine oil level low
2. Clogged air filter
3. Other
1. Add engine oil as instructed in “Checking and
Adding Engine Oil” on page “13”
2. Service air filter as instructed in “To Service the
Air Filter” on page 18.
3. Take unit to an authorized service center.
Excessive Vibration 1. Mower blade loose or unbalanced
2. Bent cutting blade
1. Tighten blade retaining bolt or balance blade as
instructed in “Blade Care” on page 16.
2. Replace with a new blade. If vibration
continues, take unit to an authorized service
center
Rough or uneven cut 1. Wheel heights not correct
2. Dull blade
3. Buildup or grass and debris under
mower deck
1. Adjust wheel heights as instructed on page 12.
2. Replace or sharpen blade as instructed in
“Blade Care” on page 16.
3. Clean debris on the underside of the mower
deck as instructed in “General Mower Care” on
page 16.
Table of contents
Languages:
Other Powermate Lawn Mower manuals
Popular Lawn Mower manuals by other brands

Husqvarna
Husqvarna 917.279100 owner's manual

Gardenline
Gardenline GLSA 1231 Operating instructions & user guide

Husqvarna
Husqvarna R152SV Illustrated parts list

Gravely
Gravely Promaster 310 Owner's/operator's manual

CMi
CMi 236648 Original operating instructions

Jacobsen
Jacobsen LF550-H-T4F Safety, operation and maintenance manual