Powertrain PTC12V40AL User manual

Page 1 Part No PTC12V40AL
PTC12V40AL Manual
12V 40A 8 Stage Battery Charger with DC Power supply for hard wire installations
within Motorhomes and Yachts
Bluetooth Remote Control and Colour LCD Display
Thank you for purchasing the PTC12V40AL charger. Not only can this this charger be used for conventional
home or workshop use for cars, but can also be hard wired to the auxiliary battery of a motorhome, yacht
or caravan system. This will allow the charger to automatically charge up the battery when it is drained and
maintain the battery when it is full when connected to 240VAC power.
In order to monitor the condition of the battery and charging process, a 2.4inch colour LCD screen is
connected to the charger via wireless Bluetooth signals and will display various information related to the
charging process. The user can also switch the charger on and off and also activate or de-activate DC
power supply using the LCD touch screen.

Page 2 Part No PTC12V40AL
SAFETY/WARNING
Before using the battery charger ensure the instructions have been read and understood.
The battery charger is not intended for use by young children or infirm persons. Please keep away from pets.
This battery charger is designed to charge most 12 volt battery types including: Lead-acid, Deep-cycle,
Calcium, Gel and Absorbed Glass Matt (AGM) batteries in flooded and maintenance free configurations. This
battery charger is also able to charge 12V Lithium batteries after selection of the Lithium Battery function.
Always wear the appropriate Personal Protective Equipment (PPE) when working near batteries. This
includes gloves and eye protection.
Always ensure that there is no damage to the power source (240v power outlet). This includes cracks or
exposed wires.
When working with batteries remove all jewellery including watches and rings. Use insulated tools to ensure
prevention of a battery short should the metal tool make contact with the battery terminals.
Ensure the battery is charged in a well-ventilated area. Explosive gases may escape from the battery during
charging. Never charge a battery in a closed off space or in an area without ventilation.
Never smoke, use an open flame or create sparks near a battery or charger whilst charging as gases may
cause explosion. Please keep burning cigarettes, flames or other ignition sources away from the charging
battery at all times.
This battery charger is designed for indoor use only, and is not water resistant or waterproof. Do not expose
the battery charger to water or liquids.
Do not attempt to use the battery charger if the cables are damaged. This unit does not contain serviceable
parts. To avoid a hazard ensure that any damage to the unit, cable are replaced by the manufacturer or
service agent/ qualified technician.
Do not disassemble the battery charger. The warranty will be void if this instruction is ignored.
Ensure the battery charger is off before connecting and disconnecting from the battery. Once connected
power can be turned on.
Do not place the battery charger where it is not able to get adequate ventilation. Do not place on
fabric/leather/vinyl seats, on the battery or improperly balanced in the engine bay.
This Battery charger is fitted with a sophisticated method of detecting the voltage and lead acid chemistry of
the battery being charged. Even though this charger has been designed to operate with minimal user input,
always consult the battery manufacturers recharging guide.
This battery charger is not capable for charging a frozen battery, non-rechargeable or dry cell battery.
Features:
12V 40Amp 8 Stage Charging System.
Bluetooth connected 2.4inch colour LCD monitor with touch screen function.
LED light to indicate whether charger is working or not.
Suitable for charging 12V Gel, Lead Acid, AGM, Calcium and 12V Lithium automotive batteries. Do not
attempt to recharge dry cell batteries.
Ring terminal wires for permanent connection to batteries.
Faulty Battery warning shown on LCD screen.
13.5V 40A DC power supply mode with short circuit and overload protection.
Zero Volt starting battery charging.
Inbuilt protection systems for safe operation.
Mounting brackets for permanent installation.

Page 3 Part No PTC12V40AL
PLEASE NOTE Front panel LED light function: If the unit has 240VAC power connected, and the unit is outputting
power when connected to a battery, the LED at the front of the unit will light up, indicating that the charger is
operational and not faulty.
However, if the unit is connected to 240VAC power and also connected to a battery and the LED is not lit up, the
charger is not charging because it is faulty and not operational. Please find a specialist to fix the unit or return to
your original vendor to discuss having the unit repaired.
PLEASE NOTE: When charging Lithium Batteries, cut the looped blue wire coming out of the front of the unit to
activate Lithium battery charging mode.
There is also a black aerial wire coming out of the front of the unit, DO NOT CUT THIS WIRE.
Battery Charger Protection Systems
1. Over-charging protection
The battery charger contains an advanced microchip monitoring and controlling system to ensure that the
battery does not become overcharged which can result in the loss of electrolyte or in internal short circuit
which can cause damage to the battery.
2. Overload protection
Overload protection will activate when the current exceeds 110% of the maximum working current. During
DC power supply mode, the “DC POWER” button on the LCD screen will flash and become red; when this
happens please remove load and then press “DC POWER” on LCD screen to reset DC Power supply.
3. High temperature protection
High temperature protection will activate when the internal temperature of the charger rises above 50°C. If
this occurs, the charger output is automatically reduced. Once the temperature is below approximately 35°C,
the charger output will return to normal.
This feature is designed to protect the battery and the battery charger when they are being used in
environments with very high ambient temperatures.
4. Even charging function
By slowly raising the voltage, the batteries cells with a lower voltage are not charged too quickly which can
overheat individual battery cells, compared to battery cells with a higher voltage.
5. Reverse polarity protection
When reverse connected, the output power will be cut off. This protection will protect both the charger and
the battery from damage. If you have accidentally made a reverse polarity connection, please switch battery
charger off, and correct the battery connections to the correct polarities.
6. Short circuit protection
No output when ring terminals or wires are connected together, power output only occurs when connected
to a battery. This prevents charger malfunction if positive and negative ring terminals/wires accidentally
come in contact with each other. When this happens during DC power supply mode, remove the load and
then press “DC POWER” button to reset the DC Power supply.

Page 4 Part No PTC12V40AL
1. Charging Stages
1. Analysis / Desulphation
A small voltage pulse is applied to the battery to ensure it can effectively and safely accept a charge.
Desulphation uses pulse reconditioning to gently remove any sulphation build up on the battery plates and
prevents oxidization. Stabilizes electrolyte consistency and minimises the battery temperature rising while
charging, recovers battery capacity and can help extend battery life.
2. Soft Start
The soft start function improves the batteries charging capability, reduces gas and heat build-up and can
improve electrolyte consistency which can become uneven in the battery cells from day to day use. A
steadily increasing current is applied over a set time so as not to initially overload the battery. This stage
prepares the battery for the more intense charging stages to follow.
3. Bulk charge
Maximum charge current is delivered to the battery to minimize charge times.
4. Absorption
Reduces the current supplied to the battery and ensures that the battery has been completely charged
without the risk of being overcharged.
5. Analysis – Testing the battery while charging
The charger shuts off power and measures voltage drop over a set time. If unacceptable readings are
measured this may indicate an internal short or other issue inside the battery.
6. Boost/ equalisation charge
Once the battery is fully charged, the charger will equalize all of the battery cells by providing a steady set
voltage over a programmed period of time, at low current.
7. Float stage
After the boost stage, the current will drop to low amperage to maintain the battery in a fully charged and
ready to use state.
8. Maintenance charge
After float stage the voltage will maintain at a constant level with a small pulse frequency. Current is
dropped to a very low level.
2. Battery Charging Instructions
Step1. Install charger onto the caravan/motor home/ Yacht using the mounting brackets.
Step2. Plug in the detachable 240VAC power cable into the charger, and then connect the 3 pin plug to a 240VAC
outlet to power the charger or hard wire 240VAC cable into 240VAC power.
Step3. Electrolyte Level Check (where applicable)
For sealed maintenance free batteries check the state of charge indicator.
Please Note: Refer to the vehicles manufacturers’ owner manual.
Step4. Connect battery charger ring terminals to auxiliary battery for permanent connection and charging: (Red +
Positive) / (Black – Negative).
To turn the charger on or off, please connect the LCD screen to a 12V battery for power supply to turn charger
on/off or toggle the DC Power supply mode.
Ensure the battery is in a safe location on a stable surface with adequate ventilation.
Ensure the correct Personal Protective Equipment is being worn I.e. Gloves and Eye Wear.
Page 5 Part No PTC12V40AL
Once 240VAC power is connected and the red and black cables are connected to the battery, follow the next
few steps.
Turn the charger on using the LCD touch screen to commence charging.
12V LITHIUM BATTERY ONLY – Cut the looped blue wire at the front of the unit to activate
Lithium battery charging and will retain this charging mode even if the charger is turned off,
then back on again. The Lithium icon should now be seen on the LCD screen.
The battery charger will commence working automatically without the need for any further user input. Once
the battery is fully charged, the user can either keep the charger on to maintain the battery, or turn the
charger off using the LCD touch screen.
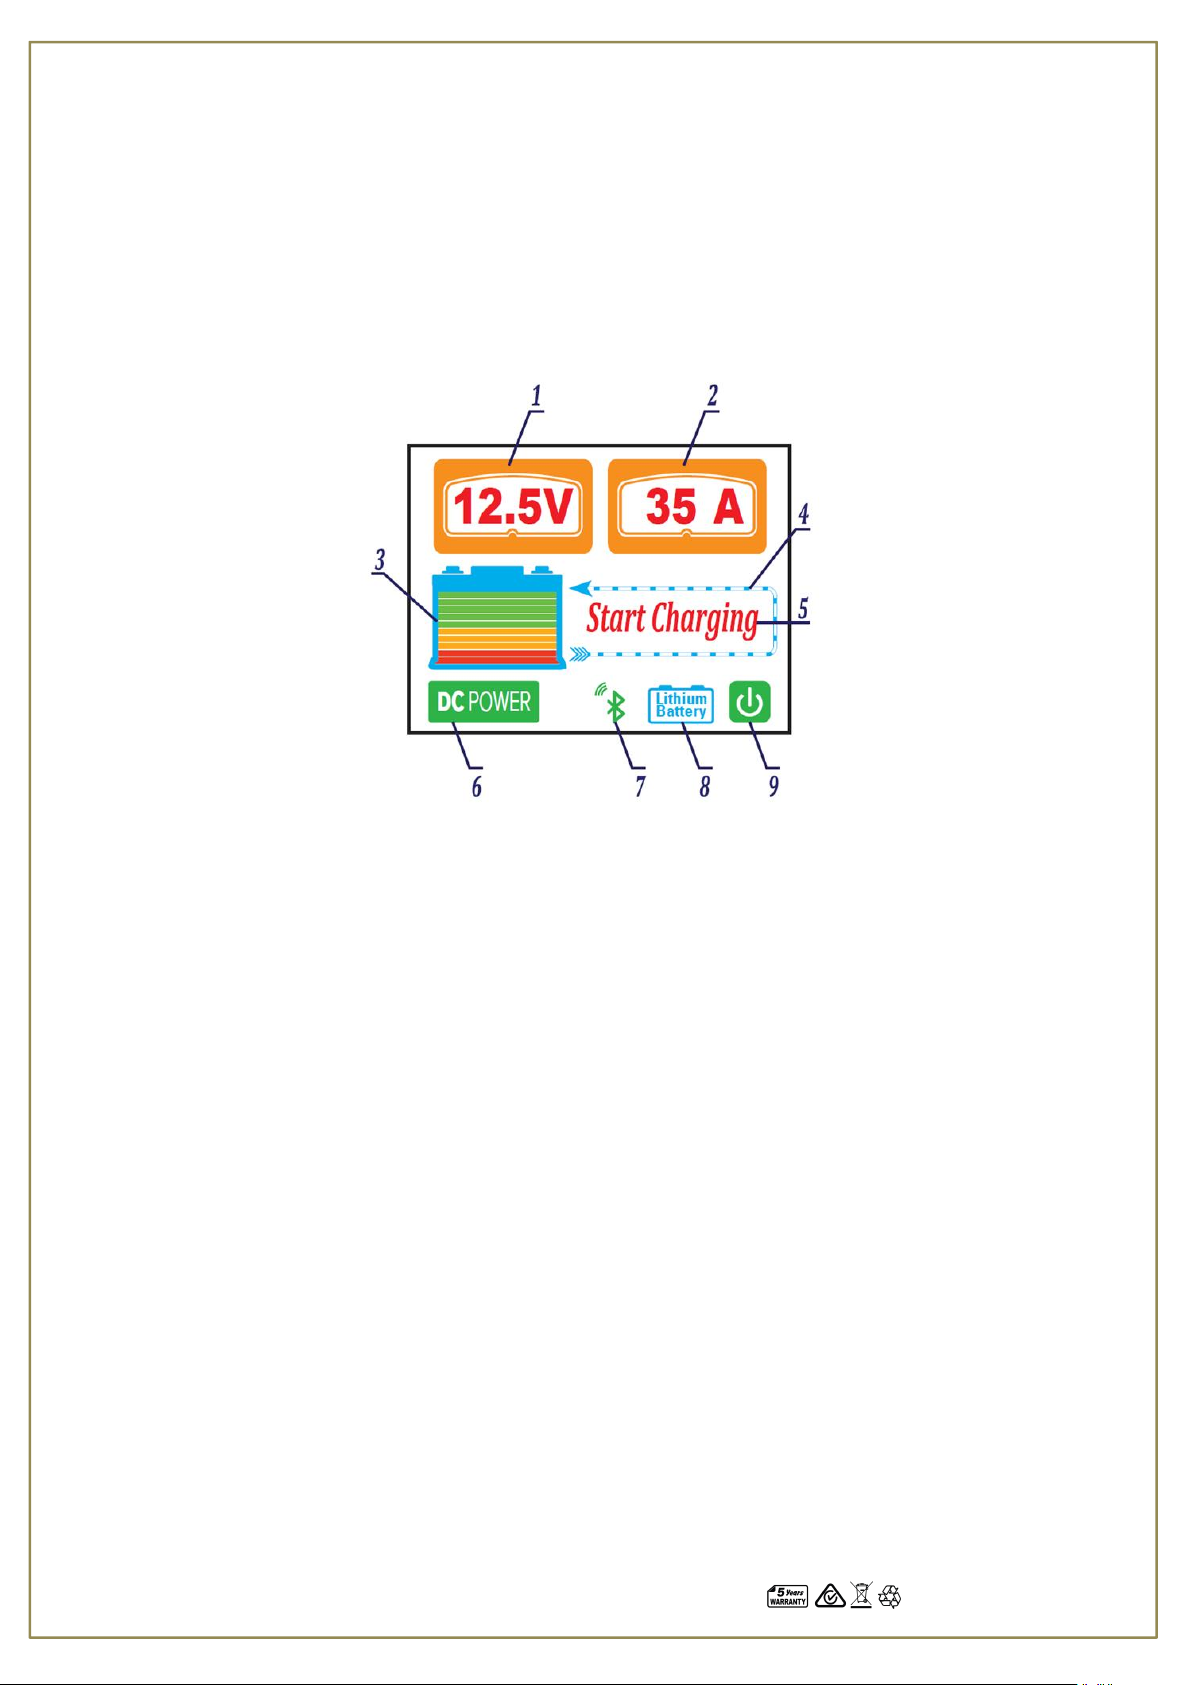
LCD Screen features:
1. Output Voltage.
2. Output Current.
3. Battery Capacity (When the connected battery is tested to be faulty, the battery mark starts to flash, once
per second, but the charging process will continue. The flashing stops once the battery voltage rises to 14.5V)
4. Dotted border will flash during charging process. Does not flash during DC power supply.
5. When charging, this indicator will change depending on which state the charger is in.
6. DC Power supply button. User can press this button on LCD screen to activate DC power supply for constant
13.5V 40A DC power output. If the DC power button is red, DC power off. If Dc power button is green, DC
power is on.
7. Bluetooth signal indicator will display when there is Bluetooth connection from LCD screen to charger.
8. Lithium battery charging indicator will display when the loop of blue wire is cut and charger is changed to
lithium battery charging only.
9. Power button; user can press this button to turn charger on or off. If power button is green, unit is on. If
power button is red, unit is off.
If the user switches off the charger using the power button (9) on the LCD screen and the charger still has 240VAC
power supplied to the charger, the battery capacity indicator (3) will still be displayed, but there is no output voltage
and output current. And if the looped blue wire is cut, then lithium battery icon (8) will still display.
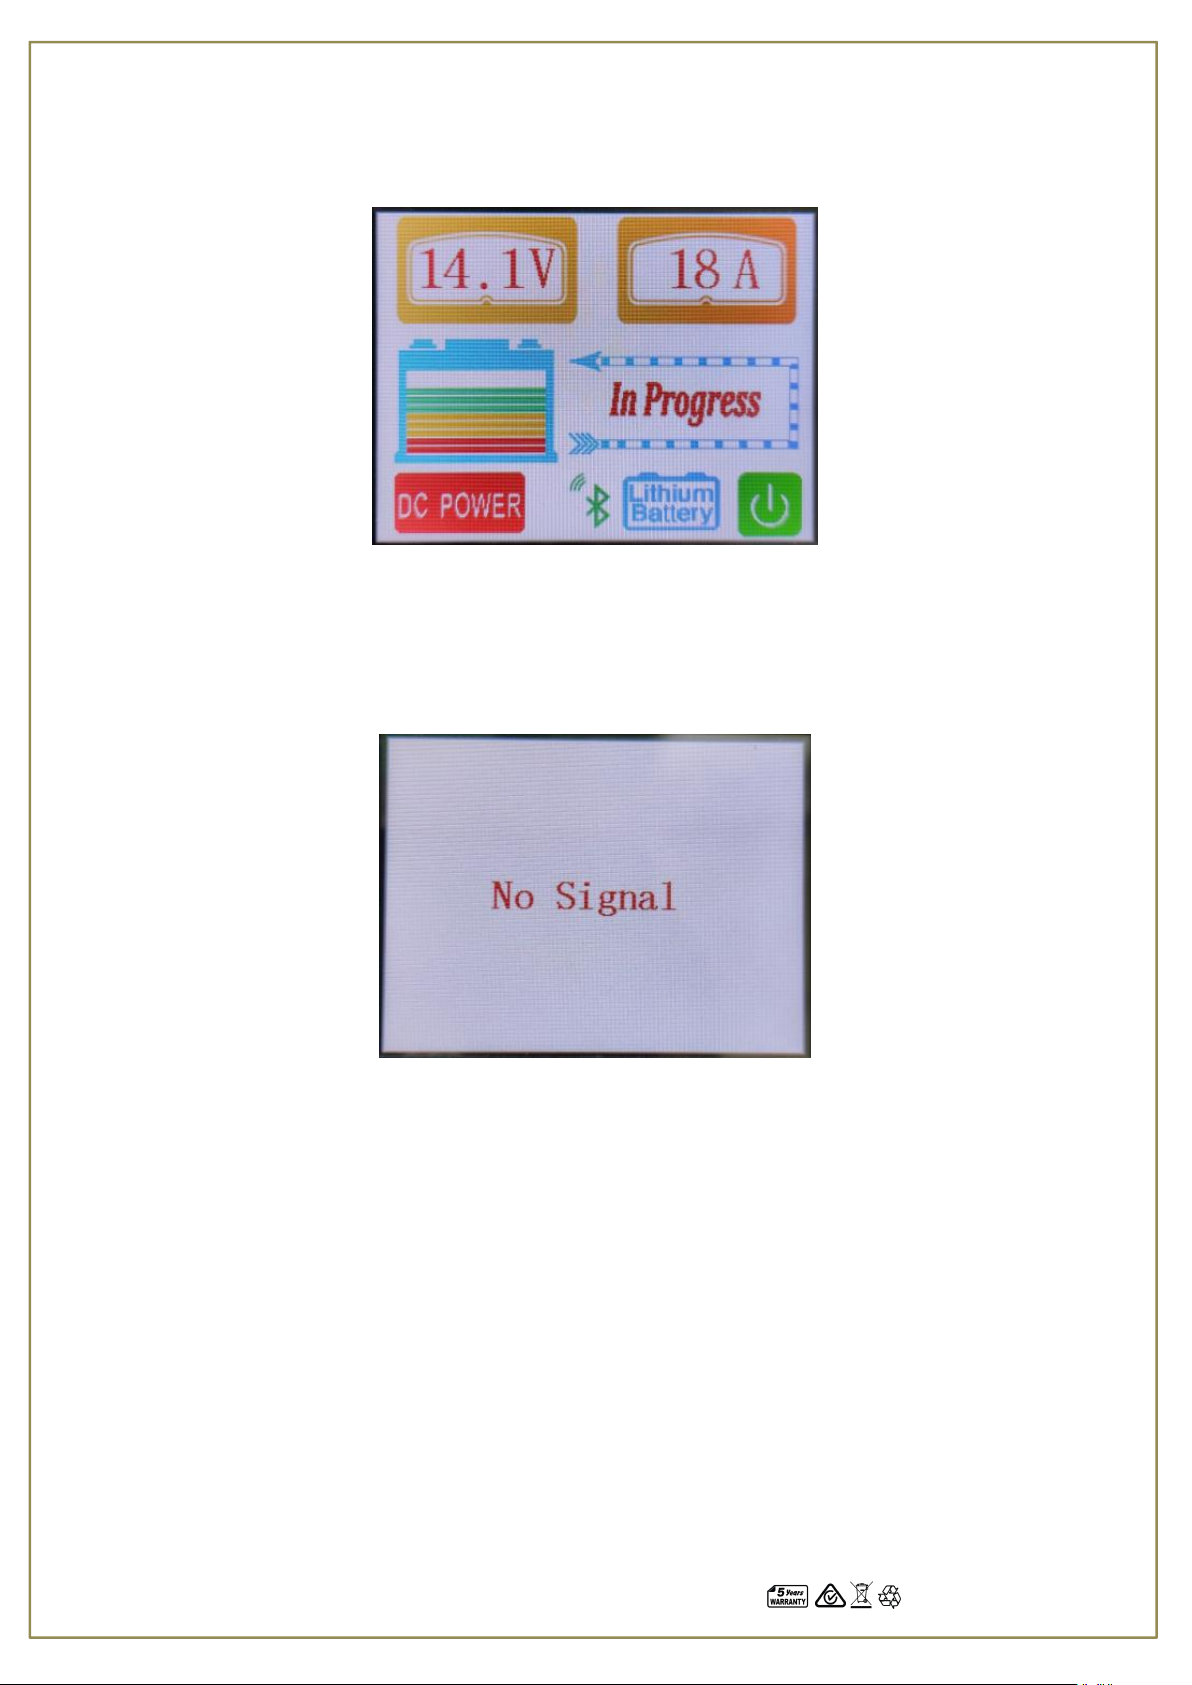
If 240VAC power is no longer supplied to the charger, then there is no bluetooth signal going to the LCD screen; thus,
the Bluetooth icon (7) will not show up, all other symbols will disappear, and the words “no signal” will display.

Page 6 Part No PTC12V40AL
If the charger is no longer working, and has become faulty, then the LCD screen will show “no signal”. When this
happens please check if the LED on the charger is lit up or not, which will indicate a fault with the charger.
If the battery being charged is detected to be faulty, the battery icon (3) will flash for 1 minute to warn the user.
However, the charger will continue the charging process even after this occurs in order to attempt to fully charge the
battery.
If short circuit or overload occurs during DC Power Supply mode, the “DC Power” button will turn red and flash and
the “DC Power on” words will flash too. When this happens, remove the load from the charger and then press “DC
Power” button to reset DC Power supply mode. During DC Power supply mode, the voltage output and current
output will still be displayed.
LCD Monitor Power off:
The LCD screen above will be displayed when: the user presses the power button on the bottom right corner of the
monitor to turn off output from the charger, the charger still has 240VAC power and is within the wireless range of
the LCD monitor. The output voltage and current will not be displayed, but the battery capacity of the connected
battery will still be displayed.
DC Power Mode:
The LCD screen above will be displayed when the user activates DC Power mode by pressing the “DC Power” button,
the output voltage and current will be displayed.
Page 7 Part No PTC12V40AL
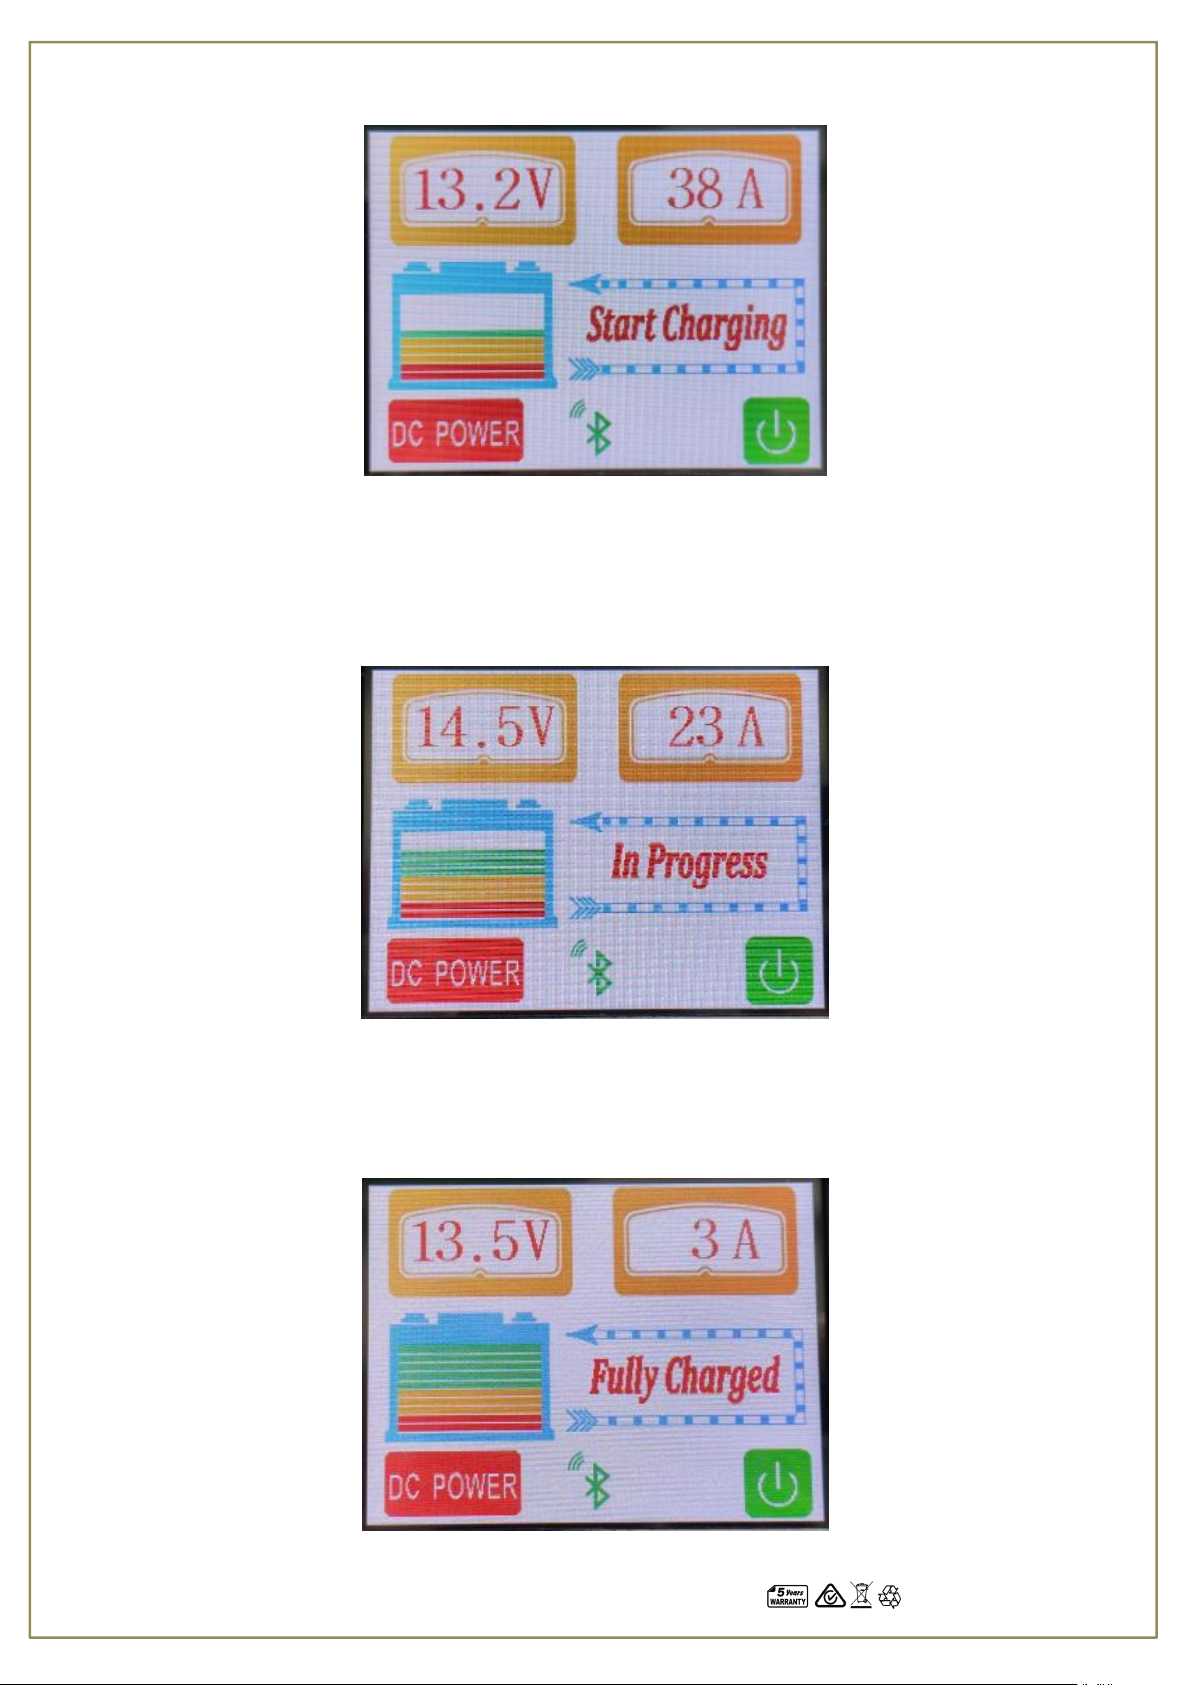
Normal Charging mode-Start Charging:
The LCD screen above will be displayed when the user turns on the charger using the power button and is using the
charger to charge Lead Acid, Gel, AGM or Calcium batteries. The “Start Charging” words will display during the first
stages of charging.
Normal Charging mode-In Progress:
The LCD screen above will be displayed after the Start Charging stage. The “In Progress” words will display during the
main charging stages.
Normal Charging mode- Fully Charged:
Page 8 Part No PTC12V40AL
The LCD screen above will be displayed when after the In Progress stage. The “Fully Charged” words will display
during the final maintenance stages.
Lithium Battery Charging mode:
The LCD screen above will be displayed when the user cuts the looped blue wire to start the Lithium charging mode
and is using the charger to charge a Lithium battery. The words displayed within the dotted border to indicate
charging progress will follow the same process as charging normal batteries.
No Bluetooth signal going from charger to LCD monitor:
The LCD screen above will be displayed when the LCD monitor is not receiving any Bluetooth signals from the
charging unit.

Page 9 Part No PTC12V40AL
TECHNICAL SPECIFICATIONS
Part Number:
PTC12V40AL
Charger Type
Automatic flooded chemistry detection, switch mode, 8 stage
battery charger.
Lithium Charging Compatible
Yes, 12V Lithium Batteries only, need to cut looped blue wire
Compatible rechargeable battery
types
12V Flooded lead acid, AGM, GEL, Maintenance free, Calcium
and 12V Lithium.
DO NOT ATTEMPT TO CHARGE DRY CELL BATTERIES
Bluetooth Signal Aerial Wire
COMES OUT OF THE FRONT OF THE UNIT. DO NOT CUT THIS
AERIAL WIRE
Zero volt start
Yes
DC Power Supply
13.5V 40A with overload and short circuit protection.
Warranty Time
5 Years
Short circuit, Reverse connection,
overload, over-voltage, over-
charging, over-temperature
protection
Yes
Ambient operating temperature
-15℃to +50℃
Product casing
Aluminium
Maximum recommended battery
charging capacity
80Ah to 400Ah
240VAC Cable Length
2m
Table of contents


