Powr-Flite PP200-Q02-U User manual

Operations and Maintenance Manual
For Commercial Use Only
PORTABLE BATTERY POWERED MISTER
Model No. PP200-Q02-U
SAVE THESE INSTRUCTIONS
P-OMPBM 12/2020
Form No. P-OMPBM 12/2020 ©Tacony Corporation, LLC. All right reserved.

P-OMPBM 12/2020 2
Your new Pow’r Flite unit is ahigh quality, precision-made product.All parts used in the
manufacturing of this unit have passed rigid quality control standards prior to assembly.
Please safeguard the original receipt/invoice given at the time of purchase.If you
experience any problems with your unit during the warranty period, the original
receipt/invoice will act as proof of purchase
Upon receipt, inspect outer box for exterior damage. Unpack all internal parts,
ensure all items are present according to the owner’s manual, and review
components for damage.
Each unit is tested and thoroughly inspected prior to shipping.If damage is discovered,
immediately notify the transportation company that delivered your machine and request
an inspection.As amanufacturer, we are unable to act upon any claim for concealed
damage and you must originate the claim.Be sure to keep the carton, packing inserts,
and carrier’s receipt until the inspector has verified your claim.
CHARGER POLARIZATION INSTRUCTIONS
The battery charger is equipped with a 2-wire, polarized AC power cord with one blade
wider than the other.This plug fits in the power outlet only one way and is asafety
feature.If you are unable to insert the plug fully into the outlet, try reversing the plug.If
the plug should still fail to fit, contact an electrician to replace the obsolete outlet.Do not
defeat the safety purpose of the polarized plug.

P-OMPBM 12/2020 3
Prior to operating the Portable Battery Powered Mister, read and
understand completely this owner’s manual paying special
attention to warning labels. These labels indicate a potentially
hazardous situation that could result in death or serious injury if
not avoided. Use only as described in this manual.
There are no owner serviceable parts inside this machine.
Removal of screws and accessing internal components will void
all warranty claims.
Personal Protection Equipment (PPE) should be worn during the
operation of this machine. Chemicals can remain airborne for
some time after application and therefore safety glasses and
masks are recommended. Gloves should be worn any time
chemicals are handled.
Only products shown on LIST N from the Center for Disease
Control (CDC) should be used through this machine in order to
kill viruses including SARS-CoV-2 (COVID-19). It is important to
follow mixture ratios exactly as indicated on product label.
Follow manufacturer’s recommendation of disposal of all
chemicals used in this machine.
For warranty information go to www.powr-flite.com

P-OMPBM 12/2020 4
Always remember to recycle
Never dispose of lithium-ion
batteries in your regular trash or
recycling bin. Batteries must be
disposed of properly.
PP200-Q02-U Specifications
Pressure (Max.) 130 PSI / 9 BAR
Weight (Empty) 3.9 LBS / 1.8 KG
Weight (Full of Solution) ≥7.5 LBS / 3.4 KG
Dimensions (HxWxL)12” x 4” x 8” / 305 x 102 x 203 mm
Voltage 10.8 VDC
Flow 1.75 GPH / 6.6 LPH
Run Time 6 Hours Continuous
Tank Capacity 1/2 Gallon / 2 Liters
Hose Length 2’ –10’ Stretch
Battery Recharge 90 Minutes
Battery Storage 32° - 140°F / 0° - 60° C
In Tank Filter YES
Anti Skid/Mark-Free Pads YES

1. IMPORTANT SAFETY INSTRUCTIONS
1. Fully assemble mister before operating.
2. Use and store in a dry location.
3. Do not allow machine to be used as a toy. Close attention is
necessary when used by or near children.
4. Do not use charger with damaged cord or plug. If appliance or
charger is not working as it should, has been dropped,
damaged, left outdoors, or dropped into water, contact an
authorized service center for service.
5. Do not pull or carry charger by cord, use cord as a handle,
close a door on the cord, or pull cord around sharp edges or
corners.
6. Keep cord away from heated surfaces.
7. Do not unplug charger by pulling on cord. To unplug charger,
grasp the plug, not the cord.
8. Do not handle charger, including charger plug and terminals
with wet hands.
9. Do not put any object into openings
10. Do not use with any opening blocked. Keep free of dust, lint,
hair and anything that may reduce air flow.
11. To ensure disinfection, follow chemical manufacturer’s
recommendation of dwell time (how long the disinfectant sits on
a surface) prior to removal. Dispose of wipe down towel
properly or allow disinfectant to air dry in place.
12. Do not charge the unit outdoors.
13. Only charge in temperatures between 32° - 113°F (0° - 45°C).
14. Do not open, crush, expose to heat above 212°F (100°C) or
incinerate the battery even if it is severely damaged.
15. Use battery only with charger supplied.
16. Battery and charger have no serviceable parts and cannot be
repaired. Replace only with battery and/or charger part
numbers shown in this manual.
Read and understand this owner’s manual and all labels on the unit before operating.
Safety is acombination of common sense, staying alert, and knowing how your unit
works.To reduce the risk of personal injury or damage to your unit use only as indicated
in this manual.
IMPORTANT:The manufacturer cannot accept responsibility for damage caused when
the appliance is not used according to these instructions or for uses other than those for
which it was intended.
P-OMPBM 12/2020 5

1. IMPORTANT SAFETY INSTRUCTIONS
Pressurized Equipment Warning
P-OMPBM 12/2020 6
Unit is under high pressure when machine is activated. If leaks are visible
around coiled hose connections, replace hose immediately with part
number shown in this manual. If pump continues to run when the trigger
is not depressed, turn machine OFF, discontinue use and return to an
authorized service center.
Flammability Warning
NEVER fill unit with flammable chemicals. Do NOT use in an area where
flammable fumes are present.
State of California Proposition 65 Warnings
WARNING: This product contains one or more chemicals known to the
state of California to cause cancer.
WARNING: This product contains one or more chemicals known to the
state of California to cause birth defects or other reproductive harm.
Chemical Warning
Straight bleach should never be used solely in this unit. When sodium
hypochlorite, a component found in bleach, dissolves in water, two
substances form which play a role in both disinfection and oxidation.
Manufacturer’s recommendations must be followed for the chemical being
used to ensure the proper balance is achieved that will disinfect and not
oxidize the metal components found in this machine. It is recommended
to flush the entire system thoroughly with clean water after use and prior to
storage. Store unit dry and empty for prolonged periods following a
system flush. Use only water-based chemicals to clean machine.
Intended Use
Do NOT modify this unit in any way or adapt it for any other use.
Modification of this unit in any way will void all warranties and could create
safety hazards.

2. BOX CONTENTS
P-OMPBM 12/2020 7
Upon initial receipt of unit, open box and ensure all parts are included as
shown below:
1. Wand Assembly 2. Coiled Hose
3. Mister Assembly
6. Owner’s Manual
4. Strap Assembly
5. Battery 7. Battery Charger

3. OPERATING INSTRUCTIONS
P-OMPBM 12/2020 8
A. Initial Assembly
1. Remove all contents from box and ensure all components are present per the
BOX CONTENTS section of this manual
2. Firmly attach one end of hose to the wand assembly and the other end to the
machine ensuring the hose is fully inserted (Fig 1).
3. Attach the shoulder strap to the unit. The mister can be used with the carrying
handle or the shoulder strap (Fig 2).
B. Battery Charging
1. Remove battery and battery charger from individual boxes.
2. Plug charger AC cable into 115V wall socket and insert battery into charger.
Battery was designed to fit into charger only one way to ensure alignment of
charging ports.
3. If the battery needs charging, the light on the charger will turn red. When
charging is complete, the red light will turn green. Flashing green light indicates
charger is in stand-by mode.
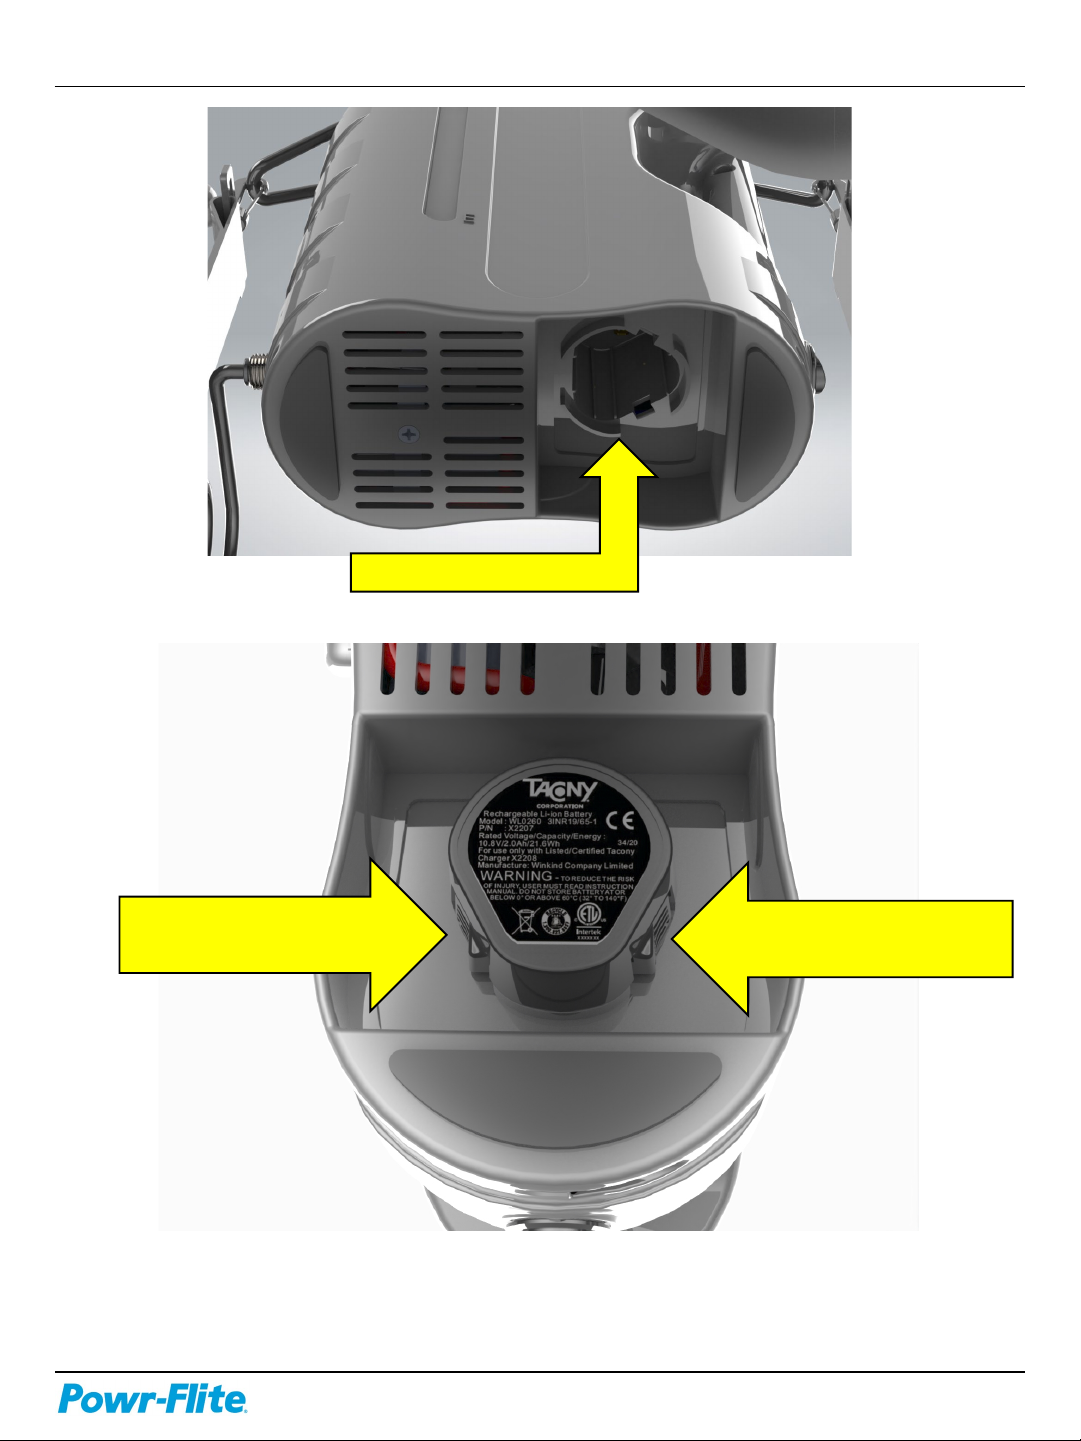
C. Battery Installation
1. Once the battery is fully charged, insert battery in the port located underneath
the main unit (Fig 3).
2. Insert battery into port and push until tabs engage. Battery will only insert into
port one way.
3. To remove battery, simultaneously depress tabs on side of battery and pull out
(Fig 4).
4. Charge as required.
It is important to NOT install a battery into a
unit that is turned ON. Verify the switch is
in the OFF position prior to inserting
battery.
Do NOT turn unit ON without verifying there
is fluid in the machine. Running the system
dry will damage the pump.

Prior to filling tank, remove battery from
unit and place away from wet area.
3. OPERATING INSTRUCTIONS
P-OMPBM 12/2020 9
D. Operation
1. Remove cap from tank.
2. Pour the recommended amount of disinfectant into the ½ gallon tank and fill
about ¼ of the way fill with clean water. Replace cap and gently shake contents
to mix disinfectant with water. Remove cap and fill to full (F) line. Note that the
solution level can be viewed through the solution level window on either side of
the unit.
3. Ensure exterior of unit is dry prior to adding battery.
4. Install battery as outlined in section C.
5. Turn switch to the ON position. You will hear the pump come on to build
pressure for spraying. Pull trigger on wand until uniform spray is discharged
from end of wand and to assist in the self priming feature.
6. Pump will come on each time trigger is pulled and will run shortly after release to
keep pressure on the system. This will repeat during use.
Read and understand the requirements of the
disinfectant used. Dwell time, or the amount of time a
solution must remain on a surface, should be known for
maximum effectivity. Do not oversaturate.
7. To apply, use a natural up and down or side to side motion ensuring complete
coverage by overlapping.
8. Over a period of approximately 5 minutes of non-use with the unit ON, pressure
may drop enough to “bump” the pump back on for a split second. This is to
serve as a reminder that the unit is still ON and should be turned off if use is not
intended to keep the battery from draining.
9. Allow disinfectant to remain on the surface for the required amount of time
based on manufacturer’s recommendations. Wipe with clean, dry rag if required
following disinfection.
When the product is brand new and/or has not been
used for an extended period, it could take up to 30
seconds for fluid to reach the end of the wand.
Continue pulling trigger at startup until a strong flow of
mist is observed exiting the wand.

3. OPERATING INSTRUCTIONS
P-OMPBM 12/2020 10
E. After use
1. Upon completion of disinfection, empty contents of tank into an approved
storage container.
2. Add ¼ gallon (half full) of clean water to the tank and replace cap.
3. Turn unit ON, pull spray trigger, and allow clean water to flush through system,
making sure to follow proper disposal of the water being flushed through the
system as there will be residual chemical found in the spray (Follow chemical
manufacturer’s recommendation for disposal).
4. Turn unit OFF, pull spray trigger again to relieve back pressure on unit.
5. Remove battery.
6. Empty contents of tank and store dry.
F. Troubleshooting
Issue Possible Cause Action
Wand Does Not
Spray
•Low battery voltage
•Battery not fully installed
•Clogged tip
•Low fluid level
Charge battery
Ensure battery fully installed.
Clean tip
Fill tank
Machine will not
turn on
•Low battery voltage
•Defective Switch
•Pump Failure
Charge battery
Call customer support
Call customer support
Low Solution Flow •Clogged tip
•Not enough solution in tank
•Clogged tank filter
•Vacuum Lock
Clean tip
Fill tank
Clean in tank filter
See next page
Water Visible Under
Machine
•Loose plumbing connection
•Water spilled during filling
Call customer support
Dry unit and re-observe
Light not coming on
charger when
battery inserted
•Confirm charger plugged in
•Confirm power to plug
•Defective battery or charger
Plug in charger to 115V outlet
Flip breaker switch
Call customer support
Customer Support
If your system fails to function properly and is not addressed above, contact customer
support at 1-800-880-2913. User/freight damage will not be covered.

3. OPERATING INSTRUCTIONS
P-OMPBM 12/2020 11
F. Troubleshooting
Occasionally air may enter the system and can cause a
vacuum lock. This is indicated by a greatly reduced
flow of liquid out of the end of the wand. Follow the
steps below to correct.
1. Turn machine OFF.
2. Pull wand trigger to remove all pressure from system.
3. Pull black plastic towards wand while pulling coiled hose out of fitting
2. Pull Hose Down
1. Pull Black Plastic Up to Release Hose
4. Point free end of hose into approved container.
5. Turn unit ON until solution flows freely out of end
of hose.
6. Turn unit OFF.
7. Replace coiled hose back into wand by simply
pushing free end of hose back into fitting until fully
seated. It is not necessary to pull the black
plastic back as hose will self lock when fully
inserted.

4. ASSEMBLY INSTRUCTIONS
P-OMPBM 12/2020 12
Figure 1
Push hose FULLY into fitting. Once fitting bottoms out, tug on tubing to
ensure snug fit.
Figure 2
5. BATTERY INSTALLATION
P-OMPBM 12/2020 13
Figure 3
Battery Port
Press on both sides
at the same time.
Figure 4
To remove battery

6. SPRAY TIP REPLACEMENT
P-OMPBM 12/2020 14
Figure 3
Figure 4
The spray tip is made of plastic and will therefore
require replacement over time. Use only the
replacement tip listed in the parts section of this
manual.
9/16"
1/2"
REMOVE
INSTALL – USE THREAD SEALER

7. KEY FEATURES
P-OMPBM 12/2020 15
PADDED SHOULDER STRAP WITH QUICK DISCONNECTS
10.8V LITHIUM-ION
BATTERY AND CHARGER
10’ COILED PRESSURE HOSE
VACUUM RELIEF
VALVE
POWER SWITCH
CARRY
HANDLE
NOZZLE EXTENSION
NOZZLE
TRIGGER
SOLUTION LEVEL WINDOW

8. SCHEMATICS
P-OMPBM 12/2020 16
Figure 3

9. PARTS LIST
P-OMPBM 12/2020 17
ITEM NO. PART NUMBER DESCRIPTION QTY
1X2216 Nozzle, Spray 1
2X2215 Fitting, Adapter, ¼” Tube X ⅛” FNPT 1
3X2214 Tubing, Stainless ¼” OD X 3/16” ID 1
4X2213 Fitting, Adapter, ¼” Tube X ⅛” MNPT 1
5X2212 Bulkhead, Female, ¼” Tube X ⅛” FNPT 1
6X2223 Hose, polyurethane, 1/4 OD X .160 ID, Blue, 175 PSI 2 FT
7X2253 Shell, Wand, Right 1
8X2220 Elbow, ¼” Tube X 10-32 UNF Male 1
9X2221 Bulkhead, ¼” Tube 2
10 X2209 Hose, Coiled Pressure 1
11 X2211 Valve, Trigger 1
12 X2217 Screw, 4-20 X ¼”, Thread Forming for Plastic 8
13 X2218 Binding Post, 8-32 X 13/64” OD X 1” Long 1
14 X2204 Shell, Wand, Left 1
15 X2205 Trigger, Wand 1
16 X2219 Adapter, ¼” Tube X 10-32 UNF Male 1
17 X2226 Plastic Bulkhead for Small Bottle Cap, ⅛” Hose Barb 1
18 X2249 Spring for Tubing Support Out of Bottle 1
19 X2250 Clamp, Hose, ¼” 2
20 X2229 Pear Link 2
21 X2260 Label, Attention, Clean After Use 1
22 X2201 Shell, Right 1
23 X2235 Label, Powr-Flite Branding 2
24 X2261 Label, Power Off to Install Battery 1
25 A328-1500 On/Off Switch 1
26 X2224 Anti Slip Pad w/HD Adhesive 2
27 X2203 Housing, Battery 1
28 X2259 Lead Wire, Power 1
29 X2227 Swivel Tee, ¼” Tube Push to Connect X ⅛” FNPT 1
30 X2231 Screw, 8-32 X 5/8” FHMS ***Undercut*** Stainless 1
31 X2256 Pump, Pressure Switch and Silicone Pump Mount Assembly 1
32 X2264 Nut, Weld, 8-32 2
33 X2228 Internal Filter 1

9. PARTS LIST
P-OMPBM 12/2020 18
ITEM NO. PART NUMBER DESCRIPTION QTY
34 X2258 Cap, Solution Bottle (Aftermarket Part) 1
35 X2202 Bottle, Fluid + Caps and Seals 1
36 X2200 Shell, Left 1
37 A732-8414 Screw, 8-18 HI-LO 8
38 X2207 Battery, Lithium Ion, 10.8V 1
39 X2208 Charger, Lithium-Ion Battery, Input 100-240V, Output 12V DC
1.5A with US AC Cable
1
40 X2206 Strap, Carry 1

10. NOTES
P-OMPBM 12/2020 19
1. ____________________________________________
2. ____________________________________________
3. ____________________________________________
4. ____________________________________________
5. ____________________________________________
6. ____________________________________________
7. ____________________________________________
8. ____________________________________________
9. ____________________________________________
10. ____________________________________________

P-OMPBM 12/2020 20
Figure 3
A Tacony Company
3101 Wichita Court
Ft. Worth, TX 76140-1755
Phone: 800-880-2913
Fax: 1-817-551-0719
WWW.POWR-FLITE.COM
Record of Purchase
Serial Number:
Purchase Date:
Dealer:
Phone Number:
Other manuals for PP200-Q02-U
1
Table of contents
Other Powr-Flite Paint Sprayer manuals

Popular Paint Sprayer manuals by other brands


Mesto
Mesto HERBI 3232U Instructions for use

Graco
Graco TexSpray Compact HP 231-801 Instructions-parts list

Boyens Backservice
Boyens Backservice Jelly economy instruction manual

Task Force Tips
Task Force Tips Ultimatic INSTRUCTIONS FOR SAFE OPERATION AND MAINTENANCE

Graco
Graco IronMan 256790 Operation and parts manual

Chicago Electric
Chicago Electric 44677 Assembly and operating instructions


