PPE Xcelerator User manual

Xcelerator User Guide
Maximum performance designed for closed course racing applications.
PPEdiesel.com
Rev: 06/06/18 | v19A
Technical Support (714) 985-4825
Duramax
GM 6.6L Duramax Diesel
2001-2010 LB7/LLY/LBZ/LMM
(111001800)
User Guide

Xcelerator User Guide
1
DISCLAIMER OF LIABILITY
This is a performance product which, increases horsepower above factory specications. Additional horsepower
creates more stress on your vehicle’s drivetrain components which may result in drivetrain failure. This product is
Legal in California only for racing vehicles which may never be used on the highway.
This publication pertains to engine and vehicles which are o the public highways except where specically
noted otherwise. Federal law restricts the removal of any part of a federally required emission control system on
motor vehicles. Further, many states have enacted laws which prohibit tampering with or modifying any required
emission or noise control system. Vehicles which are not operated on public highways are generally exempt
from most regulations, as are some special interest and pre-emission vehicles. The reader is strongly urged to
check all applicable local and state laws.
Many of the parts described or listed on this website are merchandise for o-highway application only, and are
tagged with the “Special Parts Notice” reproduced here:
SPECIAL PARTS NOTICE:
This part has been specically designed for O-Highway application only. Since the installation of this part may
either impair your vehicle’s emission control performance or be uncertied under current Motor Vehicle Safety
Standards, it should not be installed in a vehicle used on any street or highway. Additionally, any such application
could adversely aect the warranty coverage of such an on-street or highway vehicle.
This agreement sets forth the terms and conditions for the use of this product. The installation of this product
indicates that the Buyer has read and understands this agreement and accepts the terms and conditions.
Pacic Performance Engineering Inc., its distributors, employees, and dealers (the “Seller”) shall not be
responsible for this product’s improper use and service. The Buyer hereby waives all liability claims.
The Buyer hereby acknowledges no reliance on the Seller’s skill or judgment to select or furnish goods suitable
for any particular purpose and that there are no liabilities which extend beyond the description on the face hereof,
and the Buyer hereby waives all remedies or liabilities expressed or implied, arising by law or otherwise (including
without any obligation of the Seller with respect to tness, merchantability and consequential damages), or
whether or not occasioned by the Seller’s negligence.
The Seller disclaims any warranty and expressly disclaims any liability for personal injury or damages. The
Buyer acknowledges and agrees that the disclaimer of any liability for personal injury is a material term for
this agreement and the Buyer agrees to indemnify the Seller and to hold the Seller harmless from any claim
related to the item of equipment purchased. Under no circumstances will the Seller be liable for any damages or
expenses by reason of use or sale of any such equipment.
The Seller assumes no liability regarding the improper installation or misapplication of its products. It is the
installer’s responsibility to check for proper installation and if in doubt, contact the manufacturer.
The Buyer is solely responsible for all warranty issues from the manufacturer.
LIMITATION OF WARRANTY
The Seller gives Limited Warranty as to description, quality, merchantability, and tness for a particular purpose,
productiveness, or any other matter of Seller’s product sold herewith. The Seller shall not be responsible for
the products proper use and service and the Buyer hereby waives all rights other than those expressly written
herein. This warranty shall not be extended, altered or varied except by a written instrument signed by Seller
and Buyer.
The Warranty is limited to one (1) year from the date of sale and limited solely to the parts contained within the
products kit. All products that are in question of Warranty must be returned prepaid to the Seller and must be
accompanied by a dated proof of purchase receipt. All Warranty claims are subject to approval by Seller.
Under no circumstances will the Seller be liable for any labor charged or travel time incurred in diagnosis for
defects, removal, or reinstallation of this product or any other contingent expenses.
Under no circumstances will the Seller be liable for any damage or expenses incurred by reason of the use or
sale of any such equipment.
In the event that the Buyer does not agree with this agreement; the Buyer may promptly return this product, in
a new and unused condition in its original packaging, with a dated proof of purchase to the place of purchase
within ten (10) days from date of purchase for a full refund.
The installation of this product indicates that the Buyer has read and understands this agreement and accepts
its terms and conditions.
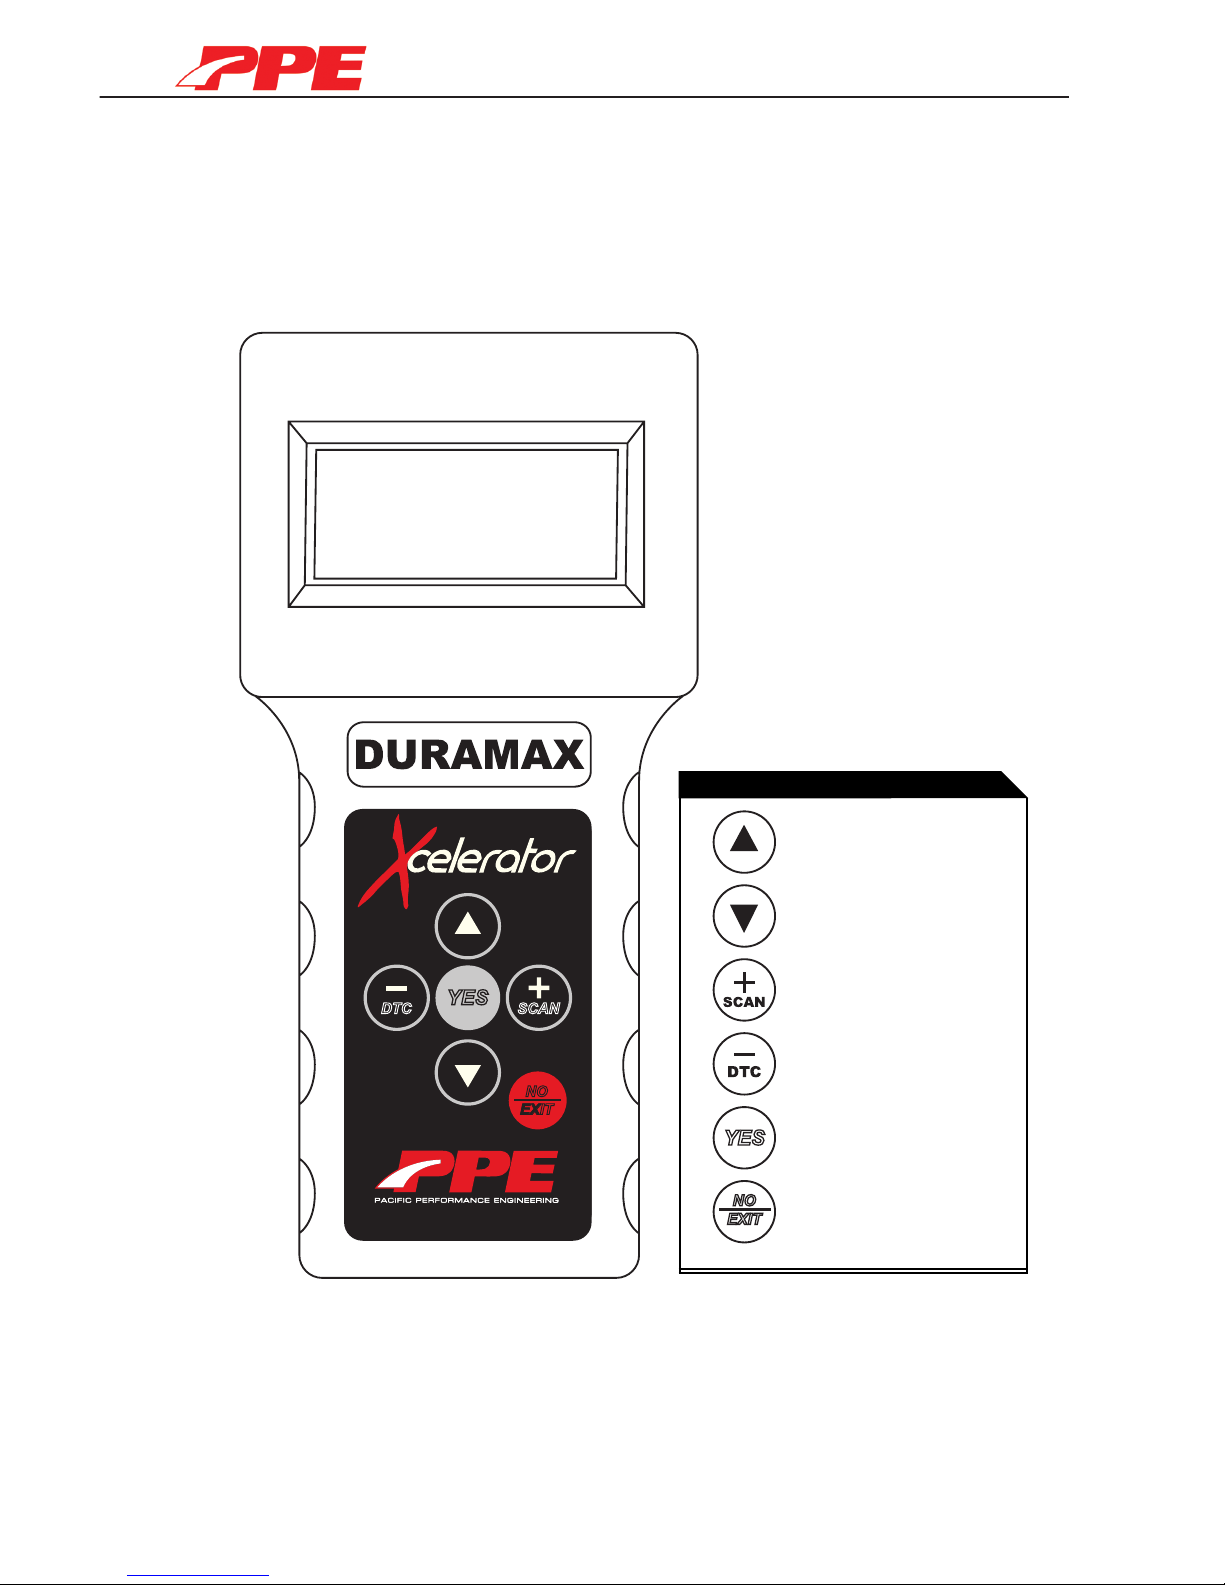
ATTENTION: Please read instructions carefully before installing the programmer into
your vehicle; failure to do so may result in damage to your vehicle’s PCM!

Xcelerator User Guide
2
TABLE OF CONTENTS
3
4
5
5
6
7
8
9-11
12
13
14
15
16
17-18
19
20
21
Parts and Accessories
Display and Keypad Description
Before Installing PPE Tunes
Preparing Your Vehicle for Tune Installation
Fuse Removal
OBD II Port Location
Power Levels
Installing Tune Into Vehicle ECM
Restoring Factory/Stock Tune
Calibration
Current Vehicle Tuning
Data Scanning
Get Diagnostic Trouble Codes
Transmission Re-learn Procedure
Other Options
Particulate Filter Regeneration
Frequently Asked Questions

Xcelerator User Guide
3
-Xcelerator Tuner (1)
-Xcelerator Carrying Case (1)
-OBD II Cable (1)
-Xcelerator Owners Manual (1)
-Warranty Card (1)
-PPE Badge (2)
PARTS AND ACCESSORIES

Xcelerator User Guide
4
DISPLAY AND KEYPAD GUIDE
- Up Button
- Down Button
- Scan/Add Button
- DTC/Subtract Button
- Yes/Enter Button
- Exit/Back Button
Keypad Functions
PPEdiesel.com
DTC SCAN
YES
NO
EXIT
YES
NO
EXIT

Xcelerator User Guide
5
Please read through the owners manual before installing a tune in your
vehicle. Failure to follow the instructions properly can result in a damaged or
disabled PCM.
User MUST ensure that the factory “stock” tune is in the vehicle’s PCM before
installing the Xcelerator tune. GM dealer re-ashes are the same as “stock”
factory tune.
Serious engine damage can occur if the Xcelerator tune is installed over a
non-factory / aftermarket performance tune. Such as another company’s
tuner. Tune “stacking” is not advised.
WARNING
Do not perform any operations on Xcelerator (except live data diagnostics)
while vehicle is running. The vehicle must be parked and engine OFF.
BEFORE INSTALLING XCELERATOR TUNES
• Turn the headlights o to prevent unnecessary battery drain.
• ALWAYS have ALL of the doors either closed or open the entire time
while installing the Xcelerator tunes until the process is complete. DO not
open or close the doors.
• All vehicle accessories and electronics using auxiliary outputs must be
disconnected PRIOR to connecting the programmer into your vehicle’s
OBD II port. (ipod, satellite radio, cell phone charger, GPS, etc.) These
devices can cause interference when running through the installation
process.
• Do not turn on the radio, A/C, or heater while installing tune.
• Unless instructed by the Xcelerator, never turn the ignition key OFF while
the Xcelerator is plugged into the diagnostic port.
• Do not unplug the Xcelerator while it is installing the performance tune.
• Do not try to install tune on your vehicle if battery voltage is low. Charge
your battery if necessary.
• If your vehicle is attached to a trailer, make sure the brake light receptacle
outlet and plug are disconnected.
PREPARING YOUR VEHICLE FOR TUNE INSTALLATION

Xcelerator User Guide
6
BEFORE INSTALLING XCELERATOR TUNES
Remove the fuses corresponding to your vehicle year specied below;
*Note: The INFO TMNT fuse can be found by opening the driver’s side door
and removing the side panel or it will be in the fuse box under the hood.
All other fuses are located in the fuse box under the hood.
(Be sure not to confuse the RDO fuse with the RDO AMP fuse!)
FUSE REMOVAL
Year Engine Pull Fuse Pull Fuse Pull Fuse Pull Fuse LOCATION
2010 LMM INFO TMNT RDO IPC CAB/HOOD
2009 LMM INFO TMNT RDO IPC CAB/HOOD
2008 LMM INFO TMNT RDO IPC CAB/HOOD
2007.5 LMM INFO (TMNT) RDO IPC CAB/HOOD
2007 LBZ **INFO **RADIO HOOD
2006.5 LBZ **INFO **RADIO HOOD
2006 LLY2 **INFO **RADIO HOOD
2005 LLY TBC BATT TBC IGNITION INFO RADIO HOOD
2004.5 LLY TBC BATT TBC IGNITION INFO RADIO HOOD
2004 LB7 TBC BATT TBC IGNITION INFO RADIO HOOD
2003 LB7 TBC BATT TBC IGNITION INFO RADIO HOOD
2002 LB7 SEO-1 SEO-2 CAB
2001 LB7 SEO-1 SEO-2 CAB
IMPORTANT!
**2006-2007 LLY/LBZ ONLY:
Pull the fuses if you get a “No Communication” error
while installing your Xcelerator.

Xcelerator User Guide
7
Driver side, centered underneath dash.
OBD II PORT LOCATION
Plug in OBD II cable as shown below.

Xcelerator User Guide
8
XCELERATOR POWER LEVELS
POWER LEVEL
5
4
3
2
1
HP INCREASE
225
160
120
90
40
TORQUE INCREASE
335
240
200
160
97
2001-2005 Duramax Standard Xcelerator
POWER LEVEL
3
2
1
HP INCREASE
120
90
40
TORQUE INCREASE
200
160
97
Duramax Economy Xcelerator
POWER LEVEL
4
3
2
1
HP INCREASE
225
160
90
40
2006-2010 Duramax Standard Xcelerator
TORQUE INCREASE
335
240
160
97

Xcelerator User Guide
Xcelerator Owners Manual
9
The selection arrow will be on the “Tune Engine” option. Select YES on
the keypad.
Carefully read the message using DOWN arrow on the keypad.
Accept by pressing YES on the keypad.
Locate the OBD II diagnostic port on your vehicle.
(See page 7 for reference pictures)
INSTALLING TUNE INTO VEHICLE PCM
STEP 1
Connect the Xcelerator into the vehicles diagnostic port. When prompted,
turn the ignition key to the RUN position (DO NOT start engine). The
Xcelerator will load through a series screens and stop. The main menu will
load as shown:
STEP 2
Tune Engine
Current Tuning
Data Scanning
Diag. Options
STEP 3
If you are going
past this screen
you have Read
and Agreed to
the Disclaimer
provided in the
package.
Accept Y or N
The programmer will check your VIN #, unlock your PCM and save the
vehicle’s stock information. Do not disturb the Xcelerator or start the
engine during this download and testing process. (approx 5-10 mins.)
Any interference during the programming process (ie. opening or
closing of your vehicle’s doors) may cause a communication error
with your vehicle’s PCM and will result in your vehicle not starting!
STEP 4

Xcelerator User Guide
10
Locate the OBD II diagnostic port on your vehicle.
(See page 7 for reference pictures)
STEP 2
STEP 3
STEP 4
The next menu will show the “Select Tune” screen, press DOWN arrow to
navigate to “Install Tune” option.
Press YES to install tune.
The next menu will show the “Select Tune” option, press YES on the keypad.
STEP 5
Use UP and DOWN
arrows to browse through
power levels. (Power
levels on page 8)
Accept power level by
pressing YES on the
keypad.
STEP 6
Choose Your
Performance Need
Tune 1
/ Y to Select
STEP 7
The Xcelerator screen will show you the tune you selected and the settings it
will be change. Press YES on the keypad to continue to the next screen.
STEP 8
Note: Text may look slightly dierent depending on the tuner’s year/model.
See page 13 to modify Calibration
Select Tune
Calibration
Install Tune
Select Tune
Calibration
Install Tune

Xcelerator User Guide
11
The Xcelerator will display the following screen to conrm your installation.
You can press UP or DOWN to select “Install Tune” or “Return to Stock”.
STEP 8 (continued)
Install Tune
Return to Stock
/ Y to Select
Install Performance tune by pressing YES on the “Install Tune” option.
Note: Select “Return to Stock” option if you do not wish to continue with
installation and factory settings will be restored.
The Xcelerator will now run through a series of screens.
Any interference during the programming process (such as opening or
closing of your vehicle’s doors) may cause a communication error with
your vehicle’s PCM and will result in your vehicle not starting!
(approx 5-10 min.)
The nal installation screen will show the following message:
Turn ignition key o. Unplug the tuner from the OBD II port. Re-install the fuses.
Installation complete, you can now operate your truck.
STEP 9
Power Increased
Tu rn Key Off and
Remove the Tuner
From Your Truck
Installing Your
Selected Tuning
Accessing
Stock Data
Installing Your
Selected Tuning
Making Changes
to Stock Data
Unlocking PCM,
Do Not Disturb
or Start the
Engine.
Installing Your
Selected Tuning
DO NOT Disturb00
Please Wait for
15 Seconds

Xcelerator User Guide
12
RESTORING FACTORY/STOCK TUNE
• We recommend restoring the factory stock tune whenever the vehicle
goes in for service. Because they WILL re-ash your vehicle and that
will overwrite your PPE tune.
• The stock tune can be installed at any time using the “Back to Stock”
feature. This feature will remove the PPE tune and reset the vehicle
ECM (Engine Control Module) to the factory/stock settings.
• It is recommended to return the Xcelerator back to stock when doing
a software update.
Locate the OBD II diagnostic port on your vehicle.
(See page 7 for reference pictures)
STEP 1
STEP 2
Tune Engine
Current Tuning
Data Scanning
Diag. Options
Selection arrow will be on the “Tune Engine” option. Press DOWN on the
keypad to go down to “Diag. Options”(Diagnostic Options) press YES.
STEP 3
The Xcelerator will now display “Return truck Back to Stock” press YES on
the keypad. The Xcelerator will display a series of screens, please wait.
STEP 5
Return Truck
Back to Stock
Select Y or N
Returning Truck
Back to Stock
From the “Diagnostic Options” menu press DOWN on the keypad to go
down to “Back to Stock” and press YES.
STEP 4
DO NOT DisturbXX
Please Wait for
15 Seconds
Back to Stock
Tu rn Key Off and
Remove the Tuner
From Your Truck
Connect the Xcelerator to the port. When prompted turn the ignition key to
the RUN position (DO NOT start engine). The Xcelerator will load through
a series of screens and stop. The main menu will load as shown:

Xcelerator User Guide
13
CALIBRATION
Calibrations can be modied after selecting the power level when installing
a tune. Modify speed limiter, adjust tire size, adjust axle ratio, and remove
security. Press DOWN to go to “Calibration”. Press YES to see the
calibration menu options.
Speed Limiter
Adj Tire Size
Adj Axel Ratio
Remove Security
Use UP and DOWN to browse through the calibration options.
Choose option and press YES to change.
SPEED LIMITER
You can adjust your vehicle’s speed limiter from 40mph to 200mph in 1mph
increments.
Press UP or DOWN to increase/decrease speed limiter. Press YES once
desired limit is set. (Note: Pressing YES will take you back to calibration menu)
ADJUST TIRE SIZE
Adjust for your vehicle’s tire size from 25” to 44.75” diameter in .25” increments.
Press UP or DOWN to increase/decrease tire size. Press YES once the desired
size is set. (Note: Pressing YES will take you back to the calibration menu)
ADJUST AXLE RATIO
Adjust your vehicle’s gear ratio from 2.73 to 5.13 (ie. or 2500 HD gear ratio is 3.73)
Press UP or DOWN to increase/decrease tire size. Press YES once desired size
is set. (Note: Pressing YES will take you back to the calibration menu)
REMOVE SECURITY
“Remove security” is used for applications where the OEM steering column
and the key security system is not used. (ie. engine swaps into custom
vehicles/marine)
After all the calibrations are set press NO to go back to the “Select Tune” menu.
Select Tune
Calibration
Install Tune

Xcelerator User Guide
14
Locate the OBD II diagnostic port on your vehicle.
(See page 7 for reference pictures)
CURRENT VEHICLE TUNING
STEP 1
STEP 2
Tune Engine
Current Tuning
Data Scanning
Diag. Options
Selection arrow will be on the “Tune Engine” option. Press DOWN on the
keypad to go down to “Current Tuning” the press YES.
STEP 3
A screen will load showing your vehicles current tune and calibrations.
Press NO on the keypad to go back to the main menu.
Connect the Xcelerator into the vehicles diagnostic port. When prompted,
turn the ignition key to the RUN position (DO NOT start engine); the
Xcelerator will go through a series screens and stop. The main menu will
display as shown:
Current tuning option will show the current tune installed into your vehicle.

Xcelerator User Guide
15
Locate the OBD II diagnostic port on your vehicle.
(See page 7 for reference pictures)
DATA SCANNING
STEP 1
STEP 2
Tune Engine
Current Tuning
Data Scanning
Diag. Options
Selection arrow will be on the “Tune Engine” option. Press DOWN on the
keypad to go down to “Data Scanning” then press YES.
STEP 3
View real-time engine data for mph, engine temperature, engine rpm, air lter
intake temperature, intake manifold air temperature, throttle percent, mass air
ow, barometric pressure, manifold turbo boost pressure and more.
Press NO on the keypad to go back to the main menu.
Connect the Xcelerator into the vehicle’s diagnostic port. When prompted
turn the ignition key to the RUN position (DO NOT start engine); the
Xcelerator will load through a series of screens and stop. The main menu
will load as shown:
View the real-time engine data while the vehicle is running.

Xcelerator User Guide
16
Locate the OBD II diagnostic port on your vehicle.
(See page 7 for reference pictures)
GET DIAGNOSTIC TROUBLE CODES (DTCs)
STEP 1
STEP 2
Tune Engine
Current Tuning
Data Scanning
Diag. Options
Selection arrow will be on the “Tune Engine” option. Press DOWN on the
keypad to go down to “Diag. Options”(Diagnostic Options) press YES.
Selection arrow will be on the “Get DTC’s” option. Press YES on the
keypad to get your vehicles Diagnostic Trouble Codes.
If there are no DTC codes, you will see the following screen, press YES
to go back.
Getting a code and want to know what it means? DTC codes can be
referenced online at PPEdiesel.com
(Note:Pressing YES will clear DTC’s and take you back to the “Diag.
Options” menu)
STEP 3
Get DTC’s
Reset Auto Tran
Back to Stock
Other Options
No DTC Codes Set
Press any Button
to Continue. . .
Connect the Xcelerator into the diagnostic port. When prompted turn the
ignition key to the RUN position (DO NOT start engine). The Xcelerator
will run through a series of screens and stop. The main menu will display
as shown:
View and clear the vehicle’s Diagnostic Trouble Codes.

Xcelerator User Guide
17
Locate the OBD II diagnostic port on your vehicle.
(See page 7 for reference pictures)
TRANSMISSION RE-LEARN PROCEDURE
STEP 1
Connect the Xcelerator into the port and turn the ignition key to the RUN posi-
tion (DO NOT start engine). The Xcelerator will run through a few screens
and stop at the main menu as shown:
STEP 2
Tune Engine
Current Tuning
Data Scanning
Diag. Options
• Allows vehicle to reset the transmission and rapidly adjust to new power
levels.
• Recommended after installing a new power level.
• Recommended after installing any transmission upgrades (ie. Clutches,
Torque Converter, and Shift Kit).
• The transmission feels like it is not shifting properly
The selection arrow will be on the “Tune Engine” option. Press DOWN on
the keypad to go down to “Diag. Options”(Diagnostic Options) press YES.
STEP 3
Get DTC’s
Reset Auto Tran
Back to Stock
Other Options
The selection arrow will be on the “Get DTC’s” option. Press DOWN on the
keypad to go down to “Reset Auto Tran” press YES.

Xcelerator User Guide
18
Trans Relearn
Recommended
after tune change
Select Y or N
STEP 4
Read message and press YES.
STEP 5
Please wait while the trans re-learn initializes.
Trans Relearn
Initializing
Please Wait . . .
STEP 6
Press YES to complete.
Transmission has
Been Reset for
Retraining.
Press any to . . .
STEP 7
You will now be back at the diagnostic options menu.
Turn key o and remove the Xcelerator from your vehicle.
Trans Re-learn Complete.
Get DTC’s
Reset Auto Tran
Back to Stock
Other Options

Xcelerator User Guide
19
OTHER OPTIONS
Tune Engine
Current Tuning
Data Scanning
Diag. Options
Get DTC’s
Reset Auto Tran
Back to Stock
Other Options
From the main menu, go to “Diag. Options” and press YES. At the next
menu go to “Other Options” and press YES.
Unlock Tuning
PF Regeneration
Vehicle OPS #’s
Tuner OPS #’s
Unlock tuning option is for users who would like to Upgrade the Xcelerator.
This menu will show a series of numbers, which we will use order to build you
an Upgrade le. Press NO to exit this menu.
UNLOCK TUNING
The diesel particulate lter regeneration service is used to clear accumulated
soot mass in the particulate lter by burning it at high temperatures.
(See page 21 for procedure instructions)
PF REGENERATION (only for 2007.5-2010 LMM)
View your vehicle OPS numbers.
VEHICLE OPS NUMBERS
View your tuner OPS numbers
TUNER OPS NUMBERS
Other manuals for Xcelerator
1
Table of contents
Popular Motherboard manuals by other brands

Texas Instruments
Texas Instruments TPS54291EVM-431 user guide

Intel
Intel BOXDX58OG specification

Mercury
Mercury RACE++ PowerPC 7410 Brochure & specs

VIA Technologies
VIA Technologies EPIA-P830 operating guide

Analog Devices
Analog Devices EVAL-ADGS1612SDZ user guide

Linear Technology
Linear Technology DC1198B-B Demo Manual