PresScan MKIII User manual

User manual PresScan MKIII rev. 3.0.2 page 1
P r e s S c a n
™
User Manual
P r e s S c a n
™
M i c r o w a v e M o i s t u r e M e t e r b y

User manual PresScan MKIII rev. 3.0.2 page 2
P r e s S c a n
™
Dear Customer,
thank you for your confidence in choosing PresScan™.
This moisture meter is the fruit of a research lasted over 4 years on
microwaves engineered to read water density.
With PresScan™ for the first time an innovative planar microwave sensor has
been applied to read water content in press fabrics.
The PresScan™ research involved our labs, Universities, Excellence Research
Centres and many Engineers using daily our drainage meters, who endlessly
helped us to finely tune the instrument.
Cristini Engineering has a policy of constant innovation.
We carefully listen to our customers, and implement constant improvements in
our products. This attention led to the development of the PresScan™ MKIII,
with new advanced features:
- New patented microwave sensor, with high speed digital data conversion;
- Far less influence to the surface water layer compared to the moisture
meters available on the market:
- Sleeker and smaller sensor case;
- Temperature range extended to 60°C;
- Fully IP67 sensor;
Yours truly,
The PresScan™ Development Team

User manual PresScan MKIII rev. 3.0.2 page 3
P r e s S c a n
™
Index
1. English.....................................................................................4
2. Italiano..................................................................................18

User manual PresScan MKIII rev. 3.0.2 page 4
P r e s S c a n
™
ENGLISH
1. INSTRUCTIONS AND CONSIDERATIONS REGARDING EMERGENCY.5
2. INTRODUCTION .......................................................................................................5
3. ACCESSORIES SUPPLIED......................................................................................5
4. OUTER ASPECT AND CONNECTORS...................................................................6
5. STARTING UP THE INSTRUMENT.......................................................................6
6. KEY FUNCTIONS.......................................................................................................6
7. MAIN USER INTERFACE.........................................................................................7
8. CARRYING OUT A MEASURING SESSION .......................................................7
9. FUNCTION MENU .....................................................................................................8
9.1.0. MENU NO.–SELECTION OF THE MEASUREMENTS ..............................................8
9.2.0. MENU CLEAR ALL.............................................................................................9
9.3.0. MENU CLEAR ACTUAL .......................................................................................9
9.4.0. MENU SCALE....................................................................................................9
9.5.0. MENU SET-UP..................................................................................................9
9.5.1. MENU CHANGE LANGUAGE .............................................................................10
9.5.2. MENU CHANGE DATE/TIME ............................................................................10
9.5.3. MENU CALIBRATION.......................................................................................10
9.5.4. MENU DISPLAY ..............................................................................................10
9.5.5. MISCELLANEOUS MENU ..................................................................................11
9.5.6. MENU CHANGE COMMUNICATION PORT ..........................................................12
9.5.7. MENU TABLE LIST..........................................................................................14
9.6.0. MENU TABLE..................................................................................................14
10. INSTRUMENT’S CONNECTION TO THE PC...............................................15
12. TROUBLESHOOTING .......................................................................................17
13. MAINTENANCE..................................................................................................17
13.1 BATTERY REPLACEMENT..................................................................................18
14. CALIBRATION TEST.........................................................................................19

User manual PresScan MKIII rev. 3.0.2 page 5
P r e s S c a n
™
1. Instructions and considerations regarding
emergency
•During the measurement process with PresScan™, close the front
connectors with the affixed screw caps.
•Connect the battery-charger with PresScan™ only to electrical
systems that respect the established norms.
•Install the battery-charger in places sluices, dry grounds and
away from heat sources (heaters, etc…).
•DO NOT use the PresScan™ while the battery-charger is
connected to the electrical system.
•Utilise only battery type suggested by PresScan™ constructor.
2. Introduction
PresScan™ instrument born from a totally innovative design, based on a
patented planar-technology microwave sensor, managed by a specific
microprocessor; this allows achieving high speed performances with the added
value of lightweight features and user-handiness; the elevated memory, 32
Mbytes, allows storing up to 180 minutes of measurements.
The graphic display allows controlling the measurement and instrument
parameters with extreme ease and simplicity.
The instrument does not require any particular start-up operations, just turn it
on and it is ready for a new measuring session.
3. Accessories supplied
PresScan™ comes equipped with the following accessories:
•a special multi format battery-charger, that allows recharging the
instrument’s battery pack in every country worldwide;
•a serial cable to connect the instrument to the serial portal of any PC, for
data transfer and firmware upgrade;
•an USB cable to connect the instrument to the USB port of a PC for high
speed data transfer;
•one special glass to check the instrument calibration;
User manual PresScan MKIII rev. 3.0.2 page 6
P r e s S c a n
™
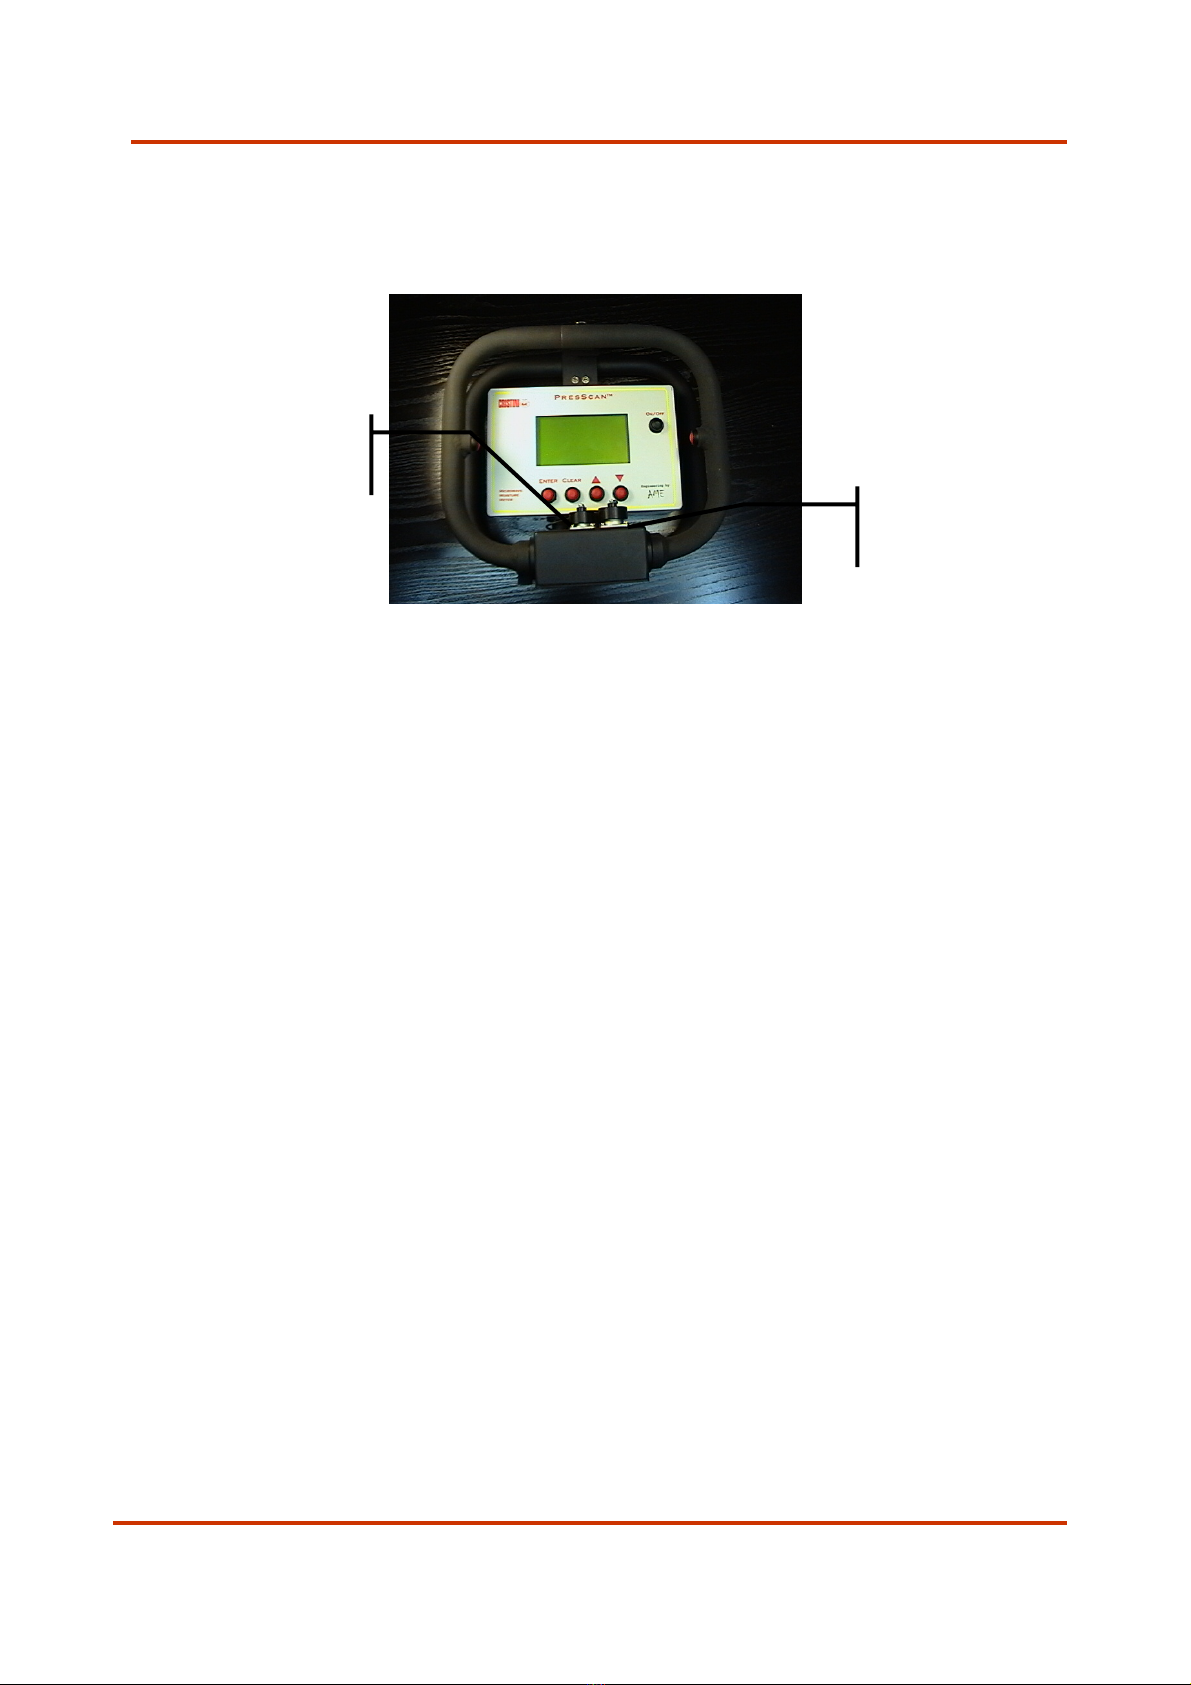
4. Outer aspect and connectors
5. Starting up the instrument
To turn on PresScan™, press and hold the ON / OFF button located on the right
hand side of the instrument until the main screen is not displayed.
After turning on the instrument, PresScan™ is ready for a new measuring
session.
By pressing an holding for at least 2 second the ON / OFF button the
instrument will turn off.
If the auto power off function is enabled, after a preset period of non-use, the
instrument will automatically shut down.
6. Key functions
Underneath the display there are located 4 keys. These are necessary to
navigate between the menus and the functions proposed by the display itself.
The two arrow keys serve for scrolling cyclically up and down the items in the
menus displayed. The ENTER key serves for confirming the operation selected,
the CLEAR key serves for cancelling the highlighted operations or for exiting
from any sub-menus in order to return to the main menu.
USB/232
Connector for
connection to PC
BATT.
Connector for battery-charger
connection

User manual PresScan MKIII rev. 3.0.2 page 7
P r e s S c a n
™
7. Main user interface
This is the window that is shown after starting the PresScan™.
The display is split into two main area; on the right hand side the selected
measurements are displayed together with all the relative data, on the left
hand side there is a small menu to access into the instrument functions.
The measurement date and time displayed are indicated above the graph area
while the survey average humidity value is indicated underneath.
The humidity scale in g/m2is shown on the vertical axis while on the horizontal
axis the time is indicated in seconds (meaning the measurement’s length of
time); the dynamics of this parameter adapt automatically to the
measurement’s length of time in a way that all the data is shown in one single
window at the end of the measurement .
The free memory space in the memory of the instrument (expressed in
minutes and seconds) is indicated in the bottom left hand corner of the display.
There are also indications of the actual date and time as well as the acquisition
speed of the measurement (number of the electric data acquired per second).
This part of the display is also used for indicating any error messages.
A menu is located at the top, inside this menu the selected item is highlighted
on the side with a “ * “ symbol.
Move onto the desired item using the cursor keys and then select by pressing
ENTER.
8. Carrying out a measuring session
After being switched on, the instrument is already set up to carry out a new
measurement.
It is possible to choose between two different functions of the measuring
buttons: switch on/switch off or button hold to measure (pls refer to the 9.5.5
“miscellaneous” menu).
Press (or hold it pressed) one of the two measuring keys located on the
handles in order to start measuring. A message will appear on the display
indicating that the measurement is in being carried out.
During the measurement the humidity profile will be shown for the first 25
seconds approximately, afterwards the display will not be updated until the
measuring session is over.
In order to interrupt the measurement, press one of the measuring keys again,
(or release it) all the data acquired will be shown on the display.

User manual PresScan MKIII rev. 3.0.2 page 8
P r e s S c a n
™
By pressing the measuring key again the data acquired will be added to the
actual measurement that will be therefore extended, if one of the other keys is
pressed instead the possibility of adding data to the measurement will be lost
and therefore it will be necessary to pass on to a new measuring session.
To perform a new measurement go to the menu “No. – selecting a
measurement” and move onto the last progressive number available (being a
new measurement the indications of the date and time will NOT be displayed
above the graph).
If a measurement is started while a memory location is already used, the new
measurement will be memorized automatically in the last available position of
the memory.
WARNING
The use of mobile phones during the scanning process could alter the
results of the measurements.
9. Function menu
The items of the menu located on the left hand side of the display can be
highlighted by scrolling with the cursor keys, in order to access the submenus
confirm by pressing the ENTER key.
The desired settings must be confirmed with the ENTER key, otherwise cancel
the operations and return to the previous menus using the CLEAR key.
9.1.0. Menu No. – selection of the measurements
At the moment in which this menu is selected a “ * “ symbol will be displayed
alongside the indicator of the actual measurement.
Scroll the measurements with the cursor keys, the measurement information
(date and time) will be shown above the graph. By pressing the ENTER or
CLEAR keys the measurement will be selected and displayed inside the graph
area.
By taking the indicator to the maximum value the first available empty
measurement will be selected; by pressing ENTER the instrument will be ready
for a new measuring session.

User manual PresScan MKIII rev. 3.0.2 page 9
P r e s S c a n
™
9.2.0. Menu Clear All
Via this function access is gained to the submenu that allows for deleting all
the measurements present in the memory.
By pressing ENTER confirmation of this operation will be requested, to delete
the operation press ENTER again or cancel by pressing CLEAR.
WARNING
During the deleting operation do NOT turn the PresScan™ off,
otherwise the next time it is turned on the warning message
MEMORYERROR 2 will be displayed and the instrument will no
longer be able to function. To restore correct operation wait a few
seconds and follow the instruction indicated on the display.
9.3.0. Menu Clear actual
By selecting this option on the menu the active measurement will be cancelled
without any confirmation request of the operation, thus making this position
available for a new measuring session.
9.4.0. Menu Scale
By pressing the ENTER key it will be possible to select one of the three options
available for the vertical scale of the graph: you can choose between the
dynamics 0 – 2000 g/m2, otherwise between 0 – 1000 g/m2or al last, the
function AUTO, in which case the instrument will automatically determine the
minimum and maximum values and adapt the dynamics on the basis of these
values.
9.5.0. Menu Set-up
By selecting this function access is gained to the submenu that allows setting
some parameters of the instrument.

User manual PresScan MKIII rev. 3.0.2 page 10
P r e s S c a n
™
9.5.1. Menu Change Language
By entering this function it is possible to select the language desired from
those available on the instrument.
A list with the available languages is shown which is selectable with the cursor
keys.
Confirming the new setting with the ENTER key, otherwise cancel the operation
with the CLEAR key.
Once the language has been selected, all the messages present on the
PresScan™ will be displayed in the new language.
It is possible to load and/or delete the languages connecting the instrument to
a PC with the software of management installed (see Par. 7.4 of the Host
PresScan™ manual)
9.5.2. Menu Change Date/Time
With this function it is possible to set the date and time of the instrument.
Select the item that you wish to modify by scrolling with the cursor keys. Enter
into the modifying mode by pressing ENTER, at this point the cursor “ * “ will
move next to the value of the item selected. Modify the value by pressing the
cursor key; confirm the modifications made with the ENTER key. If you wish to
cancel this operation instead, press the CLEAR key.
9.5.3. Menu Calibration
With this function it is possible to make a frequency analysis of the sensor
acquiring the calibration curve.
This function mode is used by the manufacturer for laboratory analysis of the
correct instrument’s operation, for this reason use is not recommended by
unqualified users .
9.5.4. Menu Display
In this submenu it is possible to set some parameters regarding the
measurement and the display brightness in the graph display.
Move onto the item desired with the cursor keys and modify the value by
pressing ENTER.
Following are the functions foreseen in this menu:

User manual PresScan MKIII rev. 3.0.2 page 11
P r e s S c a n
™
9Backlight
By pressing ENTER the cursor ” * “ will be positioned next to a
counter; modify the display brightness by pressing the cursor keys.
When the instrument is turned on the display brightness is regulated
on the last setup value.
WARNING
High brightness levels cause a fast consumption of the batteries
and limit the autonomy of the instrument.
9Grid
By setting the parameter to ON a grid will appear on the graph of the
measurement display, if instead the value is set OFF, the graph of the
measurement will be displayed without any references.
9.5.5. Miscellaneous Menu
In this menu some instrument’s function modes can be set that allow for
personalised operation by the user.
9Auto power-off
By pressing ENTER the instrument’s automatic power-off function will
either be enabled (ON) or disabled (OFF) when it is unused for a
preset period of time. As this helps increase the battery life, it is
recommended always to activate this function.
9Time auto power-off
By pressing ENTER the cursor “ * ” will move next to the numeric
indicator of the minutes after which the instrument will turn off in
automatic power-off mode. Modify the value with the cursor keys and
confirm with ENTER, otherwise cancel with CLEAR.
9Measurement
With this function the operating mode of the measurement starting
key located on the front handle will be set; the following two different
modes are available:

User manual PresScan MKIII rev. 3.0.2 page 12
P r e s S c a n
™
ON/OFF : to start the measuring press the key located on the handle,
repeat this operation to stop the work session.
KEY PRESSED : to carry out the measurement the key must be
pressed in, by releasing the measurement will be interrupted.
9.5.6. Menu Change Communication Port
The instrument can be connected to a personal computer through a RS232
serial port or USB port.
In this submenu access is gained to the functions for setting up the
communication port and the data rate.
9Pressing ENTER with cursor on item “Port” the communication port
between the two available ones can be selected: USB or RS232.
9Pressing ENTER with cursor positioned under “Data rate” the
communication speed can be selected, below the possible options
for the desired port:
RS232:
919.2 Kbps
957.6 Kbps
9115.2 Kbps
USB:
919.2 Kbps
957.6 Kbps
9115.2 Kbps
9230 Kbps
9460 Kbps
9930 Kbps
The data is transmitted with the following settings:
BAUD RATE : 115200 bit/s
PARITY : none
STOP BIT : 1
DATA BIT : 8
HANDSHAKING : none

User manual PresScan MKIII rev. 3.0.2 page 13
P r e s S c a n
™
These settings of the serial communication must be entered also on the
PC.
9Pressing ENTER with cursor on the “Apply” option the new setting
becomes active and it is returns to the previous menu.
9Pressing CLEAR goes back to the previous menu.

User manual PresScan MKIII rev. 3.0.2 page 14
P r e s S c a n
™
9.5.7. Menu Table List
Up to 4 calibration tables can be inserted on the instrument in order to be able
to process the measuring data in different ways (see next Par. 7.6).
By selecting this item a list of the present tables is shown. For every table
follows an ID number and a short description.
If a table is not present a line of asterisks shows up.
It’s possible to load, unload and delete the tables connecting the instrument to
a PC with the management software installed (see Par. 7.3 of the Host
PresScan manual).
WARNING
If at least one table is not present on the instrument it will not be
possible to perform any measures.
To exit from the menu press the CLEAR key.
9.6.0. Menu Table
With this function it is possible to select one of the four calibrations that can be
pre-set on the instrument.
By pressing ENTER the cursor moves next to the numeric indicator of the
calibration, scroll down the list using the cursor keys and confirm the operation
with the ENTER key.
All the measurements that are carried out afterwards will be processed with
the pre-selected calibration data.
WARNING
Unless you are using updates supplied by the manufacturer or created
with the specific Host PresScan software, it is recommended carrying
out measurements using the no. 1 default calibration preset by the
manufacturer.

User manual PresScan MKIII rev. 3.0.2 page 15
P r e s S c a n
™
10. Instrument’s connection to the PC
PresScan instrument can be connected to the RS232 serial port or USB port of
any personal computer in which the Host PresScan software has previously
been installed.
Through this software the transfer of data, to and from instrument, are fast
and easy managed. The main function are the data transfer of measures and
calibrations, update of tables and languages and the firmware upgrade of the
instrument, although this operation is reccomended to expert users only.
In order to connect the instrument to the PC to execute the following
operation:
NOTE
Use only the cable supplied with the instrument!
1) Connect the circular 10-pins connector to the upper part of the
instrument’s base and the 9-pins serial connector to the serial port or the
USB connector to the USB port,of any personal computer
2) Setting up communication port and speed on the instrument (see Par.
7.5.6) based on the settings of the software Host PresScan (see Par. 8.1
of the Host PresScan manual), or viceversa.
3) Enter in the main user interface of the instrument (the one shown when
the instrument is turned on).
4) Press on command “connect” in the interface of the software Host
PresScan. On the instrument is visualized the message “CONNECTED TO
THE PC” and turned off backlight of the display in order to reduce energy
consumptions. Now the instrument is totally controlled from PC.
5) Press on command “disconnect” in the interface of the software Host
PresScan to release the instrument. On the display is now showed the
main user interface and the instrument is ready for a new measuring
session.
NOTE
The procedure of upgrade of firmware can be only be carried out
through RS232 serial port of the PC. To carry out the operation is
necessary to set up and to connect the instrument to this port.

User manual PresScan MKIII rev. 3.0.2 page 16
P r e s S c a n
™
WARNING
•During data transfer never turn the instrument off. Such
operation can cause the loss of all data contained in the internal
flash memory.
•Before carrying out the firmware upgrade make sure that the
batteries of the instrument are completely charged, otherwise
connect the instrument through the appropriate charge batteries.
•Never turn off the instrument during firmware upgrade. When
the operation is terminated a message on the PC will indicate to
turn off and turn on again the instrument.
•A wrong procedure of firmware upgrade can make the instrument
unusable. It’s advised to never proceed to firmware upgrade if
not really necessary.
11. Recharging the battery
In the bottom right hand corner of the screen the battery charger indicator is
displayed. When all four battery charging level indicators are turned off it is
recommended recharging the batteries as the instrument has a limited life
autonomy before turning off.
The instrument is equipped with rechargeable NiMh batteries, in order to
recharge the battery pack insert the battery charger supplied into a power
point (100-240V ∼50-60 Hz) and the circular 5-pole plug into the
corresponding outlet located on the instrument.
During the recharging phase the instrument is perfectly functional, though
obviously the battery recharging times will be longer than usual in this mode .
When the batteries are completely recharged the green led on the battery re-
charger will light up.
The battery charger also foresees the possibility of being used in countries with
an electricity supply with parameters differing from the Italian one (traveller
function), simply by inserting the outlet adapter can be used with voltages of
110 V – 60 Hz.
WARNING
It is recommended keeping the instrument turned off during the
battery recharging process in order to guarantee longer life for the
batteries and correct functioning of the instrument itself.

User manual PresScan MKIII rev. 3.0.2 page 17
P r e s S c a n
™
12. Troubleshooting
Below some brief indications for troubleshooting:
9The instrument fails to respond to the commands
oTry shutting on and off the instrument using the ON / OFF key, if
the instrument is not responding, try to unplug and plug the
battery pack (see chapter 13.1).
oIf the message MEMORYERROR 2 is displayed, wait a few seconds
and follow the instructions on the display .
9The batteries fail to recharge
oMake sure that the battery charger cable is correctly connected to
the specific connector located above the base of the instrument;
oCheck that the battery charger is correctly connected to the power
point, the red light indicator must be turned on.
oKeep the instrument turned off during the recharging process.
oReplace the batteries (See chapter 13.1).
9The instrument fails to connect up to the remote host computer
oCheck that the cable supplied is correctly connected to the relative
circular connector located above the base of the instrument;
oMake sure that the cable supplied is correctly connected to the
serial port or the USB port of the remote computer;
oCheck that the settings of the serial port on the remote host
computer are compatible with those of the instrument (see
paragraph 7.5.6).
oCheck that no other applications on the computer are occupying
the serial portal used by Host PresScan software; if so close these
applications.
13. Maintenance
IMPORTANT
Clean the mechanical parts of the instrument, paying attention to close the
connectors with the screw caps to avoid penetration of water in the instrument
electronics.

User manual PresScan MKIII rev. 3.0.2 page 18
P r e s S c a n
™
13.1 Battery replacement
In order to replace the batteries, proceed as follows:
Turn off the instrument.
To access the battery compartment open the bottom cover by removing all the
screw with the appropriate screwdriver (hexagonal head 2.0mm).
Unlock the battery pack by releasing the tang.
Disconnect the battery pack.
Replace the 6 exhausted battery with new battery of the same type or
equivalent (rechargeable NiMH batteries size AA, R6, Mignon, 1.2V with a
minimum capacity of 2500mAh, ex. Sanyo HR-3U 1.2V 2500 mAh).
Be careful to the polarity when insert the battery in the batteries holder.
Reconnect the battery pack.
Lock the battery pack with the tang.
Close the battery compartment with the cover, applying moderate force to
tighten the screws;
User manual PresScan MKIII rev. 3.0.2 page 19
P r e s S c a n
™
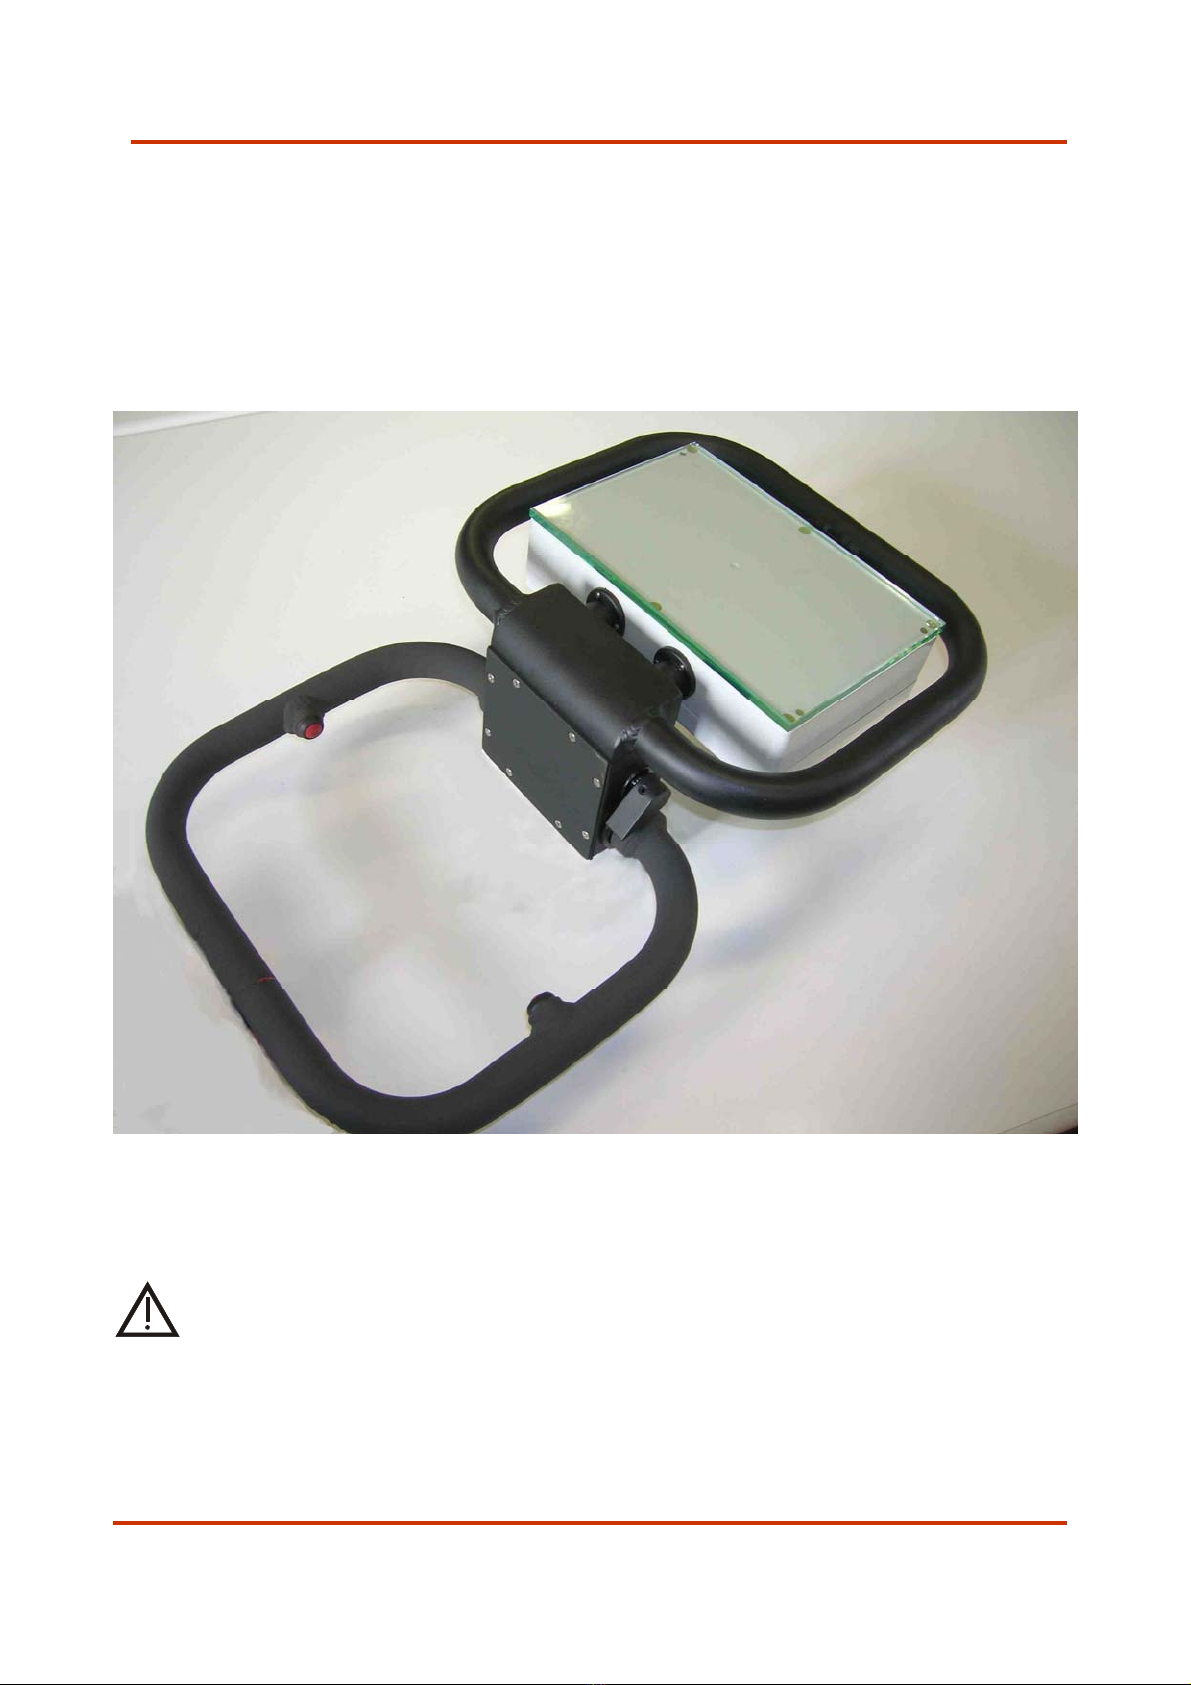
14. Calibration Test
To verify the instrument’s calibration read the following instructions:
1) Open the instrument at 180°
2) Put the instrument on a table with a glass placed over the measure
head as shown in the picture:
3) Perform the measure
ATTENTION
Keep distance from the instrument measuring surface during the
measurement!

User manual PresScan MKIII rev. 3.0.2 page 20
P
r e s S c a n
™
ITALIANO
1. ISTRUZIONI E CONSIDERAZIONI GENERALI RIGUARDO ALLA
SICUREZZA....................................................................................................................21
2. INTRODUZIONE................................................................................................21
3. ACCESSORI IN DOTAZIONE.........................................................................22
4. ASPETTO ESTERIORE E CONNETTORI......................................................22
5. ACCENSIONE STRUMENTO ...........................................................................22
6. FUNZIONE DEI TASTI.....................................................................................23
7. INTERFACCIA UTENTE PRINCIPALE.........................................................23
8. ESECUZIONE DI UNA SESSIONE DI MISURA.........................................24
9. MENU FUNZIONI ..............................................................................................25
9.1.0. MENU NO.–SCELTA DELLA MISURA ...............................................................25
9.2.0. MENU CLEAR ALL...........................................................................................25
9.3.0. MENU CLEAR ACTUAL.....................................................................................25
9.4.0. MENU SCALE..................................................................................................26
9.5.0. MENU SETUP .................................................................................................26
9.5.1. MENU CHANGE LANGUAGE..............................................................................26
9.5.2. MENU CHANGE DATE/TIME ............................................................................26
9.5.3. MENU CALIBRATION.......................................................................................27
9.5.4. MENU DISPLAY ..............................................................................................27
9.5.5. MENU MISCELLANEOUS ..................................................................................28
9.5.6. MENU CHANGE COMMUNICATION PORT ..........................................................29
9.5.7. MENU TABLE LIST..........................................................................................30
9.6. MENU TABLE..................................................................................................30
10. CONNESSIONE DELLO STRUMENTO AL PC .............................................31
11. RICARICA DELLA BATTERIA ........................................................................32
12. RISOLUZIONE DEI PROBLEMI.....................................................................33
13. MANUTENZIONE...............................................................................................34
13.1 SOSTITUZIONE DELLE BATTERIE ..............................................................................34
14. VERIFICA DELLA TARATURA........................................................................35
Nota: I menù e le frasi riportate nel presente manuale si riferiscono allo strumento
configurato in lingua Inglese
Table of contents
Languages:


