Preval vFan Parts list manual

PARTS, INSTRUCTIONS & HOW-TO MANUAL
PIÈCES, INSTRUCTIONS ET MANUEL PRATIQUE
KOMPONENTEN, ANWEISUNGEN UND HANDBUCH
MANUAL DE PIEZAS E INSTRUCCIONES
www.preval.com

www.preval.com
Page 2
Inicio rápido en 8 pasos
Familiarizándose con su sistema de aerógrafo portátil vFan
• Lo que viene incluido con el aerógrafo portátil vFan
• Funcionamiento del aerógrafo
• Diagrama del aerógrafo vFan
Guía para el mantenimiento
Cómo utilizar 150 Feet of ENERGY con nuestra unidad EDU de
distribución de potencia y nuestro compresor
Sugerencias y trucos
Solución de problemas
Preguntas frecuentes
Precauciones y garantía
Catálogo de productos
table of contents
contenIDo
8-Step Quick Start
Getting to Know your Portable vFan Airbrush System
•What the vFan Portable Airbrush Includes
• Airbrush Operation
•Diagram of the vFan Airbrush
Maintenance Guide
How to Use 150 Feet of ENERGY with our EDU
(Energy Disbursement Unit) and our Compressor
Tips and Tricks
Trouble-shooting
FAQs
Precautions and Warranty
Catalog of Products
Pg.
Pg
18
19
22
24
26
27
28
31
4
5
8
10
12
13
14
17
18

Page 3
Démarrage rapide en 8 étapes
Apprendre à connaître votre système d’aérographe portable vFan
• Ce que l’aérographe portable vFan comprend
• Fonctionnement de l’aérographe
• Diagramme de l’aérographe vFan
Guide d’entretien
Comment utiliser le 150 Feet of ENERGY avec notre EDU
(unité de libération d’énergie) et notre compresseur
Conseils et trucs
Dépannage
Foire aux questions (FAQ)
Précautions et garantie
Catalogue des produits
InHaltsVeRZeIcHnIs
table Des MatIÈRes
Schnellstart (8 Schritte)
Einführung in das tragbare vFan Airbrush-Spritzpistolensystem
• Umfang des tragbaren vFan Airbrush-Spritzpistolensystems
• Betrieb der Airbrush-Spritzpistole
• Grafische Darstellung der vFan Airbrush-Spritzpistole
Wartungsanleitung
Verwendung des 150 Feet of ENERGY Kompressors mit EDU
(Energie-Isoliereinheit) und unserem Kompressors
Tipps und Tricks
Fehlersuche
FAQ (Häufig gestellte Fragen)
Vorsichtsmaßnahmen und Garantie
Produktkatalog
32
33
36
38
40
41
42
45
S.
Pge
46
47
50
52
54
55
56
59

www.preval.com
Page 4
Test the vFan Airbrush by unscrewing glass jar and filling it half
way with water or solvent.
Take out the air hose and screw to the bottom of the airbrush.
Once secured, insert the metal tip (attached to the top of the
6-oz. glass product container) into the bottom fitting of the vFan
Airbrush at a 45 degree angle.
Open up the accessories bag and take out the pressure
regulator valve. The top of the regulator valve has a control knob.
Turn the control knob counter clockwise for off position.
Take out a unit of 150 Feet of ENERGY and remove black top.
Remove red dusting unit by pulling away from the top. Screw
the pressure regulator valve to the top of the 150 Feet of
ENERGY unit so it is snug.
Screw the other end of the air hose into the open side of the
regulator valve, ensuring it is snug.
The vFan Airbrush is ready to test spray. Turn the control knob
clockwise until it is all the way down. Push down the Airbrush
trigger and air pressure will be forced out from the aircap.
While holding the trigger down, pull back. The further you pull
back, the greater the volume of the product will flow. To adjust
air pressure, turn control knob counter clockwise. The can of
150 Feet of ENERGY will freeze after 45 seconds of use. Sold
separately, use our EDU, page 9, for long lasting, continuous
spray needs.
Now that you have tested your unit for optimal results, it is time
to strain and thin your paints accordingly to thinning guidelines.
Clean after each use. Always release air pressure from air hose
by turning control knob counter clockwise when done.
THE vFAN PORTABLE AIRBRUSH SYSTEM
8-step QuIck staRt
SEE OUR VIDEO DIRECTIONS AT: tinyurl.com/vfan-quickstart
1
4
2
5
7
3
6
8

Page 5
SYSTEM INCLUDES:
See YouTube video reference at: tinyurl.com/vfan-contents
and animated reference at: www.preval.com
The vFan Airbrush with fan aircap
Two portable compressor units
Standard aircap for 1/16" spray
patterns
Preval air hose
Preval pressure regulator valve
1-oz., 3-oz. and 6-oz. product
containers
Lids
Additional needle
Additional fittings for
dusting and drying
Tool set for
securing attachments
Coupler for 3-oz. and
6-oz.product containers
Coupler for 1-oz. product
container
EDU (sold separately)
GETTINGTO KNOW YOUR
vfan poRtable aIRbRusH systeM
G
H
b
IJ
e
f l
k
k
f
f
D
c
a
G
b
H
c
I
D
J
e k
l
M
f
a

www.preval.com
Page 6
INTRODUCING PREVAL: tinyurl.com/vfan-intro
SPECIFICATIONS:
• 20 PSI @ 5 CFM
• Dual action
•Head size: .9 mm (comes with the
aircaps) .66 mm and .38 mm available
•Hairline detail to 3-inch fan pattern
•Hybrid system — allows for multiple
power sources, including our compressor
•No electric compressor needed, but
compatible with 1/4 inch threaded intake.
The world’s first hybrid, high performance touch-up system.
AIRBRUSH OPERATION:
1. Press down on the trigger to control air and pull back on the trigger to control
quantity of paint flow. See video at: tinyurl.com/vfan-howtopaint
2. The airbrush comes with a fan aircap. Test spray on a piece of scrap. Hold
the airbrush 6" away from the surface to achieve a 3" fan pattern.
See video at: tinyurl.com/vfan-fanaircap
3. Switching aircap is as easy as screwing the fan aircap off and replacing it with
the standard aircap. Make sure there is a snug fit and there are no air leaks.
See video at: tinyurl.com/vfan-precisionaircap
4. Speed of movement controls density of color and fading effects at beginning
and end of strokes.
5. For fine detail, hold the airbrush very close to the surface, push down for air
and pull back very slowly on the trigger to release a small amount of paint.
See video at: tinyurl.com/vfan-hairlinespray
6. For background work and broad effects, hold the airbrush away from the work
surface and pull back on trigger to release required amount of color.
7. For stippling, remove the aircap, push down on the trigger and pump the
trigger forward and back. Adjust the air pressure to between 15 and 65 PSI
for desired stipple effect.
8. For cleaning and replacing parts see full disassembly at:
tinyurl.com/vfan-disassemble
9. For more information visit www.preval.com and visit the FAQ section.
M

Page 7
NO. PART
Fan Aircap
sku 0956
Standard Aircap
sku 0957
Fluid Tip
sku 0958
“O” Ring
sku 0903
Shell Assembly
sku 0
Packing Assembly PTFE
sku 0906
Trigger
sku 0915
Rocker Assembly
sku 0908
Needle Spring
sku 0902
Spring Housing
sku 0907
Needle Locknut
sku 0909
Handle
sku 0945
Valve Casing
sku 0910
Air Valve Assembly
“O” Ring
sku 0914
“O” Ring
sku 0911
.66 mm Needle
sku 0959
Wrench
sku 0912
Allen Wrench
sku 0913
DIAGRAM OF THE vFAN AIRBRUSH (ILLUSTRATION A)
1
2
2
3
3
4
4
4
5
5
6
6
7
7
8
8
9
9
10
10
11
11
12
12
13
13
14
14
15
15
16
16
17
17
18
18
19
19
1
AIRBRUSH OPERATION:
1. Press down on the trigger to control air and pull back on the trigger to control
quantity of paint flow. See video at: tinyurl.com/vfan-howtopaint
2. The airbrush comes with a fan aircap. Test spray on a piece of scrap. Hold
the airbrush 6" away from the surface to achieve a 3" fan pattern.
See video at: tinyurl.com/vfan-fanaircap
3. Switching aircap is as easy as screwing the fan aircap off and replacing it with
the standard aircap. Make sure there is a snug fit and there are no air leaks.
See video at: tinyurl.com/vfan-precisionaircap
4. Speed of movement controls density of color and fading effects at beginning
and end of strokes.
5. For fine detail, hold the airbrush very close to the surface, push down for air
and pull back very slowly on the trigger to release a small amount of paint.
See video at: tinyurl.com/vfan-hairlinespray
6. For background work and broad effects, hold the airbrush away from the work
surface and pull back on trigger to release required amount of color.
7. For stippling, remove the aircap, push down on the trigger and pump the
trigger forward and back. Adjust the air pressure to between 15 and 65 PSI
for desired stipple effect.
8. For cleaning and replacing parts see full disassembly at:
tinyurl.com/vfan-disassemble
9. For more information visit www.preval.com and visit the FAQ section.
www.preval.com
Page 8
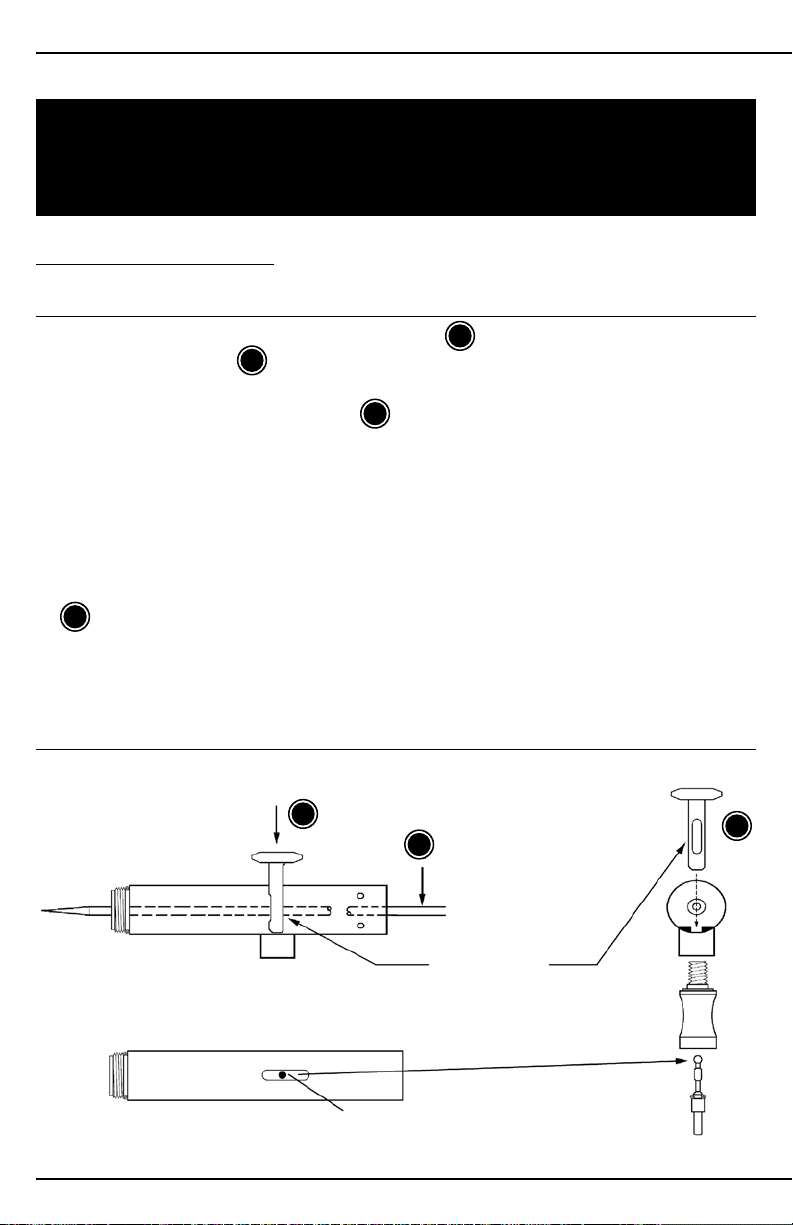
REMOVING/REPLACING THE NEEDLE AND HANDLE (Illustration A):
1. Unscrew the handle and loosen the locknut by turning counterclockwise.
Depress the trigger and hold in DOWN position while removing or
inserting the needle. This assures the needle will move freely through the
trigger. Gently remove the needle , rotating if necessary. Do NOT
force out. Do NOT bend.
2. Inspect the condition of the needle. If it is bent or misshapen in any way,
replace it with a new needle. A bent needle can damage or split the tip,
causing bubbles or a rough spray pattern. The sharp end of the needle
bends easily.
3. Hold trigger in DOWN position, insert the new needle into the rocker assembly
. Gently push needle through, rotating if necessary, push gently forward
until the needle stops in the front of the tip.
4. Release trigger and tighten locknut by turning clockwise.
TOP VIEW
NEEDLE TO
PASS THROUGH
OPENING FOR #7 TRIGGER
SHOWING BALL ON TOP OF
AIR VALVE FOR ASSEMBLY #14
END VIEW
7
7
17
7
17
THE vFAN PORTABLE AIRBRUSH SYSTEM
MaIntenance GuIDe
DIAGRAM OF THE vFAN AIRBRUSH (ILLUSTRATION B)
11
8
SEE OUR VIDEO —vFAN MAINTENANCE: INSPECTINGTHE NEEDLE AT
tinyurl.com/vfan-needle

Page 9
CLEANING THE AIRBRUSH:
See our video: How to clean your vFan Airbrush System at:
tinyurl.com/vfan-howtoclean
1. Always clean your airbrush thoroughly.
2. If airbrush is dirty, the spray will be affected or cease.
3. After use, take the product container off from the bottom of the airbrush.
- If using water based paints, place the front of the airbrush (including the
metal tip where product container attaches into) into a bowl of water and
spray thoroughly.
- If using a solvent based or oil based paints, do the same as above. Wear
protective gloves and a respiratory mask.
REPLACING THE TIP:
See our video - vFan Maintenance: Inspecting the tips at: tinyurl.com/vfan-tip
1. Remove handle, loosen locknut and withdraw needle about one inch.
2. Unscrew the aircap and remove.The tip can now be unscrewed
with wrench .
3. Place a new tip into position and tighten with wrench. The tip must be wrenched
tight. Finally, push the needle forward until it is seated fully forward into tip.
REPLACING PACKING ASSEMBLY:
1. If packing assembly becomes worn or loose, it must be tightened
or replaced.
2. Tighten packing nut with small screwdriver. To reach packing nut, all internal
parts must be removed.
3. Replace needle and ensure packing nut is not too tight. A slight resistance
to movement is needed when needle is passed through.
4. Completely reassemble airbrush’s internal parts.
2 3
18
11
6

www.preval.com
Page 10
USING OUR ULTRA-LIGHT COMPRESSOR:
•Operating pressures: 0-75 PSI. Fan aircap needs 20 PSI at 5 CFM.
•40 PSI is best for detail spraying with properly thinned paint, and 20 PSI for
light touch-ups.
•Use the higher pressures for thicker material where fine detail is not critical or
thin the paint to allow lower pressures.
•If used on food, make sure to use an electric air compressor that is filtered
properly. We do not recommend use of 150 Feet of ENERGY on food.
See our food demo: tinyurl.com/vfan-cake
•Excellent for spraying water-based paints as there is no oil residue buildup, as
found in most compressors.
•Comes with regulator, moisture trap and automatic shut-off.
USING EDU AND YOUR
150 feet of eneRGy
EDU: ENERGY DISBURSEMENT UNIT
For longer lasting, continuous spray, each compressor unit of 150 Feet of
ENERGY allows for the unit to be submerged into water using our EDU.
•Hold compressor unit upright and remove the dusting tip from the top of
the unit. Fill EDU 3/4 full with room temperature water.
•Screw the regulator valve into the top of the unit.
•Make sure the pressure control head is OFF to prevent energy from escaping.
•Attach one end of the vFan Airbrush air hose to the regulator valve and feed
the other end of the air hose into the bottom of the EDU top, placing the 150
Feet of ENERGY fully under water.
•Screw the other end of the airhose into the bottom of the vFan Airbrush.
•Adjust the regulator valve and turn clockwise to control energy output. Energy
pressure increases as the pressure control head is turned clockwise. Secure
top of EDU and you are ready to spray.
•Recommended usage is for 3-5 continous minutes, until unit is depleted. At
that point, switch to the other unit of 150 Feet of ENERGY.
•When you are finished, always release the pressure by turning the pressure
regulator counter clockwise and removing 150 Feet of ENERGY from the water.

Page 11
1/16" HAIRLINE 3" FAN
* These following are estimated values from evacuation testing of one 7-oz. 152a power unit per
type of paint.
**Oil-Based °Water-Based ^One Shot Brand
THINNING GUIDE
Duster w/out
Extension Wand
Black Acrylic
Air-Brush Paint°
White Latex Flat°
Clear Lacquer**
Clear Varnish
Semi Gloss**
Clear (Porch) Gloss
Polyurethane**
Black Lettering Enamel^
Type of
Paint Used Dilution Thinner Used Coverage
(Sq. Ft.) Volume
Used (oz.)
N/A
16 to 1
2 to 1
3 to 1
3 to 1
3 to 1
2 to 1
150
13.7
17.8
47.0
40.2
41.3
29.2
7.0
1.25
0.5
0.5
0.5
0.5
1.0
N/A
Water
Latex X-Tender®
or Water
Lacquer Thinner
Mineral Spirits
Mineral Spirits
Mineral Spirits
1/16 INCH TO 3 INCH FAN DETAIL:
HOW TO DUST USING 150 FEET OF ENERGY
Secure dusting tip into the top of 150 Feet of ENERGY. For hard to reach areas,
secure the extension wand into the dusting tip insert. Hold compressor unit
upright about 2 to 4 inches from the airbrush parts you are cleaning. Duster
works well for getting into tight spaces such as the airbrush tip, as well as
cleaning larger areas or multiple surfaces. The duster is designed to clear away
sanding debris and is also to be used as a dryer to dry wet area or wet sanding
work. Bend the wand for getting around corners.

www.preval.com
Page 12
TIPS
1. For long lasting, continuous spray with out 150 Feet of ENERGY unit, use
our EDU.
2. Always test spray and clean out your airbrush. Test spray on a piece of scrap
or use a plastic milk carton with one of the sides cutout and put paper towels
inside (keep reusing the milk carton to absorb leftover paint).
3. You can buy metal blanks online to practice on. Scrap wood, metal and plastic
panels are great, depending on the surface you wish to spray.
4. Using on food gives unique results but always use an electric and properly
filtered compressor. See video at: tinyurl.com/vfan-cake
5. Automotive touch-ups are a breeze with the vFan Portable Airbrush System.
See video at: tinyurl.com/vfan-auto
6. Go anywhere, anytime and enjoy the portability of the 150 Feet of ENERGY.
See video at: tinyurl.com/vfan-portable
7. Residential touch-ups for professional and general contractors are quick and
easy. See video at: tinyurl.com/vfan-home
8. A Do-It-Yourselfers dream. See video at: tinyurl.com/preval-commercial
Visit the Preval youtube page for more tips and tricks.
http://www.youtube.com/prevalspraygun
The vFan Portable Airbrush System is the world’s first high-performance hybrid
airbrush system. The double-action, internal-mix feature permits flexibility in
regulation of paint and airflow without work stoppage.
THE vFAN PORTABLE AIRBRUSH SYSTEM
tIps anD tRIcks
SEE OUR VIDEO ON HOWTOTAKETHE vFAN AIRBRUSH APART AND
PUT IT BACKTOGETHER AT tinyurl.com/vfan-disassemble

Page 13
PROBLEM
Paint is not coming
out of the vFan
Airbrush consistently
or not at all.
Bubbles are going
through the straw
into the bottle.
There is no pressure
coming out of the
vFan Airbrush.
When I spray paint,
the paint is coming
out splattered or
crooked.
1) Tip may be clogged. Take the head assembly apart
and spray it with 150 Feet of ENERGY to clean it. If
that doesn’t work, clean with Q-tips®and thinner.
2) The diptube is clogged. Take strainer off of diptube
and clean; spray 150 Feet of ENERGY through the
diptube or replace the diptube.
3) Clean the airbrush as it may be clogged.
4) Check to see if the needle or tip is damaged.
1) Make sure head assembly is tightened with wrench.
2) Make sure “O” rings are in place.
3) Use wax or chapstick on tip threads to seal better.
4) Make sure needle assembly matches with head.
Example: Size 2 head needs to be with size 2 needle.
5) Airbrush needs to be cleaned.
1) Check to make sure the regulator valve is sealed
correctly and control knob turned clockwise.
2) Check to make sure the trigger is seated correctly.
3) Make sure hose has no kinks in it.
4) Disassemble the airbrush, clean it and reassemble,
making sure all parts are in the proper place.
5) Make sure 150 Feet of ENERGY is not empty.
1) Check the tip of the needle with a cotton ball to
make sure the tip is not bent. The tip is fragile and
can bend easily.
2) Check tip with cotton ball to make sure the tip is
not cracked.
3) Clean entire airbrush thoroughly with thinner and
dry with 150 Feet of ENERGY. If there is paint that
can’t be removed, you must soak the parts
separately in solvents.
HOW TO SOLVE
THE vFAN PORTABLE AIRBRUSH SYSTEM
tRouble sHootInG

www.preval.com
Page 14
1. HOW DO I USE THE FAN AIRCAP?
The fan aircap is designed like a paint gun used for painting cars. The tip is
designed to give the user a better, more even result over large areas. It can
be turned in any angle to give you the most control (up to 3 inches).
2. HOW DO I USE THE STANDARD AIRCAP?
The standard aircap is used for more precise control and to achieve very fine
lines up to an inch. Simply screw off fan cap and screw on standard cap. As
you get closer to the surface, the greater the detail.
3. WHAT PSI DOES AN AIRBRUSH NEED TO WORK?
It depends on how thin the paint is: Thinner paints use 20 or higher PSI and
thicker paints use up to 75 PSI.
4. WHAT ARE THE BEST CONDITIONS TO WORK IN?
Dry, calm areas are best. The more wind there is, the more overspray there will
be and the harder it will be to control the paint’s path. Humidity, heat and cold
will affect paint curing.
5. CAN I USE THE vFAN AIRBRUSH WITH A COMPRESSOR?
Yes, the vFan Airbrush works with our Ultra-Light Compressor and most
compressors. Our airhose attaches to a standard 1/4 inch threaded intake.
6. IS THE vFAN AIRBRUSH SAFE TO USE INDOORS?
Yes, as long as it is a well-ventilated area. Using a mask is always recommended
with spray paints or chemicals.
7. WHAT IS THE BEST METHOD FOR USING THE vFAN AIRBRUSH SYSTEM
WITH 150 FEET OF ENERGY?
The best method is with our EDU Unit.
8. WHAT CAN I SPRAY WITH THE vFAN AIRBRUSH?
Almost anything (oils, liquids or paints) thinned to the manufacturers’
recommended thinning guidelines. With regards to viscosity, keep the liquid
a bit thicker than milk.
9. IS THE vFAN SAFE FOR FOOD?
Yes, when using the vFan Airbrush with a properly filtered air compressor, it is
safe for spraying food as long as the product you are spraying is also safe. We
don’t recommend using 150 Feet of Energy units when spraying foods.
THE vFAN PORTABLE AIRBRUSH SYSTEM
fReQuently askeD QuestIons

Page 15
10. HOW THICK OR THIN OF A LINE CAN I EXPECT TO GET WITH THE
vFAN AIRBRUSH?
With the vFan Airbrush, you can expect up to a 3-inch fan spray pattern.
With the standard tips you can expect 1/16-inch thin lines and up to 1-inch
round thick lines.
11. HOW LOUD IS THE vFAN AIRBRUSH SYSTEM AND ULTRA LIGHT
COMPRESSOR?
The 150 Feet of Energy power source is practically silent. The only sound that
can be heard is the air coming out of the tip of the airbrush, which is a soft hiss
or comparable to a kitchen mixer.
12. CAN I USE ANOTHER COMPANY’S TIPS AND NEEDLES IN THE vFAN
AIRBRUSH?
No. Each company uses very specific lengths and diameters on their tips and
needles. They are not compatible with other airbrushes.
13. WHY IS THE UNIT OF 150 FEET OF ENERGY GETTING SO COLD?
The power from the can is a liquid propellant called 152a. When the propellant
is released, the liquid state turns into a gas. As this process occurs, the
propellant drops in temperature and cools the can. Use our patent-pending EDU.
When the unit is submerged in room temperature water, the increase in liquid
mass insulates the 150 Feet of ENERGY.
14. HOW DOES THE vFAN AIRBRUSH WORK?
The airbrush must be attached to an air source or 150 Feet of Energy . In this
system, we offer two cans of 150 Feet of Energy for portability and ease.
We also recommend properly filtered air compressors for larger projects.To use
the vFan Airbrush, push down on the trigger to start the airflow. With the trigger
pushed down, begin pulling back to spray the paint. The farther back you pull the
trigger, the more paint will be released.
15. WHAT TYPES OF SURFACES CAN BE AIRBRUSHED?
Any surface that can hold paint can be airbrushed. You must ensure what you
are spraying is compatible with the surface you are spraying. Sanding surfaces
first and using primers is always a good idea.
16. WHY USE A vFAN AIRBRUSH INSTEAD OF A LARGE AIRGUN,
PAINTBRUSH OR ROLLER?
The vFan is used to achieve a softer, more even look with no visible touch-up
marks, paintbrush strokes or roller marks, on small areas and when little to no
overspray is desired. Plus, you will consume much less paint.

www.preval.com
Page 16
17. SHOULD I SOAK MY AIRBRUSH WITH GUN CLEANER?
Soaking the parts of the airbrush that have paint on them is ok. But soaking
the whole airbrush for too long might remove the lubrication that helps all the
parts move smoothly. Also, soaking dissolves paint and may allow it to settle in
to harder-to-reach areas. It is preferable to Clean the airbrush in pieces with the
appropriate solution before storing.
18. WHAT MAKES THE vFAN AIRBRUSH CLOG?
Clogs in your vFan Airbrush are caused by old, dried bits of paint or by paint
that has bigger particles in it than the airbrush can spray. Always use a strainer.
To avoid clogging, you should strain all paints prior to putting into the product
container with a strainer, a paint sleeve, a stocking or whatever will extract
large particles or contaminators…and make sure that what you are spraying is
thinned correctly.
19. HOW DO I SPRAY FINE LINES?
Use the standard aircap. Get close to what you’re going to spray and use less
paint. You can move faster as you spray.
20. HOW DO I ACHIEVE AN EVEN COAT?
Use the fan aircap. Overlap your passes by 40% to 75%.
21. DO I NEED TO LUBRICATE MY vFAN AIRBRUSH?
It’s a good idea to lubricant your airbrush regularly. Lubrication keeps the airbrush
parts working smoothly. Only use proper lubrication.
22. WHY ISN’T PAINT STICKING TO METAL OR PLASTIC?
Usually when paint isn’t sticking to a surface, it is because the paint has nothing
to “grab” onto. Scuffing up the glossy finish with suggested sandpaper or lightly
with an SOS pad will help. Adhesion promoter or primers will also help. After
scuffing, wipe the surface with a tack cloth and a degreaser.
23. IF I HAVE ANY QUESTIONS OR I NEED REPLACEMENT PARTS, WHO
DO I CONTACT?
We take pride in our customer service. Call us toll-free at 877-753-0021 or email
us at info@preval.com. We have everything you need or will direct you to a local
retail store or distributor to assist you.

Page 17
THE vFAN AIRBRUSH ONE-YEAR WARRANTY
Preval warrants this product manufactured to be commercially free from any
defects in material and workmanship for a one-year period after the original
date of consumer purchase. This warranty does not extend to any product
that has been affected by wear or damage resulting from misuse, abrasion,
corrosion, negligence, accident, tampering, faulty installation, inadequate
maintenance, damage or casualty, or to any product that has been improperly
repaired or altered in any way that affects the condition of operation of the
equipment. In the case of accessories or components furnished, but not
manufactured by Preval, Preval assigns to the buyer, to the extent permitted,
the warranty of the manufacturer. Proof of purchase or receipt is required.
150 FEET OF ENERGY
Contains 1,1,-difluoroethane. Contents under pressure. Vapor may flash, burn
or explode if ignited. Product vapor that is burned or comes into contact with
very hot surfaces may decompose, producing corrosive and toxic gases.
Compressor unit exposed to direct sunlight or otherwise heated may burst.
Safe Handling Procedures: KEEP CAN OUT OF THE REACH OF CHILDREN.
Use outdoors or in a well-ventilated area with a constant, abundant supply
of fresh air. Do not allow product vapor to accumulate. Do not use, store or
dispose of near sources of heat, flames, sparks or other hot surfaces. Do not
puncture, incinerate (burn) or store can above 120°F (49°C). Dispose of in
accordance with all applicable federal, state and local regulations.
Health Hazards: Excessive inhalation of vapor or intentional misuse by
concentrating and inhaling vapor may be harmful or fatal. Overexposure may
cause central nervous system damage. Contact with liquid may cause frostbite.
First Aid: Always get prompt medical attention for ANY ill effects that persist
or appear later. If contact occurs with eyes or skin, IMMEDIATELY treat for
frostbite. If inhaled and overcome, IMMEDIATELY get victim fresh air and
medical attention. If breathing is difficult, give oxygen; if breathing stopped,
apply artificial respiration.
vFAN PORTABLE AIRBRUSH SYSTEM
pRecautIons anD waRRanty

www.preval.com
Page 18
PRODUCT CATALOG
sku 271 |6 PACK OF
TOUCH UP JARS
Made for the Preval Sprayer.
Designed to stand on its own on
retail shelving or hung via peg.
These solvent-proof jars are shatter-
proof and will store up to 2.94 oz.
of paints and liquids. Each 6 pack
comes with 6 dip tubes, 6 caps and
6 product labels.
sku 268 |REPLACEMENT
POWER UNIT
Each replacement power unit has a
net weight of 1.94 ounces and is fully
charged and ready to spray. Comes
with a dip tube and attaches firmly to
Preval product containers.
sku 267 |COMPLETE
PREVAL SPRAYER
Easy to fill, attach and spray, every
unit is disposable and recyclable.
The professional, portable Sprayer
delivers up to 18 ounces of most
liquids, paints, oils and solvent based
products. Packaged with a 6-oz.
glass container. Use one Sprayer
for multiple applications.
sku 224 |PREVAL SPRAYER
DISPLAY UNIT
Each display unit comes packed
with 12 complete Preval Sprayers
and 12 Preval replacement power
units. Designed to sit on a table
top with a removable header that
displays the unique features and
benefits of the Preval Sprayer.
sku 923 |AIR COMPRESSOR
This compressor is the size of
a football and is as quiet as a
kitchen mixer. 1/6 HP, 115 volts,
1 phase, 60HZ Oil-Free piston air
compressor. Low noise level at
47 db’s. Operating pressure 0-75
PSI. Weighs 14 pounds. 20 PSI
@ 5 CFM.
sku 960 |ENERGY
DISBURSEMENT UNIT
This container clips to your belt
and insulates the 150 Feet of
ENERGY unit at a consistent
temperature to deliver a longer
lasting, more continuous spray.
sku 100 |vFAN PORTABLE
AIRBRUSH SYSTEM
Portable, professional and quiet,
the vFan provides professional fan
patterns and hairline details with any
small job or challenging touch-up. The
vFan, hose and pressurized can of 150
Feet of Energy fit in your pocket and
atomize all water- and solvent-based
paints with almost no overspray.
sku 168 |150 FEET OF ENERGY
This 2-in-1 pocket compressor and duster
powers the vFan Portable Airbrush
System, enabling power anywhere and
anytime, without running cords for a
compressor. 150 Feet of Energy also
works as a powerful air duster to blow
out hard-to-reach spaces and reduce
cleanup times.

Page 19
Pruebe el aerógrafo desenroscando el vaso de vidrio y llenándolo hasta la
mitad con agua o disolvente.
Saque la manguera y atorníllela a la parte inferior del aerógrafo. Una
vez asegurada, inserte la punta metálica (unida a la parte superior del
contenedor de vidrio de 6-oz para producto) en el empalme inferior del
aerógrafo vFan en un ángulo de 45 grados.
Abra la bolsa de accesorios y saque la válvula reguladora de presión. La
parte superior de la válvula reguladora tiene una llave reguladora. Gire la
llave reguladora hacia la izquierda para llegar a la posición de apagado (OFF).
Saque una unidad de 150 Feet of ENERGY y retire la tapa negra. Retire la
unidad roja de soplado tirando desde arriba. Atornille la válvula reguladora
de presión a la parte superior de la unidad 150 Feet of ENERGY de modo
que quede bien ajustada.
Atornille el otro extremo de la manguera de aire al lado abierto de la
válvula reguladora, asegurando que esté bien ajustada.
El aerógrafo vFan está listo para un pulverizado de prueba. Gire la llave
de control en el sentido de las agujas del reloj hasta que descienda
completamente. Presione el gatillo del aerógrafo y el aire presurizado será
expulsado desde la boquilla.
Mientras sostiene presionado el gatillo, desplácelo hacia atrás. Cuanto
más desplace el gatillo, mayor será el volumen de producto que fluya.
Para ajustar la presión de aire, gire la llave de control hacia la izquierda. La
lata de 150 Feet of ENERGY se congelará después de 45 segundos de
uso. Utilice nuestra unidad EDU (página 9), que se vende por separado,
para las necesidades de pulverizado continuo y por períodos extendidos.
Ahora que ya ha probado su unidad para obtener resultados óptimos, es
el momento de filtrar y rebajar sus pinturas de acuerdo con la guía para
diluir pinturas. Límpiela después de cada uso. Siempre libere la presión de
aire de la manguera de aire, girando la llave de control hacia la izquierda
cuando haya terminado.
SISTEMA DE AERÓGRAFO PORTÁTIL vFAN
InIcIo RÁpIDo en 8 pasos
VEA NUESTRO VIDEO DE INSTRUCCIONES EN: tinyurl.com/vfan-quickstart
1
4
2
5
7
3
6
8

www.preval.com
Page 20
EL SISTEMA INCLUYE:
Vea el video de referencia de YouTube en: tinyurl.com/vfan-contents
y una referencia animada en: www.preval.com
El aerógrafo vFan con
boquilla de aspersión
Dos unidades de compresor portátil
Boquilla estándar para patrones
de pulverizado de 1,5 mm
Manguera de aire Preval
Válvula reguladora de presión de Preval
Envases para producto de
1-oz, 3-oz y 6-oz
Tapas
Aguja adicional
Accesorios adicionales para
soplar el polvo y para secar
Juego de herramientas para
fijar los accesorios
Adaptador para contenedores
de producto de 3-oz y 6-oz
Adaptador para contenedor de
producto de 1-oz
EDU (Unidad de dispersión de
potencia - vendida por separado)
FAMILIARIZÁNDOSE CON SU SISTEMA
De aeRÓGRafo poRtÁtIl vfan
G
H
b
IJ
e
f l
k
k
f
f
D
c
a
G
b
H
c
I
D
J
e
k
l
M
f
a
Table of contents
Languages:


