PRGR RED EYES POCKET HS-120A User manual

User’s Manual

1
●Introduction…2
●Safety precautions…2
●Main features…4
●Packaged contents…4
●Names and functions of each part…5
●Inserting the batteries…6
●Switching the power on…6
●Switching the power off…6
●Making measurements (Golf)…7
●Explanation of on-screen display (Golf)…8
●Making measurements (Baseball)…9-10
●Explanation of on-screen display (Radar gun mode)…11
●Checking the history…11
●Troubleshooting…13
●Specifications…14
●Warranty and after-sales service…14
●Warranty…15
●Supplier's Declaration of Conformity…16
Contents
2
Thank you for purchasing PRGR Portable Launch Monitor- the Red Eyes Pocket HS-120A-: a
multi-function speed tester developed to help improve your skills by measuring swing speed and
ball speed in golf and various other sports.
Please read carefully through these safety precautions before using this product, and be sure to
use the product correctly.
The precautions listed here are intended to enable you to use the product correctly, and to prevent
danger or damage to the user and/or other people in the nearby vicinity. These precautions
contain important information regarding safety, so please be sure to observe them.
Practicing in parks and other public places that are used by many other people are very
dangerous. Please do not practice in such places.
When using this product, pay sufficient attention to your surroundings and ensure that nobody
is in the path of your club as you swing, and that your swing is not obstructed by any other
objects.
If you use a pacemaker or any other medical treatment device, consult with the device
manufacturer or your physician regarding the possibility of the device being affected by radio
waves (electromagnetic interference).
Do not dismantle or modify the product in any way. (Doing so may result in fire, injury, electric
shock or other accidents or malfunctions.)
When onboard aircraft, ships or in other areas where the use of such devices is prohibited,
turn off the power and remove the batteries from the device. (There is a possibility that the
device may affect other electronic equipment or devices.)
In the unlikely event of breakage, smoke being released from the device, strange odors or
other abnormalities, stop using the device immediately. (Continued use may result in fire,
This symbol indicates warnings and cautions.
This symbol indicates things you must not do (prohibited actions).
This symbol indicates things that you must observe when using the product.
Symbol description
Introduction
Safety precautions (Please read)
Warnings
3
electric shock or injury.)
Do not use the device in the rain, or under other conditions where water droplets may enter
the device. (The device is not waterproof, so using it under such conditions may result in
malfunction. Please also note that malfunctions due to water leakage are not covered by the
warranty.)
This device is a delicate precision instrument. Do not store it in any of the places described
below. (Doing so may result in discoloration, deformation or malfunction.)
⚫Places exposed to direct sunlight or high temperatures, such as near to heating equipment
⚫On dashboards or other places inside vehicles exposed to the hot sun with windows closed
⚫Places that are very humid or dusty
Do not drop the device or subject it to strong shocks or impacts. (Doing so may result
in breakage or malfunction.)
* In particular, please note that shocks to the LCD display may result in breakage.
Do not place heavy objects on the device, or stand on it. (Doing so may result in injury,
breakage or malfunction.)
Ensure that excessive pressure is not applied to the device while stowed inside caddy bags
or other bags, etc. (Excessive pressure may result in breakage to the casing or LCD screen,
or cause the device to malfunction.)
When not using the device for an extended period of time, please remove the batteries before
storing it. (Failure to do so may result in battery fluid leakage and cause the device to
malfunction.)
Do not operate the buttons of the device using golf clubs or other objects. (Doing so may
result in breakage or malfunction.)
Do not use the device in close proximity to other wireless devices, televisions, radios or PCs.
Doing so may affect those devices, or cause the product to be affected by them.
Do not use the device in close proximity to the drive units of air conditioners, air circulators or
other such equipment. Doing so may result in erratic operation or malfunction.
Do not grip the sensor section of the device with your hands, or bring metallic objects or other
reflective objects near to it. Doing so may result in erratic operation or malfunction of the
sensor.
FCC CAUTION
Changes or modifications not expressly approved by the party responsible for compliance
could void the user’s authority to operate the equipment.
Note: This equipment has been tested and found to comply with the limits for a Class B
digital device, pursuant to part 15 of the FCC Rules. These limits are designed to provide
reasonable protection against harmful interference in a residential installation. This
equipment generates, uses and can radiate radio frequency energy and, if not installed and
used in accordance with the instructions, may cause harmful interference to radio
communications. However, there is no guarantee that interference will not occur in a
particular installation. If this equipment does cause harmful interference to radio or
television reception, which can be determined by turning the equipment off and on, the user
is encouraged to try to correct the interference by one or more of the following measures:
—Reorient or relocate the receiving antenna.
—Increase the separation between the equipment and receiver.
—Connect the equipment into an outlet on a circuit different from that to which the receiver
is connected.
—Consult the dealer or an experienced radio/TV technician for help.
This device complies with part 15 of the FCC Rules. Operation is subject to the following two
conditions: (1) This device may not cause harmful interference, and (2) this device must
accept any interference received, including interference that may cause undesired operation.
Precautions

4
●Golf
・Enables simultaneous measurement of club head speed and ball speed
・Displays “smash factor” at impact
・Displays estimated distance of flight (allows switching between CARRY and TOTAL)
・Enables storage of up to 500 past measurement data entries (for all modes combined)
●Baseball
・Enables measurement of bat swing speed
*In some cases, measurement may not be possible due to the material of the bat, etc.
・Enables measurement of (final) ball speed during pitching practice, etc.
*In some cases, correct measurement may not be possible due to the type of ball, etc.
・Can also be used to count practice swings, etc., using the count function
*Counting is possible up to a maximum of 999 counts.
(1) PORTABLE LAUNCH MONITOR -RED EYES POCKET HS-120A- (main unit) …1
(2) AAA size alkaline dry-cell batteries (pack of 4)…1
*The batteries included with the device are intended for testing the operation of
the device. Depending on when you begin using the device, the batteries may run
out of charge in a shorter period of time, before the displayed battery life has
elapsed.
(3) User’s manual (this manual)…1
(4) Carrying pouch…1
①
②
③
④
Main features
Packaged contents

5
<Battery charge display>
The battery charge display icon on the LCD displays the remaining level of battery charge and
notifies you when the batteries need to be replaced.
*When using rechargeable nickel-hydrogen batteries, or other types of battery aside from
alkaline dry cell batteries, the level of remaining charge may not be displayed correctly.
MODE button
Used to switch between the
various modes.
ON/OFF & ENTER button
Used to switch the power on
and off, and to select and
confirm device settings.
Battery compartment
(rear side)
Takes four commercially
available AAA size alkaline
dry-cell batteries (LR03/AAA).
Scroll buttons
Used to scroll through
measurement histories and
device settings.
Camera screw (rear side)
Used to attach the device to
tripods and other fixings.
Measuring section
Point this part in the direction
you are hitting the ball in order
to make measurements.
LCD screen
Displays measurement results
and history
Flight distance display
switch button
Switches between CARRY
and TOTAL flight distance
display modes.
Names and functions of each part
There is sufficient charge remaining.
Please replace the batteries.

6
<About dry-cell batteries>
●We recommend the use of AAA size alkaline dry-cell batteries.
●You may also use rechargeable nickel-hydrogen batteries. However, the length of time for
which the device may be used may be shorter in some cases.
●When not using the device for an extended period of time, please remove the batteries
before storing it.
<Guidelines for battery life>
When using AAA size alkaline dry-cell batteries, the device may be used for one hour a day, for a
period of approximately one month.
*Battery life may vary depending on temperature and other conditions of use.
*The batteries included with the device are intended for testing the operation of the
device. Depending on when you begin using the device, the batteries may run out of
charge in a shorter period of time, before the battery life displayed above has elapsed.
Please replace the included batteries with new ones as soon as possible.
Press and hold down the ON/OFF button for approximately 2 seconds.
→ A double “beep” sound indicates that the power has been switched on.
*The device can be switched on without activating the auto power-off function by holding
down the MODE select button while holding down the ON/OFF button for approximately 2
seconds. In this case, the word “OFF” will be displayed on the screen for approximately 1
second, after which the screen will return to its normal display state.
<Auto power-off function>
Even if the ON/OFF button is not pressed, the device will switch itself off automatically when no
measurements or button operations are perfumed for a period of approximately 10 minutes.
Press and hold down the ON/OFF button for approximately 2 seconds.
→ An elongated single “beep” sound indicates that the power has been switched off.
(1) Open the battery cover.
(2) Insert the batteries.
(3) Close the battery cover.
Raise the battery cover while
holding down the catch.
Insert the batteries one at a time,
paying attention to the direction
in which they should be inserted.
Insert the protruding parts at the
base of the cover into the
corresponding grooves before
closing the cover.
Inserting the batteries
Switching the power on
Switching the power off
7
Portable Launch Monitor simultaneously measures club head speed immediately before impact
and ball speed after impact and displays them on the LCD screen together with the estimated
distance of flight. By switching modes, it is also possible to display “smash factor.”
(1) Insert batteries
*Refer to the “Inserting the batteries” section on page 6.
(2) Set the number of the club you are using
◆Press the ENTER button.
→ The club number selection display in the top right-hand side of the screen will flash.
◆Press the scroll buttons to switch between club numbers.
◆Press the ENTER button to confirm.
*The device cannot accurately estimate distance of flight if the club number is not set.
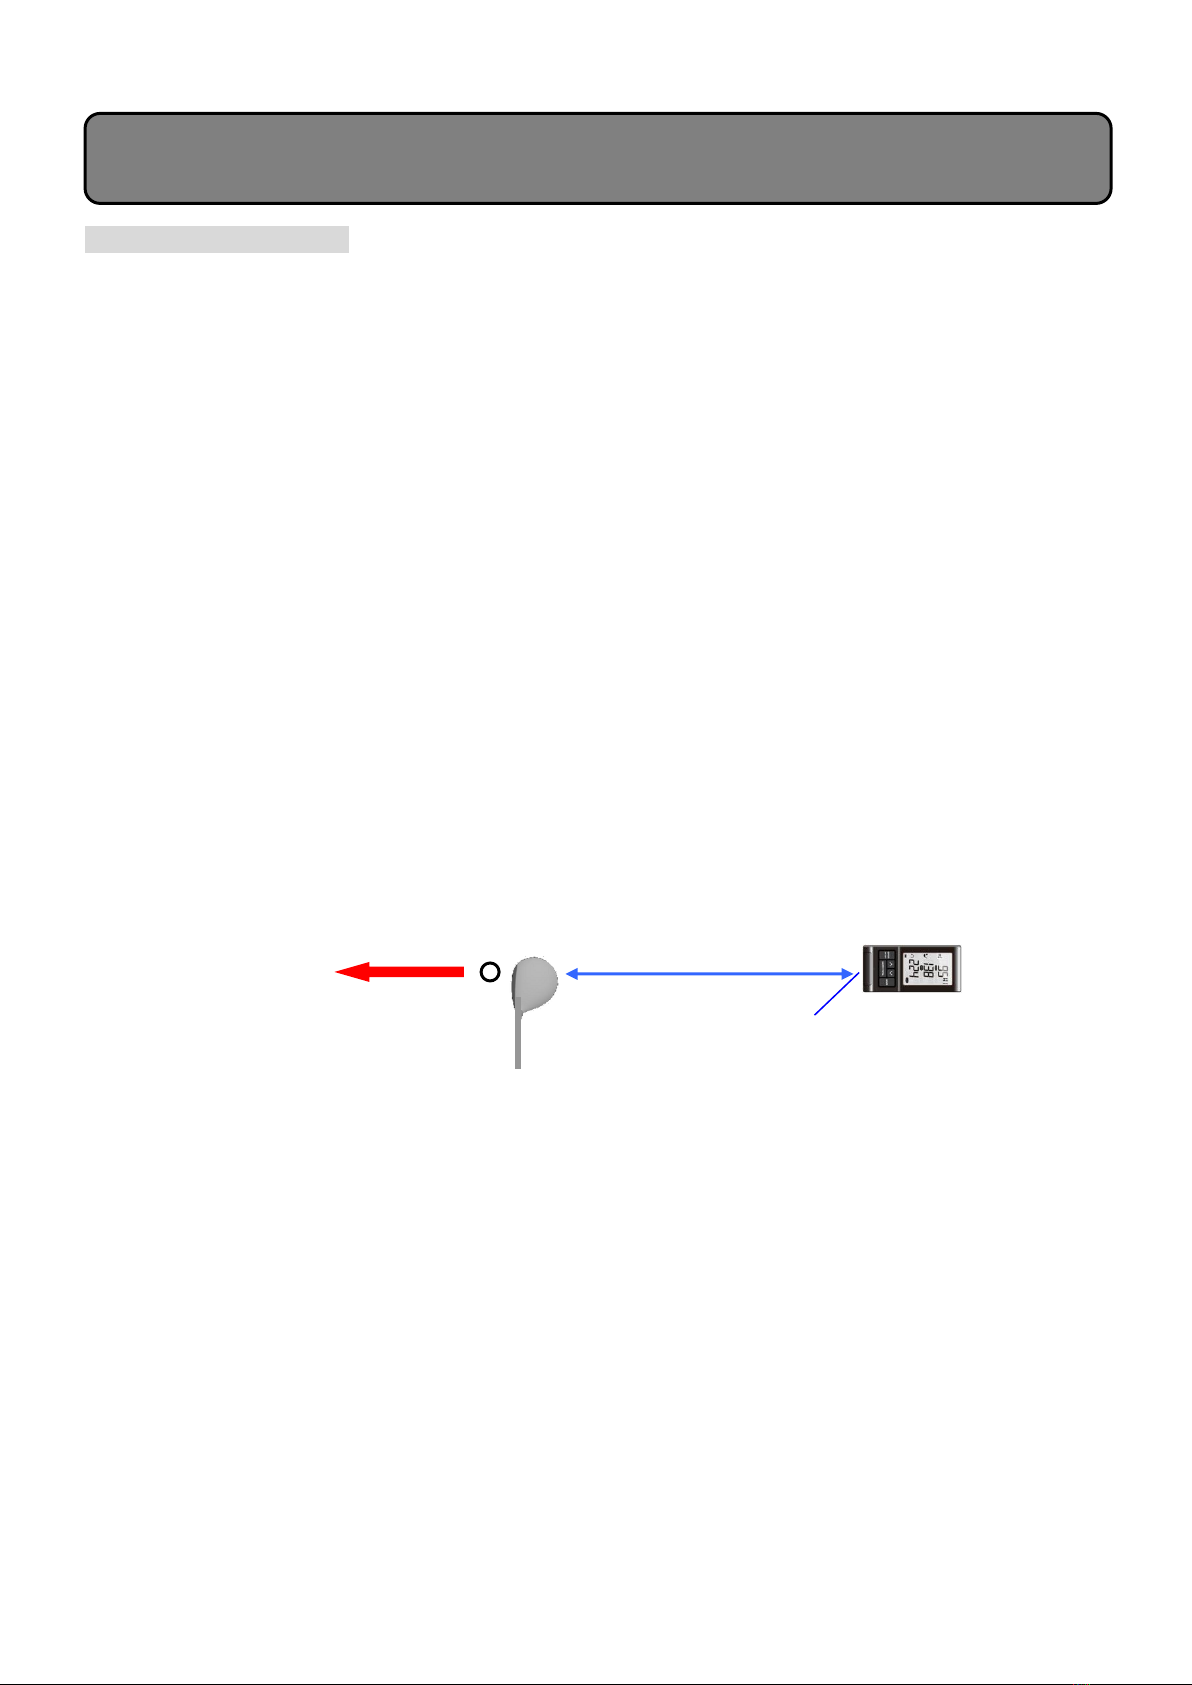
(3) Install / position the device
Install/position the device as shown in the figure below.
*Position the device in a flat location with no uneven terrain, and ensure that there are no
obstacles between the device and the ball.
*If there is a discrepancy between the direction of your swing (i.e. the direction in which you
are hitting the ball) and the direction in which the device is facing, you will not be able to
make accurate measurements.
*The device is positioned in the same way for left-handed golfers.
(4) Swing
When you swing, the results of the measurement will be displayed on the LCD screen.
*When the data is refreshed, the LCD display will flash.
*The device will not accept new measurements while the display is flashing. Wait until the
display stops flashing before taking your next swing.
Making measurements (Golf)
3.5 ft. - 5 ft.
Direction of swing
Measuring section
8
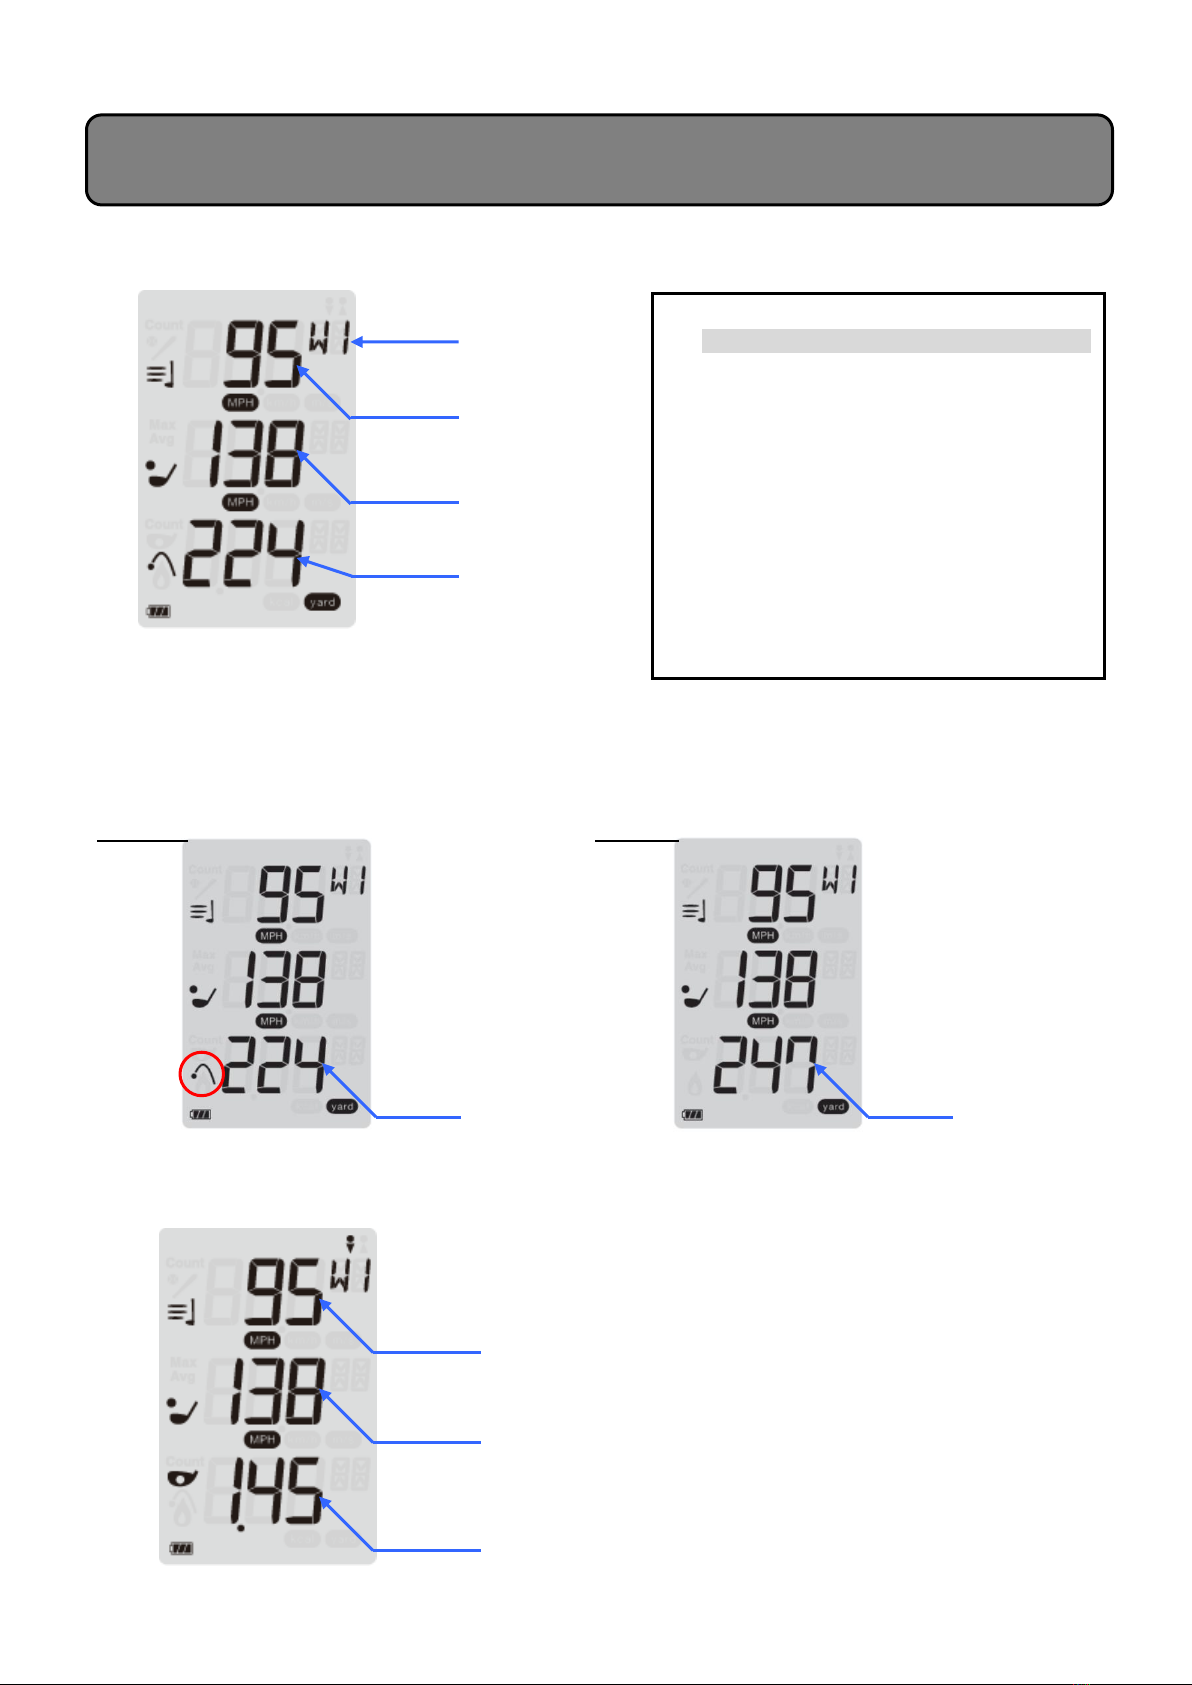
<Standard display (displays distance of flight)>
This mode displays club head speed, ball speed and estimated distance of flight simultaneously.
<Switching between CARRY and TOTAL modes>
Pressing the CARRY/TOTAL button allows you to switch between modes for displaying estimated
distance of flight.
*The icon is only displayed during CARRY display mode.
<Smash factor display mode>
Press the MODE button and the display will switch to display your smash factor.
Ball speed
Smash factor
Club head speed
Explanation of on-screen display (Golf)
CARRY
TOTAL
Estimated
distance of
flight
(CARRY)
Estimated
distance of
flight
(TOTAL)
Ball speed
Estimated
distance of
flight
Club head speed
Club number
<Estimated distance of flight>
・Portable Launch Monitor -Red Eyes Pocket-
calculates the estimated distance of a flight
based on large volumes of practice swing
data accumulated by PRGR.
・The estimated distance of flight is the carry
flight distance calculated using measured
ball speed and the average angle of swing
and amount of spin for each numbered club.
・Depending on the club that you are using,
discrepancies may arise between the
estimated distance of flight and the actual
distance travelled by the ball.
・The estimate does not take the directionality
of a hit ball into consideration.

9
Portable Launch Monitor -Red Eyes Pocket- enables you to measure bat swing speed and (final)
ball speed during pitching.
(1) Insert batteries
* Refer to the “Inserting the batteries” section on page 6.
(2) Select mode
◆Press and hold down the MODE select button for approximately 2 seconds to select radar
gun mode.
◆Press the MODE select button briefly to select between Ball Mode and Bat Mode.
*The selected mode is indicated by the icon in the top left-hand side of the screen.
*When radar gun mode is selected, Ball Mode will be selected.
(3) Install / position the device and make measurements
Use a commercially available tripod or other such stand to install/position the device as
shown in the figure below.
* Ensure that anyone in the surrounding area is safe before using the device.
<Bat speed>
Position the device within 5 feet of the impact position (or virtual impact position in the case of a
practice swing).
* Be sure to position the device on the straight line connecting home base and pitcher.
* In some cases, the material or structure of the bat may cause the distance measured
to be shorter than the actual distance, or prevent any measurements from being made.
* Take sufficient care to ensure that the bat does not hit the device, or the tripod.
5 ft. or less
5 ft. or less
5 ft. or less
5 ft. or less
Bat Mode
Ball Mode
Making measurements (Baseball)
Image of the device in use during
tee batting (with a ball and tee)
Image of the device in use during
batting practice (with no ball)

10
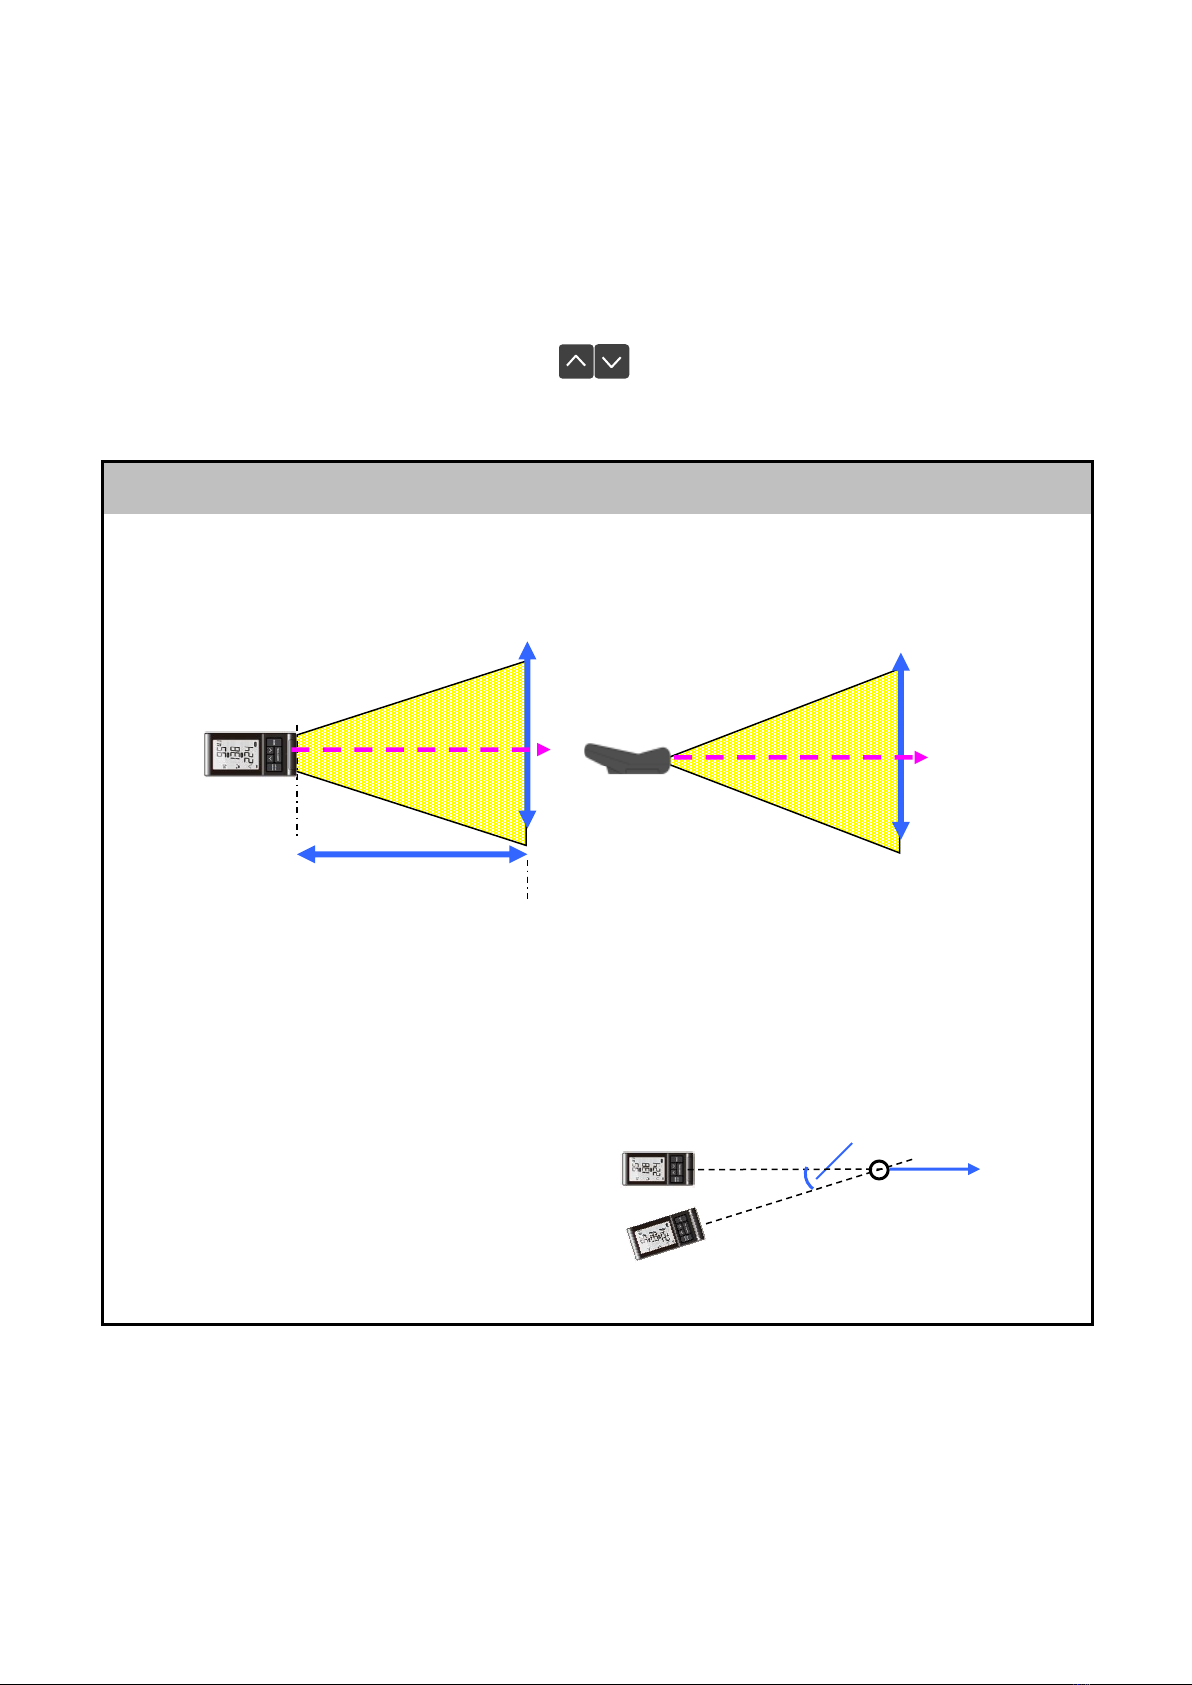
<Ball speed (final speed measurement)>
● Position the device 3.5 feet behind the net, and pitch towards the net.
* Ensure that anyone in the surrounding area is safe before pitching, and pay sufficient
care to rebounds off the net.
* The standard installation layout shown below assumes that you are pitching a baseball.
When using a softball or other type of ball, there may be cases in which measurements
cannot be made, even when setting the device in the position shown below.
● When making measurements during pitching practice, position the device behind the catcher
(in the position where the umpire would stand).
*In some cases, measurements cannot be made where the course of the incoming ball takes
it into the shadow of the catcher.
Explanation of on-screen display(Radar gun mode)
3.5 ft
Guide as to approximate scope for
which measurement is possible
3.5 ft
3.5 ft
Device
Image of measurement using a tripod
Image of measurement being made by a
coach
The speed that can be measured using the device in the installation position shown above is the
speed of the ball directly before it is caught by the catcher. This is the ball speed actually experienced
by the batter, and can be said to be an important factor in determining the quality of a pitch. Although
the actual percentage may differ depending on ball type and the amount of spin applied to the ball,
final ball speed is typically around 5–10% slower than the pitching speed (i.e. the initial speed of the
ball as it leaves the pitcher’s hand).
投手の手元速度
About final ball speed
(Conceptual image)
Final speed: 63 mph
Initial speed: 70 mph
11
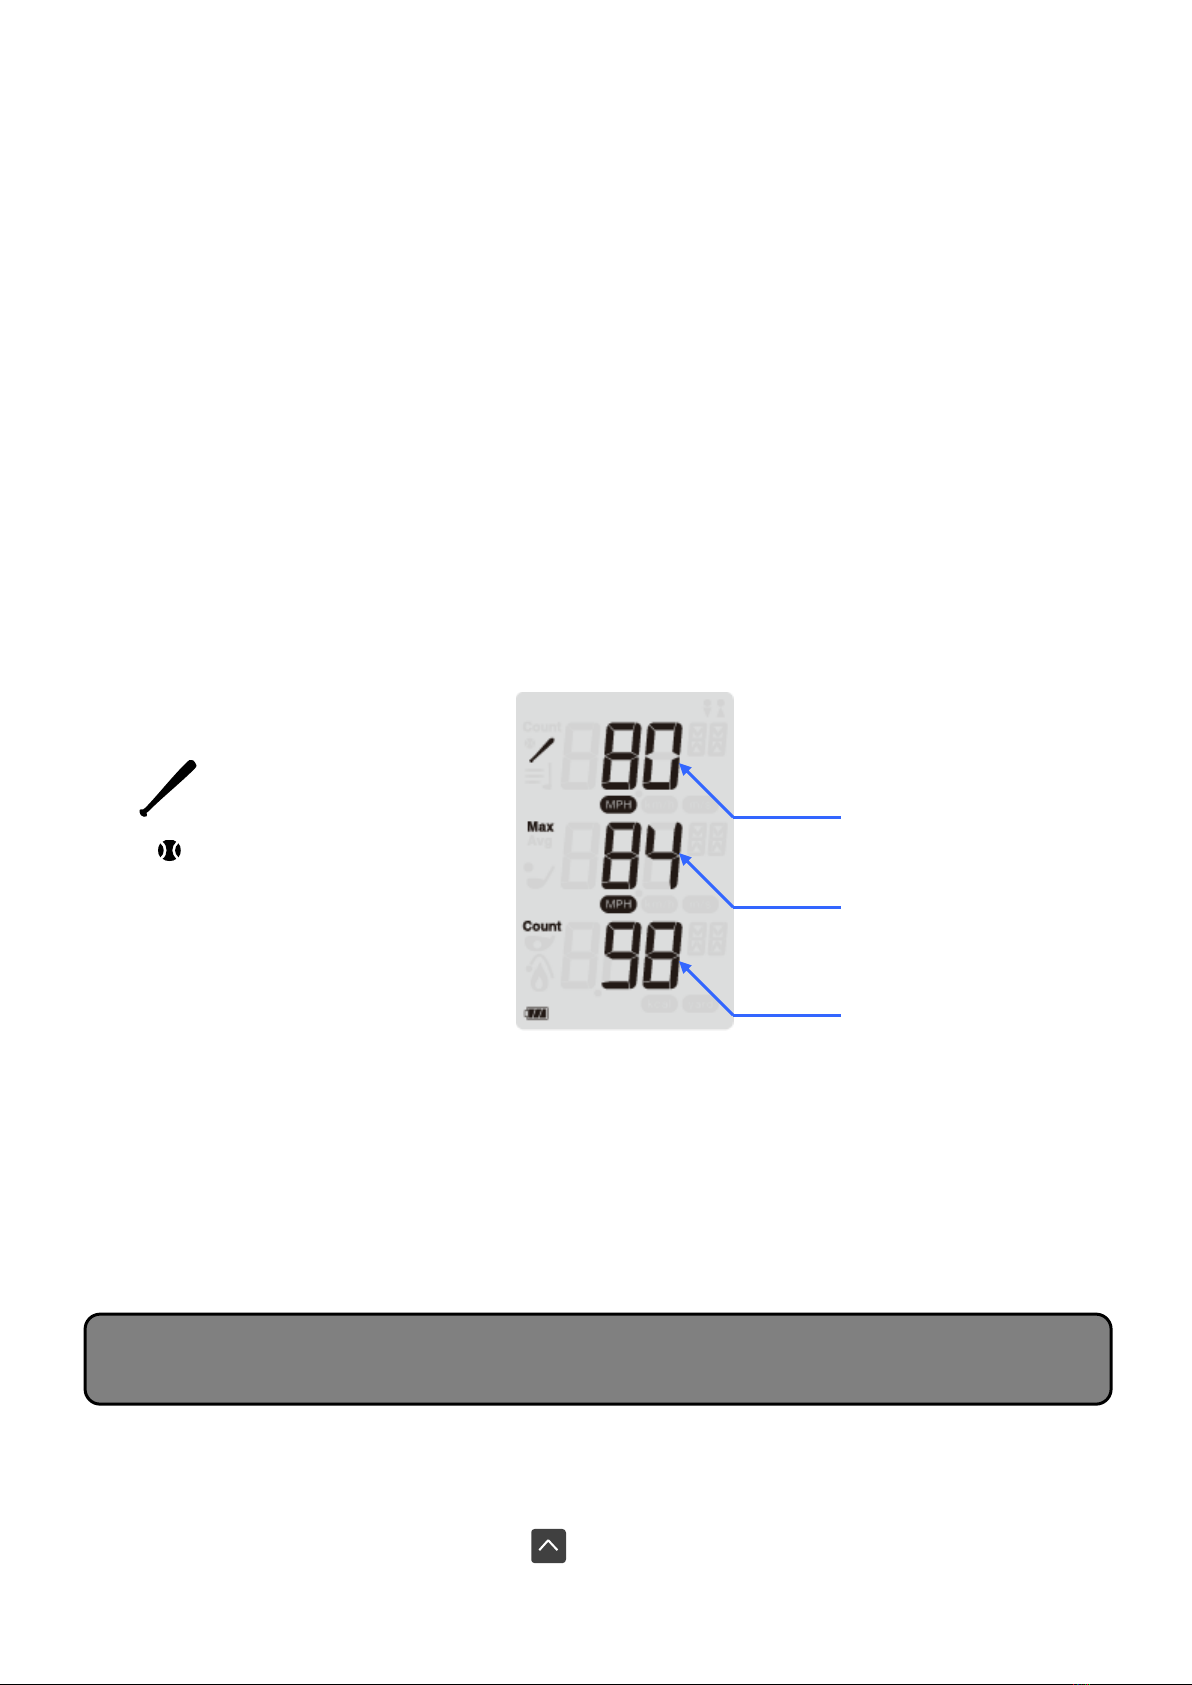
Radar gun mode has two measurement modes: Bat Mode and Ball Mode.
【 Bat Mode 】
Use Bat Mode to measure baseball bat swing speeds, or speeds of other objects where the
change in speed is great. Aside from baseball, it can also be used to measure swing speed in
other sports such as tennis and hockey.
* In some cases, measurement may not be possible due to the structure or material of
the bat (or other piece of equipment).
* Affixing aluminum foil or other metallic foil to the relevant part of the bat (or other piece
of equipment) may make it easier to obtain a measurement.
【 Ball Mode 】
Use Ball Mode to measure baseball pitching speeds, or speeds of other objects where the subject
moves at a largely constant speed. Aside from baseballs, it can also be used to measure the
speed of balls in other sports.
* In some cases, measurement may not be possible due to the structure or material of
the ball.
<About the counter function>
In radar gun mode, the device is equipped with a counter function that displays the number of
measurements made at the bottom of the screen. You can use this function to count practice
swings or pitches made.
* Counting is possible up to a maximum of 999 counts. However, the device history can
only store up to a maximum of 500 past measurement data entries (for all modes
combined).
* Erasing the history also erases the count.
PRGR Portable Launch Monitor -Red Eyes Pocket- stores a maximum of 500 past measurement
data entries (for all modes combined). The history can be displayed by carrying out the following
procedure.
•Press the upwards-facing scroll button
Checking the history
Bat Mode
Ball Mode
Max. speed
Number of counts
Swing speed
or
ball speed
12
→The previous measurement result will be displayed on the main screen, and the history
display at the top of the screen will roll back by one entry.
*Press and hold down the scroll button to scroll continuously.
*Once the total number of data entries exceeds 500, past data entries will be overwritten
automatically in sequence, beginning with the oldest entry.
<Erasing the history>
Press and hold down both scroll buttons simultaneously for more than 2 seconds.
Histories and counts for each mode will be erased.
Possible areas of measurement and positioning directions
● As a general rule, the device is capable of measuring the speed of balls passing through
the areas shown below. The areas shown are guidelines for when using a baseball. In some
cases, measurement may not be possible due to the material of the ball.
● Where there is an angle between the direction of movement of the target and the direction
in which the device is facing on installation, the speed measured will be slower than the
actual speed.
Example: when measuring a target moving at 70 mph
0 degrees: 70 mph (100%)
10 degrees: 69 mph (98%)
20 degrees: 66 mph (94%)
30 degrees: 61 mph (87%)
3.5 ft
3.5 ft
3.5 ft
* Match the direction of the imaginary line extended
from bottom of the device with the direction of the
target.
Positioning angle
Direction of
movement

13
●The device will not turn on
◆Check that the batteries have been inserted in the correct direction.
◆Remove and reinsert the batteries, and check that the metal parts (i.e. terminals) are in
contact.
◆Check the batteries’ level of remaining charge and, where necessary, replace them with new
batteries.
●The device will not take measurements
◆Check the “Install/position the device” section of this manual to confirm that the device has
been installed/positioned correctly.
◆In some cases, when hitting the ball high in the air using a wedge or other such club, the ball
speed will be slow and the smash factor will be below the prescribed level, preventing
measurements from being taken. (This is a result of the specifications of the device itself, and
is not a malfunction).
●The measurement values are strange or abnormal
◆Measurements of club head speed are made in accordance with PRGR’s own criteria.
Differences may arise between measurements taken with this device and those taken with
devices manufactured by other firms.
◆Check the “Install/position the device” section of this manual to confirm that the device has
been installed/positioned correctly.
◆Depending on the type of ball used, in some cases, ball speed may not be displayed correctly.
Measurements cannot be made using plastic balls, sponge balls, or other balls designed for
practice-only use.
◆When practicing swinging without a ball, only club head speed can be displayed. In some rare
cases, ball speed and distance of flight may be displayed when practicing swinging without a
ball. These values are due to noise interface, and are not correct measurement results.
Troubleshooting

14
●Microwave frequency sensor: Oscillating frequency: 24 GHz range (K band)
Transmission output: 10 mW max.
●Measurement range:
Golf mode
Club head speed: 10 m/s – 80 m/s Ball speed: 15 m/s – 80 m/s
Speed gun mode
Swing speed: 30 km/h – 200 km/h Ball speed: 30 km/h – 200 km/h
●Power supply: Voltage: 6 V (used four AAA alkaline dry-cell batteries)
Battery life: approx. 1 month when used for one hour per day
●Operating temperature range: 32 – 100°F/0-40℃ (provided there is no condensation)
●Dimensions (main unit): 55mm×116mm×35mm / 2.2”×4.6”×1.4” (excludes protruding parts)
●Weight: 125 g (includes batteries)
If you notice anything unusual in the operation of this product, stop using it immediately and contact us at the following
address.
●Where the product has malfunctioned or broken down during a normal state of use, and during the warranty
period displayed on the warranty, we will repair the product free of charge according to the content listed in this
manual.
●Where it has become necessary to repair the product during the warranty period, please bring the product along
with the warranty to the store/dealer from which you purchased it, and request for it to be repaired.
●During the warranty period, we will carry out the following kinds of repairs for a fee.
①Malfunctions and/or damage caused as a result of fire, earthquake, wind and water damage, lightening, other
natural phenomena, and voltage abnormalities
②Malfunctions and/or damage caused as a result of strong shocks or impact due to carrying or droppages, etc.,
after purchase
③Malfunctions and/or damage caused as a result of illegitimate repairs or modifications, or other malfunctions
and/or damage judged to be attributable to the user
④Malfunctions and/or damage caused by the product being wet or left in an abnormal environment (e.g.
exposure to direct sunlight, other high temperatures or extremely low temperatures)
⑤Scratches or other changes to the external appearance of the product arising during use
⑥Exchange of consumables or accessories/attachments
⑦Malfunctions and/or damage caused by battery fluid leakage
⑧Other malfunctions and/or damage where the fault is judged to have been caused as a result of not acting in
accordance with the user’s manual (i.e. this manual)
⑨Where the warranty is not displayed, or where required information has not been filled out on the warranty
document (i.e. date of purchase, name of store/dealer, etc.)
*Where opinions or interpretations differ as to whether or not malfunctions or damage qualify as exceptions to
the above (or to the extent of warranty when malfunctions or damage do not qualify as exceptions), the matter
shall be handled based on the judgement of the supplier.
●Warranties will not be reissued, so please keep this warranty carefully in a safe place.
*This warranty does not limit the legal rights of the customer. If you are unsure of any matters regarding repairs
Specifications
Warranty and after-sales service
Inquiries:
AMH SPORTS
12222 Bell Ranch Drive, Santa Fe Springs, CA 90670, U.S.A
TEL: (323)201-0880 FAX: (323)201-0884
15
after the warranty period, please contact the store/dealer from which you purchased the product, or the service
center listed above.
PRGR Portable Launch Monitor
-REDEYES POCKET HS-120A- Warranty
This warranty is void if there is no information entered in the asterisk (*) fields. When taking
receipt of this warranty, please confirm whether the date of purchase, store/dealer’s name,
address and telephone number have been filled out correctly. If they have not been filled out, or
if some information has been omitted, please make an immediate request to the store/dealer
from which you purchased the product.
Manufacturer: PRGR Co., Ltd.
3F Hama Rubber Building, 5-36-11 Shimbashi, Minato-ku, Tokyo 105-0004 Japan
TEL: 03-3436-3341
* Store/dealer’s name, address and contact number
Name:
Address:
(Postal code: )
Contact number:
* Customer
Warranty period:
1 year from date of purchase
* Date of purchase:
DD/MM/YYYY
Serial number:
To the customer:
●
This warranty constitutes a promise to repair the product free
of charge according to the content listed in this user’s manual.
Please read this manual carefully, fill in the required
information, and store it in a safe place.
●Before
requesting repairs, please reconfirm that you have not
mistaken the state of the power supply (i.e. device being
turned on or off) and applicable methods of operation.

16
Supplier's Declaration of Conformity
October 1, 2018
Unique Identifier
REDEYES POCKET HS-120A
Party issuing Supplier’s Declaration of Conformity
PRGR CO., LTD.
5-36-11 SHIMBASHI, MINATO-KU, TOKYO 105-8685, JAPAN
TEL: +81-3-5400-4742
Responsible Party –U.S. Contact Information
AMH SPORTS
12222 Bell Ranch Drive, Santa Fe Springs, CA 90670, U.S.A
TEL: 323-201-0880
FCC Compliance Statement (for products subject to Part 15)
This device complies with Part 15 of the FCC Rules. Operation is subject to the following
two conditions: (1) This device may not cause harmful interference, and (2) this device must
accept any interference received, including interference that may cause undesired operation.
Authorised Person
Shinji Yamamoto
Vice president
Other manuals for RED EYES POCKET HS-120A
1
Table of contents


