WIRELESS REMOTE T-STAT
Price Wireless Thermostat System
Location:
1. Mount the RemoteT-stat in a place that is convenient for
the end user, but please note the following:
a. Do not mount the thermostat in direct sunlight (across from
a window)
b. Shouldn’t be installed on an outside wall
c. Keep away from hot equipment (monitors, heaters,
photocopiers, etc.)
d. Ensure nothing will restrict vertical air circulation to the
thermostat (i.e. Do not cover!)
e. Do not mount on metal plate or in the box.
2. Place base within 50 feet from Remote T-stat and within
CAT-5 cable length from main controller (PIC, PRODIGY)
on the metal duct work using the mounting bracket
provided. Ensure base is "Hanging" in plenum away from
ductwork so it can receive wireless signal.
Installation:
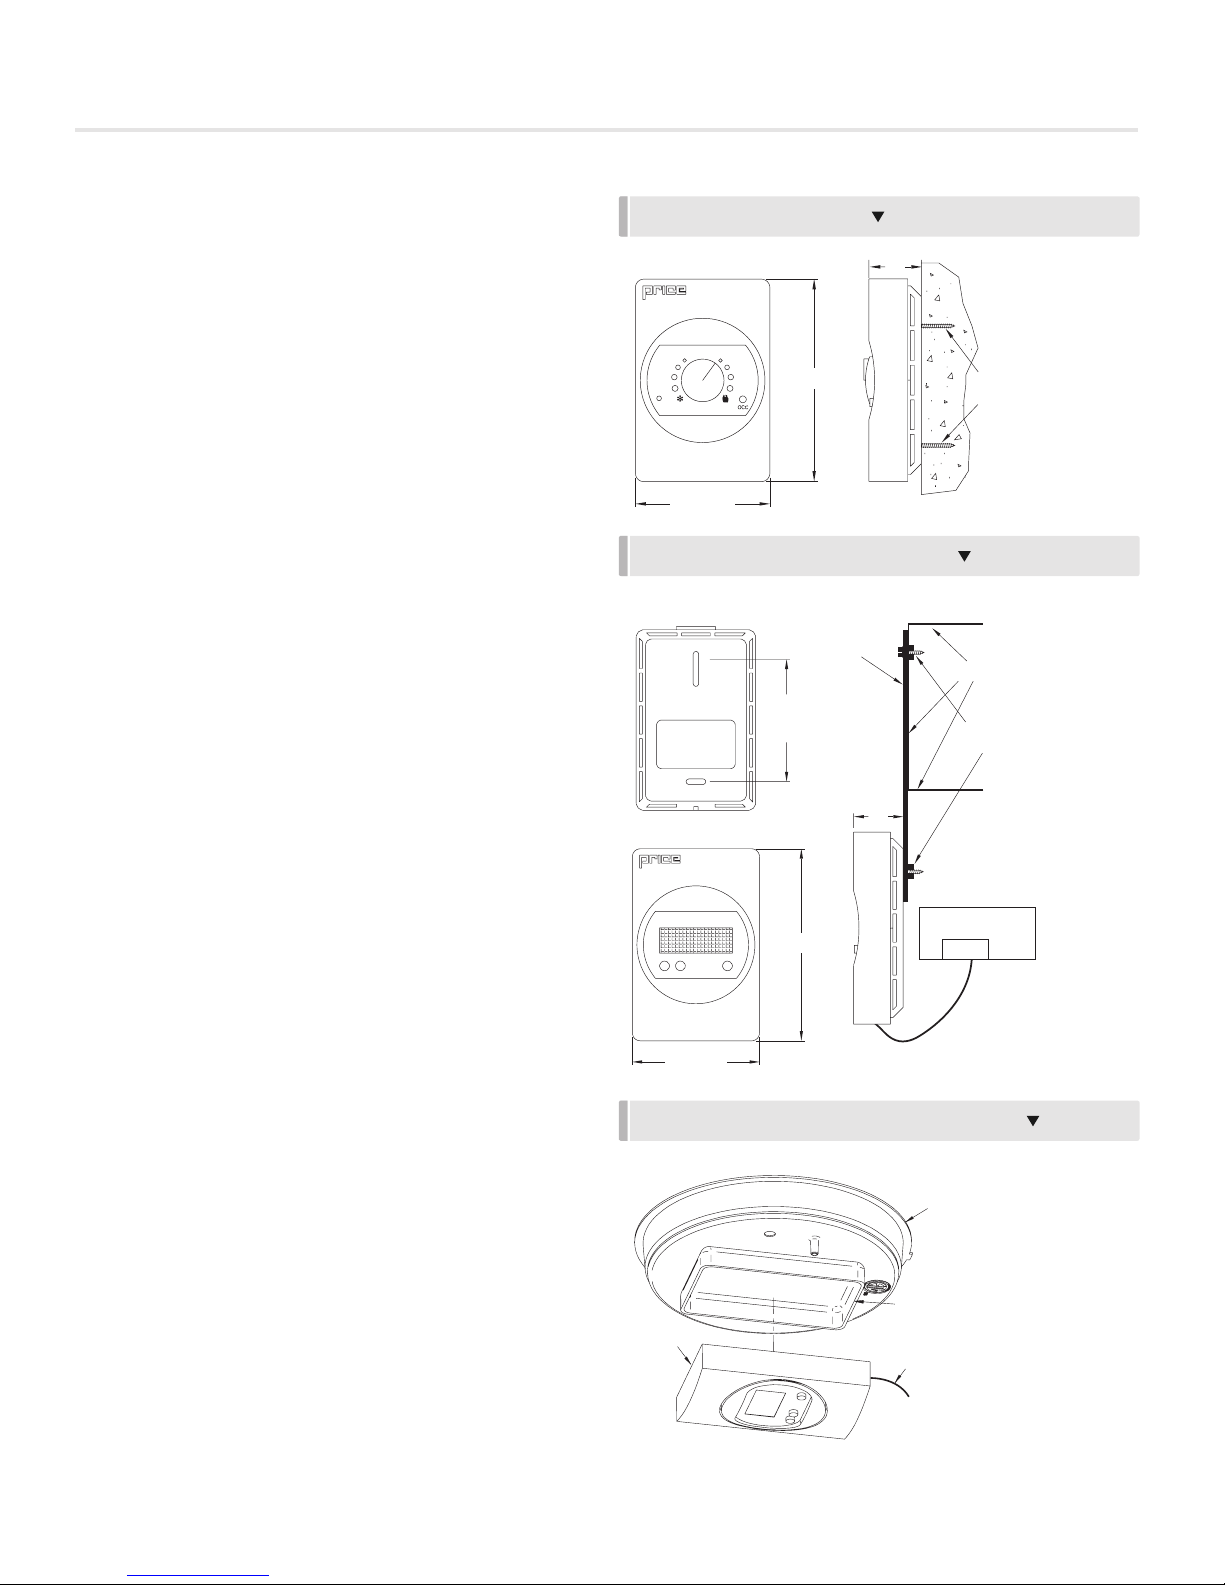
1. The back plate on the Remote T-stats is removable and
can be mounted directly to drywall (using anchors supplied
by others).
2. The back plate on the base is removable and can,
depending on the ordered kit, be mounted in 2 ways:
a. directly to metal duct work through the mounting
bracket provided (using anchors supplied by others);
b. to the bottom of the UFAD basket;
3. Run the supplied plenum-rated CAT5 cable from the main
controller “T-STAT” jack to the RJ-45 jack located on the
bottom of base.
4. Make sure that dip switches (Channel and Address) on the
backs of RemoteT-stat and Base are in the same positions,
and are unique for the building.
5. After mounting, the Remote T-stat and Base can be locked
to the corresponding backplates using the setscrew
located at the bottom of the unit.
A 0.050” Allen (hex) key is required – One is supplied in
each box.
Backplate - Rear View Surface Mount Detail
3.25” (83)
1.25”
(32)
3.23” (82)
4.88” (124)
PRICE CONTROLLER
FASTENERS
BY OTHERS
MOUNTING BRACKET
FROM PRICE
METAL DUCT WORK
THERMOSTAT BACK PLATE
FACTORY INSTALLED ON BASKET
CAT-5 -
TO T-STAT JACK ON PRICE CONTROLLER
WIRELESS BASE
UFAD -
UNDERFLOOR AIR DISTRIBUTION BASKET
TSTAT
CAT- 5
STANDARD ELEC.
BOX SPACING
Face View
1.25”
(32)
3.23” (82)
4.88” (124) WALL FASTENERS
BY OTHERS
Face View
Backplate - Rear View Surface Mount Detail
3.25” (83)
1.25”
(32)
3.23” (82)
4.88” (124)
PRICE CONTROLLER
FASTENERS
BY OTHERS
MOUNTING BRACKET
FROM PRICE
METAL DUCT WORK
THERMOSTAT BACK PLATE
FACTORY INSTALLED ON BASKET
CAT-5 -
TO T-STAT JACK ON PRICE CONTROLLER
WIRELESS BASE
UFAD -
UNDERFLOOR AIR DISTRIBUTION BASKET
TSTAT
CAT- 5
STANDARD ELEC.
BOX SPACING
Face View
1.25”
(32)
3.23” (82)
4.88” (124)
WALL FASTENERS
BY OTHERS
Face View
WIRELESS BASE, DUCT INSTALLATION
Backplate - Rear View Surface Mount Detail
3.25” (83)
1.25”
(32)
3.23” (82)
4.88” (124)
PRICE CONTROLLER
FASTENERS
BY OTHERS
MOUNTING BRACKET
FROM PRICE
METAL DUCT WORK
THERMOSTAT BACK PLATE
FACTORY INSTALLED ON BASKET
CAT-5 -
TO T-STAT JACK ON PRICE CONTROLLER
WIRELESS BASE
UFAD -
UNDERFLOOR AIR DISTRIBUTION BASKET
TSTAT
CAT- 5
STANDARD ELEC.
BOX SPACING
Face View
1.25”
(32)
3.23” (82)
4.88” (124) WALL FASTENERS
BY OTHERS
Face View
WIRELESS BASE, UNDERFLOOR INSTALLATION
2
priceindustries.com |PRICE WIRELESS THERMOSTAT SYSTEM - Manual
PRICE WIRELESS THERMOSTAT SYSTEM
PRODUCT OVERVIEW