Primare BD32 User manual

BD32 MkII AUDIOPHILE UNIVERSAL BLURAY PLAYER
Quick Setup Guide

2
Switch on/off
Play. Press and hold to pause the disc
Press and hold for 6 seconds with the
tray open to reset the remote code
Increase volume of amplifier
Select Blu-ray mode
Press and hold for 1.5 seconds to select a source
Restart the current track,
or skip to the previous track
Repeat the track or disc
Show/hide on-screen display
Press and hold for Option
Skip to the next track
Return from menu
Display Pop-up Menu/DVD Menu
Change the display brightness
Choose audio language/track
Press and hold for Pure Audio Mode
Reverse scan Forward scan
Display Top Menu/Title Menu
Choose camera angle
Choose media source
Press and hold for Input selection
Choose output resolution
Choose subtitles
Zoom in/out and adjust aspect ratio Play from specified location
Select SHUFFLE or RANDOM
Open or close the tray, or stop the disc
Decrease volume of amplifier
Clear numeric input
Display the Setup Menu
Move right on menu
Move up on menu
Move down on menu
Select item on menu
Move left on menu
Enter track number
USING THE REMOTE CONTROL
This page explains how to use the C24 remote control to operate the
BD32 MkII, and how to fit the batteries into the remote control.
When using the remote control, the front window of the remote control should
be pointed to the infrared sensor on the front panel within an angle of ±30° and
a range of about 26 ft.
NOTE: When a button is pressed but its function is invalid or unavailable at the
moment, the TV screen displays a circle with a diagonal line.
Fitting the batteries
Before using the remote control you need to insert
the two button cells supplied with the C24.
• Open the cover on the back of the remote
control by pressing the tab gently:
• Insert the two batteries, positive side
uppermost:
+
CR2025
LITHIUM BATTERY
3V
+
CR2025
LITHIUM BATTERY
3V
•Replace the cover and push until it clips into
place.
Note: Replace only with 3V button
cells type CR2025 or equivalent.
When disposing of old batteries please be
considerate to the environment.
Using the Remote Control

3
Power Eject Pause StopDisc tray
Power
indicator Back Play Next
Display
(see below)
Display
INSTALLATION
M.CH
BD
RPT ALL
Chapter/track
Source
Time display
Media:
BD
DVD
DVD-A
SVCD
SACD 2CH
SACD M.CH
CD
USB
Format:
2CH
M.CH
Pause indicator
Repeat indicator
Front panel controls
Installation

4
Back panel connections
RS232HDMI out USBHDMI
in
Optical
CoaxNetwork Power
On/off
2-channel
balanced outputs
2-channel
outputs
Trigger
in/out
IR
in/out
Multichannel audio outputs
Digital outputs
Unpack the BD32 MkII
Your BD32 MkII comes with:
• Owner’s manual
• AC power cord
• C24 remote
• 2 batteries for the C24
• USB wireless adaptor
• USB extension cable
Phase
The phase of the AC supply can make a significant difference to the sound.
Ensure that the live pin of the AC power cable is connected to the left-hand pin of the power connector,
viewed from the back panel:
Live
Language
To set the language for the BD32 MkII user interface:
• Press SETUP to display the Setup Menu.
• Highlight Playback Setup and press the SELECT button to select it.
• Highlight Language and press the SELECT button to select it.
• Select the language you want to use.
Installation

5
I N S T A L L A T I O N
22
Quick Start Guide
Power On and Play
The BD32 MkII is pre-configured with settings that have been optimized for most home theater systems, so it
can fit into your audio/video system without any additional adjustment. To begin, please follow these steps:
1. Connect the player into your system.
2. Turn on the TV and/or receiver/amplifier, and then turn on the player.
3. Switch the input selection on your TV or receiver so that the TV displays the signal from the
player.
Within a few seconds, the player will load the factory default settings and you will see the Home Menu with a
Primare logo. The player is now ready for use. Enjoy your new Primare Blu-ray Disc Player!
Please follow the rest of the user manual for information on basic and advanced operations.
Select the Best Output Resolution
One of the major advantages of the BD32 MkII is its ability to play high-definition Blu-ray video and also up-
convert standard definition video stored on DVD discs to high definition. The sophisticated video processor
inside the player ensures that the video will have the best possible color, detail and motion. The player offers
several standard and high definition video output resolutions. For best results, it is important to select an output
resolution that best matches your TV or display.
The rule of thumb when selecting an output resolution is to match the “native resolution” of your TV or display
as closely as possible. The “native resolution” is the resolution of the actual display component in the TV, such
as the Plasma panel, LCD panel, or DLP™ chip. The TV may accept input signals with lower or higher
resolutions than its native resolution. In such cases, the electronics in the TV will upscale or downscale the
video to fit its display component. Unfortunately, many TVs on the market only do an average job of scaling the
video. On the other hand, if you set the BD32 MkII to output a resolution that matches or is very close to the
native resolution of the TV, you are more likely to get a great picture.
For most new displays on the market, the best output resolution will be 1080p. A few early model “1080p”
displays did not accept a 1080p signal. For these displays, the best output resolution is 1080i. For small screen
digital TVs this will likely be 720p. For even earlier CRT tube or rear projection TVs this will likely be 1080i. For
EDTV displays (very rare if they have HDMI or DVI) this will be 480p (NTSC) or 576p (PAL). These are general
recommendations that work for most users, but there can be exceptions. Advanced users may want to try all
supported resolutions and choose the one that provides the best result visually.
The BD32 MkII supports a special Source Direct mode through its HDMI outputs. This resolution is
recommended for use with external video processors or high-end TVs. In Source Direct mode, the player
works as a “transport”. It decodes video from the discs and then sends the raw video signal in its native
resolution and format, without extra processing, to the external video processor or TV. The actual output
resolution varies by content:
noituloseRtuptuOtceriDecruoStnetnoC
i084DVDCSTN
i675DVDLAP
Most Blu-ray Movies (film-source) 1080p 23.976Hz or 1080p 24Hz
Most Blu-ray TV shows or Concerts
(video-source)
1080i
SACD and DVD-Audio 1080i
I N S T A L L A T I O N
23
For both HDMI outputs, the following output resolutions are available: 4Kx2K,Auto,1080p,1080i,720p,
480p/576p,480i/576i, and Source Direct. If Auto is selected, the player will determine the output resolution
based on the best signal resolution that the TV can display.
To change the output resolution, press the RESOLUTION button on the remote to bring the Resolution Menu,
then press the UP/DOWN ARROW buttons to highlight the desired one, and press the ENTER button to
confirm and return. If your TV does not support the selected resolution, you may see a black screen or an error
message. In this case, try a different resolution that your TV can support.
Determine the Display Aspect Ratio
Standard Definition, or 4:3 TV Wide screen, or 16:9 TV
The TV Aspect Ratio is the proportional ratio of a TV screen’s width and height. Older television sets generally
have a 4:3 aspect ratio – the width is 4/3 (or 1.33) times the height. Newer wide screen television sets have a
16:9 aspect ratio – the width is 16/9 (or 1.78) times the height. For best performance, the video output of your
player needs to match the screen aspect ratio of your TV. Since most Blu-ray discs and many DVD discs are
released in the wide screen format, it is highly recommended to use a wide screen TV with the BD32 MkII.
The Aspect Ratio selections are 16:9 Wide and 16:9 Wide/Auto. Depending on your selection and the video
format recorded on the discs, image appearance on the TV screen can be one of the following:
Original Content
TV Screen Appearance
16:9
4:3
16:9
Wide Wide/Auto
If you have a widescreen (16:9) display, select one of these options:
x16:9 Wide – 16:9 (widescreen) sources will be displayed in their native aspect ratio, and 4:3
sources will be horizontally stretched.
x16:9 Wide/Auto – 16:9 (widescreen) as well as 4:3 sources will be displayed in their native aspect
ratio. Please note that in this mode, 4:3 sources will be displayed with black borders on both left
and right sides to maintain the correct 4:3 aspect ratio.
QUICK START
Quick Start

6Basic Operations
Disc Playback
1 Press the Obutton to turn on the player.
2 Press the åbutton to eject the disc tray.
3 Place the disc with the label side facing up and the recorded side facing down.
4 Press the åbutton again to retract the tray.
5 The player will read the disc information and starts playback.
6 Depending on the content of the disc, a menu or navigation screen may appear. Please use the
navigation and SELECT buttons to select the content to play.
7 To stop playback, press the *button.
8 To turn off the player, press the Obutton.
NOTE
• During DVD and some Blu-ray Disc playback, pressing the *button will stop the disc
and save the current stopped point. You can resume playback by pressing the >button.
• Certain Blu-ray Discs with BD-Java technology do not support resume playback.
Pressing the *button during playback of such discs will completely stop the disc.
Pressing the >button once the disc is stopped will restart it from the very beginning.
OPTION Menu
1. During media file navigation and playback, press and hold the DISP button on the remote to
open the OPTION MENU, which allows you to conveniently access various settings and playback
features.
2. When the OPTION MENU is displayed, press the LEFT/RIGHT ARROW buttons on the remote to
highlight a particular item, then press the SELECT button to confirm.
The OPTION MENU selections may differ depending on content type. A summary of the selections and
their functionality is described as follows:
Within Disc Playback (CD, DVD, BD):
• Disc info: Searches the Gracenote online database and display the available disc information (an
active internet connection is required).
Within Music File Playback:
• Music info: As with “Disc info”; searches and displays available music information from Gracenote.
Within Video Discs (DVD, BD) and Video File Playback:
• Subtitle shift: Adjusts the position of subtitles on the screen. See details on page 17.
• Picture adjustment: Opens the Picture Adjustment menu. See details on page 28.
• Zoom: Opens the image zoom level menu. See details on page 16.
• ANGLE: Changes the viewing angle. This function is only available when the DVD/BD is recorded
with multiple angles.
Within Photo File playback:
• Zoom: Displays the image at different zoom levels.
• Rotate – Left / Right / Mirror / Flip: Rotates the image on the screen.
Within HDMI INPUT playback:
• Picture adjustment: Opens the Picture Adjustment menu. See details on page 28.
Fast Playback
You may fast forward or reverse during playback.
1. Press the ˘button on the remote control or hold down the ˘button on the front panel and the
player starts fast forward playback. Each press of the ˘button switches the playback speed in the
following sequence:
1 2
345
2. Press the ¯button on the remote control or hold down the ¯button on the front panel and the
player starts fast reverse playback. Each press of the ¯button switches the playback speed in the
following sequence:
1 2
345
NOTE
• Certain Blu-ray Discs utilizing the BD-Java technology may have their own fast
forwarding and reversing control. The actual speed varies by disc, and a progress scale
may be displayed by the disc.
Pause and Frame-by-Frame
1. During playback, press the >/=button on the remote control or the =button on the front panel to
temporarily pause the program. In this mode, a PAUSE icon will appear on the TV screen.
2. While a DVD or Blu-ray Disc is paused, press the [or ]button on the remote control or the ¯or
˘button on the front panel to reverse or advance the video frame-by-frame.
3. Press the >/=button on the remote control or the =button on the front panel to resume normal
playback.
Slow Playback
To play the video in slow-motion, please use the following steps.
1. Press the >/=button on the remote control or the =button on the front panel to pause the playback
first.
2. Press the ˘button on the remote control or hold down the ˘button on the front panel to select
a forward slow playback speed. Each press of the FWD button switches the playback speed in the
BASIC OPERATIONS

7Basic Operations
following sequence:
1/16 1/8
1/41/2
3. Press the ¯button on the remote control or hold down the ¯button on the front panel to select
a reverse slow playback speed. Each press of the REV button switches the playback speed in the
following sequence:
1/16 1/8
1/41/2
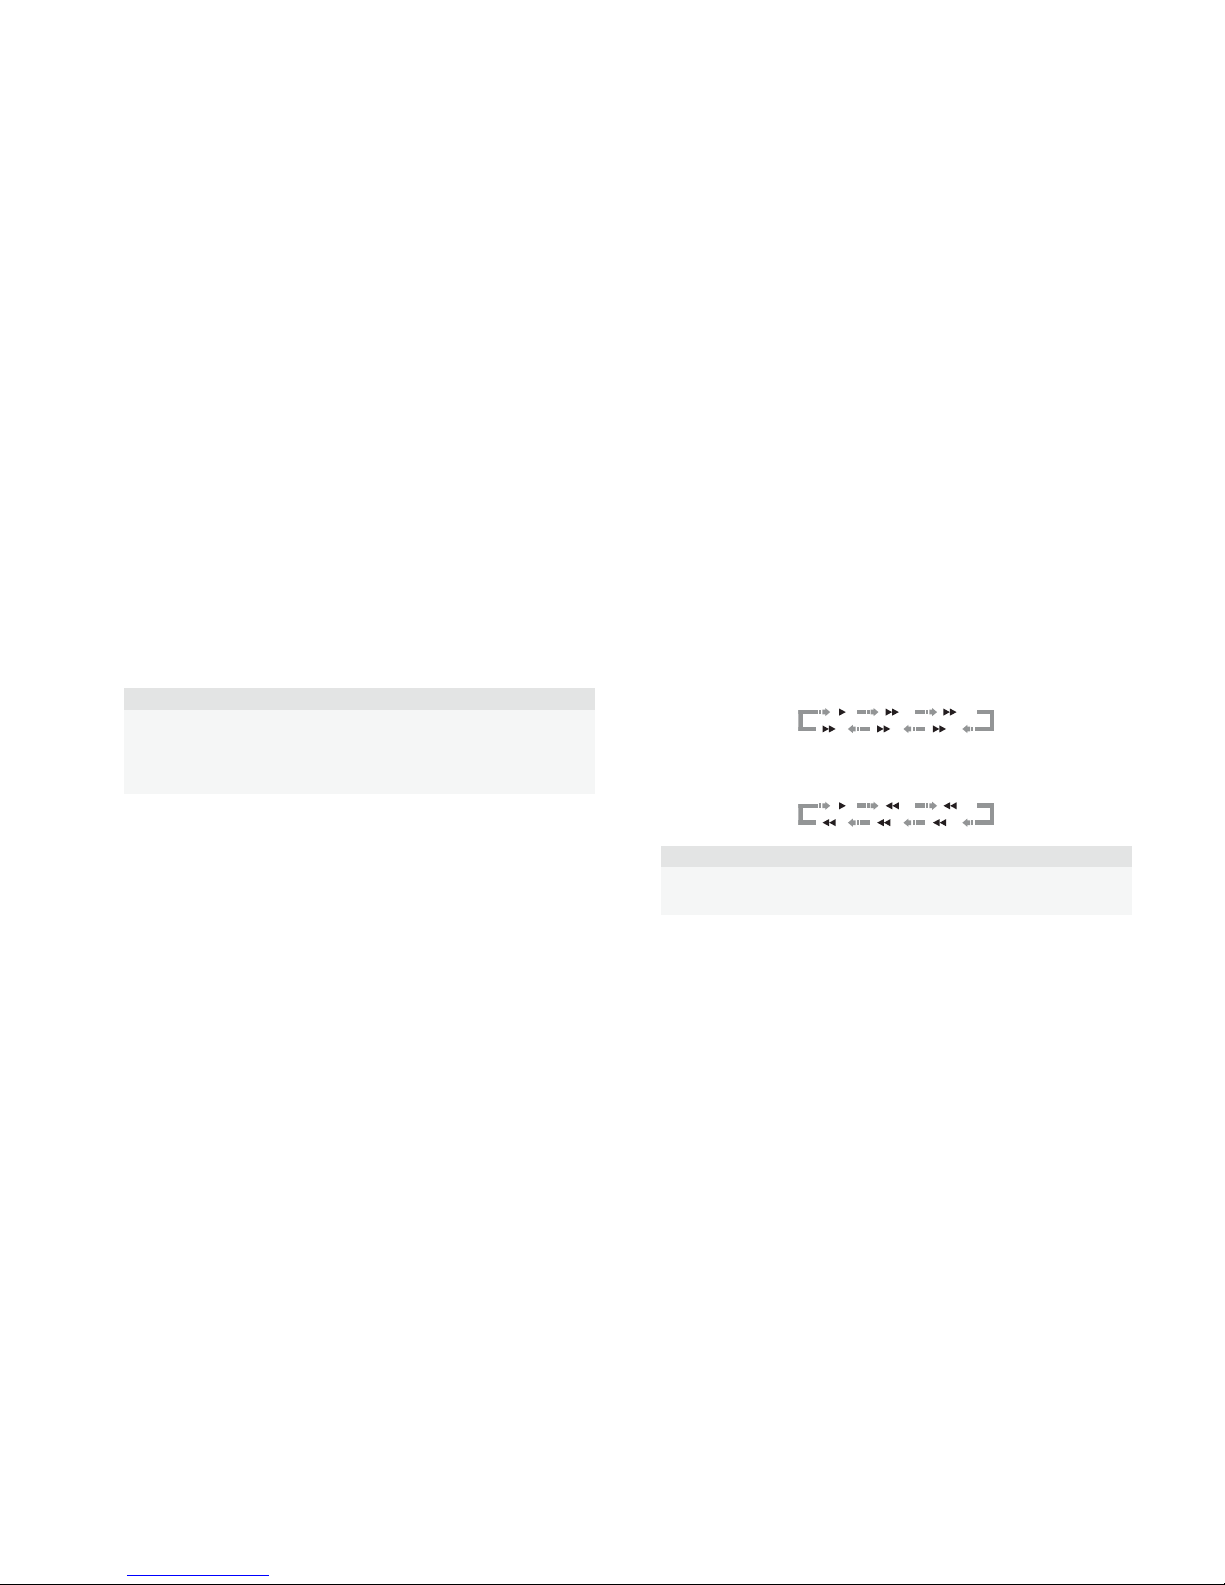
4. To exit the slow playback mode, press the >/=button on the remote control or the >button on the
front panel.
NOTE
• Certain Blu-ray Discs utilizing the BD-Java technology may not support slow playback.
Blu-ray Disc Menu Playback
1. Blu-ray Discs usually contain a Top Menu and a Pop-up Menu. The Top Menu normally appears at
the beginning of the playback, after the previews and copyright messages. The Pop-up Menu can be
accessed during the movie without interrupting playback.
2. During playback, press the POP button to access the Pop-up Menu. Press the MENU button to
access the Top Menu.
3. Navigate the menu using the arrow buttons, and then press the SELECT button to make the
selection.
4. Some menus make use of the colour buttons. You can select menu functions by pressing the
corresponding colour button on the remote control.
DVD Menu Playback
1. Some DVD discs contain title menu or chapter menu functions.
2. During playback, press the MENU button to return to the disc title menu. Press the POP button to
display the chapter menu. Depending on the disc, one or both menus may not exist.
3. Navigate the menu using the arrow buttons, and then press the SELECT button to make the
selection.
4. Press and hold down the RETURN button to return to the previous menu. The return location varies
by disc.
On-Screen Display
The on-screen display may contain the following information about the content currently playing:
• Playback status: an icon indicating play, pause, and fast forward/reverse status.
• Bit rate meter: an indication of the bit rate of the audio and video stream.
• Current and total title numbers. (DVD and Blu-ray Discs)
• Current and total chapter numbers of the current title. (DVD and Blu-ray Discs)
• Current and total tracks. (CD and SACD)
• Audio information: current and total available number of audio tracks, language, format, and
channels.
• Subtitle information: current and total available number of subtitle tracks and language.
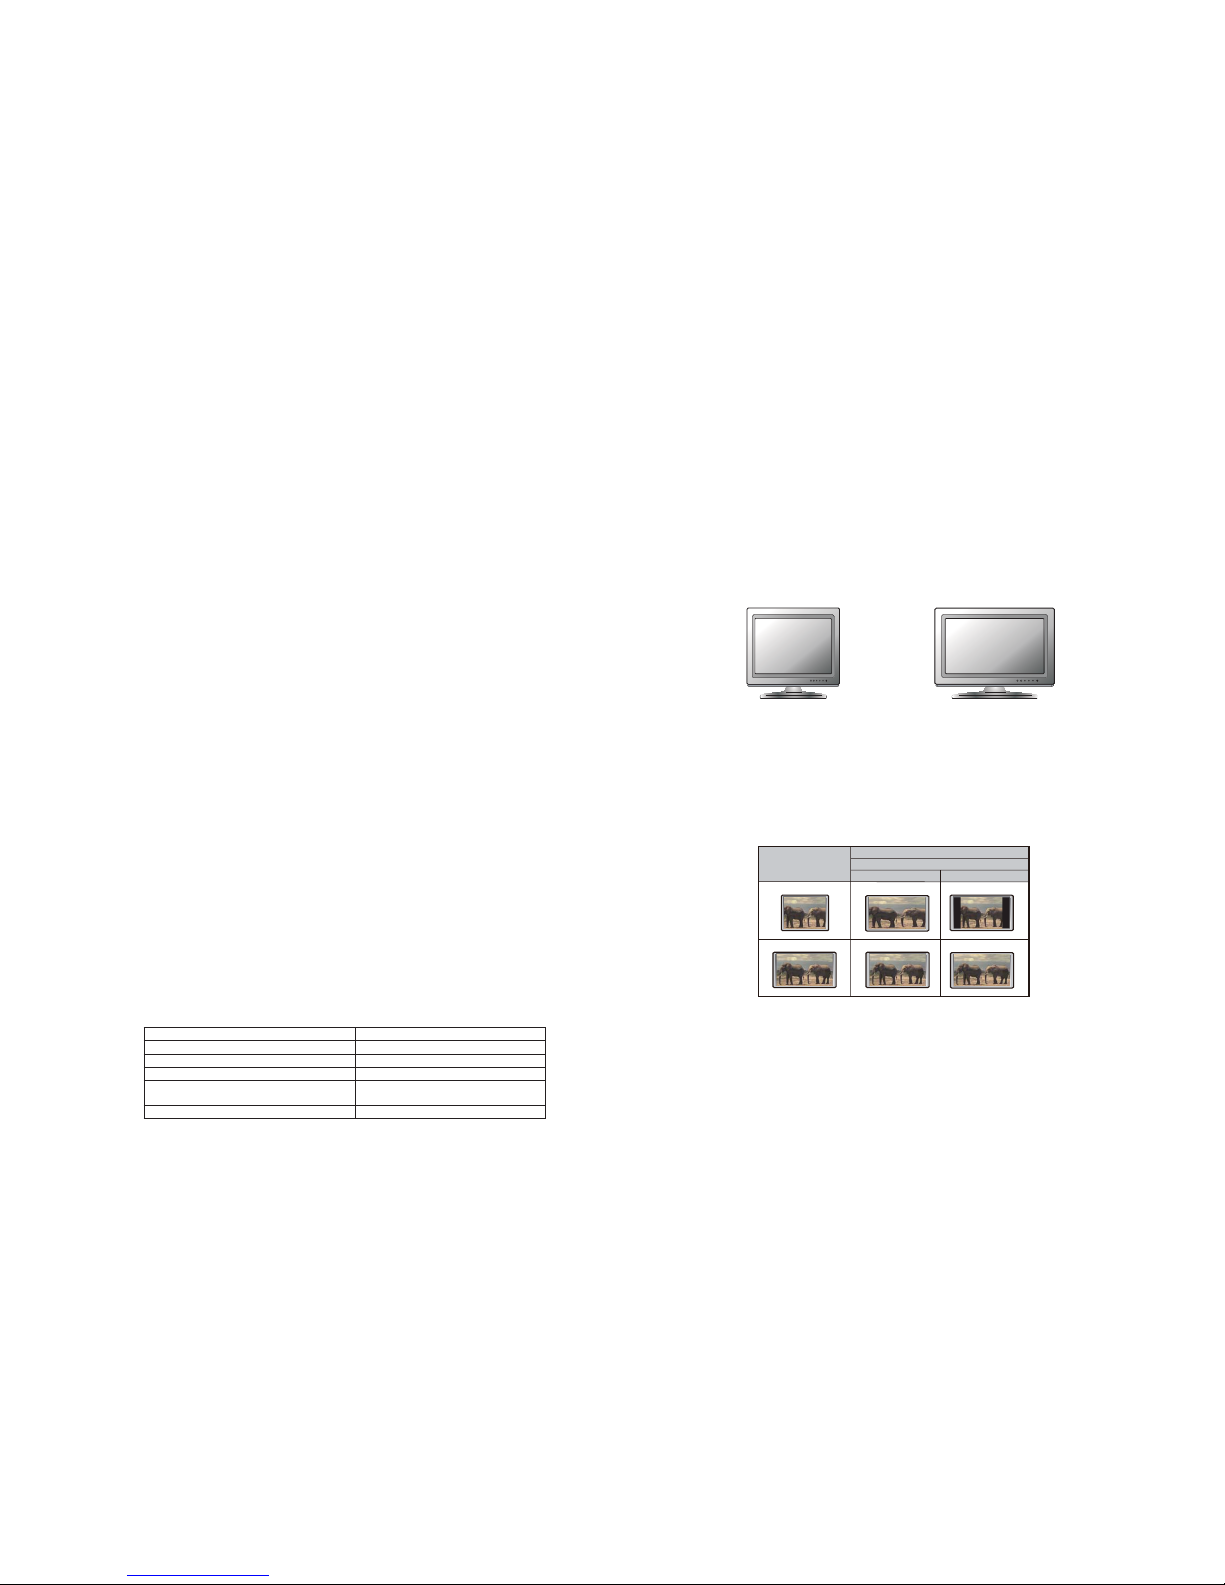
• Video format information: encoding type, frame rate and original aspect ratio.
Audio Language/Track Selection
1. To select the audio language or track, press the AUDIO button on the remote control during
playback.
2. Repeat pressing the AUDIO button or use the Aand Vbuttons to choose from all available
language or audio tracks.
NOTE
Availability of languages and audio channels varies by disc. Some DVD-Audio discs allow
audio track selection with the AUDIO button, while others require the user to select from the
audio setup menu of the disc. When playing an SACD with both multi-channel and stereo
contents, the AUDIO button can be used to switch between the two formats.
Subtitle Selection
1. When playing a DVD, Blu-ray Disc or other video programs recorded with subtitles, press the BAL/
ST button on the remote control to select the desired subtitle.
2. Repeat pressing the BAL/ST button or use the Aand Vbuttons to choose from all available
subtitles.
3. To turn off subtitles, select “Off” from the list.
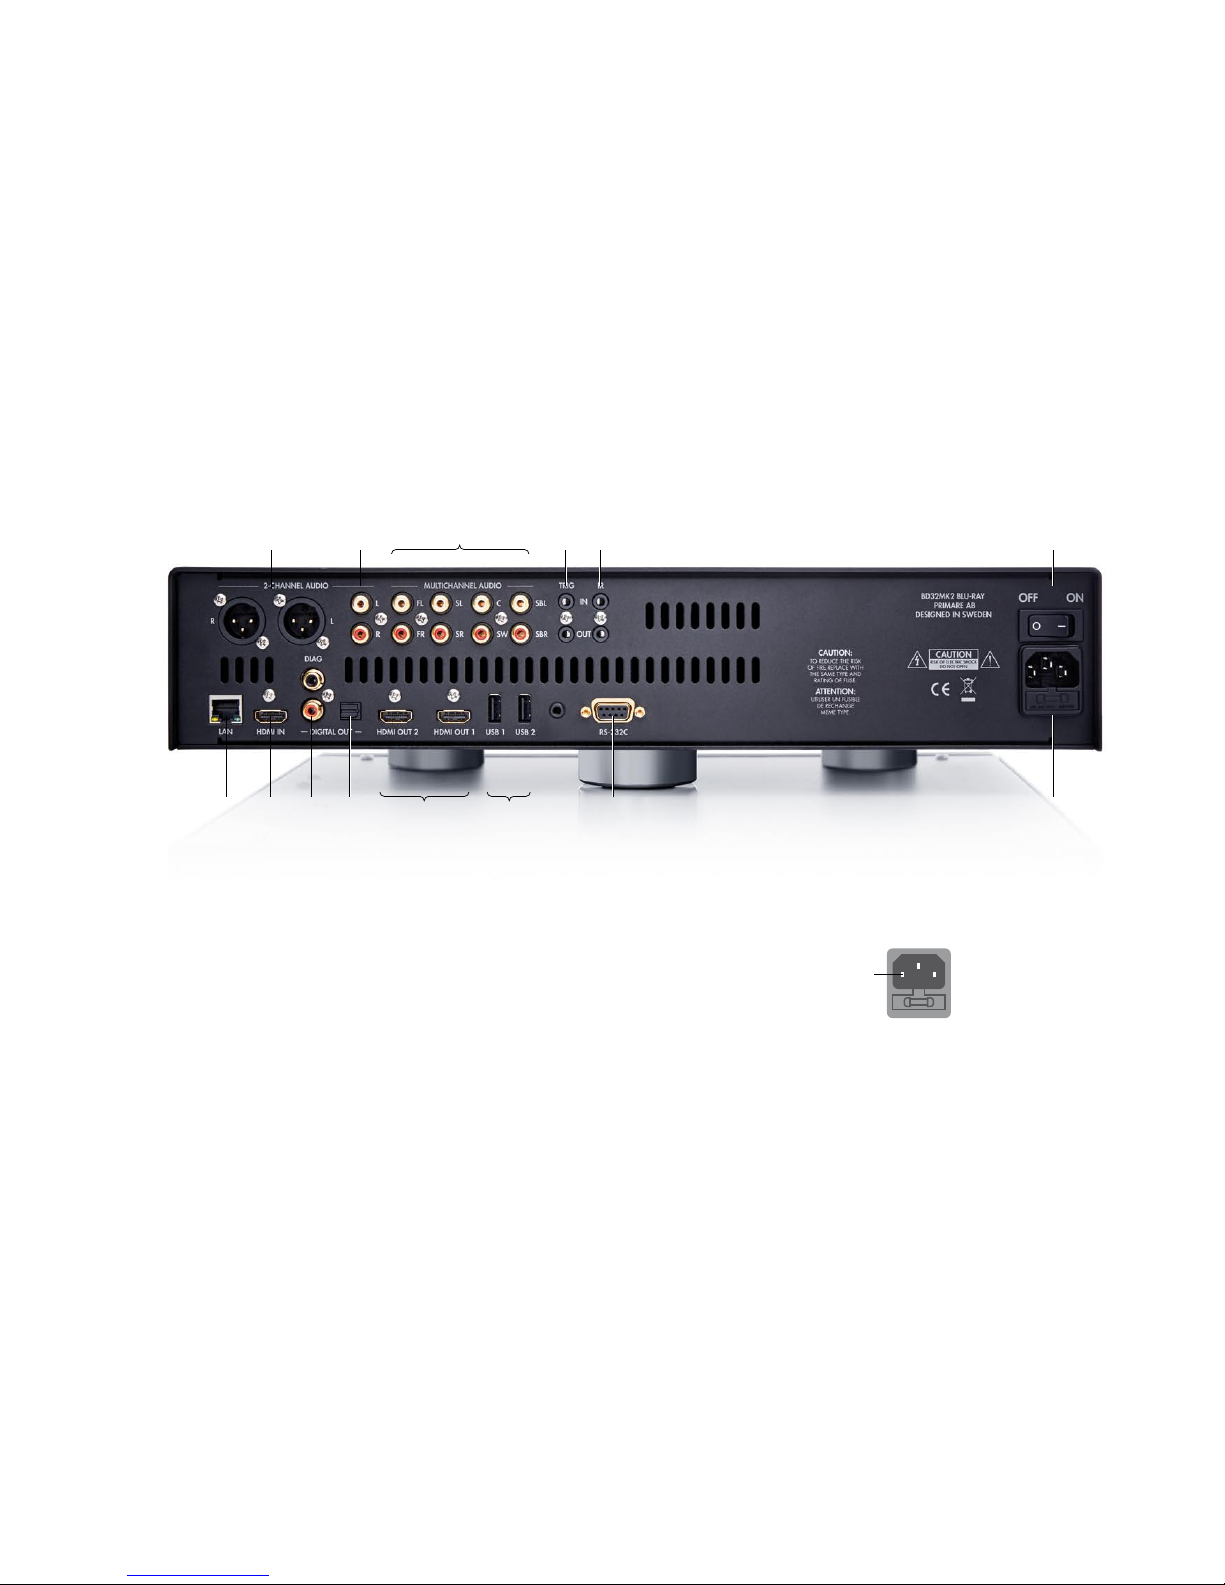
HDMI /MHL Input Selection
• When sending external media sources to the BD32 MkII through the HDMI IN port, press and hold
the HOME button on the remote to bring the “Input Source” menu.
Audio Return Channel (ARC) Selection
• When sending a digital audio signal from the TV back to the BD32 MkII through an HDMI
connection, press and hold the HOME button on the remote to bring the Input Source menu.
NOTE
• Audio Return Channel (ARC) is a feature introduced in HDMI v1.4, which allows you to
send digital audio signals from the television back to the player or receiver. Instead of
listening through TV speakers, ARC allows the sound to be processed and produced by
the home theater audio system.
• A HDMI 1.4 cable is required (included) and you need to make sure the HDMI input port
on the TV is ARC capable. Usually, ARC has to be enabled in the TV’s settings.

P R I M A R E A B
LIMSTENSGATAN 7
SE-21 6 16 LIMHAMN
S W E D E N
PRIMARE.NET
P R I M A R E A B
LIMSTENSGATAN 7
SE-21 6 16 LIMHAMN
S W E D E N
PRIMARE.NET
Other manuals for BD32
5
Table of contents
Other Primare Blu-ray Player manuals
Popular Blu-ray Player manuals by other brands

Denon
Denon DVD-2500BTCi - Blu-Ray Disc Player operating instructions

Philips
Philips BDP5700 user manual

Magnavox
Magnavox MBP110V/F7 quick start guide

Panasonic
Panasonic DP-UB154 Basic operating instructions

Panasonic
Panasonic DMPB100 - PORTABLE BLU-RAY DISC PLAYER operating instructions

Pioneer
Pioneer ELITE Blu-ray Disc BDP-88FD operating instructions