Primo Ager PAG-400 User manual
PRIMO AGER
USER MANUAL
Rev. 2 - Feb21
PRODUCT INFORMATION
Product Primo Ager Professional Dry Aging Unit
Serial No. Please refer to unit’s LCD setting
Model: PAG-400 Model: PA-400
Prepared by Primo Ager Limited. All rights reserved @2021.
BODY CONSTRUCTION
• 304 Black Coated Stainless-Steel external body with high density heat insulating material
• Commercial grade HIPS internal body
• Tempered glass front surface with black/grey honeycomb pattern
• Temperature / Humidity touch sensitive display panel
• Dimmable Low Energy Interior LED Lighting (Warm white)
• Heated tempered glass door (Optional)
• Pre-assembled hinged door (Default on RHS; order upon requested)
SMART FEATURES
• Smart 2.4G IEEE 802.11b/g/n WiFi connection works with “Google assistant” and “Alexa”
• Touch sensitive digital temperature/humidity control panel
LOADING INFORMATION
• Maximum load on hanger rod – up to 132 lb (60 kg), up to 2 full subprimal cuts of length up to 2.13 ft (65 cm)
• Maximum load on shelves – up to 110 lb (50 kg) per wire shelf
ACCESSORIES
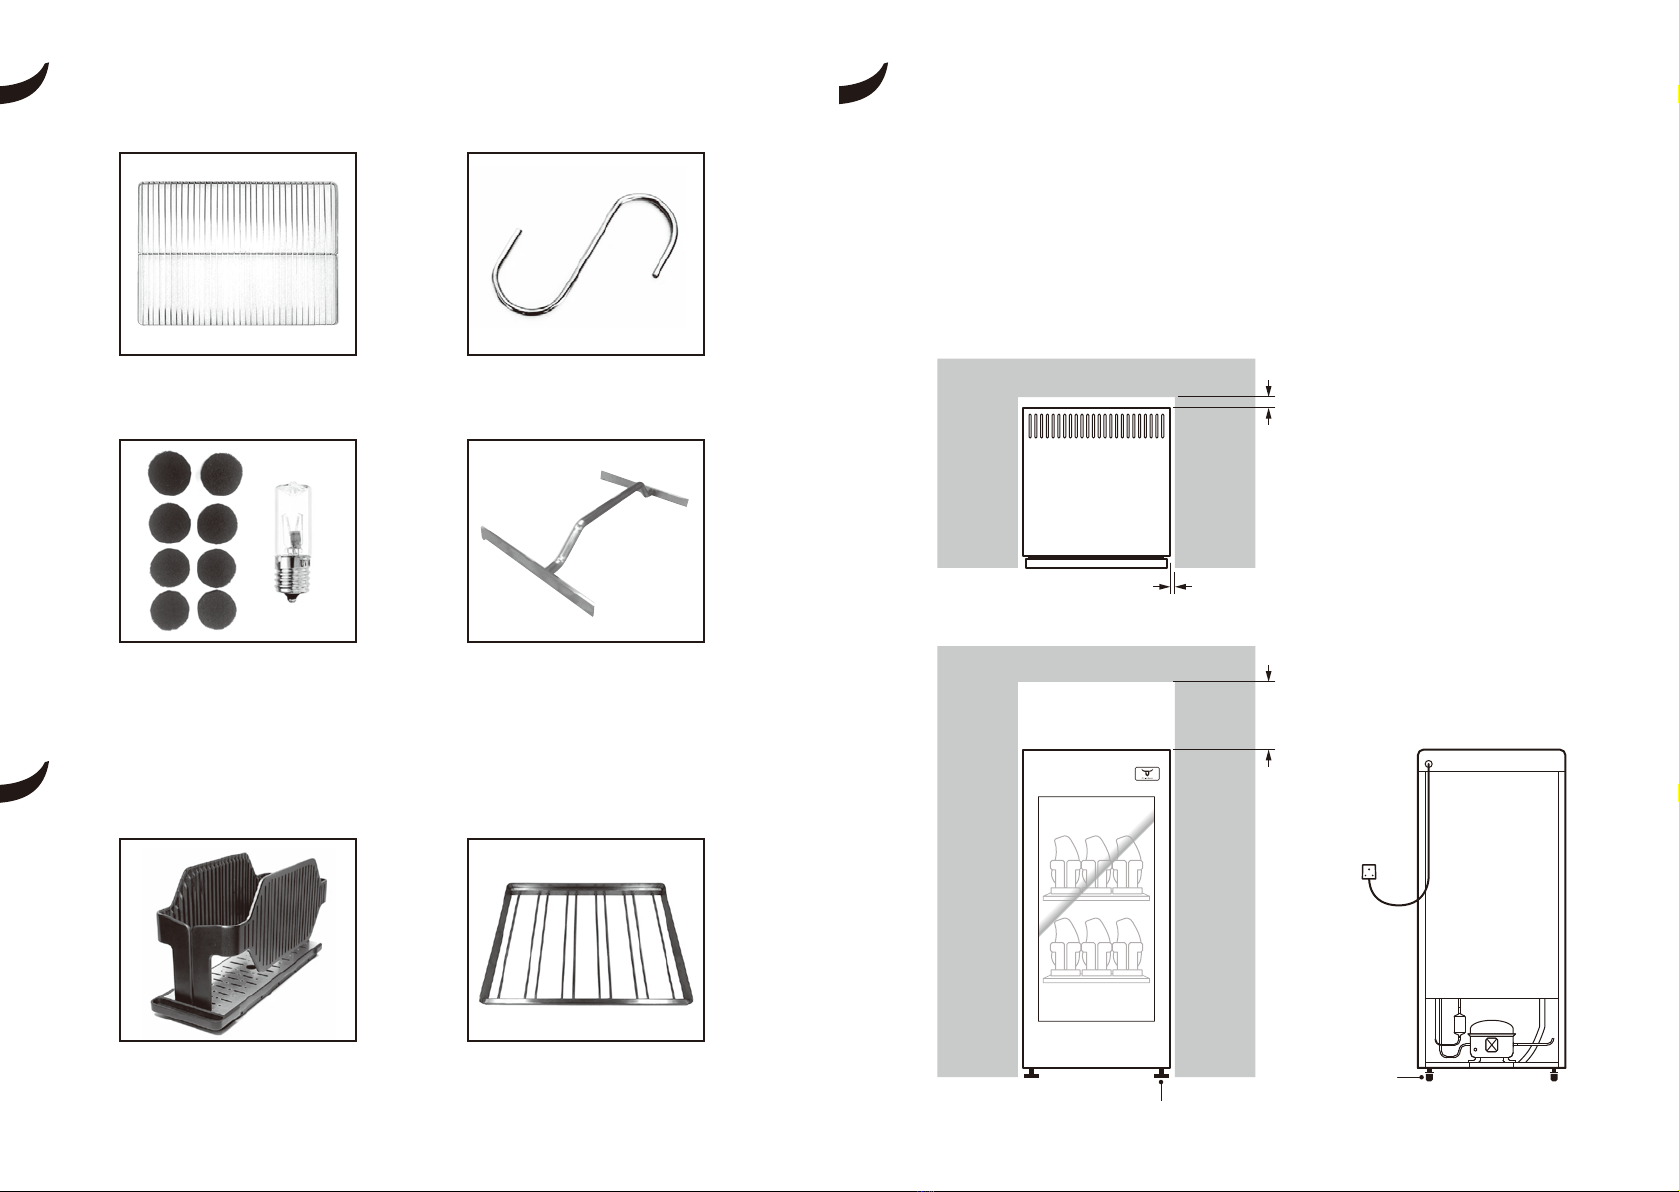
• Included Stainless Steel Hanger Rod x 1 pc.
• Included Stainless Steel S-Hook x 2 pcs.
• Included Stainless Steel Wire Shelves x 2 pcs. (adjustable slot-in for different cuts)
• PRIMO Unique Partition Meat Rack (sold separately)
MECHANICAL INFORMATION
• Multi-usage: Beef / Charcuterie / Cheese / Wine
• Temperature range: +33.8°F to 60.8°F (+1°C to +16°C)
• Humidity range 60% to 85%
• PRIMO smart Evaporative & Humidify system (no external water supply required)
• Evaporative coil cooling
• Air Jet Booster Fan motor for quick cooling air distribution
• Ultra-violet light air sterilization
• Active carbon filter
• Temperature / humidity sensor: 1.8°F (1°C)
• Defrost sensor: 1.8°F (1°C)
• Refrigerant: R290
• Operation Noise Level: Idling 43 dB; Max 59 dB
• Voltage 110V / 60 Hz or 220V / 50 Hz
PRODUCT SPECIFICATIONS
GENERAL
Model PA-400 (Opaque Door)
PAG-400 (Heated Tempered Glass Door)
Ext. Dimension H 43.3” (110 cm) x W 21.2” (54 cm) x D 23.6” (60 cm)
Volume Capacity 5.3 cu ft (150 litres)
Net Weight Approx. 202 lbs (92 kgs)
PLEASE READ THIS MANUAL CAREFULLY BEFORE
STARTING YOUR PRIMO AGER.
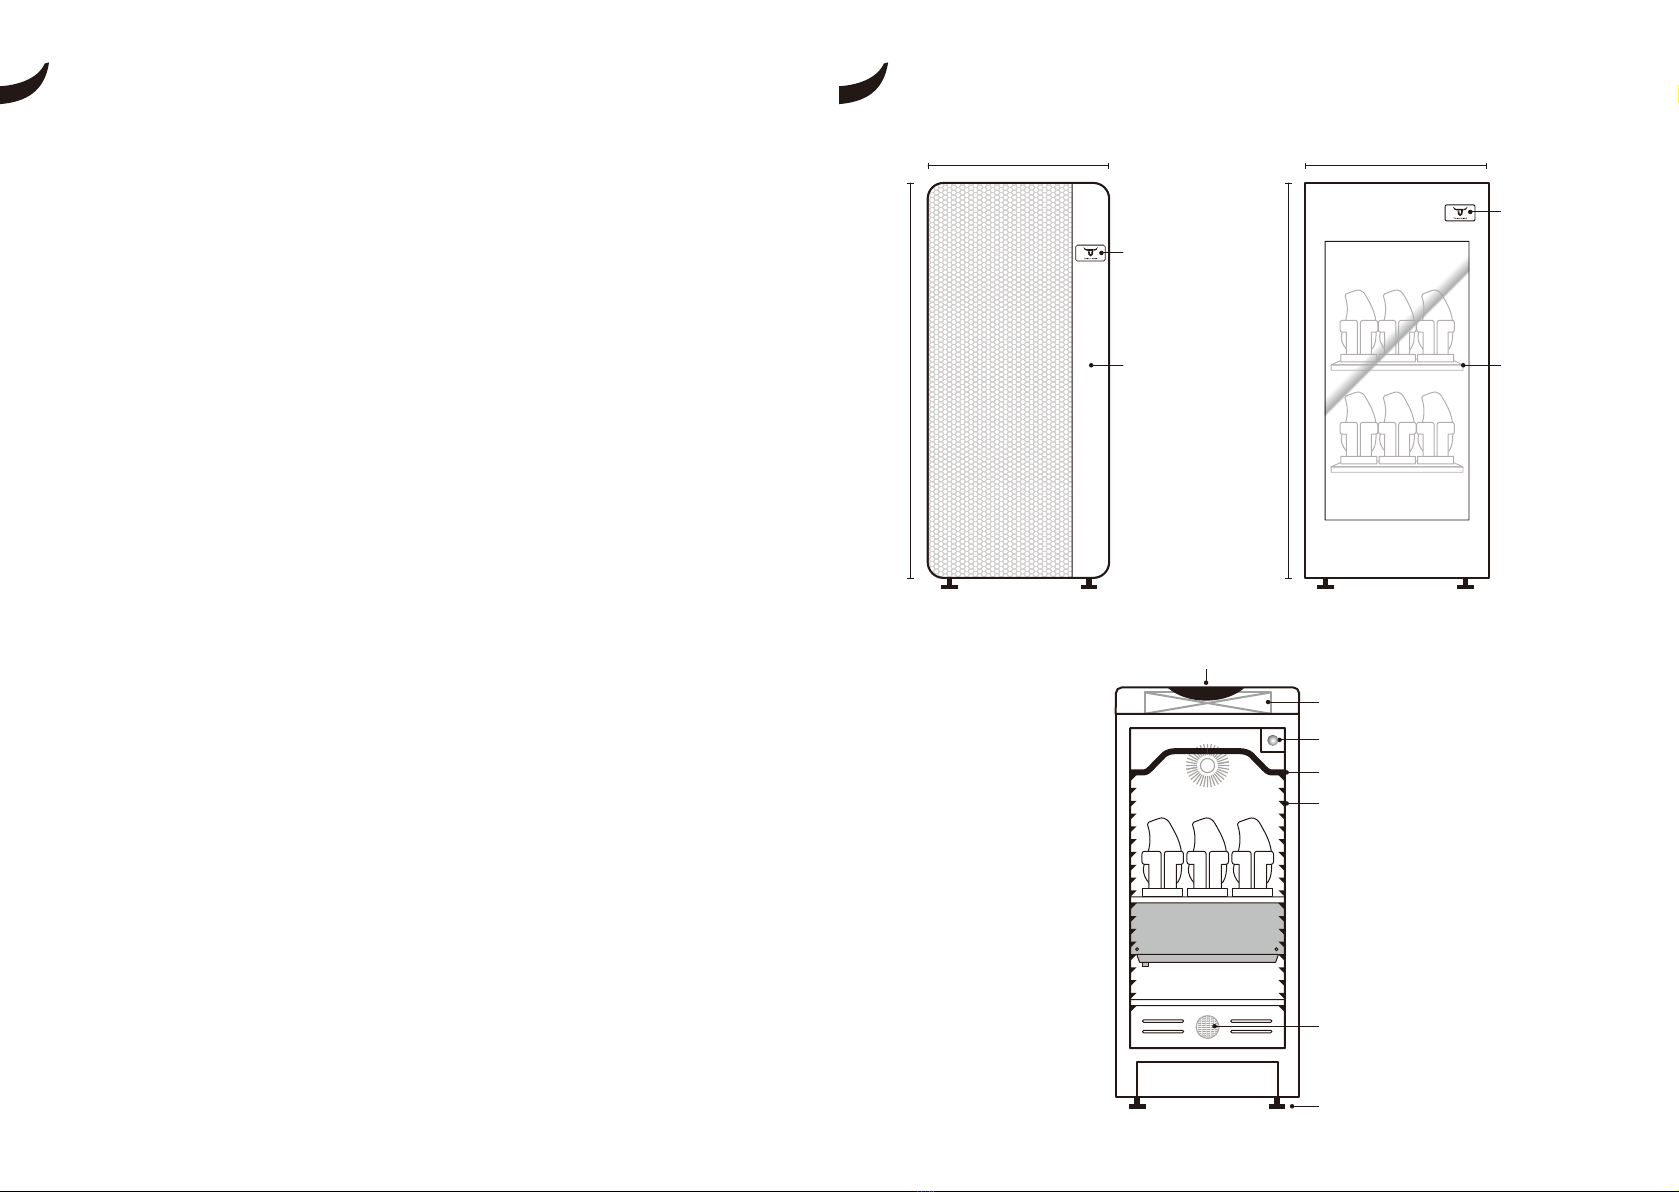
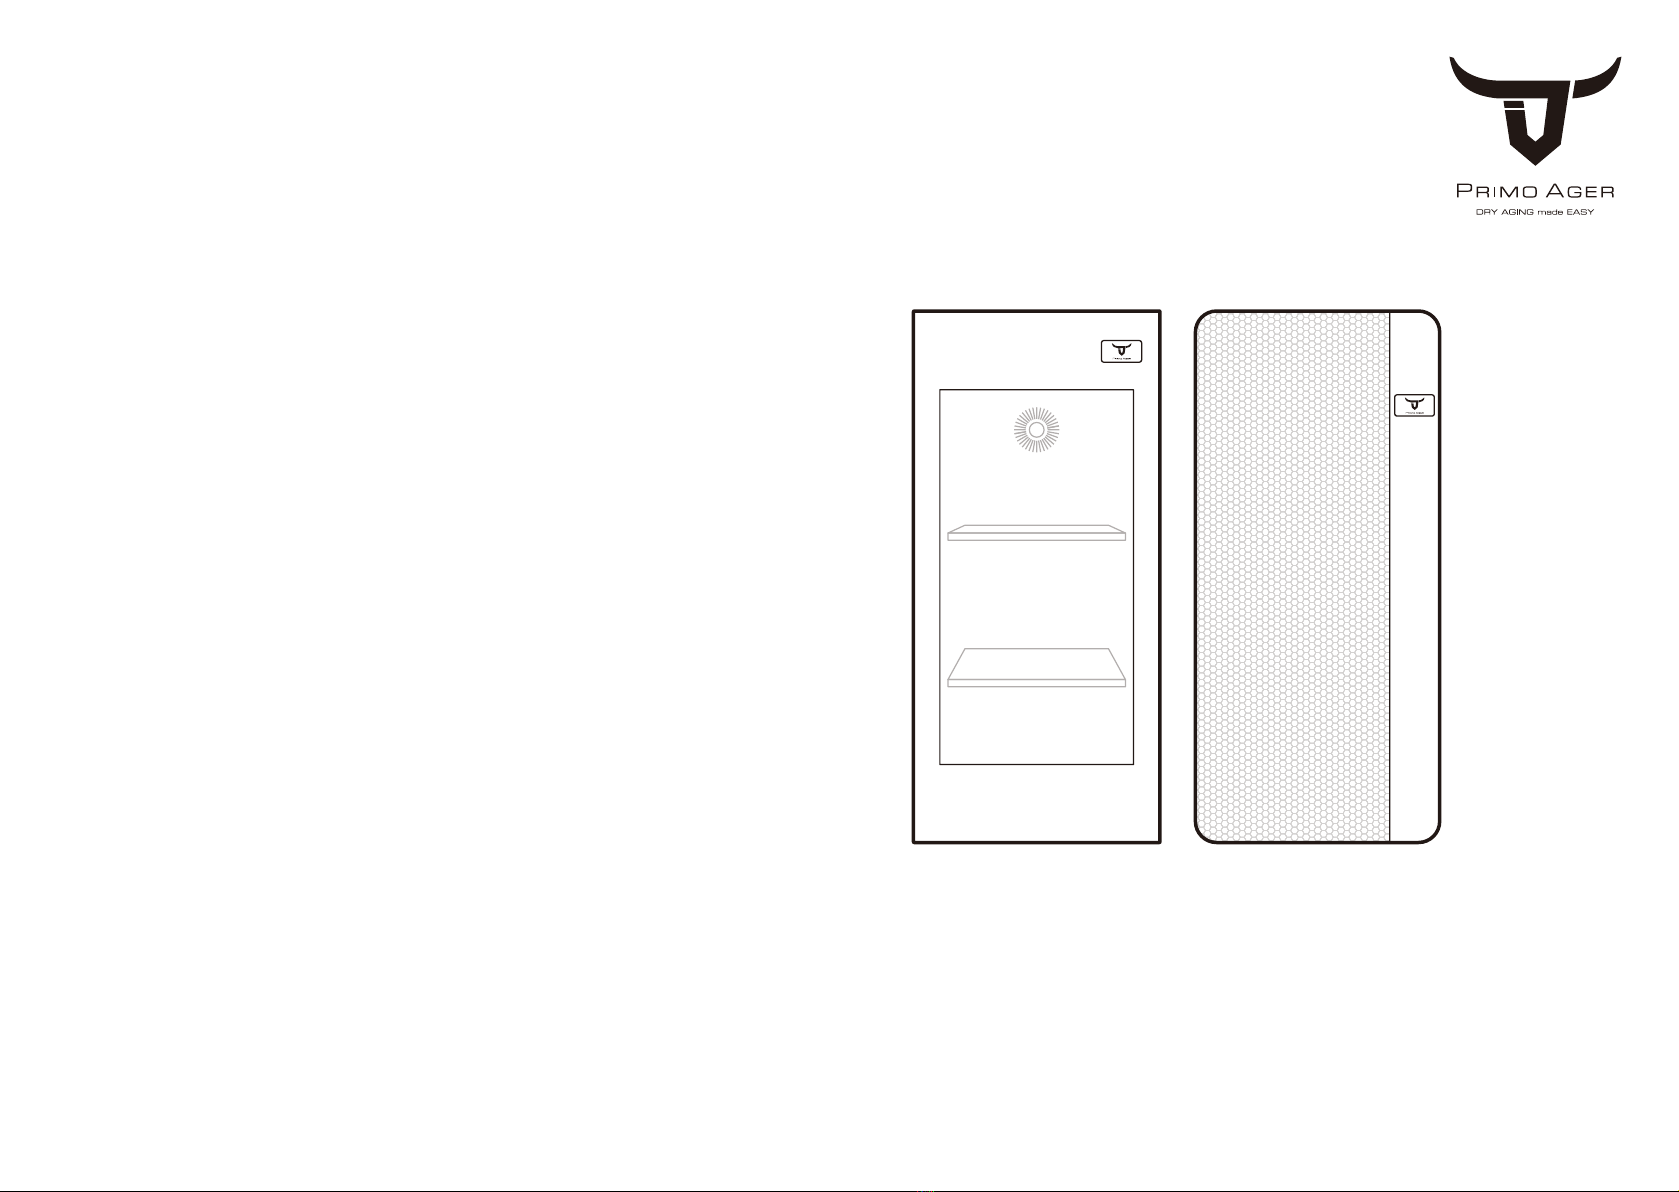
CONTENTS GETTING TO KNOW YOUR PRIMO AGER
PA-400 (Opague Door)
Touch
Sensitive Temp /
Humid. Screen
21.3” / 54 cm
43.3” / 110 cm
Opaque Door
UV-C Light Unit
Control Box
Door Grasp
S / S Hanger Rod
Slot
Active Carbon Filter
Adjustable Feet (front) / Wheels (rear)
Touch
Sensitive Temp /
Humid. Screen
21.3” / 54 cm
43.3” / 110 cm
Glass Door
PAG-400 (Glass Door)
TECHNIAL SUPPORT
Official Website www.primoager.com
Facebook Primo Ager
Instagram SmartPrimoAger
Emai info@primoager.com (General enquiry)
cs@primoager.com (Technical)
Getting to know your Primo Ager 2
Standard Accessories / Optional Accessories 3
Standard Installation of Primo Ager 4
Built-in Installation of Primo Ager 5
Placement of Primo Shelves 6
Touch-Sensitive Screen Operation 7
Temperature Settings 8
Primo Ager Information 9
Temperature / Humidity / Wifi Settings 10
Temperature / Humidity Settings / LED Brightness Settings 11
WIFI Settings / Machine Configuration 12
Alarms / Active Carbon Filter Replacement 13
UV-C Light Unit / Cleaning Methods 14
Touch-screen Temperature Control Panel / Operations 2
GETTING STARTED
1 Clean the interior of the cabinet, gently wipe with a soft cloth.
2 Make sure the voltage is as specified on.
3 The compressor will start working after about 30 seconds.
4 Allow your Primo Ager to reach to the ideal temperature and humidity
before storing your meat.
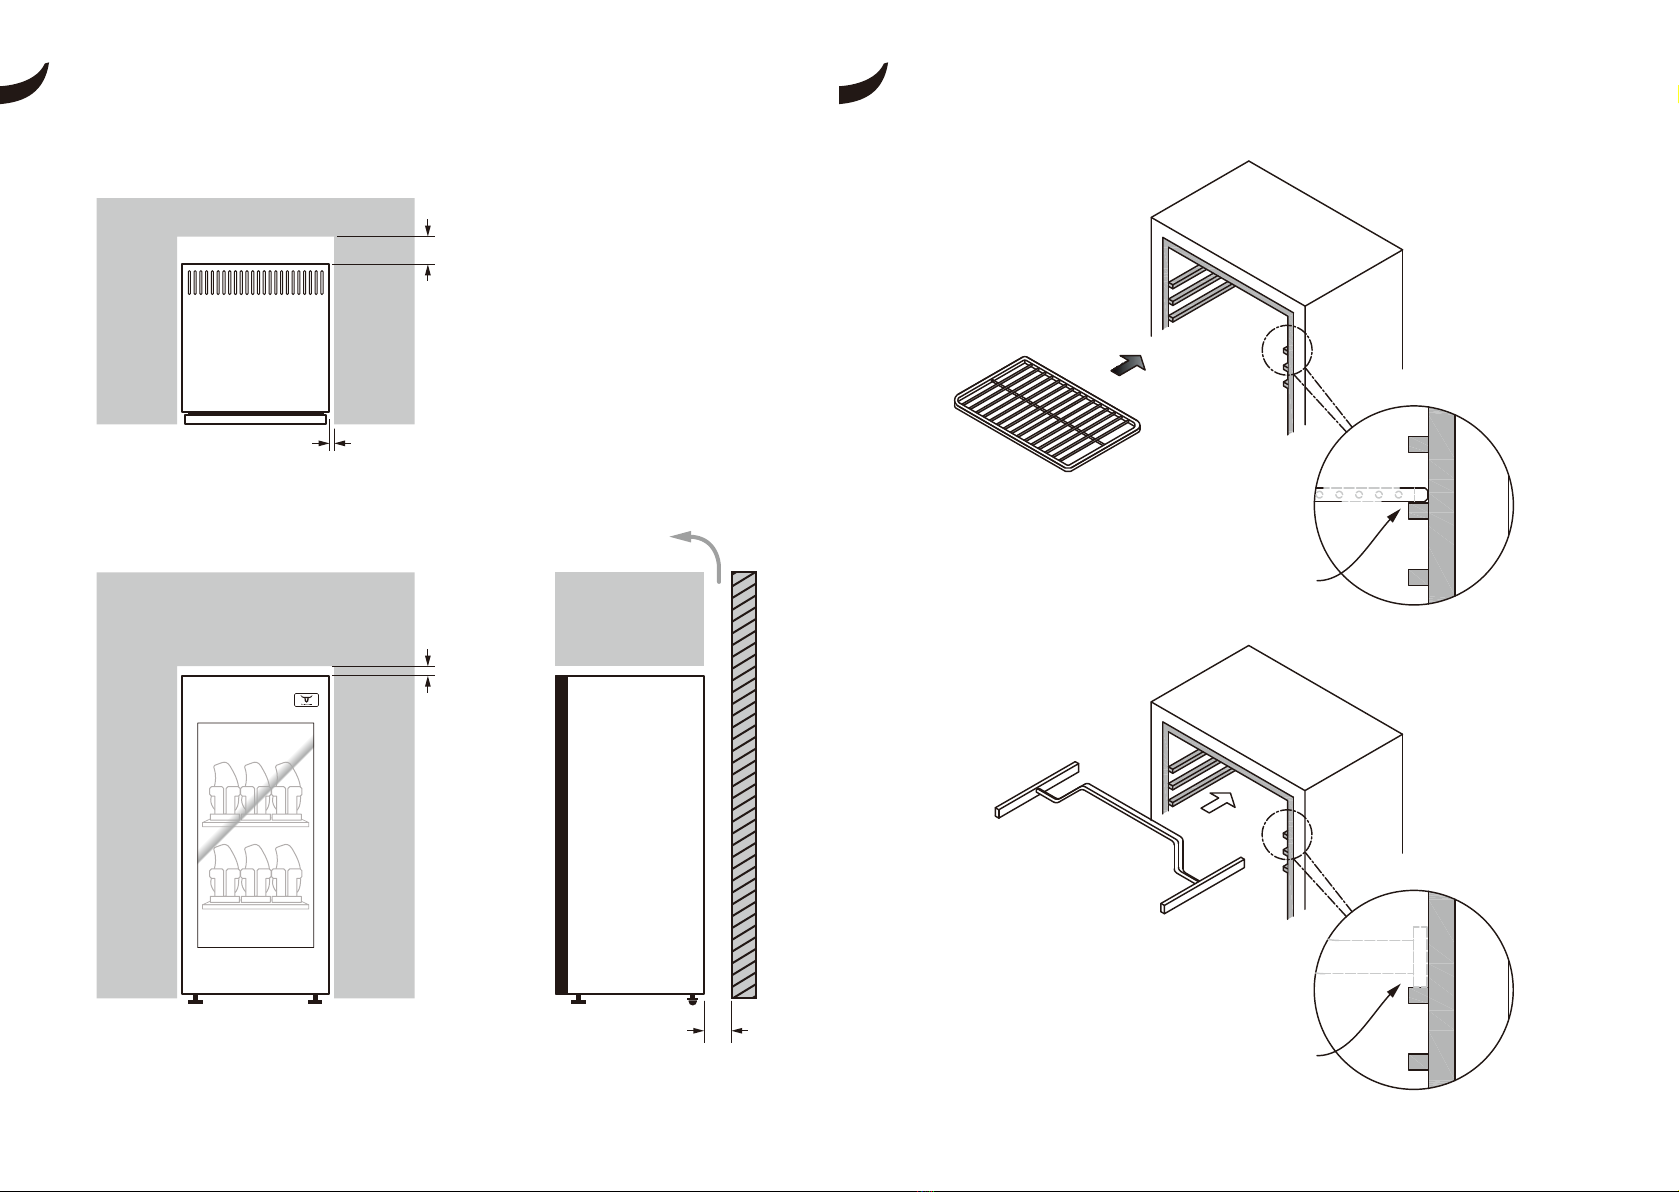
Minimum 0.5 “ / 1 cm
Minimum
2” / 5 cm
STANDARD ACCESSORIES
OPTIONAL ACCESSORIES(PURCHASE SEPARATELY)
STANDARD INSTALLATION OF PRIMO AGER
Standard Installation of Primo Ager 43 Standard Accessories / Optional Accessories
Wire Shelf x 2"
Top view
Front View
S/S S-Hook x 2
Hanger Rod
PRIMO Rack PRIMO Stainless Steel Shelf+
Active Carbon Filter / UV-C Light x 1
Minimum
10” / 25 cm
Electric plug
Rear View
Wheels
Adjustable Leveling feet
Components at
the back will
get hot as a result
of heat ventilation
from the evaporator
Do not touch to
prevent possible
hazards
• Please install the unit in a place with good ventilation where the temperature is
between 50°F (10°C) and 100°F (37°C). Too high or low temperatures may
reduce the efficiency of the unit.
• Adjusting the front stands to level the unit by rotating downward until both are
firmly touching the floor. If the unit is not adjusted, it may not be level and
vibration may occur.
• Primo Ager is designed for indoor use. Avoid direct sunlight or other heat sources.
BUILT-IN INSTALLATION OF PRIMO AGER
5 Built-in Installation of Primo Ager Placement of Primo Shelves 6
Slide into the slot
PLACEMENT OF PRIMO SHELVES
Slide into the slot
Minimum 0.5 “ / 1 cm
Minimum
3.9 “ / 10 cm
Heat Dissipation
Top view
Front View Side View
Minimum
1 “ / 3 cm
Minimum
3.9 “ / 10 cm
Wide opening design for ease on slotting in
Wide opening design for ease on slotting in

TOUCH-SENSITIVE SCREEN OPERATION
7 Touch-Sensitive Screen Operation
TEMPERATURE SETTINGS
Idle Mode
• Logo will appear if no button is pressed for 3 minutes
• Touch Primo Ager Logo for Home Screen
Home Screen
Temperature / Humidity / Lighting / WIFI Setting
Clickable Non - clickable
WIFI connection
status
UV-C light
status
Compressor
operation status
Defrost Status
Home button
oC / oF
Temperature
Humidity
PRIMO-AGER
information
Temp / Humid /
Lighting /
WIFI Setting
PRIMO-AGER
engineering
configuratons
Temperature Settings 8
Your PRIMO AGER product is equipped with an electronic thermostat
with off cycle designed for refrigeration applications at normal temperature.
It provides a relay output to drive the condensing unit. An internal timer
manages the off cycle defrost.
1. Your PRIMO AGER currently has a default temperature of 35.6oF (2oC) (Dry Aging).
2. When the temperature is set at 57oF (14oC), the refrigeration system will be operating
between 57oF (14oC) - 61oF (16oC)
3. When you are managing your foods/wine for an extended period of time,
please keep the door closed. Otherwise, the temperature will increase,
which could trigger the high temperature alarm (warning signal). In this case,
you can simply close the door, and wait until the signal vanishes.
Temperature range between
35oF - 41oF (2oC-5oC)
Relative humidity range between
70%-85%
DRY AGE
PRIMO PRE-SET AT 35oF (2oC) AT RH 80%
Temperature range between
55oF - 65oF (10oC-18oC)
Relative humidity range between
70%-85%
CHARCUTERIE
PRIMO PRE-SET AT 54oF (13oC) AT RH 75%.
Temperature range between
50oF - 60oF (8oC-12oC)
Relative humidity range between
65%-80%
CHEESE
PRIMO PRE-SET AT 50oF (10oC) AT RH 75%.
Temperature range between
43
o
F - 59
o
F (6
oC
-15
oC
)
Relative humidity range between
55%-80%
WINE FRIDGE
PRIMO PRE-SET AT 55
o
F (13
oC
) AT RH 70%.
Tips: Recommended temperature and humidity for Various Applications:
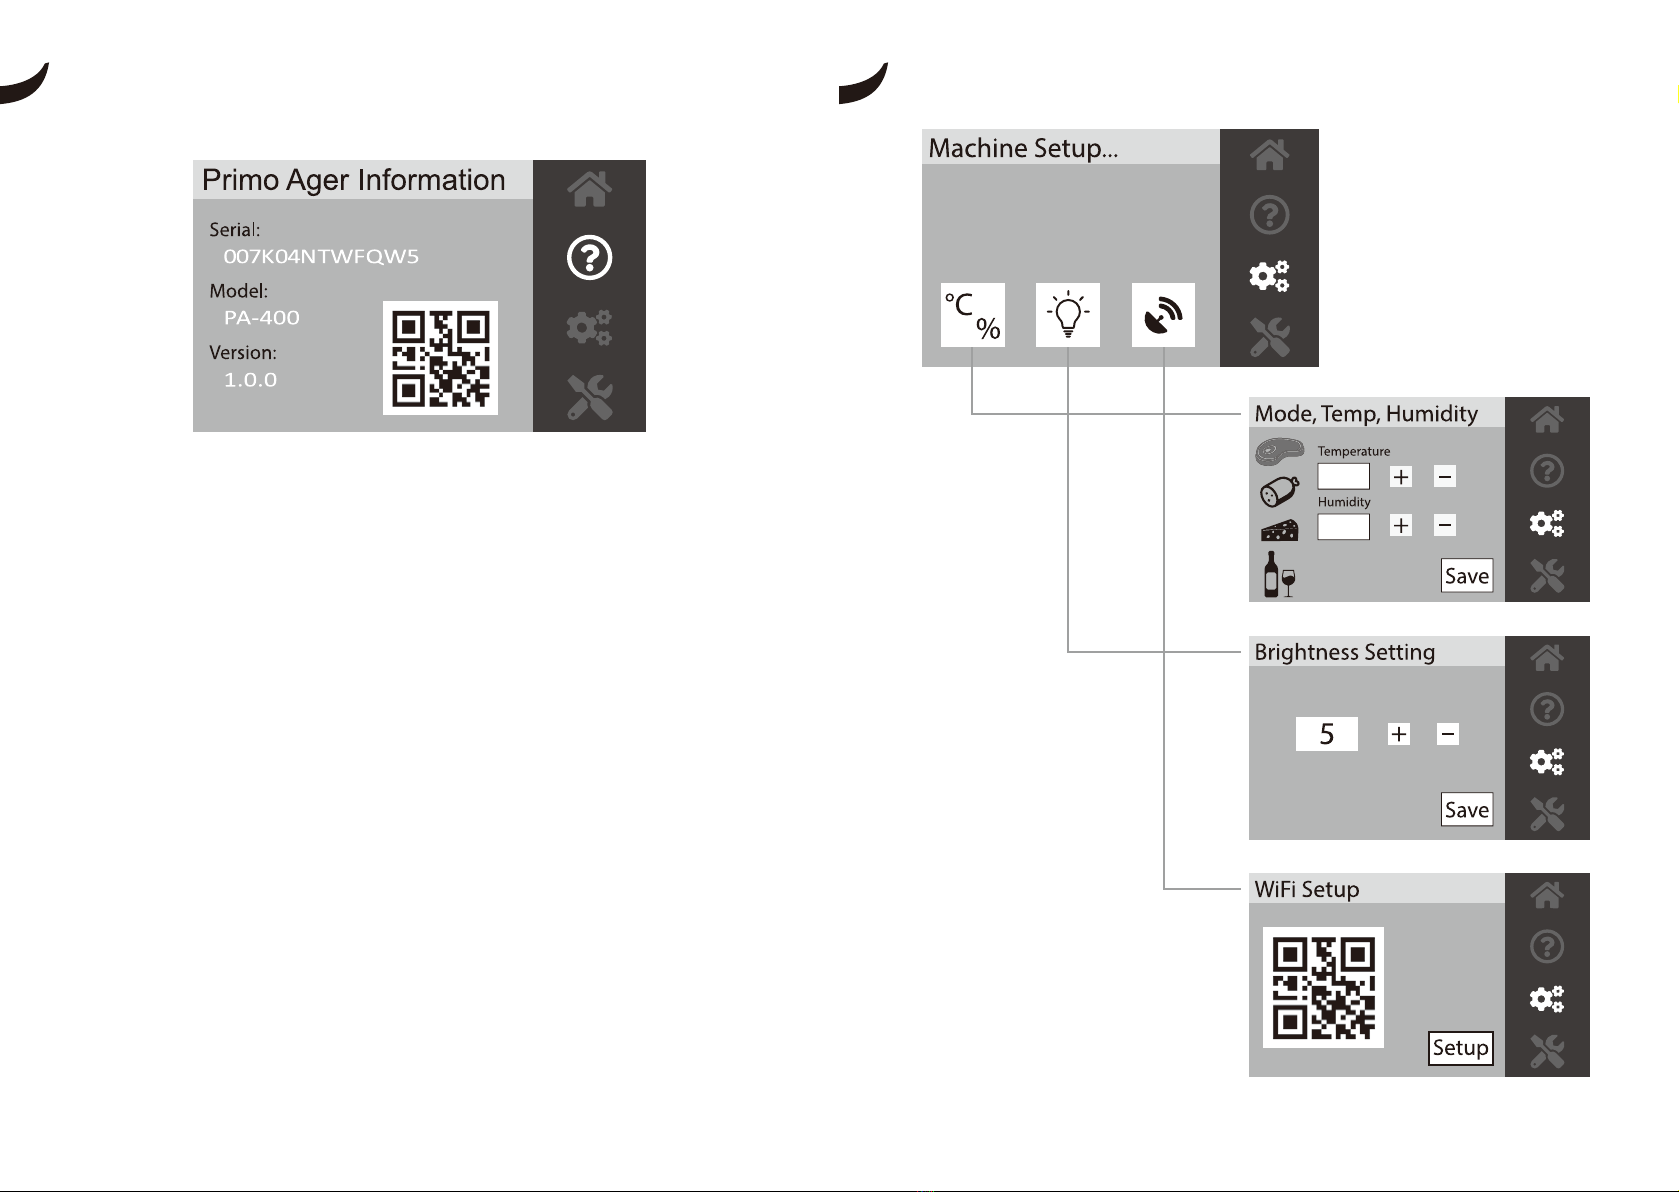
PRIMO AGER INFORMATION
This page displays your Primo Ager information.
You can simply scan the QR code to register your product
from the “Primo Ager” APP.
Please refer to our SMART INSTALLATION GUIDE for product registration.
9 Primo Ager Information
TEMPERATURE / HUMIDITY / WIFI SETTINGS
Temperature / Humidity / Wifi Settings 10
1. 4 selectable modes (Dry aged meat / Charcuterie / Cheese / Wine)
2. Simply press on the required mode
3. Adjust your desired temperature or humidity by pressing + or -
4. Press “Save”
1. Adjust the brightness by pressing + (Brighter) or – (Darker)
2. 0 = Lighting OFF, 1 ~ 10 = Lighting Darkest to Brightest
3. Press <Save>
- DRY AGED MODE IS PRE-SET WHEN FIRST STARTING
YOUR PRIMO AGER
- 4 SELECTABLE MODES ARE ALL OPTIMIZED IN THE FACTORY.
ADJUSTMENT IS NOT RECOMMENDED.
- MAXIMUM SELECTABLE TEMPERATURE RANGE 2oC~16oC
- MAXIMUM SELECTABLE HUMIDITY RANGE 60%~85%
TEMPERATURE / HUMIDITY SETTINGS
11 Temperature / Humidity Settings / LED Brightness Settings
WIFI SETTINGS
MACHINE CONFIGURATION
Dry Age
Charcuterie
Cheese
Wine
1. Download “Primo Ager” APP in App Store (iOS) or Google Play Store (Android)
2. Use your mobile phone to scan the QR code within 30 minutes after starting
your Primo Ager
3. You will then be directed to “PRIMO AGER” app to set up WIFI connection for
your Primo Ager
1. Machine configuration is protected with factory password.
2. To ensure your PRIMO AGER operates at its optimum status all the time,
our standard configuration should NOT be altered unless we have big updates
in the future.
For a complete setup, please refer to Primo Ager Smart Installation Guide.
* IN CASE WIFI SSID HAS CHANGED, SIMPLY PRESS “SETUP (RESET)”
AND RE-SCAN THE WIFI QR CODE TO SETUP WIFI AGAIN.
ONLY AUTHORIZED TECHNICIANS CAN ALTER THE CONFIGURATIONS.
PLEASE CONSULT PRIMO AGER FOR MORE INFORMATION.
WIFI Settings / Machine Configuration 12
LED BRIGHTNESS SETTINGS

When alarm signal appears on screen, please find the corresponding
solution(s) below.
1. Loosen the screw and take out the stainless steel cover.
2. Pull out old active carbon cloth.
3. Replace with new active carbon cloth.
4. Ensure the filter cloth is pushed to the end.
5. Put back the stainless steel cover and secure with screws
Replacing the UV-C light bulb
1. Unscrew both screws on the top and bottom
2. Remove casing cover
3. Gentle unscrew the light bulb from the socket and pull it out
4. Replace with genuine UV-C bulb by screwing clockwise into the socket
(parts available on Primo Ager website)
5. Put back the casing cover and secure both screws.
IMPORTANT
PLEASE MAKE SURE THE UV-C LIGHT IS OFF BY UNPLUGGING THE POWER CORD.
NEVER LOOK DIRECTLY TO THE UV-C LIGHT WHEN IT IS ON.
ALARMS
ACTIVE CARBON FILTER REPLACEMENT
13 Alarms / Active Carbon Filter Replacement
UV-C LIGHT UNIT
Fan
UV-C Light Bulb
Display Problem Trouble-shooting
Carbon Filter
REPLACE ACTIVE CARBON
CLOTH ONCE A YEAR!
REPLACE UV-C LIGHT BULB
ONCE A YEAR!
CLEANING METHODS
UV-C Light Unit / Cleaning Methods 14
Glass
1st >>>>
5th >>>>
2nd >>>>
3rd >>>>
4th >>>>
Door is opened for
more than 2 minutes
Keep the door closed, wait until the alarm signal disappears.
Temperature Sensor
non-detectable
Appoint qualified technician to replace the sensor.
Temperature is too high • Keep the door closed, wait for the temperature to drop to the
desired temperature range until the alarm signal disappears.
• If alarm signal persists for more than 45 minutes, please contact
us or our local agent for further follow-up and assistance.
Stainless Steel
• Daily Cleaning – Use a fine cotton cloth soaked with either soapy water or natural detergent
(diluted to 30-40%) to gently wipe the surface of the stainless steel. Rinse with clean water and use a
fine cotton cloth to absorb excessive water and let dry.
• Fingerprint Cleaning – Daily cleaning method or it can be applied or can be substituted by organic
solvent such as acetone or alcohol. Rinse with clean water and use a fine cotton cloth to absorb
excessive water.
• Heavily Stain Cleaning – Surface with grease or oil marks can be removed by organic solvent such as
acetone or alcohol. Rinse with clean water and use a fine cotton cloth to absorb excessive water and let dry.
**Remark: Never use bleaching agents, abrasive cleaners or chlorinated chemicals as cleaning agents.
Stainless Steel Wire Shelves
• Remove and hand wash S/S wire shelves in hot water and mild dish soap.
• Remove food spills with wet microfiber cloth
Ager Interior
• Prepare baking soda and water
• Mix 1 part of baking soda and 7 part of water
• Clean the ager interior from top to bottom
• Wipe with a clean towel until dry
Glass
• Spray cleaning solutions (water & detergent) to surface of
window. Use squeegee to wipe the mixture away; ensure
squeegee is wiped with lint-free cloth after each wipe.
Repeat until clean.
This manual suits for next models
1
Table of contents
Popular Dryer manuals by other brands

Whirlpool
Whirlpool Duet WED9600T Dimensions and installation information

Electrolux
Electrolux EDS7051 user manual

Gorenje
Gorenje DP7C quick reference

Frigidaire
Frigidaire GLGQ221A Factory parts catalog

Speed Queen
Speed Queen AES28AWF installation instructions

Frigidaire
Frigidaire FEQ332ES - 27" Electric Dryer quick guide

Trisk
Trisk CureSaver 2 Assembly, Operation and Spares Manual

Alliance Laundry Systems
Alliance Laundry Systems HAT30N Troubleshooting

White Knight
White Knight C8317 Instructions for use

Danby
Danby DDY060WDB owner's guide

American Dryer Corp.
American Dryer Corp. Phase 5 Microprocessor AD-170 Service manual

Consolidated Brands
Consolidated Brands 848 owner's manual


