PRINCESS HOUSE Precision 1800 Plus User manual

INSTRUCTION MANUAL
MY PRINCESS HOUSE CONSULTANT
PHONE NUMBER
C5091
1/17
Princess House®
Induction Burner

TABLE OF CONTENTS
Introduction.................................................................................................................................2
Important Warnings & Safeguards .............................................................................................2
Parts Identifications.....................................................................................................................4
Selecting the Proper Cookware...................................................................................................4
Operating Instructions.................................................................................................................5
Care & Maintenance....................................................................................................................8
Troubleshooting Guide & Customer Service...............................................................................8
Specifications .............................................................................................................................10
Warranty ....................................................................................................................................10
Half-price Replacements Policy .................................................................................................10
Manual de Instrucciones en Español .........................................................................................11
INTRODUCTION
The Princess House®Precision-1800 Plus Induction Burner offers the latest innovation in fast,
efficient and precise cooking with a lighter, yet durable construction and a larger cooking surface,
ideal for a wider variety of cookware shapes and sizes.
Our Precision-1800 Plus Induction Burner works with magnetic induction technology, which heats
only your cookware, not the Induction Burner’s cooking surface. The cooktop doesn’t get hot like
gas or electric burners because it transfers heat directly to the cookware.
If the Induction Burner is turned on, no heat will be generated until the cookware makes contact
with the surface. It’s cooler, faster, safer, and more energy efficient than electric and gas cooktops.
This exclusive Induction Burner is ideal for everyday use, and with its 1800 watts of power and
larger cooking surface, it will give you a full cooking experience and faster, more efficient heating.
Its compact size and easy-to-use controls make it ideal for use in any home kitchen, small spaces
or outdoors.
IMPORTANT WARNING & SAFEGUARDS
Read all instructions thoroughly before operating this Induction Burner to avoid injury to self or
property and avoid damage to the Induction Burner. Keep instructions handy for reference during
use.
CAUTION: This Induction Burner emits an electromagnetic field. Persons with cardiac
implanted pacemakers or other implantable heart devices should consult with their physician
before using.
ELECTRICAL HAZARDS
• Do not submerge Induction Burner or electrical cord in liquid, touch with wet hands, or use in
a wet outdoor environment.
• Do not use if ceramic glass cooktop is cracked.
• Do not operate if the cord is frayed and wires are exposed.
• Do not let any cord hang over the edge of a table or counter.
• Never move the Induction Burner by pulling on the power cord.
2
W A R N I N G
RISK OF FIRE OR ELECTRICAL SHOCK
DO NOT OPEN

3
• If using the Induction Burner with an extension cord, the marked electrical rating must be
15 amps or greater and be a grounding-type 3-wire cord.
• Do not connect Induction Burner to more than one extension cord and do not connect other
appliances to the extension cord when in use with the Induction Burner.
• Extension cord should always be arranged so that it cannot be pulled on or tripped over.
PERSONAL SAFETY
• This Induction Burner emits an electromagnetic field. Persons with cardiac-implanted
pacemakers or other implantable heart devices should consult with their physician
before using.
• Do not touch the hot cooktop surface or cookware. It may remain hot for several minutes
after use.
• Do not move the Induction Burner during cooking or with hot cookware on top.
• Do not place metal objects on the cooktop other than metal cookware. Do not place the
Induction Burner on any metal surface. Metal surfaces and other metal accessories may
become very hot during cooking.
• Do not heat unopened cans of food. The cans could explode.
• Do not use in or around flammable or explosive environments.
• Administer close supervision when operating around children.
• Electric shock hazard. Never attempt to repair the Induction Burner yourself. This will void the
product warranty.
• This Induction Burner can be used outdoors if under a patio or other enclosure to prevent any
rain, snow or moisture from coming into contact with it. Never leave the Induction Burner
outdoors when not in use.
PRODUCT & PROPERTY DAMAGE
• You may preheat cookware based on cookware instructions.
• Do not place objects heavier than 50 pounds on the cooktop surface.
• Do not block the air inlet or exhaust fan.
• Do not operate Induction Burner on flammable surfaces.
• Do not clean Induction Burner in a dishwasher.
• Do not use Induction Burner for anything other than its intended use.
• Do not place objects with a magnetic strip near the Induction Burner while in operation.
• Use a dedicated 120V, 15-amp electrical outlet that is not shared with other appliances to
avoid overheating or shutdown.
• Keep the rear and sides of the Induction Burner unobstructed and at least 6 inches from walls
for proper ventilation.
X
4
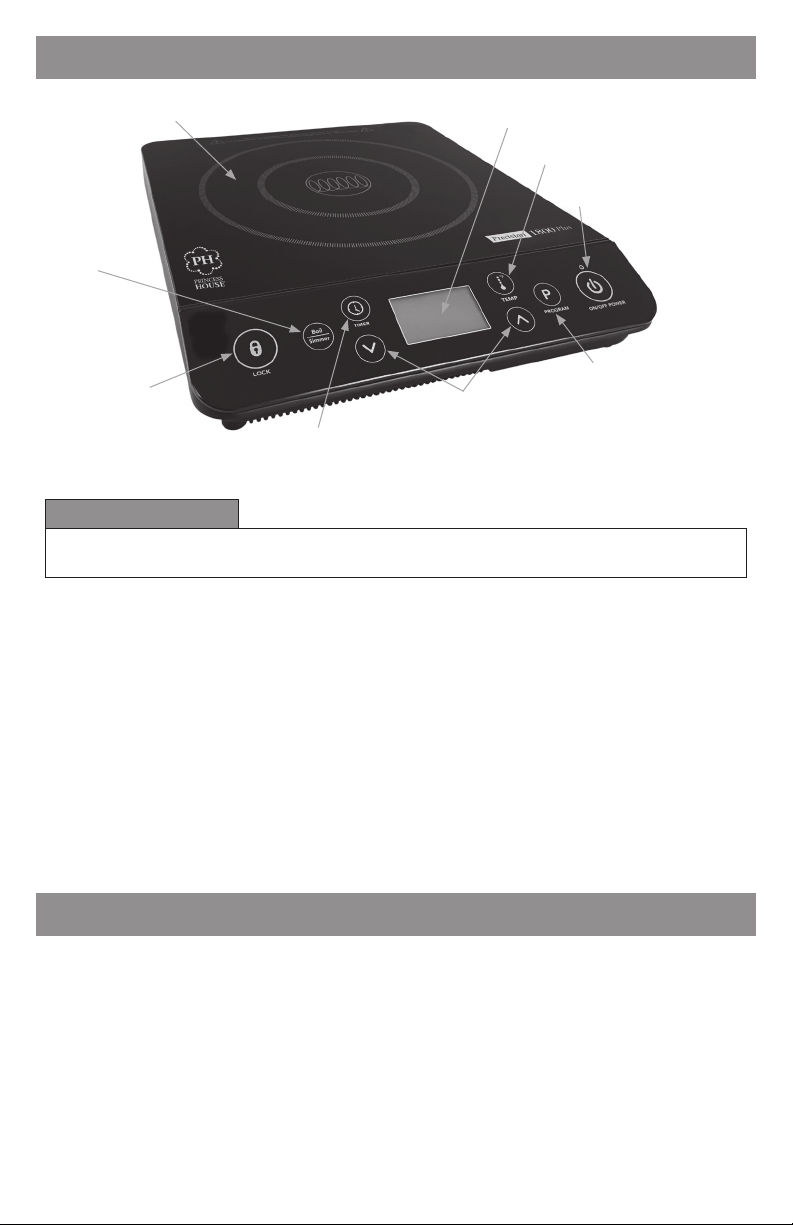
PARTS IDENTIFICATION
FCC REQUIREMENTS
WARNING: Changes or modifications to this unit not expressly approved by the party
responsible for compliance could void the user's authority to operate the equipment.
NOTE: This equipment has been tested and found to comply with the limits for consumer ISM
equipment, pursuant to Part 18 of the FCC Rules. These limits are designed to provide reasonable
protection against harmful interference. This equipment generates, uses and can radiate radio
frequency energy and if not installed and used in accordance with the instruction manual, may
cause harmful interference to radio communications.
If this equipment does cause harmful interference to radio or television reception, which can be
determined by turning the equipment off and on, the user is encouraged to try to correct the
interference by one or more of the following measures:
• Reorient or relocate the receiving antenna.
• Increase the separation between the equipment and receiver.
• Connect to an outlet on a circuit different from the receiver.
• Consult the dealer or an experienced radio/TV technician for help.
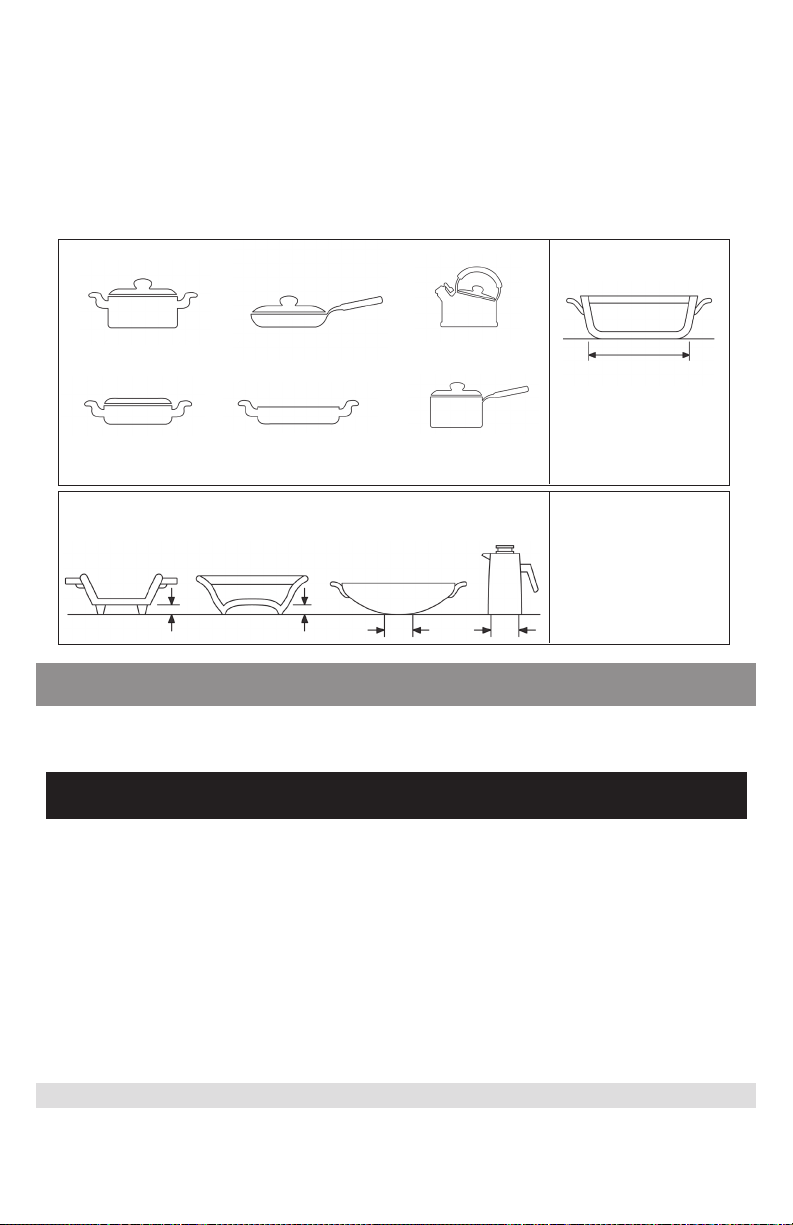
SELECTING THE PROPER COOKWARE
Your Precision-1800 Plus Induction Burner will not operate without the proper cookware.
Size, shape, and construction are all factors for suitable cookware.
In general, if a magnet will stick to the bottom of the cookware, it will work on your
induction cooktop.
1) The base of the cookware must be made of ferrous magnetic materials including cast iron,
carbon steel, magnetic stainless steel or cast aluminum with an induction rated base.
2) Non-Induction ready cookware will cause an E0 error and the Induction Burner will
not operate.
Cooktop Surface
Function Lock
Function On/Off Button
Up/Down
Arrow Buttons
LCD Display
Temperature Mode Button
Boil/Simmer
Button
Timer Button
Program Mode

5
NOTE: Different types of cookware and sizes will result in varying wattage/heat efficiency. For
maximum efficiency, do not use cookware with a base larger than 13 inches in diameter or a
combined weight over 50 lbs.
OPERATING INSTRUCTIONS
If the Induction Burner doesn’t operate as intended, please see the Troubleshooting Guide.
Caution: The cooking surface will remain hot for several minutes after the pan has
been removed.
1. To allow proper ventilation and prevent overheating, place the Induction Burner on a dry level
surface at least 6 inches away from walls and other obstructions.
2. Plug the POWER CORD into a dedicated 120V/15A electrical socket and verify the red POWER
INDICATOR light is illuminated above the ON/OFF POWER button.
3. Make sure suitable cookware is centered on the GLASS PLATE.
4. The COOLING FAN should be operating at all times when on.
5. The default setting is HEAT MODE PL1 (Power Level 1) whenever the Induction Burner is
initially powered on.
GENERAL INFORMATION
1. Your Precision-1800 Plus Induction Burner offers 3 cooking operations: Heat Mode, Temp
Mode and Program Mode. It also includes a 180-minute TIMER and a LOCK function. All
operations are easily controlled using the touchpad buttons and LCD DISPLAY. To clear or
reset all features, turn the Induction Burner off and back on.
2. It Includes built-in error code logic to detect operation faults:
E0 Cookware detection - Not induction ready
E1-E2 Over-heating protection
E3 Power supply issues.
These error codes will be shown in the LCD DISPLAY window when a fault occurs.
SUITABLE COOKWARE
Stainless Steel/
Cast Iron Pot
Stainless Steel/
Cast Iron Casserole
Stainless Steel/
Cast Iron Skillet
Stainless Steel/
Cast Iron Griddle
Stainless Steel/
Enamel
Iron Enamelware
Size and Form
Base Diameter
4.5" Minimum
13" Maximum
Cookware must have a
flat bottom surface.
UNSUITABLE COOKWARE — Material: Glass, Ceramic, Copper,
Aluminum, Non-Magnetic S/S (18/10, 18/18) Unsuitable Size
and Form
Cookware of which the
height from induction
plate is over 1.5" and
the bottom diameter
is less than 4.5".
1.5" 1.5" 4.5" 4.5"
3. Before turning the Induction Burner on, induction-ready cookware must be placed on the
cooktop surface plate and centered to avoid the E0 error fault.
4. Empty cookware may be pre-warmed/pre-heated using a low wattage or low temperature
setting. Do not use a high wattage or high temperature.
5. Before unplugging the power cord, allow the Induction Burner and cooktop surface to cool
completely using the built-in cooling fan.
6. Reference the Troubleshooting Guide in this manual for assistance. If your Induction Burner
is still not operating properly, contact our Customer Service department for assistance at
508-823-6800.
MODES OF OPERATION AND FUNCTION CONTROLS
HEATING MODE OPERATION (10 adjustable wattage/power settings)
Use the HEAT MODE, which is the default setting when Induction Burner is turned on, for most
cooking applications. It offers quick heating when more accurate temperature control is not a
requirement. If temperature control is required, use the TEMP MODE.
• Touch the ON/OFF POWER button to turn on the Induction Burner. HEAT MODE will be the
default operation.
• The LCD DISPLAY will show
PL1 (Power Level #1) and the
flame symbol.
• Set the desired power level
between PL1 and PL10 by
touching the UP or
DOWN buttons.
BOIL/SIMMER FUNCTION BUTTON
This button allows you to quickly move from simmer to boil or boil to simmer with
a simple touch of the button. To get to boil quickly, press the Boil/ Simmer button
once. This will increase the power level to highest setting. Once food is boiling and
you want to reduce heat to simmer, press the Boil/Simmer button once again. This
will reduce power level to lowest setting.
Actual working wattage for each setting will depend on cookware size.
HEAT SETTING COOKING LEVEL COOKING TASK
PL1 & PL2 Low Simmer/Keep Warm
PL3 & PL4 Medium Low Simmer
PL5 & PL6 Medium Sauté
PL7 & PL8 Medium High Sear/Sauté
PL9 & PL10 High Boil/Fry/Sear
6
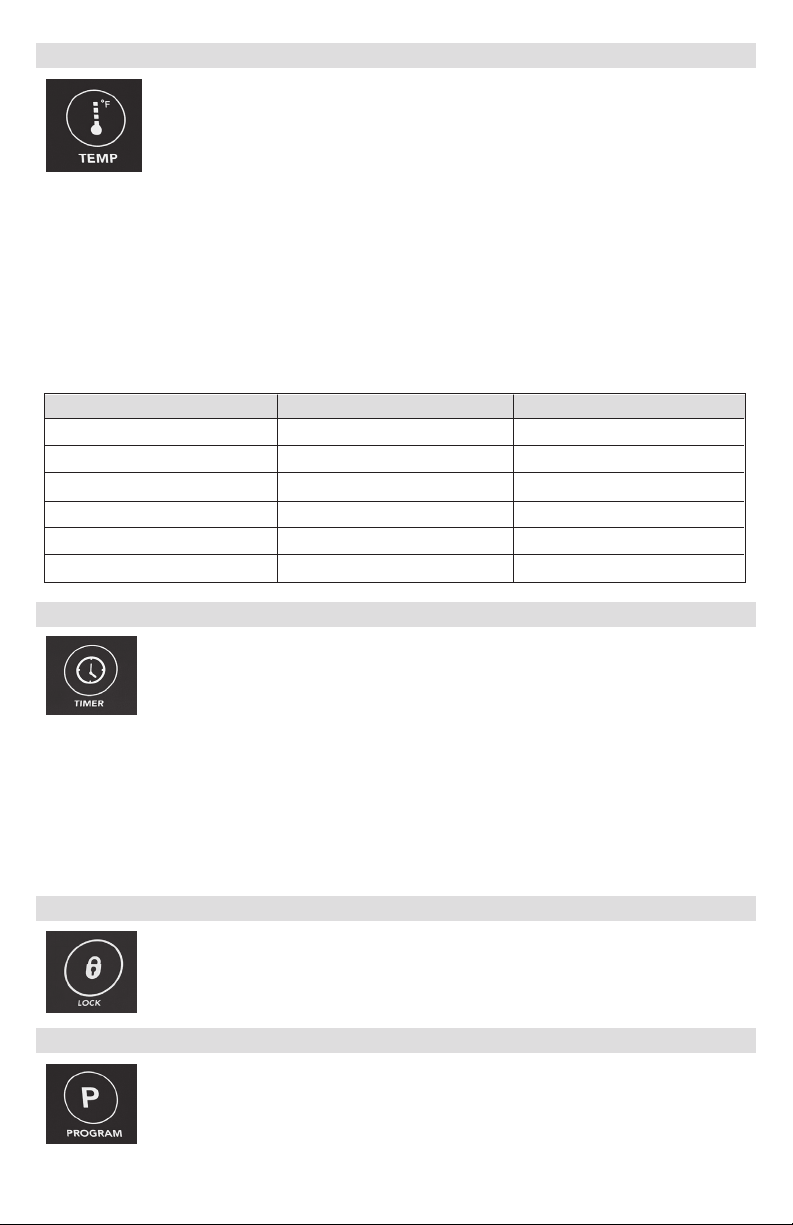
TEMPERATURE MODE (15 adjustable settings from 100°F to 450°F)
Use the TEMP MODE when more accurate temperature control is needed. There
are 15 settings from 100°F (ideal for simmering) to 450°F (ideal for boiling) in
25°F increments. The built-in sensor measures the temperature of the bottom of
your cookware and not the temperature of the food you are cooking. Temperature
fluctuations may occur depending on the cookware; this is normal.
Listed temperatures shown in the LCD Display are a guideline.
• To use the TEMP MODE, touch the TEMP button. Touch again to revert back to the default
Heat Mode. The LCD DISPLAY will show the default temperature setting of 100°F and the
thermometer symbol.
• Set the desired temperature between 100°F and 450°F by touching the UP or DOWN buttons.
• Anytime during use, touch the BOIL/SIMMER button to switch between the Boil and
Simmer function.
TEMP MODE examples for reference. Actual temperature accuracy will depend on cookware size.
TEMP SETTING COOKING LEVEL COOKING TASK
100°F Simmer Simmer
125°F-150°F Low Keep Warm
175°F-250°F Medium Low Sauté/Soups
275°F-325°F Medium Boil
350°F-400°F Medium High Boil/Fry/Sear
425°F-450°F High Boil/Fry/Sear
180-MINUTE AUTOMATIC TIMER
The TIMER can be set from 1-180 minutes when using either Heat or Temp Mode.
The timer is adjustable in 1-minute increments. Quickly touch the button for
1-minute increments. By holding the Up or Down button for a few seconds, it will
advance in 5-minute increments.
• Touch the TIMER button. The timer icon will show in the LCD Display with the minutes
flashing.
• Use the UP or DOWN buttons to increase or decrease the TIMER setting. After a few seconds
the set time will lock-in.
• When the desired set time is entered, the timer icon will flash during countdown until all set
minutes have lapsed. The unit will then go into auto shutdown mode. In the HEATING mode,
it is normal for the set time and set power level to alternate in the lower display window.
FUNCTION LOCK
Touch the LOCK button at any time during use to lock in your settings and avoid
accidental changes.
To unlock, touch and hold the LOCK for 3 seconds or power the Induction Burner
off and restart.
PROGRAM MODE
The PROGRAM MODE is a separate function from the HEAT and TEMP modes
previously described. Use this mode to program up to 3 separate time (minutes)
and temperature stages from 100°F to 450°F and up to 180 minutes on the timer
for each stage.
7

8
Stage 1
1. Touch the PROGRAM button. P1 and 100°F will show in the LCD Display.
2. To set the temperature, touch UP or DOWN buttons to select a temperature from 100°F to
450°F.
3. To set the timer, touch the PROGRAM button to enter the TIMER mode. Touch UP or DOWN
buttons to set the timer from 1-180 minutes.
Stage 2 and 3
• Immediately repeat the above steps for P2 and P3 after Stage #1 programming.
NOTE: When finished, the program settings will cycle through the LCD Display for verification
before the program is set. To make a change during the cooking cycle, the memory will need to
be cleared by turning the Induction Burner off and restarting, then program as described above.
Examples of Time/Temperature cooking stages
PROGRAM # TEMP TIME
PROGRAM 1 350°F 30 minutes
PROGRAM 2 200°F 20 minutes
PROGRAM 3 100°F (simmer) 45 minutes
CARE AND MAINTENANCE
CLEANING:
• Unplug Induction Burner from power source and let cool. Use a mild liquid detergent with a
moist cloth to wipe off any grease or stains from the ceramic glass surface and front panel and
let dry.
• Do not use metal scouring pads, abrasives or solvents to clean any of the Induction Burner’s
surfaces.
• Do not immerse the Induction Burner or cord in water or other liquids. Do not place Induction
Burner in dishwasher.
CAUTION: Unplug from the power outlet before cleaning. Use a compressed air duster to remove
dust and other particles from the cooling fan cover on the bottom of Induction Burner and the
rear exhaust vent.
STORING:
• Unplug Induction Burner when not in use.
• We recommend covering the Induction Burner to protect from dust when not in use or save
and use the original packaging for storage.
• Make sure to allow Induction Burner to cool before storing.
PRECAUTIONS:
• Do not use if ceramic glass cooktop surface is damaged or if power cord is damaged.
• Keep away from other sources of heat.
• Do not place more than 50 pounds of total weight on the cooktop.
TROUBLESHOOTING GUIDE & CUSTOMER SERVICE
If an error code appears in the LCD display along with a beep, follow the instructions below for the
particular problem. If these do not resolve the error code, contact Princess House Customer Service
for further assistance.

9
E0 = Cookware Sensor Detection
Symptom: Proper cookware is not detected. See “Selecting the Proper Cookware” section
if needed.
Remedy: Verify the cookware is Induction capable. A small magnet can be used to confirm if the
bottom of the cookware is Induction ready. Ensure the cookware is placed on the glass top and
centered within the guides. The Induction Burner will allow you to remove the cookware for up
to 1 minute before it detects an error and shuts down. Restart the Induction Burner after it shuts
down.
E1 = Internal Overheat Sensor
Symptom: Internal temperature exceeds operation limit, cooling fan malfunction, or inadequate
ventilation for the Induction Burner.
Remedy: Unplug from the power receptacle and allow the Induction Burner and cookware to
cool down for at least 10 minutes. Make sure the Induction Burner has enough clearance for
ventilation, at least 6 inches from the wall or other obstructions. Clean any dust or build-up on
the ventilation and exhaust openings. Turn Induction Burner back on and verify the cooling fan is
operating and the error code is removed.
E2 = Glass Cooktop Overheat Sensor
Symptom: Glass cooktop surface temperature exceeds its operation limit of 500°F and is too hot.
In addition to a possible malfunction, in rare cases this can be caused by cookware with very dense
construction or a diameter larger than 13" at its base, which allows the heat to transfer back to the
glass plate.
Remedy: Unplug powercord from the power receptacle and allow the Induction Burner and
cookware to cool down for at least 10 minutes. Turn the Induction Burner back on and verify
the cooling fan is operating and the error code is removed. If symptoms continue, try smaller
cookware or cookware with a lighter construction.
E3 = Incorrect Power Supply Sensor
Symptom: Induction Burner detects the 120V power supply input voltage and/or frequency is out
of operating range and prevents operation.
Remedy: Unplug power cord from the 120V power receptacle. Using a voltage meter, verify that
the voltage is in the range of 110-120V AC. If not, try another power outlet or contact a qualified
electrician to correct the power issue before using the Induction Burner.

SPECIFICATIONS
WARRANTY
Princess House offers a one-year performance warranty to replace the Princess House®
Precision-1800 Plus Induction Burner if found defective in material, construction or workmanship
when the product is used in accordance with the care and use instructions provided. Princess
House shall have the right to determine if the item is defective and, at its option, replace it
or provide a refund of the purchase price. In order for a replacement or refund to be made,
the defective product must be returned at customer’s expense to Princess House with a brief
explanation and proof of purchase. Contact your Princes House Consultant or Princess House
Customer Service for assistance.
This warranty excludes damage caused by accident, misuse, or abuse. This warranty does not
apply to scratches, stains, discoloration or other damage to external surfaces of the Induction
Burner which does not impair the functional utility of the Induction Burner.
THIS WARRANTY IS LIMITED AND EXPRESS TO THE TERMS AND CONDITIONS SET
FORTH HEREIN. THIS WARRANTY DISCLAIMS ANY AND ALL WARRANTIES OF IMPLIED
MERCHANTABILITY AND FITNESS FOR A PARTICULAR PURPOSE. IN NO EVENT SHALL
PRINCESS HOUSE BE LIABLE FOR ANY INDIRECT, CONSEQUENTIAL OR INCIDENTAL
DAMAGES ARISING FROM THE SALE OR USE OF THE PRODUCT. THESE DISCLAIMERS
CONTINUE AFTER EXPIRATION OF THE EXPRESS ONE YEAR WARRANTY.
This warranty gives you specific legal rights which may vary from state to state. Some of the
provisions set forth above may not be applicable to you.
HALF-PRICE REPLACEMENTS POLICY
Because your satisfaction is our priority, it is our pleasure to offer Half-Price Replacements on every
purchase you make. Product(s) or part(s) that are currently available in our line can be replaced
at just half the current suggested retail price if it becomes broken or damaged in use. To receive
a replacement at half price you must return an identifiable piece of the product with the original
sales receipt. Please contact your Princess House Consultant or Princess House Customer Service
for assistance in making your return. If you are unable to return an identifiable piece of the product
with the original sales receipt, you may replace your product at the current full suggested retail
value through your Princess House Consultant or by contacting Princess House Customer Service.
10
Safety Features
Overheat protection, overload
protection, non-suitable cookware
detection, improper voltage supply
detection
Approvals
ETL US (conforms to UL STD 1026)
Household Use. Complies with FCC
Part 18
Power Source . . . . . . . . . . . . . 120V/60Hz 15 amp circuit
Output . . . . . . . . . . . . . . . . . . . . . . . . . . 500-1800 watts
Power Levels. . . . . PL1- PL10 adjustable wattage settings
Temp Range . . . . . . . . . . . . .100°F to 450°F (38 - 232°C)
Weight . . . . . . . . . . . . . . . . . . . . . . . . . 8.5 lbs. (3.85 Kg)
Dimensions. . . . . . . . . . . . . . . . .15.73" x 13.125" x 2. 6"
(400 x 333.4 x 66mm)
Glass Cooktop Dimensions . . . . . . . . . .13.125"x 13.125"
(333.4 x333.4mm)
Cord Length . . . . . . . . . . . . . . . . . . . . . . . . .5 ft. (1.52m)
TABLA DE CONTENIDO
Introducción...............................................................................................................................11
Avisos importantes y precauciones ...........................................................................................11
Identificación de las partes........................................................................................................13
Seleccionando la pieza para cocinar adecuada.........................................................................14
Instrucciones de uso ..................................................................................................................14
Cuidado y mantenimiento.........................................................................................................17
Guía para solucionar problemas y Servicio al Cliente...............................................................18
Especificaciones..........................................................................................................................19
Garantía .....................................................................................................................................19
Política de reemplazo a mitad de precio...................................................................................19
INTRODUCCIÓN
La Hornilla de inducción Precisión-1800 Plus Princess House®ofrece la última innovación para
cocinar de manera rápida, eficiente y precisa con una construcción más ligera y duradera, y una
superficie para cocinar más amplia, ideal para una gran variedad de artículos para cocinar de
diferentes formas y tamaños
Nuestra Hornilla de inducción Precisión-1800 Plus funciona con una tecnología magnética de
inducción que calienta sólo tus ollas, no la superficie para cocinar de la Hornilla de Inducción.
La superficie para cocinar nunca se calienta como las hornillas de gas o eléctricas porque transfiere
directamente el calor a la pieza.
Si la Hornilla de inducción se prende, no se calentará hasta que la olla entre en contacto con la
superficie. Es más fresca, rápida, segura, y consume menos energía que las superficies para cocinar
eléctricas y de gas. Esta Hornilla de inducción exclusiva es ideal para el uso diario y con sus 1800
vatios de potencia y superficie para cocinar más grande te dará una experiencia de cocción
completa y un calentamiento más rápido y eficiente. Su tamaño compacto y sus controles fáciles
de usar la hacen ideal para utilizarse en cualquier cocina doméstica, espacios pequeños y exteriores.
AVISOS IMPORTANTES Y PRECAUCIONES
Lee todas las instrucciones antes de utilizar esta Hornilla de inducción para evitar lesiones
personales o a propiedades y evitar daños a la hornilla. Mantén las instrucciones a la mano como
referencia durante su uso.
PRECAUCIÓN: Esta Hornilla de inducción emite un campo electromagnético. Las personas
con marcapasos u otros dispositivos cardíacos deben consultar a su médico antes de
utilizarla.
11
Hornilla de inducción
Princess House®
MANUAL DE INSTRUCCIONES
ADVERTENCIA
RIESGO DE FUEGO O DESCARGA ELÉCTRICA
NO LO ABRAS

12
RIESGOS ELÉCTRICOS
• No sumerjas la Hornilla de inducción o el cable eléctrico en líquidos, tampoco la toques con las
manos húmedas o uses en un ambiente exterior húmedo.
• No la utilices si la superficie para cocinar está quebrada.
• No la utilices si el cable está deshilachado y los cables internos están expuestos.
• No permitas que el cable cuelgue sobre el borde de una mesa o mostrador.
• Nunca muevas la Hornilla de inducción tirando del cable del enchufe.
• Si utilizas la Hornilla de inducción con un cable de extensión, la clasificación comercial marcada
debe ser de 15 amperios o mayor, y debe ser un cable de tierra de tipo 3 hilos.
• No conectes la unidad a más de un cable de extensión y no conectes otros artefactos al cable
de extensión cuando estés utilizando la unidad.
• El cable de extensión debe colocarse siempre de manera que no pueda ser arrancado o
tropezado.
SEGURIDAD PERSONAL
• Esta Hornilla de inducción emite un campo electromagnético. Las personas con
marcapasos u otros dispositivos cardíacos deben consultar a su médico antes de utilizarla.
• No toques la superficie para cocinar o la olla cuando estén calientes. Estas pueden mantenerse
calientes por varios minutos después de su uso.
• No muevas la Hornilla de inducción mientras cocinas o con piezas para cocinar calientes sobre
la misma.
• No coloques objetos de metal sobre la superficie para cocinar, sólo artículos para cocinar de
metal. No coloques la Hornilla de inducción sobre ninguna superficie de metal. Las superficies
de metal y otros accesorios metálicos pueden calentarse intensamente mientras se cocina.
• No calientes latas de comida cerradas. El envase puede explotar.
• No la utilices en o alrededor de ambientes inflamables o explosivos.
• Supervisa constantemente cuando la estés usando con niños alrededor.
• Riesgo de choque eléctrico. Nunca intentes reparar la Hornilla de inducción por ti misma. Esto
anulará la garantía del producto.
• Esta Hornilla de inducción puede usarse en espacios exteriores si se coloca en un patio o
cualquier otro lugar cerrado para prevenir que esté en contacto con lluvia, nieve o humedad.
Nunca dejes la unidad en espacios exteriores cuando no la estés utilizando.
DAÑOS AL PRODUCTO Y A PROPIEDADES
• Puedes precalentar los artículos para cocinar basándote en las instrucciones del artículo para
cocinar.
• No coloques artículos que pesen más de 50 libras sobre la superficie para cocinar.
• No bloquees la salida de aire o el extractor.
• No la utilices sobre superficies inflamables.
• No la coloques en la máquina lavaplatos.
• No utilices la Hornilla de inducción para otra función que no sea para la que está destinada
• No coloques objetos con banda magnética cerca de la unidad cuando la estés utilizando.
X

13
• Utiliza una toma eléctrica diseñada para 120V, 15 amperios que no sea compartida con otros
artefactos eléctricos para evitar que se recaliente o se apague.
• Mantén la parte posterior y los lados de la unidad separados por lo menos 6" de las paredes
para que pueda tener la apropiada ventilación.
IDENTIFICACIÓN DE LAS PARTES
REQUERIMIENTOS DE FCC
ADVERTENCIA: Los cambios y modificaciones de esta unidad que no estén expresamente
aprobados por la parte responsable para su conformidad, puede invalidar la potestad del
usuario de operar el equipo.
IMPORTANTE: Esta unidad ha sido probada y cumple con los requerimientos de equipo ISM para
el consumidor, conforme a la Parte 18 de las reglas de FCC. Estos requerimientos están designados
para proveer una protección razonable en contra de una interferencia perjudicial. Esta unidad
genera, usa y puede emitir energía de radiofrecuencia y si no se instala y utiliza de acuerdo al
manual de instrucciones, puede causar interferencia perjudicial a las radiocomunicaciones.
Si esta unidad causa interferencia perjudicial a la recepción de radio o televisión, la cual puede
determinarse cuando la unidad se prende y apaga, se le aconseja al usuario corregir esta
interferencia aplicando una o más de estas medidas:
• Reorientar o reubicar la antena receptora.
• Aumentar la separación entre el equipo y el receptor.
• Conectarla a una toma de corriente en un circuito diferente del receptor.
• Consultar al vendedor o solicita ayuda de un técnico experto en radio y televisión.
SELECCIONANDO LA PIEZA PARA COCINAR ADECUADA
Tu Hornilla de Inducción Precisión-1800 Plus no funcionará sin la pieza para cocinar adecuada. El
tamaño, la forma y la construcción son factores de las piezas para cocinar adecuadas.
En general, si un imán se adhiere al fondo de tu pieza para cocinar, significa que esta pieza
funcionará en tu unidad de inducción.
Superficie para cocinar
Función de
bloqueo
Botón On/Off
(Function
On/Off button)
Botones subir/bajar
Pantalla digital LCD
Botón indicador
de temperatura
Botón
hervir/cocinar
a fuego lento
Reloj automático (Timer)
Modo de programación
14
1) La base del artículo para cocinar debe estar elaborada de materiales magnéticos ferrosos,
incluyendo hierro fundido, acero al carbono, acero inoxidable magnético o aluminio
moldeado con una base con grado de inducción.
2) Los artículos para cocinar que no estén listos para inducción ocasionarán un error tipo E0 y la
Hornilla de inducción no funcionará.
IMPORTANTE: Los diferentes tipos y tamaños de artículos para cocinar resultarán en la variación
de los vatios y la eficiencia del calor. Para una eficiencia máxima, no uses artículos para cocinar con
una base mayor de 13" de diámetro o un peso combinado mayor de 50 libras.
INSTRUCCIONES DE USO
Si esta Hornilla de inducción no funciona adecuadamente, por favor lee la Guía para solucionar
problemas.
ADVERTENCIA: La superficie para cocinar de tu unidad permanecerá caliente por varios
minutos aún después de retirar la olla.
1. Para permitir la ventilación apropiada y prevenir el recalentamiento, coloca la Hornilla de
inducción sobre una superficie nivelada seca a por lo menos 6" de separación de las paredes y
otros obstáculos.
2. Enchufa el cable eléctrico en una toma de corriente adecuada de 120V/15A y verifica que la luz
roja del INDICADOR DE PODER (POWER INDICATOR) está iluminada por encima del botón de
prendido y apagado (ON/OFF)
3. Asegúrate que la pieza para cocinar adecuada esté centrada sobre la PLACA DE VIDRIO.
4. El VENTILADOR debe funcionar cuando esté prendido en todo momento.
5. Cuando se enciende inicialmente la Hornilla de inducción el ajuste predeterminado es Nivel de
potencia 1 (HEAT MODE PL1).
INFORMACIÓN GENERAL
1. Tu Hornilla de inducción Precisión-1800 Plus ofrece tres modos de operación para cocinar:
Modo de calor, Modo de temperatura y Modo de programación. También incluye un RELOJ
AUTOMÁTICO (TIMER) de 180 minutos y una función de BLOQUEADO (LOCK). Todos los
PIEZAS PARA COCINAR ADECUADAS
Olla de acero
inoxidable/
Hierro fundido
Cacerola de acero
inoxidable/
Hierro fundido
Sartén de acero
inoxidable/
Hierro fundido
Plancha de acero
inoxidable/
Hierro fundido
Acero inoxidable/
Esmalte
Artículo para
cocinar de hierro
esmaltado
Tamaño y forma
Diámetro de la base
4.5" mínimo
13" máximo
La pieza para
cocinar debe tener
una base plana.
PIEZAS PARA COCINAR INADECUADAS — Materiales: vidrio, cerámica,
cobre, aluminio, acero inoxidable magnético (18/10, 18/18) Tamaño y forma
inadecuadas
Piezas para cocinar
cuya altura del plato de
inducción sea mayor de
1.5" y el diámetro de la
base menor de 4.5".
1.5" 1.5" 4.5" 4.5"

modos de operación son fáciles de controlar usando los botones del panel y de la pantalla
digital. Para borrar o restablecer todas las funciones, apaga y prende de nuevo la Hornilla de
inducción.
2. Incluye los códigos de error incorporados para detectar fallas de operación:
E0 Detección de la pieza para cocinar - No está lista para inducción
E1-E2 Protección de recalentamiento
E3 Problemas con la fuente de energía.
Estos códigos de errores se mostrarán en la ventana de la PANTALLA DIGITAL cuando ocurra una
falla.
3. Antes de prender la Hornilla de inducción, la pieza para cocinar lista para inducción debe
colocarse en el centro sobre la superficie para cocinar para evitar el error E0.
4. Las piezas para cocinar vacías deben ser precalentadas usando bajo voltaje o la función de
temperatura baja. No uses alto voltaje o temperatura alta.
5. Antes de desenchufar el cable eléctrico, permite que la Hornilla de inducción y la superficie
para cocinar se enfríen completamente usando el ventilador incorporado.
6. Consulta la Guía para solucionar problemas de este manual para mayor asistencia. Si tu
Hornilla de inducción todavía no funciona adecuadamente, comunícate con el Departamento
de Servicio al Cliente al 508-823-6800.
MODOS DE OPERACIONES Y CONTROLES
MODO DE OPERACIÓN DE CALOR (10 funciones ajustables de vatios/potencias)
Usa el MODO DE CALOR (HEAT MODE), el cual es la función predeterminada cuando se prende
la Hornilla de inducción para la mayoría de las aplicaciones de cocción. Ofrece un calentamiento
rápido cuando no es requerido un control de temperatura más preciso. Si se requiere un control
de temperatura usa el MODO DE TEMPERATURA (TEMP MODE).
• Presiona el botón de prendido y apagado (ON/OFF) para prender la Hornilla de inducción. La
función predeterminada será el MODO DE CALOR (HEAT MODE).
• La pantalla digital mostrará PL1
(Nivel de potencia #1)
y el símbolo de la flama.
• Selecciona el nivel de potencia deseado entre PL1 y PL10
presionando los botones ARRIBA o ABAJO (UP o DOWN).
BOTÓN PARA LA FUNCIÓN DE HERVIR/COCINAR A FUEGO LENTO
Este botón te permite cambiar de cocinar a fuego lento a hervir o de hervir a
cocinar a fuego lento con simplemente tocar el botón. Para hervir rápidamente
presiona una sola vez el botón HERVIR/COCINAR A FUEGO LENTO (BOIL/
SIMMER). Esto aumentará el nivel de potencia a la función más alta. Una vez que
esté hirviendo y quieras reducir la temperatura para cocinar a fuego lento presiona
el botón de nuevo una vez. Esto reducirá el nivel de potencia a la función más baja.
La potencia para cada función dependerá del tamaño de la pieza de cocina.
15
NIVEL DE POTENCIA NIVEL DE COCCIÓN TÉCNICA PARA COCINAR
PL1 y PL2 Bajo Cocinar a fuego lento/Mantener caliente
PL3 y PL4 Medio bajo Cocinar a fuego lento
PL5 y PL6 Medio Saltear
PL7 y PL8 Medio alto Asar/Saltear
PL9 y PL10 Alto Hervir/Freír/Asar
MODO DE TEMPERATURA (15 funciones ajustables desde 100°F a 450°F)
Usa el MODO DE TEMPERATURA (TEMP MODE) cuando es necesario un
control de temperatura más preciso. Hay 15 funciones disponibles desde 100°F
(ideal para cocinar a fuego lento) a 450°F (ideal para hervir) en incrementos de
25°F. El sensor incluido mide la temperatura en la base de la pieza para cocinar
y no la temperatura de los alimentos que estás cocinando. Las fluctuaciones de
temperatura pueden ocurrir dependiendo de la pieza para cocinar, lo cual es
normal.
Las temperaturas mostradas en la pantalla digital son una guía.
• Para usar el MODO DE TEMPERATURA (TEMP MODE) presiona el botón de temperatura
(TEMP). Presiona de nuevo para volver al MODO DE CALOR (HEAT MODE) preseleccionado.
La pantalla digital mostrará la temperatura preseleccionada de 100°F y el símbolo del
termómetro.
• Configura la temperatura deseada entre 100°F y 450°F presionando los botones de ARRIBA o
ABAJO (UP o DOWN).
• En cualquier momento durante su uso presiona el botón de HERVIR/COCINAR A FUEGO
LENTO (BOIL/SIMMER) para cambiar la función entre hervir y cocinar a fuego lento.
Ejemplos del MODO DE TEMPERATURA (TEMP MODE) como referencia. La precisión en la
temperatura dependerá del tamaño de la pieza de cocina.
TEMPERATURA NIVEL DE COCCIÓN TÉCNICA PARA COCINAR
100°F Cocinar a fuego lento Cocinar a fuego lento
125°F-150°F Bajo Mantener caliente
175°F-250°F Medio bajo Saltear /Sopas
275°F-325°F Medio Hervir
350°F-400°F Medio alto Hervir/Freír/Asar
425°F-450°F Alto Hervir/Freír/Asar
RELOJ AUTOMÁTICO DE 180 MINUTOS
El RELOJ AUTOMÁTICO (TIMER) puede configurarse de 1 a 180 minutos cuando
uses el Modo de calor o de temperatura. El reloj automático es ajustable en
incrementos de 1 minuto. Presiona rápidamente el botón para incrementos de 1
minuto. Al sostener el botón de ARRIBA oABAJO por algunos segundos, avanzará
en incrementos de 5 minutos.
• Presiona el botón RELOJ AUTOMÁTICO (TIMER). El ícono del reloj se mostrará en la pantalla
digital con los minutos parpadeando.
• Usa los botones de ARRIBA o ABAJO (UP o DOWN) para aumentar o disminuir la
configuración del RELOJ AUTOMÁTICO (TIMER). Después de algunos segundos el tiempo
seleccionado se fijará.
16

17
• Cuando se configura el reloj automático la cuenta final en la pantalla digital se alternará entre
el tiempo que queda y la temperatura escogida hasta que el tiempo se haya vencido y la
Hornilla de inducción se apague.
FUNCIÓN DE BLOQUEO
Presiona el botón de BLOQUEO (LOCK) en cualquier momento durante su uso
para bloquear tu configuración y evitar cambios accidentales.
Para desbloquear presiona el botón de BLOQUEO (LOCK) por 3 segundos o apaga
y prende de nuevo la Hornilla de inducción.
MODO DE PROGRAMACIÓN
El MODO DE PROGRAMACIÓN (PROGRAM MODE) es una función separada de
los modos de CALOR y TEMPERATURA (HEAT y TEMP) descritos previamente.
Usa este modo para programar hasta 3 etapas diferentes de tiempo (minutos) y
temperatura, desde 100°F hasta 450°F y hasta 180 minutos, en el reloj automático
para cada etapa.
Etapa 1
1. Presiona el botón PROGRAMA (PROGRAM). P1 y 100°F se mostrarán en la pantalla digital.
2. Para configurar la temperatura, presiona los botones ARRIBA o ABAJO (UP o DOWN) para
seleccionar la temperatura, desde 100°F hasta 450°F.
3. Para configurar el reloj automático presiona el botón PROGRAMA (PROGRAM) para
configurar el modo de RELOJ AUTOMÁTICO (TIMER). Presiona los botones ARRIBA o ABAJO
(UP o DOWN) para configurar el tiempo de 1 a 180 minutos.
Etapas 2 y 3
• Repite inmediatamente los pasos de arriba para P2 y P3 después de programar la etapa #1.
IMPORTANTE: Cuando termines, la configuración del programa aparecerá en la pantalla digital
para verificar antes de que se establezca el programa. Para hacer cambios durante el ciclo de
cocción la memoria necesitará ser reiniciada apagando y prendiendo la Hornilla de inducción y
luego programa como está descrito previamente.
Ejemplos de etapas de cocción de Tiempo/Temperatura
# DE PROGRAMA TEMPERATURA TIEMPO
PROGRAMA 1 350°F 30 minutos
PROGRAMA 2 200°F 20 minutos
PROGRAMA 3 100°F (Cocinar a fuego lento) 45 minutos
CUIDADO Y MANTENIMIENTO
LIMPIEZA:
• Desenchufa la Hornilla de inducción del tomacorriente y déjala enfriar. Utiliza un detergente
líquido suave con un paño húmedo para limpiar la grasa y manchas de la superficie de
cerámica y el panel frontal. Déjala secar.
• No utilices esponjas de metal, abrasivos o solventes para limpiar cualquiera de las superficies de
la Hornilla de inducción.
• No sumerjas la unidad o el cable eléctrico en agua u otros líquidos. No la coloques en la
máquina lavaplatos.
PRECAUCIÓN: Desenchufa la Hornilla de inducción del tomacorriente antes de limpiar. Usa un
compresor de aire para remover polvo y otras partículas del ventilador en la parte inferior de la
Hornilla de inducción y el escape de ventilación por detrás.

18
AL GUARDAR:
• Desenchufa la Hornilla de inducción cuando no la estés usando.
• Recomendamos que cubras la unidad para protegerla del polvo cuando no la estés usando o
guárdala en su empaque original.
• Permite que la Hornilla de inducción se enfríe ante de guardar.
PRECAUCIONES:
• No la utilices si la superficie para cocinar de cerámica o el cable eléctrico están dañados.
• Mantenla alejada de otras fuentes de calor.
• No coloques artículos que pesen más de 50 libras sobre la placa de vidrio.
GUÍA PARA SOLUCIONAR PROBLEMAS Y SERVICIO AL CLIENTE
Si aparece un código de error en la pantalla digital junto con un pito, sigue las siguientes
instrucciones para ese problema en particular. Si estas no resuelven el código de error, comunícate
con el Departamento de Servicio al Cliente de Princess House para más asistencia.
E0 = Detección del sensor de la pieza para cocinar (Cookware Sensor Detection)
Síntoma: La pieza para cocinar adecuada no es detectada. Revisa las sección "Seleccionando la
pieza para cocinar adecuada" si es necesario.
Remedio: Verifica que la pieza para cocinar tiene la capacidad para inducción. Puede usarse un
imán pequeño para confirmar si la base de la pieza está lista para inducción. Asegúrate que la
pieza para cocinar está colocada sobre la superficie de cerámica y centrada siguiendo las guías. La
Hornilla de inducción te permitirá retirar la pieza para cocinar hasta por 1 minuto antes de detectar
el error y apagarse. Reinicia la Hornilla de inducción después que se apague.
E1 = Sensor interno de recalentamiento (Internal Overheat Sensor)
Síntoma: La temperatura interna excede el límite operativo, el ventilador no está funcionando o la
ventilación para la Hornilla de inducción es inadecuada.
Remedio: Desenchufa del tomacorriente y permite que la Hornilla de inducción y la pieza para
cocinar se enfríen por alrededor de 10 minutos. Asegúrate que la Hornilla de inducción tiene
suficiente espacio para la ventilación, al menos 6" de distancia de la pared y otros obstáculos.
Limpia cualquier polvo o sucio de las aberturas del ventilador y escape. Prende de nuevo la Hornilla
de inducción y verifica que el ventilador está funcionando y que el código de error no aparezca.
E2 = Sensor de recalentamiento de la superficie de vidrio para cocinar
(Glass Cooktop Overheat Sensor)
Síntoma: La temperatura de la superficie de vidrio para cocinar excede los límites de 500°F y está
muy caliente. Además de una posible falla, en raras ocasiones esto puede ser causado por piezas
para cocinar con una construcción muy densa o con un diámetro mayor de 13" en su base, lo cual
permite que el calor se transfiera hacia la superficie de vidrio.
Remedio: Desenchufa el cable del tomacorriente y permite que la unidad y la pieza para cocinar
se enfríen por alrededor de 10 minutos. Prende de nuevo la Hornilla de inducción y verifica que
el ventilador esté funcionando y que el código de error no aparezca. Si los síntomas continúan
prueba con una pieza para cocinar más pequeña o con una construcción más liviana.
E3 = Sensor de la toma de corriente incorrecto (Incorrect Power Supply Sensor)
Síntoma: La Hornilla de inducción detecta que la toma de corriente de 120V tiene un voltaje y/o la
frecuencia está fuera del rango de operación y evita el funcionamiento.
Remedio: Desenchufa del tomacorriente del enchufe de 120V. Verifica que el voltaje está en
el rango de 110/120V AC utilizando un sensor del voltaje. Si no funciona, cambia de toma de
corriente eléctrica o comunícate con un electricista calificado para corregir el problema de la
energía antes de usar la Hornilla de inducción.
ESPECIFICACIONES
GARANTÍA
Princess House ofrece garantía de desempeño por un año para reparar o remplazar la Hornilla de
Inducción Precision-1800 Plus Princess House de encontrarse defectos en materiales, construcción
o manufactura cuando el producto es usado de acuerdo a las instrucciones de uso y cuidado
proveídas. Princess House tiene el derecho de determinar si el producto está defectuoso y, a su
criterio, remplazarlo o reembolsar el precio de compra. Para realizar un remplazo o reembolso,
el cliente debe regresar el producto defectuoso por su cuenta a Princess House con una breve
explicación y el comprobante de compra. Esta garantía excluye daños causados por accidentes,
uso incorrecto o abuso. Esta garantía no aplica a rayones, manchas, decoloracionesu otros daños
en las superficies externas de la unidad que no impidan el uso funcional de la unidad.
ESTA GARANTÍA ESTÁ LIMITADA Y ES EXPLÍCITA A LOS TÉRMINOS Y CONDICIONES
ESTABLECIDAS EN ESTE DOCUMENTO. ESTA GARANTÍA EXIME CUALQUIER Y TODAS
LAS GARANTÍAS IMPLICITAS DE COMERCIALIDAD Y O IDONEIDAD PARA UN PROPÓSITO
PARTICULAR. PRINCESS HOUSE NO SERÁ RESPONSABLE DE NINGUNA MANERA POR
NINGÚN DAÑO INDIRECTO, DIRECTO, CONSECUENTE O INCIDENTAL DERIVADOS DE LA
VENTA O USO DEL PRODUCTO. ESTAS RENUNCIAS DE RESPONSABILIDADES CONTINUARÁN
DESPUÉS DE LA EXPIRACIÓN DE LA GARANTÍA EXPLÍCITA.
Esta garantía le otorga derechos legales específicos que pueden variar de un estado a otro. Algunas
de las provisiones establecidas arriba pueden no aplicarse a usted.
POLÍTICA DE REEMPLAZO A MITAD DE PRECIO
Porque tu satisfacción es nuestra prioridad, tenemos el placer de ofrecerte la Política de reemplazo
a mitad de precio en cada uno de nuestros artículos. El artículo o la pieza que esté disponible en
nuestra línea podrá ser reemplazada por tan sólo la mitad del precio de venta actual si se daña
o se rompe durante su uso. Para recibir el reemplazo a mitad de precio basta con que devuelvas
una parte identificable del artículo acompañada del recibo de venta original. Si necesitas ayuda
contacta a tu Consultora o al Departamento de Servicio al Cliente de Princess House. Si no puedes
enviar parte del artículo dañado acompañado del recibo de venta original, puedes reemplazar el
producto a su precio de venta actual por medio de tu Consultora o llamando a Servicio al Cliente
de Princess House.
19
Características de seguridad
Protección del recalentamiento,
protección de sobrecarga, detección
de piezas para cocinar inadecuadas,
detección de fuente de energía
incorrecta
Permisos
ETL US (conforme a UL STD 1026) Uso
doméstico. Cumple con FCC Parte 18
Fuente de energía. . . . . . . . . . 120V/60Hz 15 amperios
Salida (potencia). . . . . . . . . . . . . . . . . 500-1800 watts
Niveles de energía . . . . . . . PL1- PL10 configuraciones
ajustables de voltaje
Rango de temperatura . . . . . . . . . . . . . .100°F a 450°F
(38 - 232°C)
Peso . . . . . . . . . . . . . . . . . . . . . . . . . 8.5 lbs. (3.85 Kg)
Dimensiones. . . . . . . . . . . . . . 15.73" x 13.125" x 2. 6"
(400 x 333.4 x 66mm)
Dimensiones de la superficie
para cocinar de vidrio . . . . . . . . . . . 13.125"x 13.125"
(333.4 x333.4mm)
Largo del cable . . . . . . . . . . . . . . . . . . . . .5 ft. (1.52m)

princesshouse.com • ©2017 Princess House, Inc. • C5091 1/17
MAIN OFFICE:
470 Myles Standish Blvd.
Taunton, MA USA 02780
e-mail: custsvc@princesshouse.com
Table of contents
Languages:


