Privoro Safecase User manual

SafeCase User Guide
For use with iPhone® 7 and 8.
Table of Contents
Section 1: About Safecase 1
Safecase parts and accessories 2
Section 2: Setting up the SafeCase 3
Step 1: Powering on the SafeCase 3
Step 2: Pairing the SafeCase and Privoro app 3
Downloading/installing and
opening the Privoro app 3
Choosing app settings 4
Scanning the SafeCase QR code 5
Step 3: Inserting the iPhone into the SafeCase 6
Step 4: Attaching the lock panel to the SafeCase 6
Section 3: Managing counter-
surveillance protections 7
Protected mode: for full protection 7
Unprotected mode: for phone calls
and audio/image capture 7
Audio passthrough mode: for using Siri 8
Using the front button 8
Raising/lowering the hood 8
Verifying audio masking 9
Section 4: Managing power 10
Powering on/o 10
Checking battery status 10
Via the SafeCase 11
Via the Privoro App 11
Charging 12
Section 5: Adjusting settings 12
Adjusting LED brightness 12
Turning wireless features on/o 12
Section 6: Removing the iPhone from the SafeCase 13
Appendix A: User interface summary 14
Appendix B: Technical specifications 14
Appendix C: Safety and handling 15
Appendix D: Recycling 15
Appendix E: Regulatory information 16
Section 1: About SafeCase
SafeCase is a first-of-its-kind mobile
security device. Designed as a convenient
smartphone case, SafeCase provides intelligent
mobile protections rooted in high-security
hardware. The case oers secure processing
and communication capabilities that are
independent of the mobile device.
Integrated within the SafeCase are counter-
surveillance capabilities that actively defend
against the surreptitious hijacking of the
smartphone’s cameras and microphones.
A physical barrier prevents image capture by
blocking the cameras, while intelligent audio
masking prevents audio capture by jamming
each of the microphones with true random noise.

2
Micro USB port
Hood
Corner indicator
LEDs x 4
Front button
Rear button
Battery Status
LEDs
Hook cradles
Backpack
interface
Latch slot
Tray
Base tray
Privoro SafeCase
Model - M0002
Corner indicator LEDs
Indicate counter-
surveillance protections
Hood
Controls counter-
surveillance protections
Tray
Holds rear of iPhone in place
Front button
Enables audio passthrough
for using Siri
Base tray
Enables iPhone insertion/removal
Micro USB port
For charging SafeCase via
charging cable
Latch slot
Holds top of lock panel in place
Backpack interface
Accommodates hardware
attachments
Rear button
Controls power on/o and
battery status
Battery status LEDs
Indicate battery charge level
Hook cradles
Hold bottom of lock panel
in place
SAFECASE PARTS AND ACCESSORIES
The SafeCase ships with a lock panel (which prevents
the case from opening) and a charging cable (which
charges both the SafeCase and iPhone). In addition
to these accessories, the Privoro app on your iPhone
pairs with the SafeCase over Bluetooth, allowing you
to verify the case’s audio masking, check the battery
level and receive administrative notifications.
The parts of the SafeCase (and their main functions)
are displayed in Figure 1.
Figure 1: SafeCase parts

3
Wakeup SafeCase.
c
t
i
n
g
S
a
f
e
C
a
se
t
o
a
p
o
w
e
r
wi
ll
w
a
k
e
it
f
r
om
s
h
i
pp
i
n
g
mo
d
e
.
Next
100%
9 41 AM
Privoro
Section 2: Setting up the SafeCase
STEP 1: POWERING ON THE SAFECASE
The SafeCase is in shipping mode when it arrives. To
power it on for the first time, connect the SafeCase
to a power source (charge-capable USB port or wall
charger) using the charging cable provided, with the
micro USB split connecting to the SafeCase and the
USB-A side connecting to the power source (Figure 2).
Once powered on, both the corner indicator LEDs and
battery status LEDs will blink green five times.
Figure 2: Connect the SafeCase to a power source
Figure 3: Tap the Get option
STEP 2: PAIRING THE SAFECASE AND PRIVORO APP
To enable audio masking verifications and firmware
updates, you’ll need to pair your SafeCase
to the Privoro app.
DOWNLOADING/INSTALLING AND OPENING THE
PRIVORO APP
Download the Privoro app from the App Store on your
iPhone using the following steps:
1. Open the App Store app on your iPhone (by
tapping the App Store icon on your home screen
or searching for the app).
2. In the App Store app, tap the Search option, enter
Privoro in the search field and then tap the Search key.
3. Once the Privoro app is displayed, tap the Get
option to download and install (Figure 3). You
may need to authenticate to the App Store
before downloading.
4. Once installed, open the Privoro app (by tapping
the Open option in the App Store, tapping the
Privoro icon on your home screen or searching for
the app).
Once the app has been opened for the first time, a
setup assistant will display. Tap the Next option to
proceed (Figure 4).
Figure 4: Tap the Next option

4
AllowDont Allow
Privoro uses your microphones to
verify adaptive audio jamming.
Allow "Privoro" to access
your microphone.
100%
9 41 AM
Privoro
I want that.
N
o
t
n
o
w
.
Go anywhere.
100%
9 41 AM
Privoro
I want that.
N
o
t
n
o
w
.
AllowDont Allow
“Privoro” Would Like to
Send You Notifications
Notifications may include alerts,
sounds, and icon badges. These can
be configured in Settings.
Go anywhere.
Always Allow
Dont Allow
Only While Using The App
Privoro uses your location to facilitate
device policy management.
Allow "Privoro" to access
your location.
100%
9 41 AM
Privoro
I want that.
N
o
t
n
o
w
.
AllowDont Allow
Privoro uses your camera to pair the
Privoro app with your SafeCase.
Allow "Privoro" to access
your camera.
I want that.
N
o
t
n
o
w
.
100%
9 41 AM
Privoro
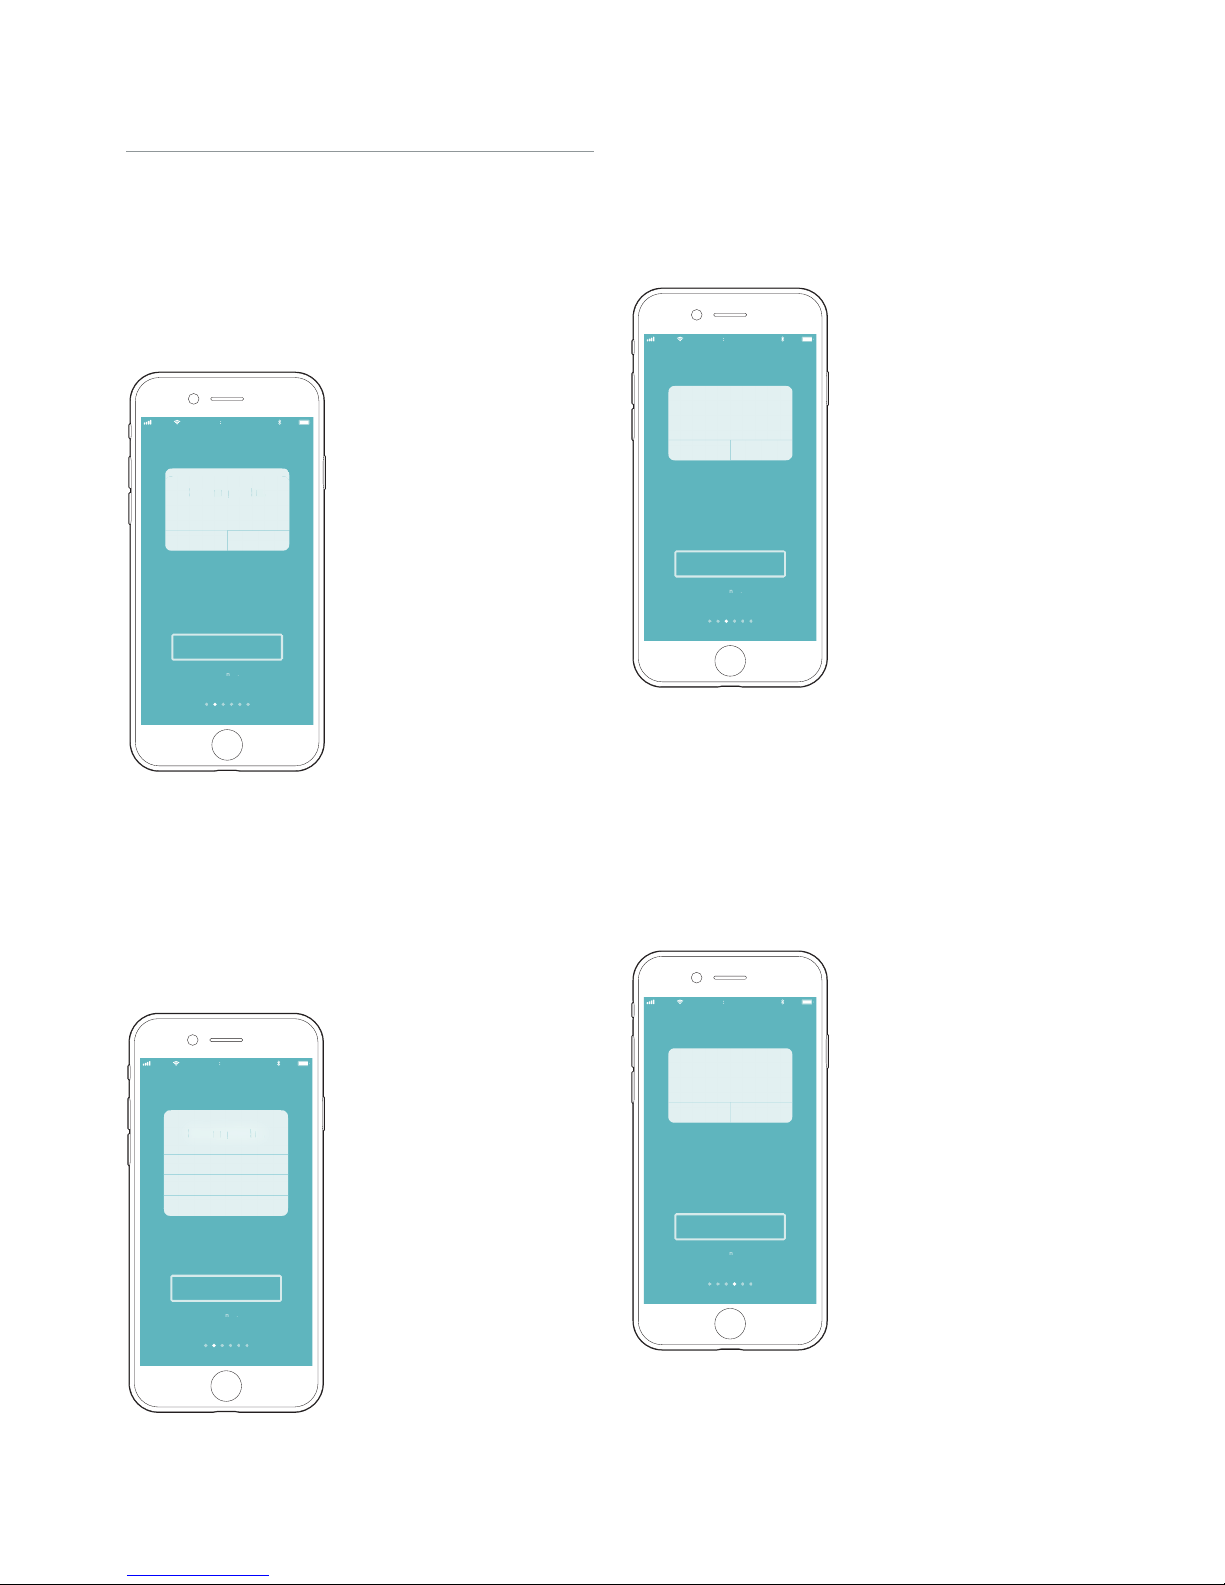
CHOOSING APP SETTINGS
You will then be guided through choosing your
app settings:
• Notification settings: When prompted to allow the
app to send you notifications, tap the I want that
button (Figure 5), unless directed otherwise by your
system administrator; this setting is necessary for
receiving administrative notifications. When prompted
to confirm this setting, tap the Allow option.
Figure 5: Tap the, “I want that” button and then
the Allow option
Figure 8: Tap the, “I want that” button and then
the Always Allow option
Figure 7: Tap the, “I want that” button and then
the Always Allow option
Figure 6: Tap the, “I want that” button and then
the Always Allow option
• Location settings: When prompted to allow the
app to access your location, tap the, “I want that”
button (Figure 6), unless directed otherwise by your
system administrator; this setting is necessary for
administrative oversight. When prompted to confirm
this setting, tap the Always Allow option.
• Microphone settings: When prompted to allow the
app to access your microphones, tap the, “I want that”
button (Figure 7), unless directed otherwise by your
system administrator; this setting is necessary for
verifying the case’s audio masking. When prompted to
confirm this setting, tap the Allow option.
• Camera settings: When prompted to allow the app
to access your camera, tap the, “I want that” button
(Figure 8), unless directed otherwise by your system
administrator; this setting is solely necessary for
scanning the case’s QR code as part of the SafeCase/
app pairing process. When prompted to confirm this
setting, tap the Allow option.
You may change these settings at any time from
the Settings app on your iPhone.

5
Scan the QR code on the
back of your SafeCase.
Skip
100%
9 41 AM
Privoro
Success!
Your device has been paired.
Place the QR code inside area
to pair your SafeCase, or
pick from a list.
Scan the QR code on the
back of your SafeCase.
Skip
100%
9 41 AM
Privoro
Place the QR code inside area
to pair your SafeCase, or
pick from a list.
Figure 9: Scan the QR code on the rear of the SafeCase
Figure 10: Confirmation message
Figure 11: Tap the Done option
SCANNING THE SAFECASE QR CODE
After choosing your app settings, a QR code scanner
will open within the app. Hold your iPhone’s rear-facing
camera over the QR code on the rear of the SafeCase
until the code is centered within the guidelines on
the screen (Figure 9). Upon successful scanning, you
will receive a confirmation message that you have
successfully paired your SafeCase
and app (Figure 10).
The final screen of the setup assistant will show an
animation of the steps for inserting your iPhone
into the SafeCase (see: Inserting the iPhone into the
SafeCase). Tap the Done option to close the setup
assistant (Figure 11), opening the app’s home screen.

6
STEP 4: ATTACHING THE LOCK PANEL TO
THE SAFECASE
The lock panel is an integral part of the SafeCase and
is required to ensure audio protections. To complete
the setup, attach the lock panel to the rear of the
SafeCase. To do so, first place the hooks at the bottom
of the lock panel into the hood cradles on the rear
of the SafeCase, and then press the lock panel to the
SafeCase until the latch snaps the panel into place
(Figure 15).
STEP 3: INSERTING THE IPHONE INTO THE SAFECASE
While inserting your iPhone into the SafeCase, the
lock panel must not be attached to the back of your
SafeCase. If the lock panel is attached, inserting your
iPhone may damage both the SafeCase and phone.
Follow the instructions for removing the lock panel
(see: Removing the lock panel).
If applicable, remove any protective cases or screen
protectors from your iPhone before setup.
NOTE: Protective cases and screen protectors may prevent
your iPhone from fitting into the case and may disrupt audio
protections.
Insert your iPhone into the SafeCase using the
following steps:
1. Slide the base tray open: Place your finger(s) on
the inside center of the base tray and slide the base
tray open (Figure 12).
NOTE: Inserting your iPhone without lowering the base tray
may damage the SafeCase and iPhone.
Figure 12: Slide the base tray open
Figure 13: Insert the iPhone into the tray
Figure 14: Slide the base tray closed
Figure 15: Attach the lock panel
2. Insert the iPhone into the tray: Place the iPhone
head-first into the tray and then rest the phone into
the case (Figure 13).
3. Slide the base tray closed: Push up from the bottom
of the base tray until it fits tightly around the bottom
of your iPhone (Figure 14).

7
SafeCase has three counter-surveillance modes:
protected mode (the default mode), unprotected
mode (for capturing images/audio and placing/
receiving phone calls) and audio passthrough mode
(for using Siri).
PROTECTED MODE: FOR FULL PROTECTION
Protected mode is the default counter-surveillance
mode. In this state:
• The intelligent audio masking and camera blocking
features are engaged.
• The case’s hood is down.
• The corner indicator LEDs pulse green every
10 seconds.
It is normal to hear a soft white noise coming from
the SafeCase when in protected mode, a result of
the audio masking adapting to the noise level in the
environment surrounding the SafeCase/iPhone. While
in protected mode, most phone features – including
apps, videos, emails, music and text messages – can
still be accessed (Figure 16).
UNPROTECTED MODE: FOR PHONE CALLS AND
AUDIO/IMAGE CAPTURE
Temporarily changing to unprotected mode is
necessary for capturing images/audio and placing/
receiving phone calls (as permitted by your system
administrator). In this state (Figure 17):
• The intelligent audio masking and camera blocking
features are disengaged.
• The case’s hood is up.
• The corner indicator LEDs pulse red every 10 seconds.
Figure 16: Hood down in protected mode
Section 3: Managing counter-surveillance protections
Figure 17: Hood up in unprotected mode

8
USING THE FRONT BUTTON
Using the front button must take place before talking to
Siri; otherwise, Siri will not be able to understand your
wake words (“Hey Siri”), questions, commands
or responses.
To change to audio passthrough mode, press the front
button (Figure 19). When finished, release the button
(and change back to protected mode).
RAISING/LOWERING THE HOOD
Raising the hood must take place before capturing
images/audio; otherwise, the recorded photos, videos
and audio will be indecipherable. Similarly, raising the
hood must take place before placing/receiving a phone
call; otherwise, the other participant(s) in the call will
not be able to understand what you’re saying.
To raise the case’s hood (and change to unprotected
mode), gently pinch and pull the top of the hood in an
upward motion (Figure 20).
To lower the hood (and change back to protected
mode) after the call/capture, gently press the top of
the hood down (Figure 21).
AUDIO PASSTHROUGH MODE: FOR USING SIRI
Temporarily changing to audio passthrough mode is
necessary for using Siri (as permitted by your system
administrator). In this state (Figure 18):
• The intelligent audio masking feature is disengaged
(while the camera blocking feature remains engaged).
• The case’s front button is pressed.
• The corner indicator LEDs blink red.
(Left) Figure 20: Pinch and pull the hood to raise
(Right) Figure 21: Press down on the hood to lower
Figure 18: Front button pressed in audio passthrough mode
Figure 19: Press the front button

9
Figure 23; Select the microphone to test and tap the
Start Recording button
Figure 22: Tap the checkbox icon
VERIFYING AUDIO MASKING
From the Privoro app, you can verify that audio
masking is functioning for each of your iPhone’s
microphones while in protected mode. In the app,
tap the checkbox icon to open the Verifications
screen (Figure 22).
In the Verifications screen:
1. If not already selected, tap the option for the
microphone you’d like to test (Rear Mic, Front Mic
or Bottom Mic), and then tap the Start Recording
button (Figure 23).
2. Look at the audio waveform captured on the screen
to confirm that it does not react to the surrounding
noise (Figure 24). If necessary, introduce noise into
your environment by speaking or producing other
sounds. If the waveform doesn’t react to noise, the
audio masking is functioning correctly.
a. If desired, you may raise the hood (see: Raising/
lowering the hood) – disengaging audio masking
– to confirm that the audio waveform reacts
to the surrounding noise while in unprotected
mode. When finished, lower the hood.
3305
Stop Recording
Figure 24: Look at the audio waveform
2822
Stop Recording
Figure 25: Tap the Stop Recording button
3. When finished recording, tap the Stop Recording
button (Figure 25).

10
Figure 27: Press and hold the rear button for three seconds
To listen to the recording, tap the playback icon
(Figure 26). Audio captured when the hood is
down should be masked by randomized noise.
You may repeat
the above steps
for your iPhone’s
other microphones.
Section 4: Managing power
POWERING ON/OFF
To power o the SafeCase, press and hold the rear
button for three seconds, until the LEDs start blinking
(Figure 27). During the power-down cycle, both the
corner indicator LEDs and battery status LEDs will blink
green five times.
Similarly, to power on the SafeCase, press and hold
the rear button for three seconds, until the LEDs start
blinking. During the power-on cycle, both the corner
indicator LEDs and battery status LEDs will blink green
five times. Once powered on, the corner indicator LEDs
will pulse green (to indicate protected mode) or red (to
indicate unprotected mode).
CHECKING BATTERY STATUS
Checking the current charge level of the SafeCase
battery can be done via the device or via the app.
Figure 26: Tap the playback icon

11
VIA THE PRIVORO APP
You can also check the current charge level via the
Privoro app. In the app, tap the device icon to open
the Devices (home) screen, if not already displayed
(Figure 30). The SafeCase battery indicator will be
displayed at the top of the Devices screen (Figure 31);
if the app is unable to connect to the SafeCase via
Bluetooth, an N/A message will be displayed instead.
Figure 30: Tap the device icon
Figure 31: SafeCase battery indicator
VIA THE SAFECASE
To check the current charge level via the SafeCase,
press the rear button for one second, until the battery
status LEDs illuminate (Figure 28). The battery status
LEDs will illuminate to show the current charge level,
with the number of LEDs illuminated corresponding to
the charge level (Figure 29).
Figure 29: Understanding the battery status LEDs
Figure 28: Press the rear button for one second
Behavior of battery
status LEDs Approx. Charge Level
5 Solid Green LEDs 100%
4 Solid Green LEDs 75%
3 Solid Green LEDs 50%
2 Solid Green LEDs 25%
1 Solid Green LED 10%
1 Blinking Green LED Less than 10%

12
When first connected to power, the battery status
LEDs will illuminate to indicate the current charge
level (see: Figure 29) for one minute before going dark.
While charging, you can check the charging status by
pressing the rear button for one second
(see: Checking battery status).
Figure 33: Press the rear button two or more times
Figure 34: Press and hold the front and rear buttons for
three seconds
Section 5: Adjusting settings
ADJUSTING LED BRIGHTNESS
If the corner indicator LEDs or battery status LEDs are
too bright or too dim, you can adjust them or turn them
o. To do so, press the rear button two or more times to
cycle through the three brightness levels: bright, dim and
o (Figure 32). With each press of the rear button, both
the corner indicator LEDs and battery status LEDs will
illuminate to the current brightness level.
TURNING WIRELESS FEATURES ON/OFF
The SafeCase has wireless communication features,
including Bluetooth, WiFi and near-field communication
(NFC); these can be turned o in situations where radio
frequency (RF) emissions are prohibited. To do so, press
and hold both the front and rear buttons simultaneously
for three seconds (Figure 34), until the corner indicator
LEDs start blinking. The corner indicator LEDs will blink
yellow five times. Once turned o, the corner indicator
LEDs will pulse yellow (to indicate protected mode) or
red (to indicate unprotected mode).
Similarly, to turn the wireless features back on, press
and hold both the front and rear buttons simultaneously
for three seconds, until the corner indicator LEDs start
blinking. The corner indicator LEDs will blink green five
times. Once turned on, the corner indicator LEDs will
resume pulsing green (to indicate protected mode) or
red (to indicate unprotected mode).
Figure 32: Connect the SafeCase to a power source
CHARGING
Included with the SafeCase is a two-in-one charging
cable, which is USB-A split to Lightning and micro USB,
allowing you to simultaneously charge your SafeCase
and iPhone. To charge the SafeCase, connect it to a
power source (charge-capable USB port or wall charger)
using the charging cable provided, with the micro USB
split connecting to the SafeCase and the USB-A side
connecting to the power source (Figure 32).

13
Section 6: Removing the iPhone from the SafeCase
If you need to remove your iPhone from the SafeCase, use
the following steps:
1. Remove the lock panel: Press the latch at the top of
the lock panel while simultaneously moving it in a
downward motion (Figure 35).
NOTE: Removing your iPhone without first removing the lock
panel may damage the SafeCase and iPhone.
Figure 35: Remove the lock panel
Figure 36: Slide the base tray open
Figure 37: Remove the iPhone from the tray
2. Slide the base tray open: Place your finger(s) on the
inside center of the base tray and slide the base tray
open (Figure 36).
NOTE: Removing your iPhone without lowering the base tray
may damage the SafeCase and iPhone.
3. Remove the iPhone from the tray: Slowly pull the
iPhone out of the SafeCase using a downward
motion (Figure 37).
To insert your iPhone back into the SafeCase, use the
same steps taken during setup (see: Inserting the iPhone
into the SafeCase).

14
Appendix A: User interface summary
Appendix B: Technical specifications
Goal Action Notification
Changing to protected
mode (from unprotected
mode)
Lower the hood Corner indicator LEDs pulse green (or yellow,
if wireless is turned o) every 10 seconds
Changing to unprotected
mode (from protected
mode)
Raise the hood Corner indicator LEDs pulse red every 10
seconds
Changing to audio
passthrough mode
(from protected mode)
Press the front button Corner indicator LEDs blink red
Powering on/o Press and hold the rear
button for three seconds
Corner indicator LEDs and battery status LEDs
blink green five times
Checking battery status Press the rear button
for one second
Battery status LEDs illuminate to indicate the
current charge level
Charging Press the rear button
for one second
Battery status LEDs illuminate to indicate the
current charge level
Adjusting LED brightness
Press the rear button two or
more times to cycle through
the three brightness levels:
bright, dim and o
Corner indicator LEDs and battery status LEDs
illuminate to the current brightness level
Turning wireless on/o
Press and hold the front and
rear buttons simultaneously
for three seconds
Corner indicator LEDs blink green (if on) or yellow
(if o) five times
SIZE AND WEIGHT
• Height: 160.5 mm
• Width: 72.8 mm
• Depth: 22.5 mm
• Weight: 0.139 kg (with lock panel), 0.110 kg
(without lock panel)
CONNECTIVITY
• Bluetooth
• WiFi
• NFC with reader mode
AUDIO
Digital signal processor for optimum audio quality
and secure voice masking
• Masks speech intelligibility up to voice level
of 90 dBA
• Masks speech presence up to voice level
of 80 dBA
BATTERY AND BATTERY LIFE
• Protected mode: up to 18 hours
• Charge time: up to 50% power level in 30 minutes
ELECTRICAL RATINGS
• 3.7V, 900 mAh Li-Ion battery
• Max input current: 1.85 A
• Rated Voltage: 5VDC
ENVIRONMENTAL REQUIREMENTS
• Operating ambient temperature: -4° and 122° F
(-20° and 50° C)
• Relative humidity: Up to 95%
• Operating Altitude: up to 30,000 Feet (9144 m)
1Tested one meter from audio source.
2Tested with 1-Amp charging supply (DCP) on the battery at 3% of its full capacity.

15
Appendix C: Safety and handling
HANDLING
Handle the SafeCase with care. The SafeCase contains a lith-
ium-ion battery, metal, plastic and electronic components. To
avoid damage to the SafeCase and the battery, take care not
to puncture, drop, burn or crush the SafeCase. The SafeCase is
not water-resistant or waterproof. Avoid exposing the SafeCase
to excessive moisture or liquid. Should the SafeCase become
damaged, discontinue use.
REPAIR
Do not attempt to open or repair the SafeCase. Opening the
SafeCase will invalidate any and all warranties. ties.
BATTERY
Do not attempt to change the SafeCase battery. Improper
replacement of the battery could result in fire, overheating
and injury. Attempting to replace the battery will invalidate
any and all warranties. The lithium-ion battery in your device
should be serviced or recycled by Privoro or an authorized
service provider and must be recycled or disposed of
separately from household/municipal waste.
CHARGING
The SafeCase comes with a 2-in-1 charging cable: USB-A split
to Lightning (charge and sync) and micro USB (charge only).
For optimal charging it is recommended you use a Privoro
SafeCase charging cable. SafeCase has a maximum input
current of 1.85 A.
Using damaged cables or charging when moisture is present
can cause fire, electric shock, injury or damage to SafeCase
or other property.
WARNING: Follow these safety instructions to avoid fire,
electric shock, injury, damage to SafeCase or other property.
Appendix D: Recycling
Privoro has partnered with Call2Recycle for your device
and battery recycling needs (within the United States
and Canada). To find a recycling location near you, go to
call2recycle.org/locator and enter your zip code.
Figure 38: 2-in-1 charging cable
Figure 39: Charging cable attached
OPERATING TEMPERATURE
The SafeCase is designed to work in ambient temperatures
between -4° and 122° F (-20° and 50° C). The SafeCase may
be damaged and battery life shortened if stored or operated
outside of these temperature ranges. SafeCase may be used
in tropical climate regions.
SafeCase battery charging may be limited if the interior
temperature of the SafeCase exceeds normal operating tem-
peratures (for example, in a hot car or in direct sunlight for
extended periods of time).
RADIO FREQUENCY INTERFERENCE
Observe signs and notices that prohibit or restrict the use
of electronic devices (for example, in healthcare facilities or
blasting areas). Although SafeCase is designed, tested and
manufactured to comply with regulations governing radio
frequency emissions, such emissions from SafeCase can
negatively aect the operation of other electronic equipment,
causing them to malfunction. When use is prohibited, or when
asked to do so by authorities, turn o SafeCase or use wireless
o mode to turn o SafeCase wireless transmitters.
USING THE IPHONE
The SafeCase works with the iPhone 7 and iPhone 8. While
using SafeCase, follow all of the iPhone safety and handling
instructions, which can be found at https://support.apple.com/
manuals/iphone.
CARE AND CLEANING
Avoid exposing the SafeCase to dirt, debris and acidic
substances that might disrupt the ability to raise and lower the
hood and base tray. Avoid exposing the SafeCase to moisture
or liquid that may impact the SafeCase performance and
functionality. If the SafeCase comes in contact with any debris
or liquid, immediately clean and dry the SafeCase with a lint-
free cloth on exterior surfaces. Use a compressed air product
to clean the raised hood and lowered base tray. Do not use
compressed air on the phone’s Lightning port or SafeCase
micro USB port.
USING CONNECTORS, PORTS AND BUTTONS
The charging cable that comes with SafeCase has two
connectors. Always confirm the connector and port match.
Do not force a connector into a port or apply excessive
pressure to a button. This may cause damage that is not
covered under the warranty.

© 2018 PPIP LLC. All rights reserved. PRIVORO and the PRIVORO DOG LOGO are trademarks of PPIP LLC, registered in the U.S. and other countries. PVOSUPJ016V01
16
FCC COMPLIANCE STATEMENT
This equipment has been tested and
found to comply with the limits for a
Class B digital device, pursuant to Part
15 of the FCC Rules. These limits are
designed to provide reasonable protection
against harmful interference in a residential
installation. This equipment generates,
uses and can radiate radio frequency
energy and, if not installed and used in
accordance with the instructions, may
cause harmful interference to radio
communications. However, there is no
guarantee that interference will not
occur in a particular installation. If this
equipment does cause harmful interference
to radio or television reception, which can
be determined by turning the equipment
o and on, the user is encouraged to
try to correct the interference by one
of the following measures:
• Reorient or relocate the
receiving antenna.
• Increase the separation between
the equipment and receiver.
• Connect the equipment into an outlet
on a circuit dierent from that to
which the receiver is connected.
• Consult the dealer or an experienced
radio/TV technician for help.
Changes or modifications not expressly
approved by the party responsible for
compliance could void the user’s
authority to operate the equipment.
This device complies with part 15 of
the FCC Rules. Operation is subject to
the following two conditions:
(1) This device may not cause harmful
interference, and (2) this device must
accept any interference received,
including interference that may cause
undesired operation.
CANADIAN REGULATORY
STATEMENT
This device complies with Industry Canada’s
licence-exempt RSSs. Operation is subject
to the following two conditions:
(1) This device may not cause interference;
and (2) This device must accept any
interference, including interference
that may cause undesired operation
of the device.
In order to comply with FCC/ISED RF
Exposure requirements, this device
must be installed to provide at least
20 cm separation from the human
body at all times.
Le présent appareil est conforme aux
CNR d’Industrie Canada applicables
aux appareils radio exempts de licence.
L’exploitation est autorisée aux deux
conditions suivantes:
1) l’appareil ne doit pas produire de
brouillage; 2) l’appareil doit accepter
tout brouillage radioélectrique subi,
même si le brouillage est susceptible
d’en compromettre le fonctionnement.
Afin de se conformer aux exigences
d’exposition RF FCC / ISED, cet appareil
doit être installé pour fournir au moins
20 cm de séparation du corps humain
en tout temps.
EU COMPLIANCE STATEMENT
Privoro hereby declares that this wireless
device is in compliance with the essential
requirements and other relevant provisions
of the Radio Equipment Directive 2014/
53/EU, as applicable. A copy of the EU
Declaration of Conformity is available at
privoro.com/support. Legal, regulatory
and compliance documentation is also
available review at the same link.
European Union—Disposal Information
The Wheeled Bin symbol means that
according to local laws and regulations
your product and/or its battery shall be
disposed of separately from household
waste. When this product reaches its
end of life, take it to a collection point
designated by local authorities. The
separate collection and recycling of your
product and/or its battery at the time
of disposal will help conserve natural
resources and ensure that it is recycled
in a manner that protects human health
and the environment.
CLASS 1 LASER INFORMATION
This device is classified as a Class 1
Laser product per IEC60825-1:2007 and
IEC60825-1:2014. This device complies
with 21 CFR 1040.10 and 1040.11 except
for deviations pursuant to Laser Notice
50, dated June 24, 2007. This device
contains a laser that could be damaged
during repair or disassembly, which
could result in hazardous exposure to
infrared laser emissions that are not
visible. This equipment should be
serviced by Privoro or an authorized
service provider.
SPECIFIC ABSORPTION RATE (SAR)
CERTIFICATION INFORMATION
This device is a radio transmitter and
receiver. It is designed and manufactured
not to exceed the exposure limits for
Radio Frequency (RF) energy set by the
Federal Communications Commission
(FCC) of the U.S. Government.
These FCC RF exposure limits are derived
from the recommendations of two expert
organizations: the National Council on
Radiation Protection and Measurement
(NCRP) and the Institute of Electrical and
Electronics Engineers (IEEE). In both cases,
the recommendations were developed by
scientific and engineering experts drawn
from industry, government, and academia
after extensive reviews of the scientific
literature related to the biological
eects of RF energy.
The RF exposure limit set by the FCC for
wireless mobile devices employs a unit
of measurement known as the Specific
Absorption Rate (SAR). The SAR is a
measure of the rate of absorption of RF
energy by the human body expressed in
units of watts per kilogram (W/kg). The
FCC SAR limit incorporates a substantial
margin of safety to give additional
protection to the public and to account
for any variations in measurements.
For more information about SAR, visit:
• fcc.gov./general/radio-frequency-safety-0
• fcc.gov/encyclopedia/specific-
absorption-rate-sar-cellular-
telephones
Appendix E: Regulatory information
CLASS 1 LASER PRODUCT
Other manuals for Safecase
3
Table of contents