pro-e FIT901D-U User manual

Operating instructions
FIT901D-U
Trademark Statement
● is our trademark.
Disclaimer
●We strive for a correct and integrated content of this manual,
but we don't gurantee that there is no mistakes or leakage.
●Our company reserves the right at all times to alter the
hardware and software mentioned in the manual without
notice.
●Without our company's explicit written authorization, this
manual can not be copied, conveyed, transcribed, translated ,
or stored in any system that can be retrieved.
We appreciate your understanding of our errors in printing and in translation.
The design and specifications of this product are subject to change without notice
WWW.TWPROE.COM WWW.SZPROE.COM
Provision

14
Dear User
Congratulations on your selection of the roof
mounted car DVD series. We appreciate your purchase
of our product. For maximum enjoyment and prolonged
life of this unit, we strongly recommend you read this
owner's manual in detail before attempting to operate
the unit. Please retain this manual for future reference.
The unit you have purchased has the following
advantages
1、Radiation shielded
2、Power saving
3、High clarity of LCD screen
4、High Brightness/contrast
5、Wide view angle
6、Quick response time
7、On Screen Display (OSD) and Infrared
Remote Control
8、Built-in configuration for CD-R, multi-format
CD-R compatible
9、Multiple video/audio cabling options i.e.:
VCD/DVD, portable video camera, webcam,
GPS and portable electronic games
Maintenance Term
A:Any natural damages in warranty period will be maintained
free of charge by our company
B: Any maintenance for disassemble self-assertively and
damage over the warranty period should pay relative charge.
C: The quality problem will be maintained free of charge by any of our
chain store according to maintenance card in guaranteed time.
D. The damage for TFT LCD display isn't in maintenance range.
We will ask for the cost for change.
■Our company will remain the explaining right for above Maintenance Term.
Prologue
Provision

P
Table of Contents
Precautions
Features ......... ..
Installation Drawing .... ..........
Connection Drawing and Instruction for DVD Function Keys
Card Slot and Remote Control Guide ........
MP3 Disc, USB SD/MMC Operation Guide ......... ..
Menu Instructions ....... .....
Technical Specifications
FM and Accessories List .......
Maintenance Term
rologue...............................................................................0
......................................................................0
..........................................................................1
Monitor ................................. ..... .................2
................................... ..... ...............3
.....4
................... ..........5-7
. ............. .........8
..................................... ........... 9-11
...................................................12
.................... .............................13
......................................................................14
13
Table of Contents
After you open the box, please firstly
check if the following spare parts are all
ready:
1.AV2 Switchline
2.Red/black power cable
3.Screws used for assembling
4.User manual
5.Remote control( with battery)
6.In-Car antenna
7.FM antenna
8.Iron Plate (for Fixing the
Monitor to Car )
FM
Accessories List
Stereo FM Transmission Frequency:
87.7M, 87.9M, 88M, 88.1M, 88.2M,
88.3M, 88.4M, 88.5M, 88.6M, 88.7M,
88.8M, 88.9M, 89M, 89.2M, OFF.
1 piece
1 piece
1 piece
1 bag
1 piece
1 piece
1 piece
1 piece
Provision

1
12
Screen Size:9.0''
Display Format:16:9
Background Light:LED
Power Supply:12V+/-10%
Brightness:250cd/㎡
Contrast:300:1
Resolution:640(H)×234(V)
TV System:PAL/NTSC/SECAM
Power consumption:15W
IR Emission:Emission Frequency( left): 2.3 MHZ ;
emission Frequency(right): 2.8MHZ
Weight:1.683Kgs
Operating Temperature:0℃~50℃
Storage Temperature:-20℃~60℃
Flash Card: MMC/SD/USB
Don't expose this unit to direct sunshine, moisture or rain
in case of fire or electric shock.
●Don't open the unit as it might be dangerous
●Please clean the display with a dry and soft cloth. Don't clean
it with any alcohol or chemical cleanser
●Do not attempt to disassemble or remodel the unit yourself
without clear endorsement of the manufacturer.
●Please read these instructions carefully before operating
the unit and observe the operation guidelines
●It is dangerous for the driver to operate the unit while driving
●Please contact your distributor when the unit needs repairing,
as there are no user serviceable parts inside the unit.
●Please ask a qualified engineer to install and check the unit.
●Always keep the remote control in a safe place.
●To prevent the risk of accidents caused by short-circuit.
Please unplug the power cord before replace the fuse ,and
make sure the fuse is with the same type and rating.
●Keep the volume comfortably low in case it might impair
the driver's concentration.
●
Precaution
Technical Specifications
Provision

211
E X I T
SLEEP 0
EXIT
NONE
E X I T
SLEEP 0
EXIT
NONE
E X I T
EXIT
NONE
EXIT
Time Setting
1.Manual roof mounted TFT-LCD monitor.
2.Viewing angle: top/bottom: 65°, left/right:70°
3.IR emission:emssion frequency for left sound channel is
2.3MHZ, for the right sound channel is 2.8 MHZ.
4.Dome light:to light antomatically by ACC or by pressing the
Dome light switch.
5.OSD Interface:all the adjustment operation can be done by
remote control or monitor buttons,.
6.Disc of different formats such as DVD-R/RW,DVD+R/RW,CD
/CDR/RW,VCD/SVCD/MP3/ MP4 can be slotted in automatically.
7.Addtional function: the unit on work will go on working in good
operating order even the screen backlight is turned off.
8.Can read USB MMC,SD card.
9.Power-off approach: by pressing the "power off" key on
the monitor for 3 seconds; or by pressing the "power off" key on
the remote control; or auto power off after 5 minutes' blue screen
without signal.;or auto power off when the setted sleep time is
reached(sleep time can be setted for 60minutes/120 minutes/
180 minutes/240 minutes)
10.Language: Chinese, English …etc.
11.Stereo FM Transmission Frequency: 87.7M, 87.9M, 88M,
88.1M, 88.2M, 88.3M, 88.4M, 88.5M, 88.6M, 88.7M, 88.8M,
88.9M, 89M, 89.2M, OFF.
“ ”
Picture Ⅵ: Press " on the
monitor or "TFT MENU" on the
remote control twice,then press
"+"/"-"the monitor ,there will be
a "sleep" icon on the screen( as
shown in picture Ⅵ), press" "
to enter it, the time can be setted
by "+"/"-"
"
Picture Ⅶ: Press " on the
monitor or "TFT MENU" on the
remote control twice,then press
"+"/"-"the monitor, there will
be a "exit" icon on the screen,
select it and press " "to exit.
(As shown in picture Ⅶ)
"
(Picture Ⅵ) Submenu Operation:
Step One: When the submenu
highlight (as SLEEP shown in
the picture)turns red, press "+"
or "-" to set.
Step Two: Press "+" or "-", and
then press " " to exit.
Picture Ⅵ
Picture Ⅶ
Monitor Features
Provision

3
10
Installation Drawing:
Attention:When installing,first, take out the lampshade,and then
tighten the screw to fix the bottom with the body.
Lampshade
Lampshade
E X I T
SYSTEM AUTO
OSD TIME 13
OSD COLOR
EXIT
1
NONE
E X I T
FM-OUT 88.3M
TURN SYS4
SCALE
ENGLISH
RESET
EXIT
16:9
NONE
E X I T
BRIGHTNESS 50
CONTRAST 50
SATURATION
ENGLISH
EXIT
50
NONE
Picture Ⅲ: Next, press " or "TFT
MENU" once again, the green highlight
will turn red (as CONTRAST shown in
picture Ⅲ), then press"+/-" on the
monitor or "VOL+/-" on the remote
control to adjust the settings.
"
Picture Ⅳ:Press " or "TFT
MENU", then press "+"/ "-" on the
monitor to adjust FM-OUT, TURN,
SCALE, RESET and EXIT settings
(as shown in picture Ⅳ).
"
Picture Ⅴ: Press " or "TFT MENU"
twice, then press "+"/ "-" to adjust
SYSTEM, OSD TIME, OSD COLOR and
EXIT settings(as shown in picture Ⅴ)
"
Picture Ⅲ
Picture Ⅳ
Picture Ⅴ
Provision

4
E X I T
亮度 50
对比度 50
色度
中文
退出
50
NONE
9
Connection Drawing
Grey Yellow to Video1
White to audio1(L)
Red to andio 1(R)
Black Yellow to Video2
White to audio2(OUT)
Red to andio 2(OUT)
Fuse 3A
Red to 12V(+)
Black to grounding
Red to 12V(+)
Black to grounding
Yellow to door switch control
Instructions for DVD
Function Keys
Dome light switch ACC Dome light switch
Right Speaker
Lock Button
Eject Stop
Pause/Play
Power/Togglekeys
Vol+ MENU Vol-
Left Speaker
Disc slot
Menu Instructions:
E X I T
BRIGHTNESS 50
CONTRAST 50
SATURATION
ENGLISH
EXIT
50
NONE
E X I T
BRIGHTNESS 50
CONTRAST 50
SATURATION
ENGLISH
EXIT
50
NONE
E X I T
BRIGHTNESS 50
CONTRAST 50
SATURATION
EXIT
ENGLISH
50
NONE
Picture Ⅰ: Press " to start the
unit, then press " " on the
monitor or "TFT MENU" on the remote
control, a full menu includes
BRIGHTNESS, CONTRAST,
STAURATION, ENGLISH and EXIT
will be displayed on the screen (as
shown in picture Ⅰ)
Picture Ⅱ:Press " "on the
monitor or "TFT MENU" on the remote
control again, there will be a green
highlight on the screen(as ENGLISH
shown in picture Ⅱ) then press "+"/
"-" to move the highlight up and
down.
"
When the highlight turns red(as
BRIGHTNESS shown in the picture),
press "+" or "-" to set.
(Picture Ⅰ) Submenu Operation:
Picture Ⅰ
Picture Ⅱ
Provision

76
POW ER EJE CT
MUT E TFT
DISPLAY
1 2 3
456
78 9
? 0
ANG LE
SUBTITLE
AUD IO
RETURN TFT
MODE
SET UP DVD
MOD E
ENT ER
PRO G
VOL - VOL+
SLO W STOP
REP EAT A-B PBC ZOO M
TFT
MEN U
DVD
MEN U
DVD
DISPLAY
CH+
CH-
--
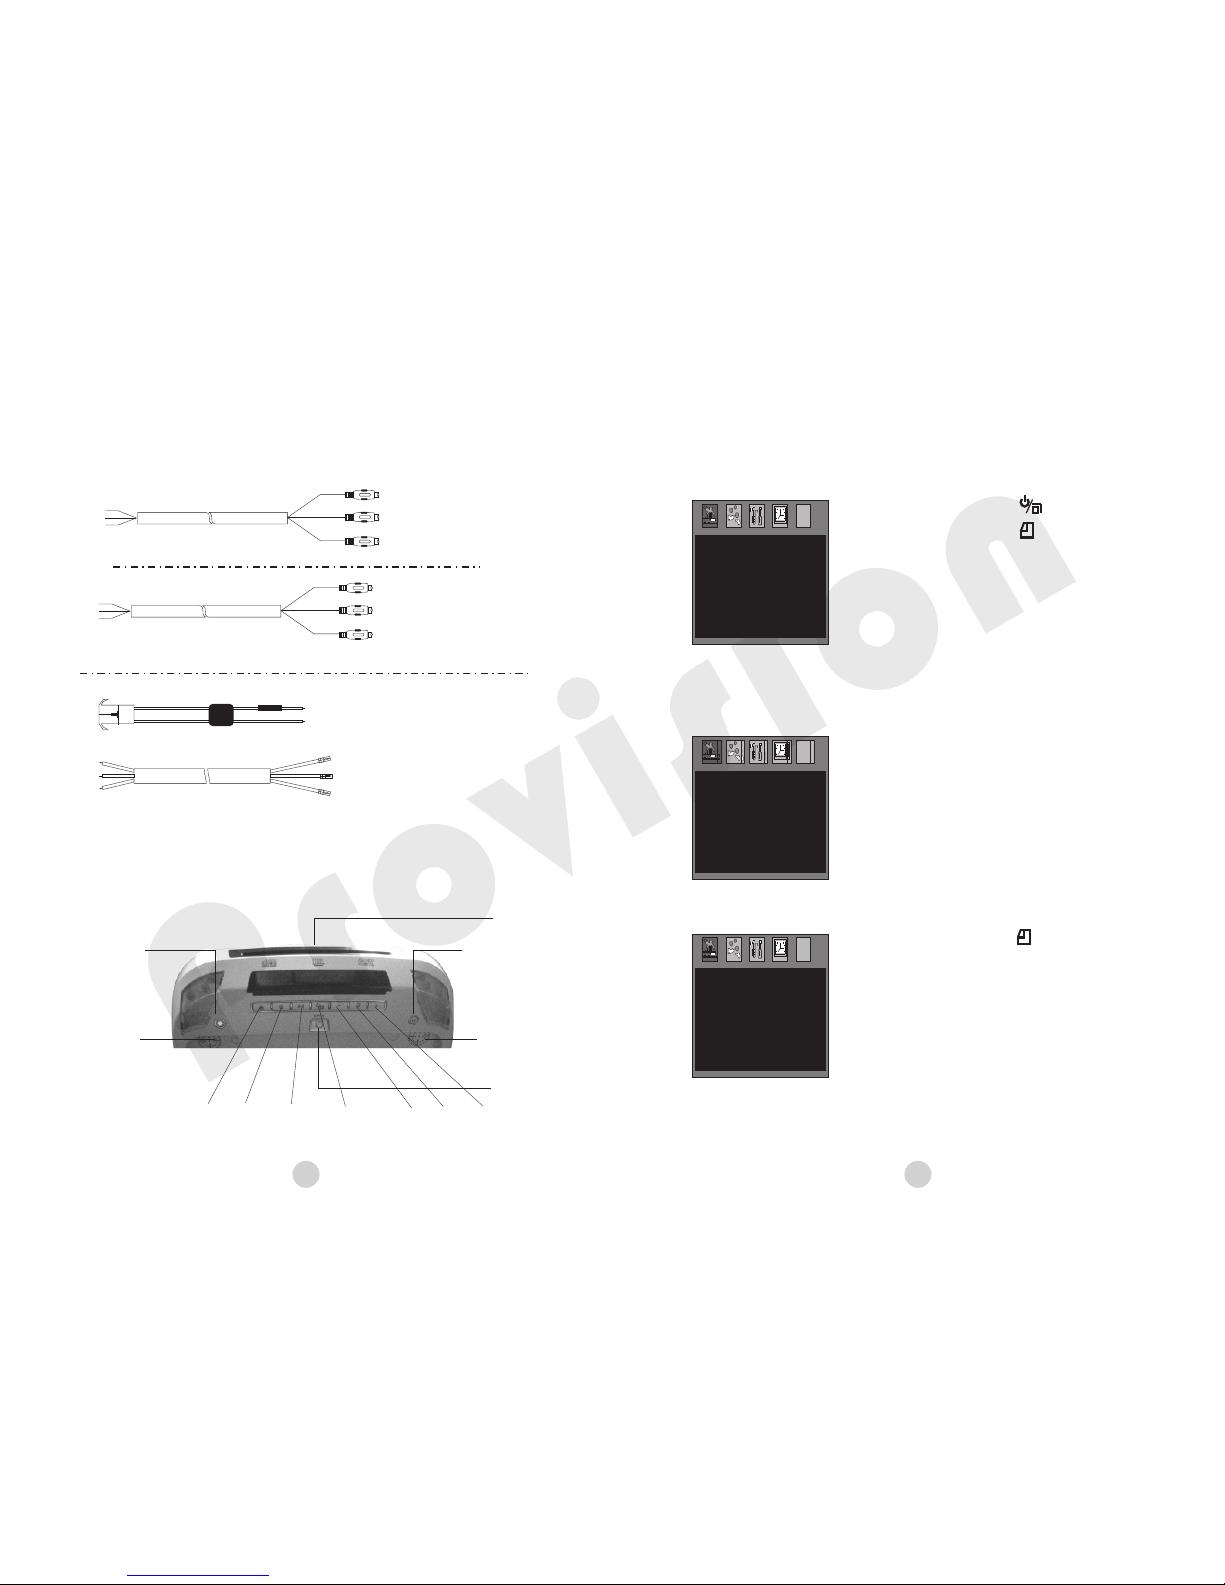
[TFT MENU]:Press this button to enter LCD menu ,
for example:adjust brightness,contrast,
color,language,saturation etc.through
“VOL+” “VOL-”
[SETUP]:press this button to enter DVD setup
menu, adjust through “3456”
[DVD MENU]:press the button to display
directory of disc, for example: music menu,
adjust through“3456”,“ENTER”for
confirmation
[DVD DISPLAY]:press the button to display
information of disc, for example: disc type,
title, the whole playing time, dub,
language type, caption etc.
[PROG]:press the button, a window of picture D
will appear on the screen, input number
setup through“3456”and“ENTER”
Can select 16 pieces of songs and
play according to order
[3456]:the button can select and adjust DVD
function, it is effective for DVD mode.
[VOL+,VOL-]:volume louder and lower, also is
used to choose and adjust LCD menu
( )picture D
Remote control
POW ER EJE CT
MUT E TFT
DISPLAY
1 2 3
456
78 9
? 0
ANG LE
SUBTITLE
AUD IO
RETURN TFT
MODE
SET UP DVD
MOD E
ENT ER
PRO G
VOL - VOL+
SLO W STOP
REP EAT A-B P BC ZOOM
TFT
MEN U
DVD
MEN U
DVD
DISPLAY
CH+
CH-
--
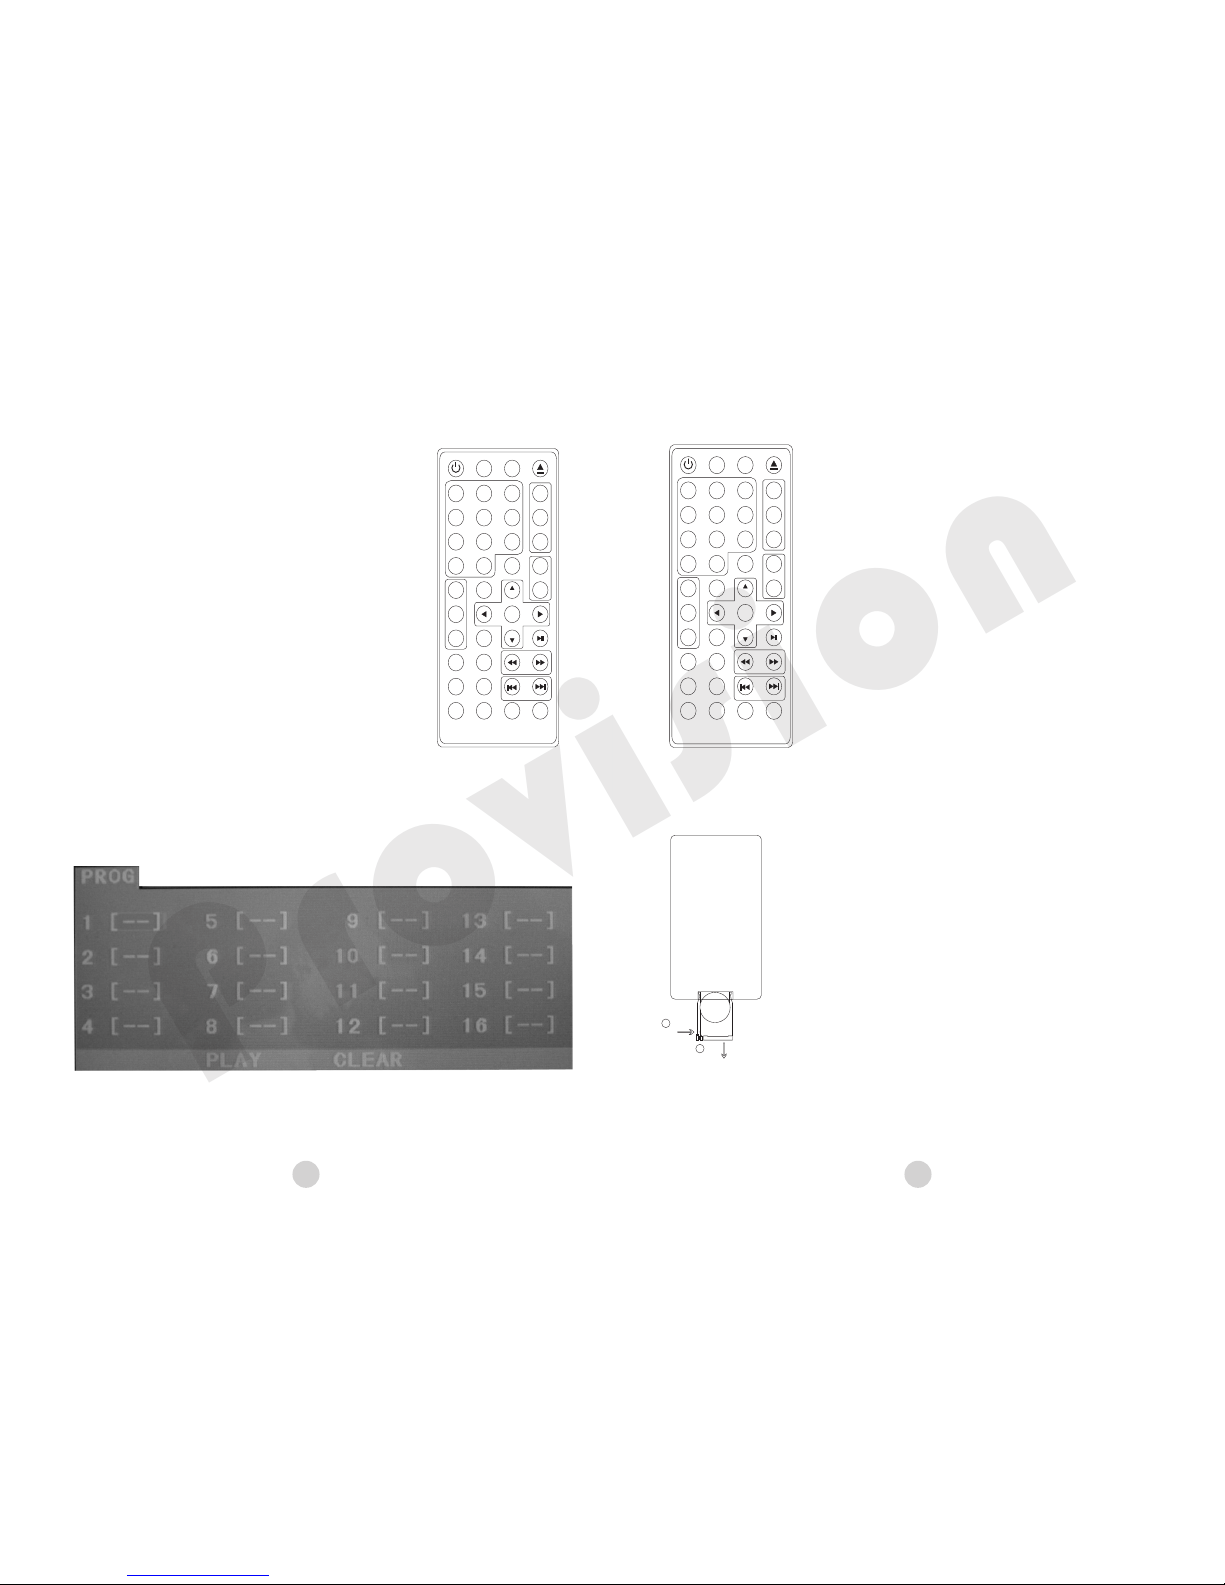
[TFT DISPLAY]:press this button to display current
status,eg.if Playing DVD,then display“DVD”
on monitor
[ANGLE]:for DVD disc with more kinds of lens angle,
when you play,you can press this button to select
lens angle according to your request.
[SUBTITLE]:for DVD disc with more kinds of
languages caption and super VCD disc,when you
play,you can press this button to select language
caption according to your request.
[AUDIO]:for DVD disc with more kinds of languages
caption and super VCD disc,when you play ,you
can press this button to select language
according to your request.
[RETURN]:when the machine is in“PBC open”
status and playing normally,press this button to
return to song menu display.
[TFT MODE]:press this button to transfer DVD/TV/
AV1/AV2
[DVD MODE]:transfer playing status between DVD,
USB and card
[PBC]: when PBC is in open, only return to
main menu can you select the song, when
PBC is in close, during playing songs, you can
press number key to directly select song.
+
1
2
1.When you use remote control, remote control must
look on directly to the receive window of remote control
in the machine, operate remote control within 60 and with
in 4 metres and avoid any obstruction between the
machine and remote control
2.Normally the battery’s life is about one year, when
remotecontrol can’t operate,please replace battery.
3.When you use remote control for the first time, please
rip off partition to avoid battery wastage.
Use of remote control:
Attention: To avoid explosion, disused battery can not be recharged,
disassembled, thrown into rice, or played with by children.
Remote control
Pull
Push
Provision

58
TFT
DISPLAY
POW ER EJEC T
MUT E TFT
DISPLAY
1 2 3
456
78 9
? 0
ANG LE
SUBTITLE
AUD IO
RETURN TFT
MODE
SET UP DVD
MOD E
ENT ER
PRO G
VOL - VOL+
SLO W STOP
REP EAT A-B PBC ZOO M
TFT
MEN U
DVD
MEN U
DVD
DISPLAY
CH+
CH-
ROMOTE CONTROL
--
Mp3 Disk,USB,SD/MMC Card Operation Guide
Once MP3/JPEG disc is slotted in or USB,SD/MMC Card
is inserted into the machine,the video disc player will
auto-search picture and music saved in Disk,USB,SD/MMC
card,after searchingis finished, it willautomatically enter
the first catalogue in Mp3 and play the first song, cursor
stops on“01”on screen.display as follows:
All catalogue in disk
is displayed
Current playing MP3/JPEG name,
if it is JPEG document,then
document name is jpg
When browsing picture,
press“zoom”to enlarge
picture
Document zone:
display Mp3
document in
current catalogue
or JPG document
Slipway can
move down
along with
playing song
Function switch zone:display playing document
type and switch to expected playing document type
Current playing is
Mp3 music document
Current playing is
JPEG picture document
Press“3456 ”to choose the playing folder,press
“ENTER”to play the first song under the folder.Press
“PREV” 、 “NEXT”to choose the song you want.
When browsing picture,press “ZOOM” to enlarge
picture;
The formats for USB,SD/MMC card that can be read
are only MP3,JPEG and VCD.
Push in SD/MMC card slightly for card eject.
Card Slot
USB Slot SD/MMC Slot AV2 In
Remote Control Guide
Provision

TFT-LCD maintenance card
User name
Date of Purchase
Product Model
Warranty period
Invoice No.
Store name
Problem
Attention
1、Use unit safely ,no compensation for loss.This maintenance card
will automatically lapse after the guarantee period. Any correction
of erasure will render this card invalid.
2、Postage cost for sending unit to factory for repair will be paid by the
customer.
3、Guarantee only valid for registered user i.e.(first user).
Fu se 3A Red to 1 2V (+)
Bl ack to groundin g
Red to 12V(+)
Black to grounding
Ye llo w to do or
sw itc h con tro l
Connect Drawing
TV Antenna
Yell ow
FM Anten na
AV
AUDIO INPUT(R)
AUDIO INPUT( )L
VIDEO INPUT
video disc player 2 video disc player 1 audio amplifier
Red White Yel low Red Wh ite Yell ow Red White
Yell ow
Red
White
Yell ow
Red
White
Yell ow
Red
White
Red
White
Yell ow
Red
White
Yellow
Red
White
Yell ow
Red
White
Yellow
AUDIO OUTPUT(R)
AUDIO OUTPUT( )L
VIDEO OUTPUT
Black
AUDIO INPUT(R)
AUDIO INPUT(L)
VIDEO INPUT
Door Light Control Line
Power Cable
Provision
Table of contents