Pro's Kit PT-1080 User manual

PT-1080 Li-ion Cordless drill driver 10.8V
User’s Manual
1st Edition,2011
©2011 Copy Right by Prokit’s Industries Co., Ltd.

1
Before any use, refer to the corresponding paragraph in the present manual.
DESCRIPTION OF SYMBOLS
Symbols are used in this manual to attract your attention to possible risks .The safety
symbols and the explication which accompany them must be perfectly understood. The
warning themselves do not prevent the risks and can not be a substitute for proper
methods of avoiding accidents.
This symbol before a safety comment indicates a precaution a warning or a danger.
Ignoring this warning can led to an accident for yourself or others. TO limit the risk of
injury, fire, or electrocution always apply the recommendations indicated.
Conforms to relevant safety standards.
GENERAL SAFETY INSTRUCTIONS
WARNING
Read all safety warnings and all instructions
Failure to follow all warnings and instructions may result in electric shock, fire and/or
serious injury.
Save all warnings and instructions for future reference
The term “power tool” in the warnings refer to your mains operated (corded) power tool or
battery operated (cordless) power tool.
1) Work area
a) Keep work area clean and well lit. Cluttered and dark areas invite accidents.
b) Do not operate power tools in explosive atmospheres, such as in the
presence of flammable liquids, gases or dust. Power tools create sparks which
may ignite the dust or fumes.
c) Keep children and bystanders away while operating a power tool. Distractions
can cause you to lose control.
2) Electrical safety
a) Power tool plugs must match the outlet. Never modify the plug in any way.
Do not use any adapter plugs with earthed (grounded) power tools.
Unmodified plugs and matching outlets will reduce risk of electric shock.
b) Avoid body contact with earthed or grounded surfaces such as pipes,
radiators, ranges and refrigerators. There is an increased risk of electric shock if
your body is earthed or grounded.
2
c) Do not expose power tools to rain or wet conditions. Water entering a power
tool will increase the risk of electric shock.

d) Do not abuse the cord. Never use the cord for carrying, pulling or unplugging
the power tool. Keep cord away from heat, oil, sharp edges or moving parts.
Damaged or entangled cords increase the risk of electric shock.
e) When operating a power tool outdoors, use an extension cord suitable for
outdoor use. Use of a cord suitable for outdoor use reduces the risk of electric
shock.
f) If operating a power tools in a damp location is unavoidable, use a residual
current device (RCD) protected supply. Use of an RCD reduces the risk of
electric shock.
3) Personal safety
a) Stay alert, watch what you are doing and use common sense when operating
a power tool. Do not use a power tool while you are tired or under the
influence of drugs, alcohol or medication. A moment of inattention while
operating power tools may result in serious personal injury.
b) Use safety equipment. Always wear eye protection. Safety equipment such as
dust mask, non-skid safety shoes, hard hat, or hearing protection used for
appropriate conditions will reduce personal injuries.
c) Avoid accidental starting. Ensure the switch is in the off position before
plugging in. Carrying power tools with your finger on the switch or plugging in
power tools that have the switch on invites accidents.
d) Remove any adjusting key or wrench before turning the power tool on. A
wrench or a key left attached to a rotating part of the power tool may result in
personal injury.
e) Do not overreach. Keep proper footing and balance at all times. This enables
better control of the power tool in unexpected situations.
f) Dress properly. Do not wear loose clothing or jewellery. Keep your hair,
clothing and gloves away from moving parts. Loose clothes, jewellery or long
hair can be caught in moving parts.
g) If devices are provided for the connection of dust extraction and collection
facilities, ensure these are connected and properly used. Use of these devices
can reduce dust related hazards.
h) Use auxiliary handle(s), if supplied with the tool. Loss of control can cause
personal injury
i) Hold power tool by insulated gripping surfaces, when performing an
operation where the cutting accessory may contact hidden wiring. Cutting
accessory contacting a "live" wire may make exposed metal parts of the power tool
"live" and could give the operator an electric shock.
3

4) Power tool use and care
a) Do not force the power tool. Use the correct power tool for your application.
The correct power tool will do the job better and safer at the rate for which it was
designed.
b) Do not use the power tool if the switch does not turn it on and off. Any power
tool that cannot be controlled with the switch is dangerous and must be repaired.
c) Disconnect the plug from the power source before making any adjustments,
changing accessories, or storing power tools. Such preventive safety
measures reduce the risk of starting the power tool accidentally.
d) Store idle power tools out of the reach of children and do not allow persons
unfamiliar with the power tool or these instructions to operate the power tool.
Power tools are dangerous in the hands of untrained users.
e) Maintain power tools. Check for misalignment or binding of moving parts,
breakage of parts and any other condition that may affect the power tools
operation. If damaged, have the power tool repaired before use. Many
accidents are caused by poorly maintained power tools.
f) Keep cutting tools sharp and clean. Properly maintained cutting tools with sharp
cutting edges are less likely to bind and are easier to control;
g) Use the power tool, accessories and tool bits etc., in accordance with these
instructions and in the manner intended for the particular type of power tool,
taking into account the working conditions and the work to be performed.
Use of the power tool for operations different from intended could result in a
hazardous situation.
5) Battery tool use and care
a) Recharge only with the charger specified by the manufacturer. A charter that is
suitable for one type of battery pack may create a risk of fire when used with another
battery pack.
b) Use power tools only with specifically designated battery packs. Use of any
other battery packs may create a risk of injury and fire.
c) When battery pack is not in use, keep it away from other metal objects, lie
paperclips, coins, keys, nails, screws or other small metal objects, that can
make a connection from one terminal to another. Shorting the battery terminals
together may cause burns or a fire.
d) Under abusive conditions, liquid may be ejected from the battery; avoid
contact. If contact accidentally occurs, flush with water. If liquid contacts eyes,
additionally seek medical help. Liquid ejected form the battery may cause irritation
or burns.
6) Service
Have your power tool serviced by a qualified repair person using only identical
replacement parts. This will ensure that the safety of the power tool is maintained.
4

SPECIAL SAFETY ADVICE FOR CORDLESS DRILL
Wear ear protectors with drills. Exposure to noise can cause hearing loss. Use auxiliary
handles supplied with the tool. Loss of control can cause personal injury.
Only plug the Battery Charger in at 230V or 120V mains. Recharge the Battery only with
the provided charger. Before starting any work on walls, floors or similar, make sure that
all power lines in the work area are switched off at the main switchboard. Inspect the
proposed drill hole location for any utility lines (e.g. water, gas, power) before drilling.
Use a suitable device such as a metal or electricity line detecting device. If in doubt
contact a qualified electrician or your utility provider. Both tools and work-pieces can heat
up considerably during the drilling operation. Allow a sufficient period of cooling before
handling. Wear appropriate gloves.
SAFERY ADVICE FOR RECHARGEABLE BATTERY AND CHARGER
a) Recharge only with the changer specified by the manufacture. A charger that
is suitable for one type of battery pack may create a risk of fire when used with
another battery pack.
b) Use power tools only with specifically designated battery packs. Use of any
other battery packs may create a risk of injury and fire.
c) When battery pack is not in use, keep it away from other metal objects, like
paper clips, coins, keys, nails, screws or other small metal objects, that can
make a connection form one terminal to another. Shorting the battery terminal
together may cause burns or fire.
d) Under abusive conditions, liquid may be ejected from the battery; avoid
contact. If contact accidentally occurs, flush with water. If liquid contacts
eyes, additionally seek medical help. Liquid ejected from the battery may
cause irritation or burns.
e) Have your power tool serviced by a qualified repair person using only identical
replacement parts. This will ensure that the safety of the power tool is maintained.
5
Technical Data
Rated Voltage DC 10.8V
No-load Speed 0-350/0-1100rpm
Range of Drill Bit sizes 0.8-10 mm
Steel: Ø 6 mmMax. Drilling Capacity
Wood: Ø16 mm
Battery pack Voltage DC 10.8V
Battery cell Li-ion Batteries, 1300mAh
Charger PT-1080F PT-1080A
Rated Voltage 230~240V, 50Hz 110~130V , 60Hz
Output Voltage DC12V, 500 mA
Noise
Sound pressure level 67 dB(A) K = 3 dB(A)
Sound power level 78 dB(A) K = 3 dB(A)
Vibration “drilling into metal” model: a h,D=2.369 m/s2, K=1.5 m/s2
Max torque 14N.m
Charging Time 3-5 hours
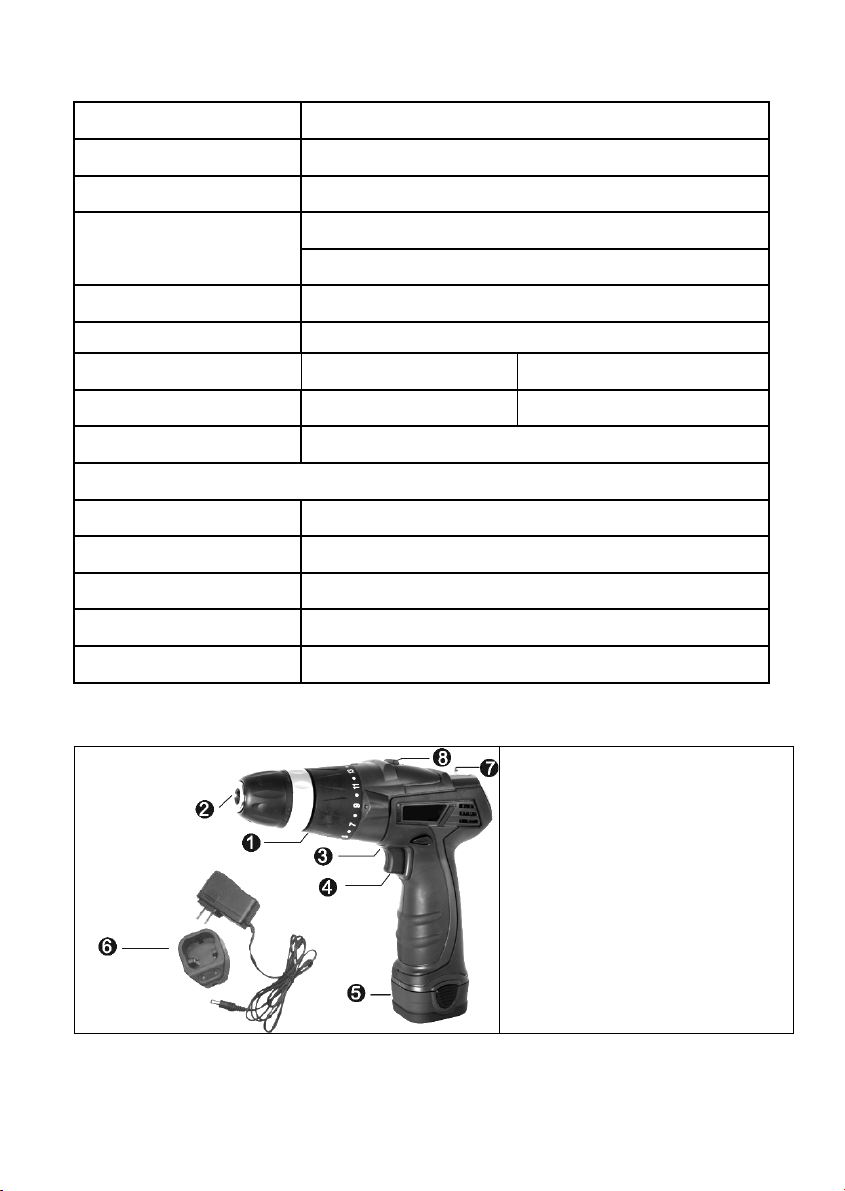
Product Features
1, 21+1 Adjustable Torque
Cover
2, 10mm Keyless Chuck
3, Forward / reverse Switch
4, On/off Switch
5, 10.8V Li-Ion Battery pack
6, Charger & Charger Base
7, LED battery power indicator
8, 2 gear-speed switch
6

Initial operation
Insertion and Removal of Rechargeable Battery
Ensuring the correct orientation between the battery and the
battery compartment, insert the rechargeable battery into the
machine. Do not apply force when inserting the battery.
Insertion can be achieved easily and without resistance. The
battery must be inserted completely until the battery retention
clips on the sides of the battery compartment automatically
lock it into place. To remove the battery press the battery
retention clips and pull the battery out of its compartment.
Charging the Battery Pack:
The rechargeable battery must be charged before the first use.
Only recharge the battery once it is has been fully discharged,
i.e. the performance clearly decreases.
Otherwise the battery may not achieve its full capacity at the
subsequent charge.
1) Firmly insert battery pack into charger base.
2) Connect battery charger to charger base.
3) Plug the battery charger to power source (230V/50Hz).
The red light and green light will come on when unit is
plugged in and during the battery pack is being charged, both the red light and green
light is on.
4) When the battery is full charged, only the green light will be lighted on, and the red
light will off.
Working status Battery Red Green
Not Insert Off On
Plug connected
into the socket Insert On On
Under charging Insert On On
Fully charged Insert Off On
Important! Only use the provided battery charger for charging the battery. First place the
rechargeable battery into the charging slot in the charger and then connect the charger to
the mains. Charging starts automatically.
Remove the battery from the charge after about 5 hours. Always disconnect the charger
from the mains before you remove the battery from the charger.
7

Inserting Tool Bits / 10mm Keyless chuck:
Important! Always remove the battery before you change the drill or screw bit to avoid
unintentional starting of the machine.
The cordless drill has a keyless chuck (2). Make sure that the drill or screw bit is not skew
when it is inserted and the chuck tightened.
Turn the chuck anticlockwise to open the chuck until you can insert the bit. Insert the
drill/screw bit all the way in and then turn the chuck in a clockwise direction to firmly
tighten it.
Turn the chuck anticlockwise again to remove the bit if you stop the work or you want to
change another bit.
On/Off Trigger:
Use the On/Off trigger to start the machine and keep holding it for continuous operation.
The rotation speed can be varied by depressing the On/Off trigger. The more the trigger is
depressed, the faster the rotation speed.
To switch the machine off, release the On/Off trigger
Forward / Reverse switch:
Important! The machine has to come to a complete stop before the reverse rotation lever
can be used; otherwise the machine may be damaged.
Use the reverse-rotation lever to switch between clockwise (normal) and anticlockwise
rotation or vice-versa. With the reverse-rotation lever in the central position the trigger
switch is locked and cannot be depressed. Put the reverse-rotation lever in the central
position before you put the machine down, to avoid unintentional starting.
Torque adjustment cover:
The tool supply you 21+1 different torque steps, you can control the maximum torque
applied to the drill bit with the torque control knob.
2 Gear-speed Switch:
Move the switch to get higher speed 1150rpm, or lower speed 350rpm.
LED battery power indicator:
Press the battery power indicator button to check the battery power full or empty.
Attention! The torque control knob should only be operated when the machine is not
running; otherwise the machine may be damaged.
To set the drill to the lowest available torque setting, twist the torque control knob until the
small arrow on the drill-housing points to the “1” stamped on the torque control knob. In
this position the torque clutch will slip with light drilling resistance. The higher the number
8

the arrow points to on the torque control knob, the larger the maximum torque that can be
applied before the torque clutch will slip.
To set the machine to maximum available torque twist the torque control knob until the
arrow points to the drill symbol. In this position there is no slip in the torque clutch.
Select a lower torque for insertion/removal of screws to avoid damage to the work-piece
(in particular wooden work-pieces) or to the screw. For drilling select a higher torque
setting. Do a test first on an item which is not your final work-piece and adjust the desired
torque accordingly before you start the actual work.
Operation for working
Only use tool bits which can be securely fastened in the chuck and for which the drill has
been designed.
1. Drilling
Check whether the drill bit is correctly inserted and tightly fastened before you start the
machine. Use properly sharpened drill bits. Use screwdriver bits that are not overly worn.
At the start of each drilling operation select a lower speed. For large holes drill with a
smaller drill bit first and then enlarge the hole using a larger drill bit.
2. Drilling in Wood
For drilling in wood use a wood drill-bit. Protect or fasten the work-piece in a suitable
holder. Mark the positions of the holes to be drilled with a sharp tool or a nail. Do not apply
excessive pressure against the work-piece with the machine.
3. Drilling in Metal
For drilling in metal use a steel drill-bit. Always provide sufficient cooling with suitable
non-inflammable coolants. Protect or fasten the work-piece with a suitable holder. The
work-piece should lie flat on the work bench. Mark the positions of the holes to be drilled
with a centre-punch. Do not apply excessive pressure against the work-piece with the
machine. Allow the drill to operate at its normal operating speed.
Important! At the start of drilling select a lower speed to avoid the bit slipping away from
the desired hole location. If the drill-hole is deep, the drill-bit may become jammed in the
hole. In this event a high torque could damage the drill bit or the drill. If the bit becomes
jammed, hold the machine firmly and immediately release the On/Off trigger. Switch to
anticlockwise rotation, and use a low rotation speed to remove the jammed drill bit more
easily.
4. Drilling in Plastic
For drilling in plastic use a steel drill and follow the same instructions as for drilling in
wood.
9

5. Drilling in Stone, Brick, Masonry or similar
For drilling in walls, stone, masonry etc. use a masonry-bit. Do not put too much pressure
on the machine. Follow the same instructions as for drilling in metal.
6. Using the Drill as a Screw-driver
Before using the machine check whether the screw-bit is inserted correctly. Avoid
over-tightening screws, otherwise the screw head may be damaged or stripping of the
threads may occur.
7. Screw Insertion
Set the direction of rotation of the drill to the clockwise direction. Insert the screw-bit into
the slot in the head of the screw. Hold the screw bit perpendicular to the head of the screw,
otherwise the screw or the screw head may be damaged. Press the screw bit against the
screw with a constant pressure while driving in the screw.
When the screw is completely screwed in, hold the machine firmly and release the On/Off
trigger, otherwise the screw or the screw head may be damaged. If the On/Off trigger is
not released immediately a high torque could also damage the drill bit or the drill.
8. Screw Removal
Set the direction of rotation of the drill to the anticlockwise direction. Insert the screw-bit
into the slot in the head of the screw. Hold the screw-bit perpendicular to the head of the
screw, otherwise the screw or the screw head may be damaged. Press the screw bit
against the screw with a constant pressure while removing the screw.
Important: Protect the environments
Do not throw used batteries into fire or water-danger of explosion! Hand in used and faulty
batteries to your local waste disposal point or to your dealer for environmentally friendly
disposal.
Maintenance and Cleaning
Attention! Always remove the battery before carrying out any work on the
machine.
To clean, always use a dry or moist, but not wet, towel. Many cleaning agents contain
chemical substances which may cause damage to the plastic parts of the machine.
Therefore do not use any strong or inflammable cleaners such as petrol, paint thinner,
turpentine or similar cleaning agents.
Always keep air ventilation holes free of dust deposits to prevent overheating.
10

PT-1080 10.8V 1300mAH 鋰電池電鑽
說明書
使用之前,請仔細閱讀當前說明書中的相應章節。
符號描述
爲了引起你在使用過程中存在的風險的注意,在說明書中添加了符號註釋。安全符號加上
文字說明能更好的幫助使用者理解。警示使用者不防止風險是不能夠代替作為避免風險的
有效方法。
這個安全註釋的符號表示的是一種預防措施的警告也是一種前方存在危險的警告。忽視這
個符號可能會造成你或其他人的事故。爲了限制火災、觸電受傷的危險,這個符號一直被
建議表示。
符合有關安全標準
安全須知總則
警告 閱讀所有的安全警告及安全指示。
未能遵循所有的警告和指示,可能會導致觸電火災或嚴重傷害。
保存所有的警告和指示,以供將來參考。
11

1)工作區域
a) 保持工作區域的乾淨與明亮。混亂與黑暗的區域容易引起事故發生。
b) 不要在易爆的環境中維修電動工具,諸如在存放有易燃液體、氣體或者灰塵的環境
下。電動工具的火花會點燃粉塵和煙霧。
c) 在維修的時候讓孩子和旁觀者遠離。分心會導致您失去控制力。
2)電氣安全
a) 電動工具的插頭必須與插座相配,切勿以任何方式修改插件。不要使用任何接地電動
工具的轉接插頭。未修改的插頭及相配的插座將減少觸電的危險。
b) 避免人體接觸接地表面,如管道、散熱器、爐灶和冰箱。如果你的身體接地會增加觸
電的風險。
c) 不要將電動工具放在雨中或潮濕的環境下。水滲入到電動工具中會增加觸電的風險。
d) 不要濫用電源線。切勿使用攜帶,拉動或撥下電源工具的電源線。保持電源線遠離熱,
油,尖銳的邊緣或移動部件。受損或纏繞的電線會增加觸電危險。
e) 當在戶外使用電動工具時,使用適合戶外的電源線。使用適合戶外使用的電源線可減
少觸電的危險。
f) 如果無法避免在一個潮濕的位置維修電動工具,請使用設於電流 RCD (residual current
device) 保護裝置。使用 RCD 裝置可以減少觸電危險。
3)個人安全
a) 當你在使用電動工具的時候,請保持警覺,知道自己在做什麽,有一定的使用常識。
當你勞累、藥物、酒精的影響下不要使用電動工具。注意力不集中的時候使用電動工
具會導致嚴重的人身傷害。
b) 使用安全的配備。始終需要佩戴眼罩。安全的佩戴設備如防塵口罩,防滑安全鞋,安
全帽,或適當的條件下使用的聽力保護設備,減少人身傷害。
c) 避免突然啟動。在插入插座之前,確保開關處於關閉狀態。隨身攜帶可能會因為手指
觸碰到開關或者插頭,會導致意外發生。
d) 在打開電動工具之前,請移除其他的調整件及扳手。一個扳手或鍵左邊的電動工具的
旋轉部分,可能會導致人身傷害。
e) 不要伸的太長。在任何時候都要保持設當的位置和平衡。這使得在意外的情況下比較
好控制電動工具。
f) 著裝適當。不要穿寬鬆的衣服或珠寶。讓你的頭髮,衣服和手套遠離運動部件。寬鬆
的衣服,首飾或長髮可能會捲入運動部件。
g) 如果提供連接除塵和收集設施設備,確保這些連接和正確使用。這些設備的使用可減
少灰塵有關的危害。
h) 如果提供工具請使用輔助手柄,失去控制可能引起人身傷害。
i) 當鑽某樣可能隱藏電線的物體時,請握在電動工具的絕緣表面。當鑽隱藏著電線的物
體,電動工具可能會觸及到導體的部份,可能會造成維修者觸電。
4)電動工具的使用和保養
a) 不要過分使用電動工具。為你所使用的功能選擇正確的電動工具,使用正確的電動工
具以安全的運轉速度內操作才能使工作做的更好。
b) 如果開關無法開啟或關閉時不要使用電動工具。任何不受開關控制的電動工具都是危
險的,必須進行修理。
c) 做任何調整、更換配件、存放電動工具前請拔下插頭,這種預防性的措施可以減少意
12

d) 儲存閒置的電動工具時要遠離兒童能觸及到的地方,不要讓不熟悉電動工具或指導說
明的人去操作電動工具,未經訓練的人使用電動工具是危險的。
e) 維修電動工具。檢查錯位部份或運動部件的結合。破損的部件或其他任何零件都會影
響電動工具的使用。如果損壞,在使用前先修理電動工具,許多事故的引起都是因為
維修不善造成的。
f) 保持刀具的清潔與鋒利。妥善的保養使其更容易控制。
g) 使用電動工具、配件、批頭等。根據這些指示,並用於特定類型的電動工具,考慮到
工作條件和要執行的工作方式。違規操作電動工具肯能會導致危險情況。
5)電池工具的使用和護理
a)充電的充電器為指定製造商製造。使用不同製造商提供的電池和電池組有可能會造成火
災。
b)使用電動工具有專門指定的電池包。使用任何其他電池組件可能會產生危險的傷害和火
災的風險。
c)不使用電池時,應使其遠離其他金屬物體,如:迴紋針、硬幣、鑰匙、釘子、螺絲或其
他小的金屬物體,此類金屬物體會聯通電池 2 端。電池端子短路,可能導致灼傷或火災。
d)在受破壞的情況下,液體從電池可能會彈出,避免接觸。如果意外發生接觸,用清水沖
洗。如果液體接觸眼睛,立即尋求醫療幫助。電池液從電池內噴出時可能會引起刺激或
灼傷。
6) 維修
a) 將您的電動工具交到指定維修點維修。這將確保電動工具的安全維護。
電鑽的特殊安全建議
請穿戴保護耳罩。接觸雜訊可造成聽力損失。使用工具的輔助功能時,若電鑽失去控制,
可能會導致人身傷害。
請配套使用所提供的充電器和充電電池。在牆面、地面或類似的工作開始之前,先檢查工
作區中的所有電源線。檢查鑽前的任何公用線路(如:水,天然氣,電力)的建議鑽孔位
置。使用合適的設備,如金屬或電力線檢測裝置。如果有疑問請合格的電工或公用事業供
應商做檢查。在鑽孔作業時,電鑽及電池會升溫,請預留足夠的冷卻劑。操作時請穿戴防
護手套。
充電電池和充電器的安全忠告
a)充電的充電器為指定製造商製造。使用不同製造商提供的電池和電池組有可能會造成火
災。
b)使用電動工具有專門指定的電池包。使用任何其他電池組件可能會產生危險的傷害和火
災的風險。
c)不使用電池時,應使其遠離其他金屬物體,如:迴紋針、硬幣、鑰匙、釘子、螺絲或其
他小的金屬物體,此類金屬物體會聯通電池 2 端。電池端子短路,可能導致灼傷或火災。
d)在受破壞的情況下,液體從電池可能會彈出,避免接觸。如果意外發生接觸,用清水沖
洗。如果液體接觸眼睛,立即尋求醫療幫助。電池液從電池內噴出時可能會引起刺激或
灼傷。
13

技術參數
額定電壓 DC 10.8V
空載轉速 0-350/0-1100rpm
鑽頭尺寸範圍 0.8-10 mm
鋼材: Ø 6 mm 最大鑽孔能力 木材: Ø16 mm
電池組的電壓 DC 10.8V
電池 鋰離子電池, 1300mAh
充電器 PT-1080F PT-1080A
額定電壓 230-240V, 50Hz 110-130V, 60Hz
輸出電壓 DC12V, 500 mA
噪音
聲壓級 67 dB(A) K = 3 dB(A)
聲功率級 78 dB(A) K = 3 dB(A)
振動 “鑽入金屬"模式: a h,D=2.369 m/s2, K=1.5 m/s2
最大扭矩 14N.m
充電時間 3-5小時
產品特點
1, 21+1 可調扭矩蓋
2, 10mm 三爪夾頭
3, 正向/反向開關
4, On / Off 開關
5, 10.8V 鋰離子電池
6, 充電器及充電座
7, LED 電池電量指示燈
8, 22 齒輪高速開關
14

初始操作
可充電電池的插入和去除
首先,請確保電池和電池倉之間的方向正確,電池可以輕鬆插入,
不必使用太大的力氣。電池必須完全插入,直到電池艙自動鎖定
到位。要取出電池時,請按電池固定夾再從電池艙中拔出電池。
電池充電:
第一次使用電鑽前必須將電池完全充滿電。再次充電必須等到電
池電量完全耗盡。沒有耗盡電量就為電池充電,使電鑽性能將明
顯降低。並且電池可能無法實現其在隨後的充電能力。
1)牢固地插入電池組充電座。
2)連接電池充電器、充電座。
3)電池充電器插上電源(230V/50HZ)。電池開始充電時紅燈和
綠色同時亮起。
4)當電池充滿電後,綠燈點亮,紅燈關閉。
工作狀態 電池 紅燈 綠燈
未插入 暗 亮
插頭連接到插座 插入 亮 亮
充電中 插入 亮 亮
充電完成 插入 暗 亮
注意:僅使用提供的電池充電器為電池充電。首先將電池放入充電器的電槽內,然後將充
電器連接到電源。充電自動啟動,約 5 個小時後取出充電電池。請務必斷開電源,然後再
從充電器中取出電池。
插入批頭/10mm 鎖緊夾頭
重要!更換鑽頭及批頭之前先要移除電池,避免機器無意間的啟動。
電鑽有鎖緊夾頭。確保鑽頭和批頭插入並鎖緊後不歪斜。
逆時針轉動打開夾頭,插入鑽頭或批頭後,依順時針方向擰緊卡盤。
如果你停止工作或者想更換另一款批頭,需要再一次逆時針鬆開夾頭。
開/關鍵
使用開/關鍵啟動機器,繼續保持它的連續操作。
旋轉速度可根據開關鍵的按下重度調節的。按的越重,速度就更快。
釋放開關鍵,機器也關閉。
15

正向/反向開關:
重要!反向旋轉鍵使用之前機器必須是完全停止的,否則可能會損壞機器。
順時針或逆時針旋轉可以通過反向旋轉鍵切換,反之亦然。如果反向旋轉鍵調節在中心位
置的話,開關鍵是被鎖住的,不能按壓。當你放下機器之前請將反向旋轉杆調節至中心位
置,避免機器的無意啟動。
扭力調節環:
此工具提供了21+1個不同的扭力調節,你可以選擇最大的扭力控制力度。
2齒輪變速開關:
高轉速1100rpm,低轉速350rpm。 二段調整
LED電池電量指示燈:
按電池電源指示燈按鈕檢查電池電量滿或空。
注意!當機器不運行的時候才可以調節扭力;否則可能會損壞機器。
設定電鑽到最低的扭力設定值,電鑽外殼上小箭頭指到旋轉扭力控制環的刻度"1" 在這
個位置,最輕的鑽切扭力會造成扭力棘輪打滑的現象,當電鑽外殼上小箭頭指到旋轉扭力
控制環的較高的數字時可以使用在扭力棘輪打滑之前最大的扭力。選轉旋轉扭力控制環的
刻度,使小箭頭對到鑽頭的符號,此時可以達到最大的鈕力值,在這個位置扭力棘輪不會
有打滑的現象
選擇低檔的扭力來轉入或是移除螺絲避免造成工作部件或是螺絲的損害(在特定的木製工
件) 鑽孔時請選擇較高的扭力設定,先在其他非你要施工的工件上試鑽再調整到適用扭力
後即可正式施工在你要的工件上.
工作中操作
僅使用被牢固鎖定在夾頭裏的工具批頭。
1、鑽孔
在開始使用之前,檢查鑽頭或批頭是否已正確插入及固定。使用適當削尖的鑽頭。使用的
鑽頭不可以是過度磨損的。每次鑽孔之前先選擇低速。鑽大洞之前應該先選擇小鑽頭,當
擴大洞時在選擇比較大的鑽頭。
2、鑽木材
鑽木頭要使用木頭的鑽頭。用一個比較合適的支架綁好工作件。用尖銳的工具或者釘子在
要被鑽的地方做好記號。不要過力的鑽工作件。
16

3、鑽在金屬
金屬鑽孔使用鋼鑽頭。期間要不斷的用非易燃易爆的冷卻液冷卻鑽頭。用一個比較合適的
支架綁好工作件,工件應平放在工作臺上。要鑽的孔中心位置做好記號,不要對工作件用
力多度。允許鑽頭以正常的速度操作。
重要!開始鑽孔之前選擇低速避免從打孔位置滑落。如果鑽孔比較深,鑽頭可能會被卡住。
在這個材料上,過高的扭力可能會損壞鑽頭和批頭。如果鑽頭卡住,請牢牢的抓住機器和
立即釋放開關按並且調整為逆時針旋轉,使用一個比較低的轉速比較容易的移動卡住的鑽
頭。
4、鑽塑膠
鑽塑膠可以使用鋼鑽,操作與鑽木頭方式一致。
5、鑽石,磚,磚石或類似產品
在牆上鑽,石,磚石等使用磚石鑽頭。不要過力過猛,按照鑽金屬孔相同的方法。
6、作為電批使用的鑽頭
在使用機器檢查是否正確插入。避免過度緊縮的螺絲,否則可能會損壞螺釘頭或斷掉。
7、螺絲插入
設置旋轉的方向為順時針。插入起子於起子頭內。保持起子頭垂直於起子頭,否則起子或
起子頭可能會被損壞。以一個恒定的力量去擰緊螺絲。
當螺絲完全擰緊,握住機器,釋放開關,否則可能會損壞起子或起子頭。如果開/關觸發沒
有立即釋放,高扭力也可能損壞鑽頭或鑽。
8、螺絲拆除
設置好鑽頭的旋轉方向為逆時針方向。插入起子於起子頭內。保持起子頭垂直於起子頭,
否則起子或起子頭可能會被損壞。以一個恒定的力量去移除螺絲。
重要:保護環境
不要把廢舊的電池扔入火中、易爆液體中。爲了良好的環境,使用的電池及廢舊的電池應
當收集到當地的廢物收購中心或者銷售點。
保養和清潔
注意:任何拆開機器的動作之前,務必取下電池。
清潔要使用乾的或者濕潤的毛巾,而不是濕毛巾。許多清潔劑含有化學物質,這可能會導
致損壞機器的塑膠部件。所以,不要使用任何強烈的或易燃的清潔劑,如汽油,油漆稀釋
劑,松節油或類似的清潔劑。
始終保持空氣的通風孔,無粉塵堆積,以防止經濟過熱。
17

18

19
©2011 Prokit’s Industries Co., LTD. All rights reserved 2011001(C)
Table of contents
Other Pro's Kit Cordless Driver Drill manuals


